
Lightmaps are a great alternative to real-time lighting, as they can provide the desired look to an environment without being processor-intensive. There is one downside, though—since there is no way of baking Lightmaps onto the dynamic objects, the lighting of the important elements of the game (such as player characters themselves) can look artificial, failing to match the intensity of the surrounding area. The solution? Light Probes.
Light Probes work by sampling the light intensity over the location that they are placed at. Dynamic objects, once Light Probe-enabled, will be lit according to the interpolation of the nearest probes around them.
For this recipe, we have prepared a basic scene, including a simple game environment and an instance of Unity's Rollerball sample asset, which will be used as the player character. The geometry for the scene was created using ProBuilder 2.0, an extension developed by ProCore, and was sold at Unity's Asset Store and at ProCore's website (http://www.protoolsforunity3d.com). ProBuilder is a fantastic level design tool that speeds up the design process considerably for both simple and complex level design.
The LightProbes.unitypackage package, containing the scene and all necessary files, can be found inside the 1362_06_06 folder.
To reflect the surrounding objects using the Reflection Probes, follow these steps:
- Import
LightProbes.unitypackageto a new project. Then, open the scene named LightProbes. The scene features a basic environment and a playable Rollerball game sequence. - First, let's set up the light from our scene. From the Hierarchy view, select the Directional Light. Then, from the Inspector view, set Baking as Baked. Also, at the top of the Inspector, to the right of the object's name, check the Static box, shown as follows:

- Now, let's set up the Global Illumination for the scene. Open the Lighting window (via the menu Window | Lighting) and select the Scene section. Then, from the Environment Lighting subsection, set
SkyboxProbes(available from the Assets) as Skybox, and the scene's Directional Light as Sun. Finally, change the Ambient GI option from Realtime to Baked, as shown in the following screenshot:
- Lightmaps can be applied onto static objects only. From the Hierarchy view, expand the Level game object to reveal the list of the children objects. Then, select every child and set them as Static, as shown:

- Imported 3D meshes must feature Lightmap UV Coordinates. From the Project view, find and select the
lampmesh. Then, from the Inspector view, within the Model section of the Import Settings, check the Generate Lightmap UVs option, and click on the Apply button to confirm changes, shown as follows:
- Scroll down the Import Settings view and expand the lamp's Material component. Then, populate the Emission field with the texture named
lamp_EMI, available from the Assets folder. Finally, change the Global Illumination option to Baked. This will make the lamp object emit a green light that will be baked into the Lightmap.
- Open the Lighting window. By default, the Continuous Baking option will be checked. Uncheck it, as shown, so that we can bake the Lightmaps on demand.

- Click on the Build button and wait for the Lightmaps to be generated.
- From the Hierarchy view, select the RollerBall. Then, from the Inspector view, find the Mesh Renderer component and check the Use Light Probes option, as shown:

- Now, we need to create the Light Probes for the scene. From the Hierarchy view, click on the Create drop-down menu and add a Light Probe Group to the scene (Create | Light | Light Probe Group).
- To facilitate the manipulation of the probes, type
Probeinto the search field of the Hierarchy view. This will isolate the newly created Light Probe Group, making it the only editable object on the scene.
- Change your viewport layout to 4 Split by navigating to Window | Layouts | 4 Split. Then, set viewports as Top, Front, Right, and Persp. Optionally, change Top, Front and Right views to the Wireframe mode. Finally, make sure that they are set to orthographic view, as shown in the following screenshot. This will make it easier for you to position the Light Probes.

- Position the initial Light Probes at the corners of the top room of the level. To move the Probes around, simply click and drag them, as shown:

- Select the four probes to the left side of the tunnel's entrance. Then, duplicate them by clicking on the appropriate button on the Inspector view or, alternatively, use the Ctrl/Cmd + D keys. Finally, drag the new probes slightly to the right, to a point that they are no longer over the shadow that is projected by the wall, shown as follows:

- Repeat the last step, this time duplicating the probes next to the tunnel's entrance and bringing them inward towards the group. To delete the selected probes, either use the respective button on the Light Probe Group component, or use the Ctrl/Cmd + Backspace keys.

- Duplicate and reposition the four probes that are nearest to the tunnel, repeating the operation five times and conforming each duplicate set to the shadow, projected by the tunnel.

- Use the Add Probe button to place the three probes over well-lit areas of the scene.

- Now, add Light Probes within the shadow that is projected by the L-shaped wall.

- Since the Rollerball is able to jump, place the higher probes even higher, so that they will sample the lighting above the shadowed areas of the scene.

- Placing too many Light Probes on a scene might be memory intensive. Try optimizing the Light Probes Group by removing the probes from the regions that the player won't have access to. Also, avoid overcrowding the regions of continuous lighting conditions by removing the probes that are too close to others in the same lighting condition.

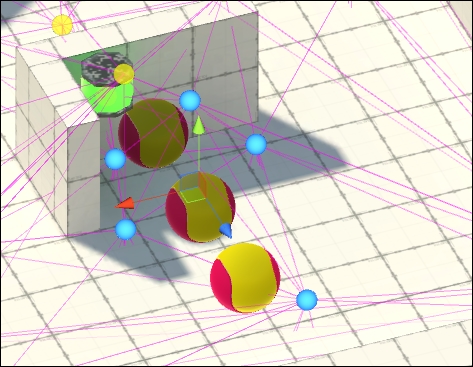
- To check out which Light Probes are influencing the Rollerball at any place, move the Rollerball GameObject around the scene. A polyhedron will indicate which probes are being interpolated at that position, as shown:

- From the bottom of the Lighting window, click on the Build button and wait for the Lightmaps to be baked.

- Test the scene. The Rollerball will be lit according to the Light Probes.

- Keep adding probes until the level is completely covered.
Lighmaps are basically texture maps including scene lights/shadows, global illumination, indirect illumination, and objects featuring the Emissive materials. They can be generated automatically or on demand by Unity's lighting engine. However, there are some points that you should pay attention to, such as:
- Set all the non-moving objects and lights to be baked as Static
- Set the game lights as Baked
- Set the scene's Ambient GI as Baked
- Set the Global Illumination option of the emissive materials as Baked
- Generate Light UVs for all 3D meshes (specially the imported ones)
- Either Build the Lightmaps manually from the Lighting window, or set the Continuous Baking option checked
Light Probes work by sampling the scene's illumination at the point that they're placed at. A dynamic object that has Use Light Probes enabled has its lighting determined by the interpolation between the lighting values of the four Light Probes defining a volume around it (or, in case there are no probes suited to define a volume around the dynamic object, a triangulation between the nearest probes is used).
It is important to notice that even if you are working on a level that is flat, you shouldn't place all your probes on the same level, as Light Probe Groups will form a volume in order to the interpolation to be calculated correctly. This and more information on the subject can be found in the Unity's documentation at http://docs.unity3d.com/Manual/LightProbes.html.
In case you can spare some processing power, you can exchange the use of Light probes for a Mixed light. Just delete the Light Probe Group from your scene, select the Directional Light and, from the Light component, change Baking to Mixed. Then, set Shadow Type as Soft Shadows and Strength as 0.5, as shown in the following screen. Finally, click on the Build button and wait for the Lightmaps to be baked. The real-time light/shadows will be cast into/from the dynamic objects, such as Rollerball.
