
You can get your work done faster with the right shortcuts — for the price of learning those shortcuts, that is. Shortcuts get you where you want to go faster, but they're not obvious and it takes practice to incorporate them into your habits. The difference between taking main roads across town and taking the back roads is that the main roads are easier but take longer. If you drive across town every day, however, it's worth your time to learn the back-road shortcut.
The same principle applies to your work processes. No doubt you perform dozens of repetitive actions every day, such as typing www.google.com into your browser's address bar, or clicking the Start button and navigating to the Programs menu, or typing "Let me know if you have any questions" at the end of an email. These are opportunities for shortcuts that can add up to large savings over time. Every movement, every task, every action is a candidate for optimization and streamlining.
Imagine that working a few new shortcuts into your day saves two seconds on each of four tasks you perform 20 times a day. That amounts to about two and a half minutes of saved time a day, which adds up to 667 minutes or more than 11 hours a year (taking into account weekends and two weeks of vacation). All told, you can save more than an entire workday every year just by learning how to search Google or sign an email by taking the back roads.
The key is teaching yourself the shortcuts that will benefit you most. Identify the activities you perform most often, learn the shortcuts, and then train yourself to use them every time.
Platform. . . . All (Firefox)
Cost. . . . . . . . Free
If you're online at work, chances are, you search for information on the Web several times a day. There are dozens of ways to do a web search from your desktop, but the most common method takes the longest:
With your web browser open, select the entire URL of the current page in the address bar.
Replace it by typing
www.google.com.Press Enter.
Type your search term — say, lifehacker — into Google's search box.
Click the Google Search button or press Enter.
You'd probably follow these same steps for lots of other web searches, too, such as at Yahoo!, Amazon.com, or Wikipedia.
There is a much faster way.
The free, open-source web browser Firefox (http://mozilla.org/products/firefox) comes equipped with a Google web search box built into its chrome, in the upper-right corner, as shown in Figure 6-1.

Figure 6-1. The Mozilla Firefox web browser comes with a search box built in to the right of the Go button.
You can execute a web search from this box without ever taking your hands off the keyboard; just use the key combination Ctrl+K. Here's how to Google Lifehacker using this shortcut:
With the Firefox web browser open, press Ctrl+K.
Type lifehacker.
Press Enter.
Firefox magically transports you to the search results page for Life-hacker without ever visiting the Google homepage. This method cuts your search down to three keystrokes plus your typed search terms —and no mouse movement.
The search bar doesn't work just for Google. It comes preloaded with Yahoo!, Amazon.com, eBay, Answers.com, and Creative Commons searches as well. Visit Firefox Add-ons at https://addons.mozilla.org/search-engines.php to get other useful engines such as the Wikipedia, IMDB (Internet Movie Database), the Merriam-Webster dictionary, Weather.com, and Ask.com.
To page to another search engine, use Ctrl+??or Ctrl+?. For example, to search for Lifehacker on Amazon.com do the following:
Press Ctrl+K to move the cursor to the Search box.
Press Ctrl+??twice to switch to Amazon.
Type lifehacker and press Enter.
Tip
TI P To open your search results in a new tab from the Firefox search bar, press Alt+Enter (instead of just Enter) after entering your search term.
There are several alternatives to the Firefox/Google search bar, including the Google Toolbar for Internet Explorer (available at http://toolbar.google.com/T4) and Google Desktop Search (see Hack 12, "Instantly Retrieve Files Stored on Your Computer," for more info).
Most application launcher programs such as Quicksilver for Mac (http://quicksilver.blacktree.com) and Launchy for Windows (http://www.launchy.net) also support quick web search queries. See Hacks 46 and 47 in this chapter for more on those.
Now that you're searching the Web without taking your hands off the keyboard, you can extend your keyboard mastery to Google's page of search results. Google offers an alternative search-results view that listens to your keystrokes and lets you move up and down the list of links and open the ones you're interested in without clicking. Google's Keyboard Shortcuts search is one of several of its experimental search products, available at http://www.google.com/experimental/index.html. Click the Join This Experiment link next to Keyboard Shortcuts to give it a test drive. When you run a web search, you can move down and back up the list of link results using the J and K keys, respectively. To open a result, use the O key (for "open") or simply press Enter. The forward slash (/) key puts your cursor into Google's search box to run another search, and the Esc key removes it, as shown in Figure 6-2.
To combine the two techniques, install the Firefox Google by Keyboard search plugin for your browser's search box, available at http://lifehacker.com/software/geek-to-live/useful-search-plugins-for-firefox-and-ie7-262602.php. (Just click the Google By Keyboard link on that page to install the plugin.) If you make Google by Keyboard your default search engine, to run a web search and open the second result on the page, you do the following:
Press Ctrl+K to move your cursor to the search box (cmd+K for Mac users).
Type your search term and press Enter.
Press the J key once to move your cursor to the second search result.
Press Enter to open the link.
Getting to your destination without ever reaching for your mouse is much faster.

Platform. . . . Windows XP and Vista
Cost. . . . . . . . Free
The graphical user interface revolutionized personal computing because it made using a computer so much more visual. However, using the mouse is one of the most inefficient ways to drive a computer. Think about it: you must move your hand from the keyboard to the mouse pad, drag the pointer across the screen until it's over a button or icon, and then double-click to open a document or launch an application.
You can save an enormous amount of time by using keyboard shortcuts to navigate your computer's operating system and programs. This hack describes how to bypass the mouse and launch programs and documents on your Windows PC without ever taking your hands off the keyboard.
Microsoft Windows XP and Vista have several built-in keyboard shortcuts that can reduce the number of times you reach for the mouse during your workday. Here are some of the essential shortcuts for navigating Windows:
SHORTCUT | RESULT |
|---|---|
Cycle through open programs (release keys when you see the screen you want). | |
Windows+D | Show the desktop. |
Windows+L | Lock your workstation. |
Windows+R | Show the Run box. |
Windows | Open the Start menu (Vista only). |
Ctrl+Esc | Open the Start menu. |
Tip
Alt+Tab, which displays a mini menu of your running programs, is my most frequently used Windows key combination. The free Alt+Tab Windows XP Power Toy add-on — available for download at http://microsoft.com/windowsxp/downloads/powertoys/xppowertoys.mspx — presents a much more informative visual choice by displaying previews of the open windows as you cycle through them.
The following are indispensable editing shortcuts:
SHORTCUT | RESULT |
|---|---|
Ctrl+S | Save the current document. |
Ctrl+C | Copy selected text to clipboard. |
Ctrl+X | Cut selected text or object and place on the clipboard. |
Ctrl+V | Paste the contents of the clipboard into the current document. |
Ctrl+Z | Undo the last action you performed. |
Ctrl+Y | Redo the last action you undid. |
Ctrl+B | Bold the selected text. |
Ctrl+I | Italicize the selected text. |
Ctrl+U | Underline the selected text. |
You might use some of these shortcuts all the time and some none of the time. To find the key combinations most useful for your workflow, look over the complete list of Windows XP keyboard shortcuts at http://support.microsoft.com/default.aspx?scid=kb;en-us;301583 and Windows Vista shortcuts at http://windowshelp.microsoft.com/Windows/en-US/Help/2503b91d-d780-4c80-8f08-2f48878dc5661033.mspx.
One of the most powerful and easiest-to-remember keyboard shortcuts in Windows Vista is very simple: one tap on the Windows key summons the Start menu, with your cursor in Vista's Start Search box. From there you can begin typing the name of any program, bookmark, or document —such as Picasa or novel — and Vista will automatically suggest matches in the menu, as shown in Figure 6-3.

Figure 6-3. Tap the Windows key once to have Vista search as you type for any application, document, or bookmark.
Use your up and down arrow keys to traverse the list of search results. Press Enter when you've selected the one you'd like to start, such as the Picasa photo manager software.
Windows XP doesn't have the convenient Start menu search box that Vista does, but a free program called Launchy can give you similar functionality. Download Launchy from http://launchy.net and install it.
According to its developer, Launchy is "designed to help you forget about your Start menu, the icons on your desktop, and even your file manager," and it does. After you get into the habit of using Launchy, mousing through Start menu subfolders or clicking through Explorer window after Explorer window will seem like a quaint activity of the past.
When you've got Launchy installed and running, press Alt+Spacebar to invoke its plain-Jane black input field. Then type the name of any document, program, or bookmark, and Launchy will suggest a list of search matches. Use the arrow keys to move up and down the list. Open the one you need with a tap on the Enter key. Figure 6-4 displays Launchy in action, finding the Word document in which this chapter was written.
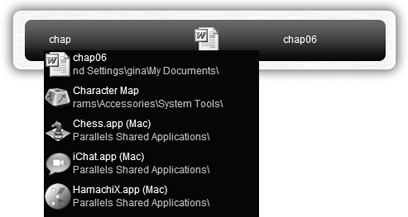
Figure 6-4. Invoke Launchy with its default key combination, Alt+Spacebar, and then begin typing the name of any program, file, or bookmark on your system.
To configure the directories Launchy indexes and other behavior, right-click the Launchy prompt and choose Preferences.
Launchy isn't just an application or file launcher. You can also use it to run a Google search, navigate your file system without Explorer, and interface with web applications such as Remember the Milk (http://rememberthemilk.com) and Google Calendar (http://calendar.google.com). For more advanced uses of Launchy, see http://lifehacker.com/software/hack-attack/take-launchy-beyond-application-launching-284127.php.
Platform. . . . Mac OS X
Cost. . . . . . . . Free
Skip time-wasting point-and-click mouse movement on your Mac using free software called Quicksilver (http://quicksilver.blacktree.com), which is a keyboard interface to an astonishing variety of computing actions. At its most basic level of functionality, Quicksilver launches applications and opens documents, much the same as Launchy for Windows, as outlined in the previous hack.
Here's how to get started using Quicksilver as a keyboard launcher:
Download and install the latest version of Quicksilver from
http://quicksilver.blacktree.com. As of this writing, beta 53 is the most recent version available.To invoke the Quicksilver commander, press cmd+Spacebar (Quicksilver's default key combination). Begin to type the name of the application or document you'd like to open; for example, type Wor. Quicksilver suggests Microsoft Word as a match (or whatever files and programs you have installed that contain "Wor" in the title) and displays a drop-down list of other possible matches on the right, as shown in Figure 6-5.
Press Enter to open Microsoft Word, or press the down arrow key to choose another option. Quicksilver adapts its suggestions to your most-used applications and documents, so the next time you invoke Quicksilver with Ctrl+Spacebar and type Wor, it will suggest the item you've launched before at the top of the list.
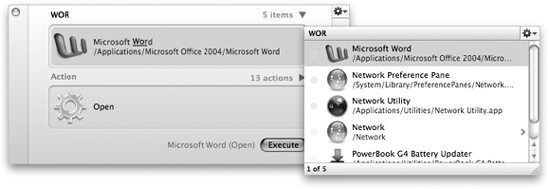
In its most basic usage (just described), Quicksilver uses a two-paned interface that lets you select a subject in the first pane — the file or application — and an action (Open) in the second pane. But Quicksilver offers a wide variety of actions beyond Open that can take additional information in a third pane. Advanced three-pane Quicksilver actions come in the form of subject-action-object.
For example, you can select a file called chapter6.doc in the first pane, select Move To as the action, and tab to the third pane to choose the book folder. This three-paned action (see Figure 6-6) moves the file to that folder.
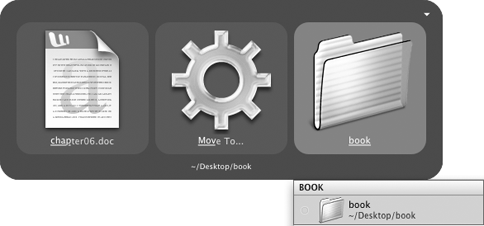
Figure 6-6. Quicksilver's three-paned subject-action-object actions can perform custom actions, such as moving a file to a destination folder.
Other actions that Quicksilver can perform on your Mac include the following:
Manipulate an iTunes music library. Start playing an album, song, or playlist; browse your library by genre, artist, or album; or rate songs as they're playing on the fly without switching out of your current working application.
Email a document to a contact. Select a document and choose Email To (Compose) as the action; select a contact in your address book as the recipient, without opening your email software (see Figure 6-7).
Append text to a file. Invoke Quicksilver and press the period key (.) to start free-form entering text. In the Action panel, choose Append To and in the third panel, choose a text file, such as
todo.txtorshoppinglist.txt, to add a line to the file without a text editor.Look up a word in the dictionary. Type a word to look up in the first panel and choose Dictionary as your action to get the definition.
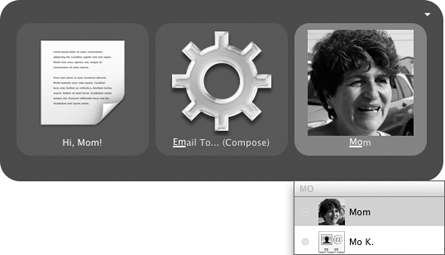
Figure 6-7. Quicksilver plugins, such as the Apple Mail plugin, let you do more with Quicksilver — such as dash off an email to Mom.
Note
Several of the actions listed here may require additional Quicksilver plugins to work as described. Check out the Quicksilver manual at http://docs.blacktree.com/quicksilver/overview to learn how to enable the actions you'd like to perform with Quicksilver.
As you can see, Quicksilver is not just a keyboard launcher; with the right plugins, it can do almost anything on your Mac via the keyboard that you do with your mouse. It would take an entire book just to describe all the things Quicksilver can do on your Mac. If this hack makes you want to learn more, get more Quicksilver tutorials and video demonstrations at http://lifehackerbook.com/ch6.
Platform. . . . Windows XP and Vista
Cost. . . . . . . . Free
If you spend your day at a keyboard, chances are, you type particular phrases — such as "Thanks for contacting us" — several times throughout the day. Maybe you've acquired a maddening habit of typing teh instead of the when your fingers are really flying over the keys. Perhaps you enter the current date into documents all the time, or you tend to use Internet acronyms such as "imo" to stand for "in my opinion."
These are all situations in which text substitution can save you time. Define short abbreviations for phrases you use often, or misspellings you're prone to, and automatically expand those abbreviations to their full, intended form. This hack explains how to do that using the free Windows application Texter.
Download Texter from http://lifehacker.com/software//lifehacker-code-texter-windows-238306.php and save the Texter.exe file to a new folder, C:Program FilesTexter. Double-click C:Program Files TexterTexter.exe to run the program for the first time. You'll notice a green icon with the letters "LH" on it appear in your Windows system tray; right-click it and choose Manage Hotstrings to start configuring abbreviations that will do your typing for you.
To create a new hotstring, click the + sign. In the Hotstring field, enter your abbreviation — btw, for example. In the text area, type your hotstring's full replacement: by the way. Choose the key that will trigger the replacement (Enter, Tab, or Space) or select the Instant check box (see Figure 6-8) to make the replacement happen automatically.
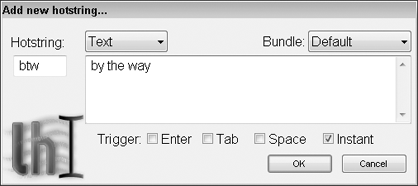
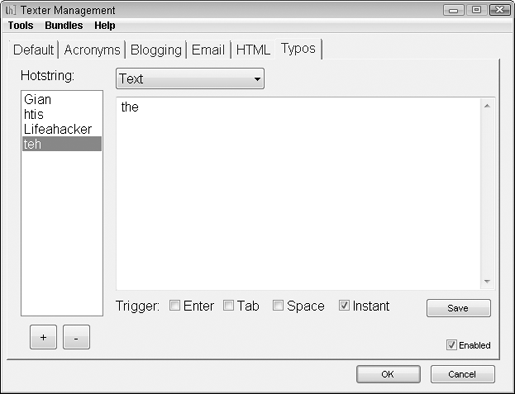
Click OK to save your new hotstring, which will appear in Texter's management dialog along with the rest of the hotstrings you set up, as shown in Figure 6-9.

After you've saved a hotstring, when Texter is enabled and running, type that hotstring and press the trigger key (not required for instant replacements), and Texter automatically expands it to your replacement. For example, the next time you type btw, Texter fills in by the way, producing 10 characters for the effort of typing three.
Different trigger keys work better for different types of replacements. For example, if you'd like the word address to expand to your street address, you need to assign a specific trigger key — one that you wouldn't normally type, such as Tab — to the hotstring. Sometimes you'll type the word address and want it to remain address and not automatically expand, so the Instant replacement setting (or even Space or Enter trigger key) wouldn't work as well there.
For common typos, however, you want to use the Instant option as your trigger. For example, if you often type teh when you mean the, you want Texter to automatically correct you without your having to press a specific trigger key.
You'll find many uses for text expansion, including the following:
Email form letters or signatures (see Hack 9 about scripting repetitive email responses)
Common misspellings (such as teh or htis)
Common phrases (such as as far as I know or Thanks for contacting us)
Document templates
Personal data (such as name, address, phone number, or email address)
Using Texter you can divide your hotstrings into "bundles," or groups. For example, to create a Texter bundle for common misspellings, from the Bundles menu choose Add and name your bundle a single word (such as Typos). The Typos bundle will appear in its own tab in the Texter management dialog, where you can add hotstrings for teh and htis that automatically become the and this. To create another bundle for common phrases, choose Bundles
You can also export and import Texter bundles for easy sharing among colleagues.
More ways to get the most out of Texter include the following:
Automatically start Texter when your computer does. To make sure Texter starts working when you do, from the Tools menu, choose Preferences, and on the General tab, select Run Texter At Startup. Texter will launch automatically with Windows.
Print a cheat sheet. Setting up three dozen hotstrings is one thing, but training your typing fingers to use them is another. Choose Preferences from Texter's Tools menu, and on the Print tab, click Create Printable Texter Cheatsheet to make a paper reference that you can pin to your bulletin board while you learn your Texter hotstrings and triggers.
Store and run Texter from a thumb drive. Texter is a completely self-contained program that can live and run from an external USB thumb drive. If you use different computers throughout the day, just plug in the drive where Texter and its data are stored, launch it, and access all your hotstrings.
Create a new hotstring or manage hotstrings using keyboard shortcuts. By default you can summon the New Hotstring dialog box by pressing Ctrl+Shift+H whenever Texter is running. Likewise, you can launch the Manage Hotstrings dialog box using Ctrl+Shift+M.
Revel in how much time Texter has saved you. After you've come to depend on Texter to do your typing for you, check out how many hours of time it's saved you. In the Preferences dialog box (get to it from the Tools menu), check the Stats tab to see how many replacements Texter's made for you and how many characters and hours of time saved that translates into.
Platform. . . . Mac OS X
Cost. . . . . . . . $29.95
In the same vein as Hack 48, Mac users can save thousands of keystrokes daily using the text-substitution application TextExpander. Everyone has phrases, information, or misspellings they type every day. With the TextExpander typing utility, you can automatically replace abbreviations such as imo with the phrase in my opinion or end email messages with two characters — say, bt, which magically turn into Best, Tom. Here's how.
Download TextExpander (available at http://www.smileonmymac.com/textexpander/index.html) and install it on your Mac. An individual license costs $29.95, but you can try TextExpander for free. In System Preferences, launch the TextExpander pane, which is listed under Other. Here you'll set up a set of text snippets, or abbreviations, that Text-Expander will replace with text you define.
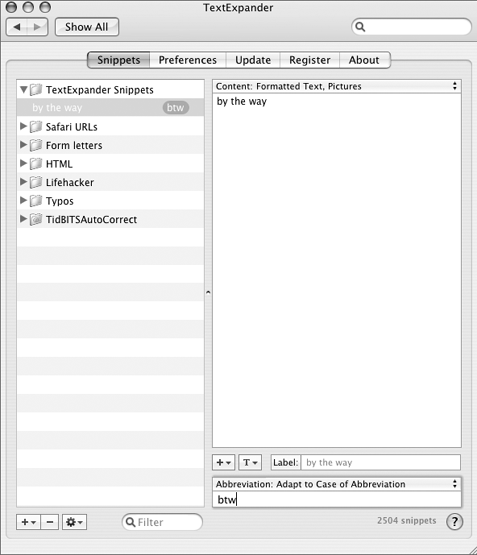
To create a new expanding snippet, click the plus sign on the bottom left of the TextExpander panel and choose New Snippet (or simply press cmd+N). On the right side of the panel, enter the expanded content — by the way, in this example — and at the bottom of the panel, in the Abbreviation field, type the snippet btw, as shown in Figure 6-11.
Your expanded content can be formatted text and pictures (such as your company logo or red, bold, warning text) as well as plain text. To insert a picture or color, or to size, bold, italicize, or otherwise format your text, select Formatted Text
By default, your TextExpander snippets are replaced as soon as you type them. However, if you use real words as your snippets, you may not always want them to expand. For example, if you use email to expand to your email address, you'll never be able to type just the word email.
To avoid this conflict, set TextExpander to use a delimiter key that triggers replacements instead of having them happen as you type. In the Preferences tab of the TextExpander pane, click the Set Delimiters button to specify which keys should trigger your replacement (the Tab key, for instance). Then, from the Expand Abbreviations drop-down list, choose At Delimiter (Abandon Delimiter), as shown in Figure 6-12.

Note
Choosing At Delimiter (Keep Delimiter) will preserve the delimiter character after your replacement, such as a Tab, carriage return, or space. This means that if you type your snippet plus your delimiter key, Text-Expander will replace the snippet and keep the delimiter after it. Otherwise, TextExpander will replace the snippet and remove the delimiter character.
You'll see more options in the Preferences area, such as limiting expansions to only certain applications, making your snippets case-sensitive, case-insensitive, or case-adaptive based on how you type the snippet (that is, Btw expands to By the way and btw expands to by the way).
TextExpander can organize your snippets into folders by purpose, application specifics, or any other category. For example, you may keep a Common Misspellings group that automatically corrects typos for you, an Email Form Letters group that works only in your email software, or a Bookmarks group that fills in long web addresses in your web browser. Figure 6-13 shows some example categories.

SmileOnMyMac, the company that makes TextExpander, offers three useful prefab TextExpander groups you can import: the AutoCorrect snippet file (about 100 common typos and their corrections); the TidBITS AutoCorrect Dictionary (more than 2,400 misspellings and their corrections); and the HTML Code Snippet file (for bloggers or web site editors). They are all available as free downloads at http://www.smileonmymac.com/textexpander/snippets.html.
Here are some more things you can do with TextExpander:
Program cursor movement. Set your cursor's position within the replacement after it has been expanded using the special
%|variable in your snippet content. Alternatively, program particular cursor movements (such as two taps to the left or three taps to the right). Use the Cursor item on the drop-down list to the left of the Label input field to insert cursor-movement variables.Add variables that insert date, time, and Clipboard contents into your snippet. From the drop-down list on the left of the Label input field, choose to insert special dynamic variables such as the current time, date, day of week, month, year, or contents of the Clipboard inside a snippet.
Synchronize your snippets with .Mac. If you're a .Mac subscriber, you can update snippets on one Mac and then download your changes onto another when .Mac synchronization is enabled for TextExpander.
View the number of characters and time that TextExpander has saved you. On TextExpander's Register tab, you can see the total number of snippets it's expanded, how many characters it's typed for you, and how much time it's saved you based on a typing speed of 400 characters per minute. Right now, TextExpander tells me it has replaced nearly 3,600 snippets and saved me almost five hours of typing time.
Platform. . . . Mobile phone with SMS capabilities
Cost. . . . . . . . Dependent on your plan
More and more modern cell phones and plans feature Short Message Service (SMS), the capability to send a text message to another phone or email address.
To the uninitiated, texting can seem inconvenient, but text messages have numerous advantages over voice calls. Human beings read text faster than they can listen to speech. Text messages are archived, searchable, and can never be misheard or cut off by bad reception. Texting someone gets info into his hands when he's away from his desk without requiring that he stop everything to pick up the phone to talk. Text messages get right to the point, cutting out time-wasting small talk, throat-clearing, and the energy it takes to get back into the flow of what you were doing before the phone rang. Text messages, unlike the spoken word, are not affected by a noisy situation such as a party or concert. Texting various web services can retrieve helpful information you need on the go, such as directions, addresses, and phone numbers.
For those of you with an SMS-capable mobile phone, this hack presents a few power-texting tips that can help you get the most out of SMS.
Texting can help you get things done. Here are a few examples:
Send reminders. Text your spouse on her way home from work to pick up milk at the store. Remind your teenager to call when you get there. Text your future self reminders about to-do's or appointments.
Search the Web. Several mobile search services such as Google SMS (
http://www.google.com/sms) and 4INFO (http://4info.net) will text you information by SMS request. For example, you can text GOOGL (or 46645) the message star wars 11215 to find show times for the latest Star Wars film in the 11215 ZIP Code. Get flight-arrival times, weather, sports scores, dictionary definitions, stock prices, and more via SMS. (See Hack 72, "Access Web Apps and Search via Text Message," for more.)Find a friend in a loud place. You're at a concert trying to meet up with a friend and you can't hear a thing. This is the time to text. SMS also comes in mighty handy in libraries, at parties, or at religious services, where talking is not possible or is a no-no. (Just make sure your phone SMS notification is set to vibrate!)
To send an SMS, create a new message and add a recipient from your mobile's address book. Sending a message to an SMS-capable phone requires only the recipient's phone number in the To: field. Then, to type the body of your message, use the numeric keys on your phone. Press each several times to cycle through the possible letters each number represents; stop when you've reached the one you need. For example, if you want the letter B, press 2 twice. You can see the key you're pressing scroll through all the letters associated with it. Pressing 2, for example, scrolls through A, B, and C.
Is this an insanely inconvenient way to type out text? Absolutely. But there are ways to make it more bearable.
Here are a couple of ways to make typing text on a numeric keypad easier and less time-consuming.
Use message templates. After a while, you'll notice that you send the same kinds of messages over and over, such as Running late, be there in..., On my way home, and Give me a call when you get a chance. Set up templates for your most-used messages to avoid repetitive thumbing. The exact instructions on how to do this vary, so consult the user guide for your phone's model.
Turn on predictive text. Many modern phones offer a predictive text feature, which precludes the need to press each numeric key multiple times to get the letter you want. Thumb out the numbers that contain the letters in your desired word by pressing each just once, and your phone will automatically predict the word you intend, saving dozens of key presses over time. See a short video demonstration of predictive text in action courtesy of Nokia at
http://nokia-asia.com/nokia/0,,79355,00.html. (If your phone supports predictive text, it may look different, depending on your model.)
When you get the hang of it, text messaging is a convenient way to communicate when you're not at your computer with easy access to IM or email. But there are ways to use SMS from your desktop computer as well.
Several software applications and web sites can deliver text messages to phone numbers:
Send text messages from AOL Instant Messenger (AIM) to a phone. Add a new contact to your Buddy List whose name is a phone number preceded by a plus sign (that is, +7185551212). An instant message sent to that buddy will be delivered as an SMS to that mobile phone.
SMS from the Web. Yahoo! Mobile (
http://mobile.yahoo.com/sms/sendsms) sends text messages to a mobile phone number of your choice from the Web.SMS via email. Many mobile service providers allow you to send a text message to a phone via email using a specific email address consisting of the phone number @ the service provider's email domain. If you don't know the domain, the free service Teleflip (
http://teleflip.com) will route your email message for you. Simply send your message to [email protected], substituting your destination phone number before the @ sign.
Warning
Check how much text messages cost on your particular mobile phone plan. Many include unlimited SMS messages, but others can charge up to 10 cents a message, which can add up over time. You don't want to be surprised by a big cell phone bill the month after you start texting!
Platform. . . . Windows XP
Cost. . . . . . . . Free
Everyone likes to email digital photos, but no one likes to receive pictures that are so huge they take forever to download and require you to scroll left and right and up and down to see the entire image. Luckily, with just two clicks, you can easily resize a large group of photos that you've downloaded from your digital camera.
Microsoft ImageResizer PowerToy is a free utility that plugs into Windows Explorer. Download and install ImageResizer from the right side of the page at http://microsoft.com/windowsxp/downloads/powertoys/xppowertoys.mspx. Then, browse to the folder where you stored your digital photos.
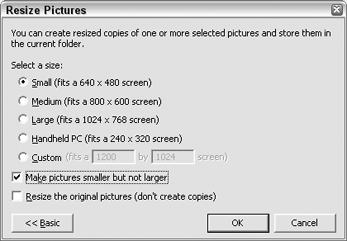
Select the photos you want to resize, right-click, and choose Resize Pictures from the context menu to open the ImageResizer dialog box. Click the Advanced button to see all the options, as shown in Figure 6-14.
From there, choose one of the ImageResizer suggested dimensions, or enter your custom width and height. Be sure to select the Make Pictures Smaller But Not Larger option if you don't want to size up — and you won't, because making digital photos larger degrades quality. Click OK.
By default, ImageResizer creates copies of the files and adds the chosen size to the filename. For example, if your original photo filename was Jeremy001.jpg and you resized it using the Small setting, the new version will be named Jeremy001 (Small).jpg.
Alternatively, if you're looking for a complete photo manager that can do more extensive photo processing, including batch resizing, red-eye reduction, photo rating, keyword assigning, search, and lots of fun effects, download and install a copy of Google's free Picasa (http://picasa.com). After Picasa indexes all your photos, select the ones you want to resize so that they appear in the Picture Tray on the bottom left. Then click the Export button on the lower right. Here you can copy the photos at a new size to another folder on your hard drive for emailing, publishing online, or burning to CD. See Hack 17 for more on managing your photo collection with Picasa.
Platform. . . . Cell phone (text messaging optional)
Cost. . . . . . . . Free
Popular online payment service PayPal (http://paypal.com) is a quick and easy way to email money to friends and co-workers — to cover your share of the dinner bill, pitch in on a shared gift, or send a payment for work done. PayPal's new mobile service now enables you to send and receive money directly from your cell phone when you're out and about.
Mobile-to-mobile payments can come in handy in lieu of cold, hard cash when purchasing something from someone you don't know (say, from Craigslist, http://craigslist.org) or when you can't find an ATM and your buddy's covering you. This hack explains how to initiate cash transactions via PayPal on your cell phone.
You'll need a free PayPal account to get started. To add money to your PayPal account, link your checking account or credit card to it. To enable cell phone payments, you need to activate your mobile phone number within your PayPal account. Do so by entering your cell phone number on the PayPal web site in the mobile area (https://paypal.com/cgi-bin/webscr?cmd=xpt/cps/mobile/MobileOverview-outside) and set up a mobile PIN (separate from your PayPal password). PayPal calls your phone on the spot and asks you to verify the PIN. When the PIN is matched, your phone is PayPal-enabled.
Then, to send someone else's phone $5.50 in cash, text-message PAYPAL (or 729725) the following message:
send 5.50 to 7185551212
with the recipient's phone number in this example being (718) 555-1212.
The first time I tried this with my Nokia phone using Cingular, I got a text message back immediately saying that the recipient was invalid. Turns out only certain carriers — Alltel, Sprint, T-Mobile, and Verizon —support the SMS function.
Luckily, there's a plan B for folks not on those plans: you can call Pay-Pal's automated voice system to send cash as well. Dial 1-800-4PAYPAL and follow the instructions to send money to the destination cell phone number.
Either method results in a text message to the recipient's phone with instructions for picking up the money. In short, the recipient has to go to the web site and link her mobile phone number to her PayPal account to claim the payment.
The obvious question is, Why wouldn't a thief just steal your phone and text himself a few Benjamin Franklins? If you treat your PayPal mobile PIN the way you do your ATM PIN, that isn't possible because every single transaction initiated from your phone gets an immediate callback from PayPal asking that you enter your mobile PIN to proceed.
If the payee doesn't have a cell phone (or doesn't want to associate it with his PayPal account), you can also text-message money to an email address. Just make your text message send 5 to [email protected] instead (substituting an email address for the phone number). In this case, the recipient doesn't get immediate notification of the payment on his phone, but he doesn't have to associate his mobile number with his PayPal account, either.
You cannot use PayPal with someone's email address if you're using the 800 voice number — only if you're sending PayPal a text message (which means PayPal supports your mobile carrier). If you do use the voice system to send a payment to someone's phone and she doesn't want to link her mobile to PayPal, you can cancel the pending payment and reinitiate it through the PayPal web site.
The following table provides examples of all the PayPal Mobile SMS commands.
COMMAND | DESCRIPTION |
|---|---|
| Send $10.99 to (212) 555-1981 phone number. |
| Send $5.00 to [email protected]. |
| Use the shortcuts s and t for send and to. |
| Add a thx 4 dinn note with your payment. |
| Send your payment in Euros (CAD for Canadian dollars, GBP for British pounds, AUD for Australian dollars, or JPY for Yen also work). |
| Share your address with someone to have him ship you an item |
| Share your phone number with the recipient. |
| Share your phone and address and send a note send asap to recipient. |
| Check your current PayPal balance. |
| Cancel a pending payment. |
TextPayMe (http://textpayme.com) offers a service similar to PayPal Mobile Payments. TextPayMe's SMS payment address is a regular email address, so usage isn't limited to cell phone carriers. However, consumers are more likely to have a PayPal account than a TextPayMe account because PayPal's service has been established for many years and is linked with popular auction site eBay (http://ebay.com).
Platforms. . . All
Cost. . . . . . . . Free
Ever more web sites require you to register on them for free and to sign in with a username and password to view their contents. An active surfer can easily accumulate dozens of logins for various sites across the Web. But what about when you don't want to go through the whole rigmarole of registering for a web site — you simply want inside?
The web site BugMeNot (http://bugmenot.com) maintains a public database of shared usernames and passwords for free web sites. If you come across a site that prompts you to log in to view its content, bypass the registration process by heading to BugMeNot to search for an already created username and password. Not all BugMeNot logins will work, but you can see the percentage success rate for a particular login and report whether it worked for you as well. If you can't find a BugMeNot login that works, create one and share it with the BugMeNot community.
There are four ways to use BugMeNot:
Enter the address of the site you want to log into on
http://bugmenot.comto get a list of possible logins.Drag and drop the BugMeNot bookmarklet to your web browser's links toolbar. When you come onto a site you'd like to log into, click the bookmarklet and get login detail suggestions in a pop-up window, as shown in Figure 6-15.
Copy and paste the suggested login — in this example, username
stupidideasand passwordasdfghjkl— into thenytimes.comlogin page to view a password-protected article.Download and install the BugMeNot Firefox extension, available at
http://roachfiend.com/archives/2005/02/07/bugmenot. Restart Firefox. Next time you are presented with a username-and-password prompt, right-click inside the username text box and choose Login With BugMeNot, as shown in Figure 6-16.
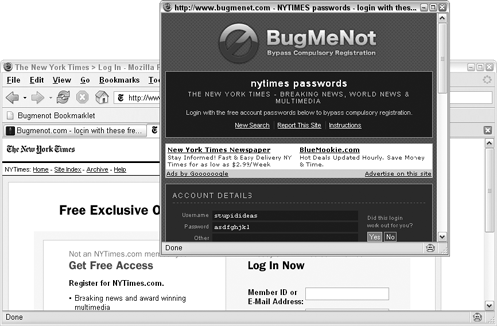

Figure 6-16. Log in with BugMeNot details directly from the context menu using the BugMeNot Firefox extension.
The extension is the fastest way to log in with a BugMeNot account because it doesn't require you to copy and paste the username and password into the login fields; however, it works only in Firefox (http://mozilla.org/firefox/).
Note
See Hack 85, "Extend Your Web Browser," for more on how to install a Firefox extension.
BugMeNot does not work on web sites that require a paid subscription to view, and some sites block BugMeNot. The most popular BugMeNot sites include The New York Times (http://nytimes.com), The Washington Post (http://washingtonpost.com), and IMDB (http://imdb.com), the Internet Movie Database.
Platform. . . . All
Cost. . . . . . . . Free
It may feel as though centuries have passed since the last time you heard the unmistakable mating call of your computer's modem dialing into an ISP. But even in today's broadband-saturated world, dial-up remains an affordable and sometimes necessary connectivity alternative while traveling or when your high-speed connection isn't available.
When you're surfing the Web on a slow connection, it can seem as though grass grows faster than the download progress meter on your web browser moves. Still, it's not difficult to optimize your browsing setup for the fastest way to log on, get what you need done, and get off. This hack covers some strategies for squeezing the most productivity out of a limited flow of bytes over a slow Internet connection, be it via an analog dial-up line or a cell phone modem connection.
Note
See Hack 79, "Turn Your Cell Phone into a Modem," for more on dialing into the Internet from your mobile phone on the go.
Chances are, your web browser's setup assumes that your Internet connection is fast and ever present. A couple of small changes for your dial-in session can make a big difference:
Increase the size of your browser's cache so that you re-download the same web page elements less often. The default cache size in Firefox, for example, is 50MB. Your hard drive probably has plenty of free space, so consider increasing this number to 100MB or more. To do so in Firefox, choose Tools

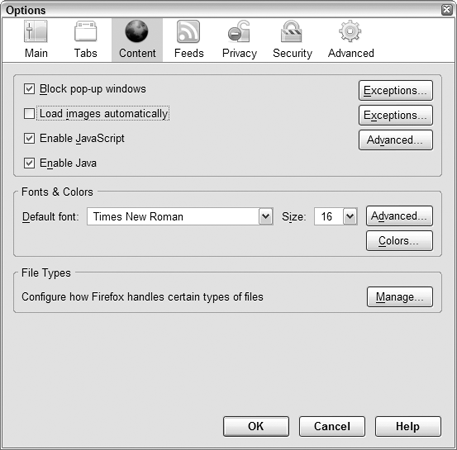
If you want real speed and your inner aesthete won't be too offended, under Content, deselect Load Images Automatically. This, of course, takes away the pretty pictures on web pages, but it significantly speeds up page load on a slow connection. You can also specify sites that should be exceptions to the no-images rule using the — you guessed it — Exceptions button, as shown in Figure 6-18.
To disable images in Internet Explorer, choose Tools

Tip
Advanced users can employ the Firefox Profile feature to set up slow-connection preferences separately from your default profile, and switch to it as necessary. See more on how to manage profiles in Mozilla's Help section (http://mozilla.org/support/firefox/profile).
Five minutes on a dialup connection and you begin to resent every unnecessary pixel, advertisement, and Flash movie on the Web. Install an ad blocker such as Adblock for Firefox (https://addons.mozilla.org/firefox/10) or FlashBlock (http://flashblock.mozdev.org) to avoid losing minutes of your life so that some web page can suggest you shoot the turkey and win an iPod in one of its banner ads.
Speaking of bandwidth hogs, if your podcasting software (such as iTunes) is set to automatically download new episodes when you connect to the Internet, you'll qualify for Social Security before you can view your browser's home page. Be sure to disable automatic podcast downloads when you're on a slow connection.
The real beauty of tabbed browsing shows its efficient self in the face of a slow Internet connection. When searching the Web for information or clicking links from your RSS aggregator, click your mouse scroll wheel or Control/Command+click to open each page in a new tab. That way, you can read one page while others load in background tabs.
Note
The web browsers that feature tabbed browsing are Firefox, Internet Explorer 7 (default in Windows Vista), and Opera. Internet Explorer 6 on Windows XP does not have tabbed browsing.
If the amount of time you're on the phone line is an issue, log on, open a bunch of pages in multiple tabs, disconnect, and read offline.
Speaking of offline. . .
Yes, always-online web applications are popular these days, but the fact is you're not always online. The capability to work offline makes a huge difference in productivity when you're dependent on a slow connection. Here's a quick list of offline work examples that can help you get things done when you're dialing in:
Use a desktop RSS reader and download all unread articles for offline reading. (See Hack 82, "Subscribe to Web Sites with RSS," for more on using RSS.)
Save web pages to your hard drive for reading later. (Chapter 9, "Master the Web," provides many hacks for improving your web experience.)
Web mail users, install a desktop email client such as Mozilla Thunderbird (
http://mozilla.org/products/thunderbird) and download your messages for offline reading and responding.Download bank transactions to Quicken or Microsoft Money instead of connecting to your bank's web site to pay bills.
A slow connection to the Internet can be an exercise in utter frustration, but tweaking your tools to fit the task can make it a lot more bearable.
Level. . . . . . . Easy
Cost. . . . . . . . Free
One of the most convenient features in Firefox is its capability to save the passwords you use to log on to web sites — such as your web mail and online banking — so that you don't have to type them in every time. Those saved passwords automatically fill in as asterisks in the Password field, but did you know how easy it is to see what they are? In Firefox, choose Tools
Now consider how easy it would be for your Firefox-loving housemate to log onto your Gmail, or the computer-sharing temp at the office to get into your checking account, or for a laptop thief to log into your PayPal account. Not such a great feature anymore, eh? But you don't have to go back to retyping your passwords every time you visit a login-only site.
This hack describes how to secure your saved passwords in Firefox without requiring you give up the convenience of those auto-filled login details.
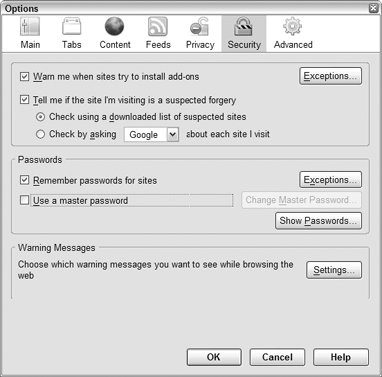
In Firefox, choose Tools
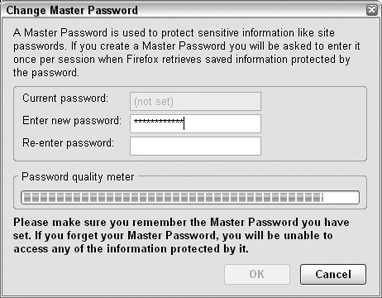
The master password is a single password that will lock the rest of your saved passwords away from prying eyes. It's a password you'll have to enter once a session — each time you restart Firefox.
When you set your master password, Firefox has a neat Password Quality Meter that displays how difficult your password is to crack. Try different combinations of words and numbers and symbols to get this secure-o-meter as high as possible. For example the password lifehacker scored low on the quality meter, but l1f3h4ck3r registered about 90 percent (see Figure 6-20), making it fairly hard to crack.
Now, the trick is to pick something you will always remember, because if you forget your master password, you won't be able to access any of your saved passwords. That would be bad. (Hack 14, "Instantly Recall Any Number of Different Passwords," offers help in creating great passwords you won't forget.)
After you've set your master password, close Firefox. When you reopen and go to a page where you've saved a password — such as Yahoo! Mail — you get a security prompt, as shown in Figure 6-21.

Enter your master password, click OK, and your Yahoo! Mail login details fill in automatically.
The master password prompt is a bit of an inconvenience, but much less so than entering a password every time you visit login-only sites. It buys you the expediency of saved passwords with the security of having to be authorized to access them.
Note
The Firefox Master Password is difficult — but not impossible — to crack. If there are passwords to web sites you absolutely don't want stored on your computer, when you enter them and Firefox asks whether it should save them, just click No.
Platform. . . . Web
Cost. . . . . . . . Free
In Hack 30, "Send Reminders to Your Future Self," you learned how to schedule events and reminders using the web-based Google Calendar, or GCal. GCal has many more useful features that make it a strong candidate for your central work and life calendar application. This hack covers more advanced uses for GCal, such as adding and getting events from anywhere, subscribing to multiple calendars, sharing calendars, booking inanimate objects such as a conference room, and inviting multiple people to events.
When Google Calendar is loaded in your web browser, you can press the Q key to summon a single field to enter an event. Forget typing in 17 fields for all the event details; GCal understands natural language such as "tomorrow at 2PM," as shown in Figure 6-22.
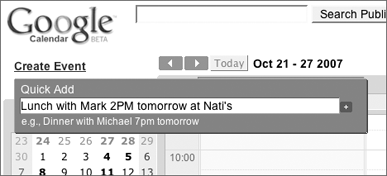
Figure 6-22. Use the Quick Add feature to add events to your Google Calendar by pressing the Q key and typing in event details in natural language, such as "Lunch tomorrow at 2PM."
To get that handy Quick Add box no matter what page you're looking at in Firefox, install the Google Calendar Quick Add extension, available for download at http://torrez.us/archives/2006/04/18/433/. With the extension installed, you can get a Calendar Quick Add box when you press the Ctrl+; key combination from any web page.
When's Passover this year? What day of the week does Cinco de Mayo land on? Browse GCal's list of shared public calendars to add sets of dates, from the phases of the moon to religious and regional holidays. Click the Manage Calendars link on the right side of GCal and then click the Add Calendar button. Choose the Browse Calendars tab to pick and choose from a list of shared calendars.
You can also create and share your calendars such as your softball team's game schedule with co-workers and friends, or share a work-related calendar with your personal GCal. For example, my "Lifehacker editor vacations" calendar is accessible to my personal GCal account.
Google Calendar can display any calendar available in the iCal file format, like your favorite baseball team's schedule, most likely available on the Web. Web site iCal Share (http://icalshare.com/) is a growing, user-submitted repository of television, sports, and entertainment iCal calendars, accessible from your Google Calendar.
GCal can even help you schedule the use of inanimate objects, such as the office projector or meeting space. Using GCal's auto-accept invitations feature, any invitation to the Conference Room B calendar that doesn't conflict with another meeting will automatically be entered. From Google's Help section, here's how to set up a calendar to manage conference room bookings:[43]
Create a secondary calendar named Conference Room B.
In the calendar list on the left, click the down-arrow button next to Conference Room B, select Calendar Settings, and then select the Calendar Details tab.
Enable the auto-accept invitations feature by selecting Auto-Accept Invitations That Do Not Conflict.
Click Save.
Click the down-arrow next to the calendar you created and select Share This Calendar.
Enter the email addresses of the users to whom you want to grant access to your resource.
Select the desired shared permission level (must be See All Event Details or higher).
If you live out of your inbox and not from a calendar, you'll love GCal's daily agenda to email feature. Get a simple list of the day's events emailed to you at 5 a.m. daily automatically. (Find the magic check box to turn that on in the GCal Settings Notifications tab.)
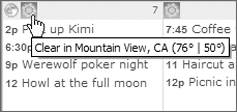
Wondering how to dress for the cookout this weekend? See how the weather might affect this week's upcoming events by turning on the forecast right inside GCal. To do so, in General Settings, enter your location and select whether you want to see the temperature in Celsius or Fahrenheit. Figure 6-23 shows the result: a small weather-forecast icon on each day right inside your calendar.
Anyone else hate Evite? Yeah, me too. Google Calendar doesn't have that festive Evite feel, but it doesn't have the overbearing ads or busy design, either. GCal can send and manage event invitations, and the recipients can leave comments on an event as well.
Thumb-happy text-messaging fans will put GCal's SMS access to good use. Text the word next to short code GVENT (48368) from your cell phone to get the next event on your schedule. Day will get your day's agenda, and nday will send back tomorrow's events. You can SMS new event details (such as "Pumpkin picking Oct 25 at 3PM") to GVENT, too, to add them to your calendar.
The fastest way to become a black belt with most apps is to navigate them right from your keyboard. As does Gmail, GCal comes with a hefty set of keyboard shortcuts, detailed in Google's Help documents.[44] Here's a quick summary:
SHORTCUT KEY | DEFINITION |
|---|---|
C | Create event |
/ | Search |
P | Previous date range |
N | Next date range |
T | Jump to "Today" |
D | "Day" view |
X | Customized view |
W | "Week" view |
M | "Month" view |
A | "Agenda" view |
Q | Quick Add |
Esc | Back to calendar |
Platform. . . . Web (digital camera or camera phone)
Cost. . . . . . . . Free
You're looking at a whiteboard full of notes or a paper document you want to copy quickly. Instead of manually transcribing the text, you can "scan" the information using a digital camera, including the one built in to your cell phone. Web application Qipit (http://qipit.com) turns digital photos that contain text into PDF files for you automatically. Here's how.
Register for a free account at http://qipit.com. To use your camera phone to scan text, enter your phone's model, number, and carrier, as shown in Figure 6-24. (Qipit needs your phone number so that when you send it images, it knows who you are.) If you don't want to enter your phone number or use your camera phone, select the I Will Use Qipit With My Digital Camera Only check box.
Note
Qipit will ask you to select which model handset you use. Qipit works with a wide variety of mobile carriers and handsets, but not all. If your phone isn't supported, you can still use Qipit with your regular digital camera.

After you've set your phone's model, Qipit will tell you what types of documents it can scan. Different cameras produce different-quality images, so a camera phone that produces lower-megapixel images may be able to scan a whiteboard but not printed documents with small text on it. For example, Qipit tells me that my Nokia 6682 can scan white-boards and hand-written notes but not printed documents, because the picture quality is too low, as shown in Figure 6-25.
Most consumer digital cameras (not camera phones) create images of high enough quality to scan printed documents, so even if your camera phone can't do that, your regular digital camera can.
When you take a photo to send to Qipit, put your camera phone on its highest quality setting. Make sure you've got ample light and get in close enough on the text so that is the only thing in the photo; avoid getting background edges in your photo. A nonphone camera doesn't have to be set to the highest quality setting — a 2- or 3-megapixel photo will do just as well as a 5-megapixel photo and will take less time for Qipit to process.

You have several ways to send Qipit your images for PDF conversion:
Email a photo directly from your camera phone. The quickest and easiest way to send an image to Qipit is to snap a photo with your phone and send it via email to [email protected]. Make the subject of your message the name of the document. (Your phone does have to have email capabilities to do this.)
Email your photo from your computer. You can send any images that you've imported onto your computer to Qipit via your regular email program. Enter the [email protected] address in the To: field and enter the document name in the subject line of your message. You can create multipage Qipit scans by attaching several images to one email. The pages will be scanned in the order in which they're attached to your message.
Upload your image via the Qipit web site. Alternatively, you can log into the Qipit web site and click the Upload Picture button to add the image to your account.
After Qipit receives your image, it "scans" it to a PDF file, lightens any shadows, and makes the text clear and legible.
After you've added document images to Qipit, click the My Documents link in Qipit to list them. From there, you can rotate the image (if, say, you shot a picture landscape and want to turn the text into portrait format). You can also email or fax the image file, merge several scans into one document, post it to your web site or blog, or publish a document at a certain web address. For example, you can view a Qipit scan of the introduction to this book at http://www.qipit.com/public/lifehackerbook/book_intro_high_res.
After you begin accumulating Qipit scans, you'll want to start organizing them. In the My Documents area of Qipit, you can add tags (such as biologynotes or projectbrainstorming) to an image. Click any tag on the right side to filter your list of scans by tag.
Note
As of this writing, you can store up to 100 pages of document scans to Qipit for free, at which point you either have to export pages and delete them from your Qipit account to make room for new ones or create another free account. Qipit representatives say they plan to offer more storage options in the future.
Level. . . . . . . Easy
Platform. . . . Web
Cost. . . . . . . . Free
Anyone who's had to schedule a meeting or get-together for a large group of people knows how difficult finding a date that works for everyone can be. Whether it's a family reunion or a board meeting, when more than five people are involved, everyone's schedule gets in the way. Instead of sending around a group email with possible dates, which everyone responds to multiple times with what dates work for them, set up a group poll in one place with Doodle (http://doodle.ch). Here's how.
On the Doodle home page, click the Create Poll link under Schedule An Event. On the next screen, enter the details of your event: a title, a description, your name, and your email address, as shown in Figure 6-26.

Click Next and select the possible dates for your event. You can enter as many dates as you'd like. On the third and final screen, optionally enter times for each of the dates you chose. You can leave times blank for all-day events (such as family reunions).
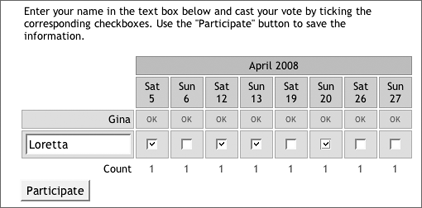
After you've created your event, Doodle will email you a link to the event poll. Forward the link to all the event attendees, who will click it and mark off which days they can attend, as shown in Figure 6-27. Doodle will tally which dates work for the highest number of attendees, as shown in Figure 6-28.
Doodle can also poll groups about things other than possible event dates; ask your group members what restaurant they'd like to go to or which movie to see by using the Create Poll link on the Doodle home page under the Make A Choice heading.
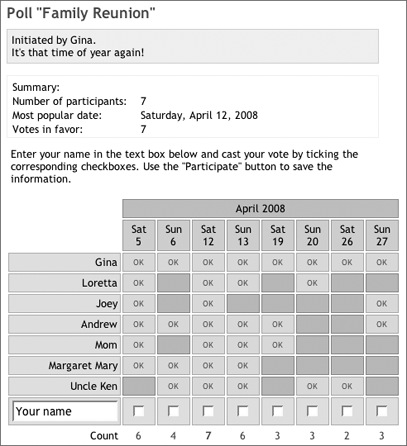
A simple Doodle poll can reduce email back-and-forth between multiple attendees and provide an easy, visual map of who can make it when to your event.