
You use more computers on a regular basis than any previous generation did. You've got your computer at work, your PC at home, your spouse's laptop, and the family Mac to take care of, and getting simple tasks done between them can be tedious. If you tend to work between several computers, you should know about several utilities already built into your operating system or available for free that can make sharing information and resources easy.
Using multiple computers lets you get online and work on files from lots of different locations, but with that capability come complications — such as your work getting out of sync. If you bookmark a web site at the office, it won't be there when you get to your home computer. If you bring work home from the office and you forget your updated files there, you're up a creek. If your spouse downloads photos from the digital camera onto her laptop, you don't get to see them — unless you've got the right setup.
Personal computers once amounted to giant, stand-alone calculators until someone came up with the idea of connecting them to exchange information. All the computers in your life are connected in some way, whether on your home network or over the Internet, and that means you can do a lot more with them, such as share disks and devices and even automatically sync files between them. This chapter covers several techniques for synchronizing files and bookmarks between computers over the Internet and on the same network.
If you have several computers on your home network — such as your teenager's laptop and your spouse's PC — see Hacks 109 and 110 to find out how to set up shared folders for you all to open and save files to a single place, whether you're working in Windows or Mac OS X. If you have many computers but just one printer, see Hack 113 for how to share that printer so that any computer can print documents to it. If you're thinking about switching to the Mac but don't want to give up Windows, you can roll two computers into one by running Windows on your new Mac, and Hack 114 tells you how. If you have dual monitors or a laptop hooked up to an external monitor, see Hack 115 to find out how to get the most out of the extended screen real estate. Finally, if you have two computers at one desk, you can control them both with a single mouse and keyboard; Hack 116 covers how.
Multiples can complicate things, but they don't have to. Whether you're sharing information between local computers, between operating systems, or over the Internet, this chapter shows you how to get all the computers in your life under control and sharing common resources.
Platform. . . . Windows and Mac OS X
Cost. . . . . . . . Free
If you have several computers at home, you want to easily transfer files between them without manually copying them to disk and walking it across the room (so-called "sneaker net"). All versions of Windows come with built-in support for sharing folders and opening and saving files to them from other computers on the network. This hack shows you how to share a Windows folder of family photos to all the other computers in the house, whether they're also PCs or whether they're Macs.
Note
The screenshots in this hack are from Windows XP, but the instructions mostly work for Windows Vista as well; Vista-specific notes are included inline.
To share a folder of photos from a central PC to other computers in the house, browse to that folder in Windows Explorer, right-click it, and choose Properties. On the Sharing tab, enter a share name, as shown in Figure 11-1.

The name you set here is what other computers will see. This name can be different from the folder name itself. If you try to use a name more than 12 characters long, Windows will warn you about a possible incompatibility with some operating systems. To be safe, stick with a name that has fewer than 12 characters. In Figure 11-1, I'm sharing the My Documents folder as PC - My Docs. Also, select Allow Network Users To Change My Files if you want to save files to this shared folder from other computers.
Note
If your computer is not set up for sharing files, you'll see a message to that effect with a link to run the Network Setup Wizard in the Sharing tab. Run the wizard to enable file and printer sharing on your computer first. Then you'll be able to name your shared folder.
Windows Vista users, be sure to click the Advanced Sharing button from the Sharing tab of your folder's Properties dialog box. There you can set the shared folder name and make the folder writable by other computers using the Permissions button.
For other computers to connect to your shared folder, it's helpful to know your PC's network name. Most likely, you chose your computer's name when you first set it up (or maybe its manufacturer or previous owner did) and you've since forgotten it. To determine your PC's name, from Control Panel, click System. (Some users may have to go to the Performance And Maintenance category first; Vista users should use the System And Maintenance link.) From the System Properties dialog box, choose the Computer Name tab and write down the name listed next to Full Computer Name, as shown in Figure 11-2.

Figure 11-2. The System Properties dialog box displays your computer's network name, which other computers will use to browse to it.
In Figure 11-2, you can see I've named my PC Scully (that's right, X-Files fans!). Take note of your computer's name, which is what other computers on the network will see and access. (If you want to change your PC's name, click the Change button. To save the new name, you'll have to restart your computer.)
Vista users, your System Properties area will look different from Figure 11-2, but it will also list the name next to Full Computer Name.
Now that your shared folder is all set up, you're ready to access it from another PC. This is the fun part: from any other Windows XP or Vista PC on the same network as the computer with the shared folder, from the Start menu, type two backslashes and the computer's name that you just wrote down. For example, from another PC, I typed \scully into the Run box to browse the PC named Scully in Windows Explorer. There you can see all the shared items available on the host PC. In Figure 11-3, you see the PC - My Docs shared folder.

Figure 11-3. Browse to the computer with shared files or printers by prefixing its name with backslashes in Windows Explorer.
Tip
You can access shared folders between PCs on a local network only unless you're running a VPN (virtual private network) as described in Hack 73. Using a VPN, you can access shared folders from your PC over the Internet — your home PC from the office, for example.
After you've set up a shared folder on your PC, a Mac on the same local network can view, open, and save files there as well. If you're using Mac OS X 10.5, under the Shared header in Finder's sidebar, you'll see the PC sharing files listed automatically. From there, you can browse its available shared folders, as shown in Figure 11-4.

Figure 11-4. Browse to the PC hosting a shared folder by using the Shared header in Finder's sidebar.
Tip
You can add a shared folder to Finder's sidebar for quick access. To do so, select the shared folder, and from Finder's File menu, choose Add To Sidebar.
If you have difficulty connecting to your PC's shared folder, make sure of the following:
The computers are on the same local network. If the computers are connected to the same wireless router, for example, they're on the same local network, which means they have similar IP addresses. To check whether the computers can communicate with one another, you can try pinging one from the other. From the command line on the host PC, type
ipconfigto determine the computer's local IP address. Then, from the command line of the computer that's trying to connect, typeping 123.56.7.8(where 123.56.7.8 is the host PC's IP address). If the ping program gets a response from the host PC, the two machines can talk to one another.The PC's firewall must allow file sharing. Make sure the firewall running on the host PC allows for incoming connections to its shared folders. If you're using the Windows built-in firewall and you enable sharing, file sharing is automatically added to the firewall's Exceptions list. However, you may have to manually let file-sharing connections through on third-party firewalls.
Platform. . . . Mac OS X 10.5 and Windows
Cost. . . . . . . . Free
Just as you can share folders from Windows, Mac OS X also has built-in sharing that works with other Macs as well as PCs. Here's how to share a folder from your Mac and access it from other computers in your home or on any local network.
To make a folder available to other computers on the network, go to your Mac's System Preferences' Sharing pane. Here you'll see a list of all the ways other computers can access your Mac. Select File Sharing and then click the + button under the Shared Folders column to add the folder you want to share, as shown in Figure 11-5.
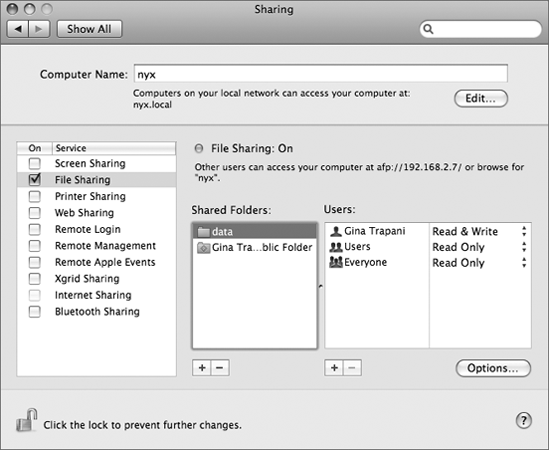
Figure 11-5. In the Sharing pane of System Preferences, manage your Mac's shared folders list and set access permissions for each shared folder.
In this area, you can see what users and groups have what access permissions to those folders. Add and remove folders in the list by clicking the + and - buttons below the Shared Folders list. For a given folder, you can share using AFP (Apple Filing Protocol) to share the folder with other Macs, SMB (Server Message Block) to share the folder with PCs, and FTP to access the folder from any device that has an FTP client (see Figure 11-6). You can turn on all or any subset of those options for a given folder.

Figure 11-6. Click the Options button to select which protocols your Mac should use to share the selected folders.
To share your Mac's files only with other Macs, select Share Files And Folders Using AFP. To share your Mac's files with Windows PCs, select Share Files And Folders Using SMB. Then, select the user account for SMB sharing and, when prompted, enter your password. (Warning: sharing with Windows PCs will not work if no user account is set to On.)
After you've shared a Mac's folder using AFP, all the other Macs on the network will be able to see and connect to the share immediately. Macs running OS X 10.5 (Leopard) will list the other Mac's name under the Shared heading in Finder's sidebar. For example, if the Mac sharing a folder's name is nyx, on other Macs it will appear in Finder as shown in Figure 11-7.

Figure 11-7. Networked Macs that are sharing files automatically show up under Shared in Finder's sidebar.
Click the Mac's name to browse its list of shared folders. If you can't see the shared folder that you know is there, click the Connect As button on the top right (under Finder's search box) and type in the username and password that has share access rights. After you're connected as an authorized user, you can open and save files there (depending on your access permissions).
When you turn on SMB (or Windows sharing) for a folder, Mac OS X gives you a message that reads something like
Windows users can access your computer at smb://xxx.xxx.x.x
where the xs are your Mac's IP address. You can indeed use that address, or you can simply use your Mac's name instead to access a shared Mac.
Either way, from your PC's Start menu, choose Run (Vista users, simply use the Search box) and type in your Mac's address prefixed by two backslashes, as shown in Figure 11-8.

Figure 11-8. Type your Mac's name prefixed by two backslashes in Windows XP's Run box to browse the Mac's shared folders in Windows Explorer.
In this example, because my Mac's name is nyx, typing \nyx into the Run box launches a Windows Explorer window that browses the Mac's shared folders. From that window, you can open, copy, edit, and save files from the shared folder over the network from your PC.
Platform. . . . Windows and Mac OS X
Cost. . . . . . . . Free
When you want two computers to always have the most updated version of a set of files, you can waste time manually copying changes as you make them between machines, or you can automatically sync your files across computers using free software. Say you want the family-room PC to store a copy of the latest batch of digital photos your spouse downloaded onto the computer in the den. Or maybe you'd like job files you edit at home to automatically sync to your PC at the office without your toting a disk back and forth yourself. Two free services allow you to sync folders between computers on the same network, and synchronize files between remote computers over the Internet.
Free Windows utility SyncToy is a simple utility that synchronizes files between two folders (located on the same PC or on different ones). Download SyncToy from http://lifehackerbook.com/links/synctoy (as of this writing, version 2.0 is available in beta) and install it one PC that will be syncing with another. Start up SyncToy and click Create New Folder Pair to define a Left Folder and a Right Folder. Files will initially sync from left to right, so choose the folder with the source files on the left and the destination on the right. If you're syncing to another computer entirely, you will need to share the folder so that your computer can open and save files to it. See the preceding — Hacks 109 and 110 — for how to share files from a PC or a Mac to another PC.
After you've chosen the Right Folder on the other PC, click the Next button. Select Synchronize as the Folder Pair action, and click Next to name your pair something descriptive, such as family room photo sync. Click the Finish button.
From here, you can configure, test, or run your new folder-pair action, as shown in Figure 11-9.

Figure 11-9. After you choose the Right and Left folders, you can customize the folder pair synchronization further in SyncToy.
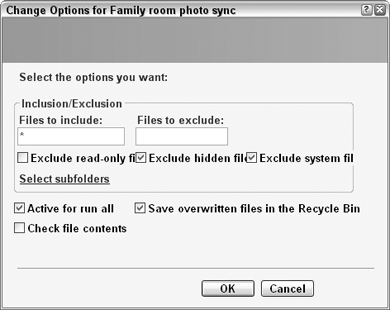
To exclude any files from the synchronization action (such as system files, or maybe non-image files), click the Change Options link. There you can exclude files by name, extension, or subfolder; exclude hidden or system files; save overwritten files in the Recycle Bin; and choose other settings for your pair, as shown in Figure 11-10.
When you're satisfied with the synchronization action options, it's time to try the synchronization. Because you'll be copying large numbers of files and you don't want to accidentally overwrite anything important, you can preview the results of the sync without actually running it. Click the Preview button to see what files will be copied from where and to where, given your action specs. Adjust your action as needed. If you don't want to synchronize folders, you can also contribute or echo from the Left Folder to the Right Folder to perpetuate actions on the Left Folder to the Right without mirroring the contents exactly. See SyncToy's help menu for details on what the Echo and Contribute actions do.
When you're happy with the results of your SyncToy action's Preview, it's time to give it a try. Click the Run button to perform the sync between folders. You can set up any number of folder-pair actions in SyncToy to copy any number of folders to any number of other computers. The other computer doesn't have to be a Windows PC; Windows just needs to be able to browse to it to select it as the Right or Left Folder in SyncToy.
After you've set up SyncToy, each time you work on files in one place, you don't have to copy them manually but instead can just run your SyncToy action to update the folders elsewhere. That is, on either the family-room or den PC, you can run a SyncToy action that copies the latest digital-camera photos with one click.
If the two computers you're working with aren't on the same local network and aren't both Windows machines — such as your home Mac and your office PC — you can still sync files between them over the Internet using a free service called FolderShare (http://foldershare.com). Here's how to set up FolderShare:
On the first computer, go to
http://foldershare.comand click Download. Download the appropriate FolderShare software for your system (either for Mac OS X or Windows) and install it. If you don't already have a FolderShare account, set one up using the installation wizard; you just need an email address and a password (that has at least one letter and one number in it.) You will also assign your computer a name that FolderShare will use to refer to it (make it something descriptive, such asWork PCorHome Mac).If you're running firewall software such as Windows Firewall, when you complete the FolderShare installation, you may get a message asking whether the firewall should allow or block connections to and from FolderShare. For FolderShare synchronization to work, you must allow FolderShare traffic through your firewall.
On the second computer, repeat the same process. But when it comes time to set up or enter an existing account, choose I've Already Created An Account and enter the email address and password you set up in Step 1. If your second computer's firewall also asks, you will have to allow FolderShare through its firewall like you did on the first.
After FolderShare is set up on two computers, you're ready to start syncing folders between them. In Windows, click the FolderShare icon on the system tray and choose My FolderShare from the menu. The Folder-Share web site will launch. Log in and click the Sync My Folders button, as shown in Figure 11-11.
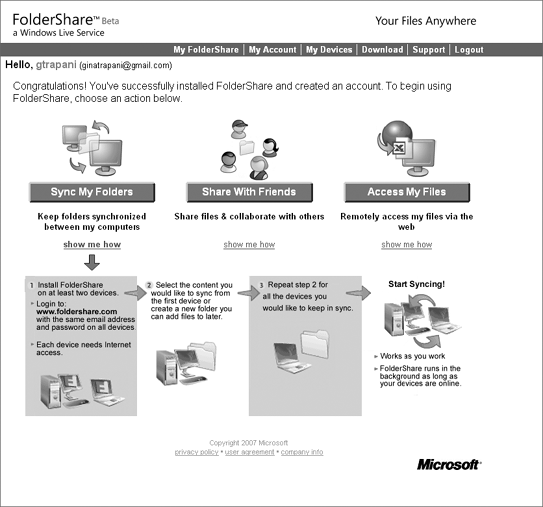
Figure 11-11. Click the Sync My Folders button in FolderShare to start configuring how it will synchronize your files between computers.
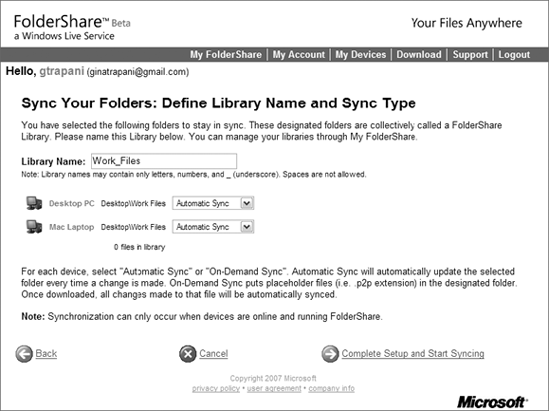
From here, you can choose a custom folder path or choose from commonly used folders, such as My Documents, My Pictures, or My Music. After you choose a folder, select a computer that the folder should sync to and a destination on that computer. After you've selected both devices and folders, FolderShare will create what it calls a library that you can name and set to automatically sync. For example, the two computers I have FolderShare installed on are named Desktop PC and Mac Laptop. I created a Work_files folder on the PC's desktop, which syncs to the lap-top, as shown in Figure 11-12.
Click Complete Setup and Start Syncing to let FolderShare begin doing its thing. Any time you copy a file to a FolderShare folder on one computer, automatically in the background it will copy that file to the mirror folder on the remote computer. In my example, work files modified on the desktop or laptop will always stay in sync, regardless of location. As long as FolderShare is running and the computer is connected to the Internet, the files will update.
Platform. . . . All operating systems with Firefox
Cost. . . . . . . . Free
You've worked hard to perfect your browser bookmark list. You've organized all the sites and bookmarklets you use regularly into folders and on your bookmarks toolbar on your primary computer, and you want those same links available to you at work, at home, and on your laptop. Instead of exporting your bookmarks and manually importing them onto every computer you use — only to let them get out of sync again when you edit them on one computer — you can automatically sync your Firefox bookmarks using the free Foxmarks Firefox extension. Here's how.
On one of your computers, using Firefox, download and install the Foxmarks extension, available at https://addons.mozilla.org/en-US/firefox/addon/2410. (See details on how to install a Firefox extension in Hack 85, "Extend Your Web Browser.") When you restart Firefox, the Fox-marks setup wizard launches automatically. Click Next on the welcome screen and choose Help Me Create A New Account on the next dialog box. Agree to Foxmarks' terms of service, and on the next screen, enter your name, email address, a Foxmarks username, and a password. Click Next, and Foxmarks creates your account. On the next screen, Foxmarks uploads your current bookmarks to its server. Click Finish to complete the Foxmarks setup.
Now, on any computer that you want your bookmarks on, install Fox-marks the same exact way — except that instead of creating a new account, you're entering your Foxmarks username and password. After Foxmarks verifies your account, it gives you the option to (1) wipe out the bookmarks already saved in your browser and just download the ones from the server; (2) wipe out the bookmarks on the server and upload the ones in your browser; or (3) merge the bookmark sets (see Figure 11-13).

Figure 11-13. The first time you log into your Foxmarks account on a computer, you can download, upload, or merge your bookmarks.
Select the option you want for your setup, click Next, and Foxmarks will synchronize your bookmarks for the first time. When that process is complete, the computers with Foxmarks installed and logged in with your username will automatically synchronize in the background. As you make changes to your bookmarks on any computer, they will update across all the Foxmarks-enabled copies of Firefox you use — even if both computers are running Firefox at the same time.
Note
Google offers a product similar to Foxmarks, a Firefox extension called Google Browser Sync (http://www.google.com/tools/firefox/browsersync). Although Google Browser Sync synchronizes more than just bookmarks (it also handles the browser's saved passwords, history, and session information), it doesn't work if you're running it in more than one browser at the same time. So if you leave your web browser up at home, you can't use Google Browser Sync at the office.
To manually sync your bookmarks with Foxmarks or change other Foxmarks settings, from Firefox's Bookmarks menu, choose Foxmarks

Figure 11-14. From the Foxmarks Settings dialog box, you can manually sync, switch accounts, or, using the Advanced tab, even configure your own server to store your bookmarks.
Tip
If you don't want to store your Foxmarks bookmarks on the Foxmarks servers and you have access to your own FTP server, visit the Advanced tab in the Foxmarks Settings dialog box to save your bookmarks to your own remote server. Keep in mind, however, that doing this will keep your bookmarks from being available on the Web as detailed next.
There may be times when you need to get to your bookmarks from a computer that doesn't have Firefox or Foxmarks installed, such as at an Internet café or from your in-laws' computer over the holidays. In those cases, you can get your bookmarks list on Foxmarks' web site at http://my.foxmarks.com. Log in with your Foxmarks username and password to view your bookmarks list on a web page. Bookmarklets — which by nature function only when saved in the browser itself — won't work from My Foxmarks, but regular web page links do. You can search, preview, edit, and rearrange your bookmarks while you're logged into My Foxmarks on the web as well.
Level. . . . . . . Medium
Platform. . . . Windows and Mac OS X
Cost. . . . . . . . Free
You're typing a letter on the laptop in the living room and you want to print it — except that the printer's in the bedroom. Sharing a printer connected to a PC on your home network and printing to it from any other computer, even over a wireless connection, is a breeze. Whether you want to print from a Mac or another PC, here's how to share a single printer for use by any computer on your home network.
First, you have to make the printer connected to the computer available for other computers to use. Here's how:
On the PC where the printer is connected, powered on, and working correctly, browse to your printer list (select Start

Note
If you don't have it turned on already, using the Network Setup Wizard, you must enable file and printer sharing on the PC to which the printer is connected to share it. Name the computer and the Windows network workgroup where it will live. By default, the workgroup name is
MSHOME. After the Network Setup wizard is completed, restart the PC to save its settings.On the Sharing tab of the printer's Properties dialog box, set your shared printer's name. Some older versions of Windows and other operating systems (such as Mac OS X) have trouble detecting printer names with spaces in them, so name your shared printer something that's all one word, such as
EPSON_SHARE, as shown in Figure 11-15.
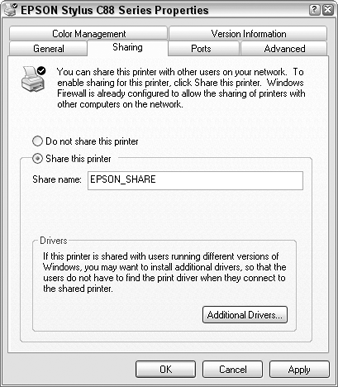
Now your printer is ready for other computers on the same network to use it.
Your client PC (that is, the PC without the printer connected directly to it) must be a member of the same Windows workgroup that the server is to print to its printer. If it isn't a member already, run the Network Wizard to set the computer name and workgroup name (in this example, MSHOME.) You may have to restart to save those settings. (Note: You don't have to enable file and printer sharing on the client as you did on the printer server.)
Then, follow these steps:
After the client is in the same workgroup as the shared printer, in Printers, click Add Printer to start the wizard, and select the network printer option.
In the next screen of the Add Printer Wizard, browse the Windows network down through the workgroup to the shared printer (see Figure 11-16), and click Next to connect.

You're done! Your PC's shared printer is available for use from the other PC on your home network.
You can print documents to your shared Windows printer from a Mac as well. To set it up in OS X 10.5 (Leopard), first you must set the Windows workgroup that the printer lives in. In System Preferences, go to Network. In the leftmost column, select the connection to the network where your PC lives (for example, AirPort) and click the Advanced button. On the WINS tab, select the MSHOME workgroup and click OK. Then click Apply to save your setting.
Now, while still in System Preferences, choose Print & Fax. Click the + button to add a new printer, and choose Windows on the toolbar. In the leftmost column, select the Windows workgroup where the printer is located (in this example, MSHOME) and select the printer.
From the Print Using drop-down list, choose Select A Driver To Use and type in your printer name, which, if all goes well, will appear on the available driver list, as shown in Figure 11-17.

Figure 11-17. Browse the Windows workgroup to find the shared printer in the Mac OS X Add Printer box.
Note
If your printer driver isn't listed, try installing the Mac driver from the disk that came with your printer.
Click the Add button to put the shared printer on your printer list. Now, from any application on your Mac, you can print to the shared printer on the PC.
Platform. . . . An Intel-based Macintosh
Cost. . . . . . . . Free (plus the cost of the Windows operating system)
You can have both a Mac and a PC on a single computer, using Apple's new Boot Camp software. Boot Camp lets you install Windows on your Mac in addition to Mac OS X. With Boot Camp set up, when you start your Mac, you can choose whether to use OS X or Windows. Boot Camp is a great way to consolidate the computers in your life and to run essential Windows programs that aren't available on the Mac. Here's how to set up Boot Camp to get a Mac and PC all rolled into one.
Note
Setting up Boot Camp is not a trivial task because it involves repartitioning your Mac's hard drive and installing another operating system and drivers. Block out a couple of hours for this project.
Getting Boot Camp and Windows up and running on your Mac requires specific hardware and software. Here's what you need:
An Intel-based Mac running OS X 10.5 (Leopard) with all software updates installed.
At least 10GB of free space on your Mac's hard drive.
A working printer connected to your Mac (with plenty of ink and paper!).
A genuine Windows XP installation disk, which includes Service Pack 2. (Important: You cannot install XP using a disk that does not include SP2 and expect to download it after the fact. If you have an old XP CD without SP2, see
http://lifehackerbook.com/links/slipstreamfor more on how to add SP2 to your older Windows XP installation disk.)Or
A genuine Windows Vista Home Basic, Home Premium, Business, or Ultimate installation disk (32-bit version only).
Before you get started, free up as much space on your Mac's hard drive as possible. (See Hack 105, "Free Up Hard-Drive Space," for more on how to visualize and cut back disk-space hogs.) Then back up all your important data, just in case. Do not skip this step! Finally, log on to your Mac as an administrative user (and log off any other users), quit all running applications, and if you're using a portable Mac, make sure it's plugged into a power source. Got all that? Great. Now it's time to get Boot Camp going.
The Boot Camp Assistant is a step-by-step wizard, located in /Applications/Utilities/, but it can help you only as long as you're in Mac OS X, which you are not throughout this entire process. So the first thing the Assistant does is prompt you to print the 26-page user guide. Yes, I groaned and balked at the waste of paper and ink this appears to be, too. But because you'll be rebooting your system and making major changes, a paper copy of the guide is a comforting help along the way when the onscreen Assistant isn't available.
In fact, Apple's user guide printout is more complete than any instructions I could include in this book, so rather than repeat the instructions it already contains, I offer additional information not included in the official instructions.
After you've told the Boot Camp Assistant that you want to set up Windows on your Mac, you come to the scary (and fun!) part: splitting your Mac's hard drive into pieces and setting Windows to install on one of those partitions. The Assistant will show you a map of your Mac's hard drive. Click the divider to drag it and set the size of your Windows partition (which will take space away from the Mac partition). Alternatively, using the buttons, you can split the drive equally or use exactly 32GB for Windows, as shown in Figure 11-18.
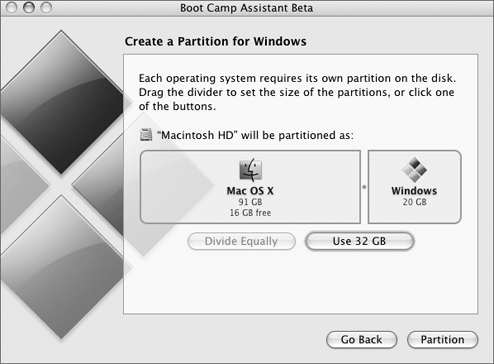
What size should your Windows partition be? Good question. This decision is difficult to undo later, so do consider a couple of questions before you decide:
What will you use Windows to do and how much how much hard-drive space will that take up?
If you're using Windows just to play PC games, for example, you won't need much space (10-20GB will do.) But if you want to manage your photo library in Windows (which I do, with Picasa, because I prefer it over iPhoto), you'll need enough space to accommodate all your photos. It's impossible to know in advance exactly how much space you'll need, but guesstimate as best as you can. Also, keep in mind that you can attach external drives to add space in Windows. But remember: files stored in the Mac OS cannot be accessed from within Windows, so make sure you have enough space for all the programs and files you'll want in Windows.
What format will the Windows partition be, FAT or NTFS?
If your Windows partition is larger than 32GB, you will have to format it as NTFS, not FAT. Mac OS X cannot write to NTFS-formatted drives, but it can write to FAT drives. That means that a Windows partition greater than 32GB will be read-only in Mac OS. In general, FAT is considered less reliable than NTFS. (Windows Vista uses only NTFS, so the 32GB threshold isn't a factor if you're installing Vista.)
After you've chosen how to split your hard drive between Mac and Windows, click the Partition button.
With your partition created, insert your Windows installation disk and click the Start Installation button in the Boot Camp Assistant. Your Mac will reboot from the Windows installation disk and begin working. Two things to know when you're installing Windows:
When it comes time to select the partition to format, be absolutely sure to choose the partition labeled
C:Partition3 <bOOTCAMP>. Vista will list it asDisk 0 Partition 3 BOOTCAMP. One false move here and you could wipe out your entire Mac, so choose carefully.If your partition is less than 32GB and you're installing Windows XP, you'll have a choice between the NTFS or FAT Windows format. NTFS is recommended, although FAT is okay, too. Whatever you do, don't select Leave The Current File System Intact — make sure you format the partition to NTFS or FAT.
Complete the rest of the Windows XP installation per the installation disk's instructions.
After you're completely booted into your new Windows installation, eject the installation disk and insert your Mac OS X 10.5 installation CD. Let Autorun launch Setup.exe, and follow the onscreen instructions. When the drivers are installed, Windows will recognize your Mac's devices (such as the Bluetooth receiver, video adapter, iSight camera, and wireless receiver). If you receive a message saying that the software hasn't passed Windows testing, click the Continue Anyway button. You'll have to reboot to finish this installation. Then you're done!
Now you have the choice to start either Mac OS X or Windows on your Mac. To make that choice when you turn on your computer, hold down the Option key and you'll see the two partitions you set up, as shown in Figure 11-19. Click the one that has the operating system you want to use.
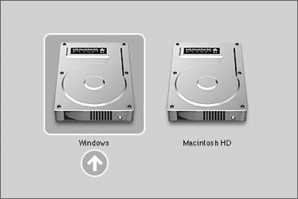
Figure 11-19. Hold down the Option key when you start your Mac to choose which operating system to boot into.
Alternatively, if the computer is already running, use the Boot Camp software to restart in a particular operating system. In Windows XP, click the Boot Camp icon in the system tray, and in the Startup Disk tab, select Macintosh HD or Windows and click the Restart button to move into that operating system, as shown in Figure 11-20.
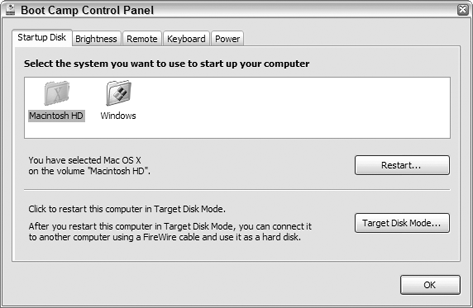
Figure 11-20. Use the Boot Camp control panel in Windows (located in the System Tray) to restart your Mac in OS X or Windows.
While you're in OS X, you can do the same thing by going into System Preferences and choosing Startup Disk.
When you first start using Windows on your Mac, one of the first things you'll notice is that the Mac keyboard is different from Windows keyboards. It has a Command key but no Windows key; on MacBooks and iBooks, the keyboard has a Delete key but no Backspace key; it also has no Print Screen key. The Boot Camp user guide you printed includes a complete table of Mac keyboard Windows action mappings, but the most important ones to know are the following:
The Option key is the Windows Alt key.
The Command key is the Windows key.
The Delete key is the equivalent of Backspace. To forward-delete with it on built-in Apple keyboards (on your Mac notebook), use Fn+Delete. (External Apple keyboards have a forward-delete key.)
The Windows Print Screen key is F14 on an external Apple keyboard.
Your best bet is to bookmark the Boot Camp key-mapping reference in Windows for easy reference the next time you need to use Print Screen or Delete. It's located at http://docs.info.apple.com/article.html?artnum=304270.
Tip
For more documentation, user discussions, troubleshooting, and frequently asked questions about Boot Camp, see Apple's support section for it at http://www.apple.com/support/bootcamp.
Level. . . . . . . Advanced
Platform. . . . Windows
Cost. . . . . . . . Free
Studies show that multiple monitors increase computer users' productivity.[50] Now that you've added another monitor to your computer setup, you've got double the screen real estate to get things done — but are you putting all that space to good use? Whether you want to stretch your desktop wallpaper or taskbar across two screens or perfectly snap all your windows into place every time, a few utilities are available that can help you make the most of every last pixel of your dual monitors. Read on to take a look.
If you haven't taken the plunge into doubling up on monitors, you have a few options for doing so. You can install a second video card inside your computer or replace your current video card with one that supports two monitors. Alternatively (and most easily), you can just plug an external display into your laptop and use your laptop's flip-up screen as your second monitor. For more information on upgrading your computer to dual monitors, see http://lifehackerbook.com/links/dualmonitors.
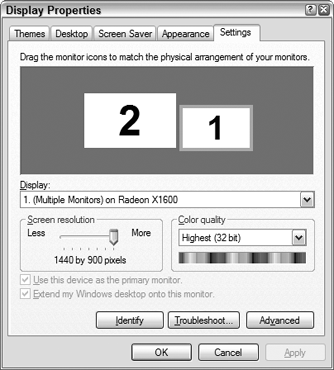
When you have your dual screens hooked up, go to your system's display settings to configure their arrangement. One of the screens will be your primary monitor (numbered 1) and the other will be the secondary. Click the Identify button to throw numbers up on each screen, letting you know which is which. If one of your monitors is smaller than the other, drag and drop it to align to the top or bottom of its comrade in the same way the screens are physically aligned on your desk, to ensure the smoothest window and mouse movement between the two. In my case, my MacBook Pro (Boot Camping Windows, that is) is the primary monitor to the bottom right of my widescreen, as shown in Figure 11-21.
Out of the box, Mac OS X handles dual monitors better than Windows: You can set screen-specific wallpaper images by default without any extra software. Just choose Set Desktop Background, and a panel appears on each screen to configure them separately.
Windows can't set different wallpaper images on a per-screen basis by default; when you choose your wallpaper, it appears on both screens. That wouldn't be so bad except for Windows' inability to deal with different-sized monitors. If you choose the "stretch" option and you have two monitors of different sizes, Windows XP can't stretch the image properly to fill in each screen. If you've installed a dual-monitor video card, its drivers may give you the capability to configure each screen individually, but that leaves the laptop-with-second-monitor types out of luck — without the right software, that is.
One free utility, DisplayFusion, sets per-monitor wallpaper or stretches one panoramic image across two screens, as shown in Figure 11-22. Download DisplayFusion from http://binaryfortress.com/displayfusion.
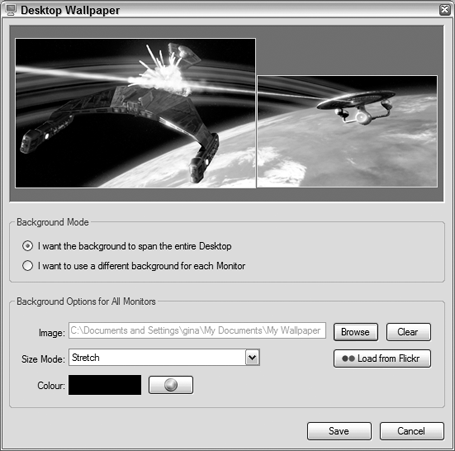
DisplayFusion offers a nice perk: the capability to search the popular photo-sharing site Flickr.com for wallpaper images built right in. DisplayFusion requires the free .NET runtime program, and it works on both XP and Vista.
It's easy to move your Windows taskbar from one monitor to the other. Make sure it's not locked (right-click and deselect Lock The Taskbar) and then just click and drag it to any side of either monitor to make it stick. The problem is, you don't want to have to scoot your mouse over to the place where the taskbar lives every time you need it (especially now that your mouse has all that way to travel). Instead, a couple of utilities can extend the taskbar across your two screens.
From the free downloads department, you can grab the MultiMon Taskbar program, available at http://www.mediachance.com/free/multimon.htm. This little utility adds a taskbar to your secondary monitor (including a clock) and lists only the programs that are open on each screen in their respective taskbars. MultiMon also adds buttons to each window near the Minimize button to move windows between monitors, and handy keyboard shortcuts that do the same. (Try it: Ctrl+Alt+Right Arrow and Ctrl+Alt+Left Arrow.) The taskbar that MultiMon adds doesn't necessarily match your Windows theme, so it can look out of place; I also had trouble with its taskbar floating above the bottom of my screen instead of sitting flush. MultiMon gets the job done, but a better taskbar extension is offered in UltraMon, a $40 software application that also handles wallpaper and screensavers. Take a look at the smooth taskbar extension across two screens with UltraMon in Figure 11-23.
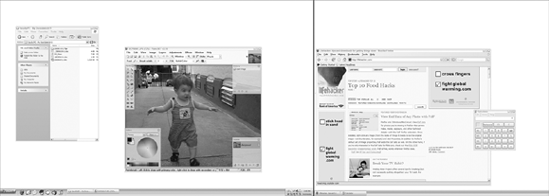
Figure 11-23. Multimonitor manager UltraMon stretches the taskbar across your second monitor and shows on each taskbar only the programs that appear on each taskbar's screen.
If you're willing to plunk down some cash for superior multiple monitor management — with extended taskbars, per-monitor screensavers, and lots more dual-monitor control — you want UltraMon. A single license will set you back $39.95, but UltraMon includes all the multimonitor features you want in one package. A free trial is available for download at http://www.realtimesoft.com/ultramon.
Now that you have your wallpaper and taskbar sussed out, it's time to start taking advantage of all that screen real estate with the apps you're actually using all day. The biggest benefit of multiple monitors is having fewer overlapping windows. You can have several documents and programs open and visible without obscuring the others — which means you can multitask without having to switch between windows by clicking your taskbar or pressing Alt+Tab.
On Windows, you can tile windows without any extra software. Just select as many open windows as you want by Ctrl+clicking them on the taskbar, right-clicking, and choosing Tile Vertically (or Tile Horizontally), as shown in Figure 11-24.
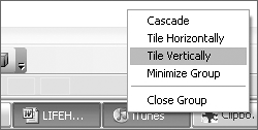
Figure 11-24. Ctrl+click multiple taskbar windows and choose Tile Vertically to make them visible but fill the entire screen width and height.
If Windows built-in tiling doesn't do enough for you, there are a few utilities that do more. Easily resize and move windows into screen halves or quadrants with freeware WinSplit Revolution, available at http://reptils.free.fr. WinSplit Revolution offers handy hot keys for moving windows between screens as well as to quadrants of the current monitor. Figure 11-25 is an example of how WinSplit can arrange three windows in a grid for easy multitasking.

Of course, you don't have to fill your entire desktop with active windows. Multiple monitors are also a nice way to keep "ambient" information in your visual field without its being right in your face all day. My laptop monitor is off to the side so that I use it for secondary applications (such as IM, email, a music player), but it also comes in handy for to-do lists, system-monitoring graphs, and even a calendar. My favorite desk-top overlay utilities are Samurize for Windows (http://samurize.com) and GeekTool for Mac (http://projects.tynsoe.org/en/geektool). I use both to embed my to-do list and calendar on my desktop; both also can embed images such as web site traffic graphs. You can also embed a Microsoft Outlook calendar on your secondary monitor and even use Windows Active Desktop to embed your Google Calendar. For more information on overlaying or embedding information on your desktop, see http://lifehackerbook.com/ch11.
Level. . . . . . . Advanced
Platform. . . . Windows
Cost. . . . . . . . Free
If you have two or more computers at one desk, you don't want two or more sets of keyboards and mice cluttering up the tabletop, too. You can buy a hardware gadget that lets you share a single keyboard and mouse with several computers (which involves a mess of tangled wires), or you could use a free software solution called Synergy. The Synergy application runs on all the computers you're using — the one that has the keyboard and mouse connected and the one(s) that do not — and lets you control all of them from that keyboard and mouse. That means you can move your mouse off one computer's screen and it will appear on the other, where you can type and work as well. Synergy also lets you share Clipboard contents between computers. If you copy information to the Clipboard on one computer and move your mouse to the other, you can paste it there, even though they're two different systems. Sound too good to be true? It's not!
Synergy works between any number of PC, Mac, and Linux desktops. For simplicity's sake, this hack sets up two PCs to share a single keyboard and mouse using Synergy.
Before you get started, you need to know two terms — server PC and client PC. When you set up Synergy, you'll have one "server": this is the computer that has the keyboard and mouse physically connected to it. The rest of the computers will be "clients." First, set up the server.
Download Synergy for Windows for free from https://sourceforge.net/project/showfiles.php?group_id=59275&release_id=406637 and install it on your PC. As of this writing, the most current version available for Windows is the SynergyInstaller-1.3.1.exe file. Run Synergy and select Share This Computer's Keyboard And Mouse (Server), as shown in Figure 11-26.
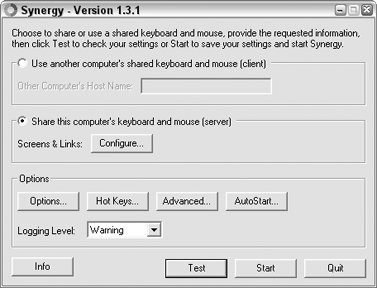
Figure 11-26. Enable the Synergy server by selecting the Share This Computer's Keyboard And Mouse option.
Note
Mac users should check out the graphical Mac Synergy client/server application, available as a free download from http://software.landryhetu.com/synergy.
Then click the Configure button to open a Screens And Links dialog box, where you'll add all the computers that will be controlled by the server's keyboard and mouse and their position in relation to each other.
In the Screens And Links dialog box, under Screens, click the + button to add a screen. First you must add the server's computer name itself, and it should match the computer's network name. To find that name, right-click My Computer, choose Properties, and go to the Computer Name tab. My server computer name is Scully, so that's what the first Synergy screen name is, as shown in Figure 11-27.
Now, to add the other computer to Synergy, you need to know its name as well (mine is Mulder). Click the + button again to add it.
After you've added to the list all the computers that the Synergy server will control, set what position they are in relation to one another. That's the only way Synergy will know where to put the mouse pointer when you, say, move it off to the side of one of your screens. Using the drop-down lists under Links, for each screen, list what's to the left or right of it, as shown in Figure 11-28.
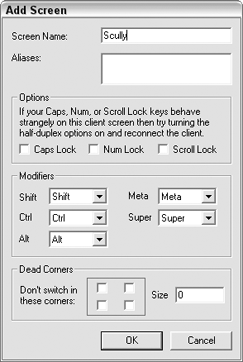
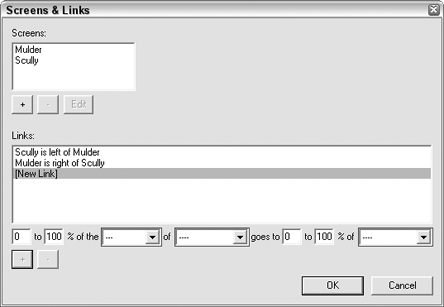
Figure 11-28. In the Screens & Links dialog box, define where each screen is positioned in relation to the other.
If you have a particularly wild screen position (a checkerboard of flat-screens, perhaps?), you can even set up screens on top of and below each other here.
Download and install Synergy on the client computer (the one without the keyboard and mouse connected) exactly the same way as you did on the server, except choose Use Another Computer's Shared Keyboard And Mouse. Enter the name of the server computer. To try the connection, click the Test button: first on the server and then on the client PC. Try moving the mouse off the server screen. If all goes well, it will land on the client screen safely! During the test, both the client and server will display Synergy's log, which will show you a history of Synergy-related activity, as shown in Figure 11-29.

Figure 11-29. When you test Synergy's connections, its log shows you exactly where the mouse pointer leaves and enters the screens you set up, and when the Clipboard contents change.
When you're satisfied with the test results, click the Stop button. To run Synergy for real, click the Start button on both the server and client. Now you're sharing the mouse and keyboard between two computers simultaneously.
[50] Ivan Berger, "The Virtues of a Second Screen," The New York Times, April 20, 2006 (http://nytimes.com/2006/04/20/technology/20basics.html).