Never before have human beings been subject to the daily onslaught of information as they are in the age of the Internet and email. Bits and pieces of data flow into your digital life nonstop. Every day, web site addresses, usernames and passwords, appointments, memos, songs, documents, digital images, and videos gather on your computer, vying for your attention and begging the question, "Where do I go?" Chapter 1 ("Control Your Email") covered the best strategies for parrying the daily influx of electronic messages. This chapter tackles the best way to organize the data those messages and other information channels contain.
As with email overload, the only way to overcome information overload is to put everything in its place on arrival. But you're not a librarian, and you don't want to spend time arranging information in folders all over your hard drive. Although there are infinite ways to organize data into complex, multitiered systems, you're going to take the smart and lazy approach to organization: you'll arrange stuff only as much as is needed to make that data useful to you.
The better organized your personal information library is, the faster you'll be able to draw from it and act on it in the future. But better organized does not equal more folders. In fact, the fewer buckets your system has, the better.
There are three key ways in which you're going to interact with your data:
Store it.
Retrieve it.
Do something wonderful with it.
When you design your data-organization system, concern yourself with storage and retrieval — that is, make those two actions as simple as possible. Next time you make a purchase online, you're not going to stop and try to remember whether you save receipts in the shopping folder, the receipts folder, or the expenditures folder. You will not ask yourself whether you should you save your password in your web browser, or add it to the passwords.doc file. (Although you might secretly wonder whether either place is secure enough anyway.)
The trick is to set up the most effective digital shelves to stow the different types of information you deal with every day. When you organize those spaces, keep the filing system simple. Create fewer destinations for quick entry. When it comes time for retrieval, you will use advanced search techniques to drill down to what you're looking for.
This chapter shows you how to create systems that make it easy to shuttle incoming bits and pieces into their right places for instant retrieval in the future. You will clear away the amorphous piles of stuff that spring up around you on your physical and digital desktops. Your parking places will have ample space to accommodate every type of item in them. Your personal "librarians" will fetch what you need when you need it with a quick keyword search. When you receive a new piece of information you may need later — such as a co-worker's change of address or a web page you may use in next month's report — where to place that new bit will be immediately obvious. Moving it into your system will be an automatic act that requires no thought or effort.
Although you may tweak the exact folder schemes and data labels outlined in this chapter for your own purposes, the principles are immutable. While you design your personal system for dealing with information, keep in mind the following:
Every item has its place.
Make those places big, general, and as few and simple to identify and remember as possible.
Do not split up those places into complex, multiple subfolder trees that make you stop and think about what should go where or how to navigate to what you need.
Every item is highly findable and instantly retrievable.
You will purge unneeded information regularly. You will archive old items out of sight.
Information streams into your life all day long. You can master the art of immediate, thoughtless filing — the moment a new bit arrives at your digital doorstep. You can build a vast knowledge library each day and keep a clear workspace and mind in the process. You're most effective when your data is out of your face but still within reach. The psychological burden of information overload will never weigh you down if you're confident and facile at processing every incoming bit in a flash. This chapter shows you some of the best practices for doing just enough organizing to keep your information accessible without wasting your time.
Whether it's a computer desktop or a physical tabletop, clutter represents procrastination, distraction, and unprocessed information. Let's clear it away.
Platforms...All
Cost........Free
Every operating system comes with a default location to save user documents. If you've had a computer for any length of time, you know that your PC's My Documents folder can get disorganized really fast. (On the Mac, it's simply called Documents.) If you frequently find yourself letting files clutter your computer's desktop, or if you spend time rearranging files in a bunch of unmanageable subfolders, it's time for a revamp. You can create a simple set of folders that will accommodate every type of file in an accessible way that keeps the files you need to work with right at your fingertips.
Over the years, I've developed a six-folder structure for My Documents that I create on every computer I use without fail. This scheme accommodates every file you will accumulate, clears the desktop, smoothly fits in with an automated backup system (see Hack 59, "Automatically Back Up Your Files to an External Hard Drive"), and makes command-line file wrangling a breeze.
In alphabetical order, the six main folders are called bak, docs, docs-archive, junkdrawer, multimedia, and scripts, as shown in Figure 2-1.

Here's a quick rundown of what each does and what it might contain:
bak— Short for backup, this is your backup destination of first resort. Your actual data backups should reside on external disks, butbakis where you store your Quicken backup file, your address book exported to CSV, or a dump of your web site's database.Note
I spend a lot of time at the command line, so I prefer the short name
bak, but there's no reason you can't name your folderbackup— or any name you prefer.docs—docsis the Big Kahuna of all six folders. It's the place where all the working files for your current tasks, projects, and clients go. Its contents change frequently, and the folder should be purged often.You can keep subfolders in
docs—finance,clients, orcreative-writing, for example. Theclientsfolder might have subfolders, too, such asacmeandbook-in-progress. That gets you three sub-folders into the hierarchy, however, and that's as deep as you can go before your file tree gets in the way of your work.docs-archive— Purge yourdocsfolder of closed working files —those for completed projects, former employers, or past tax years, for example — every few weeks. These go into yourdocs-archivefolder. The archive exists for reference and search, but the separate folder keeps all that extra stuff from cluttering updocs, which is your working task dashboard. The files indocs-archivedon't change much, if ever, so you can back them up on a different (less frequent) schedule.junkdrawer— Thejunkdrawer(ortemportmp) is a temporary holding pen for files you're working with this moment but don't need to save long-term. Your web browser and email program should both save downloaded files and attachments tojunkdrawerby default. If you're checking out a video, just testing a script, or need a place to store a software'ssetup.exeprogram, place those files intojunkdrawer.junkdrawerfiles you want to keep should graduate intodocs; otherwise, the automated hard-drive janitor (see Hack 62, "Automatically Empty Your Digital Junk Drawer") comes sweeping through and deletes anything older than a couple of weeks fromjunkdrawerwhile you sleep.multimedia— Here's where your music, video, and photos folders go. The benefit of having all those space-hogging files under one umbrella parent folder is backup. Chances are, your multime-dia backup plan is different than your documents backup because of the sheer amount of disk space required. Drop them all in themultimediafolder and you can easily exclude them from your backup scheme. Keep in mind that sharing your media with a home web server (see Hack 74, "Run a Home Web Server") works nicely with an all-encompassingmultimediafolder, too.scripts— Any executable script or shortcut lives inscripts. This is the place for your weight logger (described in Hack 68, "Automatically Update a Spreadsheet"), the janitor script, and any other batch scripts you use regularly.
Anyone who works at the command line appreciates short, to-the-point file paths. The Windows XP default user documents directory is something like this:
C:Documents and SettingsusernameMy Documents
Which makes you wonder what Microsoft was thinking at the time. (In fact, Microsoft rethought things in Windows Vista and made the users' default home directory something along the lines of C:Users username, similar to the Mac OS /Users/username/ home directory path.)
You can change the Windows XP My Documents directory to C:home usernamedocuments or something similar; a consistently lowercase path without spaces is much easier to remember, type, and script.
Here's how:
Right-click the My Documents icon and select Properties. The My Documents Properties dialog box opens.
Click the Move button and choose the new location.
Windows politely asks whether you'd like to move all your documents from the old location to the new one. Go ahead and confirm so that Windows can transfer your documents to the new location for you.
Click OK until you've exited the dialog box.
These may not be the only folders that live in your home directory. For example, a programmer may keep a code or dev directory as well. Just make sure that any additions don't truly belong within one of the core six. Remember, with simplicity comes effortlessness; the more folders you have, the more easily things get scattered and disorganized — so add to your system sparingly.
Level.......Medium
Platform....Windows XP and Vista, Mac OS X
Cost........Free
There are two ways to manage documents on your computer: As an old-fashioned "filer," you can create dozens of folders to organize your data in a complicated structure; or, as a new-fangled digital "piler," you can dump data into a single or small set of folders. In your transition from filer to piler, the most important skill you must develop and learn to trust is search.
Paper is the paradigm that we still use to understand digital documents. Manila folder icons, for example, represent digital folders in all operating systems. Although the metaphor works well enough for new computer users, power users understand that in reality, those so-called folders are just pointers to data on a disk that never actually changes location. Digital documents have special characteristics that their paper ancestors do not: your operating system indexes them automatically, making them findable without requiring a human to store them in a big filing cabinet with carefully labeled folders.
When you first transition from a paper-based world into a digital document scenario, filing digital documents the way you would paper is a natural thing to do. But now you know that your data is already indexed and searchable without the work of dragging and dropping it into these illusory folders, so it's time to move to the next level, to use and trust that the right search will retrieve the data you need.
Every major operating system offers some sort of file-search feature. Windows XP's default search (available on the Start menu) is the weakest. (To its credit, Microsoft replaced it with the optional but free-to-download Windows Desktop Search, available at http://microsoft.com/windows/desktopsearch/default.mspx). Windows Vista's search feature is much improved over Windows XP's, with a built-in search box in every Explorer window and the Start menu itself. Mac OS X offers Spotlight search, and on the Linux desktop, tools such as Beagle are available.
However, the company that offers the best-of-class web search also offers a product that indexes and searches your computer's files just as well as it does web documents: Google Desktop Search. This hack covers the installation, configuration, and use of Google Desktop to make every file — even ones you created years ago and forgot about that contain your keyword — instantly retrievable with a query using Google's advanced search operators.
Note
Many of the search query operators that work on Google's web search tool also work in Google Desktop, and Google Desktop can also include your Gmail email messages in its results. For these reasons, Google Desktop is my choice of local search tools. However, for users who don't want to use Google Desktop, many of the search techniques covered in this hack will work or have an equivalent in Windows Desktop Search, Vista's built-in search, and Spotlight.
The best time to install Google Desktop is just before you go to bed or leave the office for lunch, because it takes time for the program to index the email, files, and web pages that are already stored on your computer. The polite Google Desktop indexes your files only while you aren't using your computer so that it won't slow you down, but it may take several hours of idle computer time to build a complete index, depending on how much data you have stored. (You can search your computer before the index is complete, but you won't get full results.)
When you're ready to let Google Desktop build a complete index, download it from http://desktop.google.com, install as usual, and get it started.
Google Desktop has several options to consider. To access them, right-click the Google Desktop icon in your system tray and select Preferences. (Mac users, in the System Preferences panel, under the Other header, should choose Google Desktop.) In the Local Indexing tab, set the drives (including network drives) and file types you want indexed, choose whether secure web pages and password-protected office documents should be included, and choose whether your index should be encrypted for increased security. If you use Gmail and want Google Desktop to index your messages, enter your Gmail login in the Google Account Features tab.
Tip
Mac users who don't want the Google Desktop icon taking up space on their Dock can disable the icon while still running Desktop. In the Google Desktop pane of System Preferences, under Search Results, deselect the Show Icon In Dock check box.
PC users can also turn on the controversial Search Across Computers feature, which enables you to search the documents on your home computer from, say, the office. (Before you do, please read the sidebar about security implications.)
Google Desktop offers many features, such as mini-applications called Gadgets, but this hack focuses on its most important and useful feature: search.
As of version 5.1, Google Desktop Search indexes the following:
Email from Gmail, Outlook, Outlook Express, and Thunderbird
Files on your computer, including text, Word, Excel, PowerPoint, PDF, MP3, the contents of ZIP files, and image, audio, and video files
Media files' metadata; for example, MP3 song files by artist name and title, not just the filename
Web pages you've viewed using Internet Explorer 5+, Netscape 7.1+, Mozilla 1.4+, and Firefox
Instant messenger logs from Google Talk, AOL Instant Messenger 5+, and MSN Messenger
When your file index is complete, Google Desktop provides a search box in your task bar (or floating, or in the Sidebar, depending on your choice in the Display section of the Preferences page). Now you're ready to start finding information.
As does Google web search, Google Desktop Search displays search results using your web browser. The results from your computer are included at the top of the regular Google web search results page, as shown in Figure 2-2.

Figure 2-2. Google Desktop incorporates results for files on your own computer in regular Google web searches.
Tip
Press the Ctrl key twice (Command key for Mac users) to summon a Google Desktop search box; press the Ctrl key twice again to dismiss it.
Also as you can with the Google web search, you can use advanced operators when searching your file system to narrow down results by all sorts of criteria. Advanced search operators currently include those shown in the following table.
Email searches can be restricted to matches within email message headers. The available search operators are Subject:, To:, From:, Cc:, and Bcc:. You can combine any of these operators in a single query; you also can include either or both of the "" and - operators.
See the full list of Google Desktop advanced search operators and the details of how to use them at http://desktop.google.com/support/bin/answer.py?answer=10111&topic=1158.
Level.......Easy
Platform....All
Cost........Free
One of the main clutter culprits in most offices is the To File pile. Often, this heap spontaneously appears right on top of or next to the filing cabinet, which is pretty silly. Instead of adding stuff to the pile, why wouldn't you just file it? The reason is generally an unworkable, messy, overflowing file cabinet.
This hack explains how to revamp your overstuffed, underlabeled file system and turn it into a neat, breezy, and pleasurable place to organize your important paperwork.
Face it: That plastic file box or enormous binder held shut with a rubber band just isn't going to cut it. You have personal, financial, insurance, car, client, tax, and medical paperwork to track.
If you've been using an undersized filing cabinet that can't possibly accommodate your stuff — or have no filing cabinet at all — invest in a spacious, well-designed file drawer or cabinet that leaves you room to spare. Lots of room. In fact, Getting Things Done author David Allen says that your file drawer should be only three-quarters full: "If you want to get rid of your unconscious resistance to filing, then you must keep the drawers loose enough that you can insert and retrieve files without effort."[16]
If you're out to buy a new filing cabinet, he also advises you not to skimp on quality.
"Nothing is worse than trying to open a heavy file drawer and hearing that awful screech! that happens when you wrestle with the roller bearings on one of those $29.95 special-sale cabinets. You really need a file cabinet whose drawer, even when it's three-quarters full, will glide open and click shut with the smoothness and solidity of a door on a German car." It's true. A tool that's easy and fun to use is a tool you will use.
As soon as things start to get crowded inside filing-cabinet land, your first instinct is to start putting several manila folders into one hanging folder. Bad idea. Allocate one single manila folder to one single hanging folder. This cleanly separates your folders and makes them easy to ruffle through them. (Using hanging folders at all is a matter of preference.)
Keep a supply of both manila folders and hanging folders within reach so that creating a new one is as easy as possible.
You may be a plain A-to-Z-type person, but there are more ways than one to alphabetize file folders. One great method divides things into categories, such as Car, Client, Taxes, Bank Account; then you preface a folder name with that word. For example, one folder might be Car: Honda Accord and another is Client: Acme, and another Bank Account: ING Direct.
Whatever method you choose, make sure it is obvious and consistent throughout your files to make retrieving paperwork as simple and thoughtless as feasible.
You may be tempted to save money and space and skip getting a label maker. That's understandable. But don't underestimate the value this inexpensive, small tool provides. Neatly labeled folders make a file drawer look sharp, accessible, organized, and professional. Making a new label is a lot more fun and satisfying than scribbling onto a tab with a pen and running out of room, or having to cross something out (or white it out!) and start all over. Printed labels also make your folders legible, and presentable at meetings with clients and co-workers.
The Brother P-Touch Home and Hobby Label Maker, for example, gets the job done, and it'll set you back about 20 bucks.
Over time, it's easy for your filing drawer to get out of control and filled with stuff that doesn't matter anymore or that you simply don't need on hand at all times. In fact, according to the Small Business Administration, 80 percent of filed paperwork is never referenced again. Purge your paperwork every few months — get rid of the irrelevant stuff, such as user guides you can get on the Web or for gadgets you no longer own, past project research, and former-employer paperwork.
Archive old stuff you don't want to trash but don't need immediate access to by packing it into cardboard file boxes and putting it in storage. Closed bank-account records, old credit reports, and your 1996 taxes are good candidates here.
Level.......Easy
Platform....All
Cost........Free
Any computer-system administrator will tell you that the easiest and most secure place to store passwords is in your head. However, remembering the dozens of passwords you need to access networks, web sites, and computers at work and at home seems like an impossible task —unless you've got the right system.
A good password is easy for you to remember and hard for others to guess. Easy enough for one password, but everywhere you turn you have to come up with another to register for a web site or wireless network or to set a PIN. How do you choose new passwords? More important, how do you remember them?
You wouldn't use the same key for your car, home, office, garage, and safety deposit box, so you shouldn't use the same password for all your virtual locks, either. The problem with using the same password for everything you do is that if it's compromised and someone finds it, the rest of your identity is at risk.
If your mutual fund company, for example, has a security breach that exposes usernames and passwords, and you use the same login details there as for your online banking and at Amazon.com, the thieves could compromise not only your mutual fund account but also your bank account and the credit card details stored at Amazon.com. If you give your roommate your wireless-network password and it's the same as your email password, it wouldn't be difficult for your roomie to snoop into your private messages.
The trick is to keep a unique password for each service you use.
Remembering a unique password for the dozens of logins you have may sound impossible, but it's not. You don't need to remember 100 passwords if you have one rule set for generating them.
Here's how it works: Create unique passwords by choosing a base password and then applying a single rule that mashes in some form of the service name with it. For example, you could use your base password plus the first three letters of a service name. If your base password were asdf (see how easy that is to type?), for example, then your password for Yahoo! would be ASDFYAH, and your password for eBay would be ASDFEBA.
Another example that incorporates numbers (which some services require in passwords) might involve the same letters to start (say, your initials and a favorite number) plus the first two vowels of a service name. In that case, my password for Amazon would be GMLT10AA and for Lifehacker.com GMLT10IE. (Include obscure middle initials — such as your mother's maiden name or a childhood nickname — that not many people know about for extra security.)
Before you decide on your single password-generation rule, remember that although password requirements differ for each service, a good guideline is a password that's at least eight characters long and includes both letters and numbers. To make a password even more secure — or applicable for services that require special characters — add them around or inside it, such as #GMLT10LIF# or GMLT10#LIF.
One problem with rules-based passwords is that some sites have their own rules that conflict with your own, such as no special characters. In those cases, you have to document or remember the exception to your rule for those services. The next hack explains how you can keep track of passwords that don't follow a single rule.
Platform....Windows XP and Vista, Mac OS X
Cost........Free
Hack 14 covers how to choose memorable passwords, but what about the passwords you already have? Or passwords that were assigned to you that you can't change? Or passwords for systems with special requirements that your usual password scheme doesn't work for?
Sometimes you just have to write down a password to remember it. Don't do it where others can read it, such as on a Post-It note or in an easy-to-read text file or Word document. You can keep a secure and searchable database of those hard-to-remember passwords using the free, open-source software application KeePass (http://keepass.sourceforge.net; Mac version: http://keepassx.sourceforge.net).
A KeePass database stores all your passwords in an encrypted state and uses one master password (and, optionally, a special file called a key-file) to access that database. KeePass has fields for username, password, URL, and notes associated with each login, and you can create login groups —such as Windows, web sites, Wi-Fi networks — to organize your passwords. KeePass is very secure; if you keep it running, it will lock its work-space after a certain amount of idle time and require you to enter the master password again to access the database.
Here's how to set up KeePass:
Download KeePass from
http://keepass.sourceforge.netand install. (Mac users, get KeePassX athttp://keepassx.sourceforge.net.)To create your KeePass database, choose File

To use a master password to access your database, just enter one into the password field. (You'll have to enter it one more time to confirm.)
To use a key-file stored somewhere on your computer, either choose a disk from the drop-down list or choose Save Key-File Manually To and place the key-file somewhere other than the root of the drive. (A thumb drive is a great place to store a key-file so that you can take it with you like one of your house keys.)
For extra security, use both a key-file and a master password to secure your KeePass database. If you associate a key-file with your password, anyone who somehow gets your master password (perhaps using keylogging software) still can't access your database without the key-file.
If you choose to use a key-file, KeePass employs random mouse movement or random keyboard input (see Figure 2-4) to generate the file. Press OK when you're done.
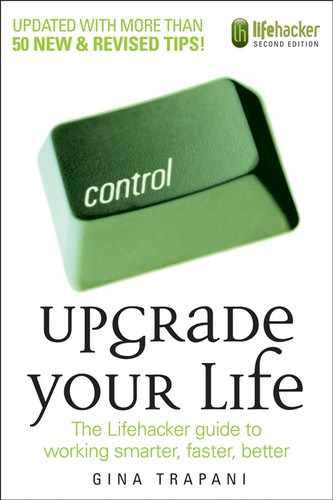
KeePass creates your database, and then you add entries to it. KeePass suggests some default groupings for your passwords —Windows, Network, Internet, eMail, and Homebanking — as shown in Figure 2-5.
To add an entry, right-click in the right pane and choose Add Entry. Assign your login a title (for example, Gina @ Home computer). (The title will be displayed in your list of logins inside KeePass, so make it as descriptive and unique as possible so that you can scan the list and pick it out quickly.) Enter your username, a password, and an optional URL, notes, expiration date, and file attachment to the entry, as shown in Figure 2-6, for each of your existing logins. Toggle the
...button next to the Password field to display the contents of your password or obscure it with asterisks.KeePass displays how secure your password is with an as-you-type quality meter, just below the Repeat field.
Click OK and your login is entered into the KeePass database. Repeat the process for every login you want to track in the database.


After you have entered all your username and password information into KeePass, you can find and use your login information whenever you need it. For example, you can set up a Wifi Networks password group that lists your logins at all the networks you use, including school, home, friends' houses, and coffee shops, as shown in Figure 2-7.

When you're at your friend Mark's house, you can then either browse to the Wifi Networks folder or simply enter Mark in the search box on the upper right to retrieve the Mark's house entry. Right-click the entry, select Copy Password To Clipboard, and then drop it into Mark's Wi-Fi login prompt.
Configure other useful KeePass features for instant password retrieval in the Options panel in the File menu, including the following:
Start KeePass with Windows automatically.
Clear any password copied to the clipboard after a certain amount of time, or allow for only one password paste for extra security.
Minimize KeePass to the system tray to save Windows taskbar real estate.
Attach files to KeePass entries. This feature is useful for storing even passworded Microsoft Word documents or encrypted text files or disk images (see Hack 19, "Create a Password-Protected Disk on Your PC," later in this chapter).
Install KeePass on a thumb drive with your database for instant, secure access to your passwords from any computer with a USB port.
Note
For web site passwords, you can securely save login information directly in Firefox. The advantage of that method is that copy and paste isn't required; Firefox autofills the login box with your details. However, this works only for web-based passwords — not Wi-Fi, network, email, or Windows login information. See Hack 55, "Securely Save Web Site Passwords," for more information.
You can encrypt a text file with your passwords saved in it, but a text file or Word document doesn't provide the structured password detail entry that a KeePass database does. In fact, because KeePass is a search-able encrypted database, you can use it to store other types of important information, such as software serial numbers, credit card numbers, and PINs. (But remember: although KeePass is very secure, the most secure place on the planet to keep a very important piece of information is in your head.)
Platform....Web
Cost........Free
The Web gets bigger every day, and so does your bookmark list. A social bookmarking service called del.icio.us (http://del.icio.us) stores your bookmarks online and associates keywords (called tags) to each bookmark for easy retrieval. Storing your bookmarks online also makes them accessible from every computer you use.
The bare-bones interface and peculiar URL of the del.icio.us service hides the feature-rich, highly hackable nature of this web application. Recently acquired by Yahoo!, del.icio.us is a fantastic option for any web researcher or power bookmarker who wants to quickly access and organize web content that matters to him. This hack covers just some of the ways to use del.icio.us to manage your bookmarks, create a personal index of web content, and tap into the community to find even more useful resources on the Web.
Register for a free account at http://del.icio.us. When you're signed in, your del.icio.us bookmarks will be available at http://del.icio.us/username. A social bookmarking service means, by default, that all your bookmarks are public and viewable by other members of the del.icio.us community. You can enable private bookmark saving in the settings area of your del.icio.us account at http://del.icio.us/settings/username/privacy.
The basic way to add a bookmark to del.icio.us is to use the post link at http://del.icio.us/post. But that's also the least efficient way. For faster bookmarking, go to the del.icio.us browser buttons area at http://del.icio.us/help/buttons and drag and drop a quick post link to your browser toolbar. Then, when you browse to a page you want to save, just click the button to add your bookmark.
Most web browsers organize your bookmarks in folders and subfolders. Arguably the best feature of del.icio.us is the use of tags: labels or keywords that let you view your bookmark list based on single or combined keywords.
For example, to bookmark a web page that describes a foolproof technique for slicing a ripe mango, add it to your del.icio.us bookmarks and tag it mango, howto, kitchen, fruit, cooking, and summer. One bookmark can have as many tags as you'd like.
If you also bookmarked a page with a great smoothie recipe and you tagged it smoothie, fruit, and recipe, the mango page and the smoothie page would both appear under the fruit tag listing. However, only the mango page would appear under the howto tag. A list of both fruit and summer tags would include only the mango page as well, because the smoothie page was not tagged summer.
To enter a set of tags for a bookmark in del.icio.us, you simply type a list of words separated by spaces. So, you'd enter
smoothie fruit summer
in the tags field for the smoothie page bookmark. The freeform nature of the tags field makes creating and assigning new tags extremely easy, but it also leaves the door wide open for misspellings and similar tags (such as fruit and fruits). After using del.icio.us for some time, you'll develop a vocabulary of tags you use often, and del.icio.us will make suggestions from your tag as you type.
In Figure 2-8, I'm bookmarking a page called "Silva Rhetoricae." I've included a description for the bookmark: "An exhaustive directory of rhetorical devices from a BYU professor."
As I type the letter w into the tags field, del.icio.us uses my preestab-lished tag vocabulary (under your tags) to suggest tags that could match (such as writing, weblogs, work, and wikipedia). In this case, I was looking for writing.

Getting around del.icio.us is easiest if you use its hackable URL scheme to get what you want. All you need to do is add what you're looking for to the end of the del.icio.us URL. For example, here's the base URL:
http://del.icio.us/
To find bookmarks tagged mango by all del.icio.us users, you simply add tag and mango, like this:
http://del.icio.us/tag/mango
To find bookmarks tagged writing by the user ginatrapani, add the username and then the tag:
http://del.icio.us/ginatrapani/writing
(Replace ginatrapani/writing with your own username and your tag(s) to quickly find your bookmarks.)
To find bookmarks tagged tech and howto by all del.icio.us users, combine the tags with + signs:
http://del.icio.us/tag/tech+howto
How about bookmarks tagged tutorial, router, and linksys by all del.icio.us users?
http://del.icio.us/tag/tutorial+router+linksys
Find all bookmarked sound files:
http://del.icio.us/tag/system:media:audio
Find all bookmarked video files:
http://del.icio.us/tag/system:media:video
Find MP3 files tagged mashup:
http://del.icio.us/tag/system:filetype:mp3+mashup
You can import your current browser bookmarks into del.icio.us using its import feature, located at http://del.icio.us/settings/username/import. You can also export your del.icio.us links at http://del.icio.us/settings/username/export.
To keep your del.icio.us links in sync with the Firefox web browser, use the Foxylicious Firefox extension, freely available at https://addons.mozilla.org/firefox/342.
Platform....Windows XP and Vista
Cost........Free
The ubiquity of digital cameras and cheap storage means that even the most amateur photographers can accumulate hundreds — even thousands — of digital photos on their computers over time. After even just a few months of taking photos, it's easy to wind up with a hard drive cluttered with a bunch of folders filled with images named things like IMG_8394.jpg. Pictures don't mean anything unless someone sees them, and no one will see the photos buried on your computer if you can't find the best ones.
The problem with digital photos is that your computer doesn't have much information about them. To your computer, a digital picture is just a collection of different-colored dots. Minimal information is stored inside a photo when it's snapped, such as what your camera settings were and the date and time. The photo doesn't have information such as who it depicts, where, or at what event it was taken. To make your photos searchable (and therefore useful), you have to add metadata such as captions, labels, and ratings to them. Google's free photo organizer for Windows and Linux, Picasa (http://picasa.com), can help you organize, edit, caption, label, and star your digital photos.
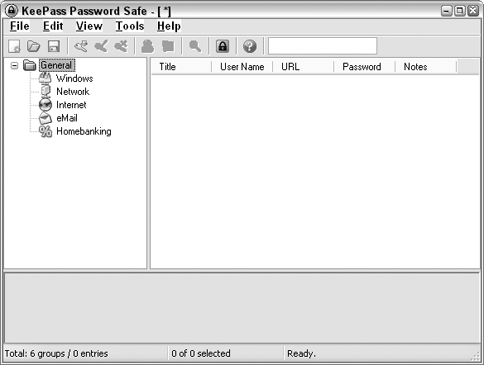
Download Picasa from http://picasa.com (free) and install it on your PC. The first time you launch the program, it asks whether it should scan your entire computer, or just your My Documents folder, for photos. Make your choice and Picasa will build its index of all the photos and videos on your computer automatically. When it's complete, you'll see a list of folders organized by year in the left panel, and you'll see a grid of images on the right side, as shown in Figure 2-9.
Now you're ready to start organizing and adding meaning to your photos.
Until your computer is smart enough to recognize places and faces in your digital photos automatically, you have to provide that information so that you can retrieve pictures based on it. For example, to see all Dick and Jane's wedding photos, or just portraits of Jane, those photos would have to be labeled "Jane" or "wedding."
Click an individual photo to focus on it in Picasa. Then click the small button on the bottom left labeled Show/Hide Caption. When you show the caption, type in a descriptive phrase using words you'd search for later, such as Joey in a tuxedo at Mom's wedding, as shown in Figure 2-10.
Use as many keywords as you think you'll ever use to search for the photo in the future. Avoid nicknames, abbreviations, or otherwise opaque captions — they won't help you later! After you've set your caption as the example shows, a search for wedding, Mom, Joey, or tuxedo will turn up that picture.

Note
The best part of Picasa's caption system is that it actually saves the text inside the photo itself. So if you publish the photo online or decide to stop using Picasa, you don't lose your photo's caption.
When adding an individual caption to every photo is too monstrous an undertaking, use albums instead. Albums are collections of photos that don't necessarily all exist in the same folder. You can't do this with folders, but with albums, you can have one photo live in several albums.
Name your albums something descriptive (such as "Mom's Wedding") and Ctrl+click to select several photos and place them in Picasa's "tray" on the bottom-left side. Then click the Add To button to place those photos into an album.
After you've organized your photos into albums with captions and stars, you can search and sort pictures for easy retrieval. Use Picasa's search box on the top panel to filter your photos down to just what you need. As you type each character, Picasa will filter the list of matching photos dynamically, searching on filename, caption, album, and folder name.
Click the arrow next to the search field to expand the criteria form. Click the star to narrow your results to Starred Photos only, as shown in Figure 2-11. (There are also buttons for filtering down to just movies, or just uploaded photos, too). Using a date slider, you can narrow the list by time period as well.

Picasa boasts more useful photo-management features, including these:
Slideshows to play on your computer or burn to CD
Password-protected albums
Batch moving and renaming photos between folders within Picasa
Editing tools that can fix red-eye, crop, tune, and otherwise make your pictures look better inside Picasa
Burning of photo archive DVDs
Platform....Windows Vista, Mac OS X (10.4+)
Cost........Free
As you begin to file your documents less and depend on searches more, it only makes sense to combine the folder paradigm and search capabilities with saved search folders. A saved search folder is a container for files that match certain criteria. For example, if you have several files in different folders and subfolders on your computer, each with the word lifehacker in the title, a search for "all files with the word lifehacker in the title" would list those files. Save that search as a folder, and you get an on-the-fly collection of documents that share the same characteristics in a virtual folder.
The main advantage of saved search folders versus regular old-fashioned folders is that a file can exist in more than one folder at the same time. A Word document named lifehacker.doc will appear in both the lifehacker in title saved search folder and the All Word documents saved search folder. This way of organizing your search results allows you to slice and dice your information any way you need it. Saved search folders come in most handy on a temporary basis: while you're working on a certain project, for instance. When you delete a saved search folder, the files inside it aren't deleted; they continue to live on in their respective locations. This hack shows you how to start creating saved search folders in both Windows Vista and Mac OS.
Windows Vista includes a search box on the top-right side of every Explorer window. Run your search by entering criteria (such as the keyword lifehacker) there, and Vista will return its file-search results. By default, a search from Explorer's search box looks for results only in the folder you're browsing. Click the Advanced Search button to change the search location and add other criteria. When you're satisfied with the results, save the search as a folder by clicking the Save Search button, as shown in Figure 2-12.

Vista comes with a few preconfigured search folders, such as Recent Documents (files that have been modified recently) and Attachments (email attachments.)
The key to creating the most useful search folder is to pinpoint its contents to exactly what you need. Several special operators used in Vista's search box can do just that. For example, searching for Jack NOT Jill will return documents that include the word Jack but not Jill (note that NOT has to be all uppercase.) A search for Jack OR Jill returns documents that mention Jack, Jill, or both Jack and Jill. A search for "Jack and Jill" (in quotation marks) will do an exact phrase match and return only documents that include the exact words Jack and Jill.
A complete list of all Vista's search operators is available at http://windowsvistablog.com/blogs/windowsvista/pages/advanced-search-techniques.aspx, including those shown in the following table.
TYPE THIS | TO FIND THIS |
|---|---|
| Items containing WinDOwS, windows, WINDOWS, or any other combination of uppercase and lowercase letters |
| Items containing the words microsoft and windows |
| Items containing microsoft, but not windows |
microsoft OR windows Note: The word OR must be in all uppercase letters | Items containing microsoft, windows, or both. |
"microsoft windows" | Items containing the exact phrase microsoft windows. |
author:"Jane Smith" | Items created by Jane Smith. |
date: > 11/05/04 | Items with a date after 11/05/04 |
After you save your search folder, its icon will look slightly different from a traditional folder, as shown in Figure 2-13.

Mac OS X's saved search feature is called Smart Folders (like iTunes' Smart Playlists). To create a Smart Folder, from any Finder window, enter your terms into the search box on the upper-right corner. To add criteria to your search, click the + button. You can add as many lines of search criteria as you please, such as the kind of file, the date last modified, the author, and contents, as shown in Figure 2-14.

When you're satisfied with your search, click the Save button to save your Smart Folder to a location of your choice. Smart Folders sport a different icon than regular folders; they have a lavender color with a gear image on them.
Platform....Windows XP and Vista, Linux
Cost........Free
The next level in organizing your digital stuff is considering privacy and safety.
Everyone has some files he wants to protect from intruders or others who have access to his computer. If you use online storage, exchange sensitive information over email, or store data on an easily lost CD or thumb drive, you may want to encrypt that data to keep it from getting into the wrong hands.
When you encrypt data, you use a special algorithm to scramble the bits that make up that file into nonsensical information, which can be restored to its meaningful state only with the right password.
TrueCrypt is a free, open-source encryption application that works on Windows and Linux. Given the right credentials, TrueCrypt creates a virtual hard drive that reads and writes encrypted files on the fly. This hack explains how to encrypt your private files using TrueCrypt.
Here's how to set up an encrypted virtual disk with TrueCrypt:
Download TrueCrypt from
http://truecrypt.org. Install and launch it.Click the Create Volume button to launch a wizard that prepares the encrypted drive location. Choose Create A Standard TrueCrypt Volume and click Next.
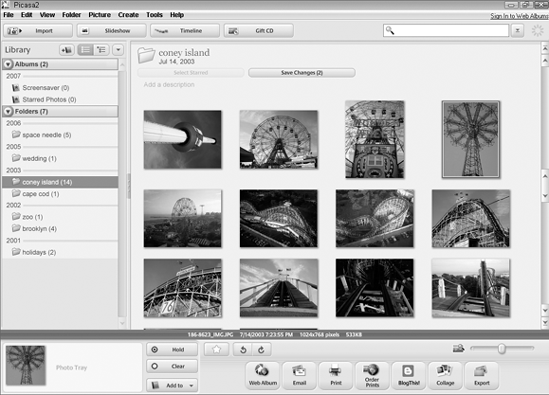
On the Volume Location page, click the Select File button, navigate to the location where you want to store your encrypted files, and type a name for it. I'm going with
C:Documents and Settings penelopeMy Documents4myeyesonly, as shown in Figure 2-15.The name (
4myeyesonlyin this example) isn't the file you want to encrypt; it's the container that will store the files you encrypt. Click Next.Choose your encryption algorithm. The curious can flip through the drop-down list and view info on each option, but you can't go wrong here; the default AES (Advanced Encryption Standard) selection will work for most purposes. (Hey, if it works for Top Secret government files[17], it should work for you.) Click Next.
Choose the size of the virtual drive — for example, 100MB, as shown in Figure 2-16.
The advantage here is that the file will always look as though it's exactly 100MB, giving no hint as to the actual size of its contents. Click Next.
Choose your volume password. TrueCrypt wants something hard to crack, such as 20 characters with letters and numbers mixed together. The whole point here is to keep snoopers at bay, so make your password a nondictionary word that's difficult to guess. Alternatively, you can use a key-file to lock your volume.
Warning
Keep in mind that if you forget your password or your key-file gets corrupted or lost, the files on your TrueCrypt volume will be inaccessible — forever.
Format the volume. This part is fun: TrueCrypt gathers random information from your system — including the location of your mouse pointer — to format the file drive location with random data to make it impossible to read. Click the Format button to go ahead with this operation, which may slow down your computer for a few seconds. (Don't let the word format scare you; you're not erasing your hard drive, you're just formatting the drive location file — the
4myeyesonlyfile in this example — that you just created.)

When the formatting is complete, your encrypted volume location is ready for use.
Your TrueCrypt file can hold your highly sensitive files locked up as tight as a drum. Here's how to get to it:
From TrueCrypt, choose Select File and navigate to the volume file you just created.
Select an available drive letter such as
Z:from the list in True-Crypt (see Figure 2-17).Click the Mount button and enter your volume password. If you enter the correct password, the virtual drive
Z:will be mounted.Go to
My Computer. Listed alongside all the other drives on your computer is a new one:Local Disk Z:. Drag and drop all your sensitive data to this drive and work from it as you would any other disk.When you're finished working with the data, in TrueCrypt, select the mounted drive (
Z:in this example) and click the Dismount button. TheZ:drive will no longer be available; all you'll have left is the4myeyesonlyfile you created, which can be dropped onto a thumb drive, emailed to yourself, burned to CD, or placed on your iPod, totally encrypted.

If someone managed to open this file, its contents would be meaningless, indecipherable nonsense. Only a user with TrueCrypt installed and the password or key-file would be able to mount the drive and access the files on it.
Tip
Using TrueCrypt you can secure an entire drive — such as a USB thumb drive. To do so, click Select Device instead of Select File and choose your thumb drive. You can also install TrueCrypt to the thumb drive itself.
Platform....Mac OS X (10.4 or later)
Cost........Free
If you have files and folders you'd like to keep private and secure on your Mac, you can use Mac OS X's built-in Disk Utility to encrypt a disk image. A disk image is just a file that you can mount like a separate disk, and unmount to lock again — like a thumb drive, but without the actual physical drive. Whether you want to password-protect sensitive customer data or your spouse's surprise birthday party plans, an encrypted disk image can lock up any number of files and folders behind a password. This hack covers how to lock and unlock a disk image.
Here's how to create an encrypted disk image:
Launch Disk Utility, located in
/Applications/Utilities/.From the File menu, choose New ??Blank Disk Image.
Enter a name (
my-secret-files, for example) for your disk in the Save As dialog. From the Size drop-down list, choose how big you'd like the disk to be. (Make it large enough to accommodate all the data you want to store there.) From the Encryption drop-down list, select 128-Bit AES Encryption (Recommended), as shown in Figure 2-18.Next, you'll set a password to access the disk image. Make your password both secure and memorable. (For help choosing a password, click the button with the key icon on it to launch the Password Assistant, which can make suggestions for your password.) By default, your new password will be saved in your Keychain (see Figure 2-19) to make it harder to forget.

Disk Utility will create and mount the my-secret-files disk image. After it's created, you'll see the new disk appear on your Desktop. Move, save, or copy files onto this disk as if it were any other while using your Mac. When you're done adding all your private files to the disk, dismount it as usual (Ctrl+click and choose Eject my-secret-files.) Now you can move the my-secret-files.dmg file onto any other disk, such as a thumb drive or CD. No one will be able to mount it without the password.

To access the files on your encrypted disk image, double-click it, and your Mac will attempt to mount it. If your password is saved in the key-chain, the disk will mount and you'll be able to save and open files from it as usual. If not, you'll have to enter your password to mount and decrypt the file for use.
Level.......Easy
Platform....All
Cost........Office supplies
There are many good reasons to ditch your expensive, electronic PDA for a paper-based planner system: cost, portability, and maintenance, to name a few. Paper-based planners never run out of battery juice or memory; they never crash or refuse to work the way you expect. Lots of even the most tech-savvy are going retro with paper calendars and to-do lists.
This hack explains how to build your own custom paper planner, calendar, and project manager using your computer and your printer.
The D*I*Y Planner system (http://diyplanner.com) is an extensive library of PDF templates from which you can pick and choose. Then, print the pages you need and assemble your planner.
You can walk into any office-supplies store and choose from a variety of prefab paper planners. But the advantages of a do-it-yourself planner are customization and scalability. Maybe you're thinking about giving up the BlackBerry and you just want to test-drive a paper solution. Maybe you don't want to have to order a new set of custom-print pages from your store-bought planner's manufacturer every time you run out. With a D*I*Y Planner, you can add, replace, and reshuffle pages very easily. Refills are a matter of printing a new set of pages.
You can also easily make D*I*Y Planners for your staff that cover custom timelines such as the duration of a particular project. Keep your D*I*Y Planner thin and portable by carrying around only the next couple of weeks' worth of information.
First, decide on the size and type of planner you want to create. The D*I*Y Planner site has templates available to print in several sizes:
Classic (half pages of 8 1/2×11-inch paper, common in North America)
Letter size (8 1/2×11-inch paper)
A4 (the equivalent to letter size in Europe and countries outside North America)
A5 (half of A4 size)
Hipster PDA (index cards)
Download the template kit you need from http://diyplanner.com/templates/official. Open and print the templates using a PDF reader such as Adobe Acrobat or Foxit (http://foxitsoftware.com). Depending on the size you choose, you may have to cut the paper in half (for Classic and A5) and punch holes in it to fit it inside a binder. The Hipster PDA index-card-sized version can be held together with a small binder clip.
The D*I*Y Planner system offers an extensive set of templates, including these:
Calendar, to-do lists, and note-taking pages
David Allen's Getting Things Done system buckets (such as Next Actions, Waiting, Projects)
A photographer release form
Book notes
Storyboard
Shopping lists
Address book
Contact logs (phone call/email/IM log of contacts)
Financial ledger
Meeting agenda
Goals tracker
Lined horizontal, lined vertical, and graph paper
Project outline and notes forms
Print only as many pages of the forms as you need to assemble your custom planner. Later, if you decide to change the planner size you use, or need to add pages for certain kinds of information (such as another address-book page to accommodate contacts whose last names start with S, or larger daily calendar pages to write your appointments), simply print the pages and reassemble or add them to your planner.
[15] "Google Copies Your Hard Drive — Government Smiles in Anticipation," EFF Breaking News (http://eff.org/news/archives/2006_02.php#004400).
[16] David Allen, Getting Things Done, (Penguin Books, 2001), 100.
[17] "National Policy on the Use of the Advanced Encryption Standard (AES) to Protect National Security Systems and National Security Information" (http://cnss.gov/Assets/pdf/cnssp_15_fs.pdf).