
5. Working with Longer Documents
In this chapter, you learn how to use various linking techniques for creating multipage documents.
The previous chapters all focused on the basics of using Publisher 2010. As you worked through those chapters, you probably noticed that we have mostly created simple, single-page documents. That doesn’t mean that Publisher is only good for creating short documents, though. You can use Publisher to create some rather long documents.
You may recall that back in Chapter 1, “An Introduction to Publisher 2010,” I mentioned that Microsoft Office 2010 is available as either a 32-bit or a 64-bit application. I highly recommend running the 64-bit version of Publisher if you are going to create long documents.
Last year, I wrote a book called Brien Posey’s Guide to Practical Telecommuting (http://www.brienposey.com/Books.asp). Before the book could be published, the publisher went bankrupt. Rather than letting all my hard work go to waste, I decided to publish the book myself.
Although I had written the text and provided the publisher with all the screen captures that went along with the book, the book had not yet been laid out. My initial idea was to import my Microsoft Word document into Publisher, and use it to lay out the book. The problem was that my manuscript was too long, and Publisher ran out of memory before it could be imported.
To make a long story short, I performed the entire layout process using Microsoft Word. Word got the job done, but as you have already seen, Publisher would have been a better tool for the job had it been able to accommodate such a long document. The good news is that the 64-bit version of Publisher accommodates longer documents than the version that I was using. That’s why I recommend using the 64-bit version of Publisher whenever possible.
Even if you don’t plan on using Publisher to write a book, I still recommend taking the time to read this chapter. Some of the techniques that I am going to show you will save you a lot of heartache, even on shorter documents. For example, I show you how to import text from Microsoft Word what to do when your text won’t fit within a text box you have created.
Text Boxes Revisited
Because this chapter focuses on creating long documents, I am going to spend quite a bit of time talking about text boxes. You learned some methods for creating text boxes in Chapter 3, “Working with Visual Elements,” and how to enter text into a text box, but now I want to come back to the topic and show you some other things that you can do with text boxes.
Formatting
If you look at Figure 5.1, you can see that I have pasted a page of text (from my telecommuting book) into a text box. Because the text is coming from Microsoft Word, Publisher has placed a dropdown menu in the lower-right corner of the text box. This menu contains the following options:
• Paste—Although Publisher displays text in the text box, this is only a preview. Clicking the Paste icon makes the text permanent.
• Keep Source Formatting—Using this option causes the text to retain the formatting that was present in the original Microsoft Word document.
Figure 5.1 You can control how the text appears once pasted.
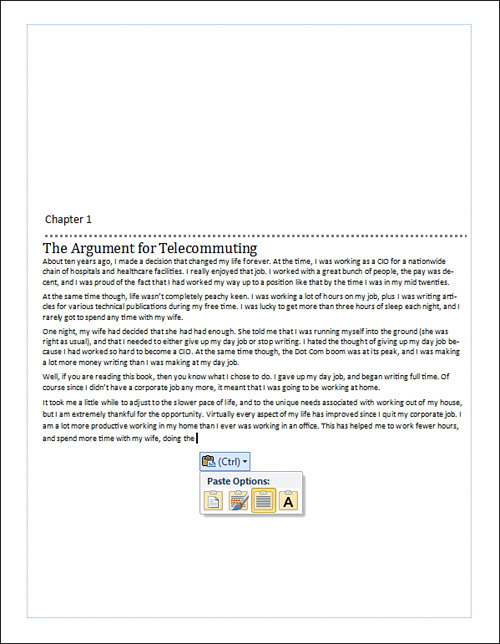
• Use Destination Styles—Using destination styles causes the text formatting to be modified to match the Publisher document’s style.
• Keep Text Only—This option causes the text to be added to the text box using default formatting.
Linking Text Boxes
As you look at Figure 5.1, you might notice the icon on the lower-right side of the text box. This is the overflow icon, which indicates that the text that has been pasted into the text box doesn’t fit. We could fix the problem by making the text box bigger or the font smaller, but these are not always good options.
LET ME TRY IT
![]()
Connecting Text Boxes with Each Other
Another option for making text fit is to create a second text box and link it to the first. To do so, complete these steps:
- Create a second text box.
- Select the text box that currently contains the text.
- Go to Publisher’s Format tab.
- Click the Create Link icon, shown on the toolbar.
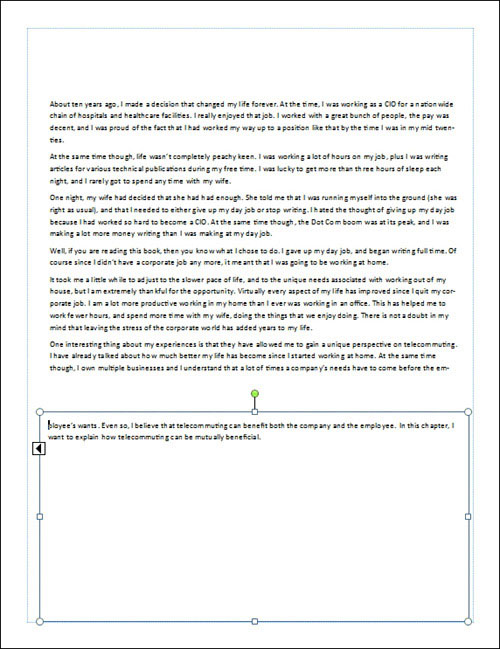
- The cursor changes to resemble a pitcher of water. Move the cursor to the new text box and click it. The text now overflows into the second text box, as shown in Figure 5.2.
By linking (sometimes called chaining) text boxes together, text flows from one text box to the other. If we were to add some text to the first text box, the overflow text would seamlessly flow to the second text box.
Figure 5.2 Text now overflows into the second text box.
SHOW ME Media 5.1—Linking Text Boxes
![]()
Access this video file through your registered Web edition at my.safaribooksonline.com/9780132182591/media.
Navigating Text Boxes
In my previous demonstration, I caused text to overflow from one text box into a secondary text box that is directly beneath it. In the real world, things are not always so well organized, though. Imagine, for instance, that you have a short newsletter divided into several columns, and that this newsletter contains three separate stories and a few clip art images. In this type of situation, there is a very good chance that at least one or two of the stories will span multiple text boxes. So how do you keep everything straight?
If you refer to Figure 5.2, notice an icon in the upper-left portion of the bottom text box. This is a link icon. If you want to find out which text box comes before this one in the chain, click the icon and you are taken to the text box that comes before it. Likewise, an arrow icon in the lower-right corner of a text box indicates that the text flows into another text box, and clicking the icon takes you to that text box.
Layout Strategies
As handy as text box links are, you might be wondering about the recommended best practices for using them in the real world. From what I have read, it seems that everyone has their own idea of what constitutes the best practices for linked text boxes, but there doesn’t seem to be much consistency.
My advice is to base your use of linked text boxes on the type of document that you are trying to create. For example, if you are creating a two-page newsletter, you probably already have a pretty good idea of what you want the newsletter to look like. In that type of situation, I think that it makes sense to lay out all the text boxes up front, before you start adding the text. You might have to make some adjustments to the text box sizes once you actually begin populating them, but you shouldn’t have too much trouble sticking to your basic design idea.
On the other hand, if you are creating a longer document that will contain primarily text, but might also have some other design elements mixed in, you will probably find it easier to create text boxes as you need them, just as I did in my demonstration earlier in this chapter.
Master Pages
As you have no doubt discovered by now, it is usually easier to compose the text for longer documents in Microsoft Word than to try to compose it in Publisher. That being the case, I want to show you how to import a Word document into Publisher. Before I do that, though, I need to teach you about master pages.
Under normal circumstances, Publisher treats each page as a blank canvas. The formatting on one page can be vastly different from the formatting used on the next. This is great if your goal is to express your creativity, but when it comes to creating longer documents, it is usually desirable to have at least some degree of consistency throughout the document. This is where master pages enter into the equation.
Master pages are designed to help reduce the amount of tedious editing work that you have to do by enabling you to apply a consistent format to each page within a document. For example, a master page might contain your corporate logo or the name of the document at the top of each page.
Besides enforcing design consistency, there is another benefit to using master pages. Publisher files can become quite large, especially when they contain many graphics. Using master pages helps limit the size of the document files because the information on the master pages exists only once within the document, rather than existing as a separate entity on each page.
Creating a Master Page
The process for creating a master page is similar to creating any other type of document page. You have all the same visual elements and editing tools available to you. For the sake of demonstration, I am going to create a master page that has my Poker-Run-Boats.com logo in the upper-left corner. If you want to follow along and create your own master page, you can do so by completing these steps:
1. Go to Publisher’s Page Design tab.
2. Click the Master Pages icon, found on the toolbar.
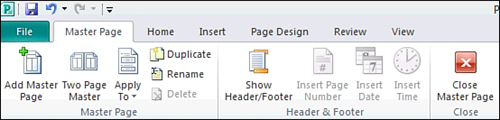
3. Select the Edit Master Pages option from the Master Pages menu. When you do, Publisher will display a Master Pages tab, as shown in Figure 5.3, indicating that you are editing a master page.
Figure 5.3 Create your master page, and then click the Close Master Page icon.

4. Create your master page, and then click the Close Master Page icon, located on the toolbar.
Applying Master Pages
When you close your master page, your document will look exactly like the master page that you have just created. Publisher automatically applies the master page to every page in the document. It doesn’t have to be this way, though. Publisher allows you to enable and disable master pages on an as-needed basis. This is handy because you might not always want to include a master page in a document. Likewise, it is common for the first page in a document to be formatted differently from the remaining pages. As such, you might want to exempt the document’s first page from master page formatting.
To control how a master page is applied to a document, follow these steps:
1. Go to Publisher’s Page Design tab.
2. Click the Master Pages link, found on the task bar.
3. Choose the Apply Master Page command from the Master Pages menu.
4. Publisher should now display the Apply Master Page dialog box. If you want your master page to be used in the document, make sure it is selected, as shown in Figure 5.4; otherwise, choose the Ignore Master option from the dropdown list.
Figure 5.4 The Apply Master Page dialog box allows you to enable or disable master pages.
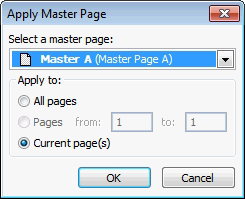
5. Choose the pages to which the master page should apply. You can apply the master page to all the pages in the document, the current page only, or to a range of pages.
SHOW ME Media 5.2—Creating Master Pages
![]()
Access this video file through your registered Web edition at my.safaribooksonline.com/9780132182591/media.
LET ME TRY IT
![]()
Editing Master Pages
Every once in a while, you might find that you need to update the master pages you have created. Updating master pages is done in nearly an identical manner to creating master pages. To make an update, follow these steps:
- Go to Publisher’s Page Design tab.
- Click the Master Pages icon.
- Verify that the correct master page is selected.
- Choose the Edit Master Pages command from the Master Pages menu.
- Make any necessary edits to the page.
- Click the Close Master Page icon.
LET ME TRY IT
![]()
Using Multiple Master Pages
Even though master pages tend to work well, some projects require a higher degree of flexibility. In these types of situations, you can create multiple master pages and assign them to your document on an as-needed basis.
If you find yourself needing to create multiple master pages, you will have to start out by creating a single master page by using the method I described earlier. After doing so, follow these steps:
1. Go to Publisher’s Page Design tab.
2. Click the Master Pages icon.
3. Choose the Edit Master Pages option from the Master Pages menu.
4. When Publisher takes you to the Master Page tab, click the Add Master Page icon.
5. When prompted, enter a single character to identify the page you are creating.
6. Enter a description for the new master page, as shown in Figure 5.5.
Figure 5.5 You must identify the new master page that you are creating.
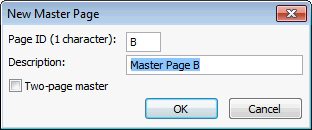
7. If the master page will be a two-page spread, select the Two-Page Master check box.
8. Click OK.
9. Click the Close Master Page icon.
Additional Master Page Options
The technique I just showed you will enable you to create a blank master page. Sometimes, though, you might have put a lot of work into your previous master page, and find that the new master page needs to be a variation of the existing master page. In these types of situations, there is no need to create a new master page from scratch. As you can see in Figure 5.6, Publisher’s toolbar contains an icon that you can use to duplicate an existing master page. After doing so, you can modify your new master page as your needs dictate.
Figure 5.6 The Duplicate icon can be used to create a duplicate master page.
Another handy option found on the toolbar shown in Figure 5.6 is the Two-Page Master option. Clicking this icon causes the master page to take the form of a two-page spread.
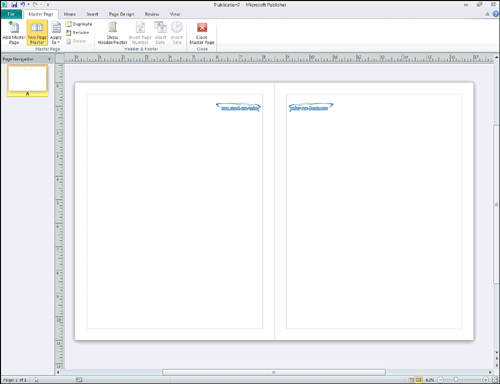
If you are planning on creating a two-page spread, I recommend that you click the Two-Page Master button before you begin designing the master page. The reason for this is that if you place design elements on a master page and then decide to create a two-page spread, Publisher will make the left page a mirror image of the right page. If you look at Figure 5.7, for example, you can see that my logo is printed backward on the left page.
Figure 5.7 You can use a two-page spread for your master pages.
Importing Microsoft Word Documents
Now that I have covered some of the more important points regarding using Publisher with multi-page documents, I want to show you how to import a Microsoft Word document into Publisher. This technique is extremely useful because it tends to be a lot easier to create a text document in Word than in Publisher. Therefore, you can use Word to create and proofread your document, and then lay out the document in Publisher.
Import Text from Microsoft Word
The actual process of importing a Microsoft Word document is pretty simple. To do so, follow these steps:
- Go to Publisher’s Insert tab.
- Click the Insert File icon. When you do, Publisher automatically creates a small text box in the middle of the page and prompts you to specify the file that you want to import. You can use this same technique to import any selected text file format.
- Select the file you are importing, and click OK. Publisher takes a moment to convert the file to its own format.
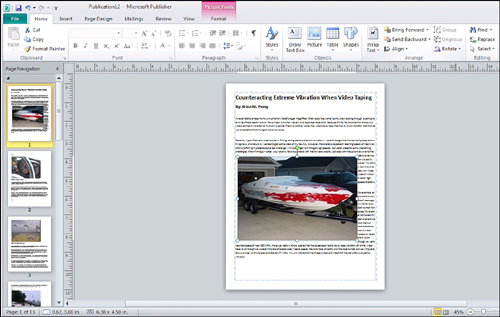
If you look at Figure 5.8, you will notice a couple of different things. First, I imported a fairly long Word document. As such, the Page Navigation section displays eleven different pages.
Figure 5.8 You can import a Microsoft Word document into Publisher.
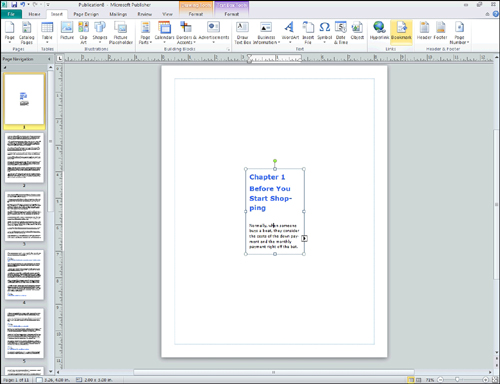
Another thing you will notice is that because the document does not fit within the miniscule text box on the first page, Publisher automatically creates text boxes on subsequent pages and chains all the text boxes together in the appropriate order. As you can see in the figure, the text boxes on the remaining document pages each take up the entire page (but stay within the margins).
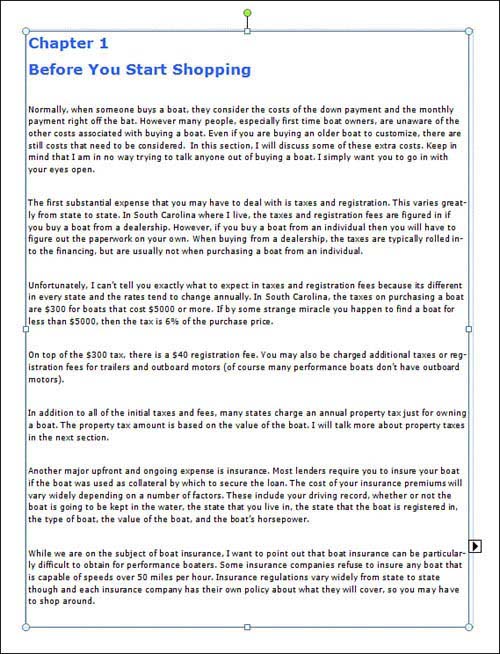
Even though Publisher has created such a small text box on the first page, we aren’t stuck using the default size. If the text box is resized, the text from the next page automatically moves up to fill the void, as shown in Figure 5.9.
Figure 5.9 Enlarging the text box causes text to be pulled from the next page.
SHOW ME Media 5.3—Importing Word Documents
![]()
Access this video file through your registered Web edition at my.safaribooksonline.com/9780132182591/media.
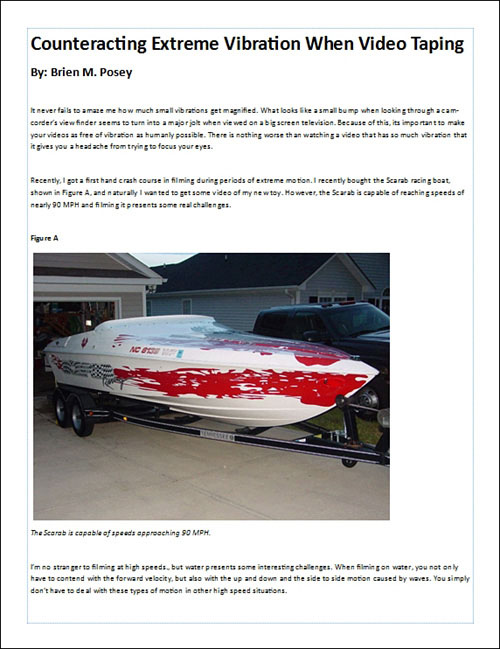
Adding Images to the Document
In the preceding section, I imported a chapter from a book that I wrote (but never bothered to publish) on customizing performance boats. This particular Word document contains only text, but my original intent when I wrote the book was to have lots of photos and illustrations to go along with the techniques I describe. That being the case, I want to take a look at how you would add images to a document such as the one I just imported.
If you look at Figure 5.10, you can see that I have left space within the Word document for inserting images. I could just go to the Insert tab and then use the Picture option to insert an image. The problem with doing so is that Publisher would place the image in its own box that would be layered on top of the document’s text, as shown in Figure 5.11.
Figure 5.10 I left places in the document for figures.
So how do we deal with this dilemma? The reason why we are having the problem in the first place is because each page contains one large text box, and there is no room for an image without covering up text in the process.
One way to get around the problem is to shrink the text box to make room for the image. That is usually going to be only half of the solution, though. More often than not, you are going to end up having to place text above, below, and maybe even beside an image. You could deal with this situation by changing the image’s properties or adjusting the text wrapping style, or you could create multiple text boxes.
Of course, things aren’t quite so simple because the text box shown in Figure 5.11 is linked to the text box on the next page. We can easily shrink the text box, add an image to the page, and create one or more new text boxes on the page, but Publisher isn’t going to populate those text boxes with text from the document because they are not a part of the text box chain. Because of this, we must break the text box chain, and then re-create it using the new text boxes we created.
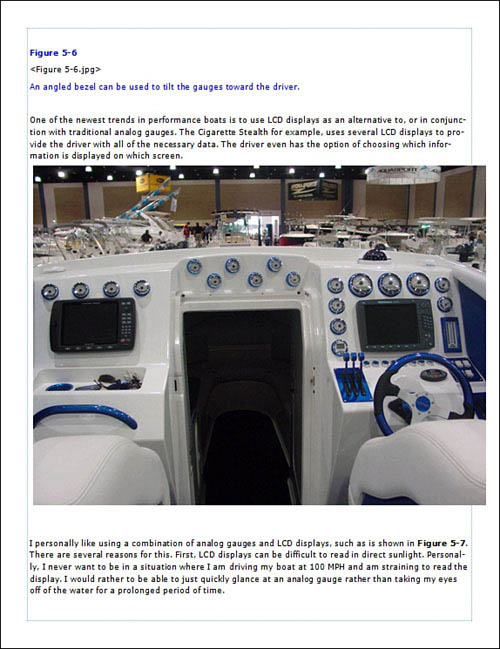
Figure 5.11 Simply inserting an image causes some of the document’s text to be covered up.
If you look at Figure 5.12, you can see that I have resized a text box. I have also created a small text box at the bottom of the screen, while leaving room in the middle of the page for the image I want to insert. If you look at the page navigation section of the screen, you can see that the text continues to flow to the text box on the next page, skipping the newly created text box.
To fix this problem, it is necessary to select the text box that currently contains text. Select the Text Box Tools Tab, and then click the Break icon, located on the Format tab’s toolbar. If you look at Figure 5.13, you can see that once I break the link, the text box displays the overflow icon and the document’s remaining pages are now blank.
At this point, I select the text box at the top of the page and click the Create link icon. I then click the text box at the bottom of the screen. The text now flows between the two text boxes but the remaining document pages are still blank.
With the lower text box selected, I must now click the Create Link icon, and then click the text box on the next page. This causes the remaining document pages to become populated once again, as shown in Figure 5.14. Now, we can add the image to the page without covering up the text on the page, as shown in Figure 5.15.
Figure 5.12 The new text box is not automatically populated.
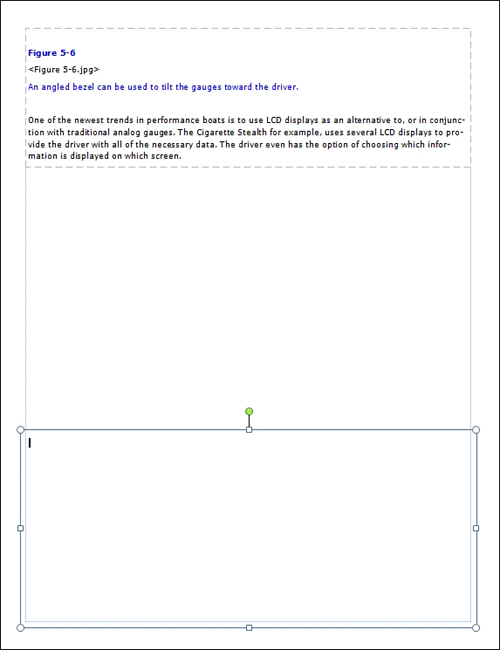
Figure 5.13 Breaking a link causes the text boxes on the remaining document pages to become empty.
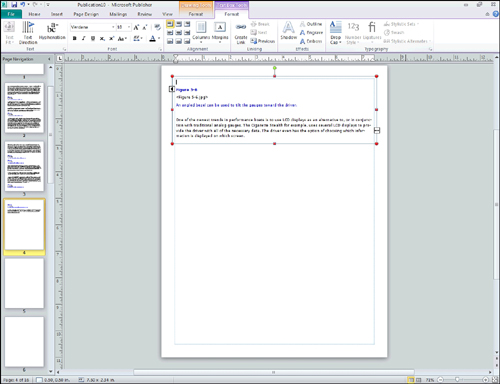
Figure 5.14 We have restored the text on the remaining pages.

Figure 5.15 We can now add our image to the page.

Word Documents with Images
In the previous section, I showed you how to add an image to an imported Microsoft Word document. As I’m sure you know, though, Microsoft Word has the ability to embed images within documents just as Publisher does. With that in mind, I wanted to show you how Publisher reacts to a Microsoft Word document that already contains images.
If you look at Figure 5.16, you can see a Publisher document that is based on a Microsoft Word document I have imported. So far, I haven’t done anything to touch up the document. This is exactly how it was imported from Word.
As you can see in the figure, the document contains text, an image, and even a caption. It is important to realize, though, that Publisher has imported the document in a very unsophisticated way.
The entire page is made up of a single text box. The image is in its own box and is simply layered on top of the text box. The only reason why this approach works in this case is because the original Word document was already formatted to leave the necessary amount of space for the image. If we were to try to move this image, things would get really messy.
In this type of situation, if you want to do any editing that involves moving images around, you will most likely have to divide up the document into multiple text boxes just as we did in the previous section.
Wrapping Text Around Images
In the previous section, I showed you how to position an image on a page full of text in a way that prevents the image from interfering with the text. In doing so, I created a couple of text boxes and left a big gap in the middle of the page so that I could insert an image. This technique works really well, and it is my preferred method for working an image into a large block of text. There are some other techniques that you can use, however.
Figure 5.16 Some Microsoft Word documents contain images.
One especially popular technique involves word wrapping. Word wrapping forces the words within a text box to flow around an image. To show you how word wrapping works, I am going to use the same Publisher document that I showed you in Figure 5.16.
As you can see in the figure, the image exists within its own box in the middle of a text box. There is text above and below the image. For the sake of demonstration, I am going to get rid of the captions immediately above and below the image so that the text will flow more smoothly.
When the captions are gone, I can right-click on the image and choose the Format Picture command from the shortcut menu. This causes Publisher to display the Format Picture dialog box. As you can see in Figure 5.17, the properties sheet’s Layout tab contains several options for wrapping text.
Figure 5.17 The Layout tab offers several different wrapping styles.
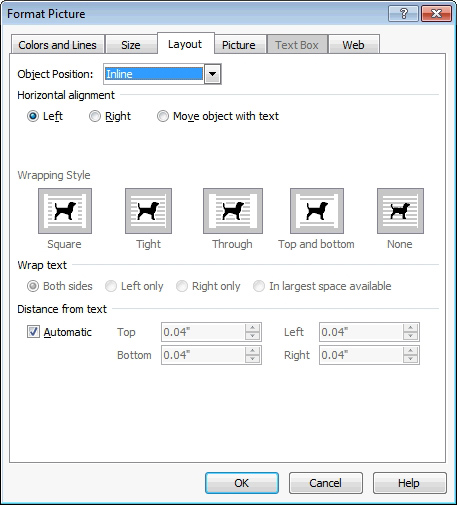
Right now, Publisher is configured to wrap the text on the top and bottom of the image only. However, we could format the text to form a square around the image. To do so, you must set the object position to Exact, and then set the wrapping style to Square.
Because the image was already present in the document, and a sufficient amount of blank space was provided for the image, the text isn’t going to instantly wrap around the image in the way that you might expect it to. However, if I delete some of the empty space, the text begins to form a square around the image, as shown in Figure 5.18.
Granted, how I wrapped the text in the document shown previously is probably overkill. You would rarely do something quite so extreme in the real world, but I wanted to show you how the text-wrapping capabilities work.
I’m no artist, but if I were laying out this document for real, I would probably shrink the image a bit, move it to one side, and wrap text around the other side. This is actually pretty easy to pull off. If you go back and look at Figure 5.17, you will notice that Publisher gives you the option of wrapping text around both sides of the image, the left only, the right only, or placing text in the largest space available. By choosing the Right Only option and moving the picture to the left, I was able to achieve the effect shown in Figure 5.19.
Figure 5.18 You can wrap text around images.
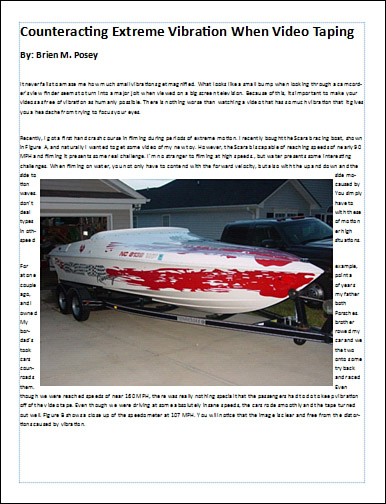
Figure 5.19 You can wrap text around one side of an image.
SHOW ME Media 5.4—Text Wrapping
![]()
Access this video file through your registered Web edition at my.safaribooksonline.com/9780132182591/media.
Irregularly Shaped Images
Back in Figure 5.17, you saw that Publisher gives you several different wrapping styles to choose from. I have already shown you how the Square and the Top and Bottom styles work, but I haven’t mentioned the Tight and the Through styles yet. Both of these styles work best with irregularly shaped images.
Tight Wrapping
To show you how Tight wrapping works, I have created a text box and then filled it with a block of text. Next, I added a shape to the middle of the page. Upon doing so, my text wraps itself around the shape, as shown in Figure 5.20.
Figure 5.20 This is what it looks like if you overlay a text box on a shape.
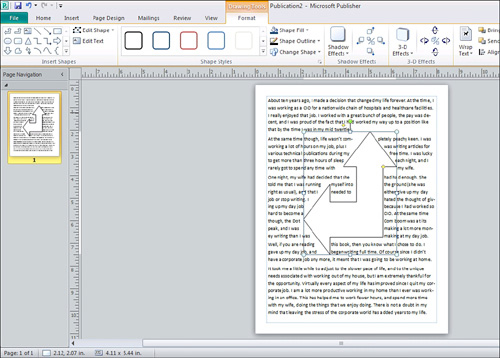
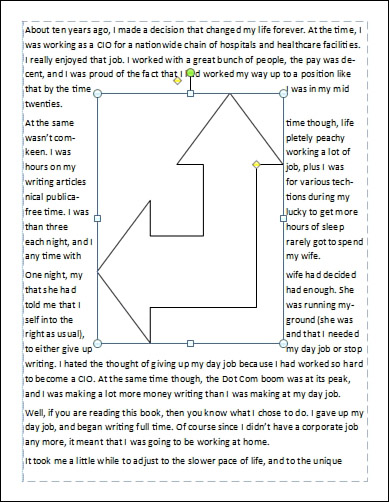
Now I am going to right-click on the shape and choose the Format AutoShape option from the shortcut menu. This brings up a properties sheet that is similar to the one used for formatting pictures. When I select the Layout tab, the wrapping style is set to Through, as shown in Figure 5.21. In other words, the Through option lets the text run through the box around the image (or shape in this case), whereas when we used the Square wrapping style, the text stopped at the square around the object. It might have been a little bit difficult to tell that this is what was going on because I was using a square image. However, you can see an example of the Square wrapping style in Figure 5.22.
Figure 5.21 The Through style lets text run through the image.
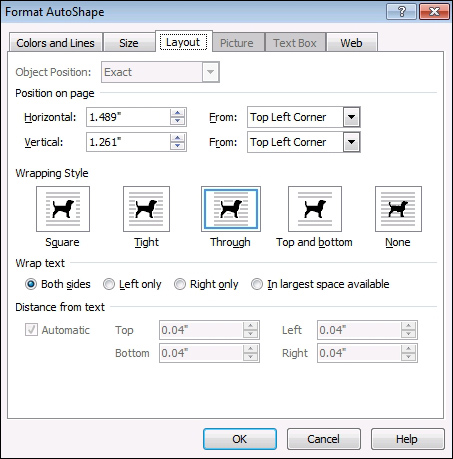
Figure 5.22 The same document with the Square wrapping style applied.
Adjusting the Wrapping
When we apply the Through wrapping style, Publisher seems to do a pretty good job of wrapping text around the image. This might not always be the case, though, especially for nonstock images or word art. There is a way to tell Publisher how the text should be wrapped, however.
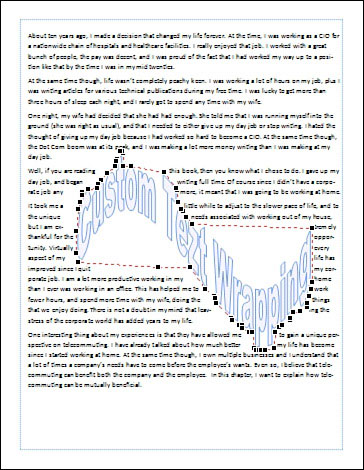
If you look at Figure 5.23, you can see that I have wrapped some text around a word art image. After doing so, I right-clicked on the word art. Notice that when I do, a series of icons appears. The Text Wrapping icon contains an option for editing wrapping points.
Figure 5.23 Wrapping points give you granular control over text wrapping.
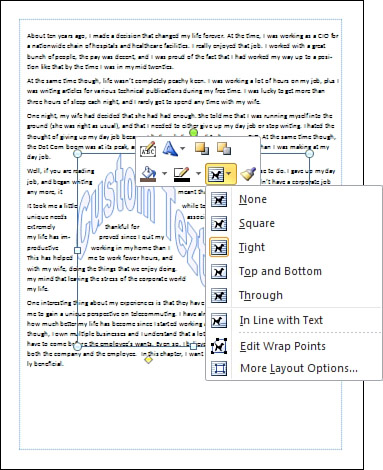
When I choose this option, a series of wrap points surround the word art. If you look at the bottom toward the left side of the word art, you will see that I have pulled one of these wrap points away from the word art. This has the effect of moving the text farther away, as shown in Figure 5.24.
In the top-right portion of the figure, there is an area above the word art in which the text is loosely wrapped, and there are no wrapping points that can be adjusted. You can easily create your own wrapping points, however. Simply click on the dotted line and drag it into the position where you want the new wrapping point to appear.
Figure 5.24 You can adjust the wrapping points as needed.
Formatting Text Boxes
I have dedicated this chapter primarily to the task of creating long, mostly text-based documents. As such, it seems appropriate that I wrap things up by showing you some of the options that are available to you for formatting text boxes. In this section, I assume that you know the basics of text formatting, such as how to change a font or how to boldface a word. All of these options can be found on the Text Box Tools, Format ribbon.
Text Fitting
Earlier in this chapter I showed you how to chain text boxes together as a way of dealing with overflow text. Sometimes, though, creating additional text boxes might not be an option because the design constrains mandate that the text has to fit on one page. When this happens, you can use text fitting.
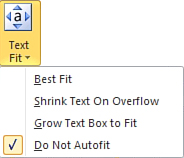
I have a block of text that simply doesn’t all fit in the text box. The Text Box Tools Format tab contains an icon named Text Fit, shown in Figure 5.25. If you click this icon, you are presented with several options for making the text fit in the box. Most of the time, the best option is going to be to use the Best Fit option, which shrinks the text to make it fit in the box. Another option is to grow the text box to accommodate the text.
Figure 5.25 Text fitting can help you accommodate overflow text.
Text Direction
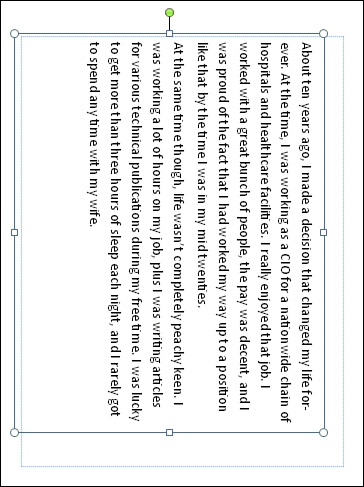
Occasionally, you might need to display text sideways on a page. To do so, all you have to do is select the text box, and then click the Text Direction icon, as shown in Figure 5.26. When you do, the text changes directions.
Figure 5.26 You can change the direction in which text is displayed.
Hyphenation
One way to cram a lot of text into a small text box is to use hyphenation. Hyphenation enables you to make better use of space by splitting words that otherwise wouldn’t fit at the end of a line of text. Of course, hyphenation is completely inappropriate for certain types of documents, so Publisher allows you to enable or disable hyphenation.
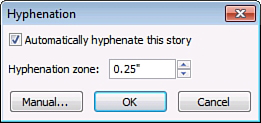
When you click the Hyphenation icon, Publisher displays the dialog box shown in Figure 5.27. As you can see in the figure, you can enable or disable automatic hyphenation by selecting or deselecting a check box. You also can control how far the page’s hyphenation zone extends.
Figure 5.27 Hyphenation can help you save space in a text box.
Alignment
If you have used Microsoft Word very much, you probably are familiar with the icons that enable you to align text to the left, right, or center. Publisher also offers a text alignment tool, but there are a few more options. If you look at Figure 5.27, you can see that Publisher provides nine different toolbar icons for aligning text. You can select a text box and then click one of these icons to get the look that you want.
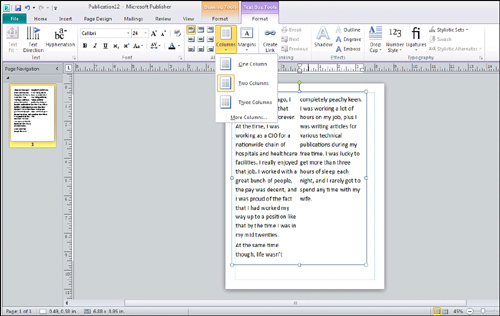
Columns
You can sometimes achieve some nice visual appearances by splitting blocks of text into multiple columns. Publisher makes it extremely easy to use columns. All you have to do is select your text box, and then click the Columns icon and choose the number of columns that you want to create. You can see an example of a two-column text box in Figure 5.28.
Figure 5.28 You can display text as multiple columns.
Word Art Lite
If you really want to get fancy with your text, you pretty much have to use word art. However, you have some options for changing the way in which basic text is displayed, beyond just changing fonts, point sizes, and colors. The Effects section of the toolbar enables you to apply a shadow, outline, engrave, or emboss effect to your text with the click of a mouse. You can see what each of these effects looks like in Figure 5.29.
Drop Cap
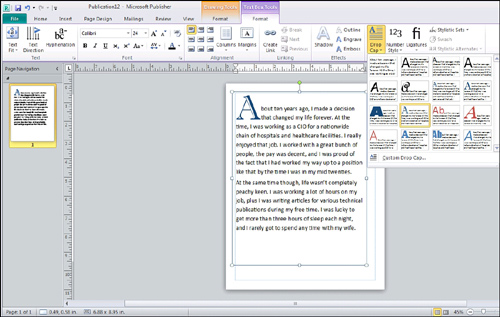
The last time I was in Dublin, Ireland, I took time out to see the Book of Kells, an ancient illuminated manuscript that is on display at Trinity College. It was common for illuminated manuscripts to be written in a way that caused the first character of a paragraph to be displayed as big and fancy, while the remaining characters appeared normally.
You can achieve this same effect in Publisher by using the Drop Cap feature. All you have to do is select your text box, click the Drop Cap icon, and then pick the effect that you want. You can see an example of the effect that the Drop Cap feature produces in Figure 5.30.
Figure 5.29 Text effects can add more impact to a document.
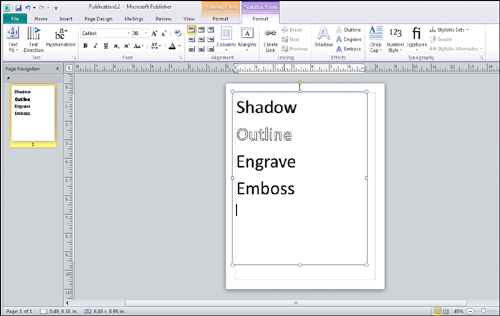
Figure 5.30 The Drop Cap feature causes the first character to appear larger than the other characters.
Number Styles
The Number Style option provides you with several different options for controlling how numbers are displayed within the document. Although Publisher provides five different options, as shown in Figure 5.31, there is very little difference in the appearance that the styles produce. The document shown in the figure actually uses all five different styles, but you would be hard pressed to tell the difference between most of them.
Figure 5.31 You can change the way in which numbers are displayed.
