1. Introduction to Managing Projects with Microsoft Project 2010
This chapter provides a basic understanding of project management terminology, Microsoft Project 2010, and what’s new in this version.
Here’s a common scenario: You’ve been put in charge of some project in your organization. This project requires scheduling, coordinating, and progress tracking. Your office is covered in yellow sticky notes, and you have five different spreadsheets going at once, which each need to be updated manually every time a date changes. Your manager is knocking at your office door, asking for a status report for a meeting she has in 10 minutes, and you’re feeling panicky because you don’t even know where to start to pull together a summary of what’s going on with your project, let alone what that summary is going to reveal about the project’s status.
This is the point at which you, as a project manager, can either throw your hands up and find a new line of work or step up to the plate and take your project management skills to the next level. What’s the next level? Tools. My recommendation? Microsoft Project 2010, for its powerful scheduling engine and customizability.
What Microsoft Project 2010 Can Do for You
Microsoft Project 2010 is a software tool that takes a lot of the manual updating and guesswork out of managing your projects. You can enter information about your project’s tasks, when they need to happen, how long you think they should take, and who should be doing the work. As you make updates, Project 2010’s scheduling engine takes all the project work into account, providing a grounded schedule that represents the reality of what can be accomplished. After you’ve seen the facts, you can move forward and make adjustments to the time, scope, or costs involved with your project, to find acceptable solutions for time-management challenges.
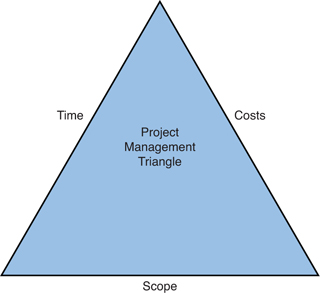
If you’re not sure how to adjust your project to meet certain constraints, consider the project management triangle: one side each for time, scope, and costs associated with your project. Figure 1.1 illustrates this triangle. If you have fewer people working on the project than you had planned, you’ll need to make up for that by extending the project deadline or limiting the scope of your project. If you have a smaller budget than planned, you’ll need to adjust your project by not doing quite as much work or completing the work in less time. If your project expands to include more work, you’ll need to increase the budget to hire more people or extend the schedule so that the people currently assigned to the project have more time to finish the added work.
Figure 1.1. Project management triangle
As work progresses, you can track how close the actual schedule is to your original baseline dates, so that you can more accurately predict when your project may be completed. If you need to be done sooner, you can use Project 2010 to model what would happen if you added more people to ease the workload or increased the project’s budget to allow the current set of people working on the project to spend even more time getting the work done. Or if you need to pull some people off of your project, you can use Project 2010 to model what your project’s dates will look like with fewer people doing the work.
As in the earlier scenario, when your manager knocks on your door asking for a status report in the next 10 minutes, you can use the reporting features in Project 2010 to quickly produce any of several attractive reports, showing things such as overall project health, budget tracking, and earned value over time. And you’ll already know what the reports will reveal, because each time you make changes, the charts and views that illustrate your project’s work over the course of the schedule are updated in real time. No surprises!
Show Me: Media 1.1—What Is Project 2010?

Access this video file through your registered Web Edition at my.safaribooksonline.com/9780132182461/media.
What Version of Project 2010 Do You Need?
The two versions of Project 2010 are Standard and Professional. For many people, Project Standard 2010 has all the functionality they need. However, if you find that you do a lot of reassigning of staff or shifting of the tools you need to get work done, Project Professional 2010 has more advanced features to help you get the right people doing the right tasks. Project Professional 2010 also has advanced functionality to help you share your plan with others, using Microsoft SharePoint Foundation 2010 or Microsoft Project Server 2010.
If you’re looking for an end-to-end enterprise project management solution, you can use Project Professional 2010 with Project Server 2010. With both of these tools deployed in your organization, people can submit project proposals for analysis by stakeholders, project managers can plan and track work in either a desktop client or on the Web, and team members can report time and task progress using Project Web App.
Tell Me More: Media 1.2—What Version of Project Is Right for Me?

Access this audio recording through your registered Web Edition at my.safaribooksonline.com/9780132182461/media.
Laying a Foundation
Before we talk about the details of using Project 2010, you need to clearly understand a few terms, because they’re used extensively in the Project 2010 interface.
Show Me: Media 1.3—Project Terminology
Access this video file through your registered Web Edition at my.safaribooksonline.com/9780132182461/media.
Project
Just so we’re clear, in relation to Project 2010, a project is a set of work that is completed according to a schedule and that has some kind of end result. For example, a project may result in a tangible item, such as a report, a building, or a retail product, or it may result in an intangible item, such as an event, a set of goals, or a strategy.
Task
A task is a smaller chunk of work that contributes to the completion of a project. For example, if you’re planning a project to build a house, you might have separate tasks for laying the foundation, putting up the walls, and adding the roof. In Project 2010, each task has a start date and a finish date, and you can assign people and/or things to help do the task work.
Resource
A resource can be a person, an item, a facility, or an expense that is required to complete the work associated with a task. In Project 2010, people are referred to as work resources; items or facilities are referred to as material resources; and expenses are referred to as cost resources. A single task may require more than one type of resource. For example, if the task is to travel to a satellite office and teach a training course, you might need a person (work resource) to teach the class, a roundtrip plane ticket (cost resource) to get the person to and from the satellite office, and a classroom (material resource) where the training course is held.
Assignment
An assignment is the term used when a resource is identified as a person, item, or cost that will do work on, or be used for, a task in a project.
What’s New in Project 2010?
The following sections provide a high-level overview of what’s been updated or added in Project 2010.
Updated User Interface
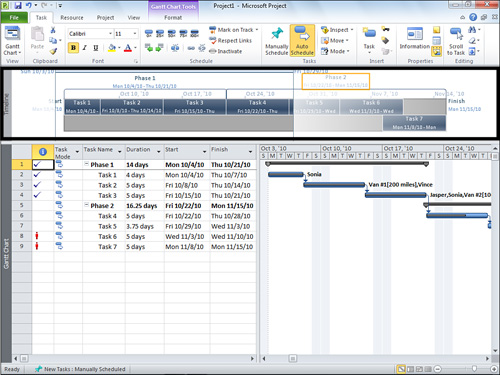
The most noticeable change in Project 2010 is the addition of the ribbon. If you used the 2007 version of Access, Excel, PowerPoint, or Word, you may be familiar with the ribbon. Commands that previously had been available in the menus at the top of the Project window are now available as buttons on several tabs across the top of each view, as shown in Figure 1.2.
Figure 1.2. The ribbon is displayed at the top of the Project window.

As you work in Project 2010, the tabs display commonly used commands for whatever you happen to be doing. For example, if you’re making changes to the way the Gantt Chart view is displayed, there’s an entire tab with buttons that control what bars are displayed, what colors are used, and other formatting options.
Show Me: Media 1.4—Introducing the Ribbon
Access this video file through your registered Web Edition at my.safaribooksonline.com/9780132182461/media.
 LET ME TRY IT
Using the Ribbon
To get familiar with using the ribbon, follow these steps:
- Click through the tabs on the ribbon to get familiar with the buttons and options available on each tab.
- Press Ctrl+F1 to minimize the ribbon. Click a tab on the minimized ribbon to display the full ribbon, and then click outside of the ribbon to return the tabs to minimized. Press Ctrl+F1 again to maximize the ribbon.
Manually Scheduled Tasks
In previous versions of Project, tasks could be scheduled only using Project’s scheduling engine. That is, you’d tell Project a few details about a task, such as when it should start and how long it should take (duration), and Project would figure out when the task would be done, based on how many people or things were assigned to the task, what other things the task depended on, and what the calendar looked like. Until you had a good understanding of how Project was making these calculations, the scheduling engine seemed to be a bit of a mystery. Even some experienced project managers who had been using Project for years occasionally would run into situations in complex projects in which the dates given by the scheduling engine were just not what they expected.
Project 2010 has taken a new approach to scheduling by introducing manually scheduled tasks. That is, instead of letting Project 2010 calculate when a project should start or finish, you can identify a task as being manually scheduled, and then you have full control over task start and finish dates.
Show Me: Media 1.5—A Look at Manually Scheduled Tasks
Access this video file through your registered Web Edition at my.safaribooksonline.com/9780132182461/media.
As you might guess, choosing to manually schedule a task can be a blessing and a curse. On the one hand, your dates are firm, and you won’t be stuck sitting there trying to figure out why the task start date is a week later than you thought it should be. On the other hand, by forcing a task to start and finish on specific dates, you may forget to account for company holidays, the people working on your task are more likely to have too much work on their plates, and you may end up accidentally double-booking tools or facilities required to get the work done. If you choose to manually schedule a task, you’ll need to keep a close eye on how that task is affected by the rest of your project and what impact that task may have on other tasks and resources.
Team Planner View
The Team Planner view, available only in Project Professional 2010, is a quick, easy, and highly visual way to review and change what your team members are working on in your project. In the Team Planner view, shown in Figure 1.3, you can see where people may have too much on their plates (overallocation), what tasks have yet to be assigned, and what the current progress is on your project’s tasks.
Figure 1.3. The Team Planner view shows what each team member is working on.
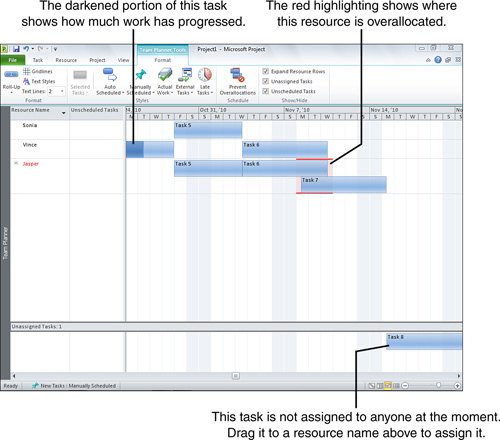
You can resolve overallocations by dragging tasks between team members and assign tasks to people by dragging them from the Unassigned Tasks area of this view to a team member’s name.
Show Me: Media 1.6—An Overview of the Team Planner View
Access this video file through your registered Web Edition at my.safaribooksonline.com/9780132182461/media.
Timeline
At the top of each view, you can display a timeline of your project, illustrating project tasks and dates (see Figure 1.4).
Figure 1.4. The timeline can be displayed above another view.
You can use the timeline to help focus what’s displayed in other Project views. This timeline can be printed or copied and pasted into other applications, enabling you to easily communicate your project plan with others who don’t have access to your plan or don’t have Project 2010 installed.
Show Me: Media 1.7—Advantages of the Timeline
Access this video file through your registered Web Edition at my.safaribooksonline.com/9780132182461/media.
New Table Customization
Adding new columns to any of the tables in Project 2010 is considerably easier than in prior versions. Instead of going through a separate window and several customization steps, you now can simply click the Add New Column header on the right side of any table, as shown in Figure 1.5.
Figure 1.5. Click the Add New Column header to insert a new column.
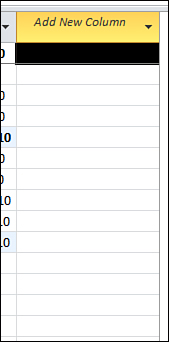
When you click the Add New Column header, the entire list of available fields is displayed for you to choose which column you want to add. After the column is added, you can drag it to where you want it displayed. If you decide you need to rename a column, you can simply double-click the column header and type the new name. So easy!
Show Me: 1.8—Adding a New Column
Access this video file through your registered Web Edition at my.safaribooksonline.com/9780132182461/media.
LET ME TRY IT
Adding a New Column to a View
To add a new column to a view, follow these steps:
- Click the Add New Column header, and then click the name of a column you want to add to the current view.
- Click the column header for the new column. The cursor turns to a four-way arrow. Click and drag the header to move it to another location in the view.
- To rename the column, double-click the column header and type a new name.
SharePoint Collaboration
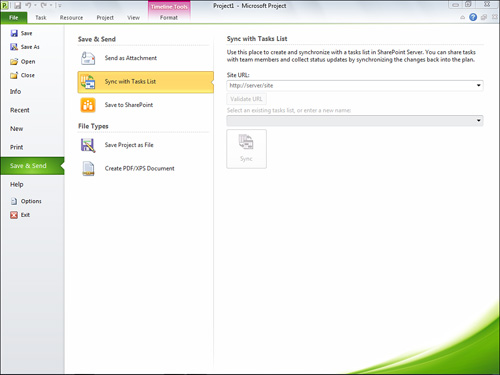
If you have Project Professional 2010, you can export your project to a SharePoint project tasks list, which is included as part of SharePoint Foundation 2010. This enables you to share project information without Project Server 2010 and without requiring others to have Project 2010 installed. Figure 1.6 shows the Sync with Tasks List options on the File tab.
Figure 1.6. The File tab includes multiple options for working with SharePoint.