4. Working with Tasks
This chapter walks you through adding tasks to your project in Project 2010.
After you have created and saved your initial project plan, the next step is to add tasks to your project. It’s important to understand the different types of tasks that Project 2010 offers. With a basic understanding of task types, you can add tasks to your project and then set up dependencies between the tasks. Project 2010 also provides a framework for adding work breakdown structure codes to your tasks, if your organization uses them.
Understanding Task Types
Each task in your project can be one of three different types:
• Fixed units
• Fixed work
• Fixed duration
These task types are used to determine which element of a task is most important for scheduling, so that Project knows what it should maintain as it sets your project’s schedule. Project calculates the schedule using the following formula: Duration = Work / Units.
Table 4.1 shows what changes Project makes, based on task types, for a task that is set to automatic scheduling.

Fixed Units
Fixed units is the task type to pick if the level of effort on your project is important to you. For example, let’s say you assign a resource to a task, and you know you can only use that resource for that task half time. You assign the resource at 50% (units). After your initial planning, you find out that you need to make the task longer, or you discover that the task may take more work than you thought. You don’t want Project to change the units, so you choose the fixed units task type. This leaves the resource assigned at 50%, and Project recalculates the work or duration, based on what factor you changed.
Looking at this from a formula perspective, say the original duration of the task is 5 days, the work is initially set to 20 hours, and the units is set to 50%. The formula would look like this: 5d = 20h / 50%. If the task is fixed units, you can’t change the 50%.
• Changed duration— If the duration is increased to 10 days, Project will adjust the 20 hours of work to maintain a balanced equation: 10d = 40h / 50%. Because the task is set to fixed units, the resource will always work at 50%. So if you increase the duration, the resource will work more hours. Project will increase the work to 40 hours.
• Changed work— If the work is increased to 40 hours, Project will adjust the 5 days of duration, because the resource is only able to work at 50%, or 20 hours per week. It will take the resource 10 days to get 40 hours of work done, working 20 hours per week. This adjustment maintains a balanced equation: 10d = 40h / 50%.
Fixed Work
If a task is set to fixed work, Project will maintain the amount of work scheduled for the task. Look again at the previous example: 5d = 20h / 50%.
• Changed units— If you need to keep the task set to 20 hours of work, and you find out that your resource is only available at 25% instead of 50%, Project will adjust the duration to 10 days because it will take the resource longer to get the work done if he or she is working fewer hours each week. This maintains a balanced equation: 10d = 20h / 25%.
• Changed duration— If you find out that you have 10 days to get the task done, instead of 5, Project will adjust the units to 25%, because it will take less of the resource’s time each week to get the work done. This maintains a balanced equation: 10d = 20h / 25%.
Fixed Duration
If a task is set to fixed duration, Project will maintain the length of time you’ve set aside to complete the task. Again, return to the example: 5d = 20h / 50%.
• Changed work— If the amount of work increases to 40 hours, with the duration fixed at 5 days, Project will adjust the resource units. Instead of 50%, the task now requires 100% to get 40 hours of work done in 5 days. The balanced equation is: 5d = 40h / 100%. You can get to 100% by increasing the amount of time the existing resource works in a week, or by assigning additional resources to the task.
• Changed units— If you find out that the resource assigned to the task is now available at 100% of his or her time, Project will adjust the amount of work for the task, to maintain the 5 days of duration: 5d = 40h / 100%. Because the resource is assigned at 100%, he or she can fit in 40 hours of work in 5 days, instead of 20 hours.
Show Me: Media 4.1—Learn More About Task Types

Access this video file through your registered Web Edition at my.safaribooksonline.com/9780132182461/media.
Adding Tasks to Your Project
When adding tasks to your project in Project 2010, you can choose to fill out a lot of detail about your tasks upfront, or you can enter some basic scheduling information at first and then fill in more details later.
Show Me: Media 4.2—Working with Tasks
Access this video file through your registered Web Edition at my.safaribooksonline.com/9780132182461/media.
 LET ME TRY IT
Adding a New Task
To add a new task to your project, follow these steps:
- In the Gantt Chart view, type a name for the new task in the first empty row of the Task Name column.
- Click the Task Mode column and then choose whether you want the task to be Manually Scheduled or Auto Scheduled. Project uses one of these methods as a default. You only need to choose a method if you don’t want to use what is set as the default.
 Not sure whether you want Manually Scheduled or Auto Scheduled? Review “How Does Project 2010 Schedule Tasks?” in Chapter 3, “Starting a Project,” for more information on scheduling in Project 2010 or view Show Me Media 4.3. If you choose Manually Scheduled, be sure to listen to Tell Me More Media 4.4 for some best practices.
 - Type the number of days over which you want the task work completed in the Duration column. You also can use minutes (m), hours (h), weeks (w), or months (mo) if one of these would be more appropriate for your project.
- Set the task’s Start and Finish dates:
• If you selected Auto Scheduled in step 2, the Start and Finish columns will be populated automatically with the appropriate dates, based on the project scheduling options you chose when you created the project (see Chapter 3). Do not manually set a start or finish date if you are using automatic scheduling.
• If you selected Manually Scheduled in step 2, choose a Start date, and Project will fill in a Finish date. Alternatively, choose a Finish date, and Project will fill in a Start date. Project calculates the Start or Finish date using the information you entered in the Duration column.
- To set additional task details, go to the Task tab of the ribbon. In the Properties group, click Details to display the Task Details Form view split with the Gantt Chart view, as shown in Figure 4.1.
Figure 4.1. Click Details on the Task tab to display the Task Details Form view, split with the Gantt Chart view.
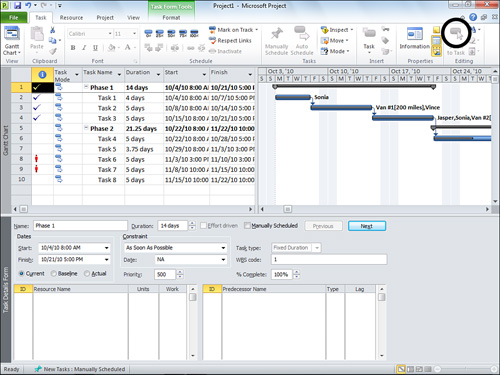
- Use the Task Details Form view to set the following:
• Task type— Choose whether the task is Fixed Duration, Fixed Units, or Fixed Work.
• Constraint— By default, this field is set to As Soon As Possible, meaning that the task could happen at any appropriate time in the project. You also can choose As Late As Possible, if that makes more sense for your project. However, you may have some tasks that need to happen in coordination with a specific date. You can choose from the following constraints: Finish No Earlier Than, Finish No Later Than, Must Finish On, Must Start On, Start No Earlier Than, and Start No Later Than. If you choose one of these constraints, be sure to choose an associated date using the Date box within the Constraint box.
- Click OK to save your task settings.
Show Me: Media 4.3—Automatic Versus Manual Scheduling
Access this video file through your registered Web Edition at my.safaribooksonline.com/9780132182461/media.
Tell Me More: Media 4.4—Best Practices for Working with Manually Scheduled Tasks

Access this audio file through your registered Web Edition at my.safaribooksonline.com/9780132182461/media.
Setting a Task Calendar
Sometimes, a task in your project may need to use a different schedule from the rest of your project. For example, let’s say a specific task needs to happen over a weekend. The overall project calendar has the weekends set as nonworking days. You can set a separate calendar for that task, so that the weekend days are set as working days. Other tasks in your project will still see the weekend as nonworking days, but the task with the modified task calendar will see the weekend as working days.
Follow these steps to set a separate calendar for a task:
- On the Project tab of the ribbon, in the Properties group, click Change Working Time.
- Click Create New Calendar.
- Choose how you want to create the task’s calendar:
• Create new base calendar— Click this to create a new calendar for your task, from scratch. Working times will be set to the calendar options from the Project Options dialog box, by default.
• Make a copy of [existing base] calendar— Click this to use an existing base calendar as a starting point for your task’s calendar. Use the drop-down list to choose which base calendar you want to copy.
- Type a name for your task’s calendar in the Name box. You may want to use a name that helps to identify this as a calendar that is intended for use on a specific task. This will help to differentiate it from the base calendars for your project.
- Click OK to create your task’s calendar.
- Similar to creating a base calendar, set the working days, nonworking days, default working times, and working times for specific time periods in your task’s calendar.
For more information on these procedures, see “Setting Up Your Project’s Calendars” in Chapter 3.
- With your task’s calendar set up and saved, double-click the task row in the Gantt Chart view.
- Click the Advanced tab and then choose the calendar you just created from the Calendar list.
- Click OK to save the calendar setting.
Indenting and Outdenting Tasks
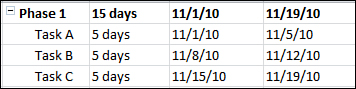
After you have a list of tasks added to your project, you may find that you want to add some organizational structure to your tasks. You can indent and outdent tasks to add hierarchy to your project. Tasks that have other tasks indented below them are called summary tasks. Tasks that are indented below another task are called subtasks. Summary tasks roll up data from their subtasks. For example, if a summary task has two subtasks, the summary task will take the earliest start date and the latest finish date from those subtasks, as shown in Figure 4.2.
Figure 4.2. Subtasks roll up data to the summary task level.
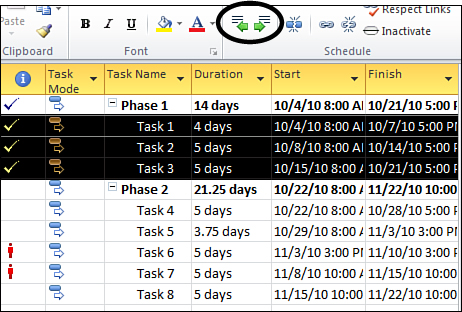
To indent or outdent a task, click the task in the Gantt Chart view to select it. Then, on the Task tab of the ribbon, in the Schedule group, click Indent or Outdent, as shown in Figure 4.3.
Figure 4.3. Use the Indent and Outdent buttons to create hierarchy in your tasks.
Setting Up Task Dependencies
Some tasks in your project may have certain relationships with other tasks in your project. For example, you may have a task that can’t begin until another task has ended. These relationships are called dependencies. Project offers four different types of dependencies for your project’s tasks:
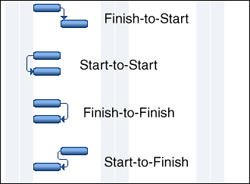
• Finish-to-Start (FS)— A finish-to-start dependency is one in which a second task cannot begin until the first task has ended.
• Start-to-Start (SS)— A start-to-start dependency is one in which a second task cannot begin until the first task has begun.
• Finish-to-Finish (FF)— A finish-to-finish dependency is one in which a second task cannot finish until the first task has finished.
• Start-to-Finish (SF)— A start-to-finish dependency is one in which a second task cannot finish until the first task has begun.
Figure 4.4 shows these four types of dependencies.
Figure 4.4. Project provides four types of dependencies.
Let’s walk through an example that uses all four of these types of dependencies. In this example, you are planning to remodel the kitchen and dining area in a home. You use Project to track each of the tasks involved in this process.
Here are the tasks you want to track for the remodel:
• Rewire kitchen— This involves moving outlets, wiring through cabinets for a built-in microwave, and adding an outlet on a kitchen island.
• Install new cabinets— This involves installing new wall cabinets, and cabinets to support a new countertop.
• Paint— This involves painting both the kitchen and dining areas.
• Install counters— This involves placing a new countertop on top of the new cabinetry.
• Install new floors— This involves placing new flooring in both the kitchen and dining areas.
• Install new appliances— This involves installing several new kitchen appliances.
Each task has some sort of dependency on another task. The “Rewire kitchen” task can’t be finished until the “Install new cabinets” task has started, because some of the wiring needs to be done through the new cabinetry (wiring for a built-in microwave, and an outlet on the island). This is a start-to-finish dependency in Project.
The “Paint” task has a start-to-start dependency on the “Rewire kitchen” task. That is, the painting can’t start until the electrician has started the process of rewiring. The electrician needs to have moved openings for outlets and light fixtures, as necessary, before the painters can come in and begin painting the kitchen and dining areas. The electrician doesn’t need to be done with all of his work for the remodel before the painters can start, just the portion of work that impacts the painters.
The “Install counters” task can’t start until the “Paint” task has finished. By setting up this finish-to-start dependency, you avoid getting drips of paint all over the shiny new countertops. This type of dependency is most commonly used in project plans.
The “Install new floors” task can’t finish until the “Paint” task has finished. The painters begin by painting the ceiling in both the kitchen and dining areas, then move on to painting the kitchen. After the kitchen is painted, the flooring installers begin their work in the kitchen, while the painters finish painting the dining room. The flooring team can’t finish its work until the painters have finished painting the dining room. At that time, the flooring team can finish its work by flooring the dining room. In Project, this is represented as a finish-to-finish task.
Finally, the “Install new appliances” task can’t start until the “Install new floors” task has finished. This is another finish-to-start dependency.
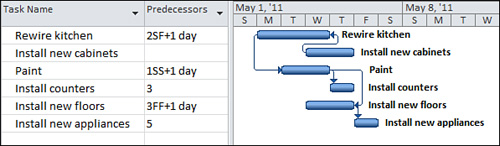
Project represents these task dependencies on the Gantt chart using arrows between the tasks. Figure 4.5 shows how our example might look if we entered it into Project and set up the dependencies.
Figure 4.5. Example of dependencies within a project
LET ME TRY IT
Adding Dependencies Between Tasks
In Project, dependencies between tasks are recorded in the row for the second task in the dependency. For example, if you are creating a dependency in which Task B can’t start until Task A has finished (a finish-to-start dependency), you would record the dependency in the row for Task B. When you record the dependency, you indicate the task’s predecessor.
To quickly set start-to-finish dependencies between tasks in your project, select the rows for the tasks you want to link, and then, on the Task tab, in the Schedule group, click Link Tasks.
If you want to set up other types of dependencies, create gaps between tasks, or overlap tasks, you can set up dependencies using the Predecessors column.
To set up a dependency between two tasks using the Predecessors column, follow these steps:
- In the Gantt Chart view, be sure the Predecessors column is displayed.
- In the row for the second task in the dependency you’re creating, type the ID number (located in the row header) for the first task in the dependency in the Predecessors column. Also, indicate the dependency type.
For example, if you are creating a dependency between Task A (ID number 1) and Task B (ID number 2), you would type the following for each dependency type:
• Finish-to-start— To indicate that Task B can’t start until Task A finishes, type 1 in the Predecessors column for Task B, as shown in Figure 4.6. Project assumes a finish-to-start dependency, by default, so you don’t need to include a dependency type abbreviation.
Figure 4.6. In this example, Task B has a finish-to-start dependency on Task A.

• Start-to-start— To indicate that Task B can start only after Task A has started, type 1SS in the Predecessors column for Task B.
• Finish-to-finish— To indicate that Task B can finish only after Task A has finished, type 1FF in the Predecessors column for Task B.
• Start-to-finish— To indicate that Task B can finish only after Task A has started, type 1SF in the Predecessors column for Task B.
- If one of your tasks needs to overlap another (known as “lead time”), or needs to fall behind another (known as “lag time”) by a certain amount, type this in the Predecessors column, as well:
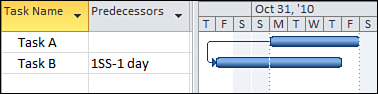
• Overlap two tasks— To overlap two tasks, type a negative duration, or percentage, after the task ID number and dependency type in the Predecessors column, as shown in Figure 4.7. For example, if you want Task B to start one day before Task A is scheduled to start, type 1SS-1d in the Predecessors column for Task B.
Figure 4.7. Insert lead time in the Predecessors column.
• Insert a delay between two tasks— If the second task needs a delay after the start or finish of the first task, type a positive duration, or percentage, after the task ID number and dependency type in the Predecessors column, as shown in Figure 4.8. For example, if you want Task B to start when Task A is 50% through its scheduled duration, type 1SS+50% in the Predecessors column for Task B.
Figure 4.8. Insert lag time in the Predecessors column.

Creating a Work Breakdown Structure (WBS)
Some organizations require the use of a work breakdown structure to align project tasks with accounting systems, business strategies, and so on. It is a method of making sure that all work is accounted for, and decomposed into small enough packages for tracking and management. In Project, a work breakdown structure (WBS) is represented as an elaborate outline, providing each task with a WBS code that identifies where it falls within your project plan.
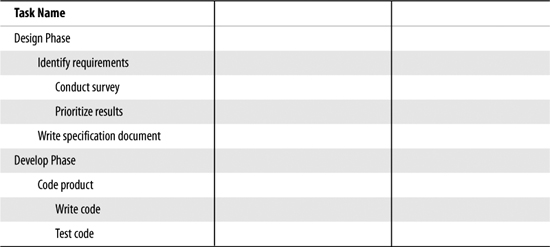
For example, let’s say you have a project with the task structure shown in Table 4.2.
Table 4.2. Example Task Structure
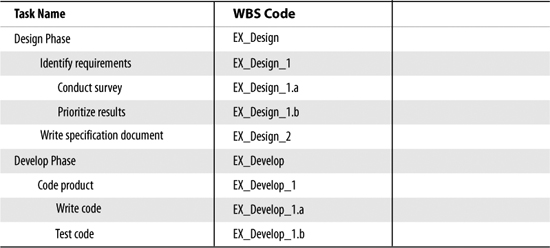
In a WBS code, each indent level in your task structure is given a set of letters, numbers, or characters that you define. For example, the phases in the example may be given a set of characters; the tasks may be given a number; and the subtasks may be given a lowercase letter. In Project, you can also assign a prefix for the code, to indicate the task’s project. If you use the combination of characters, numbers, and letters just described, with a prefix of “EX_” to indicate that this is an example project, the WBS codes might be assigned as shown in Table 4.3.
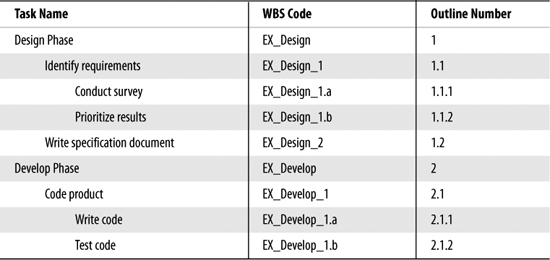
Note how the tasks and the WBS codes are starting to look like an outline. Project also includes an automatic outline scheme that simply uses increasing numbers, separated by periods, to indicate where a task falls within a project. Table 4.4 shows the example tasks, WBS codes, and their corresponding Project outline numbers.
To display outline numbers for your project, with the Gantt Chart view displayed, click the Format tab on the ribbon and then select the Outline Number check box in the Show/Hide group. The outline numbers appear to the left of each task’s name.
LET ME TRY IT
Setting Your Project’s WBS Code Structure
You can set your project’s WBS code structure at the beginning, before you have tasks added, if you know enough about how many levels of tasks you might use and what information the code needs to capture. You may, however, have an easier time building out your WBS code structure after you know what your project’s tasks really look like.
Follow these steps to set up a WBS code structure for your project:
- On the Project tab of the ribbon, in the Properties group, click WBS and then click Define Code.
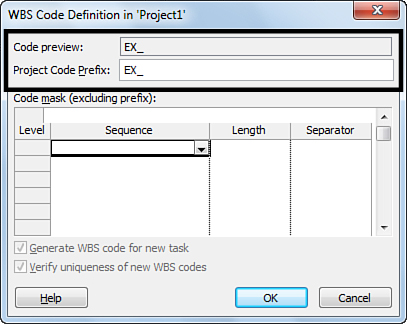
- If you want to use a prefix to identify which project the tasks belong to, type a prefix in the Project Code Prefix box, as shown in Figure 4.9.
Figure 4.9. Use the Project Code Prefix box to include text before the ordered portion of the code.
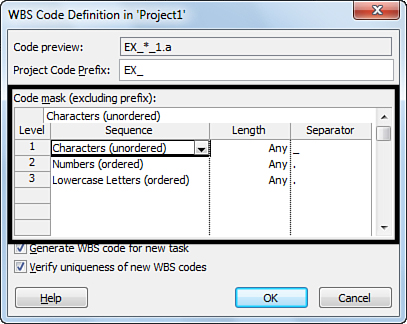
- Use the columns and rows in the Code mask table to build out your WBS code structure. Each row represents an indent level for tasks in your project. Figure 4.10 shows a defined code mask.
• Sequence— Choose whether you want to use Numbers, Uppercase Letters, Lowercase Letters, or Characters.
• Length— Choose the number of characters you want to use for this part of your WBS code. If you choose one character and the number of tasks at this level goes beyond nine, a WBS code will not be assigned, and you’ll receive an error message. Also, if you choose two or more characters, single-digit numbers will begin with a zero (01, 02, 03, and so on). If you want to avoid both of these circumstances, leave it set to Any.
• Separator— Choose a character to separate this part of your WBS code from the next part. You can choose one of the built-in separators (period, hyphen, plus sign, or slash), or type one of your own.
Figure 4.10. Use the Code mask table to define your WBS code.
- Select the Generate WBS code for new task check box if you want to automatically create a WBS code for each task you add to your project.
- Select the Verify uniqueness of new WBS codes check box if you want each WBS code to be unique. This can be helpful if you have used the Characters option in the Sequence column.
- Click OK to save your WBS code structure.
After you have your WBS code structure set up, the next step is to display the WBS code in the Gantt Chart view, so you can see the fruits of your labor.
To display the WBS column, follow these steps:
- With the Gantt Chart view displayed, right-click the column that you want to appear to the right of the WBS column.
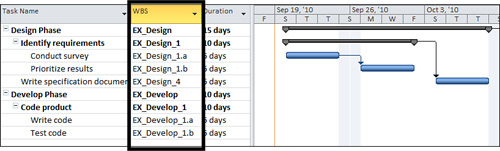
- Click Insert Column and then scroll down and click WBS from the menu that appears. Figure 4.11 shows the Gantt Chart view with the WBS code displayed.
Figure 4.11. The WBS column displays the WBS code for each task.