
Chapter 5. Useful Tools and References
VMware has traditionally been configured and managed through the vCenter client. However, there are many tools that can manage and provide useful information via the Command Line Interface provided on the ESXI server. In this chapter, we’ll examine some important command-line utilities that will aid you in monitoring and configuring your ESXI server, and we’ll take a look at general best practices for setting up services that will be crucial for your ESXI server.
5.1. Entering Maintenance Mode via the Command Line
Problem
You are unable to access your vCenter server to initiate the maintenance mode command inside the vCenter. This can occur if there is a network outage, database corruption, or failed hardware. The method shown here will allow you to put the ESXi Host in maintenance mode and will allow for a safe shutdown if needed.
5.2. Displaying Server Information
Discussion
This command-line tool is a powerful yet simple way to find out
about your ESXI server and its environment. By using the esxcfg-info command,
you can get detailed information about your configuration and server
hardware:
~ # esxcfg-info -h
Usage: esxcfg-info mode
  -a, --all           Print all information
  -w, --hardware      Print hardware information
  -r, --resource      Print resource information
  -s, --storage       Print storage information
  -n, --network       Print network information
  -y, --system        Print system information
  -o, --advopt        Print advanced options
  -u, --hwuuid        Print hardware uuid
  -b, --bootuuid      Print boot partition uuid
  -e, --boottype      Print boot type (VMVisor Only)
  -c, --cmdline       Print vmkernel command line
  -F, --format        Print the information in the given format
                      Valid values are "xml" and "perl"
  -h, --help          Print this message.
The options can be entered in any combination to display the
specified information. If you run the esxcfg-info command
alone or with the -a switch, it will dump
all values. The following example displays the first few lines of output
on one of our systems:
$ esxcfg-info | more
+Host :
   ==+Hardware Info :
      |----BIOS UUID................................................0x44 0x45 0x4c
0x4c 0x34 0x0 0x10 0x38 0x80 0x56 0xb6 0xc0 0x4f 0x4b 0x46 0x31
      |----Product Name.............................................PowerEdge R900
      |----Vendor Name..............................................Dell Inc.
      |----Serial Number............................................XXXXXXXX
      |----Hardware Uptime..........................................1762529093951
...............
The information you can gather about your system from this command is so comprehensive that you may wish to export it to a text file, like this:
esxcfg-info > esxcfginfo12102008.txt
The -F option will also let
you export the data in XML or Perl formatting. This can be useful if you
wish to parse the output and store it in a proprietary or third-party
application.
An example of exporting the network and storage information in Perl format as follows (we’ve truncated the output in this example to save space):
~ # esxcfg-info -s -n -F perl > test1.log
$host = {
{ #network_info
   current_max_virtual_switches => 256,
   next_reboot_max_virtual_switches => 256,
   { #console_nic_info
      console_nics => [
      ],
   },
   { #routing_info
      kernel_gateway => "0.0.0.0",
      kernel_ipv6_gateway => "::",
      console_gateway => "0.0.0.0",
      console_gateway_device => ",
      console_ipv4_gateway_interface => ",
      console_ipv6_gateway_interface => ",
      vmkernel_ipv4_gateway_interface => ",
      vmkernel_ipv6_gateway_interface => ",
      vmkernel_routes => [
         route => {
            network => "172.16.102.0/24",
            gateway => "0.0.0.0",
            interface => "vmk0",
         },
An example of exporting network and storage information in XML format is as follows (we’ve truncated the output in this example to save space):
~ # esxcfg-info -s -n -F xml | more

<network-info>
   <value name="current-max-virtual-switches" type="uint32" format="dec">256</value>
   <value name="next-reboot-max-virtual-switches" type="uint32" format="dec">256</value>
   <console-nic-info>
      <console-nics>
      </console-nics>
   </console-nic-info>
   <routing-info>
      <value name="kernel-gateway" type="string">10.0.1.1</value>
      <value name="kernel-ipv6-gateway" type="string">::</value>
      <value name="console-gateway" type="string">0.0.0.0</value>
      <value name="console-gateway-device" type="string"></value>
      <value name="console-ipv4-gateway-interface" type="string"></value>
      <value name="console-ipv6-gateway-interface" type="string"></value>
      <value name="vmkernel-ipv4-gateway-interface" type="string"></value>
      <value name="vmkernel-ipv6-gateway-interface" type="string"></value>
      <vmkernel-routes>
         <route>
            <value name="network" type="string">0.0.0.0/0</value>
            <value name="gateway" type="string">10.0.1.1</value>
            <value name="interface" type="string">vmk0</value>
         </route>
         <route>
            <value name="network" type="string">10.0.1.0/24</value>
            <value name="gateway" type="string">0.0.0.0</value>
            <value name="interface" type="string">vmk0</value>
         </route>
      </vmkernel-routes>
   </routing-info>
5.3. Viewing the ESXi Version
Problem
You want to find the version of ESXi you are running. This may be needed for a variety of reasons, such as for upgrading or support issues.
Solution
There are multiple ways to find the version of ESXi you are running. Two easy ways we’ll cover are:
Displaying it within the vCenter
Creating a report
Discussion
To find the version of ESXi that you are running within the vCenter, click on your ESXi Host. The version will be displayed to the right of the hostname. For instance, Figure 5-1 shows we are running ESXi 5.0.0 build 469512.

If you need to store the version, you can generate a report within the vCenter. Choose File→Report→Host Summary and save the file. The results include the version information.
5.4. Changing the Virtual Disk from BusLogic to LSI Logic
Solution
Use the vCenter to make the change.
Discussion
After using VMware’s Converter application, you may notice that your virtual machine’s SCSI controller has switched from LSI Logic to BusLogic. This is because on some OSs—notably, Windows 2003—the VMware Converter automatically uses the BusLogic driver, unlike when you create a new virtual machine using the vCenter client, which uses an LSI Logic driver. The LSI Logic driver offers better performance, so it’s a good idea to switch back:
Log in to your vCenter server, navigate to the virtual machine whose bus/controller you wish to change, and power it off.
Once the virtual machine is powered off, click the tab labeled Summary, then click Edit Settings.
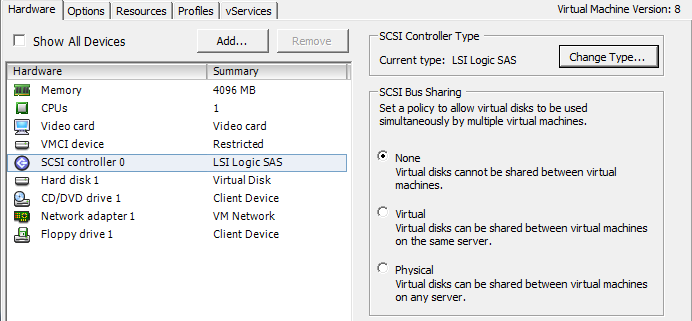
A new window will appear (Figure 5-2). Click on the SCSI Controller 0 option listed under the Hardware tab.
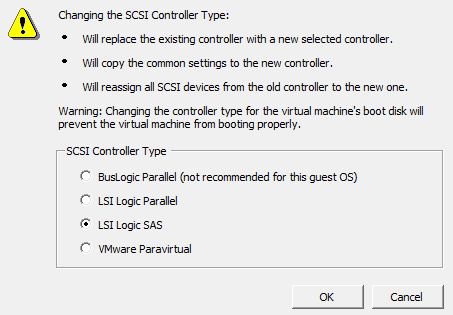
Click the Change Type button on the right side of the screen. A new window will appear in which you can change your SCSI controller type (Figure 5-3). Choose the type you wish to switch to (in this case, LSI Logic). A warning will pop up saying that changing the controller may have unexpected results when the virtual machine boots.
To complete the process, press the OK button. Then, on the Settings screen, press the OK button again. VMware will make the changes needed and convert the virtual machine to the new SCSI controller type.
Power on the virtual machine to finalize the changes.
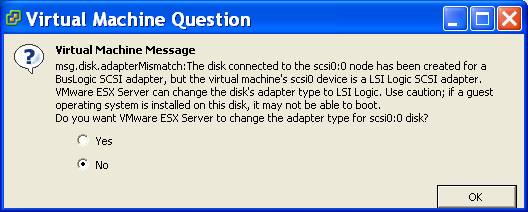
A Virtual Machine Question screen will pop up, warning you that you should be cautious when changing the controller type. Select Yes, and then click OK (Figure 5-4). If your virtual machine has problems booting with the new driver, switch back to the old one and reboot again.
5.5. Hiding the VMware Tools Icon
Problem
Many VMware users would like to hide or remove the VMware Tools icon, and are frustrated because the VMware Tools configuration offers no way to do it.
Discussion
Open the registry and navigate to the following key:
HKEY_CURRENT_USERSoftwareVMware, Inc.VMware ToolsShowTray
Warning
Do this with caution and back up your registry first!
Set the ShowTray variable to
0 (zero) and save it. Reboot your
virtual machine, and the settings will be reflected; the Tools icon will
now be hidden.
5.6. Viewing Disk Partitions via the Console
Discussion
Using the ESXi Shell, you can run the following command to see a list of datastores, their status, size, etc. Typical output looks like this:
~ # esxcli storage filesystem list
Mount Point              Volume Name           UUID                Mounted  Type
-----------------------  --------------------  ------------------  -------  ------
/vmfs/volumes/4f535fea-  datastore250 (1)      4f535fea-a7b3e465-  true     VMFS-5
a7b3e465-7829-                                 7829-5404a6487afd
5404a6487afd

/vmfs/volumes/4f546274-  esx02_datastore_lun1  4f546274-32257e8a-  true     VMFS-5
32257e8a-132c-                                 132c-5404a64c91b1
5404a64c91b1

/vmfs/volumes/4f54625f-  esx01_datastore_lun0  4f54625f-e702187c-  true     VMFS-5
e702187c-a9aa-                                 a9aa-5404a64c91b1
5404a64c91b1

/vmfs/volumes/2a35d7e3-                        2a35d7e3-f089ea92-  true     vfat
f089ea92-3611-                                 3611-fd54134d921f
fd54134d921f

/vmfs/volumes/cc7ca9e2-                        cc7ca9e2-579492ac-  true     vfat
579492ac-832f-                                 832f-d7eabf6ec3f9
d7eabf6ec3f9

/vmfs/volumes/4f3669f1-                        4f3669f1-dd9e8a3e-     true  vfat
dd9e8a3e-e9ba-                                 e9ba-000c290e79de
000c290e79de
This example shows our local OS-level disks and partitions (here,
datastore1) along with the VMFS
filesystems that are recognized only by the ESXI server.
5.7. Monitoring CPU Usage
Discussion
From the command line on your ESXI server, run the following:
esxtop
If you are familiar with the Unix top utility, esxtop will feel similar. Once
esxtop is running, press c to switch to CPU mode. This will display
your server’s current CPU usage statistics (Figure 5-5).
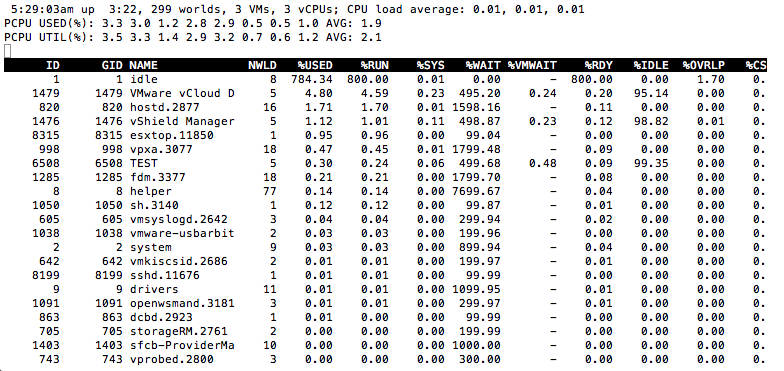
The first line displayed tells you:
The current time (5:29:03 a.m., in our example)
The time elapsed since the last reboot
The number of currently running virtual machines and virtual CPUs
CPU averages over 1, 5, and 15 minutes
The PCPU(%) line displays
the percentage of CPU use per physical CPU and the total average across
all the physical CPUs.
The CCPU(%) line shows the
CPU time as reported by the ESXI server or console. This is a user time
variable, as opposed to the PCPU, which measures time from the CPU’s
point of view.
Below the PCPU and CCPU lines, the following attributes are available:
IDGIDNAMENWLD%USEDThe percentage of physical CPU used by the resource pool, virtual machine, or world.
%RUNThe percentage of total time scheduled (not taking into account hyperthreading and system time).
%SYSSystem time: the time that elapses while kernel code is running.
%WAITThe total percentage of time the resource pool or world has spent in a wait state.
%RDYThe percentage of time the resource pool, virtual machine, or world has spent ready to run but waiting to get a CPU.
%IDLEThe percentage of time the VCPU world has spent in an idle loop (this applies only to the VCPU world; for other worlds, this field will be zero).
%OVRLPThe percentage of time spent by system services working on behalf of other worlds.
%CSTPThe percentage of time the world has spent in a ready, co-descheduled state (this state applies only to SMP VMs).
%MLMTDThe percentage of time the world spent ready to run but deliberately wasn’t scheduled to avoid violating the CPU limit settings.
LWID%STATE TIMESSet of CPU statistics made up of the following percentages. For a world, the percentages are a percentage of one physical CPU core.
EVENT COUNTS/sCPU ALLOCSet of CPU statistics made up of the following CPU allocation configuration parameters.
SUMMARY STATSSet of CPU statistics made up of the following CPU configuration parameters and statistics. These statistics apply only to worlds and not to virtual machines or resource pools.
POWER STATSCurrent CPU power consumption for a resource pool (in Watts).
You can find additional information regarding performance monitoring at http://pubs.vmware.com/vsphere-50/index.jsp?topic=/com.vmware.vsphere.monitoring.doc_50/GUID-AC5FAD2D-96DE-41C4-B5C6-A06FE65F34C6.html.
5.8. Monitoring Memory
Discussion
From the command line on your ESXI server, run the following command:
esxtop
Once esxtop is running, press the
m key to switch to memory mode.
This will display your server’s current memory usage statistics. Your
output will be similar to that in Figure 5-6. Note that here we have two
virtual machines running, TEST01 and
TEST02.
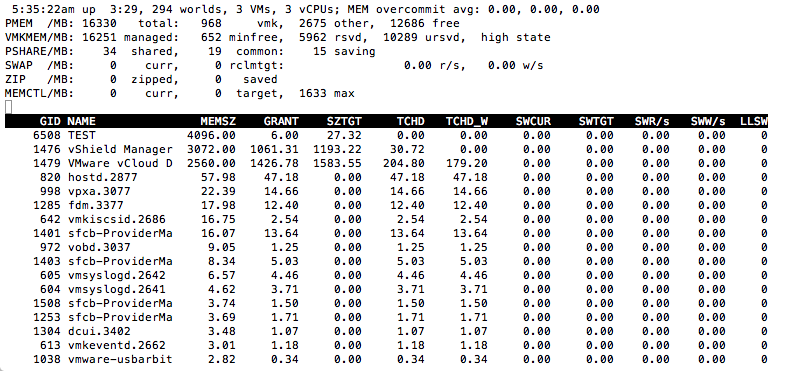
If you are familiar with the Unix top utility, esxtop has a similar feel, but it provides added information specific to your ESXI server. The first line displayed tells you:
The current time (5:35:22 a.m., in our example)
The time since the last reboot
The number of currently running worlds, virtual machines, and virtual CPUs
Memory overcommitment averages over 1, 5, and 15 minutes
The next line, PMEM, break downs the
total physical memory. In this example, the ESXI server has 16GB
(1,6330MB) of memory. Let’s take a look at the variables:
The VMKMEM line displays
the memory statistics for the VMkernel, including these variables:
managedThe total amount of machine memory being managed by the ESX Server’s VMkernel
minfreeThe minimum amount of virtual memory that the ESXi tries to keep free
rsvdursvdstateThe current state of machine memory; this will have one of the four values outlined in this excerpt from the official VMware document (DOC-9279)[1]
The memory “state” is “high,” if the free memory is greater than or equal to 6% of “total” – “cos.” [It] is “soft” at 4%, “hard” at 2%, and “low” at 1%. So, high implies that the machine memory is not under any pressure and low implies that the machine memory is under pressure.
While the host’s memory state is not used to determine whether memory should be reclaimed from VMs (that decision is made at the resource pool level), it can affect what mechanisms are used to reclaim memory if necessary. In the high and soft states, ballooning is favored over swapping. In the hard and low states, swapping is favored over ballooning.
Please note that “minfree” is part of “free” memory; while “rsvd” and “ursvd” memory may or may not be part of “free” memory. “reservation” is different from memory allocation.
COSMEM displays memory
statistics that are being reported by the ESXI server console. All
values are specified in megabytes. The values present here are:
PSHARE tells you the
current page-sharing status in the following categories. All values are
specified in megabytes:
SWAP tells you about
the swap usage on the ESXI server. Again, all values are in megabytes:
MEMCTL displays the
memory ballooning statistics. All stats are measured in
megabytes:
After the general status lines, the output shows the memory usage of each virtual machine. The line with a white background contains a header.
Additional variables can be configured by pressing the F key while in esxtop memory mode.
The variables reported for each virtual machine are:
%ACTVThe percentage of guest physical memory that is being referenced by the guest.
MEMSZThe amount of physical memory allocated to a resource pool or virtual machine.
MCTLSZThe amount of memory that has been reclaimed from the resource pool by ballooning.
SWCURThe current amount of swap memory, in megabytes, being used by the virtual machine or resource pool.
SWR/sThe rate at which the ESXI server is swapping memory from the disk for the virtual machine or resource pool.
SWW/sThe rate at which the ESXI server is swapping memory to the disk for the virtual machine or resource pool.
OVHDAMINThe memory reservation for this resource pool or virtual machine.
AMAXThe memory limit for this resource pool or virtual machine. A value of –1 means unlimited.
ASHRSThe memory shares for this resource pool or virtual machine.
NHNThe current home node for the resource pool or virtual machine. This statistic is applicable only on NUMA systems. If the virtual machine has no home node, a dash (-) appears.
NRMEMThe current amount of remote memory allocated to the virtual machine or resource pool. This statistic is applicable only on NUMA systems.
N% LThe current percentage of memory allocated to the virtual machine or resource pool that is local.
MEMSZ (MB)The amount of physical memory allocated to a resource pool or virtual machine.
GRANT (MB)The amount of guest physical memory mapped to a resource pool or virtual machine.
SZTGT (MB)The amount of machine memory the ESXi VMkernel wants to allocate to a resource pool or virtual machine.
TCHD (MB)A working set estimate for the resource pool or virtual machine.
MCTLSZ (MB)The amount of physical memory reclaimed from the resource pool by way of ballooning.
MCTLTGT (MB)The amount of physical memory the ESXi system attempts to reclaim from the resource pool or virtual machine by way of ballooning.
MCTLMAX (MB)The maximum amount of physical memory the ESXi system can reclaim from the resource pool or virtual machine by way of ballooning. This maximum depends on the guest operating system type.
SWCUR (MB)Current swap usage by this resource pool or virtual machine.
SWTGT (MB)The target where the ESXi Host expects the swap usage by the resource pool or virtual machine to be.
SWR/s (MB)Rate at which the ESXi Host swaps in memory from disk for the resource pool or virtual machine.
For additional details, please refer to the VMware documentation located at http://pubs.vmware.com/vsphere-50/index.jsp?topic=/com.vmware.vsphere.monitoring.doc_50/GUID-AC5FAD2D-96DE-41C4-B5C6-A06FE65F34C6.html.
5.9. Monitoring Storage Performance
Solution
Using esxtop, you can also monitor your disk statistics and troubleshoot your storage infrastructure.
Discussion
From the command line on your ESXI server, run the following:
esxtop
If you are familiar with the Unix top command, esxtop will feel similar. Once
esxtop is running, press the
d key to switch to storage mode.
This will display statistics for your server’s SCSI adapters, including
HBAs attached through iSCSI and the Fibre NAS. Figure 5-7 shows multiple
adapters, including local SCSI, Fibre, and iSCSI HBAs, but there is no
indication on this screen as to which adapter belongs to which storage
type.
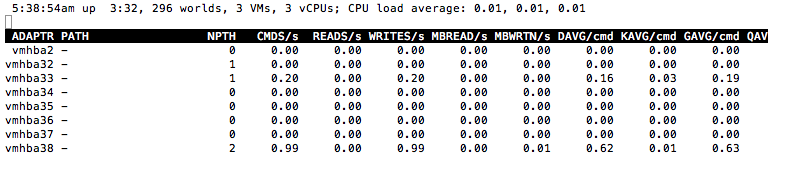
The first line displayed tells you the following information:
The current time (5:38:54 a.m., in our example)
The time since the last reboot
The number of currently running worlds, virtual machines, and vCPUs
The CPU load averages for the system
The header that follows lists columns that will describe each
disk. To view additional variables while in esxtop, you can press the f key to toggle them:
ADAPTRNPATHAQLENThe storage adapter queue depth. This is the maximum number of ESXI server VMkernel active commands that the adapter driver is configured to support.
LQLENQUEDThe commands that the system is currently queuing. This applies to worlds/LUNs only.
READS/sThe number of commands being read per second. Multiple paths will be shown separately.
WRITES/sThe number of writes issued per second. Multiple paths will be shown separately.
MBREAD/sThe number of megabytes read per second. Multiple paths will be shown separately.
MBWRTN/sThe number of megabytes written per second. Multiple paths will be shown separately.
DAVG/cmdThe device latency per command between the storage and the adapter.
KAVG/cmdGAVG/cmd
Other useful tools to monitor disk usage, such as perfmon and iostat, can also be launched from the ESXI server’s command line. These are useful tools that are native to Linux and that can help you troubleshoot alongside esxtop.
5.10. Monitoring Network Usage
Solution
Use the esxtop utility to monitor network usage.
Discussion
From the command line on your ESXI server, run the following:
esxtop
Once esxtop is running, press the n key to switch to network mode. This will
display your server’s current network statistics (Figure 5-8).

If you are familiar with the Unix top command, esxtop will feel similar. Let’s take a look at some of the values displayed in Figure 5-8:
5.11. Managing Virtual Switches
Solution
Run the esxcli network vswitch
standard command on the ESXI server.
Discussion
You’ll find this one of the most useful commands to use from your ESXi shell. It allows you to list, add, modify, or delete virtual Ethernet switches on your server using standard vSwitches. The second command here is specific to the distributed vSwitches which at this time, you can only view.
~ # esxcli network vswitch standard -h
Available Namespaces:
policy Commands to manipulate network policy settings governing the
given virtual switch.
portgroup Commands to list and manipulate Port Groups on an ESXi host.
uplink Commands to add and remove uplink on given virtual switch.
Available Commands:
add Add a new virtual switch to the ESXi networking system.
list List the virtual switches current on the ESXi host.
remove Remove a virtual switch from the ESXi networking system.
set This command sets the MTU size and CDP status of a given
virtual switch.
~ # esxcli network vswitch dvs -h
Usage: esxcli network vswitch dvs {cmd} [cmd options]
Available Namespaces:
vmware Commands to retrieve VMware vSphere Distributed Switch
informationThe -l option lists the
virtual switches and port groups that are configured on your ESXI
server. Its output will look something like this:
~ # esxcli network vswitch standard list vSwitch0 Name: vSwitch0 Class: etherswitch Num Ports: 128 Used Ports: 3 Configured Ports: 128 MTU: 1500 CDP Status: listen Beacon Enabled: false Beacon Interval: 1 Beacon Threshold: 3 Beacon Required By: Uplinks: vmnic0 Portgroups: VM Network, Management Network vSwitch1 Name: vSwitch1 Class: etherswitch Num Ports: 128 Used Ports: 1 Configured Ports: 128 MTU: 1500 CDP Status: listen Beacon Enabled: false Beacon Interval: 1 Beacon Threshold: 3 Beacon Required By: Uplinks: Portgroups: vMotion
As you can see in this example, we have two vSwitch: vSwitch0 contains our VM and Management Network portgroup, and vSwitch1 contains our vMotion portgroup.
Using the add option, you can
add more virtual switches to your ESXI server:
esxcli network vswitch standard add -v vSwitch1 -P 128
Warning
Check your options carefully before entering each of these commands. If you enter incorrect options, you risk being disconnected from your ESXI server.
Using the -l option again will
show you that the new virtual switch has been added but doesn’t have a
portgroup or an uplink:
~ # esxcli network vswitch standard list
...
vSwitch1
   Name: vSwitch1
   Class: etherswitch
   Num Ports: 128
   Used Ports: 1
   Configured Ports: 128
   MTU: 1500
   CDP Status: listen
   Beacon Enabled: false
   Beacon Interval: 1
   Beacon Threshold: 3
   Beacon Required By:
   Uplinks:
   Portgroups:
To configure a portgroup on your new virtual switch, use the
-v (lowercase) option
along with the -p (lowercase) option
to designate the new portgroup being added to the vSwitch.
~ # esxcli network vswitch standard portgroup add -v vSwitch1 -p vMotion
Again using the -l option to verify the
changes, you will notice that the backup network portgroup has been
added under vSwitch1 but that it has not yet been
assigned to an uplink:
~ # esxcli network vswitch standard list
vSwitch1
   Name: vSwitch1
   Class: etherswitch
   Num Ports: 128
   Used Ports: 1
   Configured Ports: 128
   MTU: 1500
   CDP Status: listen
   Beacon Enabled: false
   Beacon Interval: 1
   Beacon Threshold: 3
   Beacon Required By:
   Uplinks:
   Portgroups: vMotion
The -u option (uppercase)
allows us to assign the PNIC (physical NIC) to the virtual switch. In this
example, we are configuring physical Ethernet port 1 to vSwitch1.
~ # esxcli network vswitch standard uplink add -u vmnic1 -v vSwitch1
Verify your configuration change again and notice this time that the uplinks on the vSwitch and the portgroup have been assigned to vmnic1:
~ # esxcli network vswitch standard list
...
vSwitch1
   Name: vSwitch1
   Class: etherswitch
   Num Ports: 128
   Used Ports: 2
   Configured Ports: 128
   MTU: 1500
   CDP Status: listen
   Beacon Enabled: false
   Beacon Interval: 1
   Beacon Threshold: 3
   Beacon Required By:
   Uplinks: vmnic1
   Portgroups: vMotion
And finally, to remove a vmnic from a vSwitch and portgroup, use the following command. The -u represents the uplink and -v the vSwitch in which the uplink will be removed.
esxcli network vswitch standard uplink remove -u vmnic1 -v vSwitch1
5.12. Generating a Logfile for VMware Support
Problem
VMware support may require you to send in a configuration dump of your ESXI server for troubleshooting specific issues.
Discussion
If you open a ticket with VMware support, VMware might request you
to send a support bundle. This is an archive
package filled with logs and other information about your ESXI server.
Luckily, there is a very simple and powerful command that will generate
a tar file that includes everything necessary. The vm-support command is
also useful for your own troubleshooting:
~ # vm-support -h
Usage: vm-support [options]

Options:
  -h, --help            show this help message and exit
  -g GROUPS, --groups=GROUPS
                        Gather data from listed groups
  -a MANIFESTS, --manifests=MANIFESTS
                        Gather from listed manifests
  -e EXCLUDEMANIFESTS, --excludemanifests=EXCLUDEMANIFESTS
                        Exclude the listed manifests
  --listmanifests       List available manifests
  -G, --listgroups      List available manifest groups
  -t, --listtags        List available manifest tags
  -p, --performance     Gather performance data
  -d DURATION, --duration=DURATION
                        Duration of performance monitoring (in seconds)
  -i INTERVAL, --interval=INTERVAL
                        Interval between performance snapshots
  -v VM, --vm=VM        Gather detailed information about this specific VM (ie
                        --vm <path to .vmx file>)
  -V, --listvms         List currently registered VMs
  -w WORKINGDIR, --workingdir=WORKINGDIR
                        Directory to create .tgz in
  -D, --dryrun          Prints out the data that would have been gathered
  -s, --stream          stream data to stdout
  -q, --quiet           Output only the location of the bundle
  -E ERRORFILE, --errorfile=ERRORFILE
                        Prints (non-fatal) errors to specified file (overrides
                        --quiet and --stream)
  --loglevel=LOGLEVEL   Set logging to specified level: 0-50 (0=most verbose)
  --version             Display the vm-support version
  -l, --listfiles       List all files gathered by vm-support
~ #
The -v option displays all
the running virtual machines on the ESXI server:
~ # vm-support -V

Available worlds to debug:

vmid=1104      TEST01
vmid=1116      TEST02
vmid=1124      TEST03
To bundle up all your logs on the ESXI server, just run vm-support without
arguments. This process will take about 5 to 15 minutes and will produce
a .tgz file in the same directory where
the command is run. You will see something similar to this while the
tarball is being generated:
~ # vm-support
19:03:41: Creating /var/tmp/esx-test01-2011-10-10--19.03.tgz
When the command completes, it will give you detailed information on the location of the file and how to submit it to VMware support:
19:07:17: Done.
Please attach this file when submitting an incident report.
To file a support incident, go to http://www.vmware.com/support/sr/sr_login.jsp
To see the files collected, run: tar -tzf '/var/tmp/esx-test01-2011-10-10--19.05.tgz'
You can do a lot of other things with this command, such as
collect performance data or run an SCSI trace on a virtual machine. Use
the -h option to see the
available options.
5.13. Checking ESXi Patches
Discussion
A typical run of this command produces output like:
~ # esxcli software vib list
Name                  Version                             Vendor  Acceptance Level
--------------------  ----------------------------------  ------  ----------------
ata-pata-amd          0.3.10-3vmw.500.0.0.469512          VMware  VMwareCertified
ata-pata-atiixp       0.4.6-3vmw.500.0.0.469512           VMware  VMwareCertified
ata-pata-cmd64x       0.2.5-3vmw.500.0.0.469512           VMware  VMwareCertified
ata-pata-hpt3x2n      0.3.4-3vmw.500.0.0.469512           VMware  VMwareCertified
ata-pata-pdc2027x     1.0-3vmw.500.0.0.469512             VMware  VMwareCertified
ata-pata-serverworks  0.4.3-3vmw.500.0.0.469512           VMware  VMwareCertified
ata-pata-sil680       0.4.8-3vmw.500.0.0.469512           VMware  VMwareCertified
ata-pata-via          0.3.3-2vmw.500.0.0.469512           VMware  VMwareCertified
block-cciss           3.6.14-10vmw.500.0.0.469512         VMware  VMwareCertified
ehci-ehci-hcd         1.0-3vmw.500.0.0.469512             VMware  VMwareCertified
esx-base              5.0.0-0.0.469512                    VMware  VMwareCertified
esx-tboot             5.0.0-0.0.469512                    VMware  VMwareCertified
ima-qla4xxx           2.01.07-1vmw.500.0.0.469512         VMware  VMwareCertified
ipmi-ipmi-devintf     39.1-4vmw.500.0.0.469512            VMware  VMwareCertified
ipmi-ipmi-msghandler  39.1-4vmw.500.0.0.469512            VMware  VMwareCertified
ipmi-ipmi-si-drv      39.1-4vmw.500.0.0.469512            VMware  VMwareCertified
misc-cnic-register    1.1-1vmw.500.0.0.469512             VMware  VMwareCertified
misc-drivers          5.0.0-0.0.469512                    VMware  VMwareCertified
net-be2net            4.0.88.0-1vmw.500.0.0.469512        VMware  VMwareCertified
net-bnx2              2.0.15g.v50.11-5vmw.500.0.0.469512  VMware  VMwareCertified
net-bnx2x             1.61.15.v50.1-1vmw.500.0.0.469512   VMware  VMwareCertified
net-cnic              1.10.2j.v50.7-2vmw.500.0.0.469512   VMware  VMwareCertified
net-e1000             8.0.3.1-2vmw.500.0.0.469512         VMware  VMwareCertified
net-e1000e            1.1.2-3vmw.500.0.0.469512           VMware  VMwareCertified
net-enic              1.4.2.15a-1vmw.500.0.0.469512       VMware  VMwareCertified
net-forcedeth         0.61-2vmw.500.0.0.469512            VMware  VMwareCertified
net-igb               2.1.11.1-3vmw.500.0.0.469512        VMware  VMwareCertified
net-ixgbe             2.0.84.8.2-10vmw.500.0.0.469512     VMware  VMwareCertified
net-nx-nic            4.0.557-3vmw.500.0.0.469512         VMware  VMwareCertified
net-r8168             8.013.00-3vmw.500.0.0.469512        VMware  VMwareCertified
net-r8169             6.011.00-2vmw.500.0.0.469512        VMware  VMwareCertified
net-s2io              2.1.4.13427-3vmw.500.0.0.469512     VMware  VMwareCertified
net-sky2              1.20-2vmw.500.0.0.469512            VMware  VMwareCertified
net-tg3               3.110h.v50.4-4vmw.500.0.0.469512    VMware  VMwareCertified
ohci-usb-ohci         1.0-3vmw.500.0.0.469512             VMware  VMwareCertified
sata-ahci             3.0-6vmw.500.0.0.469512             VMware  VMwareCertified
sata-ata-piix         2.12-4vmw.500.0.0.469512            VMware  VMwareCertified
sata-sata-nv          3.5-3vmw.500.0.0.469512             VMware  VMwareCertified
sata-sata-promise     2.12-3vmw.500.0.0.469512            VMware  VMwareCertified
sata-sata-sil         2.3-3vmw.500.0.0.469512             VMware  VMwareCertified
sata-sata-svw         2.3-3vmw.500.0.0.469512             VMware  VMwareCertified
scsi-aacraid          1.1.5.1-9vmw.500.0.0.469512         VMware  VMwareCertified
scsi-adp94xx          1.0.8.12-6vmw.500.0.0.469512        VMware  VMwareCertified
scsi-aic79xx          3.1-5vmw.500.0.0.469512             VMware  VMwareCertified
scsi-bnx2i            1.9.1d.v50.1-3vmw.500.0.0.469512    VMware  VMwareCertified
scsi-fnic             1.5.0.3-1vmw.500.0.0.469512         VMware  VMwareCertified
scsi-hpsa             5.0.0-17vmw.500.0.0.469512          VMware  VMwareCertified
scsi-ips              7.12.05-4vmw.500.0.0.469512         VMware  VMwareCertified
scsi-lpfc820          8.2.2.1-18vmw.500.0.0.469512        VMware  VMwareCertified
scsi-megaraid-mbox    2.20.5.1-6vmw.500.0.0.469512        VMware  VMwareCertified
scsi-megaraid-sas     4.32-1vmw.500.0.0.469512            VMware  VMwareCertified
scsi-megaraid2        2.00.4-9vmw.500.0.0.469512          VMware  VMwareCertified
scsi-mpt2sas          06.00.00.00-5vmw.500.0.0.469512     VMware  VMwareCertified
scsi-mptsas           4.23.01.00-5vmw.500.0.0.469512      VMware  VMwareCertified
scsi-mptspi           4.23.01.00-5vmw.500.0.0.469512      VMware  VMwareCertified
scsi-qla2xxx          901.k1.1-14vmw.500.0.0.469512       VMware  VMwareCertified
scsi-qla4xxx          5.01.03.2-3vmw.500.0.0.469512       VMware  VMwareCertified
uhci-usb-uhci         1.0-3vmw.500.0.0.469512             VMware  VMwareCertified
tools-light           5.0.0-0.0.469512                    VMware  VMwareCertified
As you can see, we have an extensive history of patches that have been applied to our server. This command is useful for confirming that specific patches have been applied, or learning about the history of a machine that has been running for a while but for which you have just been given responsibility.
5.14. Enabling NTP in the vCenter
Solution
By using the vCenter, you can easily configure NTP on your ESX host.
Discussion
Keeping your ESXI servers and virtual machines in sync is crucial to your virtual environment. Using NTP to manage time on your ESXi Server and the virtual machines ensures that your virtual machines are not losing CPU cycles due to mismatched time synchronization.
This example shows you how to configure time via the vCenter, the preferred method of for your ESXI server. However, if you are feeling brave, you can refer to Recipe 5.15 to configure NTP via the command line.
To get started, log in to the vCenter with your administrator account. Then follow these steps:
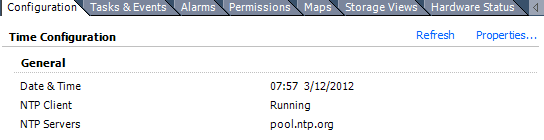
Click on the ESXI server on which you want to configure NTP. Under Configuration, select Time Configuration. You will then see a brief overview of your NTP configuration and NTP client stats (Figure 5-9).
Continue by clicking the Properties link in the upper right corner of the Time Configuration overview screen. You will be presented with a new window with options to configure NTP (Figure 5-10).

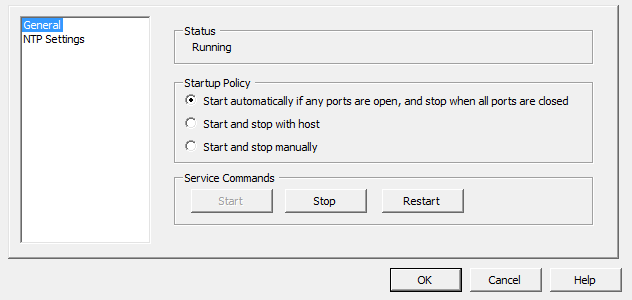
Click the Options button near the bottom right corner. You will be presented with a new window where you can select the appropriate startup policy. In our example, we chose “Start automatically if any ports are open, and stop when all ports are closed” (Figure 5-11). Note: If you are running ESXi, your first choice will read “Start automatically.”
When you press OK, the vCenter will change the firewall rules for you automatically and will allow traffic through this port.
Click on the NTP Settings link, and you will be shown the list of active NTP servers (Figure 5-12). If you are setting up NTP for the first time, there will be nothing listed here.
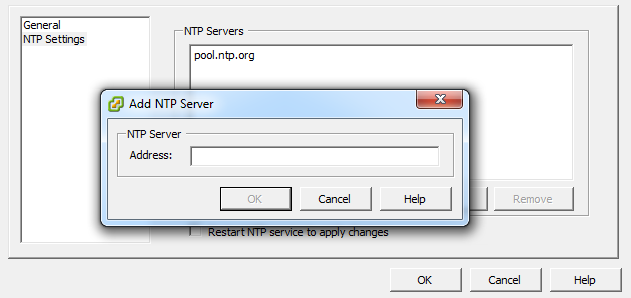
Click the Add button to add your NTP servers. If you have a default of 127.0.0.1, you can safely remove that entry by clicking it and then clicking the Remove button. Press OK to apply the changes and start the NTP service.
ESXi will automatically provision the correct firewall rules, allowing connections on port 123. You will notice that the system time is synchronized shortly after the NTP service is started.
See Also
Recipe 5.15
5.15. Changing the ESXI Server’s Time
Solution
Using the service console, you can configure NTP services on your ESXi host.
Discussion
Although Recipe 5.14 showed you how to enable NTP interactively, you may want to do it in a script. All the steps shown in Recipe 5.14 can also be performed through shell commands:
To get started, log in to the ESXi Shell and run the following command:
~ # esxcli system time set --help
Usage: esxcli system time set [cmd options]

Description:
  set         Set the system clock time. Any missing parameters will
              default to the current time

Cmd options:
  -d|--day=<long>       Day
  -H|--hour=<long>      Hour
  -m|--min=<long>       Minute
  -M|--month=<long>     Month
  -s|--sec=<long>       Second
  -y|--year=<long>      Year
Next, set the time to match your current time.
esxcli system time set -d 29 -H 20 -m 50 -M 11 -s 30 -y 2011
The following command opens the firewall port to ensure all NTP-related traffic is allowed through:
esxcli network firewall ruleset set -e true -r ntpClient
The NTP client will now be enabled and the time will set on the ESXI server correctly.
See Also
Recipe 5.14
5.16. Restarting the vCenter Agent
Solution
You can restart the agent from the command line.
Discussion
From time to time, you may have to restart the virtual center agent on your ESXI server. For example, the vCenter may not see changes made with command-line utilities until you restart the agent. You can do this with the following command:
/sbin/services.sh restart
While the agent is restarting, you may see your ESXI server become disconnected from the vCenter. Don’t worry, your virtual machines will continue to run, and the ESXI server will reconnect once the agent and the vCenter server reestablish a connection.
5.17. Finding Virtual Machine Snapshots
Solution
You can list all the snapshots via the command line.
Discussion
This command will list all the snapshots in your virtual machine’s directories:
~ # ls -Ral /vmfs/volumes/* |grep .vmsn
-rw-------    1 root     root         4304896432 Mar 12 12:01 DNS-Snapshot1.vmsn
This is helpful if you need to track down which virtual machines currently have snapshots associated with them.
Snapshots will consume a lot of disk space if left unattended and should be reverted when possible.
5.18. Renaming a Virtual Machine via the vCenter
Solution
You can rename virtual machines in the vCenter.
Discussion
Log in to your vCenter server and follow these quick steps:
Power off the virtual machine you want to rename.
Rename the virtual machine by right-clicking and choosing Rename.
Migrate the virtual machine to another datastore.
This method requires you to have more than one datastore available to your ESXI servers. However, it is the quickest method available to rename a virtual machine, because it will actually copy the virtual machine’s files to the new datastore and rename them accordingly.
5.19. Setting ESXi Options Using the Command Line
Problem
You want to set advanced configuration variables on your ESXI server, but you can’t use the vCenter (or you want to automate the process by using command-line tools).
Discussion
This command allows you to adjust the advanced configuration values from the command line. These values can also be changed inside the vCenter, which is much easier; however, if the vCenter isn’t available, this command will allow you to make the needed adjustments. Options you can change are:
~ # esxcli system settings advanced
Usage: esxcli system settings advanced {cmd} [cmd options]
Available Commands:
list List the advanced options available from the VMkernel.
set Set the value of an advanced option.To get an idea of what is configurable via the command line, run
the list command. This will
give you a very large output of options that can be tweaked:
~ # esxcli system settings advanced list Path: /Irq/BestVcpuRouting Type: integer Int Value: 0 Default Int Value: 0 Min Value: 0 Max Value: 1 String Value: Default String Value: Valid Characters: Description: 1: try to route the virtual interrupt to the best vcpu; 0 to disable Path: /Irq/IRQRebalancePeriod Type: integer Int Value: 50 Default Int Value: 50 Min Value: 10 Max Value: 20000 String Value: Default String Value: Valid Characters: Description: time in ms between attempts to rebalance interrupts ...
Inside these directories are text files that contain configurable values. For example, the Misc subdirectory has a file named HostName that contains a value like the following:
~ # esxcli system settings advanced list -o /Misc/HostName Path: /Misc/HostName Type: string Int Value: 0 Default Int Value: 0 Min Value: 0 Max Value: 0 String Value: localhost.test.com Default String Value: localhost Valid Characters: ** Description: Host name
The -s switch lets you set
a specific parameter. For instance, the following command changes the
hostname of the ESXI server:
esxcli system settings advanced set -s servername.test.com -o /Misc/hostName
5.20. Configuring Authentication Choices Using the Command Line
Problem
ESXi 3.5/4.x ONLY - You want to use the command line to set authentication parameters such as the type of authentication, the authentication server, and password aging.
Discussion
The esxcfg-auth command
allows you to configure different authentication methods on your ESXI
server. We won’t go into detail on the configurable options here,
because we discuss setting up an Active Directory in Chapter 6. However, here’s a list of those
options:
$ esxcfg-auth -h
usage: esxcfg-auth [options]

options:
  --enablemd5              Enable MD5 password storage
  --disablemd5             Disable MD5 password storage
  --enableshadow           Enable Shadow password storage
  --disableshadow          Disable Shadow password storage
  --enablenis              Enable NIS Authentication
  --disablenis             Disable NIS Authentication
  --nisdomain=domain       Set the NIS domain
  --nisserver=server       Set the NIS server
  --enableldap             Enable LDAP User Management
  --disableldap            Disable LDAP User Management
  --enableldapauth         Enable LDAP Authentication
  --disableldapauth        Disable LDAP Authentication
  --ldapserver=server      Set the LDAP Server
  --ldapbasedn=basedn      Set the base DN for the LDAP server
  --enableldaptls          Enable TLS connections for LDAP
  --disableldaptls         Disable TLS connections for LDAP
  --enablekrb5             Enable Kererbos Authentication
  --disablekrb5            Disable Kererbos Authentication
  --krb5realm=domain       Set the Kerberos Realm
  --krb5kdc=server         Set the Kebreros Key Distribution Center
  --krb5adminserver=server Set the Kerberos Admin Server
  --enablead               Enable Active Directory Authentication
  --disablead              Disable Active Directory Authentication
  --addomain=domain        Set the Active Directory Domain
  --addc=server            Set the Active Directory Domain Controller
  --usepamqc=values        Enable the pam_passwdqc module
  --usecrack=values        Enable the pam_cracklib module
  --enablecache            Enables caching of login credentials
  --disablecache           Disables caching of login credentials
  --passmaxdays=days       Set the maximum number of days a password remains valid
  --passmindays=days       Set the minimum number of days a password remains valid
  --passwarnage=days       Set the number of days a warning is given before a
                           password expires
  --maxfailedlogins=count  Sets the maximum number of login failures before the
                           account is locked out, setting to 0 will disable this
  -p, --probe              Print the settings to the console
  -v, --verbose            Enable verbose logging
  -h, --help               show this help message and exit
5.21. Manipulating the Crash Dump Partition
Problem
You wish to manage the VMkernel crash dump partition. Normally, this is set up during the installation of your ESXI server and will not require any further maintenance. However, a tool is available if you need to look at or manipulate it.
Discussion
A dump partition is a section of your hard drive that is set aside
as a place for information from crashes to be automatically stored for
later retrieval and use in troubleshooting. There are a few options
available here, network and partition, which will gather statistics and
data to include in the core dump file.
~ # esxcli system coredump
Usage: esxcli system coredump {cmd} [cmd options]

Available Namespaces:
  network               Operations pertaining to the VMkernel Core dump configuration
                        on network dump servers.
  partition             Operations pertaining to the VMkernel Core dump configuration
                        on VMkernel Diagnostic partitions.
Running the command with the list option lists the
ESXI server’s crash dump partition, which is normally set up when ESXi
is installed. A typical output will look similar to this:
~ # esxcli system coredump partition list
Name                   Path                                       Active  Configured
---------------------  -----------------------------------------  ------  ----------
mpx.vmhba1:C0:T0:L0:7  /vmfs/devices/disks/mpx.vmhba1:C0:T0:L0:7    true        true
You will probably never need to make changes to this partition.
5.22. Configuring a Firewall on the Command Line
Discussion
VMware makes it easy to configure the firewall on your ESXi Hosts with the following command. Generally, the firewall is configured via the vCenter client. However, it is important to understand how to do this via the command line as well. The configuration options are listed here:
~ # esxcli network firewall
Usage: esxcli network firewall {cmd} [cmd options]

Available Namespaces:
  ruleset               Commands to list and update firewall ruleset configuration

Available Commands:
  get                   Get the firewall status
  load                  Load firewall module and rulesets configuration
  refresh               Load ruleset configuration for firewall
  set                   Set firewall enabled status and default action
  unload                Allow unload firewall module
                                      Show this message
We won’t go into detail on the configuration options here because we discuss configuring your firewall in Chapter 6.
See Also
5.23. Managing ESXi Driver Modules
Discussion
The esxcli system module
command provides you with a way to adjust the driver modules that are
loaded during the ESXI server’s startup sequence. Here’s a list of the
configurable options:
~ # esxcli system module
Usage: esxcli system module {cmd} [cmd options]

Available Namespaces:
  parameters            Operations that allow manipulation of parameters of VMkernel
                        loadable modules and device drivers. Operations include list
                        and set options.

Available Commands:
  get                   Show the ELF header information for the given VMkernel module.
  list                  List the VMkernel modules that the system knows about.
  load                  Load a VMkernel module with the given name if it is enabled.
                        If the module is disabled then the use of --force is required
                        to load the module.
  set                   Allow enabling and disabling of a VMkernel module.
Use the list option to find out
which modules are loaded on boot and whether any modules are disabled.
In our example, we have no modules disabled (modules that are disabled
will display as false):
~ # esxcli system module list
Name                 Is Loaded  Is Enabled
-------------------  ---------  ----------
vmkernel                  true        true
procfs                    true        true
vmkplexer                 true        true
vmklinux_9                true        true
vmklinux_9_2_0_0          true        true
random                    true        true
usb                       true        true
ehci-hcd                  true        true
usb-uhci                  true        true
hid                       true        true
dm                        true        true
nmp                       true        true
vmw_satp_local            true        true
vmw_satp_default_aa       true        true
vmw_psp_lib               true        true
vmw_psp_fixed             true        true
vmw_psp_rr                true        true
vmw_psp_mru               true        true
libata                    true        true
usb-storage               true        true
vfat                      true        true
vprobe                    true        true
vmci                      true        true
iscsi_trans               true        true
etherswitch               true        true
netsched                  true        true
cnic_register             true        true
e1000                     true        true
iscsi_linux               true        true
libfc                     true        true
libfcoe                   true        true
ata_piix                  true        true
mptspi                    true        true
lvmdriver                 true        true
deltadisk                 true        true
multiextent               true        true
heartbeat                 true        true
shaper                    true        true
cdp                       true        true
ipfix                     true        true
fence_overlay             true        true
tcpip3                    true        true
dvsdev                    true        true
dvfilter                  true        true
esxfw                     true        true
vmkibft                   true        true
vmfs3                     true        true
nfsclient                 true        true
vmkstatelogger            true        true
migrate                   true        true
cbt                       true        true
svmmirror                 true        true
hbr_filter                true        true
vmkapei                  false        true
The get option allows you
to view information specific to a module. For example, here is the
output of the vmfs3 module:
~ # esxcli system module get -m vmfs3
   Module: vmfs3
   Module File: /usr/lib/vmware/vmkmod/vmfs3
   License: VMware
   Version: Version 14.54, Built on: Aug 18 2011
   Signed Status: VMware Signed
   Signature Issuer: VMware, Inc.
   Signature Digest: cfae f194 c756 d2a1 b1ae eae1 8e59 3e93 29d5 4aac 55db ea10 46a7
                     5b3e 5008 e9e3
   Signature FingerPrint: cb44 247a 1614 cea1 2079 362d ec86 9d0e
   Provided Namespaces: esx@nover
   Required Namespaces: com.vmware.vmkapi@v2_0_0_0, scsiVMware@0, vmkernel@nover
5.24. Configuring Storage Multipathing
Problem
You want to manage the paths between the ESXI server and its storage devices via the command line instead of using the vCenter client.
Solution
By running the esxcli storage
core path command on the ESXI server, you can configure the
pathing information for your SAN
storage.
Discussion
The easiest way to manage your storage’s paths is using the
vCenter. However, VMware also provides the esxcli storage core path command to enable you
to manage them via the command line.
Let’s take a look at the options available for configuring multipathing via the ESXi Shell:
~ # esxcli storage core path
Usage: esxcli storage core path {cmd} [cmd options]

Available Namespaces:
  stats                 Stats operations pertaining to the pluggable storage archite-
                        ctures' device paths on the system.

Available Commands:
  list                  List all the SCSI paths on the system.
  set                   Provide control to allow a user to modify a single path's
                        state. This effectively allows a user to enable or disable
                        SCSI paths. The user is not able to change the full range of
                        path states, but can toggle between 'active' and 'off'. Please
                        NOTE changing the Path state on any path that is the only path
                        to a given device is likely to fail. The VMkernel will not
                        change the path's state if changing the state would cause an
                        'All paths down' state or the device is currently in use.
Using the following command, you can get the output of your current paths, adapter information, target, LUN, etc. The following output on our development system shows our current paths to the local disk, Local VMware, Disk. In addition, we can also see the driver we are using, which is NMP, which is the native multipathing driver built into ESXi, and the drive type in this example its IDE.
~ # esxcli storage core path list
usb.vmhba32-usb.0:0-mpx.vmhba32:C0:T0:L0
   UID: usb.vmhba32-usb.0:0-mpx.vmhba32:C0:T0:L0
   Runtime Name: vmhba32:C0:T0:L0
   Device: mpx.vmhba32:C0:T0:L0
   Device Display Name: Local USB Direct-Access (mpx.vmhba32:C0:T0:L0)
   Adapter: vmhba32
   Channel: 0
   Target: 0
   LUN: 0
   Plugin: NMP
   State: active
   Transport: usb
   Adapter Identifier: usb.vmhba32
   Target Identifier: usb.0:0
   Adapter Transport Details: Unavailable or path is unclaimed
   Target Transport Details: Unavailable or path is unclaimed

iqn.1998-01.com.vmware:esx2-6d027a7c-00023d000002,iqn.esx,t,1-t10.
                       FreeBSD_iSCSI_Disk______001d60f814da000_________________
   UID: iqn.1998-01.com.vmware:esx2-6d027a7c-00023d000002,iqn.esx,t,1-t10.
        FreeBSD_iSCSI_Disk______001d60f814da000_________________
   Runtime Name: vmhba38:C1:T0:L0
   Device: t10.FreeBSD_iSCSI_Disk______001d60f814da000_________________
   Device Display Name: FreeBSD iSCSI Disk
                        (t10.FreeBSD_iSCSI_Disk______001d60f814da000_________________)
   Adapter: vmhba38
   Channel: 1
   Target: 0
   LUN: 0
   Plugin: NMP
   State: active
   Transport: iscsi
   Adapter Identifier: iqn.1998-01.com.vmware:esx2-6d027a7c
   Target Identifier: 00023d000002,iqn.esx,t,1
   Adapter Transport Details: iqn.1998-01.com.vmware:esx2-6d027a7c
   Target Transport Details: IQN=iqn.esx Alias= Session=00023d000002 PortalTag=1

iqn.1998-01.com.vmware:esx2-6d027a7c-00023d000002,iqn.esx,t,1-t10.
                       FreeBSD_iSCSI_Disk______001d60f814da001_________________
   UID: iqn.1998-01.com.vmware:esx2-6d027a7c-00023d000002,iqn.esx,t,1-t10.
        FreeBSD_iSCSI_Disk______001d60f814da001_________________
   Runtime Name: vmhba38:C1:T0:L1
   Device: t10.FreeBSD_iSCSI_Disk______001d60f814da001_________________
   Device Display Name: FreeBSD iSCSI Disk
                        (t10.FreeBSD_iSCSI_Disk______001d60f814da001_________________)
   Adapter: vmhba38
   Channel: 1
   Target: 0
   LUN: 1
   Plugin: NMP
   State: active
   Transport: iscsi
   Adapter Identifier: iqn.1998-01.com.vmware:esx2-6d027a7c
   Target Identifier: 00023d000002,iqn.esx,t,1
   Adapter Transport Details: iqn.1998-01.com.vmware:esx2-6d027a7c
   Target Transport Details: IQN=iqn.esx Alias= Session=00023d000002 PortalTag=1

iqn.1998-01.com.vmware:esx2-6d027a7c-00023d000002,iqn.esx,t,1-t10.
                       FreeBSD_iSCSI_Disk______001d60f814da002_________________
   UID: iqn.1998-01.com.vmware:esx2-6d027a7c-00023d000002,iqn.esx,t,1-t10.
        FreeBSD_iSCSI_Disk______001d60f814da002_________________
   Runtime Name: vmhba38:C1:T0:L2
   Device: t10.FreeBSD_iSCSI_Disk______001d60f814da002_________________
   Device Display Name: FreeBSD iSCSI Disk
                        (t10.FreeBSD_iSCSI_Disk______001d60f814da002_________________)
   Adapter: vmhba38
   Channel: 1
   Target: 0
   LUN: 2
   Plugin: NMP
   State: active
   Transport: iscsi
   Adapter Identifier: iqn.1998-01.com.vmware:esx2-6d027a7c
   Target Identifier: 00023d000002,iqn.esx,t,1
   Adapter Transport Details: iqn.1998-01.com.vmware:esx2-6d027a7c
   Target Transport Details: IQN=iqn.esx Alias= Session=00023d000002 PortalTag=1

iqn.1998-01.com.vmware:esx2-6d027a7c-00023d000001,iqn.esx,t,1-t10.
                       FreeBSD_iSCSI_Disk______001d60f814da000_________________
   UID: iqn.1998-01.com.vmware:esx2-6d027a7c-00023d000001,iqn.esx,t,1-t10.
        FreeBSD_iSCSI_Disk______001d60f814da000_________________
   Runtime Name: vmhba38:C0:T0:L0
   Device: t10.FreeBSD_iSCSI_Disk______001d60f814da000_________________
   Device Display Name: FreeBSD iSCSI Disk
                        (t10.FreeBSD_iSCSI_Disk______001d60f814da000_________________)
   Adapter: vmhba38
   Channel: 0
   Target: 0
   LUN: 0
   Plugin: NMP
   State: active
   Transport: iscsi
   Adapter Identifier: iqn.1998-01.com.vmware:esx2-6d027a7c
   Target Identifier: 00023d000001,iqn.esx,t,1
   Adapter Transport Details: iqn.1998-01.com.vmware:esx2-6d027a7c
   Target Transport Details: IQN=iqn.esx Alias= Session=00023d000001 PortalTag=1

iqn.1998-01.com.vmware:esx2-6d027a7c-00023d000001,iqn.esx,t,1-t10.
                       FreeBSD_iSCSI_Disk______001d60f814da001_________________
   UID: iqn.1998-01.com.vmware:esx2-6d027a7c-00023d000001,iqn.esx,t,1-t10.
        FreeBSD_iSCSI_Disk______001d60f814da001_________________
   Runtime Name: vmhba38:C0:T0:L1
   Device: t10.FreeBSD_iSCSI_Disk______001d60f814da001_________________
   Device Display Name: FreeBSD iSCSI Disk
                        (t10.FreeBSD_iSCSI_Disk______001d60f814da001_________________)
   Adapter: vmhba38
   Channel: 0
   Target: 0
   LUN: 1
   Plugin: NMP
   State: active
   Transport: iscsi
   Adapter Identifier: iqn.1998-01.com.vmware:esx2-6d027a7c
   Target Identifier: 00023d000001,iqn.esx,t,1
   Adapter Transport Details: iqn.1998-01.com.vmware:esx2-6d027a7c
   Target Transport Details: IQN=iqn.esx Alias= Session=00023d000001 PortalTag=1

iqn.1998-01.com.vmware:esx2-6d027a7c-00023d000001,iqn.esx,t,1-t10.
                       FreeBSD_iSCSI_Disk______001d60f814da002_________________
   UID: iqn.1998-01.com.vmware:esx2-6d027a7c-00023d000001,iqn.esx,t,1-t10.
        FreeBSD_iSCSI_Disk______001d60f814da002_________________
   Runtime Name: vmhba38:C0:T0:L2
   Device: t10.FreeBSD_iSCSI_Disk______001d60f814da002_________________
   Device Display Name: FreeBSD iSCSI Disk
                        (t10.FreeBSD_iSCSI_Disk______001d60f814da002_________________)
   Adapter: vmhba38
   Channel: 0
   Target: 0
   LUN: 2
   Plugin: NMP
   State: active
   Transport: iscsi
   Adapter Identifier: iqn.1998-01.com.vmware:esx2-6d027a7c
   Target Identifier: 00023d000001,iqn.esx,t,1
   Adapter Transport Details: iqn.1998-01.com.vmware:esx2-6d027a7c
   Target Transport Details: IQN=iqn.esx Alias= Session=00023d000001 PortalTag=1

sata.vmhba33-sata.0:0-t10.ATA_____WDC_WD2500KS2D00MJB0
                    __________________________WD2DWCANK7551048
   UID: sata.vmhba33-sata.0:0-t10.ATA_____WDC_WD2500KS2D00MJB0
        __________________________WD2DWCANK7551048
   Runtime Name: vmhba33:C0:T0:L0
   Device: t10.ATA_____WDC_WD2500KS2D00MJB0__________________________WD2DWCANK7551048
   Device Display Name: Local ATA Disk (t10.ATA_____WDC_WD2500KS2D00MJB0
                        __________________________WD2DWCANK7551048)
   Adapter: vmhba33
   Channel: 0
   Target: 0
   LUN: 0
   Plugin: NMP
   State: active
   Transport: sata
   Adapter Identifier: sata.vmhba33
   Target Identifier: sata.0:0
   Adapter Transport Details: Unavailable or path is unclaimed
   Target Transport Details: Unavailable or path is unclaimed
5.25. Managing NFS Mounts
Discussion
Using this tool, you can list, mount, and unmount NFS exports from the VMkernel.
Let’s take a look at the options available for the esxcli storage nfs command:
~ # esxcli storage nfs
Usage: esxcli storage nfs {cmd} [cmd options]

Available Commands:
  add                   Add a new NAS volume to the ESXi Host and mount it with the
                        given volume name
  list                  List the NAS volumes currently known to the ESXi host
  remove                Remove an existing NAS volume from the ESXi host
The list option displays
the current NFS mounts on your ESXI server:
~ # esxcli storage nfs list
NFSMOUNT01 is /NFS from 172.20.44.100 mounted
One of the most important requirements of NAS and software-based iSCSI is that you need to have a VMkernel port configured on the ESX Server’s network. Assuming the VMkernel port is already configured, you can add a new mount as follows:
$ esxcli storage nfs add -H 172.20.44.101 -s /nfs02 -v NFSMOUNT02
Connecting to NAS volume: NFSMOUNT02
NFSMOUNT02 created and connected.
5.26. Managing Disk Volumes
Solution
Run the esxcli storage
filesystem command on the ESXI server.
Discussion
VMware added a new command-line tool in ESXi to enable the management of disk snapshot/replica volumes. This new command allows you to:
Find these resources and view information about them
Mount or unmount a volume
Change the signature on a volume (resignaturing)
Make the mounting of a volume persistent across reboots
This command can come in handy if you need to mount a snapshot of your LUN because of corruption on the original LUN.
Let’s take a look at the options available for the esxcli storage filesystem command:
~ # esxcli storage filesystem
Usage: esxcli storage filesystem {cmd} [cmd options]

Available Commands:
  automount             Request mounting of known datastores not explicitly unmounted.
  list                  List the volumes available to the host. This includes VMFS,
                        NAS, and VFAT partitions.
  mount                 Connect to and mount an unmounted volume on the ESXi host.
  rescan                Issue a rescan operation to the VMkernel to have is scan sto-
                        rage devices for new mountable filesystems.
  unmount               Disconnect and unmount and existing VMFS or NAS volume. This
                        will not delete the configuration for the volume, but will
                        remove the volume from the list of mounted volumes.
5.27. Configuring Ethernet Adapters
Problem
You want to manage and set specific variables on the physical Ethernet adapters in the ESXI server.
Discussion
Let’s take a look at the options available for the esxcli network nic command:
~ # esxcli network nic
Usage: esxcli network nic {cmd} [cmd options]
Available Commands:
down Bring down the specified network device.
get Get the generic configuration of a network device.
list This command will list the Physical NICs currently installed
and loaded on the system.
set Set the general options for the specified ethernet device.
up Bring up the specified network device.To list all Ethernet ports in the server, use the list option. The output
will give you a variety of information about the interface, including
the driver, PCI, speed, duplex, and MTU, along with a description.
Multiple interfaces will be displayed as vmnic0,
vmnic1, and so on. For example:
~ # esxcli network nic list
Name PCI Device Driver Link Speed Duplex MAC Address MTU Description
------ ------------- ------ ---- ----- ------ ----------- ---- -----------------
vmnic0 0000:002:01.0 e1000 Up 1000 Full 00:0c:29: 1500 Intel Corporation
7f:3a:5d Gigabit Ethernet
Controller
vmnic1 0000:002:04.0 e1000 Up 1000 Full 00:0c:29: 1500 Intel Corporation
7f:3a:67 Gigabit Ethernet
Controller You can also set the speed of your interface using the options that follow. The following example sets the speed to 100MBps and the duplex mode to full duplex on the vmnic0 interface (note that if you are changing the speed, you must also specify a duplex mode):
esxcli network nic set -S 100 -D full -n vmnic0
Changing the adapter to use the maximum speed can be accomplished
using the -S option. Remember,
you can use the -l option to verify
your changes.
5.28. Rescanning Host Bus Adapters
Problem
You wish to rescan the HBAs in your ESXI server. This is useful if you add new LUNs or need to troubleshoot the HBAs.
Discussion
Use these commands to rescan a single adapter, or all the adapters on your ESXI server:
~ # esxcli storage core
Usage: esxcli storage core {cmd} [cmd options]
Available Namespaces:
adapter Operations on SCSI Host Bus Adapters on the system.
device Operations pertaining to the pluggable storage architectures'
logical devices on the system. The operation currently allowed
is to list the available devices on the system and the filters
attached to each
path Operations pertaining to the pluggable storage architectures'
SCSI device paths on the system.
plugin Operations pertaining to the pluggable storage architectures'
plugins. The operation currently allowed is to list the available
plugins on the system with the type of those plugins.
claiming Operations pertaining to the pluggable storage direct path
claiming system. These operations will allow a user to directly
control the claiming and unclaiming process. These operations are
considered temporary and any claiming operations that need to
survive a reboot should use claimrules instead.
claimrule Operations pertaining to the pluggable storage architecture
claiming rule system. These operations operate on the rules used
to determine the PSA plugin used to claim storage paths.The following example rescans the specified HBA card for new LUNs. A typical scan, without adding any new LUNs, will look like this:
esxcli storage core adapter rescan --all
5.29. Managing Add-ons from the Command Line
Discussion
The following command allows you to enable, disable, and list all the available add-ons (perhaps better understood as modules):
~ # esxcli software
Usage: esxcli software {cmd} [cmd options]

Available Namespaces:
  sources               Query depot contents for VIBs and image profiles
  acceptance            Retrieve and set the host acceptance level setting
  profile               Display, install, update, or validates image profiles
  vib                   Install, update, remove, or display individual VIB packages
The command is easy to use and pretty self-explanatory. If you have already installed ESX4, you may have noticed during the installation a new option to load add-ons. By default, your ESX4 installation will get a preloaded list of add-ons. The ones loaded by default on our Dell 1950 are shown in the following list:
~ # esxcli software vib list
Name                  Version                             Vendor  Acceptance Level
--------------------  ----------------------------------  ------  ----------------
ata-pata-amd          0.3.10-3vmw.500.0.0.469512          VMware  VMwareCertified
ata-pata-atiixp       0.4.6-3vmw.500.0.0.469512           VMware  VMwareCertified
ata-pata-cmd64x       0.2.5-3vmw.500.0.0.469512           VMware  VMwareCertified
ata-pata-hpt3x2n      0.3.4-3vmw.500.0.0.469512           VMware  VMwareCertified
ata-pata-pdc2027x     1.0-3vmw.500.0.0.469512             VMware  VMwareCertified
ata-pata-serverworks  0.4.3-3vmw.500.0.0.469512           VMware  VMwareCertified
ata-pata-sil680       0.4.8-3vmw.500.0.0.469512           VMware  VMwareCertified
ata-pata-via          0.3.3-2vmw.500.0.0.469512           VMware  VMwareCertified
block-cciss           3.6.14-10vmw.500.0.0.469512         VMware  VMwareCertified
ehci-ehci-hcd         1.0-3vmw.500.0.0.469512             VMware  VMwareCertified
esx-base              5.0.0-0.0.469512                    VMware  VMwareCertified
esx-tboot             5.0.0-0.0.469512                    VMware  VMwareCertified
ima-qla4xxx           2.01.07-1vmw.500.0.0.469512         VMware  VMwareCertified
ipmi-ipmi-devintf     39.1-4vmw.500.0.0.469512            VMware  VMwareCertified
ipmi-ipmi-msghandler  39.1-4vmw.500.0.0.469512            VMware  VMwareCertified
ipmi-ipmi-si-drv      39.1-4vmw.500.0.0.469512            VMware  VMwareCertified
misc-cnic-register    1.1-1vmw.500.0.0.469512             VMware  VMwareCertified
misc-drivers          5.0.0-0.0.469512                    VMware  VMwareCertified
net-be2net            4.0.88.0-1vmw.500.0.0.469512        VMware  VMwareCertified
net-bnx2              2.0.15g.v50.11-5vmw.500.0.0.469512  VMware  VMwareCertified
net-bnx2x             1.61.15.v50.1-1vmw.500.0.0.469512   VMware  VMwareCertified
net-cnic              1.10.2j.v50.7-2vmw.500.0.0.469512   VMware  VMwareCertified
net-e1000             8.0.3.1-2vmw.500.0.0.469512         VMware  VMwareCertified
net-e1000e            1.1.2-3vmw.500.0.0.469512           VMware  VMwareCertified
net-enic              1.4.2.15a-1vmw.500.0.0.469512       VMware  VMwareCertified
net-forcedeth         0.61-2vmw.500.0.0.469512            VMware  VMwareCertified
net-igb               2.1.11.1-3vmw.500.0.0.469512        VMware  VMwareCertified
net-ixgbe             2.0.84.8.2-10vmw.500.0.0.469512     VMware  VMwareCertified
net-nx-nic            4.0.557-3vmw.500.0.0.469512         VMware  VMwareCertified
net-r8168             8.013.00-3vmw.500.0.0.469512        VMware  VMwareCertified
net-r8169             6.011.00-2vmw.500.0.0.469512        VMware  VMwareCertified
net-s2io              2.1.4.13427-3vmw.500.0.0.469512     VMware  VMwareCertified
net-sky2              1.20-2vmw.500.0.0.469512            VMware  VMwareCertified
net-tg3               3.110h.v50.4-4vmw.500.0.0.469512    VMware  VMwareCertified
ohci-usb-ohci         1.0-3vmw.500.0.0.469512             VMware  VMwareCertified
sata-ahci             3.0-6vmw.500.0.0.469512             VMware  VMwareCertified
sata-ata-piix         2.12-4vmw.500.0.0.469512            VMware  VMwareCertified
sata-sata-nv          3.5-3vmw.500.0.0.469512             VMware  VMwareCertified
sata-sata-promise     2.12-3vmw.500.0.0.469512            VMware  VMwareCertified
sata-sata-sil         2.3-3vmw.500.0.0.469512             VMware  VMwareCertified
sata-sata-svw         2.3-3vmw.500.0.0.469512             VMware  VMwareCertified
scsi-aacraid          1.1.5.1-9vmw.500.0.0.469512         VMware  VMwareCertified
scsi-adp94xx          1.0.8.12-6vmw.500.0.0.469512        VMware  VMwareCertified
scsi-aic79xx          3.1-5vmw.500.0.0.469512             VMware  VMwareCertified
scsi-bnx2i            1.9.1d.v50.1-3vmw.500.0.0.469512    VMware  VMwareCertified
scsi-fnic             1.5.0.3-1vmw.500.0.0.469512         VMware  VMwareCertified
scsi-hpsa             5.0.0-17vmw.500.0.0.469512          VMware  VMwareCertified
scsi-ips              7.12.05-4vmw.500.0.0.469512         VMware  VMwareCertified
scsi-lpfc820          8.2.2.1-18vmw.500.0.0.469512        VMware  VMwareCertified
scsi-megaraid-mbox    2.20.5.1-6vmw.500.0.0.469512        VMware  VMwareCertified
scsi-megaraid-sas     4.32-1vmw.500.0.0.469512            VMware  VMwareCertified
scsi-megaraid2        2.00.4-9vmw.500.0.0.469512          VMware  VMwareCertified
scsi-mpt2sas          06.00.00.00-5vmw.500.0.0.469512     VMware  VMwareCertified
scsi-mptsas           4.23.01.00-5vmw.500.0.0.469512      VMware  VMwareCertified
scsi-mptspi           4.23.01.00-5vmw.500.0.0.469512      VMware  VMwareCertified
scsi-qla2xxx          901.k1.1-14vmw.500.0.0.469512       VMware  VMwareCertified
scsi-qla4xxx          5.01.03.2-3vmw.500.0.0.469512       VMware  VMwareCertified
uhci-usb-uhci         1.0-3vmw.500.0.0.469512             VMware  VMwareCertified
tools-light           5.0.0-0.0.469512                    VMware  VMwareCertified
Disabling add-ons is simple:
esxcli software vib remove -n tools-light
Enabling add-ons is also very simple:
esxcli software vib install -n tools-light
Only one add-on can be enabled or disabled in each command.
In a listing, when the star preceding the add-on is red, the associated add-on is installed but disabled.
5.30. Managing VMkernel Network Routes
Solution
Run the vicfg-route command
using the vCLI toolkit. This command is not supported as of ESXi 5.0 in
the esxshell and will require an additional installation on a Windows
Server to access the vCLI Toolkit.
Discussion
VMware gives you the ability to modify the network routes via the
command line using vicfg-route.
Alternatively, you can configure the routes using the vCenter
client.
Let’s take a look at the options available for the vicfg-route
command:
Synopsis: vicfg-route.pl OPTIONS [<gateway>]


Command-specific options:
   --add
    -a
          Add route to the VMkernel (valid for vSphere 4.0 and later),
                     requires <network> (described below)
                     <network> can be specified in 3 ways:
                             * As a single argument in <IP>/<Mask> format
                             * Or as a <IP> <Netmask> pair
                             * Or as 'default'
   --del
    -d
          Delete route from the VMkernel (valid for vSphere 4.0 and later),
                     requires <network> (described below)
                     <network> can be specified in 3 ways:
                             * As a single argument in <IP>/<Mask> format
                             * Or as a <IP> <Netmask> pair
                             * Or as 'default'
   --family (default 'v4')
    -f Address family to work on ('v4' or 'v6').  Default to 'v4' (valid for vSphere
       4.0 and later)
   --list
    -l List configured routes for the VMkernel
   --vihost
    -h The host to use when connecting via a vCenter server
As you can see, VMware provides some nice usage examples for the
vicfg-route command.
Let’s take a look at using the -l option to display
the current routes on our ESXI server. Your display might be similar to
the following:
vicfg-route -l

VMkernel Routes:
Network             Netmask             Gateway             Inter
default             0.0.0.0             10.0.1.1            vmk0
10.0.1.0            255.255.255.0       Local Subnet        vmk0
To add a route to the 172.20.44.0 network using the gateway of 172.20.44.254, we would do something like this:
vicfg-route -a 172.20.46.0/24 172.20.44.254or this:
vicfg-route -a 172.20.44.0 255.255.255.0 172.20.44.254To set the default gateway for the VMkernel, issue the following command:
vicfg-route -a default 172.20.44.254And finally, to delete a route, use the -d option. For
example:
vicfg-route -d 172.20.46.0/24 172.20.44.254You can also use the vCenter to manage your ESXI server’s routes, which is the preferred method.
5.31. Configuring Software iSCSI Options
Solution
Run the esxcli iscsi command on
the ESXI server.
Discussion
Although the vCenter provides access to all the options
you can manipulate on iSCSI devices, you might want to manage them
through command-line tools. Let’s take a look at a few of the options
available to the esxcli iscsi
command:
~ # esxcli iscsi
Usage: esxcli iscsi {cmd} [cmd options]

Available Namespaces:
  adapter               Operations that can be performed on iSCSI adapters
  networkportal         Operations that can be performed on iSCSI Network
                        Portal (iSCSI vmknic)
  physicalnetworkportal Operations that can be performed on iSCSI Physical Network
                        Portal (vmnic)
  session               Operations that can be performed on iSCSI sessions
  ibftboot              Operations that can be performed on iSCSI IBFT boot table
  logicalnetworkportal  Operations that can be performed on iSCSI Logical Network
                        Portal (vmknic)
  plugin                Operations that can be performed on iSCSI management plugins
  software              Operations that can be performed on software iSCSI
Running the esxcli iscsi
command with the get switch will query
the server to let you know whether software-based iSCSI is enabled. In
our case, it is not enabled:
~ # esxcli iscsi software get
false
Using the -e option, we can
enable software-based iSCSI and open the firewall ports it
requires:
~ # esxcli iscsi software set -e yes
Software iSCSI Enabled
Finally, using the -e switch, we can
disable software-based iSCSI on the ESXI server. Note that if you do
this, you will need to manually restart the firewall to ensure the ports
are closed for iSCSI:
~ # esxcli iscsi software set -e no
Software iSCSI Disabled. (Reboot Required)
If you choose to manage your software-based iSCSI via the command line, these changes might not be immediately reflected in the vCenter; you will need to reboot the ESXi Server.
See Also
5.32. Configuring Hardware iSCSI Options
Problem
You want to configure and display basic information for the hardware iSCSI cards used by an ESXI server.
Discussion
VMware provides a command-line utility you can use to list and configure a few options for hardware iSCSI. However, you may also find additional options that can be configured on your iSCSI HBA; check with the manufacturer to see if it offers a Linux command-line configuration tool.
Let’s take a look at the options available with the esxcli iscsi command:
~ # esxcli iscsi adapter
Usage: esxcli iscsi adapter {cmd} [cmd options]

Available Namespaces:
  auth                  Operations that can be performed on iSCSI adapter authentications
  discovery             Operations that can be performed on iSCSI adapter discovery
  target                Operations that can be performed on iSCSI targets
  capabilities          Operations that can be performed on iSCSI adapter capabilities
  firmware              Operations that can be performed on iSCSI adapter firmware
  param                 Operations that can be performed on iSCSI adapter parameters

Available Commands:
  get                   List the iSCSI information for the iSCSI Host Bus Adapter.
  list                  List all the iSCSI Host Bus Adapters on the system.
  set                   Set the iSCSI name and alias for the iSCSI Host Bus Adapter.
You can display a small set of configurable values for your
hardware-based iSCSI adapters using this command. For instance, in the
following example, we specified vmhba19, one of our
iSCSI ports, in the -A option to learn
about its configured values (keep in mind that your device ID will
probably be different from ours):
~ # esxcli iscsi adapter get -A vmhba19

vmhba19
   Name: iqn.1998-01.com.vmware:test11-4f0fa379
   Alias:
   Serial Number:
   Hardware Version:
   Asic Version:
   Firmware Version:
   Option Rom Version:
   Driver Name: iscsi_vmk
   Driver Version:
   TCP Protocol Supported: false
   Bidirectional Transfers Supported: false
   Maximum Cdb Length: 64
   Can Be NIC: false
   Is NIC: false
   Is Initiator: true
   Is Target: false
   Using TCP Offload Engine: false
   Using ISCSI Offload Engine: false
See Also
5.33. Upgrading Software VIBs
5.34. Displaying Storage Path Information
Problem
You want to see which Linux device, service console partition, or VMFS volume is associated with each vmhba.
Discussion
The storage core path command
shows how vmhba adapters are mapped on the
server to physical Linux devices. Let’s take a look at the available
options:
~ # esxcli storage core path
Usage: esxcli storage core path {cmd} [cmd options]

Available Namespaces:
  stats                 Stats operations pertaining to the pluggable storage
                        architectures' device paths on the system.

Available Commands:
  list                  List all the SCSI paths on the system.
  set                   Provide control to allow a user to modify a single path's state.
                        This effectively allows a user to enable or disable SCSI paths.
                        The user is not able to change the full range of path states, but
                        can toggle between 'active' and 'off'. Please NOTE changing the
                        Path state on any path that is the only path to a given device is
                        likely to fail. The VMkernel will not change the path's state if
                        changing the state would cause an 'All paths down' state or the
                        device is currently in use.
The list option displays
all devices, regardless of whether a console device is connected. The
vmhba adapter is displayed along with
the associated mount point:
~ # esxcli storage core path list
usb.vmhba32-usb.0:0-mpx.vmhba32:C0:T0:L0
   UID: usb.vmhba32-usb.0:0-mpx.vmhba32:C0:T0:L0
   Runtime Name: vmhba32:C0:T0:L0
   Device: mpx.vmhba32:C0:T0:L0
   Device Display Name: Local USB Direct-Access (mpx.vmhba32:C0:T0:L0)
   Adapter: vmhba32
   Channel: 0
   Target: 0
   LUN: 0
   Plugin: NMP
   State: active
   Transport: usb
   Adapter Identifier: usb.vmhba32
   Target Identifier: usb.0:0
   Adapter Transport Details: Unavailable or path is unclaimed
   Target Transport Details: Unavailable or path is unclaimed

iqn.1998-01.com.vmware:esx2-6d027a7c-00023d000002,iqn.esx,t,1-t10.
                       FreeBSD_iSCSI_Disk______001d60f814da000_________________
   UID: iqn.1998-01.com.vmware:esx2-6d027a7c-00023d000002,iqn.esx,t,1-t10.
        FreeBSD_iSCSI_Disk______001d60f814da000_________________
   Runtime Name: vmhba38:C1:T0:L0
   Device: t10.FreeBSD_iSCSI_Disk______001d60f814da000_________________
   Device Display Name: FreeBSD iSCSI Disk
                        (t10.FreeBSD_iSCSI_Disk______001d60f814da000_________________)
   Adapter: vmhba38
   Channel: 1
   Target: 0
   LUN: 0
   Plugin: NMP
   State: active
   Transport: iscsi
   Adapter Identifier: iqn.1998-01.com.vmware:esx2-6d027a7c
   Target Identifier: 00023d000002,iqn.esx,t,1
   Adapter Transport Details: iqn.1998-01.com.vmware:esx2-6d027a7c
   Target Transport Details: IQN=iqn.esx Alias= Session=00023d000002 PortalTag=1

iqn.1998-01.com.vmware:esx2-6d027a7c-00023d000002,iqn.esx,t,1-t10.
                       FreeBSD_iSCSI_Disk______001d60f814da001_________________
   UID: iqn.1998-01.com.vmware:esx2-6d027a7c-00023d000002,iqn.esx,t,1-t10.
        FreeBSD_iSCSI_Disk______001d60f814da001_________________
   Runtime Name: vmhba38:C1:T0:L1
   Device: t10.FreeBSD_iSCSI_Disk______001d60f814da001_________________
   Device Display Name: FreeBSD iSCSI Disk
                        (t10.FreeBSD_iSCSI_Disk______001d60f814da001_________________)
   Adapter: vmhba38
   Channel: 1
   Target: 0
   LUN: 1
   Plugin: NMP
   State: active
   Transport: iscsi
   Adapter Identifier: iqn.1998-01.com.vmware:esx2-6d027a7c
   Target Identifier: 00023d000002,iqn.esx,t,1
   Adapter Transport Details: iqn.1998-01.com.vmware:esx2-6d027a7c
   Target Transport Details: IQN=iqn.esx Alias= Session=00023d000002 PortalTag=1

iqn.1998-01.com.vmware:esx2-6d027a7c-00023d000002,iqn.esx,t,1-t10.
                       FreeBSD_iSCSI_Disk______001d60f814da002_________________
   UID: iqn.1998-01.com.vmware:esx2-6d027a7c-00023d000002,iqn.esx,t,1-t10.
        FreeBSD_iSCSI_Disk______001d60f814da002_________________
   Runtime Name: vmhba38:C1:T0:L2
   Device: t10.FreeBSD_iSCSI_Disk______001d60f814da002_________________
   Device Display Name: FreeBSD iSCSI Disk
                        (t10.FreeBSD_iSCSI_Disk______001d60f814da002_________________)
   Adapter: vmhba38
   Channel: 1
   Target: 0
   LUN: 2
   Plugin: NMP
   State: active
   Transport: iscsi
   Adapter Identifier: iqn.1998-01.com.vmware:esx2-6d027a7c
   Target Identifier: 00023d000002,iqn.esx,t,1
   Adapter Transport Details: iqn.1998-01.com.vmware:esx2-6d027a7c
   Target Transport Details: IQN=iqn.esx Alias= Session=00023d000002 PortalTag=1

iqn.1998-01.com.vmware:esx2-6d027a7c-00023d000001,iqn.esx,t,1-t10.
                       FreeBSD_iSCSI_Disk______001d60f814da000_________________
   UID: iqn.1998-01.com.vmware:esx2-6d027a7c-00023d000001,iqn.esx,t,1-t10.
        FreeBSD_iSCSI_Disk______001d60f814da000_________________
   Runtime Name: vmhba38:C0:T0:L0
   Device: t10.FreeBSD_iSCSI_Disk______001d60f814da000_________________
   Device Display Name: FreeBSD iSCSI Disk
                        (t10.FreeBSD_iSCSI_Disk______001d60f814da000_________________)
   Adapter: vmhba38
   Channel: 0
   Target: 0
   LUN: 0
   Plugin: NMP
   State: active
   Transport: iscsi
   Adapter Identifier: iqn.1998-01.com.vmware:esx2-6d027a7c
   Target Identifier: 00023d000001,iqn.esx,t,1
   Adapter Transport Details: iqn.1998-01.com.vmware:esx2-6d027a7c
   Target Transport Details: IQN=iqn.esx Alias= Session=00023d000001 PortalTag=1

iqn.1998-01.com.vmware:esx2-6d027a7c-00023d000001,iqn.esx,t,1-t10.
                       FreeBSD_iSCSI_Disk______001d60f814da001_________________
   UID: iqn.1998-01.com.vmware:esx2-6d027a7c-00023d000001,iqn.esx,t,1-t10.
        FreeBSD_iSCSI_Disk______001d60f814da001_________________
   Runtime Name: vmhba38:C0:T0:L1
   Device: t10.FreeBSD_iSCSI_Disk______001d60f814da001_________________
   Device Display Name: FreeBSD iSCSI Disk
                        (t10.FreeBSD_iSCSI_Disk______001d60f814da001_________________)
   Adapter: vmhba38
   Channel: 0
   Target: 0
   LUN: 1
   Plugin: NMP
   State: active
   Transport: iscsi
   Adapter Identifier: iqn.1998-01.com.vmware:esx2-6d027a7c
   Target Identifier: 00023d000001,iqn.esx,t,1
   Adapter Transport Details: iqn.1998-01.com.vmware:esx2-6d027a7c
   Target Transport Details: IQN=iqn.esx Alias= Session=00023d000001 PortalTag=1

iqn.1998-01.com.vmware:esx2-6d027a7c-00023d000001,iqn.esx,t,1-t10.
                       FreeBSD_iSCSI_Disk______001d60f814da002_________________
   UID: iqn.1998-01.com.vmware:esx2-6d027a7c-00023d000001,iqn.esx,t,1-t10.
        FreeBSD_iSCSI_Disk______001d60f814da002_________________
   Runtime Name: vmhba38:C0:T0:L2
   Device: t10.FreeBSD_iSCSI_Disk______001d60f814da002_________________
   Device Display Name: FreeBSD iSCSI Disk
                        (t10.FreeBSD_iSCSI_Disk______001d60f814da002_________________)
   Adapter: vmhba38
   Channel: 0
   Target: 0
   LUN: 2
   Plugin: NMP
   State: active
   Transport: iscsi
   Adapter Identifier: iqn.1998-01.com.vmware:esx2-6d027a7c
   Target Identifier: 00023d000001,iqn.esx,t,1
   Adapter Transport Details: iqn.1998-01.com.vmware:esx2-6d027a7c
   Target Transport Details: IQN=iqn.esx Alias= Session=00023d000001 PortalTag=1

sata.vmhba33-sata.0:0-t10.ATA_____WDC_WD2500KS2D00MJB0
                    __________________________WD2DWCANK7551048
   UID: sata.vmhba33-sata.0:0-t10.ATA_____WDC_WD2500KS2D00MJB0
        __________________________WD2DWCANK7551048
   Runtime Name: vmhba33:C0:T0:L0
   Device: t10.ATA_____WDC_WD2500KS2D00MJB0__________________________WD2DWCANK7551048
   Device Display Name: Local ATA Disk (t10.ATA_____WDC_WD2500KS2D00MJB0
                        __________________________WD2DWCANK7551048)
   Adapter: vmhba33
   Channel: 0
   Target: 0
   LUN: 0
   Plugin: NMP
   State: active
   Transport: sata
   Adapter Identifier: sata.vmhba33
   Target Identifier: sata.0:0
   Adapter Transport Details: Unavailable or path is unclaimed
   Target Transport Details: Unavailable or path is unclaimed
The stats option adds the
ability to take a deeper look into the path information.
~ # esxcli storage core path stats get
usb.vmhba32-usb.0:0-mpx.vmhba32:C0:T0:L0
   UID: usb.vmhba32-usb.0:0-mpx.vmhba32:C0:T0:L0
   Runtime Name: vmhba32:C0:T0:L0
   Successful Commands: 19410
   Blocks Read: 246676
   Blocks Written: 20172
   Read Operations: 16653
   Write Operations: 1809
   Reserve Operations: 0
   Reservation Conflicts: 0
   Failed Commands: 477
   Failed Blocks Read: 0
   Failed Blocks Written: 0
   Failed Read Operations: 0
   Failed Write Operations: 0
   Failed Reserve Operations: 0
   Total Splits: 18654
   PAE Commands: 18474

iqn.1998-01.com.vmware:esx2-6d027a7c-00023d000002,iqn.esx,t,1-t10.
                       FreeBSD_iSCSI_Disk______001d60f814da000_________________
   UID: iqn.1998-01.com.vmware:esx2-6d027a7c-00023d000002,iqn.esx,t,1-t10.
        FreeBSD_iSCSI_Disk______001d60f814da000_________________
   Runtime Name: vmhba38:C1:T0:L0
   Successful Commands: 561
   Blocks Read: 0
   Blocks Written: 0
   Read Operations: 0
   Write Operations: 0
   Reserve Operations: 0
   Reservation Conflicts: 0
   Failed Commands: 24
   Failed Blocks Read: 0
   Failed Blocks Written: 0
   Failed Read Operations: 0
   Failed Write Operations: 0
   Failed Reserve Operations: 0
   Total Splits: 0
   PAE Commands: 0

iqn.1998-01.com.vmware:esx2-6d027a7c-00023d000002,iqn.esx,t,1-t10.
                       FreeBSD_iSCSI_Disk______001d60f814da001_________________
   UID: iqn.1998-01.com.vmware:esx2-6d027a7c-00023d000002,iqn.esx,t,1-t10.
        FreeBSD_iSCSI_Disk______001d60f814da001_________________
   Runtime Name: vmhba38:C1:T0:L1
   Successful Commands: 288
   Blocks Read: 0
   Blocks Written: 0
   Read Operations: 0
   Write Operations: 0
   Reserve Operations: 0
   Reservation Conflicts: 0
   Failed Commands: 24
   Failed Blocks Read: 0
   Failed Blocks Written: 0
   Failed Read Operations: 0
   Failed Write Operations: 0
   Failed Reserve Operations: 0
   Total Splits: 0
   PAE Commands: 0

iqn.1998-01.com.vmware:esx2-6d027a7c-00023d000002,iqn.esx,t,1-t10.
                       FreeBSD_iSCSI_Disk______001d60f814da002_________________
   UID: iqn.1998-01.com.vmware:esx2-6d027a7c-00023d000002,iqn.esx,t,1-t10.
        FreeBSD_iSCSI_Disk______001d60f814da002_________________
   Runtime Name: vmhba38:C1:T0:L2
   Successful Commands: 1901
   Blocks Read: 1122
   Blocks Written: 0
   Read Operations: 1062
   Write Operations: 0
   Reserve Operations: 0
   Reservation Conflicts: 0
   Failed Commands: 0
   Failed Blocks Read: 0
   Failed Blocks Written: 0
   Failed Read Operations: 0
   Failed Write Operations: 0
   Failed Reserve Operations: 0
   Total Splits: 0
   PAE Commands: 0

iqn.1998-01.com.vmware:esx2-6d027a7c-00023d000001,iqn.esx,t,1-t10.
                       FreeBSD_iSCSI_Disk______001d60f814da000_________________
   UID: iqn.1998-01.com.vmware:esx2-6d027a7c-00023d000001,iqn.esx,t,1-t10.
        FreeBSD_iSCSI_Disk______001d60f814da000_________________
   Runtime Name: vmhba38:C0:T0:L0
   Successful Commands: 56284
   Blocks Read: 233318
   Blocks Written: 52797
   Read Operations: 1121
   Write Operations: 52722
   Reserve Operations: 1
   Reservation Conflicts: 0
   Failed Commands: 54
   Failed Blocks Read: 0
   Failed Blocks Written: 0
   Failed Read Operations: 0
   Failed Write Operations: 36
   Failed Reserve Operations: 0
   Total Splits: 189
   PAE Commands: 0

iqn.1998-01.com.vmware:esx2-6d027a7c-00023d000001,iqn.esx,t,1-t10.
                       FreeBSD_iSCSI_Disk______001d60f814da001_________________
   UID: iqn.1998-01.com.vmware:esx2-6d027a7c-00023d000001,iqn.esx,t,1-t10.
        FreeBSD_iSCSI_Disk______001d60f814da001_________________
   Runtime Name: vmhba38:C0:T0:L1
   Successful Commands: 68523
   Blocks Read: 261722
   Blocks Written: 52796
   Read Operations: 13689
   Write Operations: 52721
   Reserve Operations: 1
   Reservation Conflicts: 0
   Failed Commands: 54
   Failed Blocks Read: 0
   Failed Blocks Written: 0
   Failed Read Operations: 0
   Failed Write Operations: 36
   Failed Reserve Operations: 0
   Total Splits: 198
   PAE Commands: 0

iqn.1998-01.com.vmware:esx2-6d027a7c-00023d000001,iqn.esx,t,1-t10.
                       FreeBSD_iSCSI_Disk______001d60f814da002_________________
   UID: iqn.1998-01.com.vmware:esx2-6d027a7c-00023d000001,iqn.esx,t,1-t10.
        FreeBSD_iSCSI_Disk______001d60f814da002_________________
   Runtime Name: vmhba38:C0:T0:L2
   Successful Commands: 278
   Blocks Read: 0
   Blocks Written: 0
   Read Operations: 0
   Write Operations: 0
   Reserve Operations: 0
   Reservation Conflicts: 0
   Failed Commands: 1
   Failed Blocks Read: 0
   Failed Blocks Written: 0
   Failed Read Operations: 0
   Failed Write Operations: 0
   Failed Reserve Operations: 0
   Total Splits: 0
   PAE Commands: 0

sata.vmhba33-sata.0:0-t10.ATA_____WDC_WD2500KS2D00MJB0
                    __________________________WD2DWCANK7551048
   UID: sata.vmhba33-sata.0:0-t10.ATA_____WDC_WD2500KS2D00MJB0
        __________________________WD2DWCANK7551048
   Runtime Name: vmhba33:C0:T0:L0
   Successful Commands: 101610
   Blocks Read: 296388
   Blocks Written: 322170
   Read Operations: 2345
   Write Operations: 97847
   Reserve Operations: 74
   Reservation Conflicts: 0
   Failed Commands: 553
   Failed Blocks Read: 0
   Failed Blocks Written: 0
   Failed Read Operations: 0
   Failed Write Operations: 0
   Failed Reserve Operations: 0
   Total Splits: 90906
   PAE Commands: 0
See Also
5.35. Managing SCSI Device Mappings with ESXi5 vSphere
Discussion
In ESXi 5, VMware replaced the esxcli
storage core command with the storage core option within the
esxcli command. Using this command will allow us to manage the storage
mappings within the ESXi environment.
~ # esxcli storage core
Usage: esxcli storage core {cmd} [cmd options]

Available Namespaces:
  adapter               Operations on SCSI Host Bus Adapters on the system.
  device                Operations pertaining to the pluggable storage architectures'
                        logical devices on the system. The operation currently allowed
                        is to list the available devices on the system and the filters
                        attached to each
  path                  Operations pertaining to the pluggable storage architectures'
                        SCSI device paths on the system.
  plugin                Operations pertaining to the pluggable storage architectures'
                        plugins. The operation currently allowed is to list the available
                        plugins on the system with the type of those plugins
  claiming              Operations pertaining to the pluggable storage direct path
                        claiming system. These operations will allow a user to directly
                        control the claiming and unclaiming process. These operations
                        are considered temporary and any claiming operations that need
                        to survive a reboot should use claimrules instead.
  claimrule             Operations pertaining to the pluggable storage architecture
                        claiming rule system. These operations operate on the rules used
                        to determine the PSA plugin used to claim storage paths.

                 Show this message.
See Also
5.36. Managing VMkernel Ports
Problem
You want to create, update, or delete entries in the VMkernel configuration for VMotion, NAS, and software iSCSI.
Discussion
This command is used to configure the VMkernel ports on virtual switches. The VMkernel port is a special port that is used for vMotion, software-based iSCSI, and NFS access. Let’s take a look at the available options:
~ # esxcli network ip interface
Usage: esxcli network ip interface {cmd} [cmd options]
Available Namespaces:
ipv6 Commands to get and set IPv6 settings for vmknic.
ipv4 Commands to get and set IPv4 settings for vmknic.
Available Commands:
add Add a new VMkernel network interface.
list This command will list the VMkernel network interfaces
currently known to the system.
remove Remove a new VMkernel network interface from the ESXi host.
set This command sets the enabled status and MTU size of a
given IP interface.The list option shows the
ports that are already created on our vSwitches. In our case, we have a
vMotion port on vmk0 (the lines are wrapped here to
fit on the page):
~ # esxcli network ip interface list vmk0 Name: vmk0 MAC Address: 00:0c:29:7f:3a:5d Enabled: true Portset: vSwitch0 Portgroup: Management Network VDS Name: N/A VDS Port: N/A VDS Connection: -1 MTU: 1500 TSO MSS: 65535 Port ID: 16777219
The following example allows you to add a new VMkernel port on the
ESXI server and assign it to a port group. In the following example, we
have created a VMkernel called vmk1
and have assigned it to the vMotion port group.
However, you must have a port group present before adding a new NIC to
the system. You can create a new port group using the esxcli network command, as discussed in Recipe 5.11.
esxcli network ip interface add -i vmk1 -p vMotion esxcli network ip interface ipv4 set -i vmk1 -I 192.168.1.41 -N 255.255.255.0 -t static
The remove -i option allows you
to remove the VMkernel NIC from the system:
esxcli network ip interface remove -i vmk1
Another important option is -m, which allows you to
set an MTU speed for the VMkernel
NIC port. This is important for NFS or iSCSI connections, where you
might use something similar to the following:
esxcli network ip interface set -m 9000 -i vmk1
If you use the -l option to verify the
results, you will notice that the MTU speed is now set to 9,000 instead
of the default 1,500.