Chapter 8. vCloud Director Overview
This chapter provides an introduction to vCloud Director (vCD), a layer of vSphere that end users control over the consumption of virtual resources. The vCloud Director allows end users and small and large businesses to reduce or eliminate equipment maintenance and move into a cloud environment, either within an organization or with a service provider using a public or private cloud model. In this chapter, we will take a look at vCloud Director’s requirements and the installation of the vCloud Director evaluation appliance.
What Is vCloud Director?
Problem
You are looking to offer a public or private cloud within your organization or externally to businesses.
Solution
In this recipe, we will discuss the vCloud Director and how it can impact your business.
Discussion
The vCloud Director works by taking pools of datacenter resources, including storage, networking, and compute resources, and creating virtual datacenters that operate independently of each other. This creates a highly secure and encapsulated environment, allowing multiple users or customers to create an infrastructure without having to invest or manage physical resources. The vCloud Director integrates with existing the vSphere 4 and 5 deployments and takes advantage of DRS, DVS, and HA.
The vCloud Director leverages an open standard, the vCloud API, to let developers outside of VMware build on the platform and automate processes that fit their business requirements. Additionally, vCloud Director uses open visualization format (OVF), which allows administrators and developers to create and package specific workloads across their cloud infrastructures.
Consuming resources via the vCloud Director is simple. End users have access to a web portal and API interface, allowing customers to use resources in multiple ways. This permits service providers to offer pay-as-you-go models, along with fixed resource consumption models, giving the end user additional flexibility. Resources can be monitored and charged back to the end user via the vCenter Chargeback application. This ensures accurate reporting of resources for billing purposes.
Some of the highlighted features of the vCloud Director include:
- Virtual datacenters
Virtual datacenters use the vSphere infrastructure to offer storage, memory, CPU and networking resources within a multitenant infrastructure driven by organizational units.
- Highly secure
Through vShield technologies at the network edge, each virtual datacenter created within the vCloud and the vSphere infrastructure is secure and independent.
- Rapid provisioning
By using catalogs and templates, this allows organizations to rapidly provision new virtual machines within the virtual datacenter.
- Organizational units
The ability to create multiple organizational units within the virtual datacenter allows custom business units for deployments.
- Self-service portal
A web-based portal manages the virtual datacenter for the organization.
The vCloud Director has multiple uses: it can be used in an organization for service providers, for developers, or within an organization to allow different business divisions to manage their own infrastructure. In this chapter we’ll look at the requirements for the vCloud Director as well as requirements for deploying the vCloud Evaluation deployment appliance.
Figure 8-1 shows how the vCloud Director organizes the various vSphere resources and offers them to users. The following three resources are abstracted from the vSphere layer into the vCloud Director Cell, and then presented to the end user in the form of a virtual datacenter. Thus, end users can deploy new computing resources within their own secure environments.

- Storage
VMFS datastores and NFS shares are allocated to virtual datacenters, allowing users to provision new virtual machines.
- Networking
Distributed virtual switches (dvSwitches) and portgroups are used to create the network components and fabric that make up the multitenant environment.
- Compute
The computing resources are pulled from vCenter Servers clusters and will be used within resource pools when provisioned in a vCloud Director virtual datacenter.
A virtual datacenter consists of two different types of organization units that represent how resources are allocated to the virtual datacenter.
- Provider virtual datacenter
A provider virtual datacenter combines the compute (CPU & Memory) and memory resources of a single vCenter server resource pool with the storage resources of one or more datastores available to that resource pool. Multiple provider virtual datacenters can be created for users in different geographic locations or business units, or for users with different performance requirements.
- Organization virtual datacenter
An organization virtual datacenter provides resources to an organization and is partitioned off from a provider virtual datacenter. Organization virtual datacenters provide an environment where virtual systems can be stored, deployed, and operated. They also provide storage for virtual media, such as floppy disks and CD-ROMs. A single organization can have a multiple organization virtual datacenter. An organization administrator specifies how resources from a provider virtual datacenter are distributed to the virtual datacenters in an organization.
Organizations use catalogs to store vApp templates and media files, such as ISO or OS images. Members of the organizations have access to the catalog and can use the resources inside that catalog to deploy new vApps that encompass the virtual machines.
vApps are encapsulated containers that represent all of the virtual machine and networking components of a specific application. vApps can be simple deployments such as a single server or as a complex multitier web appliance. Templates can be created from the vApps to be used for easily deploying additional resources within the organization.
Key benefits of deploying the vCloud Director include:
Accelerating the deployment of new virtual machines through the OVF[2] and templates
Accelerating the time it takes to deploy new virtual machines within the datacenter
Enforcing network and end user isolation by using vShield within the vCloud Director
Increasing flexibility by using standard ports, allowing easier integration with additional application stacks
Decreasing costs by consolidating infrastructure and delivering resources within an easy-to-manage interface
What’s New in vCloud Director 1.5
Solution
This recipe highlights new features in the vCloud Director 1.5.
Discussion
As you look at upgrading from vCloud Director 1.0, consider some of the features and enhancements that will be available to you:
- Fast provisioning
Using linked clones allows users to quickly provision new virtual machines by using elements from other like virtual machines within the same vApp. This means the user won’t have to wait for a new clone to be made, the vCloud Director will simply use the other virtual machine elements to create a full copy. This, additionally, reduces the storage space required because the virtual machines are linked via similar elements.
- vApp custom properties
Users can now pass custom data into the guest OS when deploying vApps within the vCloud Director. This allows developers and application developers the option to set specific variables such as SSH keys and other preconfigured options.
- Blocking tasks and notifications
The vCloud Director can now be configured to post notifications and messages to AMQP-based enterprise messaging brokers. This allows administrators to use existing messaging infrastructure for notifications on events within the vCloud Director.
- Expanded vCloud API
The vCloud Director now allows full access to all GUI-accessible actions via the vCloud API. This allows for more integration and growth when deploying a hybrid cloud model.
- Microsoft SQL Server support
The vCloud Director 1.5 now supports Microsoft SQL for the vCloud database. Previously, only Oracle was available.
- vShield Edge VPN integration
Users can now create site-to-site IPSec-VPN tunnels between multiple clouds. This allows for the secure transmission of data between multiple clouds, and is accessible via the vCloud API, allowing for easy deployment.
- vCloud Director virtual appliance
The vCloud Director appliance covered in Recipe 8-5 of this chapter is intended to allow for the evaluation of the vCloud Director environment without having a full deployment.
- Firewall rules can be configured with CIDR blocks, IP ranges, and port ranges
vCloud Director 1.5.1 allows you to enter CIDR blocks and IP ranges for the source and destination when creating firewall rules using the UI or REST API. In addition, you can enter port ranges for the source and destination ports using the UI (but not the REST API). If you create a firewall rule that includes port ranges using the UI, you will not be able to query the rule using the REST API.
- Added system notification for a lost connection to the AMQP host
If the vCloud Director loses its connection to the AMQP host, vCD sends an email to the recipients specified in the System Notification settings (Administration → System Settings → Email).
- Enhanced cell management tool and log collection script
This release includes a new version of the cell management tool. With this version, you are not required to enter an administrator username and password to access help and usage information. If a command requires a username and password, the cell management tool prompts you to enter the information.
- Increased the retention maximum for vCenter Chargeback history
In vCloud Director 1.5.1, the maximum possible setting for Chargeback Event History to Keep was increased from 365 days to 1,096 days.
vCloud Director Maximums
Solution
Use this recipe to determine the maximum configurations for a vCloud Director deployment.
Discussion
The supported maximums inside a vCloud Director deployment are listed in Table 8-1. This is important information because the vCloud Director deployments are designed and put into production.
| Value/Item | vSphere 5.x maximum |
| Virtual machine count | 20,000 |
| Powered-on virtual machine count | 10,000 |
| Organizations | 10,000 |
| Virtual machines per vApp | 64 |
| vApps per organization | 500 |
| Number of networks | 7,500 |
| Hosts | 2,000 |
| vCenter servers | 25 |
| Virtual data centers | 10,000 |
| Datastores | 1,024 |
| Catalogs | 1,000 |
| Media | 1,000 |
| Users | 10,000 |
vCloud Director Requirements
Solution
Use this section as a reference for the installation requirements, to ensure your installation runs smoothly.
Discussion
Some specific requirements and guidelines must be followed to deploy the vCloud Director successfully. In this recipe we take a look at the basic requirements of, and some restrictions on the vSphere configuration. Additional detailed information can be found in the vCloud Director Install and Configure Guide available at the following location http://www.vmware.com/pdf/vcd_15_install.pdf
To deploy vCloud Director, you must create an environment inside of vSphere that adheres to the following restrictions:
You must not enable Storage DRS on the clusters used by the vCloud Director.
The clusters used by the vCloud Director must be configured with full DRS automation. This requires shared storage so each datastore is present on the hosts inside the cluster.
Distributed Switches must be used for cross-host fencing and network pool allocations to the vCloud Director instances.
There must be a trust between the vCloud Director application stack and the ESXI servers.
All network segments must be available to all hosts within the cluster. This makes automation and deployment easy because all networks will be available.
You must use Enterprise Plus licenses to gain full access to the features required for the vCloud Director.
Refer to Table 8-2, 8-3, and 8-4 for additional hardware and software requirements for vCloud Director 1.5
| Operating system | Version |
| Red Hat Enterprise Linux | Version 5 (64 bit), Update 4 |
| Red Hat Enterprise Linux | Version 5 (64 bit), Update 5 |
| Red Hat Enterprise Linux | Version 5 (64 bit), Update 6 |
| Requirement | Comments |
| Minimum disk requirement | 950MB (installation and log file), suggested 2TB to ensure enough space for growth |
| Minimum memory requirement | 1GB Memory, 4GB suggested for optimal performance |
| Database | Version |
| Oracle | 10g & 11g standard and enterprise |
| Microsoft SQL | 2005 & 2008 standard and enterprise |
Note
Please check the latest support matrix for all compatible versions of SQL. The link can be found at http://partnerweb.vmware.com/comp_guide2/sim/interop_matrix.php.
| vShield requirements | Comments |
| 1.0 | No additional requirements |
| 1.0 Update 1 | No additional requirements |
| 5.0 | Required for static routing and VPN support |
The vCloud Director can run on vCenter 4.0 Update 2, vCenter 4.0 Update 3, vCenter 4.1, vCenter 4.1 Update 1, and vCenter 5.0. vCenter 5.0 is required if you want Fast Provisioning, Hardware Version 8, or VPN support.
The vCloud Director supports the following versions of ESXi/ESX: ESXi/ESX 4.0 Update 1, ESXi/ESX 4.0 Update 2, ESXi/ESX 4.1, ESXi/ESX4.1 Update 1, and ESXi/ESX 5.0. ESXi/ESX 5.0 is required if you want Fast Provisioning, Hardware Version 8, or VPN support.
The vCloud Director has several impacts on your network because the environment will be shared among multiple users. Tables 8-6 and 8-7 summarize the network requirements needed by the vCloud Director.
| Port | Comments |
| 111 - UDP/TCP | NFS Traffic |
| 920 - TCP/UDP | NFS Traffic |
| 61616 - TCP | ActiveMQ |
| 61611 - TCP | ActiveMQ |
| 80 - TCP | Incoming HTTP requests |
| 443 - TCP | Incoming HTTPS requests |
Outgoing network ports should not be connected to the public and the external facing networks. These ports are used for internal traffic between the vCloud Director and the ESX/ESXi hosts.
| Port | Comments |
| 25 - TCP/UDP | SMTP Services |
| 53 - TCP/UDP | DNS |
| 111 - TCP/UDP | NFS |
| 123 - TCP/UDP | NTP |
| 389 - TCP/UDP | LDAP |
| 443 - TCP | vCenter and ESXi connections |
| 514 - UDP | Syslog (this is optional) |
| 902 - TCP | vCenter and ESXi connections |
| 903 - TCP | vCenter and ESXi connections |
| 920 - TCP/UDP | NFS |
| 1433 - TCP | Microsoft SQL Database (default port) |
| 1521 - TCP | Oracle SQL Database (default port) |
| 5672 - TCP/UDP | AMQP messages for task extensions |
| 61611 - TCP | ActiveMQ |
| 61616 - TCP | ActiveMQ |
For additional requirements outside the scope of this recipe, please refer to the vCloud Director Install and Configuration Guide.
vCloud Director (Evaluation Appliance)
Solution
Follow the steps in this recipe to deploy the evaluation appliance.
Discussion
VMware has made it easy for organizations to test the vCloud without making a large commitment of time and infrastructure. Customers looking to rapidly test and evaluate a vCloud environment can use the appliance released for that purpose in an Open Virtualization Appliance (.ova) format. Although the appliance includes a preconfigured Oracle XE database along with CentOS, please keep in mind that CentOS is not supported in a production environment.
In this recipe, we will take a look at deploying the vCloud Director Evaluation Appliance.
Log in to the vCenter, pull down the File menu, and then select Deploy OVF Template (Figure 8-2).
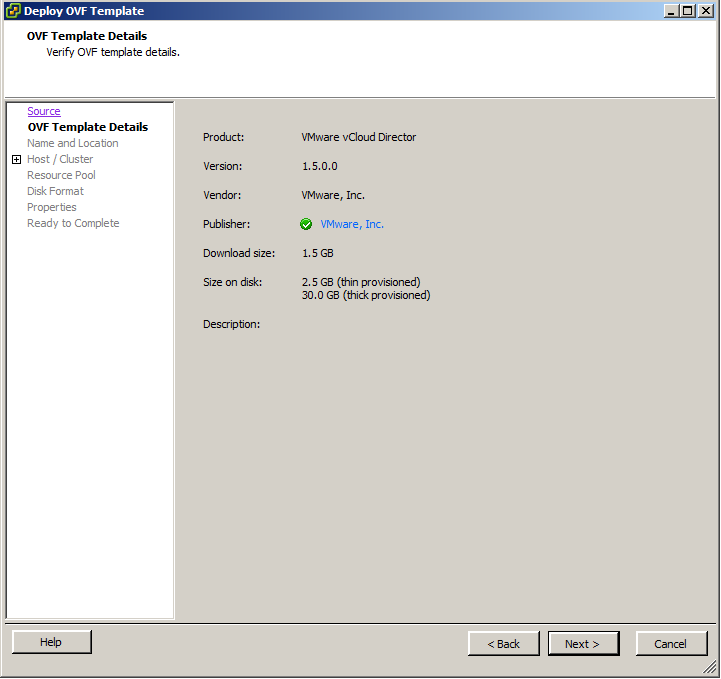
Navigate to the OVF file you have downloaded from VMware’s website. Once it is selected, click Next to begin the import process (Figure 8-3).
The wizard will display some general information about the OVF Appliance and will validate the publisher (Figure 8-4). Click Next to continue.
Next, you will need to enter the name of the virtual machine that will be the vCloud Director Appliance (Figure 8-5). Click Next to continue.
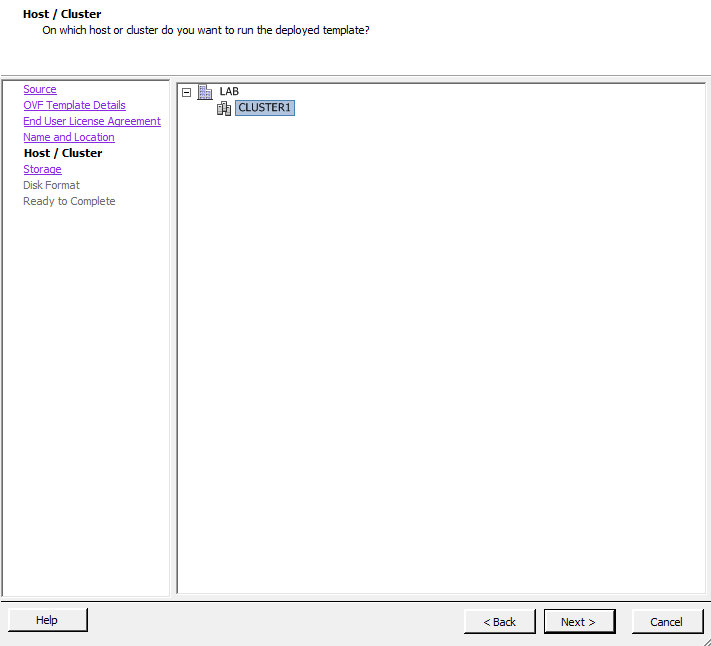
Select the host or cluster where you wish to deploy the appliance (Figure 8-6). Once selected, click Next to continue.
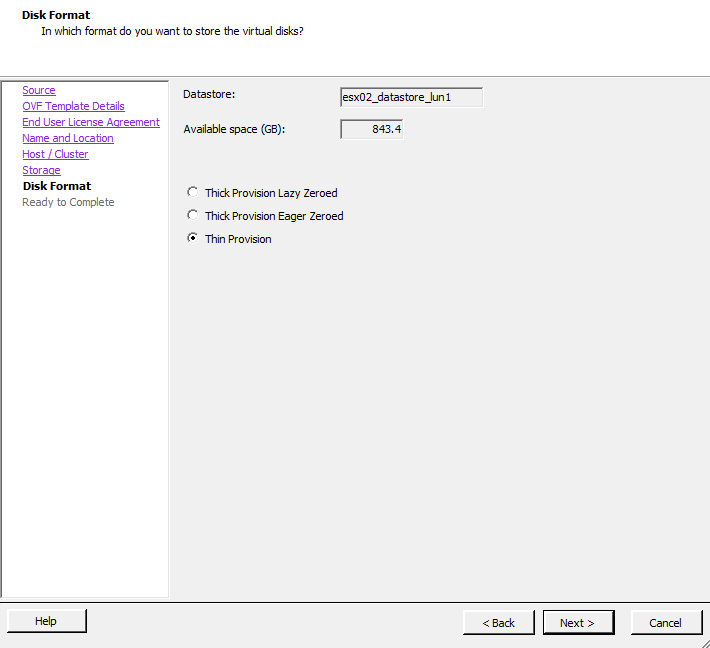
Select the disk format you would like to use for the virtual machine (Figure 8-7). Click Next to continue.
Select the network segments for your deployment. The vCloud Director will require two networks that are isolated from each other. Once the networks are selected, click Next to continue (Figure 8-8).
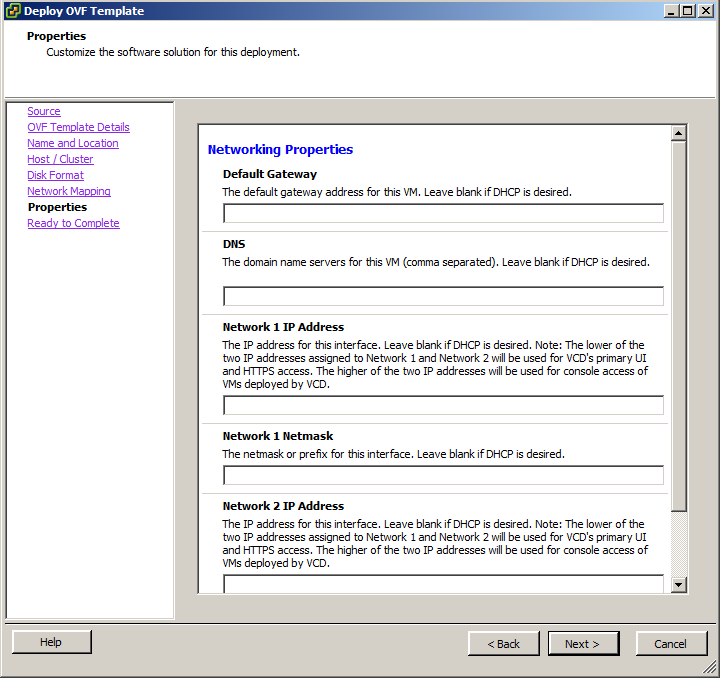
Finally, you need to configure IP addresses and networking components for the vCloud Director Appliance. After entering these, click Next to continue (Figure 8-9).
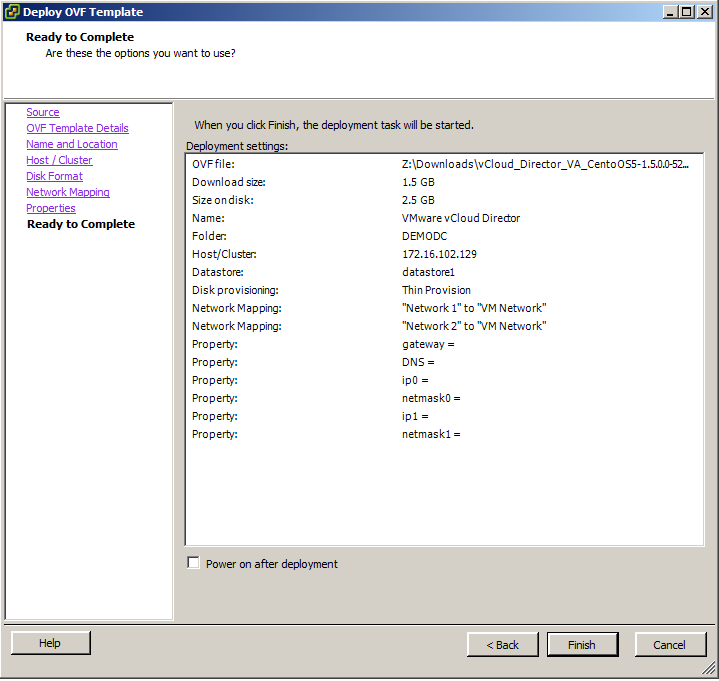
Finally, click Finish to begin the process of deploying and configuring the appliance (Figure 8-10).
Once the vCloud virtual machine has deployed, you can access it via your browser at the URL: https://
ip_addressused during the configuration process.Accept the EULA, click Next, enter your vCloud Director Key, and click Next to continue the setup wizard.
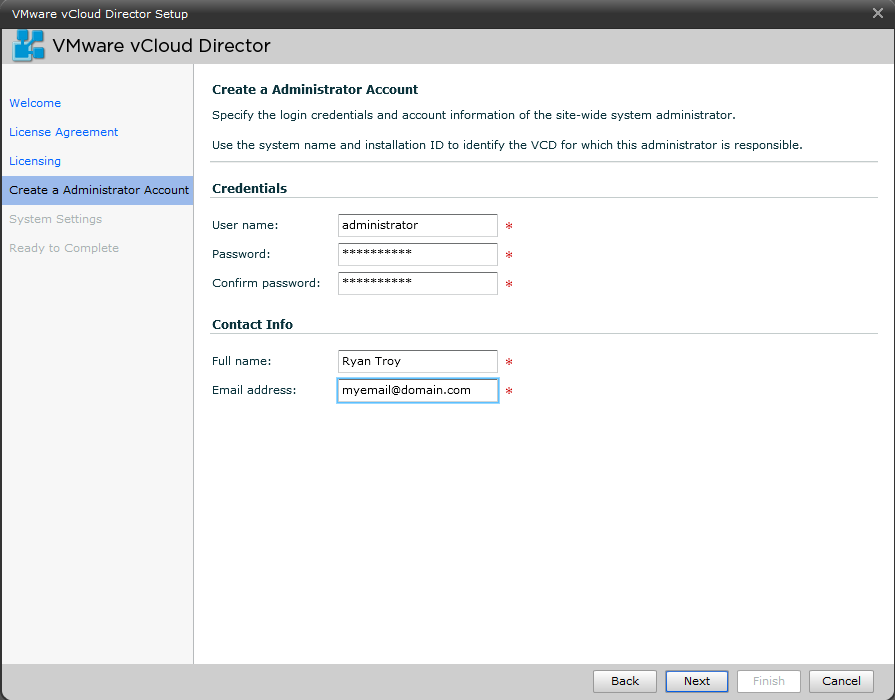
Enter the administrator credentials as shown in Figure 8-11. This will be the account used to log in to the vCloud Director interface to manage the system settings and organizations. Click Next to continue.
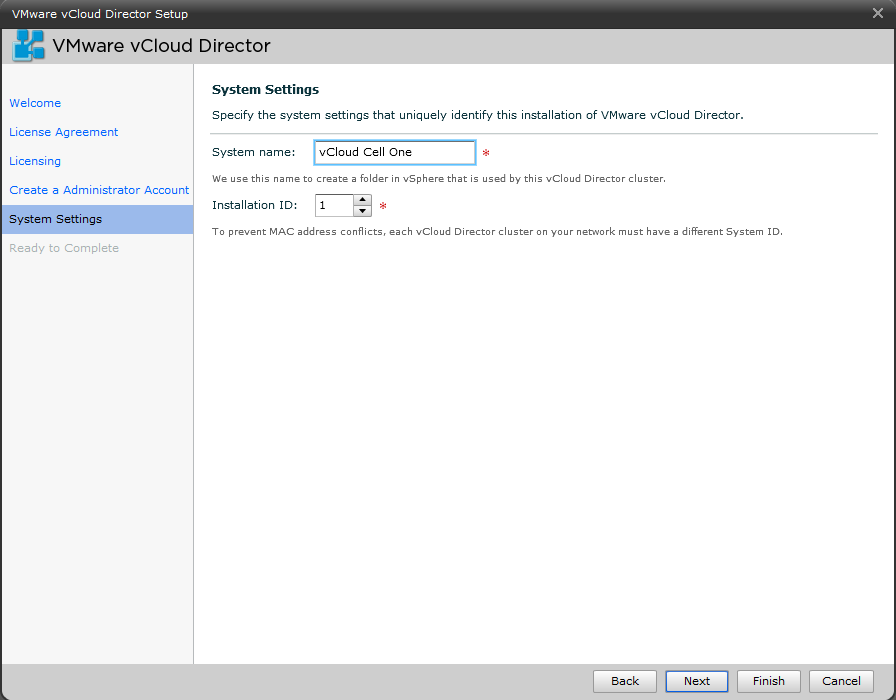
Enter a system name for the vCloud Director installation and select a unique installation ID. Click Next, review the settings selected (Figure 8-12), and then click Finish to complete the wizard.
Now that vCloud is configured with some basic settings, you can log in (Figure 8-13) and start to manage the system.


Deploying vShield Manager
Problem
You need to deploy the vShield Manager in order to configure the vCloud Director and provision organizations.
Solution
Deploy the OVA appliance provided by VMware for the vShield Manager.
Discussion
VMware vShield provides firewall, VPN, routing, and NAT services for the organizations that are deployed within the vCloud Director. Additionally, it creates secure network isolation internally and externally for organizations within the vCloud Director installation.
In this recipe, we will take a look at deploying the vShield Appliance to vCenter Server.
Log in to the vCenter, pull down the File menu, select Deploy OVF Template (Figure 8-14), and then click Next to continue to the installation.
Accept the EULA. Click Accept again, and then click Next to continue.
Enter the name for the vShield Manager and the location in which it should be deployed (Figure 8-15).
Select the cluster to which you will deploy the new vShield Manager virtual machine as shown in Figure 8-16.
Select the Datastore in which the vShield Manager virtual machine should be deployed (Figure 8-17).
Select the type of provisioning that fits your environment. You have three options here:
- Thick provision lazy zeroed
This option creates a virtual disk in the normal thick format.
- Thick provision eager zeroed
This option is compatible with fault tolerance and clustering.
- Thin provision
This option will save you disk space by not allocating all the space upfront when creating the virtual disk.
Once you have selected the option that best fits your environment (Figure 8-18), click Next to continue the installation.
Review the settings (Figure 8-19). When you’re satisfied, click the Finish button to begin deployment of the vShield Manager.
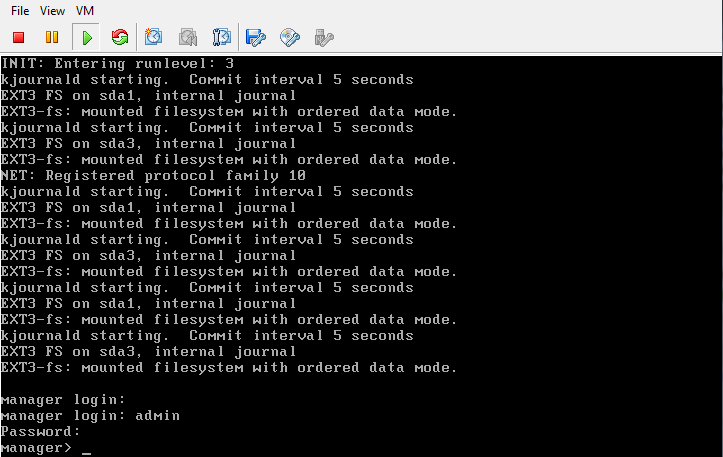
Once the vShield Manager virtual machine is done deploying, the IP address and network information will need to be configured. Log in to the vCenter server, select the vShield Manager virtual machine, and open the console as shown in Figure 8-20. The default login is Admin and the password is Default.
Once logged in, type
enable. When prompted for it, enter the password. Then typesetupto configure the networking for the vShield Manager.Enter the IP network information for the vShield Manager virtual machine. When completed, select
yto save the configuration as (Figure 8-21).Open a browser and navigate to the IP address you assigned to the vShield Manager virtual machine. You will be presented with a login screen (Figure 8-22). Enter the username and password mentioned in step 8.
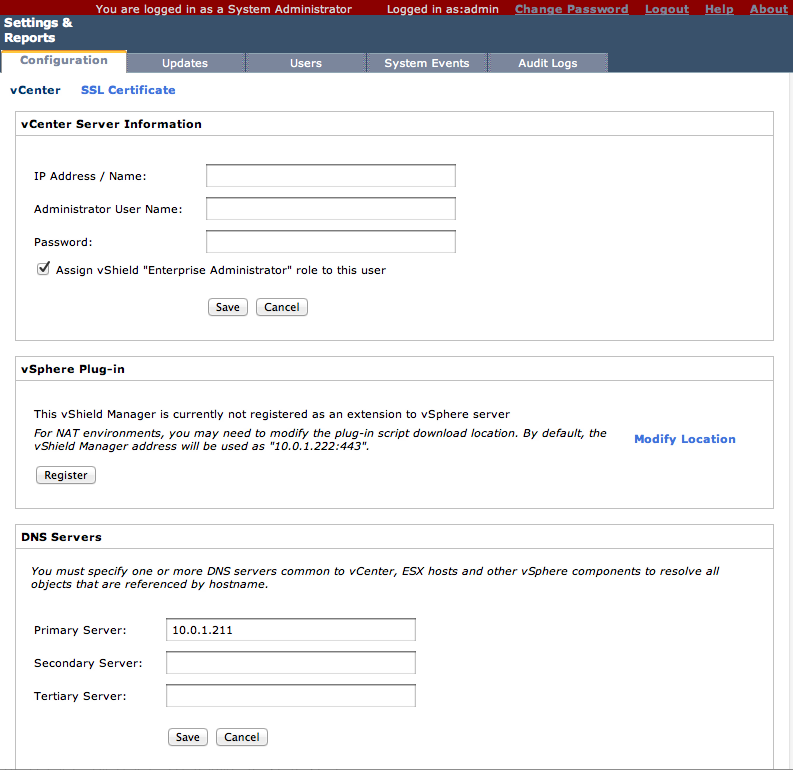
Once logged in to the vShield Manager interface, you will be presented with a configuration screen. To connect the vShield Manager to the vCenter server, enter the IP address, username, and password of your vCenter server and click the Save button (Figure 8-23).
Click the Register button under the vSphere Plug-in area to register the extension with the vCenter server.


Now vShield Manager is connected to your vCenter interface. This will allow you to proceed with the configuration inside of the vCloud Director interface.
Attaching vCloud Director to the vCenter Server
Problem
You have the vCloud Director software installed and need to attach it to the vCenter server so the vCloud Director can assign resources to virtual datacenters.
Solution
Attach the vCloud Director instance to the vCenter server.
Discussion
Attaching a vCenter server allows the resources to be available for use with the vCloud Director. Once attached, resource pools, datastores, and networks can be assigned to a virtual datacenter. In addition to providing the resources for the vCloud Director organizations, the vCenter will also hold the virtual machines and the related files for virtual machines to operate correctly.
Log in to the vCloud Director management URL: https://
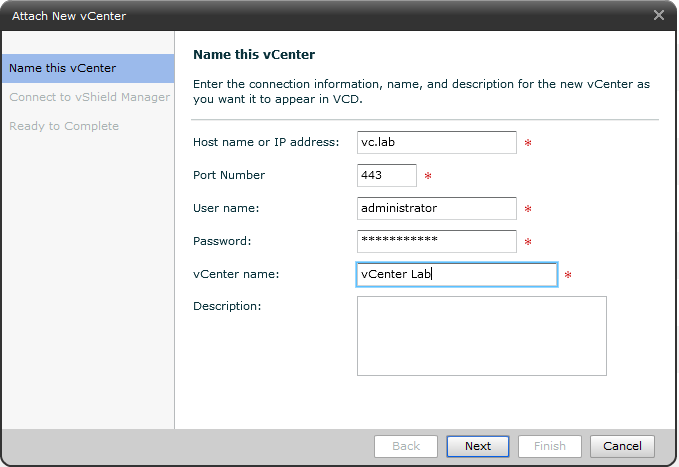
ip_address.Click the Manage & Monitor tab, click vCenters in the left side pane, and click Attach New vCenter (Figure 8-25).
Enter the information of the vCenter server to which you will be connecting.
- Host name or IP address
Denotes the vCenter server you wish to attach.
- Port number
The port number with which you will be connecting to the vCenter. This is set to 443 as default.
- User name
The administrator login for your vCenter server.
- Password
The administrator password for your vCenter server.
- vCenter name
The unique name you will be assigning to this vCenter server inside the vCloud Director.
- Description
An optional description.
Click Next to continue the installation.
Enter the IP address, username, and password of the vShield Manager that will be used with the vCenter (Figure 8-26). It’s important to note that each the vCenter being attached to the vCloud Director must have its own vShield Manager.
Click Next to save your choices (Figure 8-27). Review the settings, and once you are satisfied, click the Finish button to attach the vCenter server.
The vCenter server will now show up as active and enabled within the resources section of the vCloud Director, as shown in Figure 8-28.


Creating a Provider Virtual Datacenter
Problem
You need to create a provider vDC so vCloud Director can allocate resources to organizations.
Solution
Enable a provider vDC and register the vSphere resources with the vCloud Director.
Discussion
Creating a vDC is the first step in allocating resources to the vCloud Director Cell. After you add a provider, storage, compute, and networking resources are presented to the vCloud Director for use. You can create multiple vDCs based on different business scenarios, such as geographic locations and features (HA, storage, compute) that can be allocated to different end users or business depending on their requirements.
Log in to the vCloud Director management URL: https://
ip_address.Click the Manage & Monitor tab and click the Provide vCDs link on the left side. Then click New Provider vDC (Figure 8-29).
Enter a name and description that indicate what this provider vDC is being used for (Figure 8-30). For example, if this vDC will have access to budget compute resources, Provider vCD Budget might be a good name. Select the latest supported hardware version. This will be hardware version 8 if you are running ESXi 5.0, and hardware version 7 if you are running ESX/ESXi, 4.x. Click Next.
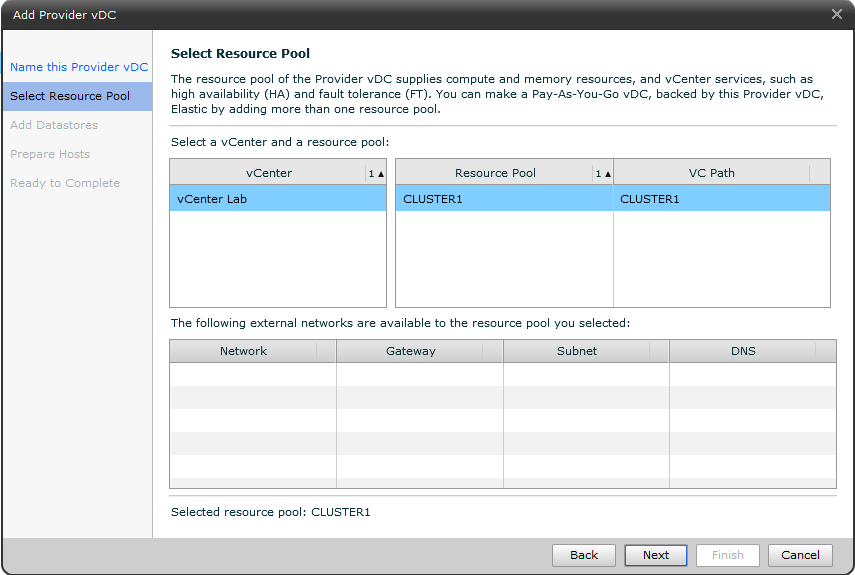
Select the vCenter server, Resource Pool, and VC Path. Additionally, select the external network you wish to use for this Provider vDC (Figure 8-31).
Select one or more datastores to add to the datacenter and click the Add button (Figure 8-32). The datastores that are selected must be on a shared storage device such as NFS, Fibre Channel, or iSCSI. Do not add local storage devices here. In this example, we’ve added two datastores to our Provider vDC,
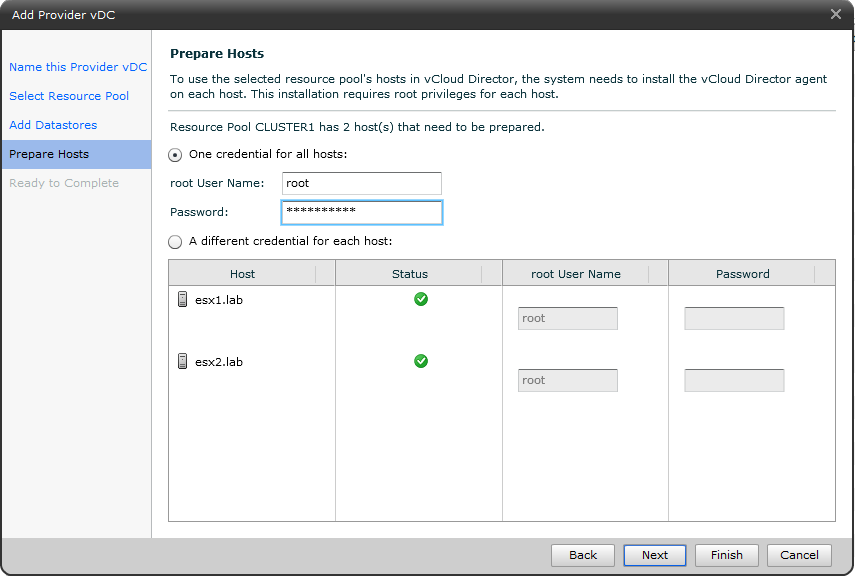
esx01_datastore_lun0andesx02_datastore_lun1.Enter the root username and password for the ESX/ESXi host(s) and click Next (Figure 8-33).
Click Finish to create the provider vDC (Figure 8-34). At this point you will see the ESXI servers in the vCenter server you attached go into maintenance mode, and agents will be installed on those hosts.


Allocating External Network Resources
Solution
Allocate the external networks for the vCloud Director to use.
Discussion
External networks are a logical network based on vSphere port groups. The external network provides the interface to the Internet for the virtual machines that reside inside different organizational networks. The external network is required if the organization has to connect to the Internet.
Log in to the vCloud Director management URL: https://
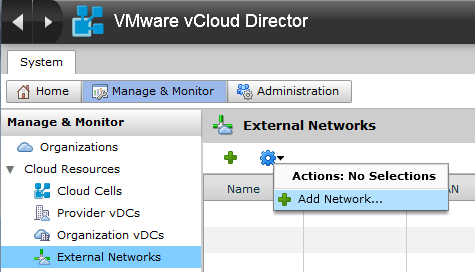
ip_address.Click the Manage & Monitor tab. Then click External Networks in the left side pane, and click Add Networks (Figure 8-35).
Select a vCenter server and vSphere Network that will provide external access (Figure 8-36). Click Next to continue.
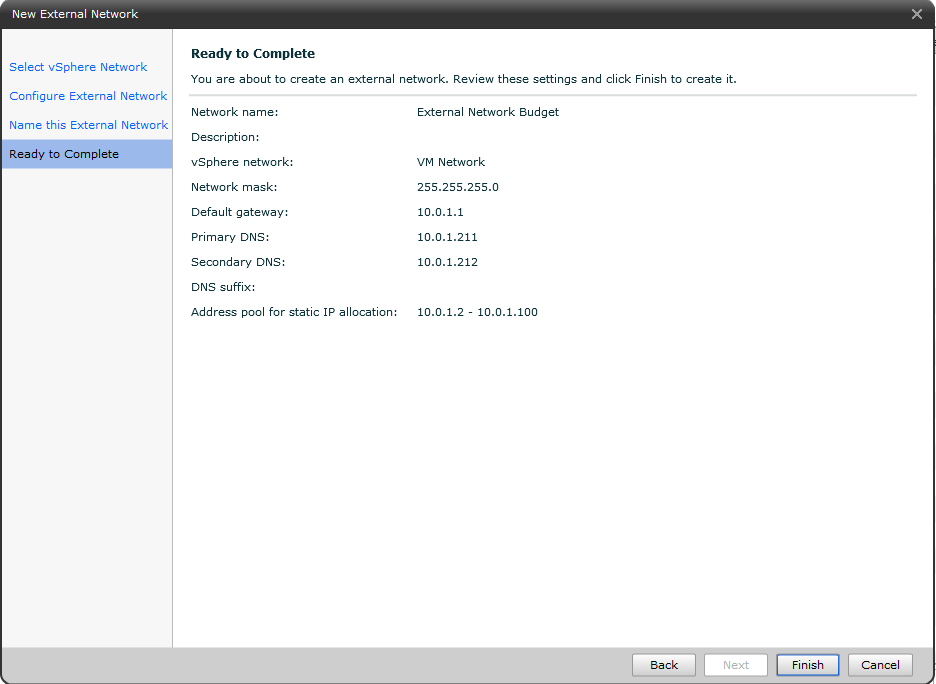
Type the basic network settings: netmask, gateway, and DNS. Then assign a static IP range that this provider vDC will allocate to the organizations that are created with this provider vDC (Figure 8-37). Click Next to continue.
Type the name of the network and click Next to continue (Figure 8-38).
Review the network settings and click Finish (Figure 8-39).


Adding Network Pools for Virtual Datacenters
Problem
You need to add network pools to assign to organizational vDCs for internal network connectivity.
Solution
In this recipe, we will look at the steps required to add network pools to the vCloud Director. This will allow internal isolated networks within the vDCs.
Discussion
Network pools are a group of networks that are available for use within a organizational vDC to create vApp networks and simple or complex network configurations for the vDC. A network pool uses the network resources from vSphere, such as VLAND IDs, port groups, or the vCloud isolated networks. This allows vCloud Director to create NAT-based internal networks, assigning them to vDCs that will later be used in vApps when deploying virtual machines.
Each organization’s vDC can have one network pool. However, multiple organizations can share the same network pool if required, giving additional flexibility within the vDCs.
To get started, follow these steps to add the network resources to the vCloud Director.
Log in to the vCloud Director management URL: https://
ip_address.Click the Manage & Monitor tab and then click Network Pools in the left side pane. Click Add Network Pool from the options (Figure 8-40).
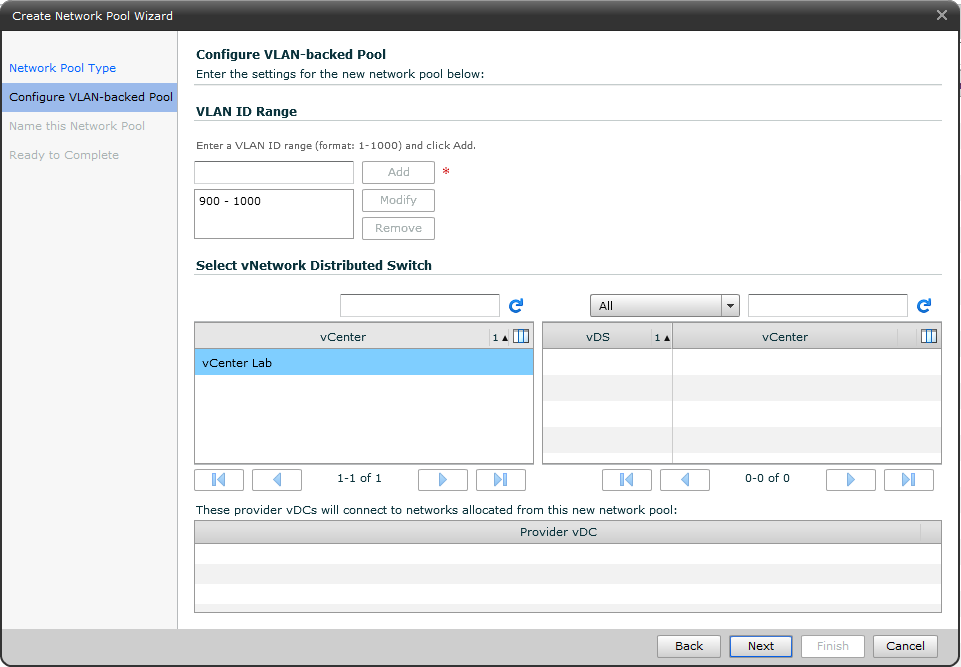
Select one of the following Network Pool options (Figure 8-41):
- VLAN-backed
This option provides the best security, scalability, and performance for organizational networks.
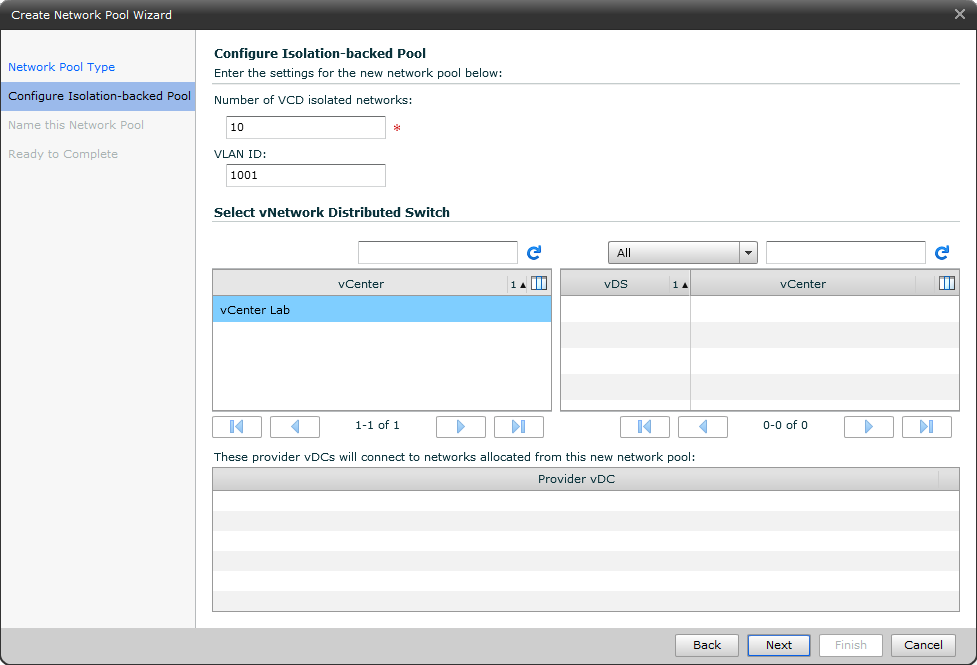
- VCD network isolation-backed
This option spans hosts and isolates traffic from other networks. This option is similar to VLANs, but it uses internal software to handle the separation of network space.
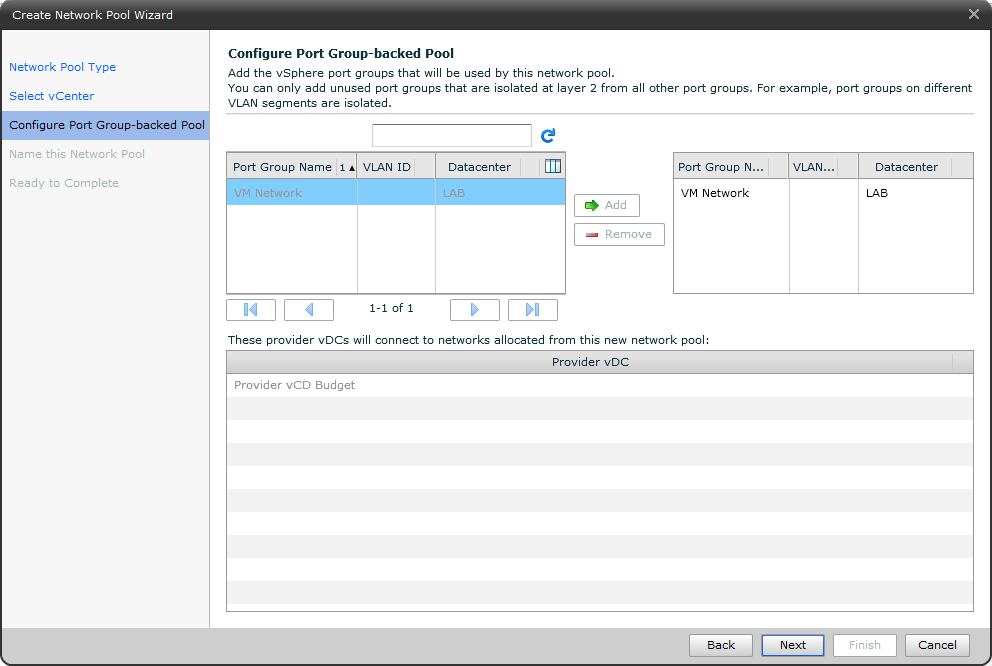
- vSphere port groups
Using this option will use network port groups and doesn’t require vSphere Distributed Switches. These port groups must be isolated from all other port groups at the layer 2 level.
Depending on which option was selected in the previous step, you will have multiple options:
If you selected VLAN-backed as your option, type a range of VLAND IDs, click Add, and select the vCenter Server and vDS switch (Figure 8-42). Click Next and continue to step 5 in this recipe to complete the wizard.
If you selected vCD Network Isolation, enter the number of VCD isolated networks and the VLAN ID. Select the vCenter server and vDC switch (Figure 8-43). Click Next and continue to step 5 in this recipe to complete the wizard.
If you selected vSphere Port Groups, select one or more port groups from the list and click Add as (Figure 8-44. Click Next and continue to step 5) in this recipe to complete the wizard.
Type a name for the network (Figure 8-45), and click Next.
Review the network pool settings and click Finish to complete the network pool addition.