
Chapter 7. Automating ESXi Installations
Given the recent progress of ESX and ESXi, we can now automate the installation of the hypervisor using a few different methods, which we will discuss in this chapter. When deploying, upgrading, or configuring new ESXI servers, the last thing you’ll want is to have to step through the complex startup process manually. It’s slow and error-prone, and practically negates the value of virtualizing your servers in the first place. Nearly every site, therefore, automates the startup. VMware uses a customized version of Red Hat’s Kickstart to allow the bulk installation and startup of ESXi.
7.1. Selecting a Different Boot Option with ESXi 5.x
Solution
We’ll discuss the available methods that set the foundation for the remaining recipes in this chapter.
Discussion
Traditionally, system administrators installed ESXI servers from an ISO image using DVD/CD-ROM or USB key. Other ways are currently available as well. We discuss all the options here.
- Download and create DVD/CD-ROM media
This is the simplest option. Here you download the ISO image from http://www.vmware.com and burn it to media. Whether you are upgrading an existing installation or performing a fresh installation, the installer will interactively walk you through the upgrade process.
- Creating a bootable USB key for installation or upgrades
As the capacity of USB drives grows, it’s more attractive to use them for installing ESXi. They are easier to manage than CDs or DVDs and can be used for multiple purposes. For additional information on creating bootable media using a USB key, see Formatting a USB Key for ESXi Installations.
- Using Kickstart for the upgrade or installation
Automating installations using Kickstart and DHCP, and creating a PXE boot environment, is helpful from the standpoint of deployment and upgrading. It eliminates manual intervention and saves time and productivity. However, this option might take longer to build and install the required components. See Building a Kickstart Configuration File for Automated Deployments.
- Using the vSphere Auto Deploy appliance
New in vSphere 5, VMware has built a Auto Deploy appliance that can be used to deploy your ESXI servers quickly and efficiently. Auto Deploy can provision hundreds of physical hosts with ESXi software. The image to deploy and the hosts to provision with the image can be specified by the administrator. Additionally, host profiles can be applied to the hosts and a vCenter instance can be assigned to the new ESXi hosts. For more information, please read Installing vSphere Auto Deploy.
- vSphere Upgrade Manager
Using VMware’s Upgrade Manager Application, you can upgrade your ESXi host to the latest version of ESXi. This option is available via the vCenter and provides an easy upgrade path.
Building a Kickstart Configuration File for Automated Deployments
Problem
You wish to automate the installation of new ESXi installations or perform automated upgrades to existing ESX/ESXI servers over the network using PXE.
Solution
Use the VMware scripting option to easily deploy new ESXI servers.
Discussion
You can deploy new servers or upgrade existing ones using Kickstart scripts along with DHCP servers to create a PXE boot environment. This recipe will assume you already have the DHCP configurations done, and we will focus on the ESXi specific kickstart options.
The following is a basic Kickstart script that can be used to install ESXi and configure networking to have a base system.
# Accept the VMware End User License Agreement
vmaccepteula

# Set the root password for the DCUI and ESXi Shell
rootpw yourpasswordhere

# Install on the first local disk available on machine and overwrite the VMFS
datastore.
install --firstdisk --overwritevmfs

# Set the network to DHCP on the first network adapater, use the specified hostname
and do not create a portgroup for the VMs esxcli network --bootproto=dhcp
--device=vmnic0 --addvmportgroup=0


%firstboot --interpreter=busybox

# Add an extra nic to vSwitch0 (vmnic1)
esxcli network vswitch standard uplink add --uplink-name=vmnic1
--vswitch-name=vSwitch0

#Assign an IP-Address to the first VMkernel, this will be used for management
esxcli network ip interface ipv4 set --interface-name=vmk0 --ipv4=10.0.0.100
--netmask=255.255.255.0 --type=static

# Add vMotion Portgroup to vSwitch0, assign it VLAN ID 201 and create a VMkernel
interface
esxcli network vswitch standard portgroup add --portgroup-name=vMotion
--vswitch-name=vSwitch0
esxcli network vswitch standard portgroup set --portgroup-name=vMotion --vlan-id=201
esxcli network ip interface add --interface-name=vmk1 --portgroup-name=vMotion
esxcli network ip interface ipv4 set --interface-name=vmk1 --ipv4=10.0.0.101
--netmask=255.255.255.0 --type=static

# Enable vMotion on the newly created VMkernel vmk1
vim-cmd hostsvc/vmotion/vnic_set vmk1

# Add new vSwitch for VM traffic, assign uplinks, create a portgroup and assign a
VLAN ID
esxcli network vswitch standard add --vswitch-name=vSwitch1
esxcli network vswitch standard uplink add --uplink-name=vmnic1
--vswitch-name=vSwitch1
esxcli network vswitch standard uplink add --uplink-name=vmnic3
--vswitch-name=vSwitch1
esxcli network vswitch standard portgroup add --portgroup-name=Production
--vswitch-name=vSwitch1
esxcli network vswitch standard portgroup set --portgroup-name=Production
--vlan-id=101

# Set DNS and hostname
esxcli system hostname set --fqdn=esxi5.localdomain
esxcli network ip dns search add --domain=localdomain
esxcli network ip dns server add --server=10.1.1.10
esxcli network ip dns server add --server=10.2.2.10

# Enable SSH and the ESXi Shell
vim-cmd hostsvc/enable_ssh
vim-cmd hostsvc/start_ssh
vim-cmd hostsvc/enable_esx_shell
vim-cmd hostsvc/start_esx_shel


# reboots the host after the scripted installation is completed
sleep 30
reboot
The following list describes the variables and options most relevant to VMware that can be used in a Kickstart configuration script.
clearpart(optional)Causes the indicated partitions to be deleted before creating the partitions specified in the configuration (via the
partitioncommand). This is not required when using theupgradecommand, because that simply reloads the existing partitions. Options include:--drives=--alldrivesIgnores any
--drivesoption and remove all partitions from the system. We strongly suggest that you physically disconnect any external SAN devices connected to the system before using this option.--ignoreddrives=Specify drives that will be ignored during the install or upgrade process. These drives will not be touched.
dryrun(optional)Will parse and validate the configuration scripts but not actually perform an installation. This can be used for testing your Kickstart configurations.
installThis options specifies that you are doing a fresh and new installation.
installorupgradeSpecifies that we are doing a fresh and new installation or an upgrade.
--disk=or--drive=Selects which partition on the disk to use for the installation and will be used like
--disk=diskname, thedisknamecan be one of the following:--overwritevmfsAllows the installation of ESXi if a VMFS partition exists with an ESX or ESXi installation. Additionally, if this option is not specified, the installation will fail if a VMFS partition is not present.
--forcemigrateIf the installation of ESX or ESXi contains third-party MIBS, the installer will normally fail because it won’t upgrade them. However, using this option forces installation of ESXi 5.0 without upgrading the MIBS.
networkAllow for network elements to be added to the system.
--bootproto=[dhcp|static]Set whether the installation will obtain its IP address from DHCP or whether you will set the address manually.
--device=This option denotes the uplink port you will be using for installation. This will be in the form of
vmnic0orvmnicXXdepending on your system’s configuration.--ip=Sets the IP address of the system. This will be used in conjunction with the
--bootprotooption to set the local IP address manually.--gateway=The network gateway. This will be used in conjunction with the
--bootprotooption to set the gateway’s IP address manually.--nameserver=Sets the nameservers for DNS resolution. Two IP addresses can be specified here in the format of
--nameserver="10.0.0.1,11.11.11.9". This will be used in conjunction with the--bootprotooption to set the name server’s IP address manually.--netmask=The network netmask. This will be used in conjunction with the
--bootprotooption to set the netmask manually.--hostname=--vlanid=Assigns the network interface to a specific VLAN. This option can be used with
--bootprotoas eitherstaticordhcp, depending on how you configure your network.--addvmportgroup=(0|1)Create a VM Network Portgroup by default. Generally, this option is set to 1.
partorpartition(optional)Creates an additional VMFS datastore during the installation. Only one datastore can exist per disk. This VMFS datastore cannot be created on the same disk as the installation.
datastorenameSpecifies where the partition will be mounted.
--ondisk=or--ondrive=The disk or drive in which the VMFS datastore will be created. Remember, this cannot be the drive used for the ESXi installation.
--firstdiskAllows you to specify which disk will be used first. The drives are selected in the order of 1) local drives (local), 2) network (remote), and 3) USB drives (USB).
upgradeSpecifies an upgrade to an existing ESXi installation.
--firstdisk=Allows you to specify which disk will be used first. The drives are selected in order of 1) local drives (local), 2) network (remote), and 3) USB drives (USB).
--deletecosvmdkIf the system being upgraded is an older ESX installation, the old service console and associated vmdk files will be removed during installation. This will free up additional space.
--forcemigrateIf the installation of ESX or ESXi contains third-party MIBS, the installer normally will fail because it won’t upgrade them. However, using this option forces installation of ESXi 5.0 without upgrading the MIBS.
%preRuns a predefined set of scripts or commands before the installation begins. For additional information, see Recipe 7.3.
%postRuns commands after the installation has completed. This can be useful when additional configuration options are needed.
--interpreter=[python|busybox]Specifies the interpreter to use during installation. The default is
busybox.--timeout=secsThe timeout for the command. This is specified in seconds. If the scripts are not executed, the script will be forcibly terminated.
--ignorefailure=[true|false]If true, the installation will continue and complete even if there is a failure during the
%postscript process.
%firstbootCreates a set of init scripts to run during the first boot of the ESXi system. This will run only the first time and will not impact future boots. Multiple
%firstbootoptions can be specified and will run in the order which they are specified in the Kickstart configuration file. For additional information, see Recipe 7.2.
Differences Between ESXi 4.x and ESXi 5.x Kickstart Commands
Discussion
If you are currently deploying a new installation using a Kickstart script from ESXi 4.x, the following are the changes that will be required in order to successfully install ESXi 5.0 using Kickstart. We have noted for each command if it has been removed from Kickstart, if it is not supported by ESXi 5.0, or if specific options are not supported.
accepteulaorvmaccepteulaThese options are available only with ESXi and are required.
autopartThis command has been removed and replaced with
install,upgrade, orinstallorupgrade.authauthconfigbootloaderesxlocationfirewallfirewallportserialnumThis option is deprecated and removed in ESXi 5.0. Licenses can be applied to the ESXI server after installation is completed.
vmserialnumThis option is deprecated and removed in ESXi 5.0. Licenses can be applied to the ESXI server after installation is completed.
timezonevirtualdiskzerombrThis option is not supported in ESXi 5.0.
%firstboot%packages
7.2. Advanced Installation Scripting Using %firstboot
Problem
You wish to further enhance your ESXI server’s configuration after the ESXi installation at the first reboot of the new ESXi installation.
Solution
Put Kickstart-specific commands and Bash shell commands in the
%firstboot section of the Kickstart
configuration.
Discussion
By including commands in the %firstboot section of the Kickstart
configuration file, you can customize your ESXi configuration by
creating virtual switches and network interfaces, making configuration
file changes, and more. Building a Kickstart Configuration File for Automated
Deployments
discusses the advanced command-line options that are available.
These can be combined in a flexible manner in the %firstboot section of your Kickstart
configuration file. Let’s look at a few common uses for that
section:
- Firewall configuration
This is one universal task that can be performed in the
%postsection.The following lines, for instance, can be included in the
%postsection to open ports for syslog, sshclient, ntpclient, update manager, http, and iSCSI:Method #1 esxcli network firewall ruleset set --ruleset-id syslog --enabled yes esxcli network firewall ruleset set --ruleset-id sshClient --enabled yes esxcli network firewall ruleset set --ruleset-id ntpClient --enabled yes esxcli network firewall ruleset set --ruleset-id updateManager --enabled yes esxcli network firewall ruleset set --ruleset-id httpClient --enabled yes esxcli network firewall ruleset set --ruleset-id iSCSI --enabled yes
An alternative syntax that is more compact but uses more complex shell features is:
FIREWALL_ENABLE="syslog sshClient ntpClient updateManager httpClient iSCSI" for SERVICES in ${FIREWALL_ENABLE} do esxcli network firewall ruleset set --ruleset-id ${SERVICES} --enabled yes done- Networking
Further customization might include a network setup using the built-in ESXi commands, which are not allowed in the general commands section because the commands in that section run before ESXi is installed. Let’s take a look at how to create a simple network.
First, we’ll assign the vmnic2 Ethernet port to the vSwitch0 switch. Then we’ll create a portgroup named vMotion on vSwitch0 and assign it to the network VLAN 201:
esxcli network vswitch standard uplink add --uplink-name vmnic2
--vswitch-name vSwitch0
esxcli network vswitch standard portgroup add --portgroup-name vMotion
--vswitch-name vSwitch0
esxcli network vswitch standard portgroup set --portgroup-name vMotion
--vlan-id 201
7.3. Advanced Installation Scripting Using %pre
Problem
You want to run additional scripts before the Kickstart configuration runs, or set up the environment in which it will run.
Solution
Put Kickstart-specific commands and Bash shell commands in the
%pre section of the
Kickstart configuration file.
Discussion
In the %pre section of
Kickstart’s configuration file, you can specify commands that you want
to run just after the Kickstart configuration has been parsed. Using the
%pre section, you can
grab specific variables relating to your system, such as disk types, and
create a partitioning schema based on the disks. For example, if you
want to use the same Kickstart file on Dell servers and HP servers, you
can check which type of disk is being used in the %pre section and
partition the disk accordingly.
Let’s take a look at a simple possibility. The following commands use some standard Unix text parsing to determine the ESXi server’s network information from bootp for use when setting the network configuration:
%pre –interpreter=busybox
VMK_INT="vmk0"
VMK_LINE=$(localcli network ip interface ipv4 get | grep "${VMK_INT}")
IPADDR=$(echo "${VMK_LINE}" | awk '{print $2}')
NETMASK=$(echo "${VMK_LINE}" | awk '{print $3}')
GATEWAY=$(esxcfg-route | awk '{print $5}')
DNS="172.30.0.100,172.30.0.200"
HOSTNAME=$(nslookup "${IPADDR}" | grep Address | awk '{print $4}')

echo "network --bootproto=static --addvmportgroup=false --device=vmnic0 --ip=${IPADDR}
--netmask=${NETMASK} --gateway=${GATEWAY} --nameserver=${DNS} --hostname=${HOSTNAME}"
> /tmp/networkconfig
For more detailed information about using scripts in the
%pre and %firstboot section, see http://www.redhat.com/docs/manuals/enterprise/RHEL-3-Manual/sysadmin-guide/s1-kickstart2-preinstallconfig.html.
See Also
Recipe Recipe 7.2 and Recipe 7.4
7.4. Advanced Installation Scripting Using %post
Problem
You wish to further enhance your ESXI servers’ configuration after the ESXi installation has completed, or do other initial tasks before applications start.
Solution
Put Kickstart-specific commands and Bash shell commands in the
%post section of the Kickstart
configuration.
Discussion
By including commands in the %post section of the Kickstart configuration
file, you can customize your ESXi configuration by creating virtual
switches and network interfaces, making configuration file changes, and
more. Building a Kickstart Configuration File for Automated
Deployments discussed the
advanced command-line options that
are available to you. These can be combined in a rich manner in the
%post section of your Kickstart configuration
file. Let’s look at a few common uses for that section:
- Modifying system configuration files
This is easy to automate using built-in Linux commands. The following example uses the standard Linux echo command to modify the /etc/resolv.conf file to configure the nameservers for your ESXI server:
echo "search yourdomain.com" > /etc/resolv.conf
echo "nameserver 10.1.1.1" >> /etc/resolv.conf
echo "nameserver 10.2.2.2" >> /etc/resolv.conf
- Time synchronization
You can use the
echocommand again, along with other Linux commands, to enable the ntpd service:chkconfig ntpd on echo "restrict 127.0.0.1" > /etc/ntp.conf echo "restrict default kod nomodify notrap" >> /etc/ntp.conf echo "server ntp1.domain.com" >> /etc/ntp.conf echo "server ntp2.domain.com" >> /etc/ntp.conf echo "driftfile /var/lib/ntp/drift" >> /etc/ntp.conf
Methods of Upgrading ESX 4.0 Classic to ESXi 5.0
Solution
This recipe looks at the VMware-provided upgrade paths available for ESX upgrades.
Discussion
VMware has continued to develop the ESXi platform and we now have multiple ways to achieve an upgrade. In this recipe we will take a look at the upgrade paths available and the methods you can use to upgrade legacy ESX/ESXi 3.x/4.x servers to the latest version of ESXi 5.0 (Table 7-1).
| Upgrade methods | Upgrade from ESX/ESXi 4.x to ESXi 5.x |
| vSphere Upgrade Manager | Supported |
| Manually from CD/DVD or USB Key | Supported |
| Scripted upgrading using Kickstart | Supported |
| vSphere Auto Deploy | Not supported currently |
The following are the latest upgrade path notes from VMware Knowledge-base Article 2004501. There are a total of eight scenarios that are available, allowing the administrator to select the best method for a specific environment (Table 7-2).
| Upgrade scenario | vSphere 5.x supported |
| ESX/ESXi 3.x Hosts | Not supported for direct upgrade. You must upgrade version 3.x ESX and ESXi Hosts to ESX or ESXi Version 4.x before you can upgrade them to ESXi 5.0. |
| ESX 4.x Host that was upgraded from ESX 3.x with a partition layout incompatible with ESXi 5.0 | Not supported. The VMFS partition cannot be preserved. Upgrading or migration is possible only if there is at most one VMFS partition on the disk that is being upgraded, and the VMFS partition must start after sector 1843200. Perform a fresh installation. To keep virtual machines, migrate them to a different system. |
| ESX/ESXi 4.x Host, migration or upgrade with vSphere Update Manager | Supported. |
| ESX/ESXi 4.x Host, interactive migration or upgrade | Supported. |
| ESX/ESXi 4.x Host, scripted upgrade | Supported. |
| 4.x ESX Host on a SAN or SSD | Partially supported. You can upgrade the host as you would a normal ESX 4.x Host, but no provisions will be made to optimize the partitions on the disk. To optimize the partition scheme on the host, perform a fresh installation. |
| 4.x ESX Host, missing Service Console .vmdk file, interactive migration from CD or DVD, scripted migration, or migration with vSphere Update Manager | Not supported. |
| ESX/ESXi 4.x Host, asynchronously released driver or other third-party customizations, interactive migration from CD or DVD, scripted migration, or migration with vSphere Update Manager | Supported with ESXi Image Builder CLI. |
Upgrading ESXi 4.x to ESXi 5.0 via CD/DVD
Problem
You want to upgrade your ESX 4.x or ESXi 4.x to the latest version of ESXi 5.0 using the CD or DVD method.
Solution
By downloading the ISO image from vmware.com, you can create a bootable CD or DVD image to upgrade ESX to the latest version.
Discussion
Upgrading ESXi 4.x or ESX 4.0 to the latest version of ESXi 5.0 can be done manually via the CD/DVD method. This method will give you a few options for upgrades.
Download the latest ESXi 5.x image from http://www.vmware.com and either burn it to a CD/DVD or copy it to a USB key.
Insert the media into your physical ESXI server, and reboot.
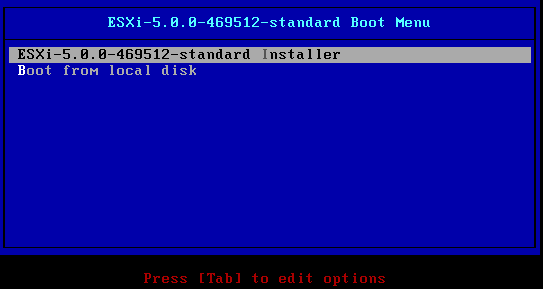
From the ESXi 5.0 Boot Menu, select the ESXi Standard installer option (Figure 7-1). This will begin the installation/upgrade process. Press Enter.
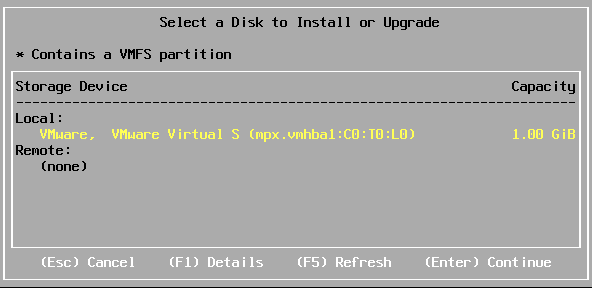
Next, select the disk on which you will either install or upgrade ESXi (Figure 7-2). If you have a SAN attached, the disk will be located under the remote section; otherwise it will be under local. Press Enter to continue. The installer will then prepare to use the disk (Figure 7-3).
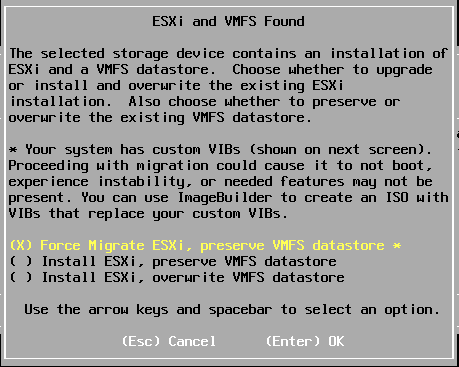
The installer will search for ESXi and ESX installations as well as VMFS filestores. Next, you will be presented with one of the following options (Figure 7-4):
- Force migrate ESXi, preserve VMFS datastore
This option will migrate your current version of ESX/ESXi 4 to ESXi 5 and keep the VMFS datastore intact.
- Install ESXi, preserve VMFS datastore
This option will install a fresh copy of ESXi 5.0 and will keep the VMFS datastore intact.
- Install ESXi, preserve VMFS datastore
This option will do a complete replacement of ESX/ESXi 4.x and the VMFS volume, creating a fresh installation.
Select the option that best fits your environment. Press Enter and the installation/upgrade will continue.
If you select the force migration option, you will need to press F11 to continue the installation.
Once completed, you will now have a fresh copy of ESXi installed and you can reboot by pressing the Enter key.

Installing vSphere Auto Deploy
Solution
Using the Auto Deploy appliance provided by VMware, you can easily build a PXE boot environment to install ESXi over the network.
Discussion
vSphere Auto Deploy will allow the provisioning and reprovisioning of a small or larger number of ESXi hosts efficiently with the vCenter server. Using this new feature in vSphere 5.x, the vCenter server will load the ESXi image directly into the physical server’s memory. This means that you no longer have to waste precious hard drive space for the installation of ESXi. Patching and updates are handled through image profiles and optionally through host profiles.
When a virtual machine boots for the first time, stateful information is saved inside the vCenter database.
| Information type | Description | Source of state information |
| Image state | Executable software to run on an ESXi host | State of the image, possibly created with the Image Builder tool. |
| Configuration state | The configuration state of the ESXi Host: network information, boot parameters, IP address, etc. | The host profile that is stored on vCenter Server. |
| Dynamic state | Software-generated information, such as generated keys and runtime databases | State stored in the ESXi Host’s memory and lost during the reboot process. |
| Virtual machine state | Information about the virtual machines that are located on the ESXi host, such as where they are located, whether they are an HA cluster, etc. | If the virtual machine is in a vSphere HA cluster, deployment can succeed even if the vCenter server is unavailable because Auto Deploy retains the virtual machine information. If the virtual machine is not in a vSphere HA cluster, the vCenter server must be available to supply virtual machine information to Auto Deploy. |
| User input | Information that is manually entered by the administrator that cannot be stored in the profiles | Custom information is stored in an answer file. You can create a host profile that requires user input for certain values. When Auto Deploy applies a host profile that requires an answer to a newly provisioned host, the host comes up in maintenance mode. You can right-click the host and select Update Answer File to be prompted for the information. The answer file information is stored with the host. Each host has one answer file that can include multiple user input items. |
A couple prerequisites that will not be discussed during the section on installation, but need to be present in your environment include:
The DHCP/DNS Server
The TFTP boot server
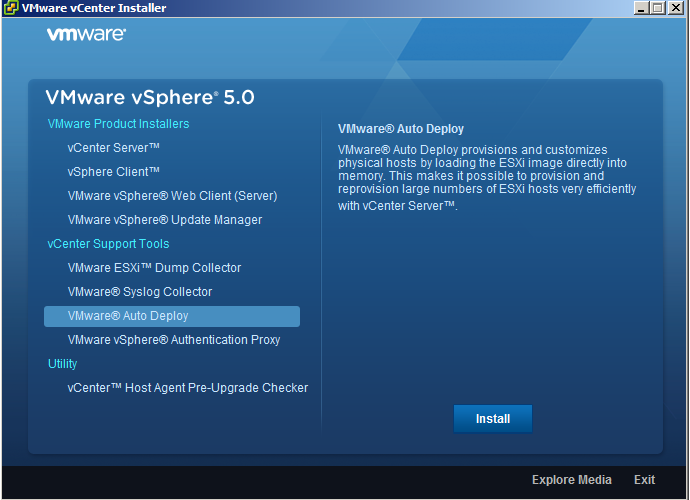
Now let’s install the vSphere Auto Deploy. This can be found on the vCenter server installation DVD or ISO image.
Select the VMware Auto Deploy option and click Install (Figure 7-5).
Click Next to start the installation process and accept the license agreements (Figure 7-6).
Select the installation destination and then select the maximum Auto Deploy repository (Figure 7-7). The default size is 2GB. If you have enough space, this can be increased to ensure there is enough space in the repository in the future. Generally, each image will be around 350MB. The default of 2GB will hold around four images, with a little extra space. Click Next.
Next, set the IP address or name of the server, the HTTP port you are running the vCenter server on, and the username and password of the vCenter Administrator account (Figure 7-8). Click Next. The installer will add an icon to the vCenter server home screen.
Next, set the port on which you wish the Auto Deploy server to run (Figure 7-9). The default port is 6501, and it’s recommended you keep that default. Click Next. You will also want to make sure this port is open in your network firewall, if applicable.
Next, select how you wish Auto Deploy should be seen on the network (Figure 7-10). This will either be a FQDN or an IP address depending on how you connected to your vCenter server in step 4. Click Next to continue.
Finally, click Install to begin the installation process (Figure 7-11). Once completed, you can log in to vCenter using the vCenter client and manage a few available options.


This recipe has walked you through the installation process of the vSphere Auto Deploy components. As mentioned earlier, you will need an additional DHCP/DNS and TFTP server in the network segment to auto provision your new ESXi hosts with the vSphere Auto Deploy capabilities. Please refer to the VMware Installation and Setup guide for additional information.
Formatting a USB Key for ESXi Installations
Solution
Format a USB key and copy the contents of the ESXi 5.x ISO image.
Discussion
We will take a look at the steps to create a bootable USB key for installing ESXi 5.x manually. Today, USB keys are becoming more popular then CD-ROMs/DVDs. We’ll take a look and explore the process of copying the media to a USB key in this recipe.
First you will need to make sure you are on a Linux system as because this example will be performed via the Linux command line. You will also need to make sure the ESXi 5.x ISO image is downloaded from the VMware website.
First, insert the USB key into your Linux server and determine to which drive it is assigned. This will be something similar to /dev/sdb or /dev/sdc etc depending on how many drives you have.
Next, we will format the USB key using the following syntax:
/sbin/fdisk /dev/sdX, replacingXwith the drive letter your USB key was mounted as.Next, type
dto delete partitions until they are all deleted (Figure 7-12).Next, type
nto create primary partition 1 that extends over the entire disk.Next, type
tto set the type to an appropriate setting for the FAT32 file system, such asc(Figure 7-13).Next, type
ato set the active flag on partition 1 (Figure 7-14).Next, type
wto save the changes.Now that the settings are changed and we have a partition table, let’s format the partition:
/sbin/mkfs.vfat -F 32 -n USB /dev/sdX1, replacingXwith the drive letter your USB key was assigned.Next, we need to mount the USB key to copy the ESXi installation to:
mount /dev/sdX1
          /usbdisk
, replacingXwith the drive letter your USB key was assigned.Let’s mount the ESXi ISO image to our Linux server so we can copy the contents to the USB key:
mount -o loop VMware-VMvisor-Installer-5.0.0-XXXXXX.x86_64.iso /esxi_cdrom, replacing XXXXXX with the version of ESXi 5.x you downloaded.Next, use the Linux
cpcommand to copy the contents of the ISO image to the USB key:cp -r /esxi_cdrom/* /usbdiskNext, move the isolinux.cfg file to syslinux.cfg, which allows you to boot the USB key:
mv
          /usbdisk/isolinux.cfg /usbdisk/syslinux.cfg
Next, we need to edit the syslinux.cfg file using your favorite editor. This can be vi or nano or gedit if you have a desktop on your server. Open the file
/usbdisk/syslinux.cfg, change the lineAPPEND -c boot.cfgtoAPPEND -c boot.cfg -p 1, and then save the file.Finally, unmount the ISO image and USB key:
umount /usbdisk && umount
          /esxi_cdrom


