6
Image Size and Perspective
View cameras provide flexibility for using lenses that vary in focal length over a wide range and for focusing on objects over a wide range of distances, which enable the photographer to exercise considerable control over image size, angle of view, and linear perspective. In this chapter the versatility and limitations of the view camera will be examined with respect to distant objects, nearby objects, and multiple objects at different distances.
6.1 Perspective
Perspective, with respect to images, is the appearance of depth when a three-dimensional object or scene is viewed directly or as a photographic or other two-dimensional representation. The ability we humans have to perceive depth and judge relative distances with such accuracy in the three-dimensional world is often credited to our two eyes and binocular vision. If we close one eye, however, the world does not suddenly appear two-dimensional because a variety of other depth cues are available to us, cues that photographers can use to retain or enhance the appearance of depth in two-dimensional photographs. These cues include linear perspective, the overlap of objects, depth of field, lighting, aerial haze, color, holography, and motion perspective. In addition, stereophotography, which involves making two two-dimensional images from slightly different side-by-side positions and then presenting each image for viewing by the corresponding eye, can create very realistic perceptions of depth. It should be noted that while motion perspective is a valuable cue for the perception of depth in motion pictures and video, it does not contribute to the perception of depth in still photographs. The first six perspective cues just mentioned are discussed briefly before discussing image size, angle of view, and linear perspective in greater detail.
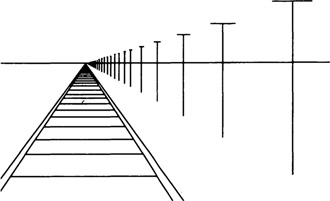
Figure 6-1
Linear perspective is represented by the convergence of the parallel subject lines toward a vanishing point on the horizon and by the decreasing image size of the poles and the track ties with increasing object distance.
Linear Perspective
Linear perspective is exemplified by the convergence of parallel subject lines in images and by the decrease in image size as the object distance increases. Linear perspective is so effective in representing depth in two-dimensional images that it is often the only type of depth cue provided by artists when making simple line drawings. Early Egyptian artists drew pictures without linear perspective, where a boat in the foreground and a boat on the horizon were drawn the same size. Alberti, an Italian architect, originated the concept of thinking of the picture plane as a window through which he looked at the visible world, which enabled him to record the images of objects with the correct size-distance relationships. He is also credited with the concept of vanishing points, where parallel subject lines that recede from the viewer meet at a point in the image (Figure 6-1).

Figure 6-2
The increasing distance of the cats from right to left is evidenced by the fact that the closer objects obscure detail in the overlap areas of the more distant objects.
Overlap
If objects are positioned so that a nearby object obscures part of a more distant object, the viewer is provided a powerful cue as to which object is closer, both when viewing the objects directly and when viewing two-dimensional representations. Overlap by itself, however, provides no information concerning the magnitude of the distance that separates the two objects (Figure 6-2).
Depth of Field
Depth of field refers to the range of distances over which objects are imaged with acceptable sharpness. When a camera is focused on an object at a certain distance and closer and more distant objects appear less sharp in the photograph, the viewer is made aware that the objects are at different distances. When the depth of field is very large and objects at all distances appear equally sharp in the photograph, the viewer may become confused about relative distances unless there are other depth cues, such as relative sizes. Photographs in which a pole in the background appears to be resting on the head of a person in the foreground is an example of confusion resulting from a large depth of field (Figure 6-3). Creative photographers, however, sometimes intentionally arrange such a juxtaposition of foreground and background objects to create a special effect.
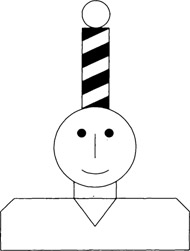
Figure 6-3
When objects in the foreground and the background are equally sharp, it is easy to perceive the background object as resting on the foreground object.
Lighting
Depth can be emphasized with lighting that reveals the shape, form, and position of objects. A lack of tonal separation between the dark hair of a model and a dark background, for example, destroys the appearance of distance between the model and the background. Uniform front light on a white cube with three visible planes can make it appear two-dimensional, whereas lighting that produces a different luminance on each plane will reveal the cube’s true form. With curved surfaces, as on the human face, form and depth are revealed with lighting that produces gradations of tone on the curved surfaces. Shadows on objects on the opposite side from the main light and shadows of objects cast onto other surfaces can reveal both the form and the position of the objects (Figure 6-4).
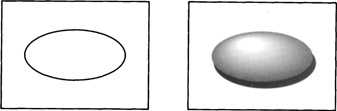
Figure 6-4
The three-dimensional attribute of objects can be represented in two-dimensional images with lighting that produces gradations of tone and shadows.
Aerial Haze
The scattering of light by small particles in the atmosphere makes distant objects appear lighter and less contrasty than nearby objects. With a series of mountain ridges that increase in distance, each more distant ridge appears lighter than the one in front of it (Figure 6-5). Heavy fog is a more dramatic example of the same effect, where a person walking away from the camera can appear to fade and then disappear within a short distance. The appearance of aerial haze, and therefore the apparent distance of an object, can be altered considerably by the choice of film and filter. Since the haze consists of scattered light that is bluish in color, use of a red filter with panchromatic film will decrease the appearance of haze and a blue filter will increase it. Black-and-white infrared film used with a red or infrared filter will dramatically decrease the appearance of haze and distance and increase the detail visible in the more distant objects. Smoke in a smoke-filled room creates the similar effect of increasing the appearance of depth in interior photographs. Fog machines are used by some photographers and cinematographers to achieve a haze effect.
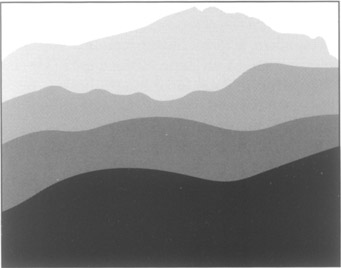
Figure 6-5
Aerial haze produces a progressive lightening of image tone with increasing object distance.
Color
As applied to perspective, red is identified as an advancing color and blue as a receding color. The terms indicate that if a red card and a blue card are placed side by side and there are no other cues as to their distance from the viewer, the red card will tend to appear closer. If the explanation for this effect is that it is due to association, it can be noted that, with aerial haze, the haze becomes more bluish with increasing distance. Also, blue sky is thought of as being at a great distance. Researchers in visual perception have considered the possibility of a physiological explanation based on a difference in focus on the retina in the eye for red light and blue light. It is not uncommon for artists to use red and blue colors to achieve perspective effects in their paintings.
6.2 Focal Length with Distant Objects
The relative sizes of images of objects at different distances from the camera can be changed while keeping the size of the image of one of the objects constant by simultaneously increasing or decreasing lens focal length and object distance, but this process will be easier to understand if the effects of changing focal length and object distance are first examined with a single object.
When photographing a distant object, image size varies in direct proportion to lens focal length. A 12-in. focal length lens, for example, will produce twice as large an image as a 6-in. focal length lens. Using lenses of normal construction, limitations will be encountered with very long and very short focal length lenses. A camera with a maximum bellows extension of 17 in. can focus a 17-in. focal length lens only on infinity, and longer lenses cannot be focused at all. The maximum bellows extension varies considerably among cameras. With cameras that have provisions for adding tandem supplementary bellows, a maximum extension of 40 in. and more can be obtained. A camera of this type can accommodate most available photographic lenses except for the longer (70-in., for example) process lenses.
Telephoto construction makes it possible to use lenses of longer focal length than the maximum bellows extension on the camera. The flange focal distance (the distance from the rear surface of the lens board to the ground glass when the camera is focused on a distant object) must be known to determine if a telephoto lens can be used on a specific camera. Although the flange focal distance was long neglected in the promotional material published by lens manufacturers, the table of contemporary view camera lenses in Chapter 12 now includes this information for most brands of lenses. The ratio of equivalent focal length to flange focal distance is often quite modest. One 15-in. focal length telephoto lens has a flange focal distance of 9.5 in., for example, for a ratio of approximately 1.6:1.
There is more danger of obtaining a blurred image due to camera movement with long focal length lenses than with short and normal focal length lenses. Wind can cause a serious vibration of a camera that is not securely anchored on a sturdy tripod. With handheld 35-mm cameras, there is a rule of thumb that it is not safe to use an exposure time setting longer than the reciprocal of the focal length of the lens in millimeters. Therefore, a 16-in. (approximately 400-mm) focal length lens would require use of an exposure time of 1/400 sec. Since the depth of field is small with long focal length lenses, there is a tendency to use smaller apertures and correspondingly longer exposure times, which increases this danger.
Unlike long focal length lenses, where the maximum bellows extension is the limiting factor, short focal length lenses are limited by covering power when focused on distant scenes. The shortest focal length lens of normal construction generally recommended for 4 × 5-in. cameras is approximately 6 in. (152 mm), if lens and back adjustments are not needed; 3-inch (76 mm) focal length wide-angle lenses are capable of covering 4 × 5-in. film. If the camera will also accommodate a 30-in. (462-mm) focal length lens, the image size can be varied over a range of 1 to 1 0 from a fixed camera position with these two lenses. Whereas there is a direct relationship between focal length and image size with a distant object, there is an inverse relationship between focal length and angle of view, as shown in Figure 6-6.
With some view cameras, difficulty may be encountered even with wide-angle short focal length lenses, in that the lens cannot be moved close enough to the ground glass to focus the image of a distant object due to bellows bind or other physical limitations— especially if the camera tilts, swings, or shifts are used. Substituting a bag bellows or a recessed lens board usually alleviates this problem.
6.3 Focal Length Limitations at Close Range
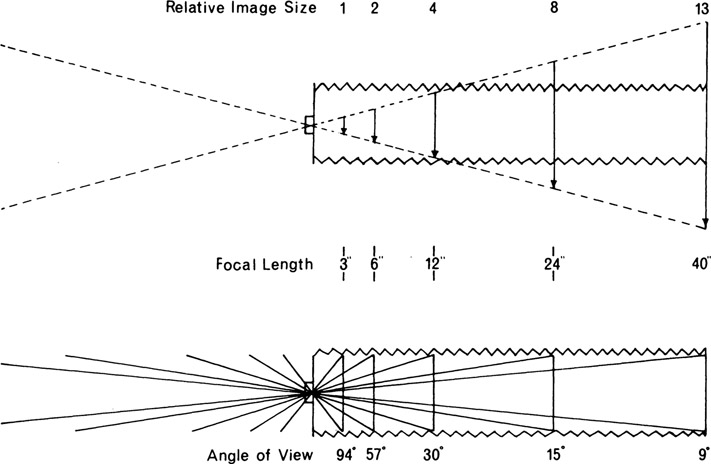
Figure 6-6
Relative image sizes (top) and angles of view (bottom) with various focal length lenses on a 4 × 5-in. camera and a distant object.
As the camera is moved toward the subject, the bellows extension limitation on long focal length lenses becomes more restrictive. At a 1:1 scale of reproduction, the image distance is double the focal length of the lens. Consequently, a camera that can accommodate a 30-in. focal length lens with distant scenes is limited to a 15-in. focal length lens of similar design for a 1:1 scale of reproduction. Conversely, the limitation of short focal length lenses becomes more liberal as the camera-to-subject distance decreases. If a 6-in. focal length lens will just cover 4 × 5-in. film when the camera is focused on a distant scene, a lens of half the focal length (3 in.) will have corresponding coverage when the camera is moved in for a 1:1 scale of reproduction, where the object distance and the image distance are both 6 in. As long as the bellows extension becomes no smaller than 6 in., any focal length lens of normal construction can be used, as illustrated in Figure 6-7. This means, however, that the camera must be moved closer to the subject as the focal length becomes smaller to obtain adequate coverage.
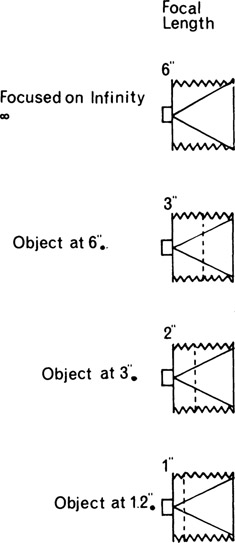
Figure 6-7
Short focal length lenses of normal construction have adequate covering power provided the lens-to-film distance remains at least as large as the film diagonal.
6.4 Maximum Scale of Reproduction
Since the maximum scale of reproduction that can be obtained depends on the bellows extension and the focal length, limitations imposed by these two variables are examined more closely. The lens formula R = (v − f)/f can be used to determine the maximum scale of reproduction (R) obtainable with given values for the lens focal length (f) and bellows extension (image distance, v).
Scale of Reproduction and Bellows Extension
Table 6-1 shows the bellows extensions (image distances) required to obtain various scales of reproduction with a 6 V2-in. focal length lens, which is equal to the film diagonal of 4 × 5-in. film. Although it is theoretically possible to obtain as large an image as desired with this focal length lens by moving the camera closer to the subject and increasing the lens-to-film distance, the bellows extension obviously becomes too large to be practicable as the scale of reproduction increases beyond 4 or 8 except with special cameras, such as process cameras, which have unusually long bellows.
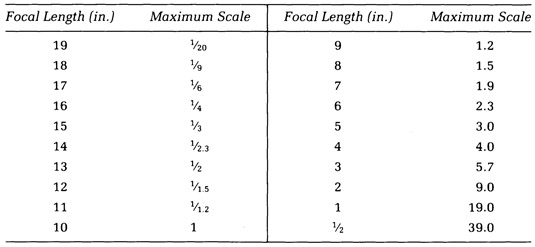
Scale of Reproduction and Focal Length
It becomes necessary to substitute a shorter focal length lens when the bellows imposes a limitation on the use of the standard focal length lens for photomacrography. Table 6-2 shows the relationship between focal length and the maximum scale of reproduction for a representative view camera that has a 20-in. bellows.
Table 6-3 shows the bellows extensions required for different scales of reproduction with the more popular view camera formats and corresponding standard focal length lenses.
Scale of Reproduction, Focal Length, and Object Distance
Table 6-1 Scale of Reproduction and Bellows Extension (with 6 1/2-in. focal length lens)
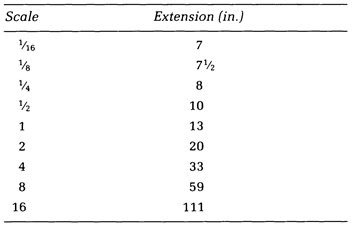
Table 6-2 Maximum Scale of Reproduction and Focal Length (with 20-in. bellows)
Shorter focal length lenses, as illustrated in Table 6-3, have the advantage of being capable of producing larger images with a limited bellows extension. However, three disadvantages are involved in using lenses considerably shorter than necessary to obtain the desired scale of reproduction. First, the circle of good definition may not be large enough to cover the film, especially if the camera adjustments are used. Second, the camera may have to be placed so close to the subject that it will interfere with lighting the subject, taking an exposure meter reading, and setting the shutter and diaphragm. Third, the perspective is often less attractive with three-dimensional subjects when the camera-to-subject distance is very small.
Table 6-3 Scale of Reproduction, Bellows Extension, and Focal Length (with standard film formats and lenses)
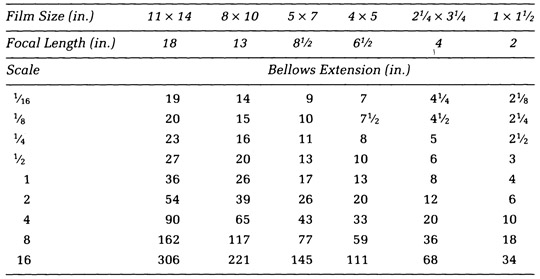
Table 6-4 shows the relationship between focal length and object distance for five different scales of reproduction ranging from 1 to 16. The advantage of the longer focal length lenses in providing more distance between the subject and the camera when making large-scale photographs is evident.
Table 6-4 Scale of Reproduction, Focal Length, and Object Distance
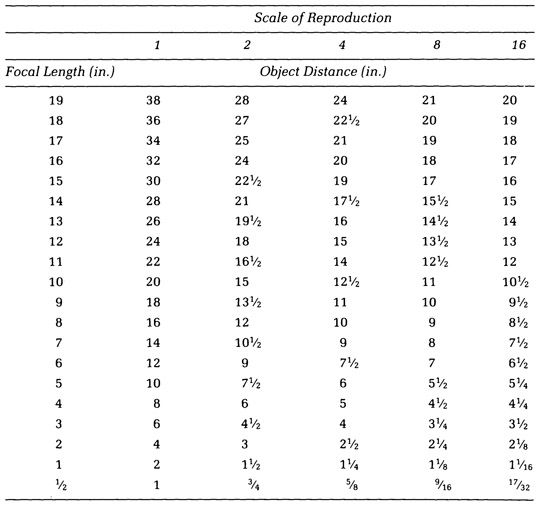

Figure 6-8
A 1:1 scale of reproduction is always obtained when the object distance is two times the focal length of the camera lens regardless of the focal length. The image distance will also be two times the focal length.—Jean-Paul Debattice
6.5 Closeup Photography, Photomacrography, and Photomicrography
The terms closeup photograph, photomacrograph, and photomicrograph have become established as categories of photographs representing different scales of reproduction, with the scale increasing in the order listed. Establishing a dividing line between normal and closeup photographs is an arbitrary matter. As the camera is moved toward the subject, a point is reached where the film will be noticeably underexposed unless compensation is made for the increased bellows extension. A general rule for critical work (when reversal color film is used, for example) is that compensation should be made in the exposure when the camera is within 10 focal lengths of the subject—200 in., for example, with a 20-in. focal length lens and 30 in. with a 3-in. lens. This is an appropriate place to begin the closeup category. An object distance of 10 focal lengths corresponds to a scale of reproduction of approximately 1:10 (actually 1:9).
A logical dividing line between a closeup photograph and a photomacrograph is where the image becomes equal in size to the object. The object distance for a scale of reproduction of 1 is always two focal lengths (Figure 6-8). Photomicrography is a term applied to photographs taken through a microscope. Thus, any image representing a scale of reproduction larger than 1 made directly with a camera is a photomacrograph. When a scale larger than 25 or 50 is required, it is usually more practical to take the photograph through a microscope.
6.6 Image Definition of Photomacrographs
Other than obtaining a sufficiently large image, the major optical problem in photomacrography is concerned with image definition. The following methods for obtaining an improved image should be considered when the image definition of a photomacrograph is not satisfactory.
Change the Aperture
Even with a two-dimensional subject, where depth of field is not a factor, the definition is not the same at all apertures. Stopping the lens down minimizes loss of definition due to lens aberrations but increases the loss of definition attributable to diffraction, and the aperture that produces optimum definition changes with the scale of reproduction. The harmful effects of diffraction are less likely to be a problem with photographs made with a view camera than with cameras using smaller film sizes, but the effects become more pronounced as the bellows is extended to obtain larger images of close objects. When the bellows extension is two times the focal length of the lens, the adverse effect of diffraction on image definition will be twice as large as when the lens is focused on infinity at the same f-number. If a lens is set at f/45 for a photomacrograph with a bellows extension two times the focal length, the effective f-number is f/90. The diffraction effect on the photomacrograph at f/45, therefore, will correspond to that on a photograph of a distant scene at f/90. The formula for diffraction-limited resolution is R = 1800 f/-number. The graph in Figure 4-5 (Chapter 4) shows the relationship between f-numbers and the diffraction-limited resolving power for 4 × 5-in. and 35-mm cameras. Note that the f-number represents the effective f-number, not the f-number marked on the lens when the bellows extension is longer than one focal length.
An additional reason for stopping the lens down is introduced with three-dimensional subjects. Depth of field decreases rapidly as the lens-to-subject distance decreases, so that obtaining as little as ½-in. depth of field may become impossible even at the smallest aperture with large-scale photographs. It may be necessary to compromise by accepting some overall loss of definition due to diffraction when it is necessary to stop the lens down to obtain the maximum depth of field. Critical focusing becomes especially important in photomacrography because of the limited depth of field. It is easier to focus precisely by moving the subject or the entire camera than by using the focusing adjustments.
Reverse the Lens
Lenses that have been designed for use with subjects at long to moderate distances from the camera produce the best images when the front of the lens faces the longer of the conjugate distances. When the scale of reproduction is larger than 1, the lens-to-film distance is longer than the lens-to-subject distance.
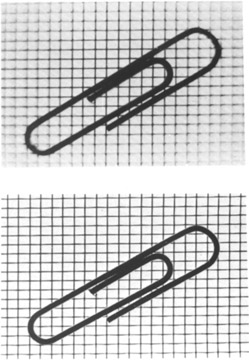
Figure 6-9
Photographs of a small object made with a normal-type camera lens (top) and a macro lens (bottom), both at the maximum diaphragm openings.
Use a Positive Supplementary Lens
By keeping the film plane approximately one focal length from the lens, the corrections designed into the camera lens for longer object distances are not disrupted. Aberrations in the supplementary lens can be minimized by using a small aperture or, preferably, a corrected lens (such as another camera lens) as a supplementary lens, reversing it so that the front of the supplementary lens faces the camera lens.
Substitute a Lens Designed for Use with Shorter Object Distances (a macro lens, a process lens, or even an enlarging lens)
The top photograph in Figure 6-9 was made with a general-purpose camera lens at the maximum diaphragm opening. The increasing loss of sharpness toward the corners is due to curvature of field, which would not be present in photographs of objects at moderate to large distances. The bottom photograph was made with a macro lens that was designed to be used at small object distances.
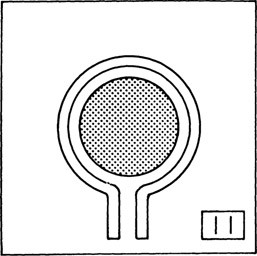
Figure 6-10
Electronic-flash ring light.
6.7 Lighting for Photomacrographs
Complications are often encountered in lighting small objects for photomacrographs due to the limited space between the subject and the camera. When detail is required in all parts of the subject, light must approach the subject from the direction of the lens. Since the lens may be only a few inches from the subject, conventional lights cannot be placed in the desired position with three-dimensional subjects. Three methods of overcoming this difficulty are (1) to use a ring light that encircles the lens, (2) to use reflectors that can be placed close to or even in front of the lens, and (3) to surround the lens and subject with a translucent cone. Ring lights are available in electronic flash and fluorescent tubes (Figures 6-10 and 6-11).
The lighting technique most successful in lighting cavities in the subject is to place a piece of thin flat glass at an angle in front of the camera lens. Light from a source at the side will be reflected to the subject as though it had originated from the direction of the lens (Figure 6-12). Comparisons of illuminating a small three-dimensional subject with direct light, a ring light, and light reflected from a glass plate in front of the camera lens are shown in Figure 6-13.
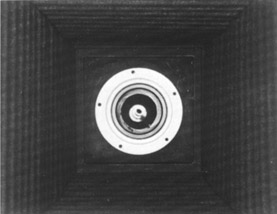
Figure 6-11
A photograph made with a ring light to show an unpainted lens flange in a view camera, which can be a source of flare light. Recessed areas of this type are difficult to illuminate with conventional light sources.
Mirrors, foil, or white paper can be placed near or around the lens when it is not necessary for the light to come precisely from the direction of the lens (Figure 6-14). Care must be used to shield the lens from the direct light. When a more vigorous lighting effect is desired, these techniques can be used to provide the fill light, in combination with one or more stronger direct lights.
A translucent cone that surrounds the subject and tapers down to fit around the camera lens can produce very uniform illumination on the subject when the cone itself is illuminated by external light sources. This technique is commonly used when photographing polished metal and other highly reflective objects and is not limited to small objects, providing a sufficiently large translucent cone is available (Figure 6-15).
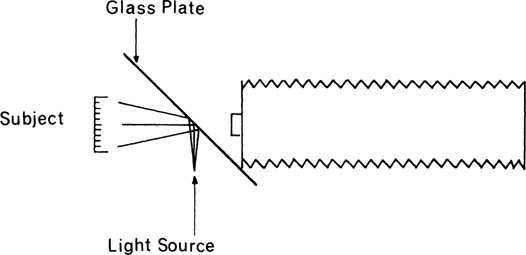
Figure 6-12
A glass plate reflector in front of the camera lens.
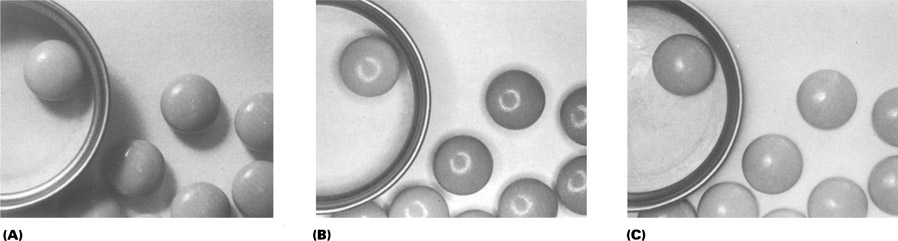
Figure 6-13
(A) Use of direct light for a photomacrograph, which produces shadows that may conceal important detail with some subjects. (B) Evidence of the ring light used for this photograph is revealed by the reflections on the pills, and it can be noted that shadows were not entirely eliminated. (C) A glass plate at a 45° angle in front of the lens reflects light onto the subject as though it originated at the lens.
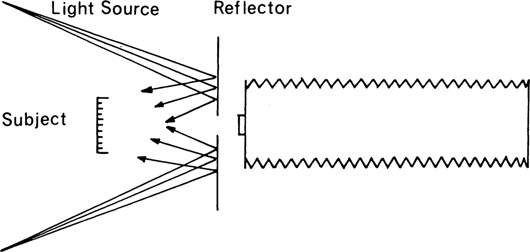
Figure 6-14
A reflector in front of the camera with a hole for the lens.
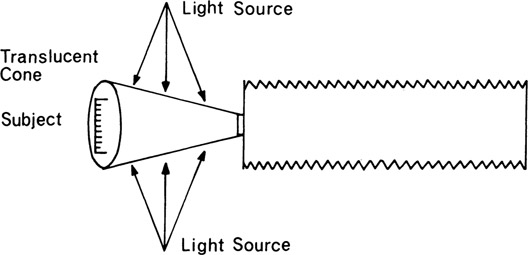
Figure 6-15
Use of a translucent cone illuminated from the outside.
6.8 Perspective
Perspective may be defined as the appearance of objects with respect to their distance and position. Perspective is the quality that creates the illusion of three dimensions in two-dimensional photographs. Several factors contribute to this illusion of depth in photographs, but the most obvious one is linear perspective, which is identified as a change in image size in relation to the object distance. The freedom of choice of lens focal length and camera position afforded by the long bellows provides view camera users with extensive control over linear perspective.
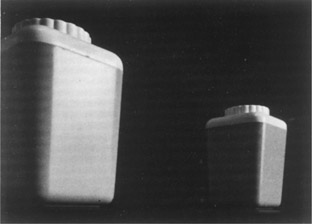
Figure 6-16
Image sizes are inversely proportional to object distances.
6.9 Object Distance and Perspective
When two objects that are equal in size are located at different distances from the camera, the image sizes will vary inversely with the distances, so that a 1:2 ratio of object distances produces a 2:1 ratio of image sizes (Figure 6-16). A single object at an angle will reveal perspective not only by the difference in size of the near and far parts of the object as they appear on the photograph, but also by the convergence of parallel lines that connect the near and far parts (Figure 6-17). Moving the camera away from the two objects will cause both images to decrease in size, but not at the same rate. Since the ratio of the distances of the two objects decreases as the camera is moved away, the ratio of the image sizes will also decrease. With objects at a 1: 3 ratio of distances, doubling the distance from the camera to the near object increases the distance from the camera to the far object by only one-third of the original distance (Figure 6-18). The ratio of the object distances is now 1:2 and the ratio of the image sizes is 2:1. Doubling the distance between the camera and the near object again, to 4 times the original distance, reduces the ratio of distances to 1:1½ and the ratio of image sizes to 1½:1. The relative image sizes, and therefore the linear perspective, in this illustration are determined solely by the position of the camera. With movable objects, the linear perspective can also be altered by changing the distance between the objects.
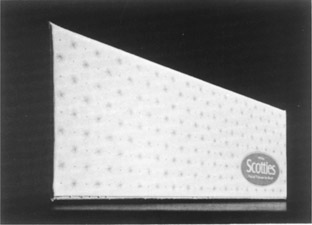
Figure 6-17
Perspective with a single object at an oblique angle is evident in convergence of lines in addition to difference in size of the two ends.
Inexperienced photographers usually select the camera position on the basis of factors other than perspective. The tendency is to adjust the distance between the camera and the subject to obtain the desired image size and angle of view or to select the most convenient location for the camera without giving consideration to the perspective. This casual approach will occasionally result in an obviously unfortunate perspective effect, such as the too-large nose on a portrait or the compressed appearance of a subject photographed from a distance. Professional photographers learn to control perspective to obtain the desired effect. To do this, it is first necessary for the photographer to be aware of the subtle as well as obvious perspective effects. The camera position is then selected on the basis of the perspective desired, and finally, the focal length lens that will produce the appropriate image size is used.
The perspective that results when a camera is moved relatively close to the subject is known as a strong perspective, and a weak perspective results when the camera is at a longer than normal distance from the subject. Objects appear to decrease rapidly in size with distance from the camera when the perspective is strong. This effect is sometimes referred to as distortion or distorted perspective. (The noun distortion is more properly reserved for the lens aberration previously described.) When the perspective is weak, objects appear to decrease slowly in size with their distance from the camera, being represented more nearly by their true size relationship.
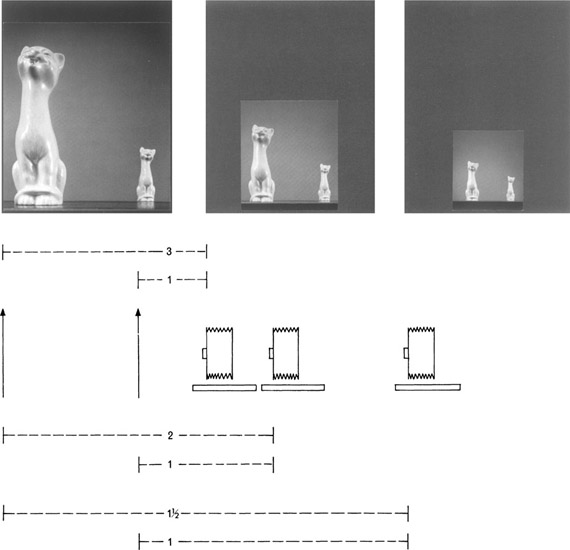
Figure 6-18
The near object decreases in size more rapidly than the far object as the camera distance is increased, resulting in a decrease in the ratio of the distances to the two objects and a corresponding decrease in the ratio of the sizes of the images.
6.10 Focal Length and Perspective
Substituting lenses with different focal lengths, with the camera remaining in the same position, changes the size of the images of near and far objects at the same rate with no change in the relative sizes of the objects. The result is the same as when a negative is placed in an enlarger and prints are made at different scales of reproduction. It is not correct, however, to say that focal length has no effect on perspective. Even though the relative sizes of near and far objects remain identical with different focal length lenses, the angles of view and overall image sizes will be different and can create different impressions of depth in the photographs (Figure 6-19). The effect of changes in focal length on perspective should not be overlooked, since viewers are generally more concerned with the total perspective effect than with the actual ratio of image sizes. The perspective effect depends on such subtle factors as the cropping of the print and the distance at which the print is viewed. Focal length is related to the effect that viewing distance has on perspective, which is discussed next, but in general, increasing the focal length tends to decrease the perspective even though the camera position remains unchanged.
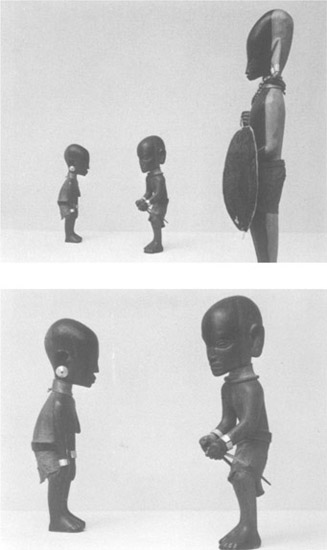
Figure 6-19
Viewer’s impression of depth changes with lens focal length, due to differences in the angles of view, even though the relative sizes of objects remain identical.
6.11 Simultaneous Changes in Object Distance and Focal Length
Changes in linear perspective are most obvious when comparison photographs are made in which the object distance and the focal length are changed simultaneously in such a way that part of the subject remains constant in size. Figure 6-20 illustrates the control the photographer can exercise over linear perspective in photographing a subject by substituting longer focal length lenses and moving the camera away from the subject to maintain a constant image size for the far end of the subject. Factors other than suitability of the perspective, however, often dictate or limit the options of camera position. The rail fence in Figure 6-21 also shows how a short focal length lens on a camera placed close to the subject appears to expand space between objects at different distances, and a long focal length lens on a camera placed at a proportionally longer distance from the subject appears to compress the space between the objects. The ratio of the focal lengths of the lenses for these two photographs was 1 to 30.
Architectural interiors, for example, seldom allow the photographer much freedom with respect to the distance at which the camera is placed from the subject. Natural-appearing perspective is not always desirable. Unusually strong and unusually weak perspective can be used effectively for dramatic impact (Figure 6-22). Certain perspective customs have evolved over the years in some fields of photography. Rather weak linear perspective is the rule for studio portraits and catalog photographs, for example. Stronger perspective is generally found in interior architectural photographs, not only because of the necessity of placing the camera close to the subject, but because strong perspective increases the feeling of spaciousness. The complete destruction of linear perspective is desirable on certain types of industrial photographs of three-dimensional subjects that are used for the preparation of nonperspective engineering drawings. Photographic copying requires the complete elimination of linear perspective, which would be evident as a change in shape of the image resulting from inaccurate alignment of the camera.
The treatment of vertical subject lines represents the most obvious discrepancy between the way the eye sees perspective and the way we have become accustomed to recording it photographically. Although vertical subject lines do appear to converge when examined
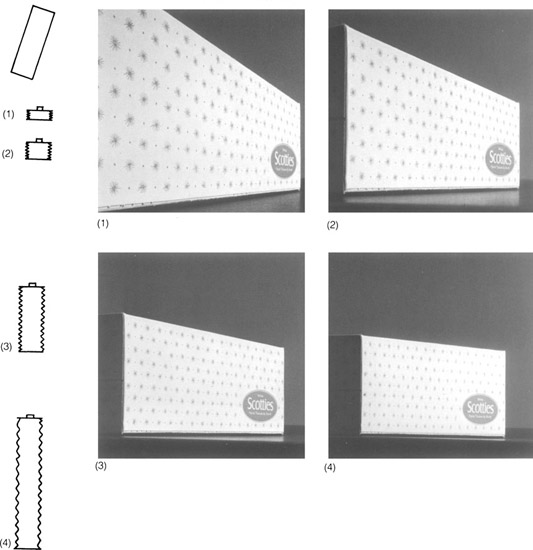
Figure 6-20
Simultaneous increases in object distance and lens focal length result in weakening the linear perspective. The right side of the object remains constant in size.
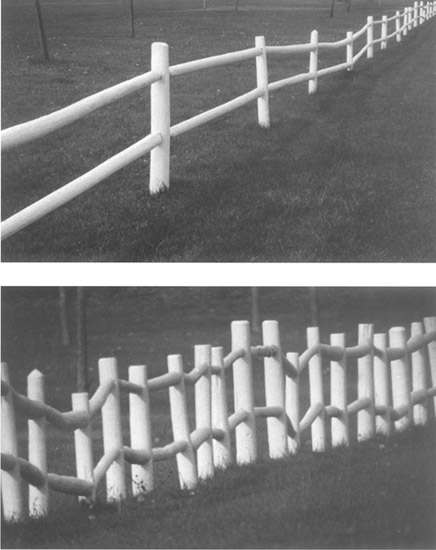
Figure 6-21
The top photograph was made with a short focal length lens on a camera placed close to the first post, and the bottom photograph was made with a lens having a focal length 30 times that of the first lens and with the camera placed approximately 30 times as far away from the post.
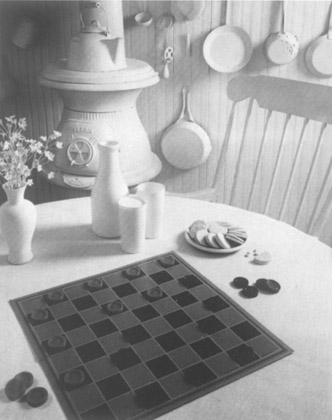
Figure 6-22
Effective use of strong perspective created by use of a short focal length lens with the camera close to the subject.—David Spindel
from a high or a low viewpoint, complete elimination of the convergence is expected in the photograph for some fields of photography.
6.12 Use of Camera Movements Versus Changing Object Distance
Two techniques for modifying the convergence of parallel subject lines have been presented—tilting or swinging the back of the camera and increasing or decreasing the subject-to-camera distance. Although similar effects may be obtained with the two techniques with some subjects, they are not generally interchangeable. Each technique has a limitation that may make it unsuitable for a specific situation. The tilt and swing adjustments are both capable of completely eliminating the convergence in only one set of parallel subject lines at a time. When photographing a box-shaped object so that two sides are visible, swinging the back to eliminate the convergence on one side exaggerates the convergence on the other side. Moving the camera farther from the subject, in the same situation, will decrease the convergence on both sides of the object simultaneously, but the convergence can never be eliminated completely with this method. Figure 6-23 illustrates how the converging vertical lines of the subject can be eliminated by tilting the back of the camera, whereas photographing the subject from a longer distance with a longer focal length lens reduces but does not eliminate convergence.
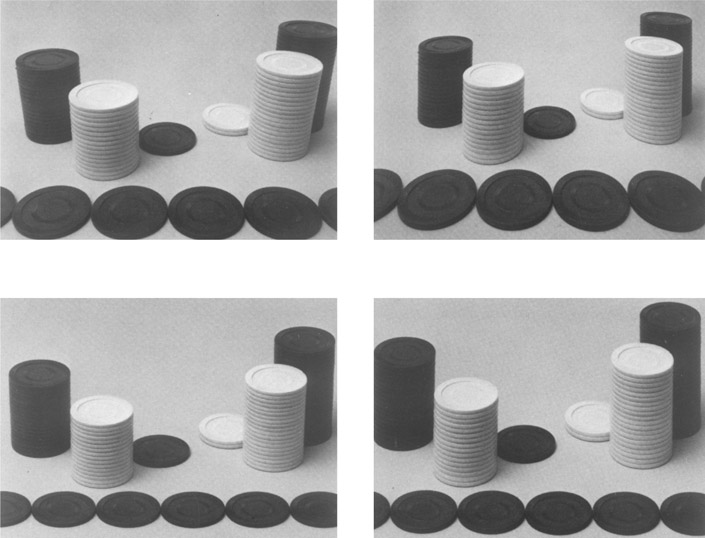
Figure 6-23
(Top left) Aiming a camera downward with a short focal length lens causes strong convergence of vertical subject lines with the back tilt zeroed. (Top right) Tilting the back of the camera to the vertical position eliminates convergence of vertical lines. Circular objects appear more unnatural in shape. (Bottom left) Same downward tilt of the camera from a longer distance with a longer focal length lens produces only slight convergence of vertical subject lines with the back tilt zeroed. (Bottom right) Back must be tilted to the vertical position to completely eliminate converging vertical lines in the preceding photograph. Change in shape of circular objects is less obvious than when the camera was closer with a shorter focal length lens.
6.13 Apparent Perspective Effects
Viewing Distance
Several factors influence the appearance of linear perspective in photographs in addition to the actual size relationship of the various parts of the image and the extent of convergence of parallel subject lines. The most important of these factors is the distance at which photographs are viewed. The major reason why some photographs appear to have strong perspective and others weak perspective is because they are not viewed at the so-called correct viewing distance. For contact prints, this distance is equal to the image distance in the camera at the time the film was exposed (Figure 6-24). If the negative is enlarged, the correct viewing distance is the image distance in the camera multiplied by the magnification in printing. (Focal length is often specified in place of image distance in determining viewing distance. This is sufficiently accurate except when the subject is close to the camera. In this situation, the discrepancy between focal length and image distance can be considerable.) Therefore, an 8 × 10-in. contact print from a negative of a distant scene exposed with a 12-in. focal length lens should be viewed at 12 in., and an 8 × 10-in. enlargement from a 4 × 5-in. negative (magnification of 2.0) exposed with a 6-in. focal length lens should also be viewed at 12 in. At this distance, the images of objects on either of the two photographs will subtend the same angle to the eye as the original objects would have subtended to the eye placed in the position of the camera lens, and the linear perspective will appear normal. If the print is viewed from a closer position, there is no change in the relative size of the images of the near and far objects, but the perspective would then appear weaker because the mind expects the near objects to increase in size at a faster rate than the far objects—that is what happens when the eye moves closer to an actual scene. To summarize, viewing a print from closer than the correct distance causes the perspective to appear too weak. Strong perspective results from too large a viewing distance.
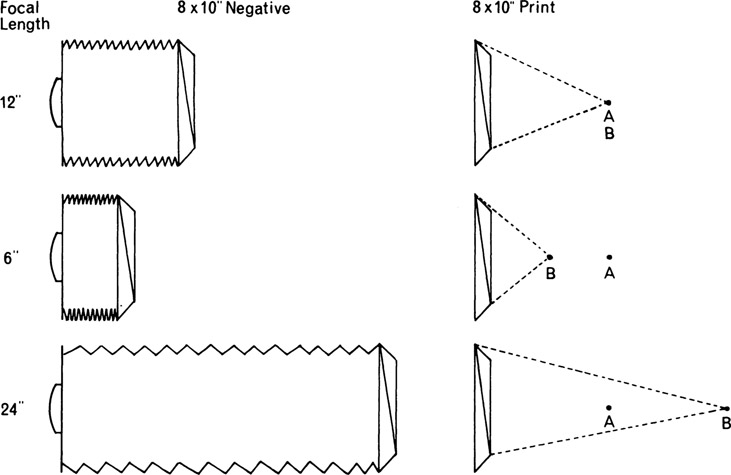
Figure 6-24
Correct viewing distance (B) and conventional viewing distance (A) with different focal length lenses.
Small variations in viewing distance obviously will not produce dramatic changes in perspective. The perspective in photographs of essentially two-dimensional scenes changes little, even with large changes in viewing distance, while in a photograph that contains dominant objects in the foreground and background, converging lines or other good perspective clues may change quite dramatically.
How can the photographer force, or at least encourage, the viewer to look at a print from the correct distance, from a longer distance for strong perspective and from a smaller distance for weak perspective, when an impression of normal perspective is desired? Except in unusual circumstances, the viewer cannot be forced to accept a specified viewing distance, but observations have revealed that people tend to view prints from a distance approximately equal to the diagonal of the print (that is, print size is the most important factor that determines the distance viewers voluntarily select to examine prints, although convenience often modifies the position). Therefore, photographers can achieve their perspective objectives by taking photographs in such a way that the correct viewing position will be in the appropriate place in relation to the position the viewer can be expected to assume.
Since the correct viewing position is determined by the image distance in the camera and the magnification in printing, the photographer can change either of these factors, but changing the magnification (without cropping) accomplishes little because viewing distance tends to increase as print size increases. Use of a shorter focal length lens on the camera, however, reduces the correct viewing distance without affecting the print size. The viewer will look at the print from the same distance as if a normal lens had been used, and the perspective therefore will appear strong. Normal, strong, and weak perspectives can result from using standard, short, and long focal length lenses, respectively, on the same camera. This change in perspective occurs even though the lens-to-subject distance is the same for all three photographs. In practice, there is a tendency to move the camera closer with short lenses and farther away with long lenses, which adds an actual linear perspective change and makes the differences in perspective more dramatic.
Cropping
Any cropping done after the negative has been made tends to weaken the perspective. Enlarging only a portion of a negative causes the magnification and the correct viewing distance to increase at a greater rate than the actual print size and, therefore, the distance at which it will tend to be viewed. Trimming a print that has already been made, by reducing its size, will encourage people to view it from a closer position even though the correct viewing distance remains unchanged. A limit is reached with small prints, where the eyes cannot accommodate comfortably to a close position, and the viewer abandons the attempt to even approximate a distance equal to the print diagonal.
6.14 Wide-Angle Effect
Viewing prints at other than the correct viewing distance not only causes the linear perspective to appear weak or strong but also causes the shape of some objects to appear unnatural. This effect is most noticeable near the edges of photographs made with short focal length wide-angle lenses. Three-dimensional objects appear to be stretched out of shape in directions radiating away from the center of the photograph when the camera back and lens are in their normal positions. The wide-angle effect is most obvious with objects having regular shapes, such as spheres. It is also apparent on heads located close to the edges of group photographs made with short focal length wide-angle lenses (Figure 6-25).
Although there is no wide-angle effect when prints are viewed from the correct positions, a spherical object is recorded on the film as a circle only when the center of the image of the sphere is located on a line from the lens perpendicular to the film. At other positions, the image is recorded as an ellipse with increasing elongation as the distance between the image and the perpendicular line increases.
When the camera back is swung or tilted, or any of the rising-falling or lateral adjustments are used, the center of radiation
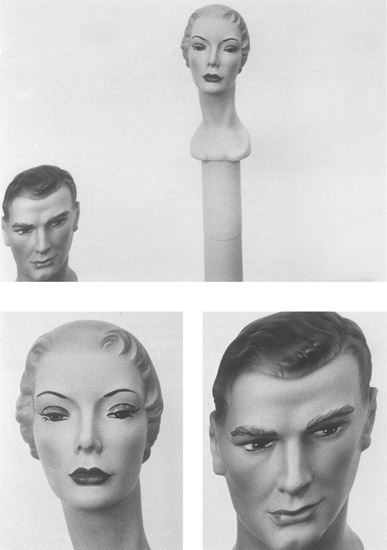
Figure 6-25
(Top) Photograph made with a 90-mm wide-angle lens on 4 × 5-in. film. The woman’s head was on the lens axis. (Bottom) Comparison enlargements of on-axis and off-axis images.
is the point where a line drawn from the lens perpendicular to the film intersects the film (Figure 6-26). Viewed from the correct position, the ellipse is seen at an oblique angle that makes it appear as a circle, whereas at longer distances it is seen for what it actually is and the spherical object appears to be misshapen. The reader can observe how the appearance of an ellipse changes with the angle at which it is viewed by tilting the book while observing the ellipse in Figure 6-27. At the appropriate angle, the ellipse will appear as a circle, and as the book is tilted farther, it will again appear as an ellipse with the direction of elongation at right angles to the original direction.
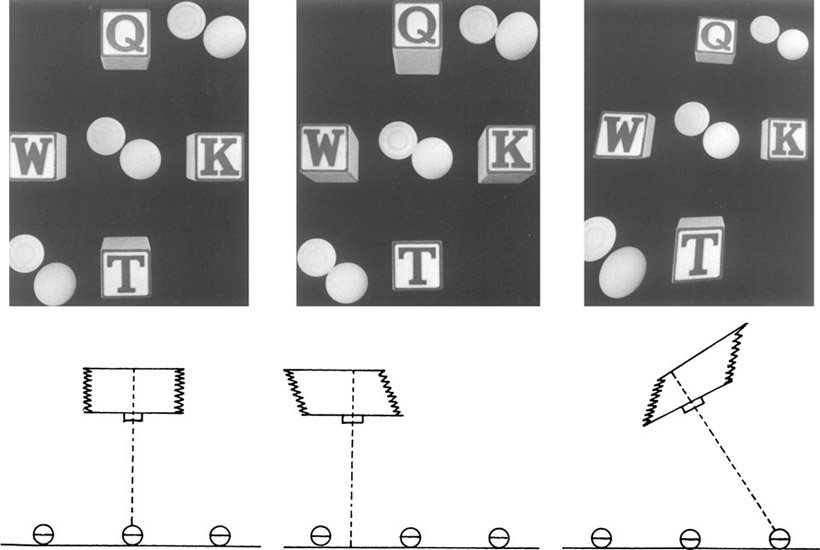
Figure 6-26[Left) A spherical object is recorded on the film as a circle only when the center of the image of the sphere is located on a line from the lens perpendicular to the film. (Middle) Elongation of the image increases with displacement from the perpendicular line. (Right) A spherical object that is near the edge of a photograph can be recorded as a circle by tilting or swinging the back so that the central ray of light from the object is perpendicular to the film. This will exaggerate the elongation of images on the opposite side of the film.
Difficulty is often encountered in attempting to make a wide-angle photograph appear normal by viewing it from the correct position, especially if the photograph is 8 × 10 in. or smaller, due to the difficulty of focusing the eyes at close range, the unnatural convergence of the eyes for binocular vision, and the large angle the print subtends to the eyes (Figure 6-28).
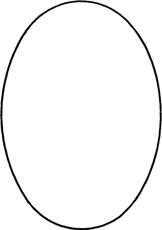
Figure 6-27
An ellipse is seen as a circle when viewed at the appropriate angle.
Two-dimensional objects are free of the wide-angle effect. A wide-angle copy photograph of a drawing containing circles will represent the circles accurately even though the images are located in the extreme corners. The stretching of the image that occurs when the light rays strike the film at oblique angles in the corners is exactly offset by the compressing effect resulting from the lens viewing the parts of the subject at the same oblique angles (Figure 6-29).
There are two methods of avoiding the wide-angle effect in photographs. The first is to use a lens of sufficiently long focal length that the correct viewing distance corresponds to that generally assumed by viewers (Figure 6-30), and the other is to avoid locating the types of objects that reveal the wide-angle effect around the edges of the photograph. Since a standard focal length lens produces an angle of view of 53°, the outer portions of photographs made with short focal length wide-angle lenses that exceed this angle are the danger areas.
If too large a viewing distance produces the image stretching characteristic of the wide-angle effect, it would be expected that too short a viewing distance would produce a corresponding compression of the image in the corners. Although such a compression can occur, it does not present the same problem as the wide-angle effect; in fact, it is seldom noticed. The images of spherical objects photographed with unusually long focal length lenses will deviate little in shape from circles regardless of their position on the print, and any appearance of compression of the circles in the corners will be due to viewing these parts of the print at oblique angles. The angles to the corners are not extreme enough to produce an obvious compression when the print is viewed from a distance equal to its diagonal, as can be expected, even though this is only a fraction of the correct viewing distance, based on focal length and magnification.
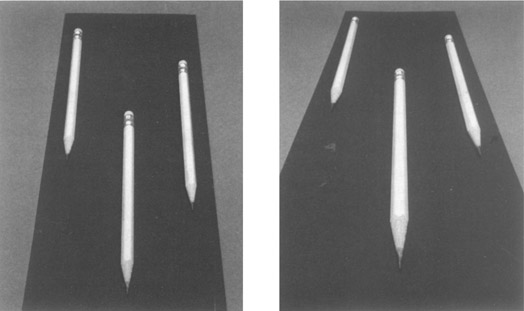
Figure 6-28
The photograph on the left was made with a 210-mm focal length lens on a 4 × 5-in. camera, producing a normal perspective at a comfortable viewing distance. The photograph on the right was made from a closer position with a 90-mm focal length lens, producing a stronger perspective. It would be necessary to view the photograph on the right from a distance of about 2 in. to make the perspective appear normal.
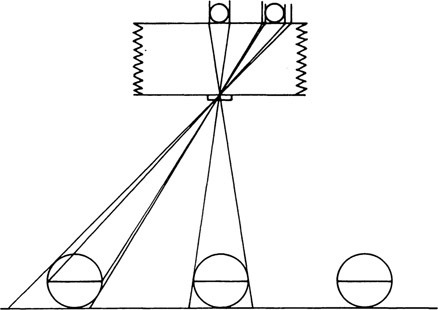
Figure 6-29
Images of two-dimensional objects are not susceptible to the wide-angle effect. The stretching, resulting from the light striking the film at an oblique angle, is counteracted by the lens viewing the object at the same angle.
6.15 Trick Perspective
Because three-dimensional space is represented by two dimensions in photographs, it is not difficult to deceive the viewer, creating an entirely false impression of the actual scene photographed. This is done when photographers use unusually long or short focal length lenses that almost force people to view the prints from incorrect positions, thus creating impressions of weak or strong perspective.
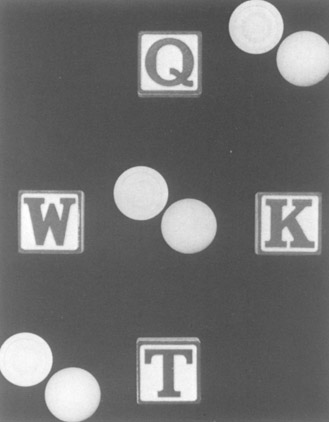
Figure 6-30
Photograph showing the elimination of the wide-angle effect through use of a long focal length lens.
Previous experience plays a dominant role in the interpretation of photographs. It may be difficult to judge the actual size of an object in a photograph unless the viewer is familiar with the object or another object of known size is included in the photograph for comparison (Figure 6-31). Two lines that converge as they recede are assumed to be parallel unless there are conflicting clues. If the converging lines are the images of railroad tracks, there is a valid reason for assuming that the rails are actually parallel, but lines drawn on paper and other abstract lines that are seen as converging are also assumed to be parallel when they may actually be parallel, converging, or diverging.
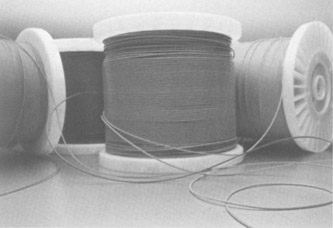
Figure 6-31
Ambiguous size representation, as in this photograph, is often acceptable, but an object of known size can be included for comparison when knowledge of the actual size of objects is important. (Original in color.)—Len Rosenberg
In a similar manner, if images of two objects are identical except for size, the object that appears smaller is assumed to be farther away and by a distance that seems appropriate for the size differential. The distance concept may be entirely false if one of the objects is actually larger than the other. In fact, the two objects may have been at the same distance from the camera. The reduction in size of all objects in a scene makes it possible to use models to create an illusion of a full-scale situation (Figure 6-32). Extensive use of this technique has been made to depict disaster scenes in motion pictures. People also have a tendency to see ellipses as tipped circles seen in perspective, and angles that vary over a wide range in photographs tend to be visualized as right angles on the subjects (Figure 6-33). These and other vagaries involved in the psychology of vision can often be used by perceptive photographers to increase the effectiveness of their photographs. When they interfere with the creation of a realistic effect, however, it may be necessary for the photographer to place greater emphasis on other perspective controls, such as variation in sharpness with distance as determined by depth of field, overlapping the images of objects at different distances, aerial perspective due to atmospheric haze, the alternation of light and dark tones with distance, the use of shadows obtained with appropriate lighting, and the inclusion of an object of known size to establish scale. Two additional types of trick perspective are illustrated—one where inverting a photograph does not produce the expected result (Figure 6-34), and the other where application of the Gestalt organizational law of continuation creates the illusion that a man’s body is transparent (Figure 6-35).
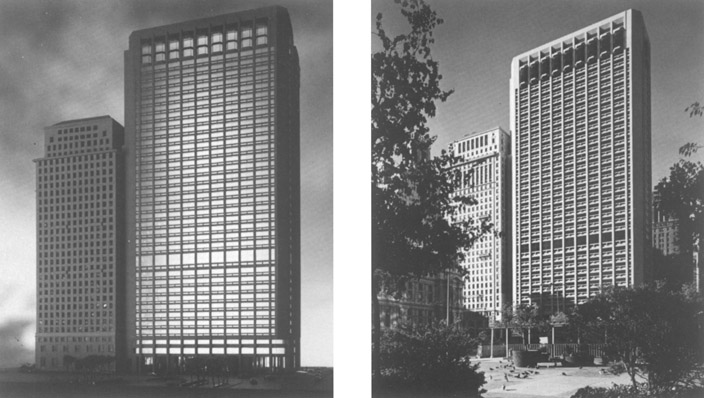
Figure 6-32
An architectural scale model photographed in a studio (left) and the corresponding building that was constructed later [right).—Lawrence S. Williams, Inc.
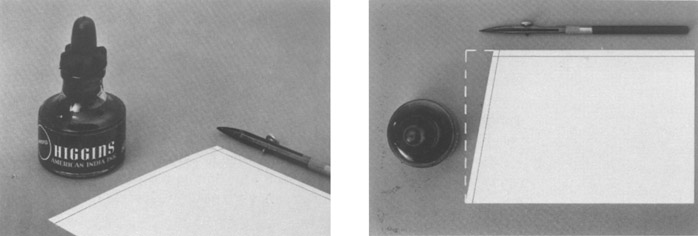
Figure 6-33
Viewers tend to assume that the angles formed by the edges of the white card are right angles (left). Perpendicular view (right) reveals that one angle on the card is acute, the other obtuse.
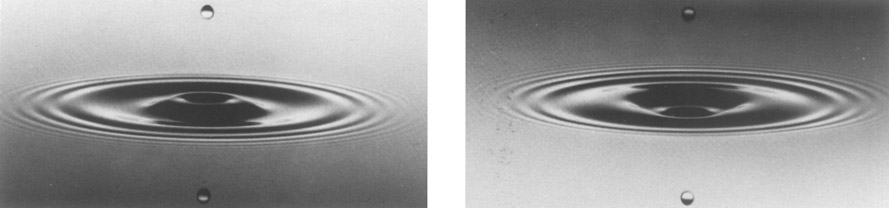
Figure 6-34
Even though the second of these two identical photographs has been inverted, viewers typically perceive that they are looking downward at a liquid surface in both pictures but that the ridges and depressions of the waves are reversed.—Jean-Paul Debattice
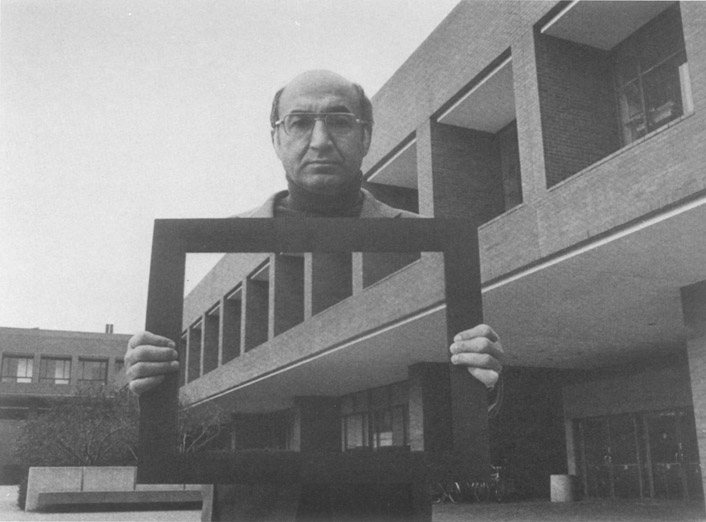
Figure 6-35
Alignment of the image inside the frame with the background creates the illusion of a transparent body, an application of the Gestalt organizational law of continuation.