Up to this point, we have learned quite a bit about creating a game world, and we just started to interact with the game world in the previous chapter. We need to bump it up a notch now by adding to both the editor and the game project the ability to create and use portals. A portal is an opening that connects two worlds or allows someone to cross over from one area into another. In terms of a tiled game world, we need a portal that will teleport the player to another location on the map, as well as specify a position on a different level file entirely. Once the code to teleport to a new location on a map is understood, adding the ability to teleport to a new level is just a matter of loading that new level file with the Level class and then setting the scroll position to the target X,Y position. The level editor already has fields for portals built in to the tile structure, which we will learn to use in this chapter.
Here’s what we’ll cover in this chapter:
Updating the level editor
Level class modifications
Teleporting to another dimension
Looking for tile collisions
We need to update the Level class to accommodate the more advanced features of the editor that have gone unused until now. The editor project is available in the chapter’s resource files with the full source code, but we already covered the editor in detail back in Chapter 6, “Creating the Dungeon Editor.” As you may recall, the content of a .level file is plain XML data that can be viewed and edited in a text editor. Among the tile data fields are four generic data fields that store strings, so you can put any data you want there—whole numbers, decimal numbers, names, descriptions, etc. You could use one as a searchable item name field and then add an item to the game world at that tile location, or even something as exotic as a script function name. Here are the data fields for each tile already supported by the level editor:
Tile palette number
Data 1
Data 2
Data 3
Data 4
Collidable
Portal
Portal X
Portal Y
Portal file
These fields are sufficient for now, but we can add new ones to meet the design goals for a new game in the future if needed. We need to make a few new changes to the Level class (Level.cs) to handle all of the data fields from a level file. First, the new data fields need to be added to the tilemapStruct structure, and then we need to add a function to return tile data at a specified index in the tilemap so that the player’s character sprite can interact with the level. In other words, we need to find out where the portals are and let the character get teleported! Here is the new Level class with an expanded tilemapStruct and loadTilemap() function. The new items are highlighted in bold.
public class Level
{
    public struct tilemapStruct
    {
        public int tilenum;
        public string data1;
        public string data2;
        public string data3;
        public string data4;
        public bool collidable;
        public bool portal;
        public int portalx;
        public int portaly;
        public string portalfile;
    }

    private Game p_game;
    private Size p_mapSize = new Size(0, 0);
    private Size p_windowSize = new Size(0, 0);
    private int p_tileSize;
    private Bitmap p_bmpTiles;
    private int p_columns;
    private Bitmap p_bmpScrollBuffer;
    private Graphics p_gfxScrollBuffer;
    private tilemapStruct[] p_tilemap;
    private PointF p_scrollPos = new PointF(0, 0);
    private PointF p_subtile = new PointF(0, 0);
    private PointF p_oldScrollPos = new PointF(-1, -1);

    public Level(ref Game game, int width, int height, int tileSize)
    {
        p_game = game;
        p_windowSize = new Size(width, height);
        p_mapSize = new Size(width * tileSize, height * tileSize);
        p_tileSize = tileSize;

        //create scroll buffer
        p_bmpScrollBuffer = new Bitmap(p_mapSize.Width + p_tileSize,
            p_mapSize.Height + p_tileSize);
        p_gfxScrollBuffer = Graphics.FromImage(p_bmpScrollBuffer);
        //create tilemap
        p_tilemap = new tilemapStruct[128 * 128];
    }

    public tilemapStruct getTile(PointF p)
    {
        return getTile((int)(p.Y * 128 + p.X));
    }

        public tilemapStruct getTile(int pixelx, int pixely)
    {
        return getTile(pixely * 128 + pixelx);
    }

    public tilemapStruct getTile(int index)
    {
        return p_tilemap[index];
    }

    //get/set scroll position by whole tile position
    public Point GridPos
    {
        get
        {
            int x = (int)p_scrollPos.X / p_tileSize;
            int y = (int)p_scrollPos.Y / p_tileSize;
            return new Point(x, y);
        }
        set
        {
            float x = value.X * p_tileSize;
            float y = value.Y * p_tileSize;
            p_scrollPos = new PointF(x, y);
        }
    }

    //get/set scroll position by pixel position
    public PointF ScrollPos
    {
        get { return p_scrollPos; }
        set { p_scrollPos = value; }
    }


    public bool loadTilemap(string filename)
    {
        try
        {
            XmlDocument doc = new XmlDocument();
            doc.Load(filename);
            XmlNodeList nodelist = doc.GetElementsByTagName("tiles");
            foreach (XmlNode node in nodelist)
            {
                XmlElement element = (XmlElement)node;
                int index = 0;
                tilemapStruct ts;
                string data;

                //read data fields from xml
                data = element.GetElementsByTagName("tile")[0].
                    InnerText;
                index = Convert.ToInt32(data);
                data = element.GetElementsByTagName("value")[0].
                    InnerText;
                ts.tilenum = Convert.ToInt32(data);
                data = element.GetElementsByTagName("data1")[0].
                    InnerText;
                ts.data1 = Convert.ToString(data);
                data = element.GetElementsByTagName("data2")[0].
                    InnerText;
                ts.data2 = Convert.ToString(data);
                data = element.GetElementsByTagName("data3")[0].
                    InnerText;
                ts.data3 = Convert.ToString(data);
                data = element.GetElementsByTagName("data4")[0].
                    InnerText;
                ts.data4 = Convert.ToString(data);
                data = element.GetElementsByTagName("collidable")[0].
                        InnerText;
                ts.collidable = Convert.ToBoolean(data);
                data = element.GetElementsByTagName("portal")[0].
                        InnerText;
                ts.portal = Convert.ToBoolean(data);
                data = element.GetElementsByTagName("portalx")[0].
                        InnerText;
                ts.portalx = Convert.ToInt32(data);
                data = element.GetElementsByTagName("portaly")[0].
                        InnerText;
                ts.portaly = Convert.ToInt32(data);
                data = element.GetElementsByTagName("portalfile")[0].
                        InnerText;
                ts.portalfile = Convert.ToString(data);

                //store data in tilemap
                p_tilemap[index] = ts;
            }
        }
        catch (Exception es)
        {
            MessageBox.Show(es.Message);
            return false;
        }
        return true;
    }

    public bool loadPalette(string filename, int columns)
    {
        p_columns = columns;
        try
        {
            p_bmpTiles = new Bitmap(filename);
        }
        catch (Exception ex)
        {
        return false;
        }
        return true;
    }

    public void Update()
    {
       //fill the scroll buffer only when moving
       if (p_scrollPos != p_oldScrollPos)
       {
           p_oldScrollPos = p_scrollPos;
           //validate X range
           if (p_scrollPos.X < 0) p_scrollPos.X = 0;
           if (p_scrollPos.X > (127 - p_windowSize.Width) * p_tileSize)
               p_scrollPos.X = (127 - p_windowSize.Width) * p_tileSize;

           //validate Y range
           if (p_scrollPos.Y < 0) p_scrollPos.Y = 0;
           if (p_scrollPos.Y > (127 - p_windowSize.Height) * p_tileSize)
               p_scrollPos.Y = (127 - p_windowSize.Height) * p_tileSize;

           //calculate sub-tile size
           p_subtile.X = p_scrollPos.X % p_tileSize;
           p_subtile.Y = p_scrollPos.Y % p_tileSize;

           //fill scroll buffer with tiles
           int tilenum, sx, sy;
           for (int x = 0; x < p_windowSize.Width + 1; x++)
                for (int y = 0; y < p_windowSize.Height + 1; y++)
                {
                     sx = (int)p_scrollPos.X / p_tileSize + x;
                     sy = (int)p_scrollPos.Y / p_tileSize + y;
                     tilenum = p_tilemap[sy * 128 + sx].tilenum;
                     drawTileNumber(x, y, tilenum);
                }
       }
   }

   public void drawTileNumber(int x, int y, int tile)
   {
       int sx = (tile % p_columns) * (p_tileSize + 1);
       int sy = (tile / p_columns) * (p_tileSize + 1);
       Rectangle src = new Rectangle(sx, sy, p_tileSize, p_tileSize);
       int dx = x * p_tileSize;
       int dy = y * p_tileSize;
       p_gfxScrollBuffer.DrawImage(p_bmpTiles, dx, dy, src,
           GraphicsUnit.Pixel);
   }

   public void Draw(Rectangle rect)
   {
       Draw(rect.X, rect.Y, rect.Width, rect.Height);
   }

   public void Draw(int width, int height)
   {
       Draw(0, 0, width, height);
   }
   public void Draw(int x, int y, int width, int height)
   {
       Rectangle source = new Rectangle((int)p_subtile.X,
           (int)p_subtile.Y, width, height);
       p_game.Device.DrawImage(p_bmpScrollBuffer, x, y, source,
           GraphicsUnit.Pixel);
   }
}
In the previous chapter, we learned how to create a list of tree sprites and draw them in the game world, so that when the player moves around the trees come into view within the scrolling viewport. That works well when you want to scatter random environment items like bushes, houses, coffee shops, software stores, and, well, anything you want. We can also use the level editor to position objects at a specific location, which is more useful than using randomness, especially when you need to count on a certain thing being at a certain location. For instance, you might have a quest that has the player find a certain landmark where nearby a treasure is buried.
The data fields are numbered 1 to 4, and can contain any type of data—numbers or strings. If we used these fields to position an item, we could use them like so:
Data 1: Item number
Data 2: Position x
Data 4: Script function
The item number would be out of the game item database, or it could be the number or name of a sprite. The x,y position of the item is next in Data 2 and 3. The fourth one is a bit interesting. What is a script function? This goes a bit beyond the scope of this book, but if we wanted to really make this level editor and game engine interesting, we could add Lua script support to the game. Lua is an interpreted programming language—meaning, Lua source code is not compiled; it is simply stored in a text file and treated as text, and yet the Lua interpreter will run our script code at runtime. The ramifications for scripting are enormous. Imagine being able to edit a script without restarting the game. Yes, that’s possible: edit the script, save it, then load and execute the script with the Lua interpreter. Like I said, this gets a bit complicated, but it adds a tremendous amount of design freedom to the game, which is otherwise bound by its data and engine. We will add Lua scripting support to the game in the next section.
Now we need to look at some code to make this all work. Among other things, we have some work to do in the loadTilemap() function now because of the new fields.
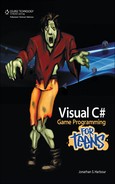
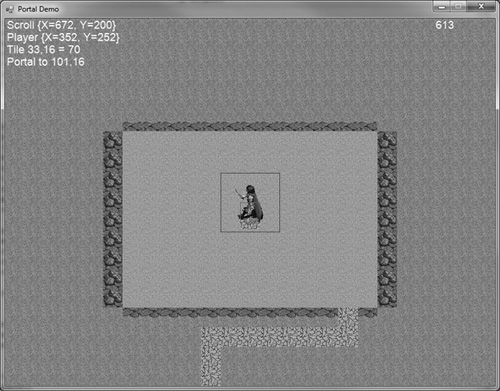
A portal is a doorway to another dimension. Or, in the case of our editor here, a new x,y location on the map. Or on another map file! Let’s start with a series of portals on a single map and then look at how to portal to another world. Take a look at the data for the highlighted tile in Figure 9.1. The Portal flag is checked, while the x and y fields are set to coordinates (101,16). The examples here are shown using an above-ground representation of the game world instead of a dungeon level, for the sake of clarity—the dungeon levels are both smaller and harder to move around in.
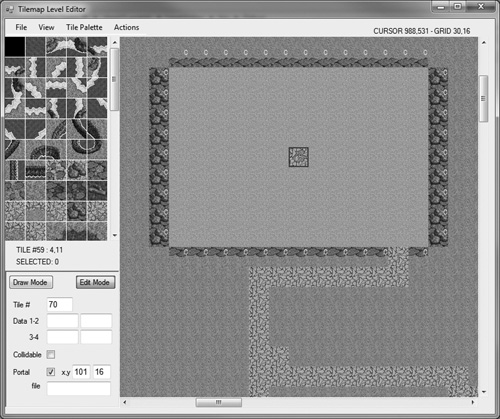
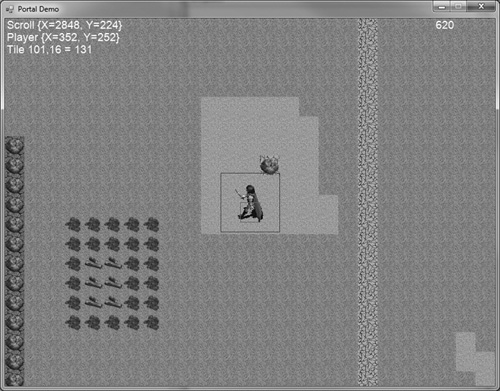
The location (101,16) is on the right side of the map, shown in Figure 9.2. What we want to do is have the game jump to that location when our character walks into the portal tile. Nearby, the target location is another portal tile.
In case you are wondering why the two portals aren’t linked directly together, that is something you can play with if you want, but if you point one portal to a tile that contains another portal, then your character will teleport twice. Unless you want that kind of behavior, don’t link portal squares directly—have one drop off the player nearby but not directly on another portal. Or, go ahead and do it and see for yourself what happens! In our example, you must press Space to trigger a portal, but if you use automatic teleporting then the player could be teleported repeatedly, possibly even getting stuck in a portal loop.
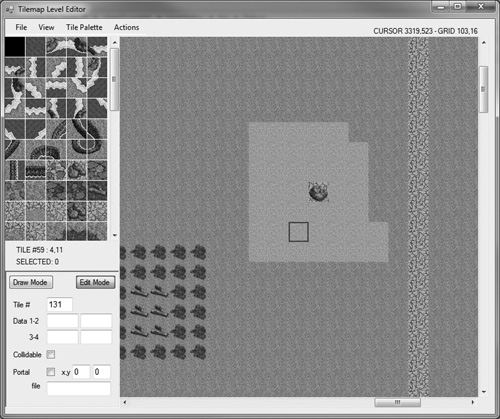
The first thing we need to do to get portals working is to isolate the portion of the character sprite that is actually on the “ground,” so to speak. By default, the player sprite (which is called hero in our code) is positioned on the screen in the upper-left corner. Since the sprite is 96x96 pixels in size, there’s a lot of area taken up by the sprite that is much larger than the 32x32 tiles. If we use the upper-left corner, then the player will be interacting with tiles on the ground from a position above and to the left of his or her head! That definitely won’t work. So, we need to adjust the position used to determine what tile the player is walking on—we need to isolate the player’s feet. Figure 9.3 shows the collision boxes for the player sprite. The blue box represents the entire character’s collision box, while the small red box (and red dot) represent the walking collision box.
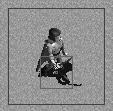
The small red collision box, and the red dot at its center, is what we actually want to use as a center point to determine which tile the sprite is “walking on.” Thus, when the player walks onto a portal tile, it will accurately look as if the sprite’s feet touched the tile before the teleport occurred. The Portal demo program looks at that coordinate as a position relative to the scroll position and then retrieves the data for the tile at that location. Figure 9.4 shows information about the portal tile the player is standing on—note the message in the upper-left corner of the window.
In the game, it’s up to you how the portals will work. You can make them automatically teleport the player just by merely walking on the tile, or you can require the player to take some action—perhaps using an item to trigger the portal. In our program, the Space key is the trigger. When the portal is engaged, the player is teleported to the target coordinate (101,16), as shown in Figure 9.5.
Trick
Getting tired of the same old ground tiles in every example? Replace them! You are encouraged to use a different set of ground tiles or add new ones to this collection. I am only using these same tiles for consistency. You may replace the tiles in the level editor and in the game. The only requirement is that your tile palette image be oriented like the one presented in the book and that the tiles remain at 32x32 pixels in size. Otherwise, some coding changes will be needed.
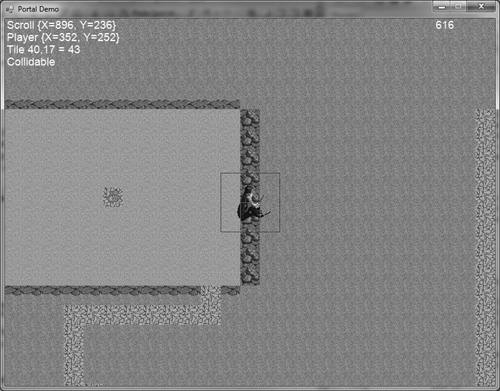
The Portal demo program also looks for the Collidable property in tiles and reports on the screen when a collidable tile is identified. Figure 9.6 shows the message that is printed when the player walks over a collidable tile. Although the sprite doesn’t respond to collidable tiles yet in this example, we can use this information to enable collision response in the next major revision to the game.
With the portal system working, we can now use it to create secret doors to appear to walk through walls! A portal is just a tile property that defines a target location for the player to be moved to. If you set the target for a portal to a tile just one or two spaces away, then it can appear as if the player is hopping over an obstacle. You could use this technique to get past solid objects or walls, which would be even more effective if a trigger object or key is required.
Here is the source code for the Portal demo program.
using System;
using System.Collections.Generic;
using System.Threading;
using System.Data;
using System.Drawing;
using System.Windows.Forms;
using RPG;

namespace Portal_Project
{
    public partial class Form1 : Form
    {
       public struct keyStates
       {
            public bool up, down, left, right;
        }

        Game game;
        Level level;
        keyStates keyState;
        bool gameover = false;
        Sprite hero;
        int heroDir = 0;
        bool portalFlag = false;
        Point portalTarget;
        int drawLast = 0;

        public Form1()
        {
            InitializeComponent();
        }

        private void Form1_Load(object sender, EventArgs e)
        {
            this.Text = "Portal Demo";

            //create game object
            Form form = (Form)this;
            game = new Game(ref form, 800, 600);

            //create tilemap
            level = new Level(ref game, 25, 19, 32);
            level.loadTilemap("portals.level");
            level.loadPalette("palette.bmp", 5);

            //load hero
            hero = new Sprite(ref game);
            hero.Image = game.LoadBitmap("hero_sword_walk.png");
            hero.Columns = 9;
            hero.TotalFrames = 9 * 8;
            hero.Size = new Size(96, 96);
            hero.Position = new Point(400 - 48, 300 - 48);
            hero.AnimateWrapMode = Sprite.AnimateWrap.WRAP;
            hero.AnimationRate = 20;

            while (!gameover)
            {
                doUpdate();
            }
            Application.Exit();
        }

        private void Form1_KeyUp(object sender, KeyEventArgs e)
        {
           switch (e.KeyCode)
           {
               case Keys.Escape : gameover = true; break;
               case Keys.Up:
               case Keys.W : keyState.up = false; break;
               case Keys.Down:
               case Keys.S : keyState.down = false; break;
               case Keys.Left:
               case Keys.A : keyState.left = false; break;
               case Keys.Right:
               case Keys.D : keyState.right = false; break;
               case Keys.Space:
                   if (portalFlag) level.GridPos = portalTarget;
                   break;
           }
        }

        private void Form1_KeyDown(object sender, KeyEventArgs e)
        {
           switch (e.KeyCode)
           {
               case Keys.Up:
               case Keys.W: keyState.up = true; break;
               case Keys.Down:
               case Keys.S: keyState.down = true; break;
               case Keys.Left:
               case Keys.A: keyState.left = true; break;
               case Keys.Right:
               case Keys.D: keyState.right = true; break;
           }
        }

        private void doUpdate()
        {
           //move the tilemap scroll position
           int steps = 8;
           PointF pos = level.ScrollPos;

           //up key movement
           if (keyState.up)
           {
               if (hero.Y > 300 - 48) hero.Y -= steps;
               else
               {
                   pos.Y -= steps;
                   if (pos.Y <= 0) hero.Y -= steps;
               }

           }
           //down key movement
           else if (keyState.down)
           {
               if (hero.Y < 300 - 48)
                   hero.Y += steps;
               else
               {
                   pos.Y += steps;
                   if (pos.Y >= (127 - 19) * 32) hero.Y += steps;
               }
           }

           //left key movement
           if (keyState.left)
           {
               if (hero.X > 400 - 48) hero.X -= steps;
               else
               {
                   pos.X -= steps;
                   if (pos.X <= 0) hero.X -= steps;
               }
           }
           //right key movement
           else if (keyState.right)
           {
               if (hero.X < 400 - 48) hero.X += steps;
               else
               {
                   pos.X += steps;
                   if (pos.X >= (127 - 25) * 32) hero.X += steps;
               }
           }

           //update scroller position
           level.ScrollPos = pos;
           level.Update();

           //limit player sprite to the screen boundary
           if (hero.X < -32) hero.X = -32;
           else if (hero.X > 800 - 65) hero.X = 800 - 65;
           if (hero.Y < -48) hero.Y = -48;
           else if (hero.Y > 600 - 81) hero.Y = 600 - 81;

           //orient the player in the right direction
           if (keyState.up && keyState.right) heroDir = 1;
           else if (keyState.right && keyState.down) heroDir = 3;
           else if (keyState.down && keyState.left) heroDir = 5;
           else if (keyState.left && keyState.up) heroDir = 7;
           else if (keyState.up) heroDir = 0;
           else if (keyState.right) heroDir = 2;
           else if (keyState.down) heroDir = 4;
           else if (keyState.left) heroDir = 6;
           else heroDir = -1;

           //get the untimed core frame rate
           int frameRate = game.FrameRate();

           //drawing code should be limited to 60 fps
           int ticks = Environment.TickCount;
           if (ticks > drawLast + 16)
           {
               drawLast = ticks;

               //draw the tilemap
               level.Draw(0, 0, 800, 600);

               //draw the hero
               int startFrame = heroDir * 9;
               int endFrame = startFrame + 8;
               if (heroDir > -1) hero.Animate(startFrame, endFrame);
               hero.Draw();

               //print da stats
               game.Print(700, 0, frameRate.ToString());
               int y = 0;
               game.Print(0, y, "Scroll " + level.ScrollPos.ToString());
               y += 20;
               game.Print(0, y, "Player " + hero.Position.ToString());
               y += 20;

               Point feet = HeroFeet();
           int tilex = (int)(level.ScrollPos.X + feet.X) / 32;
           int tiley = (int)(level.ScrollPos.Y + feet.Y) / 32;
           Level.tilemapStruct ts = level.getTile(tilex, tiley);
           game.Print(0, y, "Tile " + tilex.ToString() + "," +
               tiley.ToString() + " = " + ts.tilenum.ToString());
           y += 20;
           if (ts.collidable)
           {
               game.Print(0, y, "Collidable");
               y += 20;
           }
           if (ts.portal)
           {
               game.Print(0, y, "Portal to " + ts.portalx.ToString() +
                   "," + ts.portaly.ToString());
               portalFlag = true;
               portalTarget = new Point(ts.portalx - feet.X / 32,
                   ts.portaly - feet.Y / 32);
               y += 20;
           }
           else
               portalFlag = false;

           //highlight collision areas around player
           game.Device.DrawRectangle(Pens.Blue, hero.Bounds);
           game.Device.DrawRectangle(Pens.Red, feet.X + 16 - 1,
               feet.Y + 16 - 1, 2, 2);
           game.Device.DrawRectangle(Pens.Red, feet.X, feet.Y, 32, 32);

           //refresh window
           game.Update();
           Application.DoEvents();
       }
       else
       {
           //throttle the cpu
           Thread.Sleep(1);
       }
   }
        //return bottom center position of hero sprite
        //where feet are touching ground
        private Point HeroFeet()
        {
           return new Point((int)(hero.X + 32), (int)(hero.Y + 32 + 16));
        }
    }
}
This chapter saw some dramatic improvements to both the Level class and the Dungeon Crawler game engine code, with the addition of code to detect collidable tiles, and code to make portals active, allowing us to teleport the player to a new location. Although the level editor provides the "portalfile" field to enable teleporting to a position in a different level file, we will reserve that feature for later. Believe it or not, we now have a game world that is suitable as an environment for the Dungeon Crawler game! That means we can shift focus from the game world and level editing over to a new subject—people and monsters!