
In This Chapter
Performing common tasks in the Code Editor
Organizing code in C# and Visual Basic
Getting started with the basics of C# and Visual Basic
Do you ever get the feeling that sometimes you're not alone? If you've ever written a program with one of the Visual Studio Code Editors, you know what I mean. Writing code in Visual Studio is like having a word processor that knows what you want to say next.
When you start to type code in Visual Studio, helpers appear magically out of nowhere. Like the host at your favorite restaurant, they share with you a list of today's specials: "Might I suggest an Integer, or how about a DataSet, sir?"
Even if you have no clue about all the choices that Visual Studio offers in the convenient pop-up list, just hover your mouse over one of them, and a description appears. Like a museum tour guide, Visual Studio shares with you the intimate details of the programming artifacts you're inspecting.
This chapter shows you some of the magical helpers and guides that Visual Studio uses to help you write better code. You also get a quick overview of how to write programs using two popular .NET languages: C# and Visual Basic.
Although Visual Studio provides a great number of visual designers that allow you to generate code by dragging and dropping controls and components onto visual designers, at some point, you have to write code. Visual Studio really helps you write code by providing you with many editors for editing all kinds of files. The Source Code Editor is especially feature rich, offering a number of productivity boosting features.
Here are some of the ways to open source code files in the Code Editor:
Double-click a source code file in Solution Explorer.
Press F7 while viewing a form in the Windows or Web Forms designers.
Add a new source code file via the Add New Items window.
The Code Editor is more than just a plain text editor like Notepad. You can use the Code Editor to do many things, such as
Enter code in the main Code Pane area.
Set breakpoints in the gray Indicator Margin along the left of the editor.
Select lines of code by clicking the space between the Code Pane and the Indicator Margin.
You can optionally display line numbers in the Selection Margin.
Collapse code by using the outline lines along the left margin of the Code Editor.
Jump to code via the Navigation bar along the top of the Code Editor.
Figure 1-1 shows an example of the Code Editor.
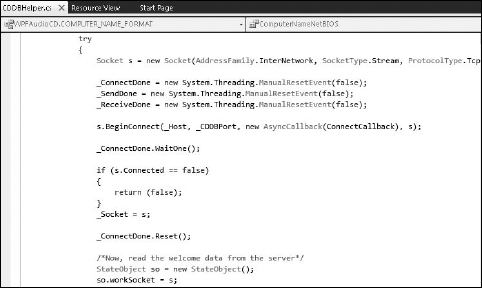
The Code Editor has many features similar to what you'd expect to find in a word processor. Some features, such as formatting, however, are slightly different. For example, you can't bold your code in the Code Editor, but you can use familiar features, such as copy and paste.
An important aspect of writing code is handling indentation. When you properly indent, you make it easier to read on-screen. The Visual Studio Code Editor provides three indentation styles:
None: No indentation is applied to code.
Block: Indentation matches the preceding line of code.
Smart: Lines are automatically indented according to the standards of the programming language.
By default, the Code Editor indents each code line based on the standards for the programming language: smart indenting. When you're typing your code, the Editor automatically indents the line. When smart indentation is enabled, you can't manually increase indentation by pressing the Tab key.
To change the indentation style used by the Code Editor, follow these steps:
Choose Tools

Expand the Text Editor folder.
Expand a language to configure or click the All Languages folder to apply the setting to all programming languages.
Click Tabs.
A list of tab settings appears.
Set the Indenting style, as shown in Figure 1-2, and then click OK.

You can access formatting features to indent your code by choosing Edit
Table 1-1. Code Editor Formatting Commands
Menu Item | Description |
|---|---|
Format Document | Applies indentation style to the entire document |
Format Selection | Applies indentation style to the selected text |
Tabify Selected Lines | Converts indentations to tab characters |
Untabify Selected Lines | Converts indentations to white space |
Make Uppercase | Changes the code of the selected text to uppercase |
Make Lowercase | Changes the code of the selected text to lowercase |
Delete Horizontal White Space | Deletes all white space on the line |
View White Space | Displays character marks in the editor |
Word Wrap | Toggles line wrapping on and off |
Incremental Search | Activates a search of your document, letter by letter, as you type |
Comment Selection | Places comment characters in front of the selected text |
Uncomment Selection | Removes comment characters from selected text |
Increase Line Indent | Increases indentation |
Decrease Line Indent | Decreases indentation |
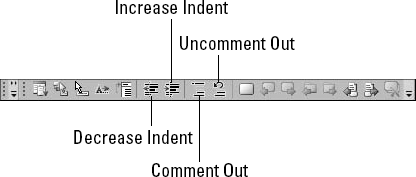
Some indentation and comment commands are available on the Text Editor toolbar, as shown in Figure 1-3.
Most of these commands are useless if you're using smart indentation. Smart indentation automatically manages indentation for you. You might choose to turn off smart indentation if your company uses a different indentation standard. Also, you might want to use your own indentation standard, such as using white spaces instead of tabs.
Visual Studio provides extensive Find and Replace capabilities that go way beyond what you find in a standard text editor. Table 1-2 lists the Find and Replace options. You access the Find and Replace commands by choosing Edit
Table 1-2. Find and Replace Commands
Command | Keyboard Shortcut | Purpose |
|---|---|---|
Quick Find | Ctrl+F | Searches for text |
Quick Replace | Ctrl+H | Replaces text |
Find in Files | Ctrl+Shift+F | Includes options for searching for text in a set of files |
Replace in Files | Ctrl+Shift+H | Includes options for replacing text in a set of files |
Find Symbol | Alt+F12 | Restricts search scope to symbols only |
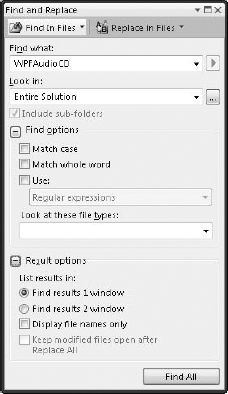
The Find and Replace commands all use the same dialog box, and most of the commands use the same options. As Figure 1-4 shows, your Find and Replace options are the following:
Find What: In this text box, enter text for which to search.
Replace With: In this text box, enter text to replace the found text.
Look In: From this drop-down list, specify the scope of the search, such as Current Document or Entire Solution.
Find Options: Use these checkboxes to specify options, such as whether to match case or the whole word.
Find Next: Click this button to find the next text match. The button toggles to Replace Next when you are in Replace mode.
Replace All: Clicking this button replaces all matches. The button toggles to Find All when you are in Find mode.
To select a different kind of Find and Replace command, open the drop-down lists displayed at the top of the Find and Replace dialog box.
Tip
Before you use Find and Replace, ask yourself whether one of the Visual Studio new refactoring features might work better. See Chapter 5 of Book III for an overview of refactoring in Visual Studio.
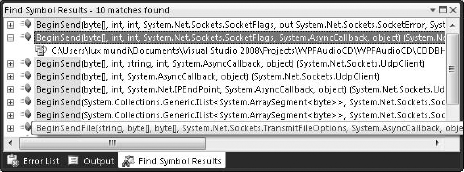
The Find Symbols command restricts your search to only symbols. Symbols are the methods and type definitions declared in source code. You can use the Find Symbols command to search your own code or external libraries for which you don't have source code. The results of the Find Symbols code appear in the Find Symbol Results window. Figure 1-5 shows the results from a search for BeginSend in a set of source code. The results show exactly where BeginSend is used in source code. Double-click any of the results to go to the source code.
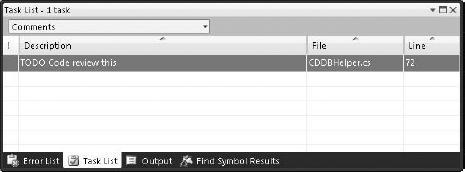
Use the Visual Studio Task List to keep track of a simple list of to-do items. The Task List window displays two kinds of tasks:
User tasks: Tasks entered directly into the Task List window
Task comments: Comments placed in your source code using special tags
The Task List provides a consolidated list of tasks you enter directly into the Task List window and tagged comments you place inside your source code. The default set of tags you use to mark your comments comprises TODO, HACK, or UNDONE.
Tip
You can create your own custom tags.
To tag a comment within your source code, use the standard comment mark for your programming language, followed by one of the task comment tags. For example, to add a task comment in Visual Basic or C#, you type the following:
VB:
'todo Code review this
C#:
// todo Code review this
Tip
Tags may be entered in upper- or lowercase. By default, tags are in uppercase.
The Task List window consolidates all your task comments in a single view. You can double-click a comment in the Task List to jump to the location in the source code where the comment appears. To open the Task List window, click Task List on the View window. Figure 1-6 shows an example of the Task List window.
Tip
Always check the Task List for code samples you download from Microsoft and other third parties. The samples usually include a list of tasks you need to complete in order to use the sample.
You can add your own task comment tags. Figure 1-6 uses a comment tag called TODO. To add your own task comment tags, do the following:
Choose Tools
Expand the Environment folder.
Click Task List.
Type a name for the comment tag in the Name text box.
Click the Add button.
Your new comment tag appears in the list.
Click OK.
The Code Editor includes outlining features you can use to expand and collapse your source code. Use the Edit
The .NET programming languages provide syntax to create a named section of code you can collapse and expand, known as a region directive. To use a region directive, sandwich your code block between a start and end region directive. The syntax for the directive varies, depending on the language you're using.
In Visual Basic, the directive looks like this:
#Region "Description of code block"
'source code here
#End Region
In C#, the directive appears as follows:
#region Description of code block
//source code here
#endregion
Note that C# doesn't require double quotes around the description. Figure 1-7 shows an example of a class using regions to organize the source code.

The Visual Studio Code Editor has a special feature — IntelliSense — that helps you complete syntax while you type. You might recognize IntelliSense as the feature that brings your dot notation to life. When you type a variable's name and then type a period or dot, you get a list of properties and methods that you can use for that variable. The context-aware list of properties and methods is brought to you courtesy of IntelliSense.
IntelliSense is capable of more than listing methods and properties. You can see IntelliSense in action when you
The new IntelliSense features in Visual Studio 2010 take point-and-click code generation to a whole new level. See Chapter 5 in Book III for a demonstration.
The Visual Studio Code Editor provides several visual cues that you can use while writing code, such as these:
Colors are used to identify different kinds of code. For example, strings are red, and commented text is green.
Bookmark and breakpoint symbols appear in the far-left margin.
Coding errors have colored squigglies beneath them to indicate the kind of error. For example, syntax errors appear with red squigglies beneath them, whereas warnings use green squigglies beneath them.
Figure 1-8 shows an example of a squiggly underline on an undeclared variable.
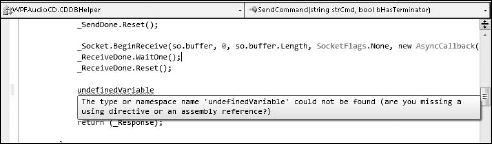
Figure 1-8. The Code Editor uses visual cues, such as squiggly lines, for errors. You can also turn line numbers on.
You can optionally turn on line numbers to help you with your code. To turn on line numbers, follow these steps:
Tip
Use the options in the Text Editor section to customize the Code Editor. You may want to disable certain features in the Code Editor, such as word wrap, if you're working with especially large source code files. Disabling features when you're editing large files can make the editor less sluggish.
Often, you need to browse your own code or try to navigate your way through code that someone else has written. Visual Studio provides two basic kinds of tools for browsing code:
When you have the source code
When you have a compiled assembly
The Code Editor has the following tools for browsing your own source code:
Navigation bar: Allows you to jump to the classes and methods defined in a source code file
Bookmarks: Allow you to place a bookmark in your code
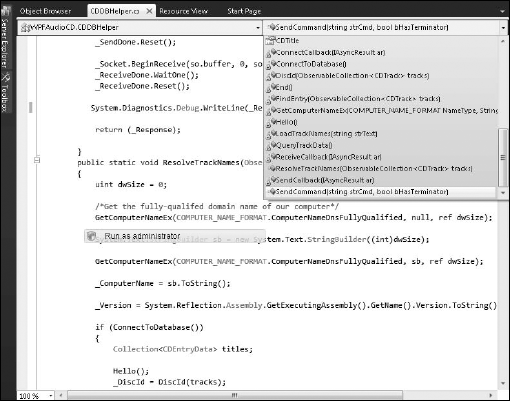
The Navigation bar appears at the top of a source code file in the Code Editor. The left drop-down box lists types or classes that you can find in the source code file. After selecting a type, you can view the type's members in the right drop-down list. Selecting a member takes you to its declaration in source code. Figure 1-9 shows an example of selecting a type's member from the Navigation bar.
A bookmark sets a place in code where you can jump to via the Bookmark window. To set a bookmark in source code, do the following:
Position your cursor on the line where you want to set the bookmark.
Choose View
Click the Toggle button on the far left of the Bookmark window to set the bookmark.
Type a descriptive name for the bookmark.
After you set a bookmark, double-click the bookmark in the Bookmark window to jump to that place in the code.
Visual Studio provides the Object Browser, Class View, and Code Definition for viewing assemblies. See the section on browsing types in Chapter 2 of Book III for more information.
Visual Studio supports many programming languages. Visual Basic and C# are two popular .NET programming languages. This section shows you the highlights of using Visual Basic and C# with Visual Studio 2010.
Warning
Mastering the basic syntax of programming languages, such as Visual Basic and C#, isn't the same as learning how to program. When you discover how to program, you also discover basic programming constructs, such as conditionals and iterators. By grasping the concepts of programming constructs, you can easily and quickly pick up any language syntax.
An important element of using a new programming language is figuring out how you should organize your program. You may already know that you use a Dim statement to declare variables in Visual Basic and that you use a using statement in C# to reference a namespace. That's all well and good, but if you don't know how to organize those statements in your source code file so that they're in the proper order and nested, your program won't compile.
Both Visual Basic and C# have similar approaches to program organization that use these elements:
Non-executable statements: Lines of source code that provide setup and wrapper statements for grouping executable statements, including
Imports(Visual Basic) orusing(C#) statements —Importsandusingstatements allow you to use code elements from resources external to your project without fully qualifying the element's namespace each time you use it. These statements create a shortcut, in essence, to the namespace.Namespace and type declarations: These statements create wrappers that organize your code.
Namespace declarations create unique identifiers for the types you declare within the namespace.
Data type declarations contain executable code. Examples of data types include classes and structures. See Chapter 2 in Book III for more details on types. Visual Basic includes a
Modulestatement that allows you to write code without using types.
Tip
Visual Basic uses the Options statement to specify how and when syntax checking occurs. Options statements are set by default on the project's property pages, so you don't need to include Options statements in your source code.
Executable statements: Lines of source code that provide the functionality of your program are executable statements. Executable statements are nested inside data type declarations and organized into members. Examples of members include
Methods
Fields
Properties
Events
In C# programming, a member is defined as a method, field, property, or event based on the style of programming you use and how you intend to use the member. For example, a class could implement its color as a property member, in which case you would access it as
MyClass.Color
Implemented as a method, it might look like this:
MyClass.GetColor()
Coding standards dictate that using the property is preferred over using the method; however, both approaches work and can return the same value.
Visual Basic includes additional executable statements — procedures — that can be used as class members or as part of a module. Examples of procedures in Visual Basic include
Function: A set of statements that returns a valueSub: A set of statements that doesn't return a valueProperty: Declares a property withGetandSetprocedures
The long and short of these organizing differences between Visual Basic and C# is that everything must be a data type in C#. In Visual Basic, you don't have to use types to organize your code, but it's recommended.
Tip
The most common data type used is a class. Classes are the fundamental building blocks of object-oriented programming (OOP). You don't have to follow the principles of OOP to use classes in C# or Visual Basic. Some would have you believe that you always write object-oriented code in C#, and that it's easier to write old-style procedural code with Visual Basic. That simply isn't true. Yes, C# forces you to use classes and objects, but that's not the same thing as writing object-oriented code. You can write procedural code by using objects. See Chapter 3 in Book III to read more about classes and OOP.
Figure 1-10 shows two functions where you can see the differences between the coding styles in Visual Basic and C#. Notice, for example, that Visual Basic uses Namespace...End Namespace, and C# uses namespace {}. Note also that because C# is case sensitive, all its keywords are in lowercase (top of Figure 1-10). Comparatively, Visual Basic keywords are in proper case with initial letters capitalized (bottom of Figure 1-10).
Most development professionals adhere to a set of capitalization standards when it comes to naming variables, classes, and other units of code. The casing standards are consistent, regardless of the programming language used. Chapter 5 in Book III covers these standards.
Tip
Lots of folks say that one or the other language is better, but you can write good code in Visual Basic, and you can write horrible code in C#, and vice versa. What matters is how well you learn how to code, not which language you choose.
The following sections provide a few syntax details for C# and Visual Basic. Refer to the Visual Studio documentation for more specifics on programming with either language.
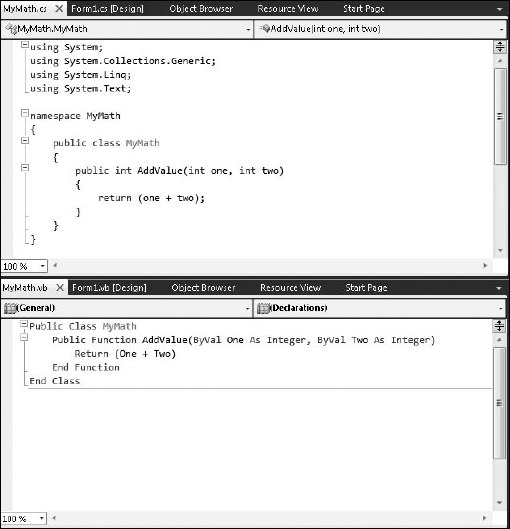
Figure 1-10. The coding styles in Visual Basic and C# are similar, but their syntax differs slightly.
Every executable program requires a procedure called Main. The Main procedure is the entry point into your application. In Visual Basic Windows applications, the Visual Basic compiler creates a Main function for you when the Enable Application Framework check box is selected on the Application tab of the project's property pages.
Tip
Only executable programs, such as Windows applications, require a Main procedure. Class libraries don't require a Main procedure.
The Movie Collection Starter Kit for C# has a good example of a Main procedure. In the Program.cs source file, you'll find the following Main procedure:
static void Main()
{
  Application.EnableVisualStyles();
  Application.SetCompatibleTextRenderingDefault(false);
  Application.Run(new MainForm());
}You must declare variables you wish to use and specify their data type. You can assign a value to the variable when you create it or assign a value in a separate assignment statement.
Visual Basic uses the keyword Dim to declare variables, like this:
Dim variablename as DataType
For example, to declare the variable i as the data type integer in Visual Basic, you type
Dim i As Integer
Comparatively, C# doesn't require any special keywords when declaring variables. You declare variables in C# with the following syntax:
DataType variablename;
int i;
You assign values to variables using the equal (=) operator. For example, to assign the value 7 to the variable i, you'd type this:
i = 7 "(VB)
i = 7; //(C#)
When you read an assignment statement, you say i "gets" 7, not i "equals" 7. In the case of variable assignment, the equal operator is not the same as equality.
You can declare a variable and assign a value in one statement. To combine declaration and assignment in Visual Basic, you type
Dim i As Integer = 7
And in C#:
int i = 7;
See Chapter 2 in Book III for more details on declaring variables and assigning values.
The primary means of organizing code in Visual Basic and C# is class declarations. Your executable code is nested within a class declaration. The following code is an example of a class declaration in Visual Basic:
Public Class Customer
"executable code here
End Class
You use a class using the new keyword, which creates an instance of the class, called an object. You use the object to access the executable code inside the class. For example, to create an object called newCust from the class Customer in Visual Basic, you'd type
Dim newCust As New Customer()
Here's the equivalent statement in C#:
Customer newCust = new Customer();
To call an executable procedure on the newCust object, you use dot notation, as shown here:
newCust.ValidateAddress()
You can consume objects in either language, regardless of what language the object is written in. For example, you can consume a Customer object written in Visual Basic using C#, and vice versa.
See Chapter 3 in Book III for more details on declaring classes and creating objects.
A single line of code is a statement. Both Visual Basic and C# provide syntax that allows you to write multiple statements as a block of code.
Examples where you need to use code blocks include If...Then statements and Try...Catch statements.
C# uses curly braces to encapsulate multiple statements. Visual Basic uses the syntax Procedure...End Procedure. Compare these two If statements for clarification:
"Visual Basic
If flag = True Then
  j = j + 1
  flag = False
End If

//C#
if (flag = true)
{
    j = j + 1;
    flag = false;
}Executable code is implemented as members of a data type, usually a class. Basically, everything inside a class is a member of the class. A procedure that adds two integers and returns a value is a method. Variables declared for use within the class are fields.
Visual Basic also uses classes and members, but it uses keywords such as Function and Sub to declare a procedure.
See Chapter 3 in Book III for more details on creating members and procedures in classes.
Visual Basic includes an object called My, which you can use to access features related to your application and the .NET Framework. For example, you can use My.Settings to access your application's configuration settings.
You don't have to declare variables or create an instance to use My. You simply type My and a dot in the Visual Basic Code Editor, and a list of available objects appears. Three commonly used My objects are
My.Application: Sets properties of the current application, such as setting a startup splash screenMy.Computer: Provides access to computer resources, such as the Clipboard and the file systemMy.User: Provides information about the user account using the application