Figuring out the products in Visual Team System
Exploring the tools of the new role-based editions
Using Team Foundation Server
If you've ever worked on a team project, you've probably experienced the frustrations of trying to collaborate via e-mail and folder shares. Invariably, an important document gets overwritten or an important stakeholder is left off the distribution list. Either way, the project suffers.
For most teams, the thought of implementing software to help with collaboration is about as much fun as having a root canal. Even if you decide on a vendor and manage to get the budget approved, you know the software's benefits are overshadowed by its daunting complexity.
The Microsoft approach to solving this problem is a bit different than most other vendors' approaches. Instead of creating an entire new set of tools for people to learn, Microsoft decided to create a solution that allows team members to keep using the same tools they've always used. The project managers keep using Excel and Project. The developers use Visual Studio. The architects get modeling tools that actually synchronize with code, and the testers finally get real software. The name for this make-everybody-happy approach to supporting team development is Visual Studio Team System.
Visual Studio Team System (VSTS) isn't an edition of Visual Studio. Rather, it's a platform for building software in a team environment. The platform is composed of the following product offerings:
Four role-based vertical feature sets within Visual Studio: Each feature set has a different set of tools tailored to a role in the software development life cycle. Visual Studio has specific features for the following roles on a team
Visual Studio 2010 Ultimate: This product suite includes all four role-based vertical feature sets.
Team Foundation Server (TFS) Standard Edition: This server product's features enable the members of a team to collaborate and manage projects. All versions of Visual Studio 2010 — except the Express Edition — can access a Team Foundation Server.
Each edition of Visual Studio in the VSTS comes with a client access license (CAL) that allows access to TFS. You must purchase a CAL separately for Visual Studio Standard or Professional editions. Each user accessing TFS must have a CAL.
You aren't required to use TFS. You can use any of the Visual Studio editions without TFS.
Team Foundation Server Workgroup Edition: This product provides the same features as TFS but is limited to five connections. TFS Workgroup Edition is included with any of the role-based versions of Visual Studio or the Team Suite.
If you have five or fewer members on your team, TFS Workgroup Edition is the way to go. You can upgrade to Standard Edition any time.
Each product in Visual Studio Team System comes with an MSDN Premium Subscription. Table 2-1 lists many of the tools you'll find in VSTS. (Descriptions for many of these tools appear later in the chapter.)
Table 2-1. Tools and Roles
Tool | Roles |
|---|---|
Application Designer | Architect |
Logical Infrastructure Designer | Architect |
Deployment Designer | Architect |
Class Designer | Architect, Developer |
Visio and UML Modeling | Architect, Developer |
Team Foundation Client | Architect, Developer |
Visual Studio Professional | Architect, Developer |
Dynamic Code Analyzer | Developer |
Static Code Analyzer | Developer |
Code Profiler | Developer |
Unit Testing | Developer, Test |
Developer, Test | |
Load Testing | Test |
Manual Testing | Test |
Test Case Management | Test |
Build Automation | Team Foundation Server |
Change Management | Team Foundation Server |
Work Item Tracking | Team Foundation Server |
Reporting | Team Foundation Server |
Project Site | Team Foundation Server |
Integration Services | Team Foundation Server |
Project Management | Team Foundation Server |
Visual Studio Team System is more than a new suite of tools: It supports the entire application life cycle and enables processes to improve continuously.
Still, implementing VSTS isn't a light-hearted undertaking. Visual Studio Team System integrates with several Microsoft server and client products. As a result, VSTS requires a big honkin' server with at least 15GB of storage just to get started, plus about 8GB of storage for each project. The server products required by VSTS include
Windows Server 2003 R2 or Windows Server 2008
SQL Server 2005 (Standard or Enterprise Edition) or SQL Server 2008 (Standard or Enterprise Edition)
Windows SharePoint Services (WSS)Compared with other products of this type, VSTS is relatively simple to implement. A single server can support several hundred developers.
If you'd rather not deal with implementing yet another server, you can find a service provider to host a TFS for you. Developers connect to the hosted server as if it were sitting in your server room. You get all the productivity of TFS without any of the hassles of implementing and administering a server.
You can use a number of clients to access TFS. These include
All the clients except Internet Explorer require the installation of Team Explorer (the Team Foundation client). See the section "Accessing Team Foundation Server," later in this chapter, for more about Team Explorer.
To take TFS for a test spin, you can download a 90-day trial edition from Microsoft's Web site at
www.microsoft.com/downloads/details.aspx?FamilyID=
b0155166-b0a3-436e-ac95-37d7e39a440cTo find out more about VSTS, check out these resources:
Team System Rocks Web site: A Web site dedicated to VSTS that features blogs, forums, and tutorials. The site has dozens of videos on using VSTS. Visit the site at
http://teamsystemrocks.com
Visual Studio Team System Developer Center: View the VSTS portal on MSDN at
http://msdn.microsoft.com/vstudio/teamsystem
Visual Studio Team System Virtual Labs: Access tutorials hosted on MSDN at
http://msdn.microsoft.com/en-us/aa570323.aspx
The role-based editions of Visual Studio have several tools. Some of these tools include the Application Designer in the Architect Edition. Other tools (such as static code analysis in the Developer Edition) simply integrate existing tools that many developers have used for a while. Either way, the new editions are long on features and compatibility.
Before you decide to spring for Visual Studio 2010 Ultimate, consider that you can achieve the same effect as many of these editions by using third-party tools. Depending on your situation, you may come out ahead by sticking with Visual Studio 2010 Professional and using a set of third-party tools such as these:
Modeling: Visio for Enterprise Architects and Class Designer.
Build automation: MSBuild and NAnt.
Static code analysis: FXCop analyzes your code for compliance to standards.
Project portal: Use WSS or create your own portal with ASP.NET 4 portal pages.
Windows SharePoint Services is a component in Windows Server 2003 and Windows Server 2008. You can download WSS free from Microsoft at
www.microsoft.com/downloads/details.aspx?FamilyId=
    B922B28D-806A-427B-A4C5-AB0F1AA0F7F9
Team Foundation Server: Access TFS, using the Team Explorer add-in for Visual Studio 2008.
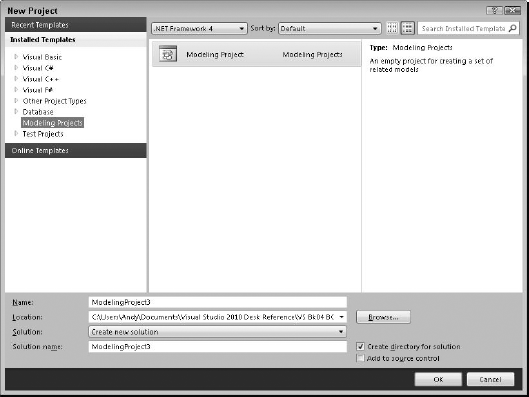
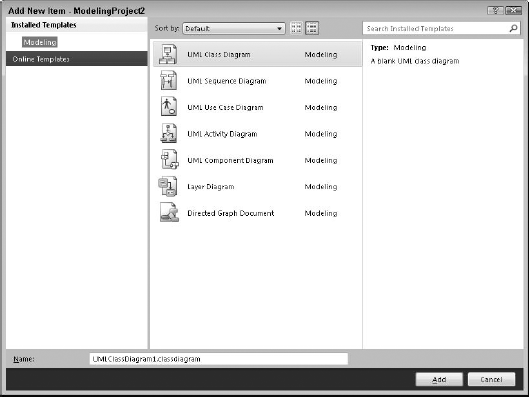
Visual Studio 2010 Ultimate includes a set of designers that allow architects to model their application designs. Visual Studio 2010 Ultimate ships with several project templates that allow you to create Unified Modeling Language (UML) diagrams.
To create UML diagrams in Visual Studio 2010 Ultimate, choose New
Visual Studio 2010 Ultimate offers several types of UML diagrams to add to your modeling projects. To add a new UML diagram, choose Project
Visual Studio 2010 Ultimate provides additional tools that developers can use to write better code. Many of these tools are available elsewhere as free downloads or open-source software.
Visual Studio Team System for Software Developers integrates the following tools into the development environment:
Static code analysis: This tool uses rules and patterns to detect errors and bad coding form.
Dynamic code analysis: This code-profiler monitors an application's performance while it's running.
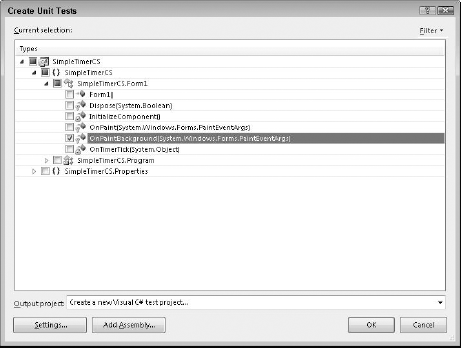
Unit testing: This framework lets you generate and manage unit tests.
Code coverage: This tool provides feedback on how effective your unit tests are at covering all your code.
Developers generate unit tests from the Code Editor, as shown in Figure 2-3.
Visual Studio 2010 for software testers provides resources for creating and managing many kinds of tests. You can use the Tester Edition to
Create unit tests.
Record Web tests.
Execute a sequential list of tests.
Measure your application's performance by running any combination of unit tests and Web tests over and over again.
Capture the steps for manual tests.
Turn any code into a test.
You organize your tests into projects by using a Test Project template in Visual Studio, as shown in Figure 2-4.
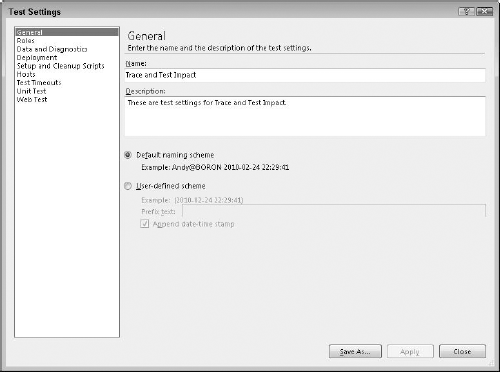
A Test Run Configuration is added by default to the solution when a Test Project is added. Use the Test Run Configuration to configure the testing environment and code coverage, as shown in Figure 2-5.
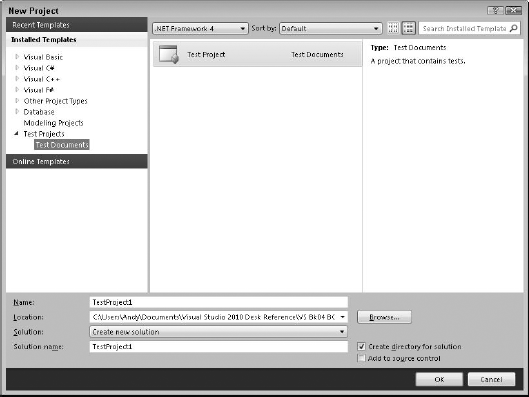
You add a Test Project from the New Project window, just like you would add any project in Visual Studio.
Visual Studio 2010 Ultimate brings the database developer closer into the software-development loop. With Visual Studio 2010 Ultimate, you can do the following:
Refactor database schema objects.
Automate testing with unit tests.
Place database schemas under source control.
Use
SchemaCompareandDataCompareto compare two databases and generate scripts to synchronize the databases.Populate test databases based on production data, using the
DataGenerator.
Team Foundation Server — the bedrock of collaboration features in VSTS — provides the following:
Source control management: Create check-in policies that define the actions your developers must complete before integrating source code.
Work item tracking: Create tasks, assign tasks to team members, and associate tasks with actions, such as code check-in.
Build automation: Step through a wizard to create complex automated build processes.
Reporting: Generate reports on all activities in your TFS.
Centralized project site: Set up a project site where all stakeholders can access project artifacts.
Project management: Perform project management tasks in familiar tools, such as Excel and Project.
Many of the features in TFS are possible, using the technologies of WSS. WSS version 3 is available as a free download from the Microsoft Web site. Before you take the plunge with VSTS, install WSS. Also, pick up a copy of Microsoft SharePoint 2007 For Dummies, by Vanessa Williams (Wiley). You'll find scenarios that show you how to use SharePoint in many different business contexts.
You must install the Team Explorer client before you can access TFS. Team Explorer is an add-in for Visual Studio. You can install the client using the Team Foundation Server software or download the add-in from Microsoft Downloads. You don't need to have any edition of Visual Studio to use Team Explorer.
To download the client from Microsoft, access this link:
www.microsoft.com/downloads/details.aspx?familyid=
    0ED12659-3D41-4420-BBB0-A46E51BFCA86&displaylang=en
To use Team Explorer to access an existing project on a TFS, follow these steps:
Choose View

The Team Explorer window appears.
Click the Add Existing Team Project button.
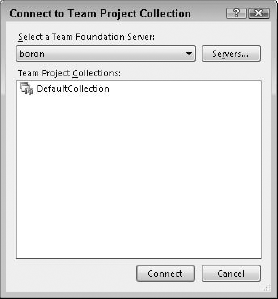
The Connect to a Team Foundation Server window appears.
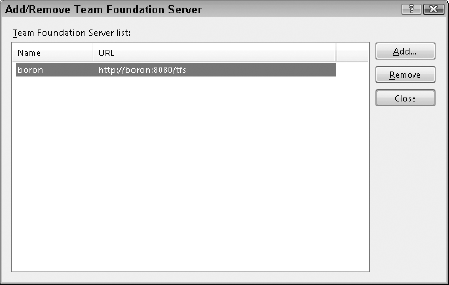
Click the Servers button.
The Add/Remove Team Foundation Server window appears (see Figure 2-6). Alternatively, you can select an existing server from the Team Foundation Server drop-down list.
Click Add.
The Add Team Foundation Server appears.
Type the server's name in the Name text box.
If your administrator instructs you to use a different port or protocol, enter those in the Connection Details section. Figure 2-6 shows a connection to a server. This shows the default port. In some cases, this port will conflict with other third-party products. For example, Visual MainWin also relies on this port. To ensure that there isn't any conflict, you need to change the port used by one of the two products.
Click OK.
If prompted, type your username and password.
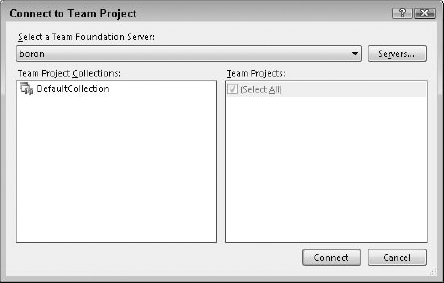
The Connect to a Team Project dialog box appears.
Select a project from the list of projects, as shown in Figure 2-7.
Click OK.
The project appears in the Team Explorer.
You may wonder why Microsoft didn't create a Visual Studio 2010 Ultimate features for project managers. It's probably because project managers don't use Visual Studio that often. And the Ultimate edition accommodates their style of work by interfacing with Excel and Project.
Some tasks, such as creating new team projects, must be completed by using Visual Studio. Visual Studio provides a group of predefined environment settings specific to project managers. To reset your settings to use the Project Management Settings, use the Import and Export Settings Wizard, as described in Book II, Chapter 1. The project manager environment settings eliminate most of the menu items used by developers and other roles.
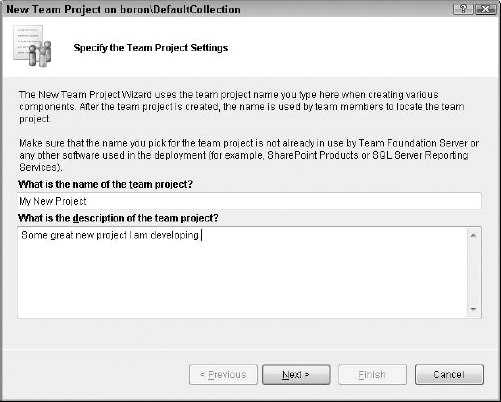
The New Team Project Wizard walks you through the process of creating a new team project. To start the wizard, follow these steps:
Choose File
The New Team Project Wizard appears.
Alternatively, you can choose File
Click Connect.
The New Team Project wizard appears, as shown in Figure 2-9.
Enter a name and description for your project and then click Next.
The project name must be unique on the Team Foundation Server.
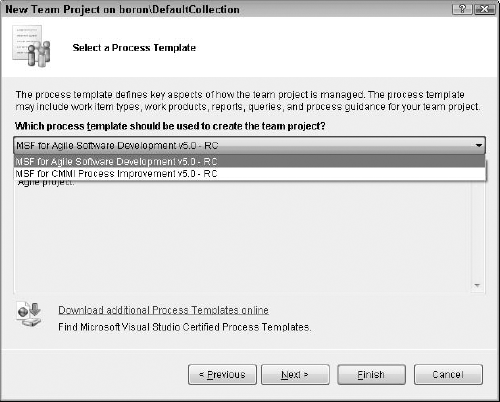
The Select a Process Template step appears. The process template defines workflow for your project. Team Foundation Server includes two process templates from the Microsoft Solutions Framework; you can extend them or create your own.
Select a process template from the drop-down list and click Next, as shown in Figure 2-10.
The steps that appear next depend upon the process template you select. Steps 5 through 9 in this list are based on the Microsoft Solutions Framework (MSF) for the Agile Software Development process template.
Visit the VSTS Developer Center on MSDN to get more information on using development processes from the Microsoft Solutions Framework at
http://msdn.microsoft.com/vstudio/teamsystem/msf
The Specify Source Control Settings window appears.
Select your settings to establish source control for the project then click Next.
The Confirmation Page appears.
Review your settings and click Finish.
The wizard creates your project. The project is now accessible from the Team Explorer (see Figure 2-11).
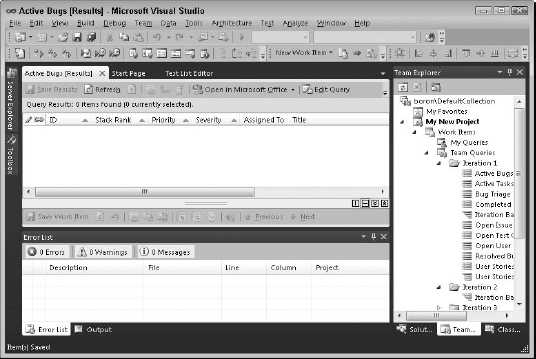
Team Explorer is the premier client for browsing resources in a Team Project. You open the Team Explorer from the View menu. The Team Explorer displays the following:
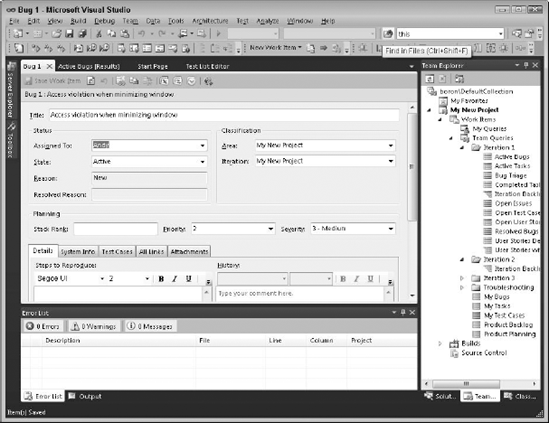
Work items: Lists the work-item queries in your team project. Click a query to expand a list of work orders.
Documents: Displays the document libraries from the project portal. The project's process template determines which document libraries are created.
Reports: Displays a list of reports available for your projects. Reports are created by using SQL Server Reporting Services.
Team Builds: Displays a list of build types for your team project.
Source control: Defines check-in policies for the project.
Figure 2-12 shows a work-item query accessed via Team Explorer.
You can connect to projects in a TFS by using Excel or Project. Team Explorer adds a Team toolbar that you can use to get work items and to publish new or modified items to the server. To connect to a new work-item list in Excel, follow these steps:
Click the New List button on the Team toolbar.
The Connect to Team Foundation Server window appears. (Refer to Figure 2-8.)
Connect to your server, as described in the preceding example.
Select a team project from the list of projects and then click OK.
The New List window appears.
Select the Query List radio button to access a list of work items.
Alternatively, click Input List to enter new work items and get individual work items.
Click the Select a Query drop-down list.
A list of predefined work item queries appears.
Select a query from the list and then click OK.
The query's results appear as a spreadsheet (see Figure 2-13).
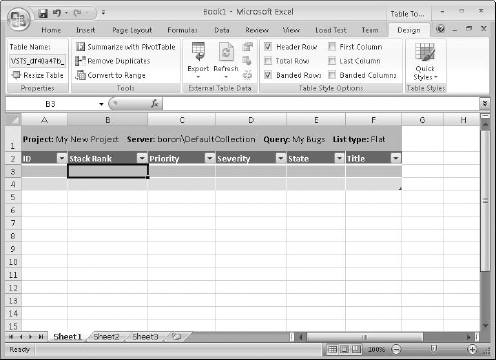
The work items are retrieved into an Excel list. You can add new work items or update existing items. Click the Publish button in the toolbar to save your changes to the server, and your saved changes are immediately available to other team members.
You can add work items in Excel, Project, or Team Explorer; or, during source-control check-in.