
Using sockets for network communications
Creating an application to access content on the Web
Creating a simple chat application
Since the mid-1990s, the Internet and the World Wide Web have become ubiquitous. The increased bandwidth capabilities allow for vast amounts of information to travel around the world in lightning-fast speeds. E-mail, pictures, documents, bank and market transactions, and even movies and television programs are transported from one place to another on the Internet. Now, more than ever, the world has become smaller and more connected.
Very few applications written today don't involve some sort of network connectivity. From applications that automatically download updates from the vendor's Web site or display the latest news headlines from organizations around the word, the ability to add networking capabilities to your applications is a must for nearly all software developers.
To help you build networked applications, the .NET framework offers libraries that help you network your applications with ease. The System.Net namespace contains all the classes you need to add any kind of networking to your application.
You can find the C# and VB examples for this chapter at www.dummies.com/go/vs2010.
Perhaps one of the most common types of network applications is one that accesses content on the Web using the Hypertext Transport Protocol (HTTP). HTTP is the means by which content from the Web is delivered to your browser. For an example of using HTTP to access content on the Web, you create a Windows Forms application that accesses weather forecast data for a particular city from Google using the Google Weather API. You use the Google Weather API to get the weather for Indianapolis, Indiana. The Google Weather API provides forecast data in an XML file format. You access data for Indianapolis with the following URL: www.google.com/ig/api?weather=Indianapolis.
From Visual Studio, choose File

The New Project dialog appears.
Select Windows Forms Application from the C# program templates and click OK.
Visual Studio creates the Windows Forms application.
Right click the References node in Solution Explorer.
The Add Reference dialog appears.
Using the .NET tab on the Add Reference dialog box, choose
System.Net.dlland click OK.This step adds a reference to
System.Net.dllin the References node of the Solution Explorer and allows the application to use the services provided by this assembly.In the Form Designer, drag a rich text box and a button from the Toolbox on your form, as shown in Figure 9-1.
Click the Get Weather Data button so that code for the Click Event is created.
To access weather data, add the code shown in Listing 9-1.
Example 9-1. C# and Visual Basic Code to Access Google Weather Data
C#:using System; using System.Collections.Generic; using System.ComponentModel; using System.Data; using System.Drawing; using System.Linq; using System.Text; using System.Net; using System.IO; using System.Windows.Forms; namespace WeatherWatcher { public partial class Form1 : Form { static readonly string _WeatherUri = "http://www.google.com/ig/api?weather=Indianapolis"; public Form1() { InitializeComponent(); } private void _ButtonWeatherData_Click(object sender, EventArgs e) { try { HttpWebRequest request = (HttpWebRequest)WebRequest.Create(_WeatherUri); HttpWebResponse response = (HttpWebResponse)request. GetResponse(); Encoding utf8Encoding = Encoding.UTF8; StreamReader responseStream = new StreamReader(response. GetResponseStream(), utf8Encoding); string content = responseStream.ReadToEnd(); StringBuilder builder = new StringBuilder(); builder.AppendFormat("Google Weather for Indianapolis n {0}.", new object[] { content }); this.richTextBox1.Text = builder.ToString(); } catch (System.Exception ex){ Console.WriteLine(ex.Message); } } } }Imports System.Net Imports System.IO Imports System Imports System.Text Public Class Form1 Dim _WeatherUri As String = New String("http://www.google.com/ig/ api?weather=Indianapolis") Private Sub Button1_Click(ByVal sender As System.Object, ByVal e As System.EventArgs) Handles Button1.Click Dim request As HttpWebRequest = WebRequest.Create(_WeatherUri) Dim response As HttpWebResponse = request.GetResponse() Dim utf8Encoding As Encoding = Encoding.UTF8 Dim responseStream As StreamReader = New StreamReader(response. GetResponseStream(), utf8Encoding) Dim content As String = responseStream.ReadToEnd() Dim builder As StringBuilder = New StringBuilder() builder.AppendFormat("Google Weather for Indianapolis" & vbCrLf & vbCrLf & vbCrLf & "{0}.", content) Me.RichTextBox1.Text = builder.ToString() End Sub End ClassUse Ctrl+F5 to run the application.
Click the Get Weather Data button.
The weather forecast data for Indianapolis appears in XML format, as shown in Figure 9-2.

Many things are happening in the preceding lines of code. First, the application has to make a TCP/IP connection to www.google.com.
Note
The Transport Control Protocol/Internet Protocol (TCP/IP) is the backbone of the modern Internet. This protocol is the basis for the common application protocols used to transport data across the Internet such as Hypertext Transport Protocol (HTTP) and the File Transport Protocol (FTP). You can find out more about network protocols on Wikipedia at http://en.wikipedia.org/wiki/Internet_protocol_suite.

In the .NET framework, the System.Net.Sockets.Socket class creates a TCP/IP connection to a given location. In this example, the System.Net.HttpWebRequest class makes the socket connections for you. Once connected, the System.Net.HttpWebRequest issues a command to get data from the URL that you provided. After this request reaches the destination at www.google.com, this site creates a response and sends it back on the same TCP/IP connection. The System.Net.HttpWebResponse class handles the response from www.google.com. The GetResponse method waits for data from www.google.com, and when data are available, this method returns. Now you can read the data into a string and display in the RichTextBox on your form. The HttpWebRequest and HttpWebResponse classes handle all the details of making TCP/IP connections and handling HTTP requests and responses freeing the developer from concern about the details of the HTTP protocol.
You can see from the preceding example that the .NET framework makes it easy to add the capability to access data from the Web in your applications.
The preceding example, however, is a very naïve implementation. The main flaw in this implementation is that it calls GetResponse on the HttpWebResponse class, which blocks waiting for data to return from www.google.com. When accessing data across the network, many factors can impact the time required for data to return. The data provider may be in a distant location on a network with high latency, or the provider may have to execute lengthy operations before returning data. In any case, these factors are beyond the control of the requesting application. Because the request and response occur in the same thread as the Click event on the button, any updating of the application window is blocked until data arrive, and GetResponse returns. Blocking the window from updating isn't a good user experience; the application appears frozen because the user isn't able to drag the application on the desktop or maximize/minimize it.
Fortunately, the HttpWebResponse class provides asynchronous methods to get data from a data source. In this case, the request goes to www.google.com, but the application doesn't block waiting for data, but instead, the HttpWebResponse issues a callback when data arrives. At this point, you can read the data and assign the forecast data to the RichTextBox.
You can change your code in the Click event of the Get Weather Data button, as shown in Listing 9-2.
Example 9-2. C# and Visual Basic with Asynchronous Request of Google Weather Data
C#:
using System;
using System.Collections.Generic;
using System.ComponentModel;
using System.Data;
using System.Drawing;
using System.Linq;
using System.Text;
using System.Net;
using System.IO;
using System.Windows.Forms;
namespace WeatherWatcher
{
public partial class Form1 : Form
{
static readonly string _WeatherUri =
"http://www.google.com/ig/api?weather=Indianapolis";
delegate void UpdateText(string s);
public Form1()
{
InitializeComponent();
}
private void OnResponseReady(IAsyncResult result)
{
HttpWebRequest request = (HttpWebRequest)result.AsyncState;
HttpWebResponse response = (HttpWebResponse) request.
EndGetResponse(result);
Encoding utf8Encoding = Encoding.UTF8;
StreamReader responseStream = new StreamReader(response.
GetResponseStream(), utf8Encoding);
string content = responseStream.ReadToEnd();
StringBuilder builder = new StringBuilder();builder.AppendFormat("Google Weather for Indianapolis
{0}.",
new object[] { content });
UpdateText updateText = delegate(string s) { this.richTextBox1.Text =
s; };
this.richTextBox1.BeginInvoke(updateText,
new object[] {builder.ToString()}
);
}
private void _ButtonWeatherData_Click(object sender, EventArgs e)
{
try
{
HttpWebRequest request =
(HttpWebRequest)WebRequest.Create(_WeatherUri);
IAsyncResult result = request.BeginGetResponse(new AsyncCallback(
OnResponseReady),request);
}
catch (System.Exception ex)
{
                Console.WriteLine(ex.Message);
            }
        }
    }
}Imports System
Imports System.IO
Imports System.Net
Imports System.Text
Public Class Form1
Dim _WeatherUri As String = New String("http://www.google.com/ig/
api?weather=Indianapolis")
Private Sub OnResponseReady(ByVal result As IAsyncResult)
Dim utf8Encoding As Encoding = Encoding.UTF8
Dim request As HttpWebRequest = result.AsyncState
Dim response As HttpWebResponse = request.EndGetResponse(result)
Dim responseStream As StreamReader = New StreamReader(response.
GetResponseStream(), utf8Encoding)
Dim content As String = responseStream.ReadToEnd()
Dim builder As StringBuilder = New StringBuilder()
builder.AppendFormat("Google Weather for Indianapolis" & vbCrLf
& vbCrLf & vbCrLf & "{0}.", content)
Me.RichTextBox1.Text = builder.ToString()
End Sub
Private Sub Button1_Click(ByVal sender As System.Object, ByVal e As System.
EventArgs) Handles Button1.ClickDim request As HttpWebRequest = WebRequest.Create(_WeatherUri)
Dim asyncResult As IAsyncResult = request.BeginGetResponse(New System.
AsyncCallback(AddressOf OnResponseReady), request)
End Sub
End ClassThis time, when you click the Get Weather Data button, the code makes a call to BeginGetResponse and provides an AsyncCallback parameter. This parameter is a delegate that the HttpWebResponse class calls when data arrive from www.google.com. In this example, the HttpWebResponse class calls OnResponseReady when data are available. Under the covers, the .NET framework is executing the request on a thread pool thread and returning the result on this same thread, freeing the main application thread so that the window can redraw, maximize, or minimize, which provides a satisfying user experience. Book IV, Chapter 8 provides more details about threads and thread pools.
The second example is much better. You can move the window around while the request is processed, but displaying the raw XML weather data is of limited utility. Deciphering the forecast from the XML data visually isn't intuitive. Also, the request URL is hard-coded to return weather data for Indianapolis, Indiana only. If you're planning a trip to another city, you'd want to see the weather forecast for that city to know what clothing to pack and whether your golf plans are in jeopardy of being rained out.
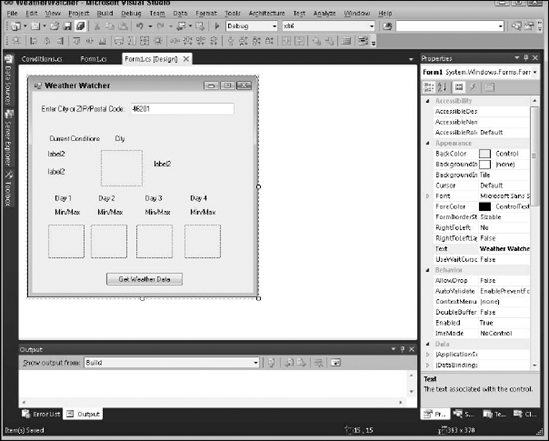
A better example would provide a graphical representation of the weather data in the application window. Fortunately, the .NET framework makes this task rather easy. Figure 9-3 shows an example Form Designer layout for a simple weather forecast application. This form contains a PictureBox for displaying the appropriate icon for the current conditions as well as a four-day forecast. Also, labels display the current temperature, humidity, forecast time, and min/max temperatures for the next four days.
Now, all you have to do is parse the XML data from Google and populate the labels and PictureBox objects with the appropriate data. Press Ctrl+F5 to run the application, and you see weather data similar to Figure 9-4.
This application is much more useful because it now graphically displays the current conditions and four-day forecast for a given location. If you're planning a trip to visit friends in the Waltham, MA 02453 area, you can just enter the ZIP/Postal Code 02453 and click the Get Weather Data button to see the forecast for that location. Alternatively, you can just type the City in the text box and see the forecast for that city.

One common network scenario in networked application is a client/server application. In this scenario, one application is the server and listens from incoming client application. The server responds to requests from the client, and the client receives responses from the server. A simple example of this type of application is a chat application.
In the next example, a Chat Server application listens for incoming connections, and a Chat Client application connects to Chat Server. Once connected, both applications can exchange text messages.
The Chat Server application is a simple Windows Forms application. Using the Form Designer, create a window like shown in Figure 9-5. See Book IV, Chapter 2 for examples creating Windows Forms applications.
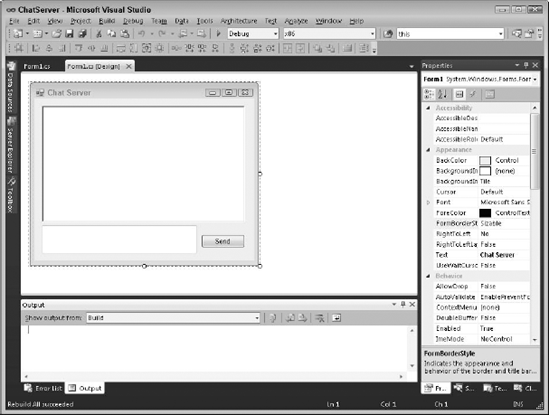
This window contains a RichTextBox that contains the chat text, a small TextBox near the bottom of the window that will contain the text to send to the client, and a Send button to send the text to the client.
You create a server application by creating a socket using the System.Net.Sockets.Socket class and assigning an IPEndPoint object to this socket. The IPEndPoint object indicates the address and port number on which the server will listen for incoming connections. Once created, the Listen method on the Socket class is called to indicate that the server is listening for incoming connections. Listing 9-3 shows the code for establishing a server socket.
Example 9-3. C# and Visual Basic Code to Create a Server That Listens for Connection
C#:

private void Form1_Load(object sender, EventArgs e)
      {
          _Server = new Socket(AddressFamily.InterNetwork,
                               SocketType.Stream,
                               ProtocolType.Tcp);

          _Endpoint = new IPEndPoint(IPAddress.Any, 10255);

          _Server.Bind(_Endpoint);
          _Server.Listen(5);

          _Server.BeginAccept(new AsyncCallback(OnAcceptClient), _Server);
}Private Sub Form1_Load(ByVal sender As System.Object, ByVal e As System.
EventArgs) Handles MyBase.Load
_Server = New Socket(AddressFamily.InterNetwork,
SocketType.Stream,
ProtocolType.Tcp)
_Endpoint = New IPEndPoint(IPAddress.Any, 10255)
_Server.Bind(_Endpoint)
_Server.Listen(5)
_Server.BeginAccept(New AsyncCallback(AddressOf OnAcceptClient), _Server)
End SubThe BeginAccept method tells the server socket to start an asynchronous wait to accept incoming connections. When a client connects, the Socket class calls the OnAcceptClient method to complete the client connection, as shown in Listing 9-4.
Example 9-4. C# and Visual Basic Code to Accept an Incoming Connection
C#:

private void OnAcceptClient(IAsyncResult result)
        {
            Socket server = (Socket)result.AsyncState;
            Socket client = server.EndAccept(result);

            _Client = client;

            StringBuilder builder = new StringBuilder();
builder.AppendFormat("Accepted connection from client at - {0}" +
Environment.NewLine,
client.RemoteEndPoint.ToString());
System.Diagnostics.Debug.WriteLine(builder.ToString());
this.Invoke((Action)(() => this.richTextBox1.AppendText(builder.
ToString())));
string welcomeData = "Welcome, you are connected to " + client.
RemoteEndPoint.ToString() + Environment.NewLine;
byte[] message = Encoding.UTF8.GetBytes(welcomeData);
client.BeginSend(message, 0, message.Length, SocketFlags.None,
new AsyncCallback(OnSendComplete), client);
server.BeginAccept(new AsyncCallback(OnAcceptClient), server);
}Private Sub OnAcceptClient(ByVal result As IAsyncResult)
Dim server As Socket = result.AsyncState
Dim client = server.EndAccept(result)
_Client = client
Dim builder As StringBuilder = New StringBuilder()
builder.AppendFormat("Accepted connection from client at - {0}" +
Environment.NewLine,
client.RemoteEndPoint.ToString())
System.Diagnostics.Debug.WriteLine(builder.ToString())
Me.BeginInvoke(New WriteTextDelegate(AddressOf WriteText), builder.
ToString())
"Dim welcomeData As String = "Welcome, you are connected to " + client.
RemoteEndPoint.ToString() + Environment.NewLine
Dim message As Byte() = Encoding.UTF8.GetBytes(welcomeData)
client.BeginSend(message, 0, message.Length, SocketFlags.None,
New System.AsyncCallback(AddressOf OnSendComplete),
client)
End SubAfter the connection is complete, the server calls BeginAccept once again to wait for another client connection. After the connection occurs, data can flow back and forth between the client and the server. Listing 9-5 shows the server code to send and receive data from the client.
Example 9-5. C# and Visual Basic Code to Exchange Data with the Client
C#:

private Socket _Server;
private Socket _Client;

private IPEndPoint _Endpoint;
private byte[] _Buffer = new byte[1024];
private int _Size = 1024;

private void OnReceiveData(IAsyncResult result)
        {
            Socket client = (Socket)result.AsyncState;

            int nBytes = client.EndReceive(result);

            if (nBytes == 0)
            {
                this.Invoke((Action)(() => this.richTextBox1.AppendText("Client
    at " + client.RemoteEndPoint.ToString() + " disconnected." + Environment.
    NewLine)));

                client.Close();

                return;

            }

            string data = Encoding.UTF8.GetString(_Buffer, 0, nBytes);

            this.Invoke((Action)(() => this.richTextBox1.AppendText("Client
    at " + client.RemoteEndPoint.ToString() + Environment.NewLine + data +
    Environment.NewLine)));

            client.BeginReceive(_Buffer, 0, _Size, SocketFlags.None,
                       new AsyncCallback(OnReceiveData), client);

        }

        private void OnSendComplete(IAsyncResult result)
        {
            Socket client = (Socket) result.AsyncState;

            System.Diagnostics.Debug.WriteLine("Sent data to client at " +
    client.RemoteEndPoint.ToString());

            client.BeginReceive(_Buffer, 0, _Size, SocketFlags.None,
                                new AsyncCallback(OnReceiveData), client);
}Private Sub OnSendComplete(ByVal result As IAsyncResult)
Dim client As Socket = result.AsyncState
System.Diagnostics.Debug.WriteLine("Sent data to client at " + client.
RemoteEndPoint.ToString())client.BeginReceive(_Buffer, 0, _Size, SocketFlags.None,
New AsyncCallback(AddressOf OnReceiveData), client)
End Sub
Private Sub OnReceiveData(ByVal result As IAsyncResult)
Dim client As Socket = result.AsyncState
Dim nBytes As Integer = client.EndReceive(result)
If (nBytes = 0) Then
Me.BeginInvoke(New WriteTextDelegate(AddressOf WriteText), "Client
at " + client.RemoteEndPoint.ToString() + " disconnected." + Environment.
NewLine)
client.Close()
Return
End If
Dim data As String = Encoding.UTF8.GetString(_Buffer)
Me.BeginInvoke(New WriteTextDelegate(AddressOf WriteText), "Client at " +
client.RemoteEndPoint.ToString() + Environment.NewLine + data + Environment.
NewLine)
client.BeginReceive(_Buffer, 0, _Size, SocketFlags.None,
New AsyncCallback(AddressOf OnReceiveData), client)
End SubNow that the Chat Server is completed, you can develop the Chat Client. The Chat Client looks very similar to the Chat Server application. It also has a RichTextBox for displaying chat text along with a TextBox for entering data and a Send button.
The Chat Client code is simpler than the Chat Server. The Chat Client just needs to connect to the Chat Server, and then data can start flowing back and forth. The same System.Net.Sockets.Socket class used for the server socket is the same class used for the client socket. Listing 9-6 shows the code required to connect to Chat Server.
Example 9-6. C# and Visual Basic Code for the Client to Connect to the Server
C#:

Socket _Socket;
       byte[] _Buffer = new byte[1024];
       int _BufferSize = 1024;
_Socket = new Socket(AddressFamily.InterNetwork, SocketType.Stream,
ProtocolType.Tcp);
EndPoint endPoint = new IPEndPoint(IPAddress.Loopback, 10255);
_Socket.BeginConnect(endPoint, new AsyncCallback(OnConnectComplete),
_Socket);
private void OnConnectComplete(IAsyncResult result)
{
Socket client = (Socket)result.AsyncState;
client.EndConnect(result);
StringBuilder builder = new StringBuilder();
builder.AppendFormat("Connected to server at {0}
.",
client.RemoteEndPoint.ToString());
this.BeginInvoke((Action)(() => this.richTextBox1.AppendText(builder.
ToString())));
this.BeginInvoke((Action)(() => this.button1.Enabled = true));
client.BeginReceive(_Buffer, 0, _BufferSize, SocketFlags.None,
new AsyncCallback(OnReceiveComplete), client);
}VB:
Private _Socket As Socket
    Dim _Buffer As Byte() = New Byte(1024) {}
    Dim _BufferSize As Integer = 1024

Private Sub Form1_Load(ByVal sender As System.Object, ByVal e As System.
    EventArgs) Handles MyBase.Load
        _Socket = New Socket(AddressFamily.InterNetwork, SocketType.Stream,
    ProtocolType.Tcp)

        Dim endPoint As EndPoint = New IPEndPoint(IPAddress.Loopback, 10255)

        _Socket.BeginConnect(endPoint, New AsyncCallback(AddressOf
    OnConnectComplete), _Socket)
    End Sub
Private Sub OnConnectComplete(ByVal result As IAsyncResult)
        Dim client As Socket = result.AsyncState

        client.EndConnect(result)

        Dim builder As StringBuilder = New StringBuilder()

        builder.AppendFormat("Connected to server at {0}" + Environment.NewLine,
                                client.RemoteEndPoint.ToString())
        'Me.button1.Enabled = True

        Me.BeginInvoke(New WriteTextDelegate(AddressOf WriteText), builder.
    ToString())

        client.BeginReceive(_Buffer, 0, _BufferSize, SocketFlags.None,
                           New AsyncCallback(AddressOf OnReceiveComplete),
    client)

    End Sub
After the connection occurs, the code to send and receive data is identical to that in the Chat Server application.
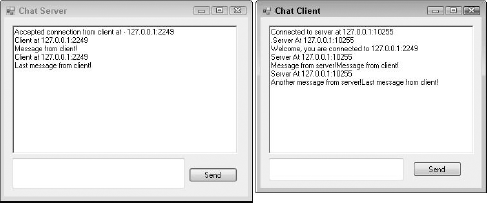
Now, press Ctrl+F5 to run the Chat Client application. The Chat Server and Chat Client are running and ready to exchange data. Figure 9-6 shows example data exchanged between Chat Server and Chat Client.
The .NET framework makes networking your applications very simple. After you have a few networking concepts under your belt, you can harness the .NET framework to allow your applications to get data from the Web or to pass information from one application to the next creating the foundation for a larger-scale distributed system.