When I first learned how to program computers, the flow of programming was sequential. You wrote one line of code after another. Each line of code was numbered, and you thought about your program in terms of what happens first and what happens next.
When I went to college, I was taught a more sophisticated approach to programming that uses functions to group statements of code. Functions are great because you can easily organize your code into reusable blocks.
When I started working as a programmer, I encountered yet a third programming paradigm that organizes code into classes. I found this curious because even though a program's basic building block is classes, the style of programming is called object-oriented programming (OOP).
Visual Studio provides many tools that support the activities of object-oriented design (OOD) and programming. This chapter covers some of the basics of working with objects and classes and shows you how to use Class Designer to visually design and inspect classes and objects.
Most programmers take awhile to figure out the relationship between objects and classes when they first encounter OOP. If you think of software as a means of modeling a real-world scenario, the following points are worth remembering:
Objects represent the people, places, and things in your program. For example, think about a business that sends an invoice to a customer. Invoice #100984 and Customer #60093 are objects that your program needs to manipulate. The business, ABC Graphics, sending invoice #100984 to customer #60093 is an object, too.
Classes are the units of code you write to make objects come to life in your program. For example, your program defines
InvoiceandCustomerclasses. Each class encapsulates the data and behaviors required to create objects that represent real-world invoices and customers.
You write classes, but you think in terms of objects, which is why programming with objects is called object-oriented programming. Table 3-1 compares OOP with procedural and sequential programming styles.
Table 3-1. Comparison of Programming Styles
Programming Style | Programmers' Approach | Basic Building Blocks |
|---|---|---|
Object-oriented | What objects am I modeling in my program? | Objects |
Procedural | What functions do I need to tackle this problem? | Functions |
Sequential | What's the next line of code to write? | Statements |
Thinking in objects isn't limited to programmers. Objects are often found in the planning and design stages of a project, where object-oriented thinking is formally known as both of the following:
Object-oriented analysis: Requirements analysts use objects to model problems in the business domain.
Object-oriented design (OOD): Designers use analysis objects to model classes that programmers will write to create objects.
Programmers use object-oriented programming languages (OOPLs) — such as Visual Basic, C#, C++, and Java — to implement classes.
Even if you've never written an object-oriented program or know nothing about objects, chances are you're familiar with several of the characteristics of OOP:
Using the familiar dot notation to access the members of an object
Using the new operator to initialize a reference type
Setting an object's properties
Classes and objects are the bedrock of OOP. Classes are special kinds of data types that you use to create objects in your code. Objects are placeholders in your code for the real people, places, and things upon which your program acts.
Classes are a complex data type. Simple data types store values, such as integers and Booleans. Composite data types, such as structures that are capable of storing more than one value, aren't more sophisticated than integers and Booleans. The values that you can store by using classes, however, are beyond mere integers or sets of integers.
Note
You might recognize simple data types as value types and complex data types as reference types. See Chapter 2 in Book III for a thorough discussion of the differences between value types and reference types.
A class is a data type that's capable of storing data and actions. When you declare and initialize a variable by using a class data type, you create an object that stores data and action values defined by the class data type. Objects are used to accommodate the potential complexity of values stored for class data types. An object is often referred to as an instance of the class data type.
Note
The term object is often interchanged for the term class. People often use the term object in a generic sense to mean "the class that defines the object." People seldom use class when they mean object. You must consider the context in which the term is used to determine whether the author or speaker means class or object. (Ask whether the author is writing about a data type or the value represented by the data type. If it's the former, it's a class. Otherwise, it's an object.)
Classes act as a template for defining the data and actions of an object. You create objects by using the class as a template. Each object created from the class is like a blank form into which you can place data. The source of that data may be a database, data typed on a screen by a user, or another object.
Some people find it helpful to think of classes as the blueprints for objects — or to think that classes are abstract and that objects are concrete.
Tip
Think of classes as a template for creating an object.
You're familiar with the concept of data, but you may not immediately understand what the potential actions of a class data type may be. Consider a class data type called Customer. You expect a Customer data type to store a customer's name and account number. If you need to tell someone a customer's 30-days aging of their account, how might you approach solving this problem?
Given that an account's aging is based on the current date, you need to be able to calculate the value in real time. You can't query a database for the answer. Your Customer class needs a procedure that returns the account's aging.
Tip
Storing calculated values in a database is usually considered bad form. There are a number of reasons that you don't want to store calculated values, but the two most important reasons are that the calculated values consume additional space and they can become outdated when the values that support them change. Classes often return calculated values for an object. For example, an Employee class may have a procedure that returns the employee's age.
Another way to think of actions is that actions are sometimes things that an object can do. For example, a student registers for courses. Registering for courses is an action that a student object is capable of doing.
Classes are important to software development because they
Are a basic building block of programs
Group related code in a unit
Control visibility and accessibility of your code
Encourage reuse
Are easy to extend
Can model real-world scenarios
Map code to the real world
Code created with objects and classes, adhering to the principles of OOP, display these characteristics:
Abstraction: Models a real-life thing by using only the attributes relevant to solving the problem at hand.
Creating user-defined classes is an example of an abstraction. When you approach a problem you're trying to solve, you identify the objects that are relevant to the problem. For example, you need a
Customerobject and anInvoiceobject to prepare invoices. You determine the level of detail required in yourCustomerandInvoiceclasses to adequately solve the problem of printing invoices.Encapsulation: Wraps the data and actions of an entity into a single unit.
Encapsulation isn't unique to OOP. Functions and subroutines are examples of encapsulation, as are classes.
Inheritance: Builds a hierarchy of related code by creating parent-child relationships between units of code.
Inheritance allows you to create a supertype/subtype relationship between types. A simple example of inheritance is having a
Dogclass and aCatclass that inherits from anAnimalclass. TheAnimalclass has all the data and actions common to both dogs and cats. However, unique behaviors — such as a cat's purr — appear in the appropriate derived class.Polymorphism: Allows child types to provide their own code to implement actions performed by their parent or sibling.
Polymorphism makes it possible for a class hierarchy to share a common set of behaviors while each has its own implementation. For example, the
Animalclass has a reproductive cycle. TheDogandCatclasses each require their own implementation of a reproductive cycle. Polymorphism allows you to refer to the generic concept of a reproductive cycle in your code, regardless of whether you mean a dog or a cat.
Tip
Another important characteristic of OOD is information hiding. You should design your classes so that important design decisions are hidden. In other words, one should have to think about only initializing and accessing your classes, not understanding how you've written them. The classes in the .NET Framework are a good example of information hiding. You must explicitly think about information hiding as you design your application. It's possible to abstract, encapsulate, inherit, and polymorph without hiding information. Simply using object-oriented techniques doesn't ensure that you're hiding information.
You use an OOPL (such as Visual Basic, C#, or C++) to write object-oriented programs. The .NET Framework is an object-oriented library of classes.
In addition to the OOP languages, Visual Studio provides several tools to support OOP, including
The only way to learn OOD and programming is to do OOD and programming. Memorizing terms and definitions can help your vocabulary, but by themselves, they do very little to increase your understanding of OOD and OOP. So, instead of getting hung up on terminology, just start coding.
Classes and OOP have terminology with which you might not be familiar and which might seem overwhelming at first. At its heart, classes are just ways to organize code similar to the modules, functions, and subroutines with which you might be familiar. Like modules, functions, and subroutines, you declare variables and procedures similarly to how you do in modules.
Classes are templates that define an object's
Data: Data is sometimes referred to as the object's state, which is the set of values an object holds at a given point in time.
Behavior: Behaviors are the actions that the object takes.
The code that creates a new class is a class declaration. A class declaration consists of the class header and body. The class header defines the following:
Attributes: Optional keywords used by the compiler. The .NET Framework provides several attributes for use in your class and method declarations.
Modifiers: Keywords that define how the class may be used. For example, classes and members use access modifiers, such as
publicandprivate, to determine whether the class or member may be accessed by code outside the class or namespace.Name: Identity of the class.
Base class: Data type from which the class is inheriting. All classes implicitly inherit from
System.Object.Interfaces: Comma-separated list of interfaces implemented by the class. An interface is a set of member declarations with no source code to implement them. Interfaces make it possible to define a publicly consumable contract without writing the source code. Other developers can target the interface without fear of the interface changing. See Chapter 4 of Book III for more information on interfaces.
A class' body defines the class' data and behavior. The items declared inside a class are its members. The members you can create inside a class body include
Constants: Values in the class that don't change.
Constructors: Special procedures that are called to create an object using the class. An object is often referred to as an instance of the class.
Destructors: Special procedures that are called before an object is discarded by your program.
Events: Procedures that raise a notification when a certain action occurs.
Fields: Variables declared for use within the class, often for storing data.
Indexers: Procedures that index individual instances of the class.
Methods: Procedures that provide the behaviors of the class.
Operators: Procedures that define conversions for the class and extend built-in operators.
Properties: Procedures that provide access to the class' data structure.
Types: Nested data types, such as classes or structures, created within the class.
Note
The combination of a class header and its body is its definition.
You may have noticed that a class' body is made up of procedures and variables. If you've done any programming at all, you're probably familiar with the concept of using variables and procedures to create your program.
In C#, a class' body is wrapped in opening and closing curly braces. Listed here is a class definition in C#:
public class Message
{
  private string m_message;
  public string Contents
  {
    get { return m_message; }
    set { m_message = value; }
  }
public Message(string message)
{
this.m_message = message;
}
public string ReverseContents()
{
char[] c = this.m_message.ToCharArray();
StringBuilder sb = new StringBuilder();
for (int i = 1; i <= c.Length; i++)
{
sb.Append(c, c.Length - i, 1);
}
return sb.ToString();
}
}Can you tell which elements in this class are fields, properties, and methods? It's not immediately obvious just by looking at the code. To someone not familiar with OOP, this code looks like variable and procedure declarations. Table 3-2 summarizes the members in this class.
Table 3-2. Members Found in the Message Class
Member Type | Quantity | Example |
|---|---|---|
Field | 1 |
|
Property | 1 |
|
Constructor | 1 |
|
Method | 1 |
|
Take a look at the equivalent code sample in Visual Basic. Notice how the Visual Basic keywords Property and New provide clues as to the member's purpose:
Public Class Message
  Private m_message As String
  Public Property Contents() As String
    Get
      Return Me.m_message
    End Get
    Set(ByVal value As String)
      Me.m_message = value
    End Set
  End Property
  Public Sub New(ByVal message As String)
    Me.m_message = message
  End Sub
Public Function ReverseContents() As String
Dim c As Char() = Me.m_message.ToCharArray()
Dim sb As New StringBuilder
For i As Integer = 1 To c.Length
sb.Append(c, c.Length - i, 1)
Next
Return sb.ToString()
End Function
End ClassClasses are logically organized within namespaces. Your class code is stored in a physical file called an assembly. A single namespace can span multiple assembly files, but a single class can reside in only one assembly. To access classes, you must reference the assembly and the namespace within your project. See Chapter 2 of Book III for more information.
Tip
The C# keyword this and Visual Basic keyword me are used to reference the current instance of an object in your code.
All classes inherit from the .NET class System.Object. Inheriting from System.Object provides all the basic services your classes need to function as objects and get along with other objects.
System.Object is the base class of your class, and your class is a derived class of System.Object.
Any time your classes derive from a base class, you should check the documentation of the base class to determine whether there are any methods you should override. When you override a member, you write your own code to implement the member.
For example, the System.Object class has a method called ToString that you should override. By overriding ToString in the classes you define, you can get a string representation of objects created from your class. See Chapter 5 of Book III for more information on overriding.
Several overridden methods are available for System.Object. Table 3-3 lists all the methods your class inherits from System.Object and identifies those that you should override.
Tip
Overriding a base class' methods when recommended is considered good form. Overriding ensures that your derived class works as expected. Look for the "Note to Implementers" section in the base class' type for information on overriding.
Table 3-3. Methods of System.Object
Description | Override | |
|---|---|---|
| Constructor | Not required |
| Destructor | Not recommended |
| Determines whether two object instances are equivalent | Yes |
| Generates a hash code for use in hashtables | Not required |
| Returns the data type of the object instance | No |
| Copies a value or an object reference | No |
| Determines whether two object instances are the same object | Not required |
| Returns a human-readable representation of the object instance | Recommended |
Because classes are data types, you use them like you use any data type. They're reference types, so you use the new operator to create a new instance of a class.
The new operator calls the class's constructor method. A class may have more than one constructor. If no constructor method is defined in the class, the object is initialized by using the default constructor. The default constructor is the New() method defined in the System.Object class. Recall that all classes derive from System.Object.
Note
Classes are reference types, so everything about how memory is allocated for reference types in Chapter 2 of Book III applies to classes. When you initialize a new instance of a class, the object itself is allocated on the heap. The reference to the object is allocated on the stack.
To create a new instance of the Message class created in the preceding section, you type the following:
Message m = new Message("Hello");You use dot notation to access the members of the class. The member's visibility is determined by the modifier set on the member's declaration. You can always see public members, but not private members. To call the ReverseContents member, type the following:
string s = m.ReverseContents();
Here's the equivalent code, using Visual Basic syntax:
Dim m As New Message("Hello")
Dim s As String = m.ReverseContents()
Tip
You don't need to declare the Message class using Visual Basic and C# syntax. You can just as easily create the class in C# and then reference and instantiate it in Visual Basic.
Hopefully, this syntax looks familiar to you. If you've used any features in the .NET Framework, you've encountered this syntax.
Tip
You can use any of the classes in the .NET Framework or any third-party library just by knowing the rules for declaring variables based on a class data type and creating instances of objects.
Visual Studio provides a visual design tool — Class Designer — that you can use to create class diagrams. Some common uses of Class Designer are
Designing new classes
Visualizing existing classes
Refactoring classes
Another use of Class Designer that might not be immediately evident is as a training aid. You can use Class Designer to familiarize yourself with the concepts of OOP. You can also use it to learn syntax.
Warning
Use Class Designer as an aid, and not a crutch. If you rely too heavily on the tool, you risk being dependent on it. Becoming dependent on the Class Designer is definitely not where you want to be if your company decides to migrate some projects to another object-oriented language, such as Java.
Like most of the visual designers in Visual Studio, Class Designer generates diagrams from code and code from diagrams. The diagrams and code are synchronized. The class diagram is a visual representation of source code.
Tip
The class diagrams created by Class Designer are design diagrams — not analysis diagrams. Design diagrams usually show more implementation details than analysis diagrams. If you want a tool better suited to creating analysis diagrams, try Visio for Enterprise Architects. You can easily generate classes from your Visio diagrams and then view those classes in Class Designer. You can find out more about Visio by reading Visio 2007 For Dummies (Wiley) by John Mueller and Debbie Walkowski.
Common tasks you can do in Class Designer include the following:
Create new classes and members.
Define relationships among classes.
View classes and relationships.
Refactor code.
Class Designer is capable of designing more than just classes. You can use Class Designer to design or view any kind of data type, including
Classes
Delegates
Enumerations
Interfaces
Structures
Class Designer can also create Visual Basic modules, which you can use to encapsulate your code. See the Visual Basic documentation for more information on the differences between classes and modules.
You add a new class diagram to your project using the Add New Item window. A project may have multiple class diagrams. To add a new class diagram
Right-click your project's folder in Solution Explorer.
From the contextual menu that appears, choose Add

The Add New Item window appears.
Type a name for the class diagram in the Name field.
The example uses
ClassDiagram1as the class diagram name.Click the Add button.
Visual Studio adds the class diagram file to Solution Explorer and opens it in Class Designer.
Class diagrams use the .cd filename extensions. Like most files in Visual Studio, the class diagram file is an XML file.
Class diagrams are visual representations of classes in a project. The diagrams are similar to diagrams created using the Unified Modeling Language (UML) specification.
Note
UML is a modeling language that identifies 13 diagrams used for designing software. Many tools available on the market are capable of creating UML diagrams, including Microsoft Visio for Enterprise Architects. Visual Studio class diagrams won't replace UML diagrams you're already using. Consider them another tool to add to your modeling arsenal.
Class Designer consists of the
Toolbox
Designer surface
Class Details pane
The Designer provides a toolbar and shortcut menus to access additional features. The Designer works with Solution Explorer, Class View, and OTB.
Class Designer provides several commands you can use for working with your diagram. The commands that you can use depend on what you have selected in the diagram. You have three levels of commands for working with class diagrams:
Diagram: To work with the entire diagram, click a blank area of the diagram.
Type: Click a shape to access commands that act on the data type.
Member: Click a member within the type to view commands.
Figure 3-1 shows the Class Designer toolbar. The first column of Table 3-4 lists the commands of the Class Designer toolbar, as they appear on the toolbar from left to right.
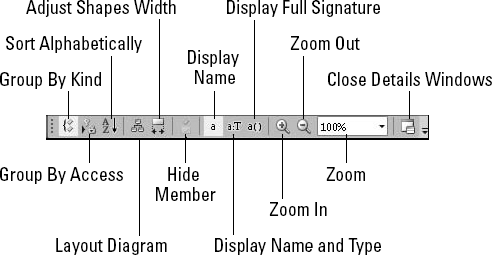
Table 3-4. Class Designer Toolbar Commands
Command Type | Command | Description |
|---|---|---|
Arrangements of shapes | Group by Kind | Groups by kind of data type |
Group by Access | Groups by data type's access modifier | |
Sort Alphabetically | Sorts by data type's names | |
Layout | Layout Diagram | Organizes diagram |
Adjust Shapes Width | Widens shapes | |
Member display options | Display Name | Displays members' names only |
Display Name and Type | Displays names and type | |
Display Full Signature | Displays full declaration | |
Visual | Zoom In | Zooms in on diagram |
Zoom Out | Zooms out on diagram | |
Zoom Percentage | Sets a zoom percentage | |
Class Details Window | Opens the Class Details window |
The Class Designer menu provides you the opportunity to act upon the shapes that represent data types on the diagram. Table 3-5 lists the options available for data types you click in the class diagram.
Table 3-5. Class Designer Menu Type-Level Commands
Description | |
|---|---|
Add | Selects a member to add to the type |
Refactor | Accesses refactoring options for the type |
IntelliSense | Generates code using IntelliSense |
Show Base Class | Displays the type's base type on the diagram |
Show Derived Class | Displays types derived from the type on the diagram |
Collapse | Collapses members |
Expand | Expands members |
Show All Members | Displays any hidden members |
Create Instance | Creates an object using the OTB |
Invoke Static Method | Calls a static method using the OTB |
You can access most of these commands from a shortcut menu when you right-click a shape in a class diagram. The shape's shortcut menu includes commands to delete the shape from the diagram and view the type's underlying source code.
One of the more exciting features of Class Designer is the ability to design classes. You can drag and drop data types on the class diagram; in the background, Visual Studio is generating the code to create the data type.
Class Designer can create all kinds of data types. The Toolbox includes all the shapes you need to create data types and show relationships between data types.
To create a new class with Class Designer, follow these steps:
Add a new class diagram, following the steps in the previous section.
Press Ctrl+Alt+X to open the Toolbox.
The Toolbox pane displays icons representing items you can add to the Class Designer. Open the Class Designer tab, if necessary, to see the controls you can use.
Drag and drop a Class icon from the Toolbox onto Class Designer.
The New Class dialog box appears.
Type a name for the class in the Name text box.
The example uses Message as the name.
Select an access modifier from the Access drop-down list.
The
publicaccess modifier is accepted by default. The example usespublicas the access modifier.Type a new filename for the class or select an existing file to add the class.
The example uses the Create New File option and
Message.csas the filename.Click OK.
The Class shape appears on Class Designer.
Visual Studio generates the class declaration and places it in the file you created or selected in Step 6.
Figure 3-2 shows Class Designer with a class called Message. You can see the Message.cs source code that Visual Studio created in the pane next to the class diagram.
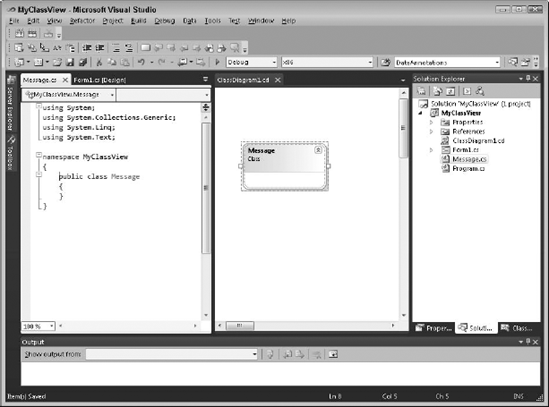
To add more types to the class diagram, drag the type from the Toolbox onto the design surface. A dialog box, similar to the one in Step 3, appears.
You use Class Designer to add members to your class. When you add a member using the designer, you specify the following information about a member:
Name
Data type
Access modifier
You can, optionally, supply a descriptive comment and mark whether to hide the member on the class diagram.
Visual Studio uses the information you supply to create a member declaration in your source code. You have two options for adding members to your class with Class Designer:
Type the members in the Class Details pane. The Class Details pane shows the class's members grouped by methods, properties, fields, and events.
Add the members to the class in the class diagram.
The class diagram and the source code are synchronized. Any members you declare directly in source code appear in the class diagram.
To add a new member via the Class Details pane
Click the section of the Class Details pane for the type of member you wish to add.
If the Class Details pane is closed, choose View
Type the member's name in the line immediately below the section's header.
For example, to add a new field, click the line below the Fields section where you see
<add field>.Press the Tab key.
The cursor stops in the Type cell.
Type the member's data type.
Tip
IntelliSense works in the Class Details pane.
Press Tab and add an optional descriptive comment.
Click to place a check mark in the Hide column if you don't want the member to appear on the class diagram.
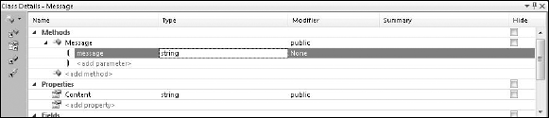
Figure 3-3 shows a field (
m_strMessage) and a property (Content) in the Class Details pane.
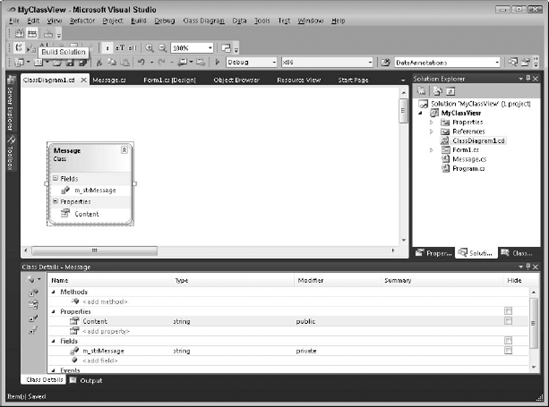
Visual Studio generates the member declarations for you in the class's source code file.
The Class Details pane features a toolbar button with shortcuts for adding members. To access the shortcut button, click the arrow on the button, as shown in Figure 3-4.
A method's declaration is a little more complex than a field or property declaration because a method may accept parameters. In addition, multiple kinds of methods are available, such as constructors and destructors. The Class Details pane has no problems adding methods to your class.
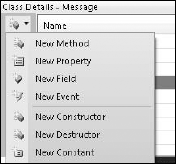
To add a new constructor method, follow these simple steps:
Click the shortcut button on the Class Details toolbar.
Chose New Constructor.
A new constructor method appears in the Methods section of the Class Details pane.
Tip
Constructors use the same name as the class in C#. In Visual Basic, constructors are named
New.Type the constructor's parameters in the lines below the constructor's declaration, as shown in Figure 3-5.
Visual Studio generates the member declarations and stubs out the member's bodies. (The members don't perform any useful task — they simply provide a placeholder for code you add later.) Exceptions are placed inside the generated members to remind you that you need to add your code if you try to use the members. For example, the following code is the constructor generated for the preceding sample:
public Message(string message)
{
  throw new System.NotImplementedException();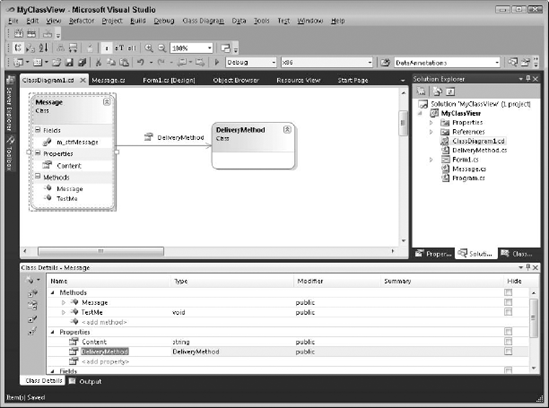
}You can also create members by using the class diagram. To create a member in the class diagram, do the following:
Right-click the class in the class diagram.
From the contextual menu that appears, choose Add.
A list of members appears, which you can add to the class.
Select the type of member you wish to add.
The member appears in the diagram.
Type the member's name in the diagram, as shown in Figure 3-6.
Use the Class Details pane to complete the member's declaration.

The nature of OOP is that classes interact. You create an interaction between classes when you create member declarations in your class. For example, if you declare a field of the string type, you create an association between your class and the string class.
In Class Designer, you show associations between only classes that are relevant to the model you're creating. You could show every association, but then your diagrams would be too crowded for people to understand. Instead, you should show only the associations that you want to draw attention to.
Here's how to create an association between two types:
Create both types on the class diagram.
Click the Association icon in the Toolbox.
Click the type where you want to draw the association.
The cursor appears as a line, as shown in Figure 3-7.
Drag the line to the class.
An association between the classes appears. Visual Studio adds the association as a property.
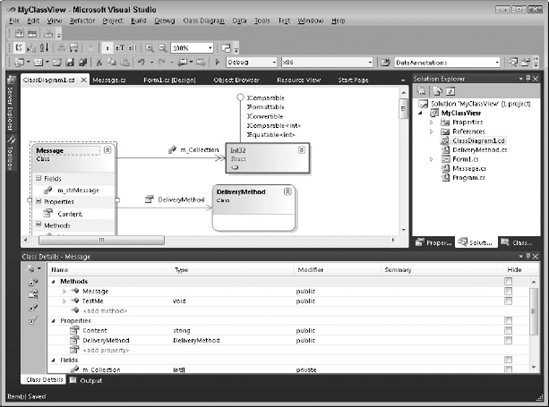
You can show associations between classes and collections. To show an association between a class and a strongly typed collection, follow these steps:
Add the member to your class that uses the strongly typed collection.
For example, add a field that uses a generic collection based on another data type in your diagram. The example uses a field named
m_Collection, which is of typeInt32[](an array).Right-click the member on the class diagram.
From the contextual menu that appears, choose Show as Collection Association.
An association between the classes appears, as shown in Figure 3-8.
Class Designer takes advantage of the Visual Studio code generation features. While using Class Designer, you can access
Advanced IntelliSense features, such as overriding type members and implementing abstract base classes.
Refactoring commands, such as extracting interfaces from a type and renaming members.
See Chapter 5 in Book III for more information on using IntelliSense and refactoring features of Visual Studio.
Class Designer is an excellent tool for viewing information about data types. You can view data types within your own project, as well as any types referenced by your project. This means that you can view types from the .NET Framework or a third party.
To view a type in your project, simply drag and drop the source code file from Solution Explorer to the class diagram.
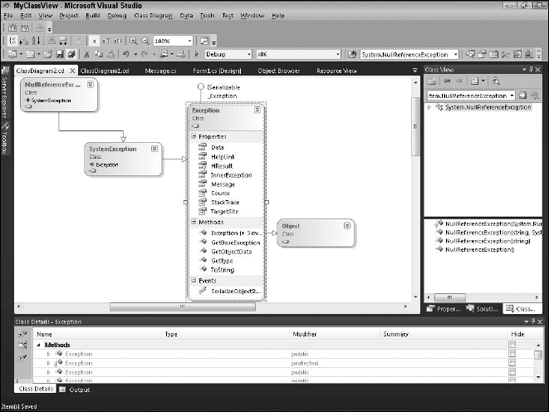
You use Class View to drag referenced types from your project to the class diagram. For example, to add the type NullReferenceException to a class diagram, follow these steps:
Add a new class diagram to your project.
Press Ctrl+Shift+C to open Class View.
Type System.NullReferenceException in the Search box.
Alternatively, expand the Project Reference folders and navigate to the
NullReferenceExceptiontype.Tip
The
NullReferenceExceptiontype is in theSystemnamespace in themscorlibassembly. Your project references themscorlibassembly by default.Press Enter.
The
System.NullReferenceExceptionappears in the search results.Drag and drop System.NullReferenceException on the class diagram.
Admittedly, viewing a single type on a class diagram isn't very exciting. You can use the Class Details pane to view the type's members. You can also view a type's inheritance hierarchy.
To view a type's base type, follow these steps:
Right-click the type and choose Show Base Class from the shortcut menu.
The base type appears on the class diagram.
Repeat Step 1 for each base type you display.
Show Base Class appears dimmed when you reach the top of the inheritance hierarchy.
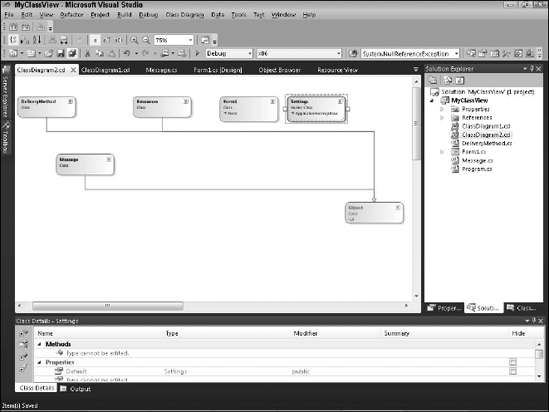
Figure 3-9 shows the class diagram for the
NullReferenceExceptiontype. Notice thatSystem.Objectis at the top of the hierarchy.
To view the class diagram for an entire project, follow these steps:
Right-click the project folder in Solution Explorer.
From the contextual menu that appears, choose View Class Diagram.
A class diagram of the project appears. Figure 3-10 shows the class diagram for this example (which started out as a Windows Form application).