
Getting acquainted with Windows Forms
Creating your first smart client application
Working with controls
Setting properties and responding to events
Visual Studio has all the tools you need to build everything from the simplest to the most complex Windows applications. By using the Microsoft .NET Framework, Visual Studio provides the visual designers that make building Windows applications a breeze. For example, Visual Studio gives you the following elements to accomplish common tasks:
Project Templates help you set up your project.
Visual designers help you lay out Windows Forms.
The control toolbox makes adding user interface (UI) elements to your Windows Forms a breeze.
Wizards, property-setting windows, and shortcut task lists enable you to easily configure UI elements.
This chapter walks you through some of the tools that Visual Studio provides for building managed Windows applications that use either Visual Basic or C#.
The Windows operating system (OS) and applications that run on Windows have been around for more than 30 years. With ubiquity, early Windows applications became bloated and hard to deploy. In response, developers snubbed their noses at these newly dubbed fat clients and started using a combination of client and server resources to create leaner applications.
Proving that the grass isn't always greener, folks quickly learned that thin clients had their problems, too. Although thin clients were easier to deploy, they weren't all that feature rich, and they didn't work when the network went down. Then came the Internet, and the world went crazy for Web-based applications. Many talented developers found innovative ways to twist and contort simple Web pages into what seemed like full-blown desktop applications. They used a combination of server-side code and JavaScript. Although developers had modest success in this arena, many diehard Windows programmers cringed at the lack of UI sophistication in Web-based applications.
Thanks to inexpensive, fast hardware and the maturity of Windows application development, the Windows application is again being redefined — this time as the smart client. Although a smart client may look like any old Windows application, you can use its key differences to
Create rich user experiences.
Deploy and maintain applications with greater ease.
Enjoy more security than in a traditional Windows application.
Smart clients still provide all the same features as earlier generations of Windows applications:
You can build data-centric, interactive applications.
You can access the local computer.
They don't require a server in order to run.
Windows applications are all about creating an intuitive, visually appealing, and interactive user experience. If user experience weren't important, everyone would still be running good old-fashioned, character-based applications in DOS.
Smart clients aren't the last word in Windows applications. The next wave of Microsoft products for Windows and Visual Studio will usher in even more opportunities for Windows developers to enhance the user experience.
The basic building block of a smart client Windows application is the Windows Form. Windows Forms, a key technology of the .NET Framework, provide
The Windows Forms Designer is the Visual Studio visual design surface for working with Windows Forms. Use the Windows Forms Designer for these tasks:
Visually lay out your UI.
Configure UI attributes.
Write custom code that's executed when users interact with your form.
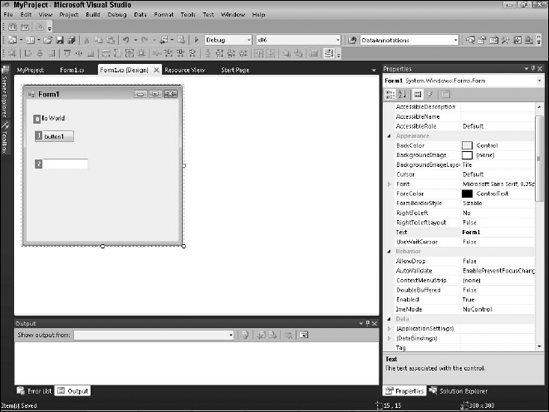
Figure 1-1 displays the Windows Forms Designer in Visual Studio. The next section walks you through creating a new Windows application and using the forms designer.

Visual Studio uses Solutions and Projects containers to organize all the files necessary to build an application. When you create a new Windows application, Visual Studio creates all the files you need and prepares the development environment with the windows, designers, and editors that you need to work with your new project.
To create a new smart client project in Visual Studio, follow these steps:
Choose File

The New Project window appears.
Tip
You can also open the New Project window by pressing Ctrl+Shift+N. On some editions of the product, you can choose File
In the Installed Templates hierarchy, click the programming language you want to use.
A list of project templates that are available for that programming language appears on the right.
Windows applications created by using Visual Basic, C#, managed C++, and F# use the .NET Framework. Although most of the examples in this chapter use C# and Visual Basic, you can create Windows applications by using any language. See Chapter 3 in Book III for more details about creating Windows applications with C++.
Click the Windows Forms Application icon.
Enter a unique name for your application in the Name text box.
Although you can give your application any name you want, you probably should choose a name that describes your application. Many developers include the word Windows or the abbreviation Win in an application's name to distinguish it from other kinds of applications, such as Web or mobile applications. In this example, I use the default name
WindowsApplication1.Click OK to create the application.
Visual Studio creates a new solution with a Windows project. A new Windows Form is added to the project, and Visual Studio displays the form in the Windows Forms Designer.
When you create a new Windows application, Visual Studio generates all the code necessary to display the Windows Form on the screen when you run your application. To run your new Windows application, press Ctrl+F5. Visual Studio builds your Windows application and displays a blank Windows Form.
Most Windows applications use menus, text boxes, and buttons. These types of user interface elements are controls. Follow these steps to add controls to make your application say, "Hello world!":
Open the control toolbox by pressing Ctrl+Alt+X.
Make sure that you open the tab named All Windows Forms.
Drag and drop a label control from the toolbox onto the Form Designer.
Drag and drop a button control onto the forms designer.
Double-click the button control.
Visual Studio creates a block of code to handle the button's Click event. The Code Editor appears with the cursor flashing in the block of code.
Type this line in the Code Editor:
VB
label1.Text = "Hello World!"
C#
label1.Text = "Hello World!";
Press Ctrl+F5 to run your Windows Form.
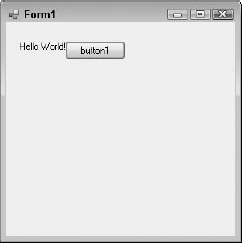
When you click the button on your form, Hello World! appears on the label you add in Step 3, as shown in Figure 1-2.
A Windows Form is a blank canvas: It doesn't do much on its own. To bring your Windows Form to life, you must add controls to it. Controls are UI elements, such as buttons and text boxes, designed for interacting with your Windows Form. Controls breathe life into your Windows Forms by
Providing structure and navigation in the form of menus, toolbars, and status bars
Allowing users to interact with your forms by using buttons, labels, and text boxes
Displaying dialog boxes to provide user feedback about your application's state
Tip
Putting controls on a form is also a way of designing an application. The form with controls and no code is an adequate prototype with which you can then proceed to plan the code. By taking the time to think through the application and place the controls as they will be in the final application, you'll likely have fewer bugs, flaws, and debugging issues during the development process.
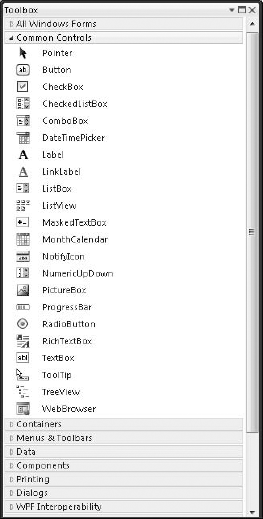
Visual Studio provides a toolbox chock full of controls. The control toolbox, shown in Figure 1-3, includes all the commonly used controls that even casual Windows users are familiar with, such as
Labels, text boxes, and buttons
Check boxes, list boxes, and combo boxes
Calendars and date pickers
The toolbox displays controls in groups, or tabs:
All Windows Forms: Contains an alphabetical list of controls.
Common Controls: Lists frequently used controls, such as labels and text boxes.
Containers: Used for laying out and grouping other controls on the form.
Menus & Toolbars: Creates the menus and toolbars your application uses.
Data: Contains controls and wizards for accessing data.
Components: Contains controls that provide back-end services, such as connecting to an event log.
Printing: Provides printing features.
Dialogs: Allows you to add common dialog boxes, such as those used for saving files.
WPF Interoperability: Provides interoperability between Windows Presentation Foundation and Windows Forms.
Crystal Reports: Allows you to add a Crystal Report to your form. See Book VI, Chapter 4 to read more about Crystal Reports.
General: Contains an empty group.
This chapter demonstrates how to use frequently used controls, such as labels, text boxes, and buttons. More advanced controls, such as those in the containers and on the menus and toolbox tabs, are discussed in Chapter 2 of this book. To read more about using data controls on Windows Forms, see Book V, Chapter 2.
You can customize the toolbox by
Adding and removing tab groups
Moving tab groups up or down
Adding and removing controls to and from the tab groups
To customize the toolbox, follow these steps:
Right-click an item, such as a specific control or tab, in the toolbox you want to customize.
A contextual menu appears, as shown in Figure 1-4.
From the shortcut menu, choose the action you want to take.
Tip
To add new controls to the toolbox, choose Choose Items from the contextual menu.

The easiest way to add a control to a form is to drag and drop it from the toolbox onto the Windows Form. You can also draw a control to specify its exact size. To draw a text box on a Windows Form, follow these steps:
Click the text box control in the toolbox.
If the toolbox is closed, press Ctrl+Alt+X to display it.
Move your mouse pointer to the Windows Form.
Note: You don't need to drag the text box.
The pointer changes to a plus sign (+).
Tip
If you change your mind about drawing the control, click a different control or click the pointer in the toolbox to reset your mouse pointer without adding a control to the form.
In the upper-left corner, click the mouse pointer wherever you want to start drawing the text box.
Tip
To draw a default-size text box, click and release your mouse button without dragging.
Drag the mouse pointer to the upper-left corner where you want the text box to end, as shown in Figure 1-5, and release the mouse button.
The text box is drawn on the form. When you're done placing controls, the next step is typically to format them and set how you want them to behave. See the next section, "Manipulating Controls," for details.
Creating a UI with controls involves more than dragging and dropping. To get the most from controls, you need to know how to position them on your form. This section covers some common tools for putting controls exactly where you want them.
Even the simplest Windows Form can have dozens of controls. Developers often want to align controls in a way that's visually appealing to users. Although you can work with each control individually — drag, drop, resize, and align — using the Visual Studio Format menu is much easier. After selecting two or more controls, use the Format menu to perform the following actions:
Align: Position controls into alignment with one another.
Make Same Size: Make controls the same width or height.
Horizontal Spacing: Set the side-by-side spacing between controls.
Vertical Spacing: Set the spacing above and below controls in a row.
Center in Form: Position a control or group of controls in the center of the Windows Form.
Order: Set controls to appear in front of other controls.
Lock Controls: Lock the position of a single control or group of controls so that the position can't be changed.
Visual Studio displays a Layout toolbar with many of the common formatting commands. To display the Layout toolbar if it's not already open, follow these steps:
Choose View
A submenu displays a list of all Visual Studio toolbars, and check marks indicate all visible toolbars.
Select the Layout option.
The Layout toolbar appears, as shown in Figure 1-6. You can use this toolbar to access common formatting commands.
Here's how to create a form with aligned labels and buttons for accepting user input:
Draw three labels on the form and Stack the labels vertically.
Try not to align them.
Draw three text buttons on the form — again, without aligning them.
Hold down the Shift key and then click the three buttons to select them.
You have three options for selecting formatting controls:
Shift+click: Format all controls to conform with the first control selected.
Ctrl+click: Format all controls to conform with the last control selected.
Click and drag: Click the form and then drag a selection rectangle around all the controls you want to select.
Click the Make Same Size icon on the Layout toolbar.
The buttons are made the same size.
Click the Align Lefts icon on the Layout toolbar.
Align Lefts is the second icon on the toolbar. The buttons are aligned to the left.
Position the mouse pointer over the right side of the buttons. When the pointer turns to an arrow, drag your mouse to the right and left.
The buttons widen and narrow with the mouse movement.
Click the form to deselect the buttons.
Hold down the Shift key while you select the three label controls.
Choose Format
The labels are aligned to the right.
Position the pointer over the labels until it turns into a four-way arrow and drag the labels to the left to create space between the labels and buttons.
Tip
You can use the arrow keys on your keyboard to move the labels around on the form.
When you add a control to a form, Visual Studio provides visual cues, or snaplines, for positioning the control. Snaplines recommend the best position for the controls in accordance with spacing recommendations set in the official Microsoft UI guidelines. The snaplines appear while you drag controls around the form to let you know when the controls are at appropriate positions.
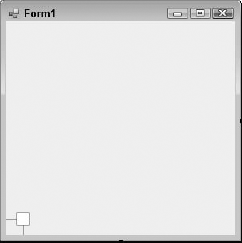
Drag a button control from the Visual Studio toolbox to the form design surface and don't release the button.
Move the mouse pointer to the lower-right corner of the form.
As you approach the corner, blue snaplines appear, as shown in Figure 1-7.
Drop the button on the form.
Drag a text box control to the form and don't release the text box.
Position the text box above the button and, when the snapline appears between the text box and the button, release the text box.
Snaplines are visible any time you move controls on the design surface. The space between the button control and the edge of the form is the sum of the button's margin property and the form's padding property. Margins define the exterior space between controls, and padding designates space between a control's interior border and its contents. You can set these properties yourself or use snaplines to do it for you. See the section "Using the Properties Window," later in this chapter, for more information on setting control properties.
Nothing's worse than when you press the Tab key in a Windows application, and the cursor jumps to an unexpected field. The tab order determines the order in which the Tab button moves from field to field on your form. To set the tab order, follow these steps:
Tip
Good tab order is essential to creating an application that provides a high-quality user experience and one that is easy for everyone to use. This article at http://msdn.microsoft.com/library/cb35a5fw.aspx describes how to create an accessible application.
Choose View
The controls on the page display numbers representing their tab order.
Click to select the controls in sequential order to set the tab order, as shown in Figure 1-8.
Repeat Step 1 to take the form out of tab-order selection mode.
To designate that a control shouldn't be tabbed to, set the control's TabStop property to False. Controls with the TabStop property set to False are skipped when the user presses Tab. Controls that aren't visible or enabled are also skipped when the user presses Tab.
To set a control as invisible or disabled, set the control's Visible and Enabled properties to False.
Tip
You can set a control's tab order by using the TabIndex property. (See the section "Using the Properties Window," later in this chapter, to see how to set a control's properties.)
Some of the controls you add to your form can walk you through simple task wizards by using smart tags. Smart tag-enabled controls have a little arrow in the upper-right corner of the control. When you click the arrow, a list of common tasks associated with the control appears. To see a smart tag-enabled control in action
Drag and drop a
CheckedListBoxcontrol onto the forms designer.Click the smart tag arrow to display a list of common tasks, as shown in Figure 1-9.
In the
CheckedListBoxTasks window, click Edit Items.From the String Collection Editor that appears, you can add items to the
CheckedListBoxcontrol.

The smart tags display a subset of tasks for the control. Use the control's Properties window to see all the tasks and properties available for the control.
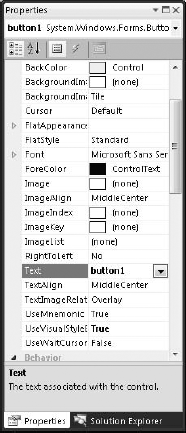
Every control has a set of properties and events that define how the control acts when your application runs. For example, the button control's Text property specifies the text that's displayed on the button. The button control has a Click event that's executed each time a user clicks the button.
The Visual Studio Properties window displays a control's properties and events in a grid, as shown in Figure 1-10.
The Properties window is open by default. If you close the Properties window at some point, you have two options for opening it again:
Choose View
Press F4
The Properties window has the following elements:
A drop-down list at the top displays the selected control. Use the list to select a control to view.
A toolbar changes the view settings. Your view-setting choices are, from left to right
Categorized: Properties appear in groups
Alphabetical: Properties are sorted in alphabetical order
Properties: The control's properties are displayed
Events: The control's events are displayed
Two columns display the name-value pairs of the control's properties or events, depending on the view setting.
A brief description of the selected property or event appears at the bottom of the window.
The Properties window is a visual tool that organizes and categorizes the thousands of properties and events available for manipulating controls. You use the Properties window for two tasks:
Set a control's properties.
Create event handlers for a control.
When you use the Properties window, Visual Studio generates the code to set the control's properties and create event handlers. You can do all these tasks by using code, although it's much easier to use Visual Studio. To read about how to set properties and work with events in code, see Book V, Chapter 4.
You can access thousands of properties and events by using the Properties window. Visual Studio groups properties and events into categories so that they're easier to manage. The following list describes the properties and events categories:
Action: Creates handlers for events, such asClickandScroll.Accessibility: Sets properties that make controls accessible to people with disabilities and makes the application easier to use for everyone.Appearance: Contains properties related to font, color, border, and cursor style. TheTextproperty and text-formatting properties are in this group.Behavior: Contains properties and events related to how a control acts. Examples includeSorted, TabStop, andSelectedIndexChanged.Data: Sets a control's data source, gets items selected in a control, and responds to changes in the data.Design: Contains design-time properties, such as whether controls are locked. TheNameproperty is here, too.DragDrop: Responds to events related to dragging and dropping controls.Focus: Captures events related to how the control gains and loses focus.Key: Responds to keyboard-related events.Layout: Sets layout properties, such as anchor, margin, and size.Mouse: Responds to mouse events, such asMouseUp.WindowStyle: Sets properties that define the Windows Form itself.
Within each control are properties that you can set. Here are some common properties that many controls share:
Name: Sets the identifier used to reference the control in code.Text: Sets the text displayed in the control.
Tip
To set the access key for a control, add an ampersand (&) in front of the letter to use as the access key in the Text property. For example, to set the letter P in Print as the access key, set the Text property for the control equal to &Print. A user can then press the Alt key in combination with the access key to execute the control.
Note
Windows Forms are controls. You access the properties of a Windows Forms control the same way you access the properties for any control. Here are the common properties for Windows Forms:
Text: Sets the text displayed on the form's title bar.DefaultButton: Sets the button that responds to the Enter key by default.CancelButton: Sets the button that responds to the Esc key by default.MainMenuStrip: Sets the primary menu control for the form.
In addition to the controls you use to customize your forms, you have events to consider. Events are actions that your application might handle or respond to. Examples of common events include
Tip
You can get context-sensitive help for any property or event you see in the Properties window by positioning your cursor in the value field for the property or event, and pressing F1.
Properties are expressed as name-value pairs. A property's value isn't always as simple as color=black. Values can be complex. You can use the selectors, wizards, and ellipses on the Visual Studio Properties page to dynamically build complex property values.
Examples of complex properties include properties related to
Setting data sources
Editing collections of items
Applying fonts and formatting
Selecting images and files
To set properties for a control on a Windows Form, follow these steps:
Click the control in the forms designer.
Press F4 to display the Properties window.
The control's name and type appear on the drop-down list at the top of the Properties window.
Click the Properties button on the Properties window's toolbar to display a list of the control's properties.
The Properties button is the third toolbar button from the left.
Scroll down the properties list and enter property values.
You can type simple property values or select them from a drop-down list. Click the ellipsis button for more complex properties, such as collections to display a dialog box that builds the property, as shown in Figure 1-11. Click the plus sign (+) next to compound properties to set individual properties.

The Visual Studio Properties window displays a control's events. For example, when a user clicks a button, the button's Click event occurs. You can use event handlers to write code that fires each time the event fires.
To set an event handler by using the Properties window, follow these steps:
Select a form's control by clicking the control.
In the Properties window, click the Events button to display the control's events.
To create an event handler by using a default name, either press Enter without typing a name or double-click the field for the name.
Tip
Double-click a control on the Windows Forms Designer to create the control's default event handler.
Type a name for the event handler next to the event and press Enter.
Visual Studio creates the event handler and opens the code editor to the event handler.
See Book V, Chapter 4 for more details about responding to events.