
This chapter focuses on Visual Web Developer, which is the Web development tool that comes with Visual Studio 2010. In this chapter, you see how to build Web applications using Visual Studio and the ASP.NET Web development platforms. You also discover the difference between server controls and HTML controls as well as how to add your own custom controls to your Web site.
To help you build Web applications, Microsoft offers a wide array of products. Among them are ASP.NET and Visual Studio, which are used to create enterprise Web sites featuring e-commerce and full-blown Web-based applications. ASP.NET Web sites use server-side code to do many things, from rendering dynamic content to accessing databases.
In addition to these high-end tools, Microsoft offers Web design and development tools for a range of sites and skill levels, all of which support Web design standards, such as Cascading Style Sheets (CSS), to work together seamlessly. The bigger picture of Microsoft tools looks something like this:
Visual Web Developer: The premiere Microsoft toolset for building ASP.NET Web sites is part of Visual Studio 2010.
Microsoft Expressions: This set of three products (Graphic Designer, Interactive Designer, and Web Designer) targets professionals who design Web sites.
SharePoint Designer: Because this tool for designing SharePoint sites is built on FrontPage (a program for creating HTML-based sites), SharePoint Designer can create the file-based sites of FrontPage. SharePoint Designer supports the limited development of ASP.NET Web sites.
The Microsoft Web design and development products recognize that building Web sites requires specialized skills. The person designing Web site graphics isn't usually the same person who's writing the site's data access procedures. Because the specialized tools "talk" to each other, Web designers, graphics designers, and developers can all work on different facets of the Web site without interfering with other areas or having to translate each other's work.
You can use Visual Web Developer for any of the following tasks:
Create and edit Web sites by using ASP.NET.
Design Web pages by using visual design tools.
Test your Web sites on your choice of Web servers, including the lightweight ASP.NET Development Server.
Use server-side ASP.NET controls for creating dynamic content.
Publish your Web site to a host server.
Use syntax-aware editors for HTML and server-side code.
Access data by using server-based controls and wizards.
Create a consistent "look and feel" for your Web sites by using themes and master pages.
Build Web sites that have sophisticated features, such as personalization, membership, and site navigation.
The following sections help you get acquainted with Visual Web Developer.
The ASP in ASP.NET stands for Active Server Pages. After people realized that using HTML to write Web pages by hand was a long and laborious chore, they figured out that they could replace static HTML content with server-side programs. For example, rather than write the same page header repeatedly, you can call a program on a server that magically spits out the page banner every time it's called. The ASP.NET code still generates HTML, but the developer doesn't have to write that common HTML in all the files.
Note
An ASP.NET Web site uses its own kind of Web pages. ASP.NET Web pages are different from plain old Web pages in the following ways:
Files end in
.aspxrather than the usual.htmor.htmlfor Web pages.Directives in the form of
<@ Page
attribute="value">set configuration attributes used by the compiler.
A form element in the following syntax
<form id="
formname" runat="server">is required on every ASP.NET Web page. The form control is responsible for intercepting a user's interaction with your Web page and sending it to the server for processing. But it does so differently than the standard HTML
<form>tag that it uses and its code-behind to add much more functionality.Note
Microsoft didn't invent the
formtag. Rather, theformtag is part of the HTML syntax and is often called a server form. Many server-side scripting languages, such as the Practical Extraction and Report Language (PERL) and Hypertext Preprocessor (PHP), are used with the form tag to respond to actions taken by someone using an HTML form. Microsoft invented therunat="server"attribute, which ASP.NET uses to build the form so that it can be sent to the browser.You can use Web server controls to invoke server-side programs. I discuss these special elements in the section "Benefitting from the battle of the server controls" later in this chapter.
You use the visual design tools in Visual Web Developer to drag and drop Web server controls on an ASP.NET Web page. Visual Studio then generates the code to make the controls work, and you write your own custom code that processes the controls when users interact with them in their browsers. Visual Studio packages all this code and creates a compiled computer program that's executed whenever a user requests the page.
ASP.NET Web sites are hosted on the Microsoft Internet Information Services (IIS) Web server. The server intercepts all ASP.NET requests and passes the requests to ASP.NET for processing. The IIS Web server identifies an ASP.NET request from a plain old HTML request because ASP.NET Web pages use the .aspx file extension.
Note
When you use Visual Studio to run an ASP.NET Web site, Visual Studio compiles the pages. When you deploy your Web site to an IIS Web server, the files are copied as-is, and ASP.NET takes over the process of compiling the code for you. You can force Visual Studio to compile the code before you deploy it to IIS. See Book VI, Chapter 2 for more information about deploying ASP.NET Web sites.
Any time a user requests an ASP.NET Web page in her browser, a program runs on the Web server to deliver the page. When the user performs an action on the page, such as clicking a button to submit information, the page sends a request back to the server. The process of sending data back to the server is a postback.
The postback calls the same ASP.NET Web page that the user interacted with. The data the user entered into the browser is passed to the ASP.NET Web page's server-side code for processing. The server-side code customarily sends back a confirmation message to the user indicating whether the data was successfully processed.
Tip
A postback is also referred to as a round trip because data flows from the browser to the server and back to the browser each time the user performs an action on the page. For more information about writing the server-side code that responds to a postback in an ASP.NET Web page, see Book V, Chapter 4.
Note
You can avoid postbacks in many cases. You can use validation controls, which inject script into the HTML to perform the validation tasks without a postback. AJAX adds even more functionality on the client side, thus avoiding even more postbacks.
You can use the Visual Web Developer in Visual Studio to create different kinds of Web sites, depending on where you want to work with the site's content and the kind of Web server you want to use for testing. Here are the four kinds of sites you can create with Visual Studio:
File system: Store your Web site's files in a folder on your local hard drive and use the Visual Studio built-in Web server for testing.
Local IIS: Create a Web site on your local machine by using IIS as your Web server. Visual Studio creates the Web site in IIS for you.
Remote server: Access an IIS Web server on a different computer by using the HTTP protocol.
FTP: Access a Web server on a different computer by using the File Transfer Protocol (FTP). You typically use FTP when you access a site hosted on a third-party server.
Note that the kind of Web site you create doesn't determine how you choose to deploy it. That is, you can create a file system Web site and then later deploy it to an IIS server by using FTP. For more information on deployment options, see Book VI, Chapter 2.
Working with a file system Web site is generally much easier than working with any of the other configurations. If more than one developer is working on a single Web site, you might need to use one of the other approaches. For more information about team development and source code control, see Book VI, Chapter 3.
Creating a Web site in Visual Studio is the easy part of building a Web application. Choosing the content that goes into your Web application is a little trickier. When you create a Web site, Visual Studio does all the work for you. Visual Studio creates the folder structure and configuration files necessary to run the Web site. Here's what ASP.NET does when it creates a Web site:
Creates a folder structure on your local computer for managing the Web site's files
Provisions the project to the specified Web server
Creates a new Web Forms page named
default.aspxCreates a code-behind file (the code that provides the functionality to the presentation layer) for writing server-side code for the forms page named
default.aspx.vbAdds an
App_Datafolder for storing data-related filesCreates a
web.configfile for storing Web site configuration information
This book describes folder-based systems exclusively because they're easy to work with.
To create a new folder-based Web site, follow these steps:
Choose File

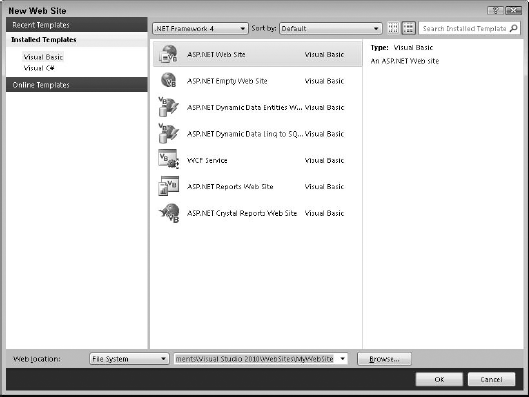
The New Web Site dialog box appears.
Click the ASP.NET Web Site template.
The default location for a new Web site is the file system.
Accept the default location and enter a name, such as MyWebSite, after the pathname, as shown in Figure 4-1.
Leave the language set to Visual Basic.
Click OK to create the ASP.NET Web site.
The default.aspx page opens in Design view.
An ASP.NET Web page is a combination of HTML markup elements and ASP.NET syntax. The runat="server" attribute is an example of ASP.NET syntax that tells the ASP.NET compiler to process tags differently. Any plain-text or HTML tags are rendered to the browser exactly as they appear on the Web page. You use the Source view of an ASP.NET page to view its syntax. To view the default.aspx page in Source view, click the Source tab at the bottom of the Document Explorer, as shown in Figure 4-2.
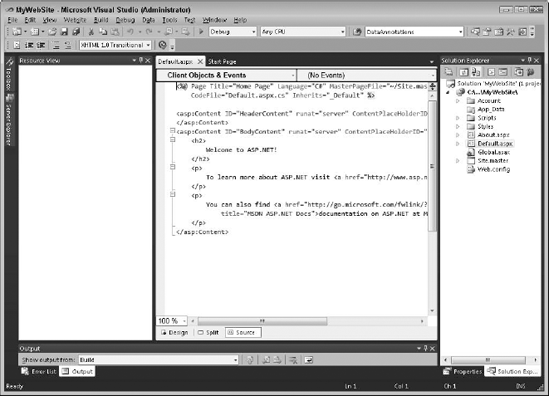
Notice the markup elements displayed in Source view:
The
<%@ Page . . . %>directive at the top of the page provides additional configuration information for the ASP.NET compiler.The
<!DOCTYPE . . . >entry tells the client's Internet browser that the page complies with the XHTML standard.Tip
If you don't care about this standard, you can safely delete this line.
Familiar HTML tags, such
as <html>and<head>, are used.The
runat="server"attribute is used on the<head>and<form>tags.
The syntax you see displayed in Figure 4-2 appears in every Web page you add to your project. You drag and drop controls from the toolbox onto the Web page's Design view, as described in the next section. As you add controls to the page, ASP.NET syntax appears in the page's Source view.
Tip
You can use the View menu to access the Web page's Source and Design views.
The Web page that's added to a newly created ASP.NET Web site is blank. To make the page meaningful, you must fill it with content, such as
Text boxes, labels, and buttons
Plain text in paragraphs or lists
Images and animations
Tables displaying data and forms that allow users to enter and interact with data
You have several options for adding content to your Web page. If you know the ASP.NET syntax for building ASP.NET Web pages, you can just open any text editor and start adding content. But most people prefer to use Design view in Visual Studio to add content so that they can see how the content they're adding appears on the page as they go.
Drag and drop the controls on the visual design surface.
Set the properties that determine attributes, such as appearance and function.
Specify what happens (if anything) when a user interacts with a control by either using a wizard to build the code or writing the code manually.
Suppose that you want to create a simple Web form page that displays the text Hello World! when a user clicks a button. To add the content to the default.aspx Web page that you can see how to create in the preceding section, follow these steps:
In Design view of the default.aspx page, drag and drop a Label control from the Toolbox task pane.
Tip
If the toolbox isn't visible, press Ctrl+Alt+X.
Drag and drop a Button control on the designer surface.
A button appears on the page.
Press Ctrl+F5 to run the Web page.
The Web page that appears has a label and a button. If you click the button, however, it doesn't do anything. To display Hello World!, you have to finish setting the controls' properties and configuring the button to work.
Note
ASP.NET projects that use the File System for deployment execute using the ASP.NET Development Server. When you run a Web page from Visual Studio, the ASP.NET Development Server executes and loads the Web page in your browser. A text balloon appears in the Notification Area displaying the URL of your Web page. The ASP.NET Development Server also displays an icon in the Notification Area. You can stop this service by right-clicking this icon and choosing Stop from the contextual menu.
To set the controls' properties, follow these steps:
In Design view, press F4 to open the Properties window.
Click the Label control in the designer to display the label's properties in the Properties window.
The Properties window lists properties on the left and their corresponding values on the right.
Locate the Text property and then set the value to Blank by deleting the contents.
Locate the ID property and name it
lblMessage.
Repeat these steps to set the button's Text property to Show Message, and its ID to btnDoIt. The Text property specifies the text that appears on the page.
Adding the code to make the button work requires you to work in Code view on the page. Although you can type the code directly in the Code Editor, it's easier to start in Design view and let Visual Studio write some of the hookup code for you. Follow these steps:
In Design view, double-click the button you placed on the designer.
The Code Editor appears. Double-clicking any control in the designer creates a block of code that's linked to the default event handler for that control. In the case of a button, the default event handler is the
Clickevent. The code that's typed in the code block is executed every time the button is clicked. Visual Studio automatically places the insertion point in thebtnDoIt_Click()method. For more information on event handlers, see Book III, Chapter 4.In the Code Editor, type this line:
VB
lblMessage.Text = "Hello World!"
C#
lblMessage.Text = "Hello World!";
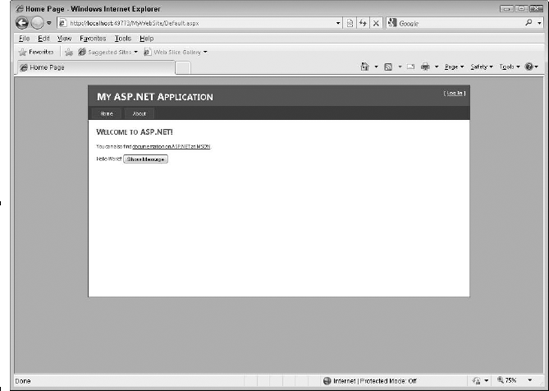
Press Ctrl+F5 to run the Web page.
When the Web page appears, click the button.
The statement
Hello World!appears on the page, as shown in Figure 4-3.
Note
You can download the complete program (both C# and VB versions) for this example from the companion Web site for this book at www.dummies.com/go/vs2010.
Note
Some of you may be thinking that something mysterious happens with ASP.NET applications. If you choose View Source from the browser's contextual menu, though, you'll see that the output of the ASP.NET application is common HTML. Yes, you write your code in a combination of HTML and C# or VB, but the output is simple HTML.
As described in the "Creating Web Sites" section in this chapter, creating a Web site using Visual Studio is easy. The hard part is figuring out what content to add. Luckily for you, Visual Studio lets you add all kinds of content to your Web pages and Web site, and you have a ton of different ways to view and edit your Web pages.
Adding new pages involves more than just adding Web pages. You can use Visual Studio to add these elements:
Web pages: ASP.NET Web forms, Web services, mobile Web forms, user controls, and plain old HTML files, for example
Web pages for mobile Web sites: Mobile Web forms and user controls, for example
Files to control the look and feel of your Web site: Master pages, site maps, skin files, and CSS, for example
Files for managing data: XML files, class files, and datasets, for example
Use the Add New Item dialog box to add new content to your Web site. You can open this dialog box in two ways:
Right-click the project folder in Solution Explorer and choose Add New Item.
Choose Web Site
You can add items that you already created by choosing the Add Existing Items option. Many of these items, such as the datasets, are displayed in their own designers. You don't have to write everything from scratch.
To add a new Web page to an existing Web site, follow these steps:
Choose Website
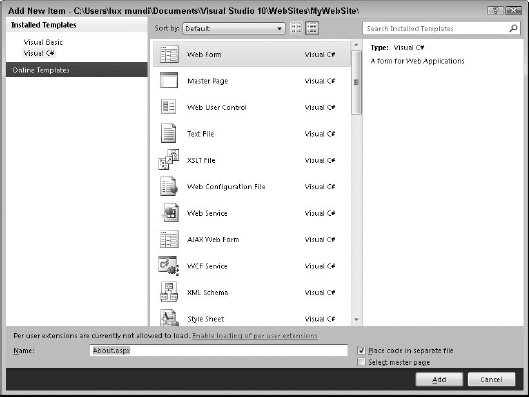
The Add New Item dialog box, shown in Figure 4-4, appears.
Click the Web Form template.
Enter the name
About.aspxand leave the language as Visual Basic.Leave the Place Code in Separate File check box selected and the Select Master Page check box deselected.
The Place Code in Separate File option places all your program code in a separate, code-behind file. Master pages are used to control the look and feel of your Web pages. See Book IV, Chapter 6 for more information about using master pages.
Click Add.
A new ASP.NET Web page is added to your Web site. The page opens in Design view so that you can add content. See Book IV, Chapter 6 for more information on site navigation and linking to Web pages.
You can add empty folders for organizing your content. ASP.NET Web sites use several reserved folders, which you can add to your site at any time:
App_Browsers:Stores browser definition files, which are used to tell ASP.NET how to render markup for certain kinds of browsers, such as on mobile devicesApp_Code:Contains source code for class libraries, helper utilities, and business objectsApp_Data:Stores data files, including a local database for managing Web site membership and rolesApp_GlobalResourcesandApp_LocalResources:Contains resource files used for translating page content into other languagesTheme:Stores all your skins, CSS, images, and other "look and feel" filesApp_WebReferences:Contains files for Web servicesBin:Stores compiled assemblies that you want to use in your Web site
You can add any of these folders by either choosing Website
ASP.NET provides several different kinds of controls you can use on your Web pages. You use controls to display dynamic content on your Web page. ASP.NET writes all the plumbing code that renders your content and passes a user's response back to the server for you to process.
ASP.NET provides these kinds of server controls:
Web server: Simple controls (such as a label or text box) and complex controls (such as calendars and menus)
HTML server: Simple HTML elements that you expose for server-side coding
Validation: A special kind of Web server control that validates the input of other Web server controls
User: A custom control you create by using ASP.NET markup elements that can be embedded in a Web page
Server controls have many similarities. All of them
Have the
runat="server"attribute in their markup code.Must be placed inside an ASP.NET Web page in order to execute.
Are accessible from server-side code, which means that you can write a program to manipulate the controls.
Have events.
Have properties that set their behavior at run-time.
Must reside within the form control. (Each page can have only one.)
Are rendered on the browser as a combination of plain HTML and JavaScript.
You can access all these server controls, except user controls, from the toolbox. You add user controls by using Solution Explorer. You can place other kinds of controls in a user control to create a composite control.
The ASP.NET syntax for Web server controls looks similar to HTML markup syntax. Like with HTML, ASP.NET syntax uses tags with attribute/value pairs. The markup for a Web server button control looks like this:
<asp:Button ID="Button1" runat="server" Text="Button" />
You can add attributes to the markup code by either typing them directly in Source view of the Web page or by using the Properties window. The attributes specified in the markup code are properties of the Web server control, not HTML attributes. Some properties are mapped to HTML attributes. ASP.NET uses the collection of properties to determine how best to render the markup in a browser.
The markup code for an HTML server control looks like this:
<input id="Button2" type="button" value="button" runat="server" />
All server-side controls have these markup elements:
IDattribute: Tells the server-side code how to access the controlRunatattribute: Flags the control as a server-side control
Notice that the tags are a little different for Web server controls and HTML server controls. Web server control tags start with asp: and then the name of the control — for example, asp:button and asp:textbox. HTML server controls use HTML syntax, such as <input> and <div>. You can convert any HTML element to a server control by simply adding the runat attribute to the markup.
Note
Server controls provided by ASP.NET use the tag prefix asp. Custom server controls created by you or a third party use the tag prefix defined for the custom server control. The tag prefix maps the control to the control's namespace. The namespace tells ASP.NET where to find the code that defines how the control works. Tag prefixes are defined by using a Register directive at the top of each Web page that uses the control. Alternatively, you can place the prefix information in the Web site's configuration file so that all pages in the site can use the custom server control.
All server controls must be contained within the <form> element on the Web page.
At first blush, HTML server controls and Web server controls look similar. They have some differences, however, as Table 4-1 illustrates.
Table 4-1. Comparison of HTML Server Controls and Web Server Controls
HTML Server Controls | Web Server Controls |
|---|---|
Map almost one-to-one to HTML elements | Render to a single HTML element or a combination of elements |
Are client-side by default | Server-side only |
Properties mapped to HTML attributes | Properties aren't mapped directly to HTML attributes |
Customized using CSS | Customized using CSS or templates |
Don't support themes | Support themes |
Here are some examples of Web server controls:
Label, TextBox, andButtonLinkButton, ImageButton, andHyperLinkTreeViewandSiteMapPath
To add an HTML control to a Web page and convert it to a server control, follow these steps:
Click the plus sign (+) next to the HTML tab in the toolbox to expand the list of HTML controls.
If the toolbox isn't displayed, press Ctrl+Alt+X to open it.
Drag an
Input (Button)control to the design surface and drop it.The image of a button appears.
Edit the markup code with the
runatproperty set toserver"as follows:<input id="Button1" type="button" value="button" runat="server"/></p>
All the events captured for this control are now server-side. Double-click the button's image to display a server-side code block, where you can enter server-side code for the button's Click event.
To convert the HTML control back to a regular control, you can remove the runat property from the control's markup in Source view.
Note
Unless you plan to use server-side resources, you should always use plain HTML elements. Server-side controls use more resources than client-side controls. You should also consider whether you can deliver functionality in a client-side script rather than use server-side code. By using a client-side script, you eliminate a round trip back to the server. (For a little background on round trips and postbacks, see the earlier section "Understanding how ASP.NET pages are served.")
For example, you can easily create a Hello World! example by using a client-side script. Follow these steps:
Add a paragraph element to your Web page by typing the following code in Source view on the Web page:
<p id="output" style="color: Red; font-weight: bold"></p>
Drag and drop an Input (Button) control in Design view on the page by using the HTML tab in the toolbox.
Enter Show Message in the
Valueproperty on the Properties window.If the Properties window isn't displayed, press F4.
Double-click the image of the Input button.
A JavaScript code block appears in Source view on the page. (JavaScript is a client-side scripting language.)
Type this code in the JavaScript code block:
document.getElementById("output").innerHTML = "Hello World!";Press Ctrl+F5 to run the Web site.
The Web site appears in your browser.
Press the button.
The phrase
Hello World!appears on the page replacing the button.
Note
You can find a link to a simple page demonstrating the JavaScript for the preceding example at the companion Web site for this book at www.dummies.com/go/vs2010.
Note
This code sample uses the innerHTML property of the paragraph element. (This property was used for brevity.) The appropriate way to modify page content dynamically is to access the node and modify it by using the Document Object Model (DOM). The benefit of using innerHTML is that you can easily understand what this code is doing. The downside is that because the property isn't universal and doesn't provide a reference to the node in question, accessing the node again by using client-side code is impossible.
In the earlier "Adding Content" section, this chapter uses a Web server button control. How do you know when to choose an HTML input button and when to choose a Web server button control? Here are a couple of reasons to choose HTML input button controls instead of Web server button controls:
HTML server controls provide more control over the HTML markup that's rendered in the browser. You can also control the markup of Web server controls by using a template, but it requires more work than using HTML server controls.
HTML server controls are easier for non-Visual Studio users to understand. This information is especially valuable if you're working with Web designers who provide you with CSS because the designers may not understand how to provide styles for Web server controls.
On the other hand, here are some reasons to choose Web server button controls instead of HTML input button controls:
You want access to more properties than are available with a typical HTML element.
You don't want to take the extra step of converting the controls to server-side, like you do with HTML server controls. By default, Web server controls are server-side.
You want to take advantage of device filters and browser definition files.
Visual Studio provides more visual design support for Web server controls than for HTML server controls. If you want to rely on HTML server controls, why use ASP.NET? Many Web developers use Web server controls almost exclusively, except for the two generic HTML tags div and span.
Note
You can also use a Label Web server control to display messages. Label controls are rendered as HTML span tags. The span tag is a generic inline container for use inside block-level containers, such as div tags and paragraph <p> tags. Because messages are usually rendered at the block level, some folks prefer to use div tags. If you plan to display a message inside a block tag, such as a paragraph tag, you can choose a Label control. In reality, most browsers aren't affected if your div and span tags are improperly nested. It matters only if you're a purist.
For an in-depth discussion of additional Web server controls, see Book IV, Chapter 6. It describes site navigation controls and hyperlinking mechanisms for transitioning between Web pages.
I cover login controls in Book IV, Chapter 6 and data controls in Book V, Chapter 2.
Sometimes, you want to create a reusable control that doesn't already exist in the Visual Studio toolbox. You can choose from two types:
User: Create this type of control with the same tools you use to build Web pages. Like other controls, user controls are contained within an ASP.NET Web page.
Custom: Build your own, custom control and add it to the Visual Studio toolbox. Writing a custom control requires some programming expertise.
User controls are similar to ASP.NET Web pages because you can include HTML and server-side code in a single file. Unlike Web pages, user controls
End in the file extension
.ascxUse the
@ Controldirective, rather than@ PageMust be hosted as part of an ASP.NET Web page
Don't include host page elements, such as
html, body, andform
In previous versions of Visual Studio, user controls were used extensively as a means of providing page templates. For example, you would create header and footer user controls on each of your Web pages. That's no longer necessary with master pages.
This doesn't imply that user controls are no longer valuable. You can use a user control any time you want to encapsulate a group of controls and make them reusable. For example, you could create a user control for displaying calendar controls.
To create this user control in an existing Web site, follow these steps:
Right-click the Web site's project folder in Solution Explorer and then choose Add New Item from the contextual menu.
The Add New Item dialog box appears.
Click the Web User Control icon.
Give the user control the name
calendar.ascxand then choose Visual Basic as the language and click Add.Drag the control from Solution Explorer onto your Web Form.
Visual Studio opens the user control in Design view.
To add your user control to an existing Web page, drag the calendar.ascx file from Solution Explorer and drop it on Design view of the Web page. Visual Studio adds the following markup to your Web page:
At the top of the page, you see
<%@ Register src="calendar.ascx" TagName="calendar" TagPrefix="uc1" %>
In the page content, you see
<uc1:calendar ID="Calendar1" runat="server" />
Note
This example shows a tag prefix being used for a custom control, as described in the earlier section "The syntax." The Register directive specifies the name of the control (calendar, in this case) and the tag prefix. To use the control on the page, the syntax references the custom control's tag prefix, uc1, and places the control's name after the colon. In this example, the control isn't mapped to a namespace. Instead, the control is mapped to the user control file using the attribute Src="calendar.ascx". That's how ASP.NET knows where to find the control when it processes the control on the page.
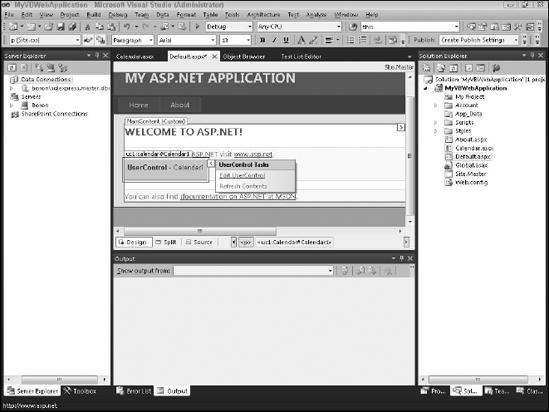
In Design view of the Web page, the user control is displayed with a placeholder box until content is added to the user control. To open the user control for editing, follow these steps:
In Design view of the Web page, click the smart tag arrow on the user control.
The UserControl Tasks list appears.
Click the Edit UserControl link, as shown in Figure 4-5.
The user control opens for editing.
A user control is blank when you first create it. You add controls to newly created controls. Adding controls to a user control is similar to adding controls to a Web page. You simply drag and drop controls from the toolbox onto the design surface.
One control that you can't use on a user control is the <form> server control. User controls, like all server controls, are hosted in Web forms. You can't call a user control as a normal HTML element. Web forms can have only one <form> server control. You place your user control inside the <form> server control on the page where you want to display your user control.
Warning
If you happen to place a <form> server control in a user control, you don't receive an error message until you execute the page where the user control is hosted.
The following example demonstrates how to create a user control — specifically, a specialized calendar control that displays the preceding, current, and following months. This user control encapsulates the controls and code that make the calendars work so that you can reuse the control without having to customize the code each time.
Follow these steps to create the calendar user control:
Drag and drop a calendar control from the toolbox to Design view of the user control.
You can press Ctrl+Alt+X to display the toolbox.
Add two more calendar controls by repeating Step 1 or copying and pasting the markup code in Source view.
You should have three calendar controls:
Calendar1, Calendar2, andCalendar3.Position your controls so that
Calendar2is betweenCalendar1andCalendar3.On
Calendar1andCalendar3, use the Properties window to set theShowNextPrevMonthproperty tofalse. Set theSelectionModeproperty toNone.Press F4 to open the Properties window if it's closed.
With the user control displayed in Design view, double-click a blank area of the designer.
Visual Studio opens the Code Editor and positions your cursor inside a code block for the
Page_Loadevent.The
Page_Loadevent is called when the user control is loaded.In the
Page_Loadcode block, enter this code:VB
If (Not Page.IsPostBack = True) Then
   Me.Calendar2.VisibleDate = System.DateTime.Today
   Me.Calendar1.VisibleDate = Me.Calendar1.TodaysDate.AddMonths(−1)
   Me.Calendar3.VisibleDate = Me.Calendar1.TodaysDate.AddMonths(1)
End If
C#
if( !IsPostBack )
{
   Calendar2.VisibleDate = System.DateTime.Today;
   Calendar1.VisibleDate = Calendar1.TodaysDate.AddMonths(−1);
   Calendar3.VisibleDate = Calendar1.TodaysDate.AddMonths(1);
}
Tip
If you want to test whether your code is working, press Ctrl+F5 to run your Web site.
In Design view of the user control, click
Calendar2and then press F4 to display the Properties window for that control.Click the Events button on the Properties window toolbar.
The Events button looks like a lightning bolt.
Double-click the
VisibleMonthChangedevent.Visual Studio creates an event handler and opens the Code Editor for you.
Type these two lines of code:
Me.Calendar1.VisibleDate = Me.Calendar2.VisibleDate.AddMonths(−1)
Me.Calendar3.VisibleDate = Me.Calendar2.VisibleDate.AddMonths(1)
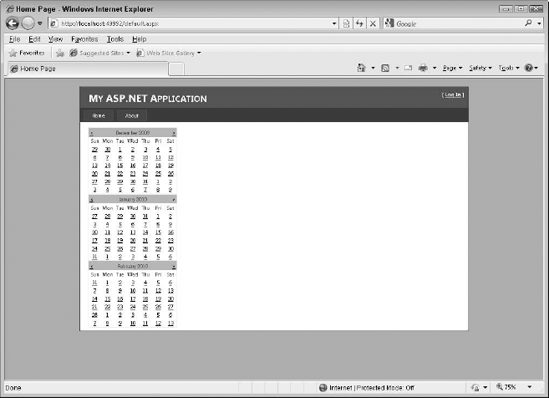
Press Ctrl+F5 to run your Web site.
Your Web page displays the user control with three calendars, as shown in Figure 4-6. As you navigate with the middle control, the other controls are updated, too.
You can use one of several views to edit ASP.NET Web pages in Visual Studio 2010:
Design view: The
default.aspxpage is opened in Design view by default. Design view is a WYSIWYG visual designer in which you can build your Web page by typing content or dragging and dropping controls on the design surface.Source view: You can view and edit the underlying HTML markup that's used to build the Web page.
Code view: Display the programming language editor associated with that Web page.
Component Designer view: Create a visual design surface for nonvisual components.
Source view in Visual Web Developer displays the HTML markup and ASP.NET syntax used to create the Web page or user control. You use Source view to edit HTML markup and ASP.NET syntax.
You can display Source view of a Web page in one of three ways:
Click the Source tab at the bottom of the Document Explorer on the Web page.
Choose View
Right-click the Web page in Solution Explorer and choose View Markup from the contextual menu.
Source view automatically displays the HTML Source Editing toolbar. It has several commands for formatting the markup and has these two additional validator commands:
Target Schema for Validation: Use this drop-down list to specify whether Visual Studio should use XHTML 1.x, HTML 1.0, or a version of Internet Explorer in validating the Web page's markup.
Check Page for Accessibility: The accessibility validator uses a number of accessibility standards to determine whether people with disabilities can use assistive technologies with your page.
Run the validator commands if you want to ensure that your page conforms to industry standards.
When you run your ASP.NET Web page, the content that's sent to the browser isn't what you see in Source view in Visual Studio. Rather, the ASP.NET syntax is converted to HTML.
In this example, the ASP.NET syntax is cleaner than the HTML. Part of the reason is the view state values you see in the HTML. The view state values are shown in the long sequence of characters and represent data stored on the page. View state is added by ASP.NET. In the case of simple HTML elements, such as labels and text boxes, ASP.NET syntax isn't much simpler than HTML. The real difference between HTML and ASP.NET shows up when you use more complex display structures, such as tables. For example, the GridView control requires a few lines of ASP.NET syntax and is rendered as a table created by using numerous lines of HTML.
See Book IV, Chapter 7 for information about the view state.
Notice a couple of characteristics about the comparison:
ASP.NET directives, such as
@Page, aren't present in the output.Any HTML markup with the
runat="server"attribute is converted to HTML.
For example, this line
<form id="form1" runat="server">
is converted to this one:
<form name="form1" method="post" action="default.aspx" id="form1">
The <form> tag is special because it designates which controls the users of your Web page can interact with. When you add controls to your Web page by using Design view, the markup necessary to build those controls is placed inside the <form> tag.
Source view is a syntax-aware editor that you can use to write or edit HTML and ASP.NET syntax. For example, to add a new hyperlink to your Web page, follow these steps:
Type an opening tag bracket (<).
A list of valid HTML and ASP tags appears.
Press the down-arrow key to highlight the
atag and then press Tab.Press the spacebar to display a drop-down list of valid attributes.
Select the
hrefattribute.To do so, press either the down-arrow key or the letter h. When the
hrefattribute is displayed, press Tab to select it.When the list of available Web pages appears, type "
http://www.cnn.com" (with the double quotation marks).You can also use the Pick URL option to pick a URL.
Type the closing tag bracket (>).
Visual Studio fills in the closing tag for you.
You can also add new attribute/value pairs to existing HTML and ASP.NET tags by pressing the spacebar inside any of the tags.
Visual Studio takes care of much of the task of writing code for you. ASP.NET has two coding styles:
Inline: Code is written in Source view by using script tags.
Code-behind: All code is maintained in a separate file.
The default approach uses the code-behind style. The code-behind file is divided into two files:
One file, generated automatically by Visual Studio, contains all the code generated by Visual Studio to handle the controls you place on the screen and wires up the events you write code for.
You view the other file when you click in Code view. This file contains all the code you write.
When you run your Web site, the code from these two files is combined.
Note
Earlier versions of ASP.NET had only one code-behind file. This single code-behind file contained all the code generated by Visual Studio and the code written by the developer. Microsoft changed this model into two separate files to keep the code clean and prevent developers from being confused by the generated code. The feature that enables the code to be split into two files is partial classes. Together, the files create a class, which is a unit of a program. Partial classes make it possible to split a single class across two files. Partial classes are intended for use with code-generation tools. As a rule, you shouldn't create your own partial classes. You can read more about using classes to organize your code in Book III, Chapter 3.
Warning
You shouldn't change the code generated by Visual Studio. Any changes you make will likely be overwritten when the file is regenerated. It's okay to open the generated file from Solution Explorer and view its contents. But you shouldn't add or edit the code.
You need to run your Web site from time to time while you're developing to make sure that it's working properly. If you're working mostly with the visual Design view, you shouldn't have many problems. You can run your Web site in one of two modes:
Debug mode: Provides detailed information about errors you might encounter in running your Web site. Most developers execute their Web sites in Debug mode while they're actively developing their sites.
Release mode: After a site is ready to be deployed, its developer usually switches it from Debug mode to Release mode because the site runs faster in Release mode. However, the process halts when an error is encountered, and you don't get much useful feedback.
Most of the sample code in this book uses Release mode because it has less overhead. The downside is that you don't get good feedback when errors occur.
To start your Web site without debugging, press Ctrl+F5. To start it with debugging turned on, press F5. You can also use Debug menu commands for starting your Web site.
Debugging a Web site can be overwhelming — even professionals get hung up. For more information about using and configuring the debugger, see Book III, Chapter 7.
A starter kit is a fully functional Web site that you can open and customize to suit your needs. Visual Studio 2010 includes a Personal Web Site starter kit. Starter kits are listed alongside other project templates in the New Web Site dialog box.
You can download additional starter kits from the Downloads page from the ASP.NET site, www.asp.net.
Microsoft adds starter kits regularly. Here are some available starter kits:
Club Site: A Web site for a club or organization
Time Tracker: A Web site for tracking hours spent on a project
PayPal-enabled eCommerce: A site for getting started with PayPal
DotNetNuke: A good way to get started with DotNetNuke, which is a Web application framework for creating and deploying Web sites