Installing SQL Server 2008 Express Edition
Configuring the Adventure Works sample database
Creating scripts in database projects
Creating stored procedures in SQL Server projects
Using Visual Database Tools
Most useful programs require some kind of data storage. Often, that's a database program like Microsoft SQL Server. SQL Server 2008 is the latest release of the popular database program and ships with Visual Studio 2010.
This chapter shows you how to install SQL Server 2008 and how to use Visual Studio to create and manage database objects.
SQL Server 2008 is the latest version of the popular Microsoft database management system. Each edition of Visual Studio includes a license for one of the editions of SQL Server 2008. Table 6-1 lists the editions of SQL Server and describes how to get the program.
Table 6-1. SQL Server Editions
SQL Server Version | When to Use It | How to Get It |
|---|---|---|
Enterprise Edition | In large companies | Purchase separately; retail price $24,999 |
Standard Edition | In small- and medium-size businesses | Purchase separately; retail price $5,999 |
Workgroup Edition | In departments or branch offices | Purchase separately; retail price $3,899 |
For prototypes or local development | Free download from Microsoft Web site; included with all Visual Studio Express Editions and Visual Studio Standard Editions | |
Developer Edition | For prototypes or local development | Included with Professional, Tools for Office, and Team Editions of Visual Studio |
Compact Edition | In a database for mobile devices | Free download from Microsoft Web site |
Web Edition | For Web hosters and end customers deploying publicly-facing web Applications | $15 per process per month |
Tip
Get more information about each of the SQL Server 2008 editions, including pricing and product comparisons, on Microsoft's SQL Server portal at
http://www.microsoft.com/sqlserver/2008/en/us/pricing.aspx
You can download SQL Server Express Edition and Mobile Edition from the portal at http://www.microsoft.com/downloads/details.aspx?FamilyID=220549b5-0b07-4448-8848-dcc397514b41.
Most developers use one of these two editions of SQL Server:
Express Edition is free to use and redistribute. Express Edition replaces Microsoft SQL Server 2000 Desktop Engine (MSDE), the lightweight SQL Server 2000 database. You can include a local copy of a database in your application and freely distribute Express Edition with your application. You can easily use Express Edition as the database for a small Web site, for example. The size of Express Edition databases is limited to 4GB. Express Edition is also a good choice for developers who don't want or need the overhead of Developer Edition.
Developer Edition is a fully functioning version of SQL Server 2008 Enterprise Edition. A Developer Edition license restricts you to using the product only in development and testing environments. Developer Edition is a good choice for consultants and corporate developers who may need to access complex databases.
Tip
Unless you know that you need the features of Developer Edition, start out with Express Edition and then upgrade if you need it.
The examples in this book use SQL Server Express Edition; many developers always install Developer Edition. SQL Server 2008 Express Edition is installed by default with Visual Studio 2010. However, you'll likely want to install SQL Server 2008 Express Edition with Advanced Tools so that you can use the SQL Server Management Console to configure your databases.
SQL Server 2008 Express Edition with Advanced Tools is installed separately from Visual Studio 2010.
Tip
Install Visual Studio 2010 first and then install SQL Server 2008 Express Edition. Express Edition requires version 3.5 of the .NET Framework, which is installed as part of the SQL Server 2008 installation.
Preparing your machine to install SQL Server requires many steps. Your installation steps depend on the services and components you choose to install.
Follow these steps to install SQL Server Express Edition:
Install Visual Studio 2010 or version 3.5 of the .NET Framework.
See Book II, Chapter 1 for more information about installing Visual Studio 2010 Professional.
Launch the SQL Server Express Edition setup by running the installer setup file.
The Start page appears.
Before installing SQL Server, review the hardware and software requirements and read the release notes.
The hardware and software requirements include instructions for accessing the Books Online documentation, where you can find complete installation instructions.
After reviewing the installation documentation, click the link to install the server.
The Setup Support Rules page appears as shown in Figure 6-1. Correct any errors that appear and click OK.
The wizard checks for hardware and software requirements.
Enter the product key and click Next.
The wizard displays the License Terms.
Accept the License Terms and click Next.
Click Install.
The wizard installs the prerequisites.
Click Next.
The wizard displays the Feature Selection page.
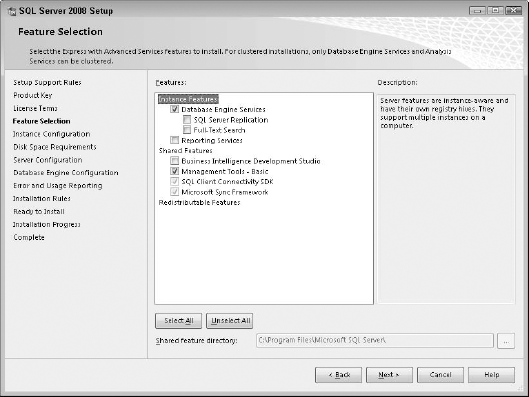
Select the features you want to install, as shown in Figure 6-2.
The components you can choose to install include
At a minimum, you should choose to install Database Engine Services and Shared Features. The remaining services allow you to create specialized database applications. You should install them as you need them.
Tip
Unless you need the more advanced features of Developer Edition, you may find that Express Edition works fine. You can download SQL Server 2008 Express Edition with Advanced Services at
http://msdn2.microsoft.com/en-us/express/bb410792.aspx
Click Next.
The Disk Space Requirements page appears.
Click Next.
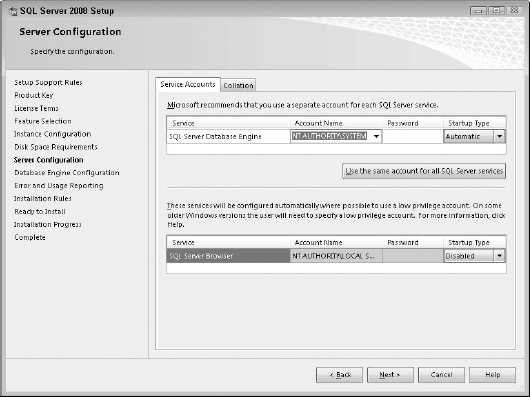
The Server configuration page appears.
Select the account name to use for SQL Server, as shown in Figure 6-3, and click Next.
The Database Engine Configuration page appears.
Click Next.
Click Next.
The Installation Rules page appears.
Click Next.
The Ready to Install page appears. Here, you can review the features of SQL server you're installing.
Click Install to begin the installation.

Tip
Use the Add or Remove Programs utility in Windows Control Panel to add components to, or remove them from, your SQL Server installation.
Tip
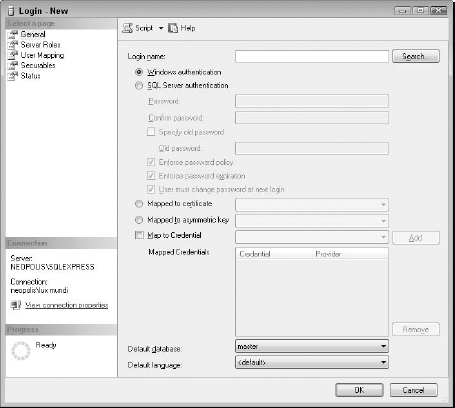
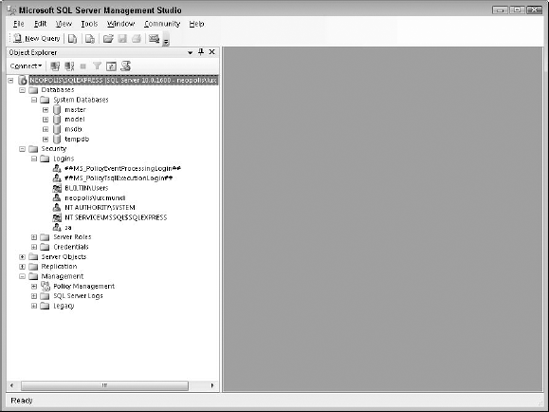
To add users that will have adequate rights and permissions to administer SQL server, you can run the Microsoft SQL Server Management Studio that was installed with SQL Server 2008. To add a new select the Security node in the tree view on the left side of the window, select the Logins node. Right-click this node and choose New Login from the contextual menu that appears. The New Login dialog box, shown in Figure 6-4, appears.
SQL Server 2008 includes many helpful tools for working with databases. These tools include
If you decide to use SQL Server 2008 Express Edition, you need to install some additional tools to make your life easier. You should install the following tools:
You can download the Adventure Works sample database at the Microsoft Codeplex download page for SQL Server 2008 Product Samples at
http://msftdbprodsamples.codeplex.com/releases/view/24854
You can download Books Online for SQL Server 2008 from Microsoft at
http://www.microsoft.com/downloads/details.aspx?FamilyId=765433F7-0983-4D7A-B628-
     0A98145BCB97&displaylang=en
Tip
After installation, you can use SQL Server 2008's policy-based management tools found on the Management node in Server Management Studio. These tools help you disable unused services and features of SQL Server so that you can minimize your security exposure.
You're likely to use the SQL Server Management Studio frequently for administering your databases. You can launch the Management Studio by choosing Start
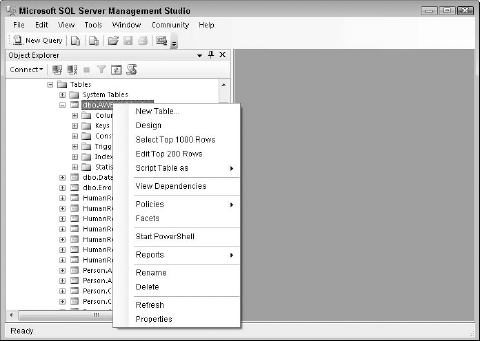
The Management Studio features Object Explorer, which is similar to Server Explorer in Visual Studio. Like in Server Explorer, you right-click an object in Object Explorer to display a list of commands you can execute, as shown in Figure 6-6.
The Management Studio uses many of the same designers and explorers as Visual Studio. For example, Query and View Designer is the same. See the section "Managing Your Database with Visual Database Tools," later in this chapter, to see Query and View Designer in action.
One cool feature of the Management Studio is the Script Table As command: Right-click a table in Object Explorer and choose Script Table As from the contextual menu. Select the kind of script you want to create, such as CREATE, and Management Studio generates the script.
Tip
Use the Management Studio or Visual Studio for creating queries. SQL Server 2008 doesn't include a separate query tool, such as the SQL Server 2000 Query Analyzer.
The Management Studio for SQL Server Developer Edition includes support for solutions and projects. You use Solution Explorer similarly to how you use Visual Studio to work with database projects that store script items and database connections.
The Adventure Works sample database showcases many of the new features of SQL Server 2008. One feature that Adventure Works uses extensively is schemas, which allow database objects to be grouped together. For example, the Adventure Works database uses a schema named HumanResources. The tables Employee and Department are associated with the HumanResources schema.
One drawback of using schemas is that more typing is required when you use SQL statements to access data. For example, to access the Employee table, you must type HumanResources.Employee.
The code samples you install with SQL Server 2008 provide a set of scripts you can use to either remove the schemas or create synonyms for the schemas. The scripts are
AlterSchemaToDbo.sqlCreateSynonymsDbo.sql
Both of these scripts have the same net effect: You can access the tables without specifying a schema first. The main difference is that if you use the first script, AlterSchemaToDbo.sql, the code samples included with SQL Server don't work. If you don't care about using code samples, use whichever script you want.
You can reverse either script by using the scripts AlterSchemaFromDbo.sql or DropSynonymsDbo.sql.
The scripts are available at
C:Program FilesMicrosoft SQL Server100SamplesEngineAdministration
AdventureWorksScriptsYou can create two kinds of database projects in Visual Studio, and they are vastly different:
Database Project: Create and manage scripts by using SQL.
SQL Server Project: Create database objects and retrieve and update data from databases by using .NET programming languages such as Visual Basic and C#.
In an SQL Server Project, you use Visual Basic or C# to write complex data access procedures that take advantage of the features of the .NET Framework. Database projects are containers for storing SQL scripts.
Visual Studio provides a project template for database projects. You use database projects to
Create SQL scripts.
Store database references.
Place scripts under source control.
Run and test scripts.
Storing scripts in a project keeps them together in a single container and allows you to place those scripts under source control. You can use the Visual Studio Visual Database Tools to generate scripts.
For more information about these tools, see the section "Managing Your Database with Visual Database Tools," later in this chapter. To read more about source control, see Book VI, Chapter 3.
You can add any kind of SQL script to a database project. Visual Studio provides templates and tools for generating certain kinds of scripts, such as
Change and Create scripts
Stored procedures
Triggers
Tables
Views
Database queries
To create a database project, follow these steps:
Press Ctrl+Shift+N to open the New Project dialog box.
Click the plus sign (+) to expand the Other Project Types line.
Click the Database project type.
A list of project templates appears.
Click the SQL Server 2008 Database Project icon.
Type a name and location for the project.
Visual Studio prompts you to select a database reference.
The Add Database Reference dialog box appears if Visual Studio finds existing database connections in Server Explorer. The New Database Reference dialog box appears if no existing database connections are in Server Explorer.
Select an existing database reference or create a new one.
Visual Studio creates the database project and adds the database reference to Solution Explorer
Adding a new database reference is similar to creating a new database connection. See the section about connecting to databases in Chapter 2 of Book V for more information.
See the next section for more information about working with database references.
Database projects use database references to know which database to execute an SQL script against. Database references appear in Solution Explorer and are saved with the database project.
An SQL Server project uses a single database reference for the entire project. Other projects, such as Windows and Web projects, use database connections rather than database references. See the section about connecting to databases in Chapter 2 in Book V.
A database reference uses a database connection to know how to connect to the database. Database connections are visible in Server Explorer. You use Server Explorer to browse a database connection and view database objects, such as tables and views. You can't browse database objects by using a database reference in Solution Explorer. However, you can use Server Explorer to browse the database connection to which a database reference points.
When you add a new database reference to a database project, Visual Studio checks to see whether any existing database connections are in Server Explorer. If so, it prompts you to select those connections.
Otherwise, Visual Studio prompts you to add a new database reference. Adding a new one creates a new data connection in Server Explorer. The New Database Reference dialog box functions exactly the same as the Add Connection dialog box, which you use to add new data connections in Server Explorer.
See the section about connecting to databases in Chapter 2 of Book V for more information on creating database connections in Server Explorer.
A database project can have multiple database references. To add a database reference to an existing database project, follow these steps:
Right-click Database References in Solution Explorer.
Choose New Database Reference from the contextual menu.
The Add Database Reference dialog box appears, or the New Database Reference dialog box appears if no database connections exist in Server Explorer for the project.
Select an existing reference or create a new one.
The Add Database Reference dialog box displays a list of all existing data connections in Server Explorer, as shown in Figure 6-7. If there are no existing data connections, the Add References dialog box doesn't appear.
Click the Add New Reference button if you don't see the data connection you need.
Click OK.
Visual Studio adds the database reference to the Solution Explorer.

Database references allow you to store references to multiple databases. For example, use a reference to a local database when you're working with a test database. Use another reference to a production database when you're ready to execute your scripts in a live environment.
Tip
Set your test database as the default database reference. All your scripts are executed against the default database reference. To run your scripts against another database, you must explicitly select the database each time you execute the script. To set a database as the default database, right-click the database reference in Solution Explorer and then choose Set As Project Default from the contextual menu.
Database projects include five project templates for creating SQL scripts. The available templates are
Stored Procedure Script
SQL Script
Table Script
Trigger Script
View Script
The templates provide boilerplate SQL statements for creating scripts. For example, the Table Script template has a CREATE TABLE statement. The SQL Script template is a blank template.
Tip
Create your own SQL Script templates and save them as project item templates.
To create a new script in a database project, follow these steps:
Right-click the database project folder in Solution Explorer.
Choose Add SQL Script from the contextual menu.
The Add New Item dialog box appears.
Alternatively, choose Add Existing Item from the contextual menu to add an existing SQL script.
Click the icon for the kind of SQL script you want to create.
Type a name for the script.
Click the Add button.
Visual Studio adds the script to the database project. The script appears in the Script Editor.
You can use the Visual Studio Visual Database Tools to generate scripts and queries. Scripts that you can generate include
Change scripts
Create scripts
Database queries
See the upcoming section "Managing Your Database with Visual Database Tools" to read more about using the Visual Database Tools to generate scripts.
Scripts created with Visual Studio use the file extension .sql. Because there are so many naming conventions for SQL scripts, Visual Studio recognizes more than just the .sql extension. An abbreviated list of file extensions appears in Table 6-2.
Visual Studio includes a script editor for creating SQL scripts. The editor doesn't feature IntelliSense, like other Visual Studio editors such as the Code Editor, do.
You can execute an entire script or portions of a script, depending on what you want to accomplish. SQL scripts are often quite lengthy. If you don't need to run the whole script, you can simply highlight the portion of the syntax you need to run. Of course, you can always let the whole script run from start to finish.
To execute a script from a contextual menu, follow these steps:
Follow these steps to run a portion of an SQL script that's open in the script editor:
Highlight the SQL statement you want to execute in the script editor.
Right-click the selected text.
Choose Run Selection from the contextual menu.
To execute a script against a specific database reference, follow these steps:
Right-click the script file in Solution Explorer.
Choose Execute SQL from the contextual menu.
The Run On window appears.
Tip
Drag and drop a script file onto the database reference that you want to execute against in Solution Explorer.
Previous versions of Visual Studio featured integration between the Visual Studio toolset and SQL Server. Integration was limited to using wizards and visual designers for manipulating database objects. Although that level of integration still exists, the Visual Studio SQL Server projects allow you to access SQL Server 2008 in a way that wasn't possible until now.
SQL Server projects are a new project type in Visual Studio designed to take advantage of integration between SQL Server 2008 and the .NET Framework. With SQL Server projects, you can do any of the following tasks:
Write and debug .NET code that performs complex data operations by using the Code Editor.
Deploy .NET assemblies as database objects to SQL Server 2008 databases.
Execute .NET assemblies in SQL Server 2008.
Note
Code written using the languages of .NET, such as C# and Visual Basic, is compiled into .NET assemblies. Code that takes advantage of the services of the Common Language Runtime (CLR) is managed code.
Using SQL Server projects, you write stored procedures, views, triggers, and other database objects by using .NET code. You execute your code using SQL statements to call the database objects.
Note
Managed code that executes in SQL Server 2008 is a CLR routine. CLR routines are sometimes also described using the word managed, such as managed stored procedure or managed trigger.
To create and execute a managed stored procedure named GetEmployees, follow these steps:
Use .NET code to create a data access method named
GetEmployees.Assume that the method uses the namespace
MyDataProcedures.GetEmployeesProc.GetEmployees
It doesn't matter what the code inside
GetEmployeesactually does. Presumably, the code accesses data, but it could just as easily add 2 + 2.Compile the code into the .NET assembly
GetEmployees.dll.Because .NET assemblies use the file extension
.dll, they're often referred to as DLL files.Deploy the
GetEmployees.dllto an SQL Server 2008 database.You can choose Build

Alternatively, connect to your SQL Server 2008 database by using the Management Studio and execute the following SQL statement in a new query:
CREATE ASSEMBLY GetEmployees from 'GetEmployee.dll' WITH PERMISSION_SET
    = SAFE
Create a stored procedure with the following SQL statement to execute the .NET assembly:
CREATE PROCEDURE uspGetEmployees
AS
EXTERNAL NAME MyDataProcedures.GetEmployeesProc.GetEmployees
Visual Studio performs this step for you when you use the
Deploy Solutioncommand.Type the following SQL statement in a new query in SQL Server Management Studio to execute the stored procedure:
EXEC uspGetEmployees;
SQL Server 2008 executes the code in the .NET assembly
GetEmployees.
You use an SQL Server project to create .NET assemblies that you can deploy to SQL Server 2008. To create a new SQL Server project, follow these steps:
Press Ctrl+Shift+N to open the New Project dialog box.
Click the plus sign (+) next to the Visual Basic project type.
Click the Database project type.
A list of database project templates appears.
Click the Visual Basic SQL CLR Database Project icon.
Type a name and location for the project.
Click OK.
The Add Database Reference dialog box appears, or the New Database Reference dialog box appears if no data connections exist.
Select an existing database reference or create a new reference.
Visual Studio creates the new SQL Server project.
Unlike a database project, an SQL Server project can reference only a single database. See the earlier section "Managing scripts with database projects" for more information on creating database references.
To change the database that an SQL Server project references, follow these steps:
Double-click My Project in Solution Explorer.
The project's settings appear in the document window.
Click the Database tab.
The database reference appears.
Click the Browse button.
The Add Database Reference dialog box appears.
Select an existing database reference or create a new reference.
At the heart of SQL Server projects lies the integration of SQL Server 2008 with the CLR of the .NET Framework. SQL CLR integration allows you to deploy and execute .NET code to your SQL Server.
Before you can execute .NET code on your SQL Server, you must enable integration between SQL Server and the Common Language Runtime. To enable SQL CLR integration, execute the following SQL statement using the SQL Server Management Studio:
sp_configure 'clr enabled', 1
GO
RECONFIGURE
GO
SQL Server projects provide templates for creating common database objects, such as
Stored procedures
Triggers
User-defined functions
User-defined types
Aggregates
You add new items to the project by using the Add New Item dialog box. To create a stored procedure that outputs Hello SQL Server!, follow these steps:
Note
You must set your project to target the .NET 3.5 CLR version when building a database project for SQL Server 2008.
Right-click the project in Solution Explorer.
Choose Add
The Add New Item dialog box appears.
Type the name hellosqlserver.vb.
Click the Add button.
The stored procedure appears in the Code Editor.
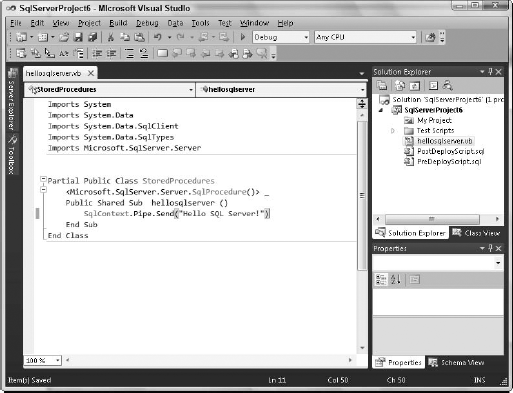
Replace the line
Add your code herewith the following line:SqlContext.Pipe.Send("Hello SQL Server!")Figure 6-8 shows you the code. Notice that you don't have to write any SQL statements to create the stored procedure. Visual Studio creates the stored procedure to access your .NET code when you deploy the project.
Choose Build
Choose Build
Visual Studio deploys the stored procedure to the Adventure Works database.
Deploying the stored procedure creates the stored procedure in SQL Server.
You can use Server Explorer in Visual Studio or the SQL Server in Management Studio to execute the stored procedure.
You execute your managed CLR routines by using SQL statements. For example, to execute a managed stored procedure, type the following line:
EXEC mystoredprocedure
To use Server Explorer to execute the hellosqlserver stored procedure from the preceding section, follow these steps:
Expand the Stored Procedures folder in Server Explorer.
Press Ctrl+Alt+S to open the Server Explorer window if it's closed.
Right-click the
hellosqlserverstored procedure.You may need to refresh Server Explorer if you don't see the stored procedure. To refresh the Server Explorer contents, right-click the Stored Procedures folder and choose Refresh from the contextual menu.
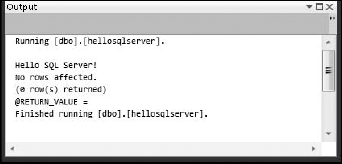
Choose Execute from the contextual menu.
The output from the stored procedure appears in the Output window, as shown in Figure 6-9.
If an error message tells you to enable CLR integration, see the earlier section "Enabling integration with SQL Server 2008."
Visual Studio provides support for debugging SQL Server projects. You must enable debugging before you can use the debugger. To enable debugging, right-click the database connection in Server Explorer and choose Allow SQL/CLR Debugging.
To debug the hellosqlserver stored procedure, follow these steps:
Right-click the Test Scripts folder in Solution Explorer.
Choose Add Test Script from the contextual menu.
A new test script appears in the Code Editor.
Type exec hellosqlserver in the script.
Insert a breakpoint by clicking the gray border to the right of the statement you type in Step 3.
A red dot appears next to the statement.
Right-click the test script in Solution Explorer and choose Set As Default Debug Script from the contextual menu.
Press F5 to start debugging.
The debugger stops at your breakpoint.
Press F11 to step through each line in your stored procedure.
To read more about using the debugger, see Book III, Chapter 7.
You can also start the debugger by right-clicking the stored procedure in Server Explorer and choosing Step into Stored Procedure.
Visual Studio provides an extensive set of tools for creating and managing database objects. Almost any time you work with database objects or SQL Server projects, you're using one of the Visual Database Tools. Although the tools work with many kinds of databases, they're tightly integrated with SQL Server.
Visual Studio includes these tools for manipulating databases:
Server Explorer is the key to accessing Visual Database Tools. Database objects appear in a hierarchical tree view in Server Explorer. You invoke most tools by right-clicking a database object in Server Explorer and choosing a tool from the contextual menu.
Tip
Change the hierarchical view of Server Explorer by right-clicking a data connection and choosing Change View from the contextual menu.
Before you can work with a database in Server Explorer, you must create a connection to a database. For more information, see the section about connecting to a database in Chapter 2 of Book V.
You can use Server Explorer to create a new database in SQL Server. To create a new database, follow these steps:
Choose View
Right-click the Data Connections folder.
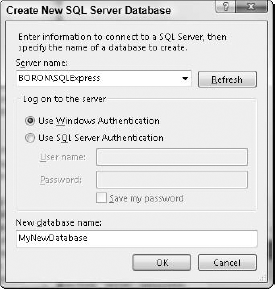
Choose Create New SQL Server Database from the contextual menu.
Type your server's name or select a server from the Server Name drop-down list.
Note
Be sure to include the instance name. The default instance name for SQL Server 2008 Express is SQLExpress. The default instance name for SQL Server 2008 Developer Edition is MSSQLSERVER.
Select the appropriate authentication type and enter your login credentials, if required.
Type a name for the database, such as MyNewDatabase, in the New Database Name field, as shown in Figure 6-10.
Click OK.
A connection to the new database appears in Server Explorer.
In most cases, you create a database on a database server running SQL Server. Sometimes, however, you may wish to run the database on the local computer. A database that you deploy with your application is called a local database. You may choose to store your application's data in a local database rather than an XML file or a plain text file. Visual Studio supports using SQL Server and SQL Server Express .mdf database files and Access .mdb database files as local databases. All the Visual Database Tools work with local databases.
Here's how to create a new local database:
Create a new Windows application.
See Book IV, Chapter 1 for more information on creating a Windows application.
Right-click the project folder in Solution Explorer.
Choose Add
The Add New Item window appears.
Click the SQL Database icon.
Type a name for the database in the Name text box and then click the Add button.
The database file is added to Solution Explorer. A data connection to the local database file appears in Server Explorer. The Data Source Configuration Wizard starts.
Click Finish to exit the wizard.
The Data Source Configuration Wizard creates a strongly typed DataSet. You use the Visual Database Tools to add tables, queries, and views to your local database, as described in the next two sections. You access local databases using ADO.NET the same way you access remote databases.
You may also add an existing SQL Server or Access database to your project. To add an existing database file, right-click the project folder and choose Add
Tip
Follow Steps 2 through 5 of the preceding list to add a local database to a Web site. The Data Source Configuration Wizard doesn't start. The default application services provider database used for Membership and other ASP.NET services is a local database.
Add tables to a database by using Table Designer. To add a new table to the database you create in the preceding section, follow these steps:
Click the plus sign (+) to expand the data connection in Server Explorer.
Right-click the Tables folder.
Choose Add New Table from the contextual menu.
Table Designer displays a grid that you use to add new columns.
Add these columns to the table by using the grid:
CustID, data type
uniqueidentifierFirstName, data type
varcharLastName, data type
varchar
Right-click the CustID column.
Choose Set Primary Key from the contextual menu.
A key appears next to the column name, as shown in Figure 6-11.
Press F4 to display the table's Properties window.
Save the table.
Visual Studio adds the table to the database, and it appears in Server Explorer.
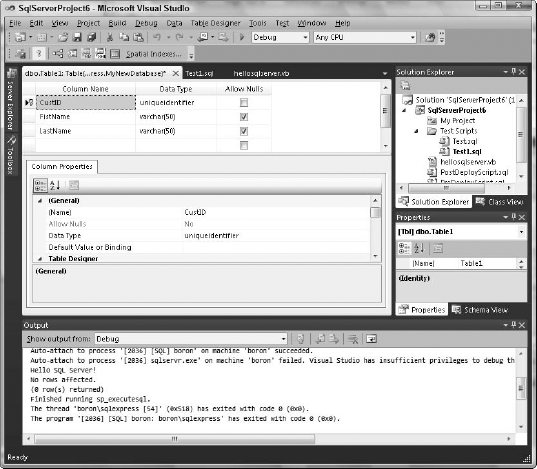
Table Designer is capable of doing much more than just adding columns. Click the Table Designer menu to see a list of commands that enable you to
Create foreign key relationships.
Create indexes.
Add check constraints.
Table Designer generates change scripts that execute the changes you make in the designer in SQL Server. You can harness the power of these scripts and reuse them, modify them, or execute them later.
To generate change scripts, follow these steps:
Create a new table or modify an existing table in Table Designer.
Double-click an existing table object in Server Explorer to open it in Table Designer.
Choose Table Designer
The Save Change Script dialog box appears.
Click Yes to save the script.
Tip
To generate create scripts in database projects, right-click the table in Server Explorer and choose Generate Create Script to Project from the contextual menu. In a database project, you can generate create scripts for any table in Server Explorer. Create scripts are most often used to add tables or fields to a database, and on rare occasions to add databases themselves.
Query and View Designer is a visual tool for creating queries and views. The tool is known as Query Designer when it's used for creating queries and View Designer when used to create views.
Note
Query Designer is also known as Query Builder.
Use a query any time you need to execute an SQL statement against the database. Create a view when you want to save your query in the database.
Tip
You can save queries in a database project.
Examples of queries you can create with Query and View Designer include
Select: Retrieves rows by using a
SELECTstatementInsert Results: Copies rows from one table to another by using an
INSERT INTO ... SELECTstatementInsert Values: Inserts a new row by using the
INSERT INTO ... VALUESstatementUpdate: Updates rows by using an
UPDATEstatementDelete: Deletes rows by using the
DELETEstatementMake Table: Copies results of a query into a new table by using the
SELECT ... INTOstatement
To start Query Designer, follow these steps:
Right-click an existing data connection in Server Explorer.
Choose New Query from the contextual menu.
The Query Designer opens.
To start View Designer, follow these steps:
Right-click the Views folder in an existing data connection in Server Explorer.
Choose Add New View from the contextual menu.
The View Designer opens.
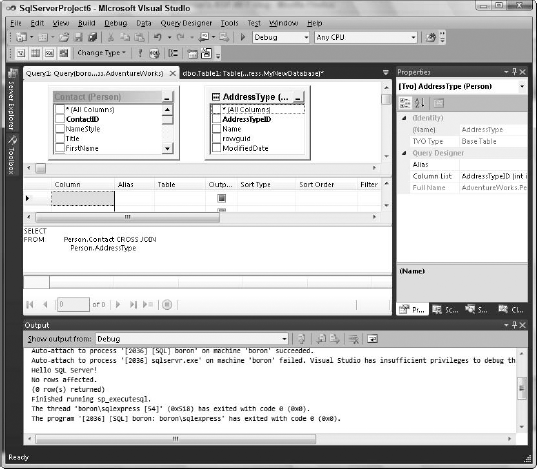
Query and View Designer has three panes that help you build SQL statements. Figure 6-12 shows Query Designer.
The three panes, from top to bottom, are
Grid: Specifies which columns to display and how to sort, group by, and filter
SQL: Displays the SQL created by the Designer
Results: Displays the query's output
To see the Query Designer in action, check out the section about updating data with the data designer in Chapter 2 of Book V.