
14. Featured Images
We finally made it to the featured images chapter. There were several places in our theme that we just plopped in the the_post_thumbnail() function with no real direction, because I wanted to make sure you had a good foundation in theme development before we moved on to more advanced steps. Unfortunately, this means that we’re doing things a little backwards, but now you should have no problem understanding everything in this chapter.
What you’re about to learn
• How to register thumbnails for your theme
• How to creating multiple crop sizes
• The difference between hard and soft cropping
• How to display thumbnails by name in your theme
A Quick Recap
In previous chapters, we covered how to add theme support for post thumbnails (also called featured images), how to pull them into the theme, and how to upload them to a post. In case you’ve skipped around in the book or just want a refresher, here’s what we’ve done so far:
add_theme_support( 'post-thumbnails' );
In the functions.php file we inserted the above code, which enabled the featured image on posts and pages. Then, in the template files, we put in the the_post_thumbnail() function, like so:
<?php the_post_thumbnail(); ?>
This outputs the following HTML, which basically takes the original image (assigned to that post as the featured image) and inserts it into the theme:
<img width="1200" height="2200" src="http://localhost/j2-theme/wp-content/
uploads/2012/05/ch11-01-page-template.jpg" class="attachment-post-
thumbnail wp-post-image" alt="ch11-01-page-template" title="ch11-01-
page-template" />
The HTML above has width, height, alt, title, and class attributes, all of which are populated by the image panel in the library or on the Edit Post page. In most cases, we’re using the featured image to display a small thumbnail in line with our posts. As you can see above, a 1200 × 2200px image will not do the job.
The next step is to locate all the sizes we need to define by looking through the theme design. Once we do that we can return to the functions.php and register those sizes.
Defining Thumbnail Sizes
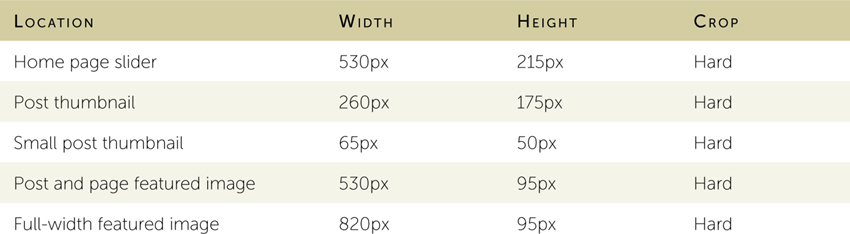
On the home page there are two distinct featured image sizes, the slider (Figure 14.1) and the post thumbnail (Figure 14.2). In the sidebar there’s a small thumbnail inline with the recent posts list (Figure 14.3). There’s also a large featured image at the top of the post and page templates (Figure 14.4), and one on the full-width page template (Figure 14.5).
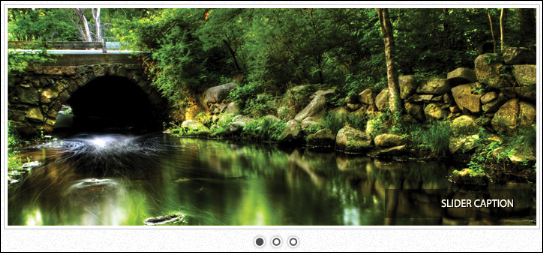
Figure 14.1. The slider image (530 × 215px).
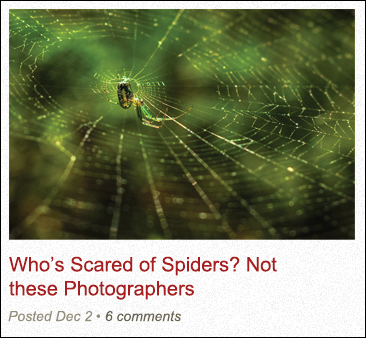
Figure 14.2. The post thumbnail (260 × 175px).

Figure 14.3. The small thumbnail (65 × 50px).

Figure 14.4. The post and page templates featured image (530 × 95px).
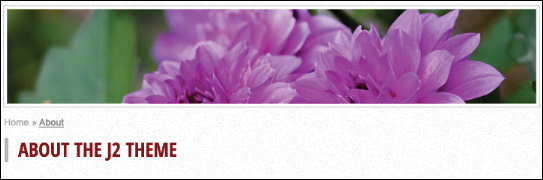
Figure 14.5. The full-width page featured image (820 × 95px).
Once you locate the distinct thumbnails throughout the theme, document their location and size and decide whether you want to hard or soft crop them (Table 14.1).
Table 14.1. Organizing thumbnails.
Hard and Soft Cropping
The difference between hard and soft cropping is the actual cropping. In hard cropping, the image is resized until the maximum width or height is reached, then cropping occurs. In soft-cropping (also known as “box resizing”), the image is resized proportionally to fit inside your dimensions.
Here’s an example of a hard crop. The original image seen in Figure 14.6 is 473px wide and 473px high. In my functions.php, I defined an image size of 220px wide by 180px high and set crop to “true.”
add_image_size( 'homepage-thumb', 220, 180, true );

Figure 14.6. Image upload, full size (473 × 473px).
You can see the resulting cropped image in Figure 14.7. The screenshot was resized from 473px wide to 220px wide. At that point it was cropped to 180px high. If the image were wider than it is tall, it would have been reduced to 180px high first, then cropped to 220px high. The hard crop ensures that the image is always the exact dimensions we define.

Figure 14.7. Hard crop (220 × 180px).
In many themes, a soft crop works just fine (Figure 14.8). However, our layout is very specific and requires the featured images to be a certain size. The problem with the hard crop is that we can’t predict exactly how the image will crop. If there’s a very tall photograph of people, we risk their heads getting clipped in the cropping process. The problem with the soft crop is that it doesn’t maintain the image proportions, which could mean changes in the site layout.

Figure 14.8. Soft crop (180 × 180px).
Currently, there’s no way to go back and resize all the featured images. So, if you have an established blog with lots of images and you change your theme, then your featured image names and sizes won’t carry over. The good news is that there’s a plugin that will do this for you: it’s called “Regenerate Thumbnails” and can be found at http://wdgwp.com/regenerate-thumbnails.
Coding Image Sizes
In the functions.php file we’ll define the names and specific sizes of each of the five thumbnails listed in Table 14.1. If we’re defining a single thumbnail size we can use the set_post_thumbnail_size() function, which lets us define the width, height, and crop choice for a single featured image.
set_post_thumbnail_size( 100, 100, true );
The code above instructs WordPress to crop a thumbnail 100px × 100px every time an image is uploaded through the admin. We’ll use a different function to accomplish the same thing. For more information on set_post_thumbnail(), go to http://wdgwp.com/set_post_thumbnail_size.
In the functions.php below the add_theme_support( ‘post-thumbnails’ ) function, copy the code below:
add_image_size( 'slider', 530, 215, true );
add_image_size( 'post-thumb', 260, 175, true );
add_image_size( 'sm-post-thumb', 65, 50, true );
add_image_size( 'page-featured-image', 530, 95, true );
add_image_size( 'fullwidth-featured-image', 820, 95, true );
The add_image_size() function accepts four parameters. The first is the name of the thumbnail we’re creating. The second and third are the width and height, respectively. The last parameter is a true or false statement that indicates whether or not to hard crop. In the theme, we’re hard cropping all the featured images.
Note that in order to maintain the theme’s design and layout, every featured image must be at least 820px wide by 215px high. If an image is not at least as wide or tall as the largest dimensions we define, then WordPress will be unable to resize it correctly. If we upload an image that is 820px wide but 105px tall, the “fullwidth-featured-image” will resize fine. However, the “slider” will not: its final cropped size will be 530px × 105px. This is a common practice, and it’s a good idea to mention this in any documentation you provide with the theme.
With the image dimensions defined in the functions.php file, let’s run through an example. Say you upload example.png, which is 1100px × 700px. Once the image is uploaded, WordPress automatically resizes and crops (if necessary) all versions of it. The images will be renamed and stored in the Uploads folder, which is located in wp-content and has subfolders based on the year and month of the upload. Table 14.2 shows a list of the images that now exist in wp-content/uploads/2012/05/.
Table 14.2. Example image in all sizes.

The resizing and renaming occurs immediately after you upload the image to WordPress. The images tagged as “Default resize” under relationship are images that are resized based on the default settings in Settings → Media in the WordPress admin. Figure 14.9 shows the media settings, which can be changed by the user admin and are typically used in the body content of posts and pages.
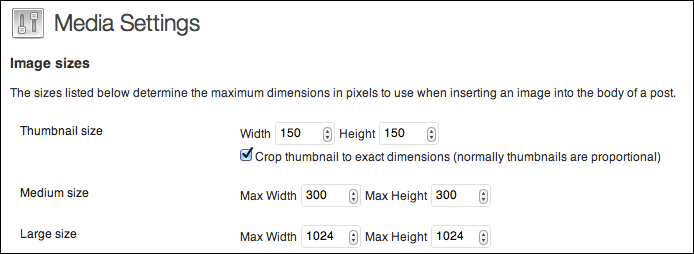
Figure 14.9. Media settings.
Displaying Featured Images
Displaying featured images is relatively simple now that we have defined them in our functions.php file. The next step is to go back to the page templates (index.php, archive.php, page.php, page-full-width.php, and single.php) and add the name of the thumbnail to the the_post_thumbnail() function.
On the home page, the slider will be defined in greater detail later. For now, insert ‘slider’ into the the_post_thumbnail() function like so:
<?php the_post_thumbnail( 'slider' ); ?>
This outputs the following HTML:
<img width="530" height="215" src="http://localhost/j2-theme/wp-content/
uploads/2012/05/example-530x215.png" class="attachment-slider
wp-post-image" alt="example" title="example" />
Notice the hard-coded width and height attributes. This will cause us problems later when we want the site to be responsive. The rest of the <img> is pretty straightforward and the src=”” is pulling the exact image we needed.
We need to duplicate these steps for all the other the_post_thumbnail() calls. I’ve laid out a little plan of attack for you below.
index.php → Slider
PHP
<?php the_post_thumbnail( 'slider' ); ?>
<img width="530" height="215" src="http://localhost/j2-theme/wp-content/
uploads/2012/05/example-530x215.png" class="attachment-slider
wp-post-image" alt="example" title="example" />
index.php → The Loop and archive.php → The Loop
PHP
<?php the_post_thumbnail( 'post-thumb' ); ?>
HTML
<img width="260" height="175" src="http://localhost/j2-theme/wp-content/
uploads/2012/05/example-260x175.png" class="attachment-post-thumb
wp-post-image" alt="example" title="example" />
single.php → The Header and single.php → The Header
PHP
<?php the_post_thumbnail( 'page-featured-image' ); ?>
HTML
<img width="530" height="95" src="http://localhost/j2-theme/wp-content/
uploads/2012/05/example-530x95.png" class="attachment-page-featured-
image wp-post-image" alt="example" title="example" />
page-full-width.php → The Header
PHP
<?php the_post_thumbnail( 'fullwidth-featured-image' ); ?>
HTML
<img width="820" height="95" src="http://localhost/j2-theme/wp-content/
uploads/2012/05/example-820x95.png" class="attachment-fullwidth-
featured-image wp-post-image" alt="example" title="example" />
Custom Widgets or Other Areas
PHP
<?php the_post_thumbnail( 'sm-post-thumb' ); ?>
HTML
<img width="65" height="50" src="http://localhost/j2-theme/wp-content/
uploads/2012/05/example-65x50.png" class="attachment-sm-post-thumb
wp-post-image" alt="example" title="example" />
With replacements to all the template files in place, our featured images should be displaying correctly. One way that WordPress continues to make our lives easier is in the class attribute on the <img> tags. If you were keen enough to notice, WordPress actually appends a custom class name based on the featured image function given name, as shown in Table 14.3.
Table 14.3. Featured image name and appended CSS class.
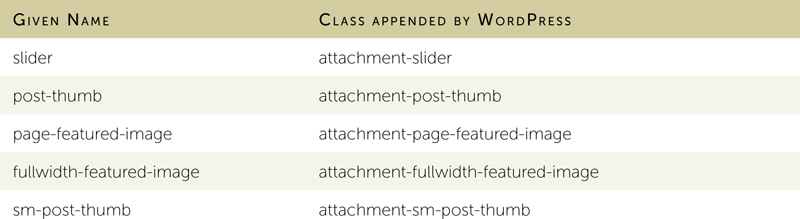
This is a nice little added benefit, making it far easier to target featured images anywhere in the theme. It’s also one more reason to be semantic in our naming conventions.
What’s Next
Correctly coding and displaying the featured images adds a lot of functionality to our theme. This was a good stepping-stone into more advanced WordPress coding. Up next we’ll look at how to query specific posts, filter the loop, and create a slider. Chapter 15, “Custom Fields,” takes you up a level in advanced development, but at the same time helps you reap a lot of rewards.