
4. Getting Ready
Wedding Stage One
Anticipation. Excitement. Nerves. Beautiful hair, gowns, shoes, and jewelry. Is it any wonder that “getting ready” is one of my favorite parts of the day? But, in addition to all the lovely moments with the bride and her bridesmaids, there is much to do in the time before the ceremony: detail shots of personal flowers such as bouquets and boutonnieres, family and guests arriving, bride and groom seeing one another for the first time, and more. As with every aspect of the wedding day, you need to have a plan—and then be prepared to change it as needed!
Poring Over the Picture
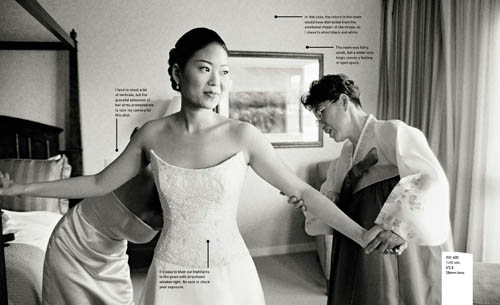
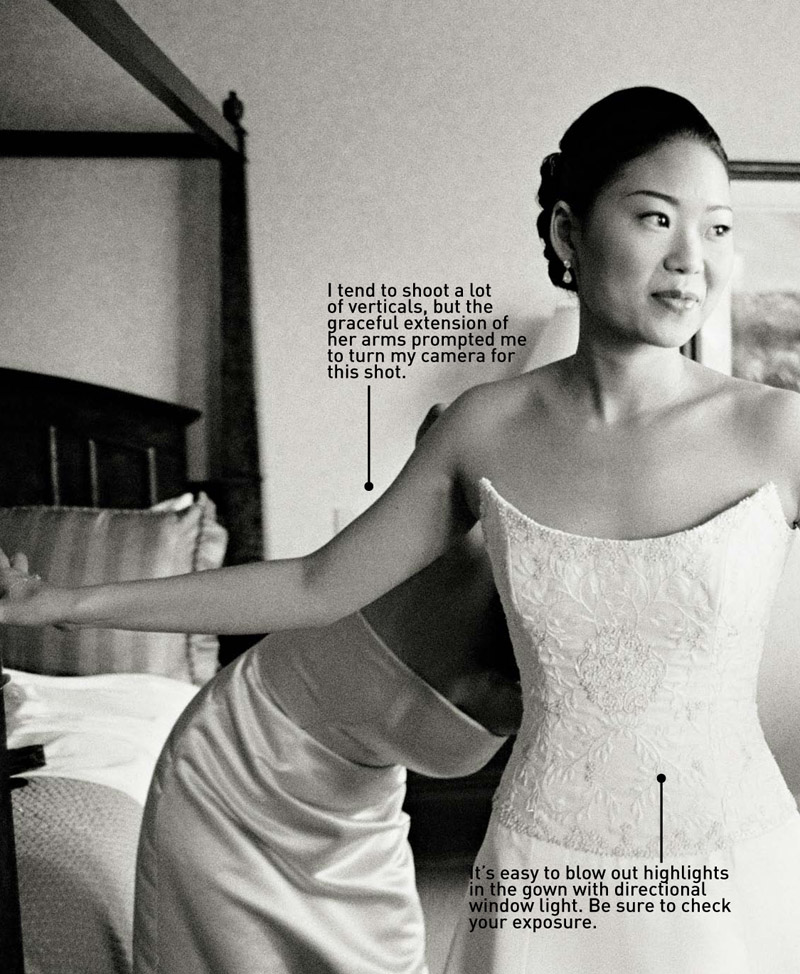
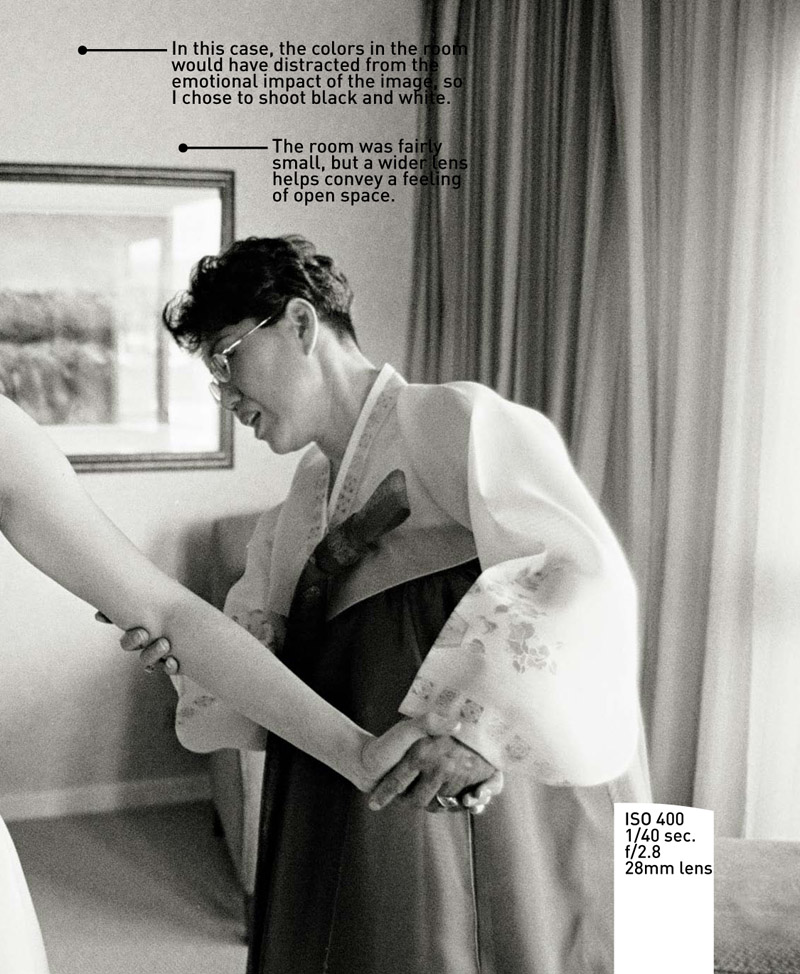
I love the serene expression on the face of this bride as her mother and bridesmaid try to solve some puzzle regarding the buttons on the back of the dress; it seems as though nothing could shake her calm.
Getting Started
The bride’s room is usually where I begin the wedding day coverage, and after all the preparation and planning for the day’s shoot, it always feels great to finally get started. I ease into the situation, often concentrating on various detail shots first, staying alert for special moments between the people who are there, and thinking ahead to how I’ll handle the moment of the bride getting dressed.
Put them at ease
The first thing I do upon entering the room is greet everyone and introduce myself with a smile. Remember: People aren’t accustomed to being photographed in a candid way and they may be intimidated. Part of your job is to help everyone feel comfortable with your presence. The good news is, this will result in more natural, authentic images.
Shoot the details
The second thing I do is locate the dress, and—putting on my “stylist” hat—scout for a good spot to hang it for a photo. A beautiful armoire, a canopy bed, a curtain rod, the back of a door, outside on a patio overhang...there are many possibilities. I always, always check with the bride to make sure that she’s comfortable with my removing the dress packaging and relocating the dress, and I’m obsessively careful when handling it! Before moving the dress, I grab a towel from the bathroom and wipe down any surface that will touch the dress, and I make sure that whatever I’m using to hang the dress is sturdy enough to support the weight of the gown—wedding dresses can be really heavy!
I shoot both the front and back of the gown, and sometimes I need to use a fairly wide lens to include the whole gown in the shot (Figure 4.1).
Next, I move in for close-ups of any wonderful lace, ribbon, or beading details; simple folds of sumptuous fabric as it hangs; the row of tiny buttons up the back (Figure 4.2). When shooting these details, watch your exposure—if you’re using an automatic exposure mode such as Aperture Priority, the light color of the gown can trick the camera’s meter into underexposing the image. This isn’t a disaster, but you’ll save some time in post-processing—and the image quality will be better—if you take a moment to make sure it’s exposed properly in-camera.
Figure 4.1. The side-lit armoire was a perfect spot to hang this dress. I used a wide focal length on my 24–70mm lens in order to get the entire dress in the shot.
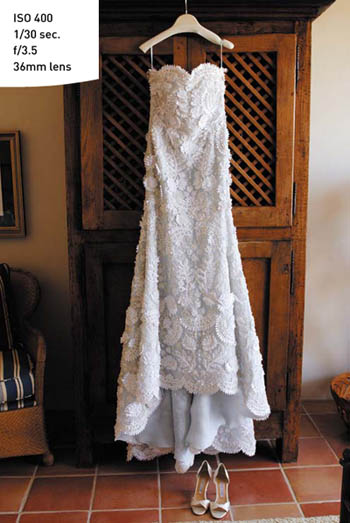
Figure 4.2. For detail work, I sometimes use my 35mm lens on an APS-sensor (not full-frame) camera. The sensor makes the 35mm lens look like a 52mm lens, and it focuses in very close. It also has a wider aperture (f/2) than my macro lens (f/2.8), so it’s especially good in darker situations.

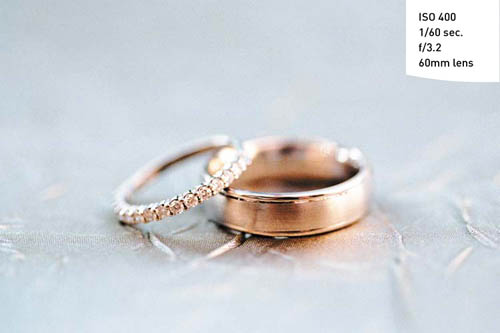
Once I’m finished shooting the dress, I very carefully return it to the place where I found it (while breathing a small, private sigh of relief!). Then I look for all the other accoutrements, such as shoes, jewelry, handkerchief, and so on, and I find nice spots to photograph each of these items. The possibilities are endless! Shoes look great placed on a window ledge, hung on a pretty doorknob, or placed daintily on an ottoman or a freshly made bed. Jewelry can be artfully arranged on a wooden table or on a pretty bedspread or throw pillow. If the rings are available to shoot, they can be placed on the jeweler’s box they came in, on a spread-out scarf or pashmina shawl, or simply in an outstretched hand. If you have a macro lens, now is the time to use it—especially to get wonderful close-ups of the rings (Figure 4.3).
Figure 4.3. I used my 60mm macro lens for this close-up of the rings. Notice how narrow the area of focus is. The slightest bit of movement while shooting would throw off the focus, so I took a few shots to make sure that I got one that was perfect.
For these types of details, I shoot with a fairly wide-open aperture, somewhere in the f/2 to f/4 range. This creates a shallow depth of field that gives the images a wonderful softness and helps the subject stand out from the slightly blurred background. Be careful, though, and keep an eye on your depth of field (use the depth-of-field preview button on your camera to check it). It can sometimes be too shallow, with only the tiniest sliver of the image in focus—and not always the part you intended.
Depth of field becomes more shallow the closer you get to the subject, so this effect is more pronounced when using the macro lens for very tight close-ups; sometimes I need to use a smaller aperture (such as f/5.6 or f/8) in these situations to ensure that my depth of field isn’t too shallow! The slightest movement when you’re shooting can also move the focal point to an unintended spot, so be mindful and hold still when releasing the shutter.
Focus on florals
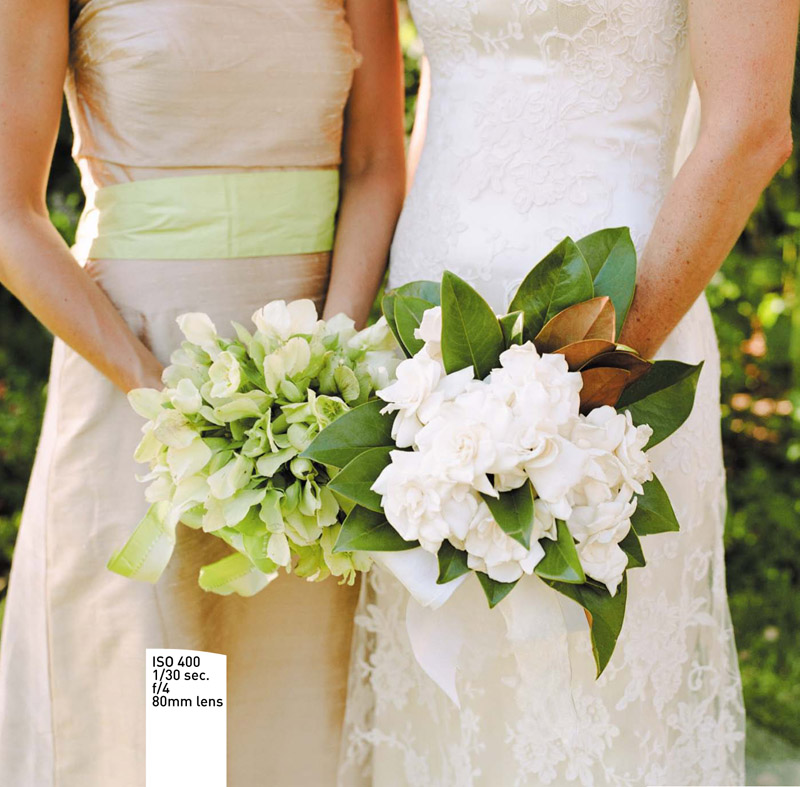
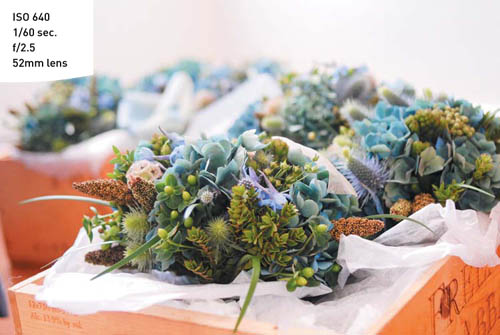
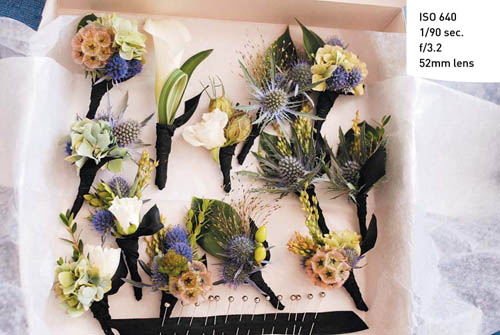
Personal flowers such as bouquets and boutonnieres are often delivered to the bride’s room during this time, and you’ll want to capture some solid shots of them while they’re at their freshest. I move the flowers close to a window or take them outside if possible; a shady or backlit spot is perfect for capturing beautiful, natural color. I shoot a wide variety of images: all the bouquets lying together, each one individually, and very tight close-ups of the prettiest blooms. Once the ladies have picked up their bouquets, I shoot them again as they’re being held. I also reshoot the boutonnieres on the guys’ lapels. I adore shooting the flowers, and I can never get enough (Figures 4.4 and 4.5).
Figure 4.4. Shoot the bouquets en masse for impact. I used a wide-open aperture to create separation between the bouquet in the foreground and those beyond.
Keep the other wedding vendors in mind as you shoot the florals and decor. Your responsibility is first and foremost to your client, of course, but you should also strive to capture images that showcase the work of your colleagues at the wedding. Afterward, the planner, florist, designer, rental house, caterer, and so on will be thrilled to receive the images. Not only will they share those images with future, potential clients, but they’ll be more likely to refer you, knowing that you’ll take the time and care to create images that show their work in the best possible light.
Figure 4.5. I shot these wonderfully creative boutonnieres individually on the lapels as well, but I loved the look of them taken all together.
Seek out the sweet moments
Of course, at the same time that I’m diligently capturing all the details, I’m also paying attention to the bride and the others in the room. I frequently jump back and forth from still-life work to candid shots of the bride getting ready, the bride having her hair and makeup done, bridesmaids and family members hanging out or busy with their own preparations, and so on. Be sure to shoot everyone who is present in the room, and, of course, give a little extra emphasis to mothers and other family members (Figures 4.6 and 4.7). I prefer to hang back from the action as much as possible—particularly at this part of the day when we’re in such close quarters with one another, everyone is still getting accustomed to my presence, and nerves may be running a bit high—so I use my zoom lenses and shoot as unobtrusively as possible.
Figure 4.6. There is so much to do before the ceremony, but always stay alert for sweet moments like this one, shared between a bride and her mother. I abandoned the shoes to hustle over for this shot; my 70–200mm lens got me close enough without intruding on the scene.
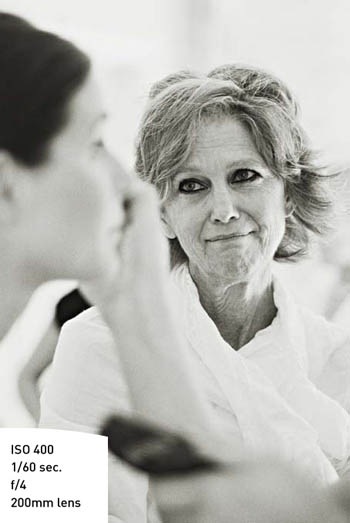
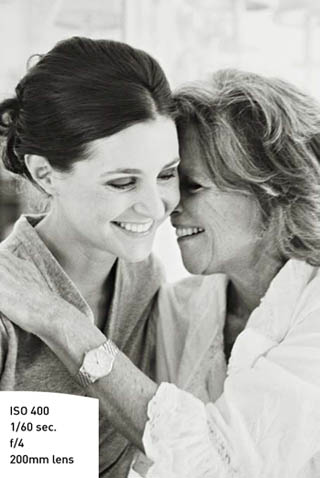
Figure 4.7. I swung around in front of my subjects to capture this. It’s a touch blurry because I was moving very quickly and my shutter speed of 1/60 sec. didn’t quite freeze the action, but it works because it captures the emotion of the moment.
Getting Dressed
Up to this point, I have been very unobtrusive, but I do insert myself into the situation a bit more when it comes time to put on the dress. I want to capture the moment in a timeless, beautiful way, and it helps to think about where the bride should stand and how exactly I intend to capture it. I plan it out in advance so that when the time comes to shoot, my focus is on capturing the genuine emotion that is expressed by the bride and by those around her as they see her in the gown for the first time.
The lead-in
Before the bride is ready to step into her dress, I determine where I would like her to be—indirect window light is best—and I quietly do any necessary tidying up. (Although I like the environment to look natural and authentic, I don’t want something like an ugly water bottle mucking up the background of my shots.) When the time comes for the bride to dress, I ask her to stand near the window, and—unless it’s really dark in the room—I turn off any overhead lights to avoid the unattractive color clashes that can come from mixed natural and tungsten lighting. I measure the exposure ahead of time and preset my cameras; I want to be completely prepared because, often, the actual moment of getting dressed happens very quickly!
Window light
I love the look of window light as backlighting while the bride is getting dressed, and I almost always shoot some version of this. There are, of course, many ways to do it. I can silhouette the subject (Figure 4.8), I can expose for the subject and allow the background to blow out (Figure 4.9), or I can shoot something in between. You’ll have your own personal vision of how to best capture the moment, but the important thing is to be in control of your tools and know how to use them to realize that vision. Happy accidents are wonderful things, but we can’t rely on them at a wedding! Know what you want to do, and how to do it.
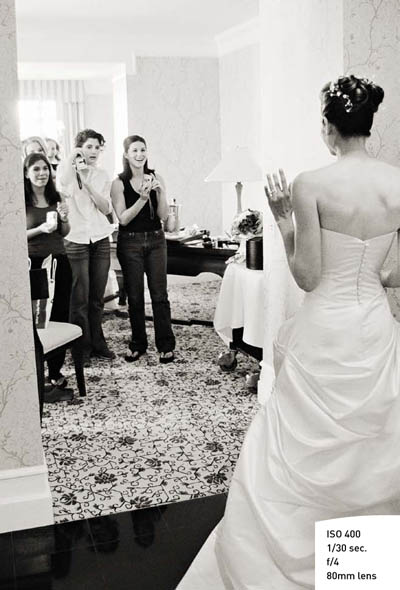
For images of the bride getting dressed, I usually choose to expose for the subject and allow the background to blow out, and I almost always shoot it in black and white because I love the dreamy and timeless look that results. With that in mind, I have a trick for setting myself up to achieve the effect I want. From the angle where the bride will be backlit, I use my handheld light meter to measure exposure for the shadows. (If you don’t have a handheld light meter, you can measure it in-camera by pointing at someone who is standing in front of the window—just use spot metering, or move in close enough so that the subject fills the whole frame.) You don’t want the light streaming in from the window to interfere with the reading. Set your camera to Manual, and dial in that exposure. When shooting from that angle, I use the Manual setting, so that the backlighting doesn’t trick the camera into drastically underexposing the image. When I swing around to shoot from another angle, where the light is falling directly on the bride (rather than from behind her), I quickly switch to Aperture Priority and let the camera make the necessary adjustment to exposure (Figure 4.10). When I move back to my original position, I switch back to Manual and keep shooting. In this way, I can move very quickly and capture many different angles, while being assured of the proper exposure throughout.
Figure 4.8. I set my camera to matrix metering to meter for the whole scene and used Aperture Priority mode, knowing that the light from the window would cause the camera to underexpose the image and create a silhouette.
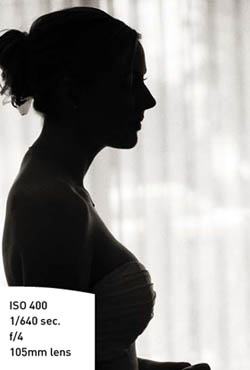
Figure 4.9. I manually set my camera to achieve my favorite backlit look: exposing for the subject while allowing the background to overexpose.
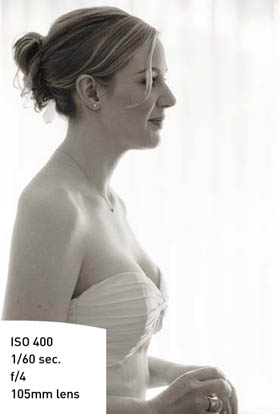
Figure 4.10. When I changed position, the lighting drastically changed from entirely backlit to this lovely side light from the window. I quickly switched from Manual to Aperture Priority so that I could shoot continuously and still be assured of the proper exposure.
The room is often fairly dark, so keep an eye on your shutter speed, making sure that it’s fast enough that you can hand-hold without motion blur (remember that you can increase your ISO to help achieve a faster shutter speed). I can hand-hold fairly well at a shutter speed of 1/8 sec., but the movement of the subject also will cause motion blur at such a slow speed. Sometimes, this results in a beautiful, dreamy image, and sometimes it results in a mushy mess. For me, 1/30 sec. or a little bit faster is ideal for this part of the day.
Once the dress is on, I use my 24–70mm lens on one camera and my 70–200mm lens on another camera to capture everything from wide shots of the whole scene to tight close-ups of the back of the dress being buttoned or the ribbon sash being tied. As with every part of the wedding day, capturing this variety of perspectives is key to creating a descriptive set of images that, taken together, truly tell the story.
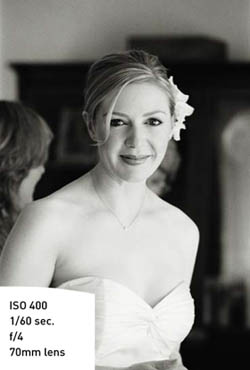
Bridal Portraits
Most of the time, I don’t pull the bride aside for a dedicated portrait session. My clients tend to be fairly camera-shy, and one of the reasons they’ve hired me is because I help them feel natural and at ease in front of the camera—mainly by letting them be themselves and allowing them to forget that they’re being photographed. I find plenty of great opportunities throughout the getting-ready process to shoot a bride in ways that capture beautiful, spontaneous, expressive portraits without asking her to pose for me (Figure 4.11). Figure 4.10 is another good example of this.
A great time to look for portrait opportunities is right after the bride has gotten dressed—she’s still standing in the window light, she’s excited about finally wearing the gown “for real,” and she’s surrounded by her best friends and family, who are all equally excited. The interplay between them creates some wonderful, vivid moments, and the bride is so caught up that she doesn’t even notice that I’m shooting.
I’m nearly always able to find naturally occurring portrait opportunities for the bride, but if I feel that it’s not happening, I’ll simply ask her to come to the window or step outside if it’s a pretty setting, and shoot a few quick images in a casual way. Portraits are most flattering when shot with a longer lens, such as an 85mm, and I use a wide aperture (usually f/2.8 or f/4) for shallow depth of field, to keep a soft look. I make it really fast, because my clients generally want to simply enjoy their day with minimal interruption from me.
Figure 4.11. As this bride walked away from me into the next room, I could see that the light and the frame of the doorway would make a wonderful shot. I couldn’t anticipate the lovely gesture of her head and arm as she walked through, but I was ready and released the shutter at the crucial moment.
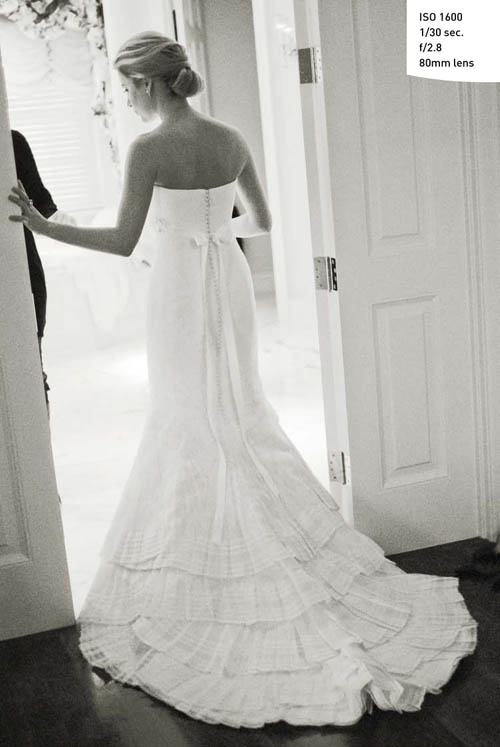
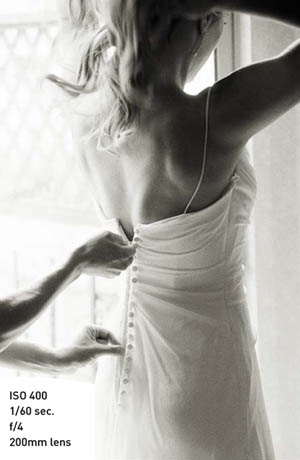
Figure 4.12. This shot has a fine-art figure-study sensibility that is rendered beautifully in black and white.
The Guys
It’s true that this part of the day is mostly about the ladies, but let’s not forget the guys! If the groom and his groomsmen are getting ready at the same site as the bride, I slip away from the bride during a lull in the action and grab a few shots of the men. (You can also send your assistant to do it, if you have one.)
It’s quite a contrast—I may spend an hour or more in the bride’s room, but I generally need no more than five or ten minutes with the guys. I’m looking for a few key shots of the groom straightening his tie (or, as in one case, actually learning how to tie it from a sheet of printed instructions!), fastening his cufflinks, having a beer with his buddies (Figure 4.13). I might ask him to pose for a very quick portrait. Then I head back to the ladies—I don’t want to miss her putting on the dress!
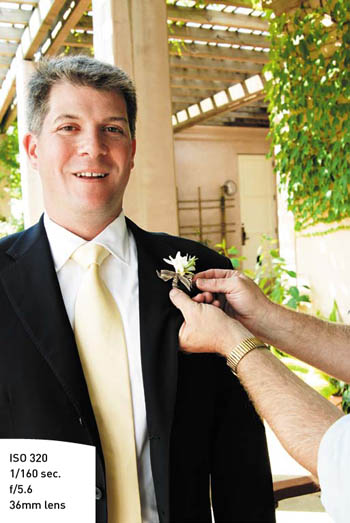
Figure 4.13. I always spend much less time with the groom before the ceremony, but I like to catch the pinning of the boutonnieres.
If the guys are getting ready at a different site and I’m not able to go there, I make a special effort to capture some good candid shots of them at the ceremony site, before the ceremony begins.
Bride and Groom Seeing One Another
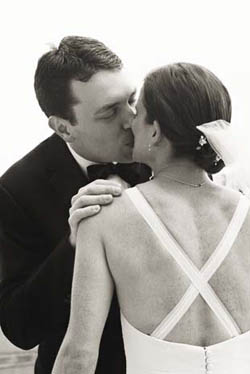
If the bride and groom have chosen to see one another before the ceremony, I take the lead in selecting where and how it will happen, and I use a bit of planned choreography to capture everything that I want. I position the groom in a pretty spot, preferably with nice, even light, and grab a few shots of him alone—it’s a great moment, full of energy and anticipation. I then position the bride some distance behind him and instruct her to approach him slowly. I move back in front of the groom and shoot him again while the bride moves toward him in the background; I also zoom in on the bride over his shoulder (Figure 4.14). When she’s about 10 feet away, I ask her to freeze for a moment while I quickly move around behind her; this way, I’m in position to capture his expression when he turns around to see her. At this point, I give him the go-ahead, he turns, and I snap away (Figures 4.15 and 4.16). Once I’ve photographed his initial reaction, I swing around to the side of the couple so that I can continue shooting them as they enjoy the moment.
This is definitely the part of the day where I’m giving the most very specific direction to the couple that—let’s face it—doesn’t feel completely natural. This is so different from my usual, as-unobtrusive-as-possible approach to the wedding day that I often acknowledge it. I let the couple know that I realize it may feel a little strange, but it’s worth it to make this moment of seeing one another a very special one and to capture it for them in photographs.
Figure 4.14. Step 1: Shoot the bride and groom as she approaches him from behind.
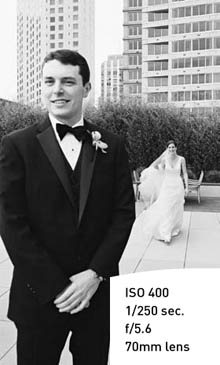
Figure 4.15. Step 2: Ask the bride to pause, and then move behind her so you can capture his expression when he turns to see her.
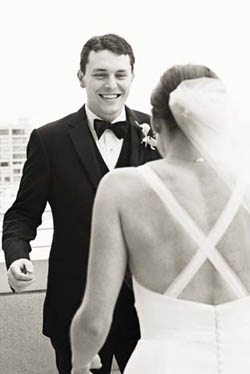
Figure 4.16. Step 3: Continue shooting this great moment, moving about as necessary.
Arriving at the Ceremony Site
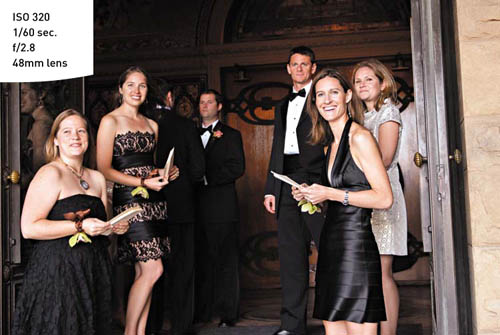
Once you’ve finished shooting all the preparations and any pre-ceremony portraits, it’s time to head to the ceremony site and get ready for the main event. Aside from the ceremony decor, this is a great time to capture images of guests arriving, ushers handing out programs, kids playing, and family being seated (Figures 4.17 and 4.18). If it’s daylight, take the opportunity to shoot candid coverage of the guests—especially if it will be dark by the time cocktail hour comes around. I also try to capture images of the bride and wedding party arriving at the site and lining up for the processional. There are often wonderful moments between the bride and her parents before they take her down the aisle. The excitement and anticipation at this time is exhilarating!
Figure 4.17. I like to arrive at the ceremony site early enough to capture shots of the guests arriving.
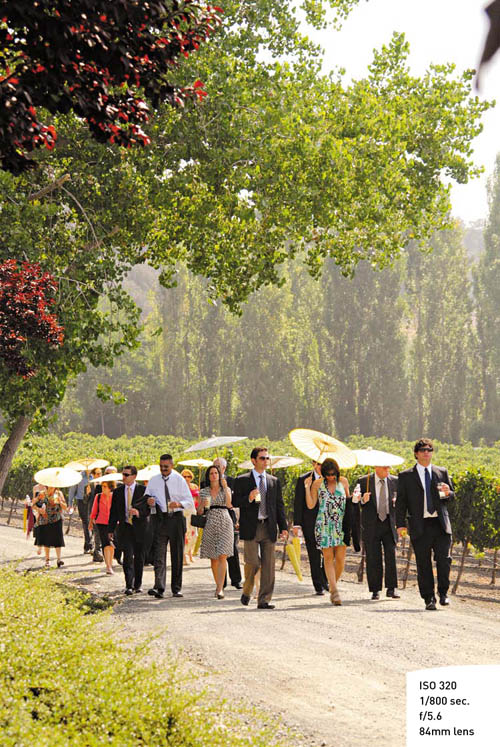
Figure 4.18. In the moments just before the ceremony, the excitement is often tangible.
Moments to Watch For
As you’re photographing before the ceremony, watch for the following moments:
• Small gestures from the bride once she’s dressed: Look for the bride clasping her hands, smoothing the fabric of her gown, twisting to check the back of her dress, and so on.
• Details of the bride’s ensemble, as she’s wearing them: You might focus on her earrings; the dress’s bow, buttons, or other details; or the bride’s hairstyle and other adornments.
• The bride putting on her veil: There is something about this moment. For many brides, the veil is what really makes it real for them. Capture that emotion.
• Anyone entering the room or seeing the bride in her dress for the first time: People coming into the room for the first time will probably get a heartfelt greeting from the bride, and the first glimpse of her in her dress will surely elicit some great emotion (Figure 4.19).
• Guys getting boutonnieres pinned: The guys never have as much going on in the “getting ready” department as the ladies, so the boutonnieres represent a nice opportunity to capture that feeling of wedding preparation for them.
• Kids: Shoot them early while they’re fresh, clean, and happy! Children often leave the event early, so catch them while you can.
Figure 4.19. I love the energy and excitement in this shot of the bridesmaids seeing the bride in her gown for the first time.
Chapter 4 Assignments
Getting a Feel for Backlighting
Set up a backlit lighting situation and practice manually metering and using the in-camera meter in various ways. Notice how differently the camera interprets the scene, depending on whether you use matrix metering, center-weighted, or spot metering. Get a sense of how the image changes as you stop up and down. If you can develop an innate sense of how these changes impact the image, you’ll have a much easier time adapting quickly to achieve the look you want.
Shooting all around a Window
Find a friend to model for you, and set up a fake “getting dressed” moment next to a window. Using the technique described in the “Window light” section of this chapter, manually meter for the shadows when the subject is backlit. Practice shooting as you move around the subject. Notice how the light changes as your angle to the window changes. Get used to quickly switching your camera from Manual for the backlit shot to Aperture Priority as you move.
Choreographing the “Seeing One Another” Moment
Get two friends to help you with this one, and direct them as if they were a couple seeing one another for the first time. You don’t have to do it exactly the way I do—get a feel for what angles work for you and what lenses you like to shoot at various moments. Trying it out with actual people will help you understand the flow of the movement, and you’ll feel clearer about how to direct your clients at the wedding.
Share your results with the book’s Flickr group!
Join the group here: flickr.com/groups/weddingsfromsnapshotstogreatshots