8. Reception and Dancing
Wedding Stage Five
Once the crush of cocktail hour is completed and guests are seated for dinner, you usually have a moment to catch your breath and reorganize for the reception. Next up are scheduled events such as toasts, the first dance, and cake cutting, as well as a whole lot of dancing. There are so many ways to get creative when shooting these moments, and so many opportunities to capture meaningful, memorable images.
Reception coverage is both very fluid (as you rove about looking for those exceptional moments that happen organically) and somewhat orchestrated (as you cover planned events, such as toasts and cake cutting). Stay in communication with the planner or catering manager about timing, because the schedule often shifts a bit. Most important, always anticipate what’s coming up, and be ready for it. Take light readings; make decisions about positioning, lenses, settings, flash setup, and so forth; and prepare the gear in advance so you aren’t scrambling at the last moment!
Poring Over the Picture
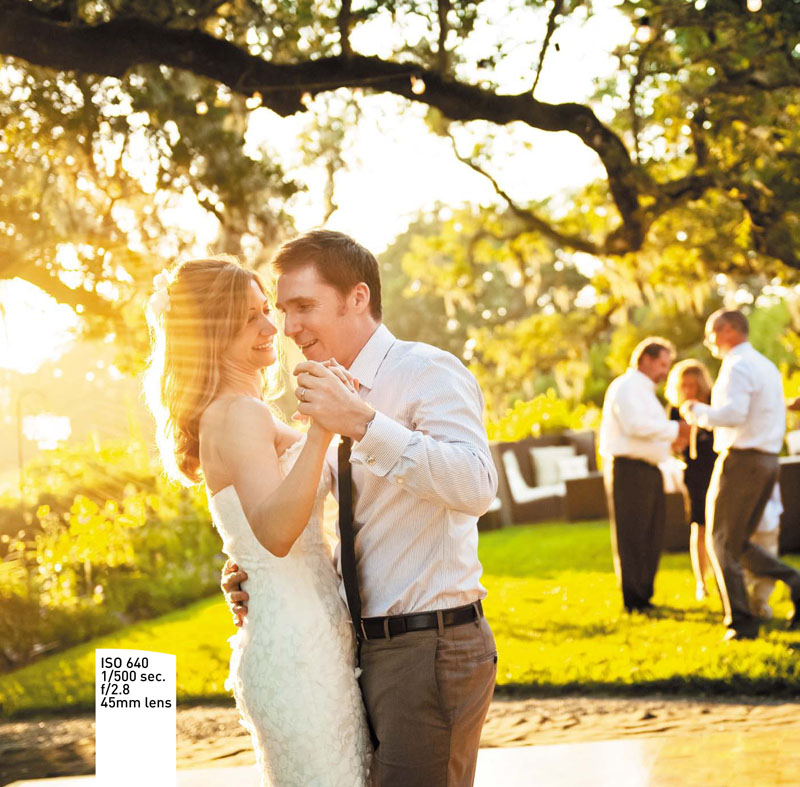
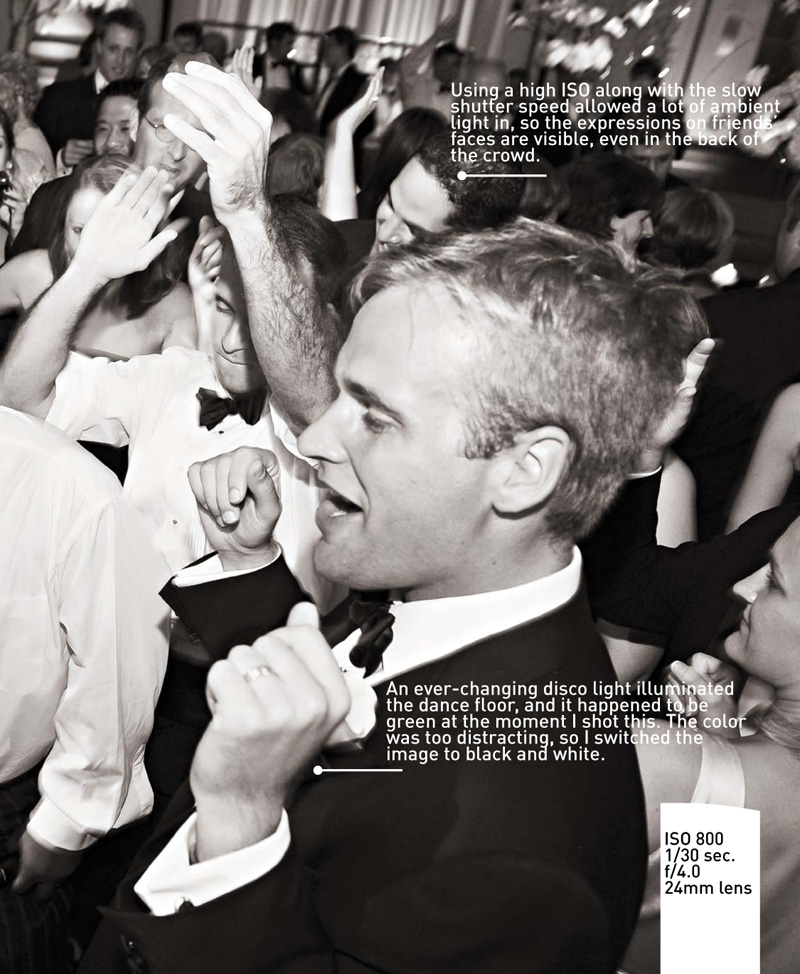
When the lead singer in the band leapt into the crowd to boogie with the bride and groom, I took his place up on the stage to shoot this image that captures the exhilaration of the celebration.
Dinner
If you feel that you may have missed some guests during cocktail hour, you have another good opportunity to shoot candids just as they’re entering the dining area and sitting down. Stop shooting individuals when they begin to eat, though—nobody enjoys being photographed while chewing!
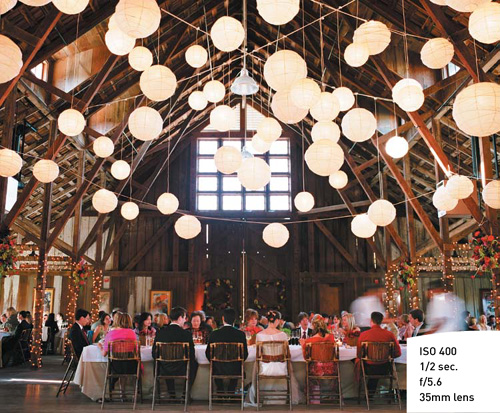
Be sure to take a step back at some point during the dinner and shoot an overview to capture the decor and ambience of the event, as well as the crowd in its entirety. Shoot from a balcony or other elevated spot if possible; even standing on a chair will help.
When the light is low, I shoot with a longer exposure on a tripod so that the movement of people has motion blur, but the setting is totally sharp (Figure 8.1). Be sure that the bride and groom are actually present in the room and visible in the shot.
Figure 8.1. Don’t forget an overview of the dinner scene.
Toasts
As with all the reception events, I shoot the toasts with multiple cameras, using different techniques with each. For example, for a toast that takes place at night in low light, I shoot the person making the toast in a very straightforward way, with on-camera flash (bouncing it, if possible, to soften the light). If there is enough available light, I also shoot without flash at a high ISO for a more natural look.
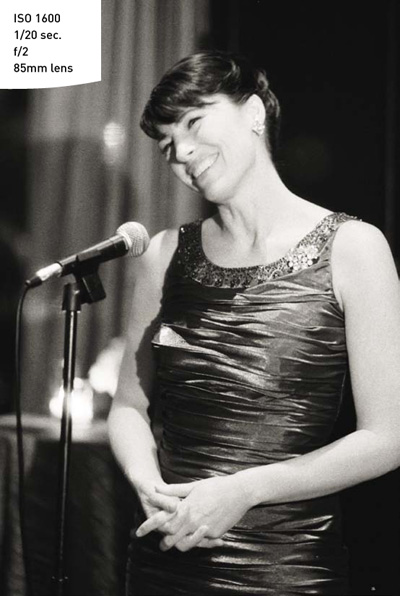
I wait for a moment when the speaker pauses or laughs so that I capture a flattering expression (Figure 8.2). I get several shots of the speaker rather quickly, so that I can turn my attention to the couple and others as they listen and react.
Figure 8.2. I waited for this moment of laughter and shot it without flash for a very natural look.
The toasts provide a fantastic opportunity to capture completely authentic emotion as the couple reacts to the words of their dear friends and family, and the more you can stay invisible while shooting, the more real it will be. I find a spot opposite the couple, usually shooting through a gap between the people seated across from them, and I crouch there for most of the toasting so as to minimize any disruption for the couple and their guests.
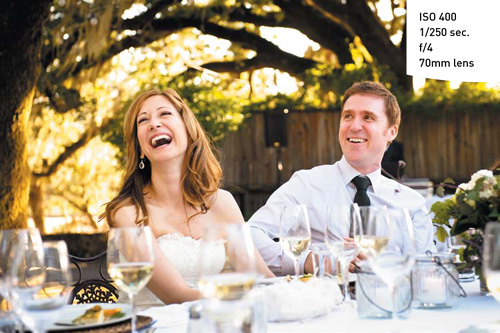
I love the flexibility in focal length afforded by my 24–70mm and 70–200mm zoom lenses, and I use them if there is enough available light (Figure 8.3).
Figure 8.3. In a lovely outdoor daytime setting such as this, I have greater flexibility in my choice of lenses because an aperture of f/2.8 is ample for the situation.
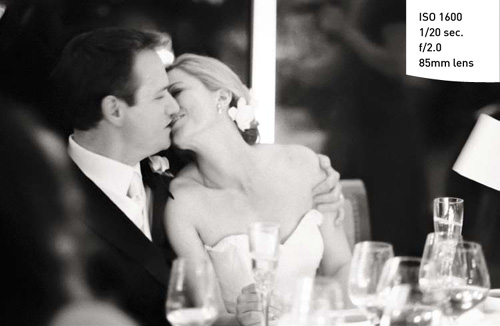
More often than not, though, the setting is quite dark, and a maximum aperture of f/2.8 just isn’t wide enough. The lens I use most for toasts is my 85mm, because the telephoto focal length gets me just close enough to the couple when I’m in position, and it opens to a wide f/1.8, allowing me to shoot in extremely low-light situations. With my crouched position, the couple is able to forget about my presence entirely, and I can capture very personal and intimate images (Figures 8.4 and 8.5). If the tables are very close together and I’m closer to the couple, the 85mm may be too long for me to get both bride and groom in the shot. In that case, I switch to my 50mm lens, which also opens up to f/1.8.
Figure 8.4. By shooting as discreetly as possible, I’m able to capture very real moments of authentic emotion as the couple reacts to the toasts.
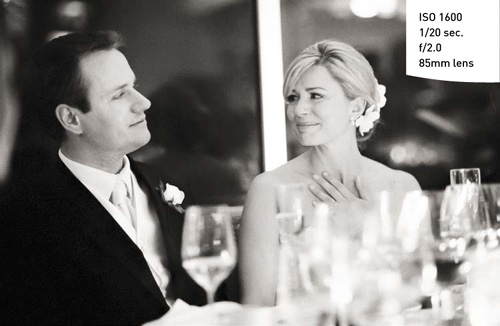
Figure 8.5. I keep my attention on the couple throughout the toasts and capture a range of images during this time.
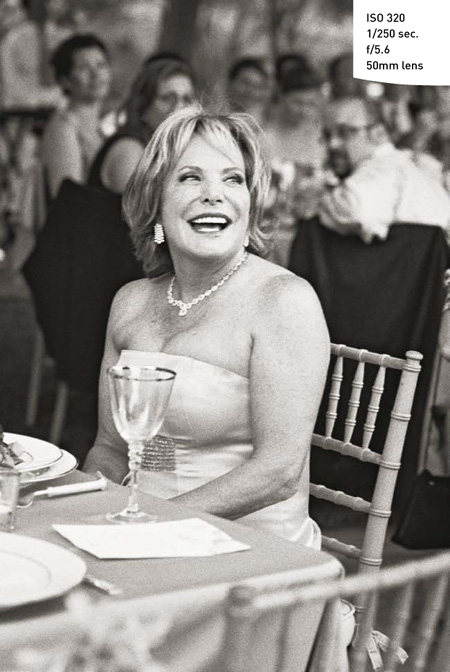
Take note of where key friends and family members are seated, and look for great reactions from them as well (Figure 8.6).
Unless it’s a very pretty outdoor setting in soft, evening light (as in Figure 8.3), I tend to prefer black and white for these shots. To my eye, if the colors in the image are very bright or clashing, they can distract from the emotional impact of the moment.
Figure 8.6. Toasts are an opportunity to capture wonderful, authentic reactions from family and close friends.
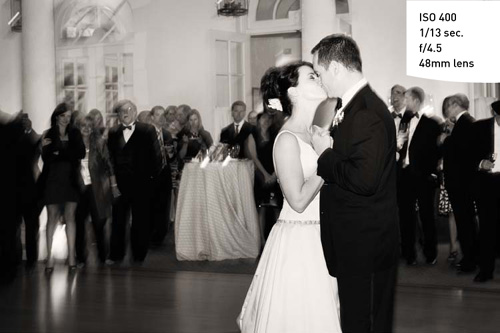
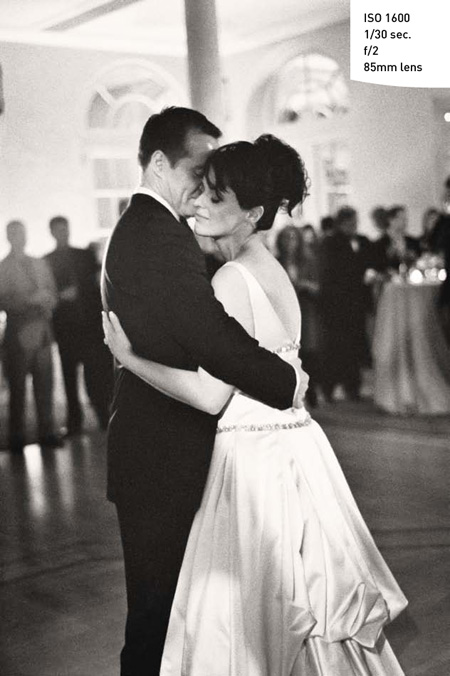
The First Dance
I always make a point to discuss the first dance in advance with my clients and find out if they have anything special planned. Some couples take lessons and have an entire choreographed routine, and it’s helpful to know in advance what they’ll be doing. In particular, I ask if there will be a dip at the end of the dance. It seems like a small, silly thing, but it’s really easy to be in the wrong place when it happens! If I know in advance that it’s coming, I have a much better chance of being in the right place at the critical moment (Figure 8.7).
Figure 8.7. It’s always satisfying when I manage to catch the dip from a great angle.

As with the toasts, when the couple takes to the floor for their first dance, I shoot in a few different ways. If the room is dark, I shoot with on-camera flash, bouncing it from the ceiling if it’s low enough, to diffuse the light. I use my 24–70mm lens so that I have a lot of flexibility in taking wide shots that show off the room, as well as closer shots that focus on just the bride and groom. To capture as much ambient light as possible, I set the flash to TTL and the camera to Manual. With a shutter speed of around 1/40 sec. (maybe a bit faster if the couple is moving very quickly, to avoid unintentional motion blur) and a fairly open aperture of about f/4, I’m able to bring the environment into the image and often capture great reactions from guests and family members in the background.
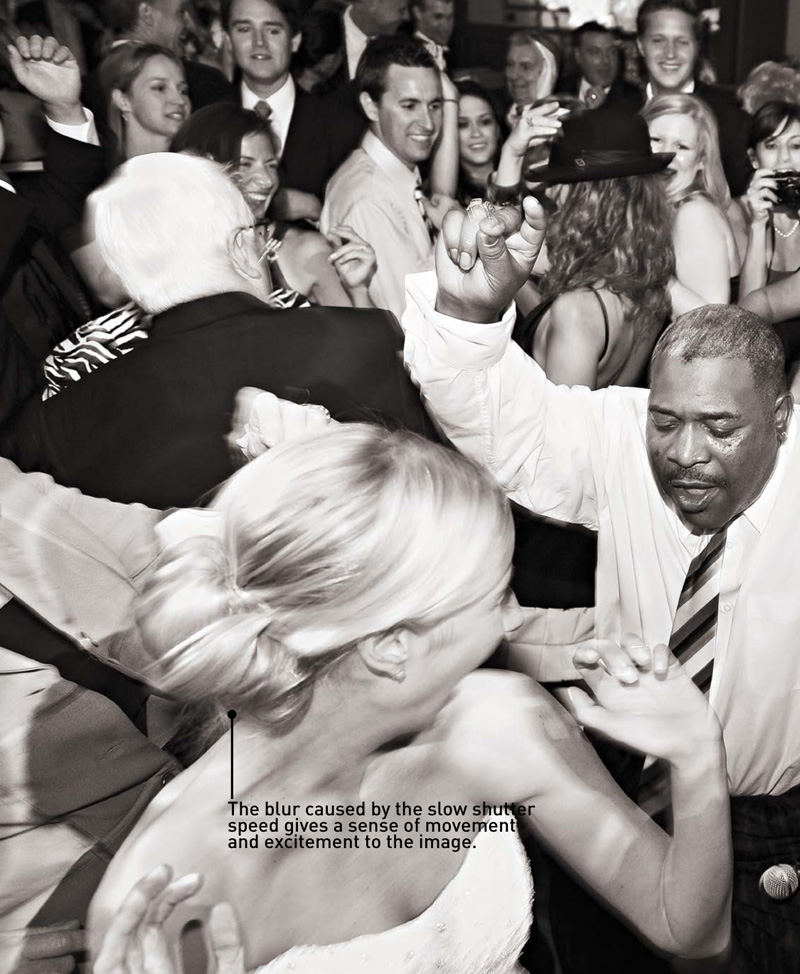
I often experiment with dragging the shutter. I set my shutter speed to about 1/10 sec. and move the camera as I shoot, tracking with the movement of the couple. This way, I intentionally create motion blur in the background, while the flash freezes the action of the couple so that they’re mostly sharp. With such a slow shutter speed, the couple sometimes has a bit of blur as well, but less than the blur of the background (Figure 8.8). I’ll switch to these settings long enough to fire off several shots, and then return to my usual shutter speed of 1/40 sec. or so.
Figure 8.8. Slowing the shutter speed way down and tracking the movement of the couple creates a nice motion-blur effect.
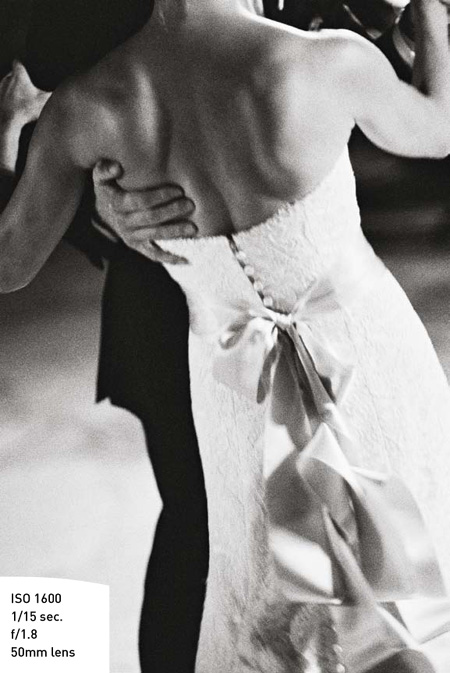
I often shoot without flash as well, using one of my faster lenses, such as the 85mm f/1.8. As long as there is enough available light for me to shoot with a wide-open aperture, a shutter speed of 1/30 or 1/20 sec., and a reasonable ISO that won’t cause too much grain or digital noise (I usually keep it at 1600 or less—that’s the ISO I use when shooting black-and-white film, too), then I’m good to go. Because the shutter speed is usually so slow, I know to expect some motion blur, and I embrace it. I like to track the movement of the bride and groom with my lens so that they’ll be less blurry than the background, and I also like to get close up on details such as his hand around her waist (Figure 8.9).
Figure 8.9. Back-of-the-dress details make for a beautiful ambient-light shot of the first dance.
If it’s just too dark to get the settings needed to shoot without flash, I’ll add the video light. My assistant holds it and moves fluidly around the couple, with the predominant position being a little less than 90 degrees away from me so that the light hits the couple from the side (Figure 8.10). My assistant also can slip behind the couple, crouching directly behind them to create a nice, backlit glow. With the video light, I’m able to achieve the settings I need to set the flash aside for a bit.
Figure 8.10. The video light coming from the left side added just enough to capture this dreamlike image.
If you don’t have the video light—or an assistant to hold it—but there is a videographer at the wedding, you can “borrow” his light to get the same effect. The videographer will already be using his light on the couple, so just coordinate your movements with his so that, from your position, the light is coming from the side. Moving around in relation to the light will obviously change the way the image looks; with a little practice, you’ll get the feel for it.
Be sure to consider the videographer’s shot if you’re taking advantage of his light. It’s OK if you pass through once in a while, but it would be obnoxious to continuously cut in on his shot as you both move about.
Cake Cutting
I approach cake cutting much the same as I approach the toasts. I shoot in a straightforward way with flash, using a slower shutter speed to pull in as much ambient light as I can and bouncing the flash if possible. I also shoot with available light, using the video light when necessary (Figure 8.11).
Figure 8.11. I shoot the cake cutting both with flash and without, and often prefer the more soulful look that is possible when shooting with available light.
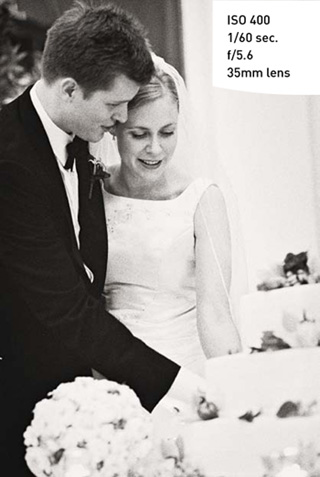
At this time, guests often crowd around and I may be squeezed in fairly close to the couple, so I usually need a normal-to-wide lens to get everything in the shot.
The cake is often placed near a wall, and if you stand directly facing the wall and shoot with on-camera flash, you risk creating a hot spot in the image where the flash hits the wall and bounces directly back into the lens. To avoid this, simply turn a bit so that you’re shooting at an angle to the wall, not directly at it.
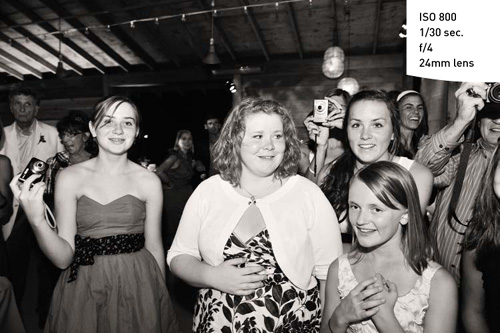
Don’t forget to turn around and grab a shot of the guests as they watch (Figure 8.12).
Figure 8.12. I used a wide lens to catch this fun shot of guests during the cake cutting.
I always shoot important moments multiple ways, both for variety in the look of the images and as extra insurance. If a flash dies or a camera body begins to malfunction during the cake cutting, I always have another option for covering the moment. I ask my assistant to shoot these moments as well, as an additional precaution.
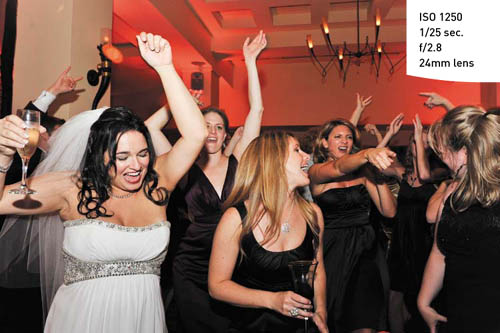
Dancing
Dancing and party shots are fun, especially if you have a soft spot for often-played classics like “Don’t Stop Believin’” and “We Are Family”!
But between the quick movement of the subjects, the press of the crowd, and the typically dark lighting conditions on the dance floor, dancing shots also can be challenging. Using a few simple techniques, you can create images that are truly head and shoulders above simple snapshots.
Flash
At most weddings, the dancing takes place at night and in dark conditions—although occasionally I’m lucky enough to have an outdoor summer wedding where the dancing begins before dusk, in which case I shoot as much as I possibly can before it gets dark (Figure 8.13). Inevitably, though, the time comes to pull out my flash.
Figure 8.13. Whenever guests are dancing in daylight, I shoot like crazy! I was stretching it here, with a shutter speed of 1/30 sec., but the blur works in this image.
Similar to the technique described in the “The First Dance” section, I use my flash on the TTL setting and my camera on Manual. I use a relatively high ISO (usually 800) and a shutter speed of around 1/60 sec. so that I can pull in as much ambient light as possible without getting too much motion blur. For the aperture, it’s a balancing act between opening up enough to capture ambient light in the background and ensuring that I have enough depth of field so that the subjects are sharp. This is a particular concern because of the darkness of the room (which can make it difficult for the camera to accurately autofocus on the subject) and the movement of the dancers. I usually use an aperture of about f/4.
I bounce the flash off the ceiling whenever possible to soften the light and give it a more natural look (Figure 8.14). If the dance floor is outside in the dark, however, there is nothing that the light can bounce off and I have no choice but to point the flash directly at the subjects. When shooting this way, I’m very aware of any people or objects that stand in the path to my subject, because they could block the flash and ruin the shot.
Figure 8.14. Bouncing the flash from the ceiling makes the light much softer and more diffuse.
By attaching the flash to the camera using a sync cord, you can remove it from the hot shoe and shoot with the flash off-camera. You can experiment with holding the flash from various positions (from the side, from above, and so on) to create different looks (Figure 8.15). It takes a lot of practice to aim the flash properly with one hand while simultaneously composing the shot, focusing, and pressing the shutter with the other. In addition, flash sync cords are notoriously inconsistent, so the flash may not always fire. I recommend using this technique sparingly as a supplemental, fun “extra” until you really feel comfortable that you can achieve consistent results.
I shoot with natural light so much that I have to consciously remind myself to slow down just a bit when shooting with flash, to make sure that the flash unit has time to recycle.
Figure 8.15. I used a sync cord and held the flash off-camera high and to the left.
Lens choice
I love using a telephoto lens for dancing shots because they allow me to keep a distance from the subject and capture a more natural look. That said, telephoto lenses work well only if I’m able to shoot without flash (for example, that rare occasion when the dancing is during daylight) or when the dance floor isn’t too crowded (so my flash has an unobstructed path to the subject). For shots of individuals or couples dancing, I most often use my 24–70mm on the normal-to-wide side or my prime 35mm.
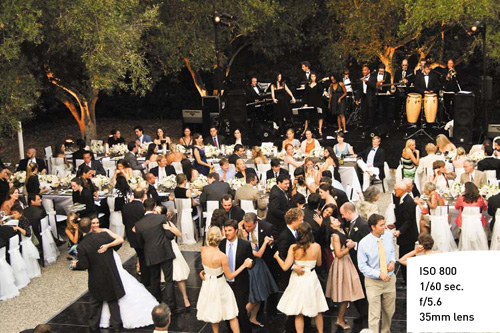
I switch to a wider lens for overview shots with available light. For these images, motion blur only adds to the feeling, so when the light is low, I often shoot at very slow shutter speeds, such as 1/8 sec. Similar to overview shots of cocktail hour and dinner, an overall perspective of the dance floor is nice to have for the final album (Figure 8.16).
Figure 8.16. I took advantage of the daylight and shot this overview of the reception from a second-floor window.
Timing
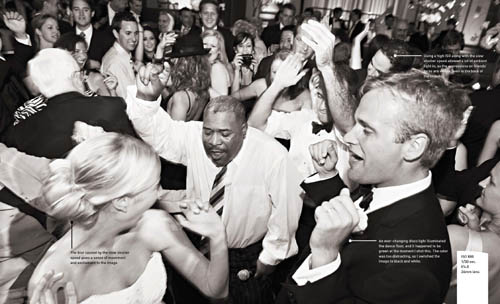
Obviously, because dancing subjects are in motion, timing your shots is key. I anticipate the movement of my subjects, often just tracking them with my lens until the moment when they spin, turn, or do something that creates a desirable composition (for example, making both partners visible, or providing a great perspective on one partner over the other’s shoulder; Figure 8.17). I often keep my camera trained on a particular couple for a few moments until I see the opportunity, and I very consciously select my moment to press the shutter. I recommend shooting a lot of dancing images and simply weeding them out later, because you’ll get a high percentage of duds no matter how carefully you try to compose!
Figure 8.17. I waited for just the right moment, when he spun her and they were both facing the camera.

Unique angles
Always look for unique angles from which to shoot, especially for overview shots. You can get above the crowd from a staircase, from a balcony, from the band’s stage (with permission, of course), from a chair, or even just holding the camera over your head to shoot. I also like to get down low and shoot from a corner of the floor with a wide-angle lens for a really dynamic image (Figure 8.18). Basically, anything that isn’t shot from eye level will have a different—and often more compelling—look than a typical snapshot.
If there is a band and they’re really getting the crowd going, it’s fun to stand near the stage, turn around, and shoot the sea of guests from the front as they rock out (Figure 8.19).
Figure 8.18. Shooting with a wide-angle lens from down low captures a nice party vibe, as well as the details of the room.
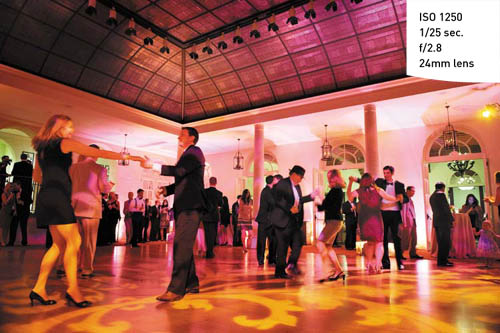
Figure 8.19. If partiers are crowding the stage, scramble to the front, turn around, and shoot them.
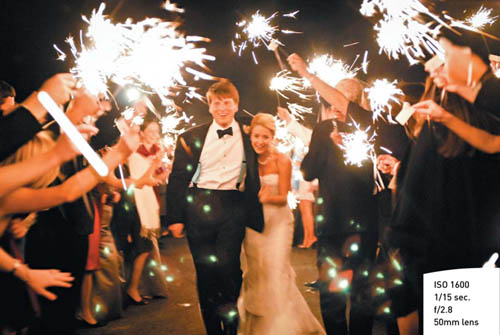
Departure
If the couple is doing some kind of special departure, you need to get at least one fantastic exit shot to end the story with an exclamation point. It’s always nighttime, and it’s always dark, so I’m always using flash. But if there is some ambient light (say, from a streetlight or the guests holding sparklers), I ask the couple to pause for just a moment as they leave, and I shoot with a tripod (or just hand-hold the best I can). The results are worth it (Figure 8.20)! And don’t forget to turn around and get shots of the guests’ reactions as the couple goes.
Figure 8.20. I don’t like to make too many requests of the couple as they enjoy the day, but I did ask this couple to walk very slowly for a moment so that I could shoot them by the light of the sparklers.
Moments to Watch For
When you’re shooting the dinner and reception, watch for the following moments:
• Kids gathering around the cake as they wait for it to be cut: Like moths to the flame, they just can’t stay away.
• Sweet dancing moments between: the parents, other family members, and close friends of the couple.
• Still-life shots of getaway car, favors, and other elements that may not be introduced until just before the evening ends: Keep in touch with the planner to make sure you don’t miss anything (Figure 8.21).
• Signs of the party: Look for shoes left behind to facilitate dancing, a splash of wine on a tablecloth, chairs sitting empty as everyone dances, and so on (Figure 8.22).
Figure 8.21. The wedding is drawing to a close, but you don’t want to miss anything. Make sure you know in advance about any end-of-the-evening details that need to be covered.
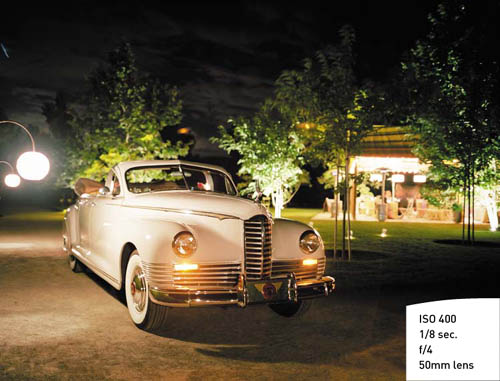
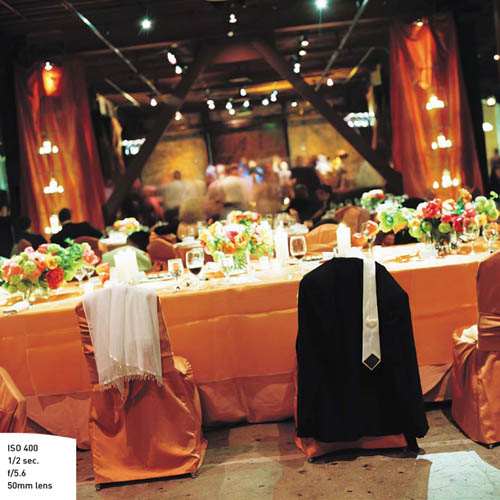
Figure 8.22. With the couple’s accessories hanging on their chairs and the dance floor in the distance, this shot says a great deal about this party.
Chapter 8 Assignments
Dancing with Light
If you plan to have an assistant hold a video light during the first dance, it’s a good idea to do a little test run so that both of you can get the feel of moving around one other and the subjects. You’re engaged in a dance of your own with your assistant and with the light, so stage a rehearsal. Ask some friends to pose as the couple, and simply fake a first-dance shoot. You need a fair amount of space, so you could do this outside at nighttime, and it’ll really give you a sense of how the position of the light affects the look of the image.
Flash Play: Drag It
While you have some willing models, set up your flash and practice dragging the shutter. Try it out at different speeds, and try moving the camera at different rates as you shoot, as well. You’ll begin to get a sense of how much blur is caused by the various shutter speeds, as well as how fast you move the camera. Pay attention to the background as you shoot, and see how elements such as lights and architectural details are rendered.
Flash Play: Take It Off
Try using a sync cord to get your flash off the camera. First, just try to hit the subject with the light—it can be more challenging than it sounds! Then experiment with holding the flash in different positions—up high, off to the side, and so forth. Notice how the different angles of light affect the shot.
Share your results with the book’s Flickr group!
Join the group here: flickr.com/groups/weddingsfromsnapshotstogreatshots