1. Equipment

What You Need
To create consistently high-quality images, you need high-quality equipment. Entering the field of professional wedding photography involves an investment—but you don’t need to own every lens and gadget under the sun. Keep it simple and know your equipment well so that it becomes an extension of you—a way to serve your vision. Ultimately, a photographer’s knowledge, skill, and experience with her own equipment is nearly as important as the equipment itself.
Poring Over the Picture
These are my must-have items for every wedding. Try not to bring anything that won’t be used—it’s simply more stuff to lug around and more to dig through when searching for that one lens you really need, just as the ceremony is about to start!


Which Features Are Important
Everyone knows that photography equipment isn’t cheap, but the good news is that you don’t need to buy the most expensive, feature-laden equipment in order to make great images at weddings. Many of the features on the highest-end gear are irrelevant to wedding work, and you can stretch your equipment budget by prioritizing the features that matter most (and resisting those that don’t). Invest in a few basic pieces of excellent-quality gear, and you’ll have all you need to produce amazing results (Figure 1.1).
Figure 1.1. This beautiful image was shot with my least-expensive lens—it cost only $125 or so.
Camera bodies
The most important component of a DSLR body is the size and quality of the sensor. In terms of sensor quality, the most important feature for wedding work is the ability to shoot in low-light situations at very high ISOs. This gives you a lot more flexibility throughout the entire day—in dark hotel rooms when the bride is getting ready; inside churches, synagogues, and ballrooms; and even when shooting groups or party shots.
Avoid the temptation to fixate on the number of megapixels a camera has. File size is very important to a point, but just about any DSLR on the market today will produce files that are large enough for your needs as a wedding photographer—and the number of megapixels will only increase as technology evolves. The camera I currently use for most of my shooting produces 12.1-megapixel images, and I’ve never had an issue with the file size being too small when producing prints, albums, canvases, and other items for my clients.
Most major camera manufacturers carry three distinct lines of products:
• Professional: Camera bodies in the professional line generally cost anywhere from $5,000 to $10,000—and that’s just for the camera body, not including a lens. Professional camera bodies have the highest-quality sensors and are jam-packed with features.
• Prosumer: In the prosumer line, the bodies generally cost $2,000 to $3,000. Although they may have fewer features than cameras in the professional line have, prosumer camera bodies often have the same great-quality sensors.
• Consumer: Consumer camera bodies typically cost less than $1,000. Sometimes (but not always) they have lower-quality sensors that don’t perform as well in low-light situations. The sensors on consumer cameras often are cropped (see the sidebar on the following page).
Spending the extra money for the top pro models buys you additional features, but most of those features—things like huge file size, super-fast frames-per-second rates, and giant buffers to facilitate sustained rapid-fire shooting—really aren’t that relevant to the needs of a wedding photographer. These features are more applicable to the needs of sports or fashion photographers.
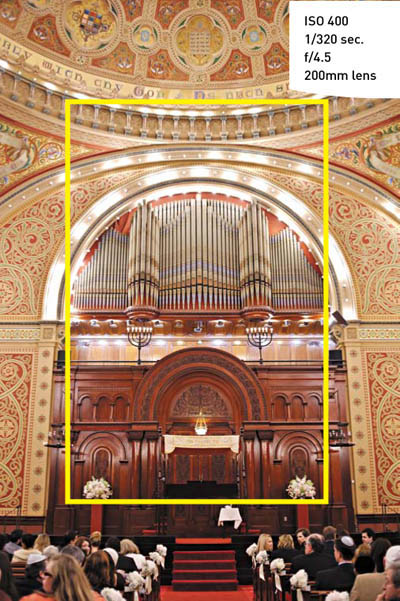
Figure 1.2. This image was shot with a camera with a full-frame sensor. The line indicates what it would look like if the sensor had a crop value of 1.5X.
Pro models are often larger, and the casing may be more durable or weatherproof (Figure 1.3). But, again, these features aren’t necessary for most wedding work—and they may even be a detriment. Larger, more rugged bodies are heavier, which can be difficult when you’re shooting for nine or ten straight hours. Plus, you’ll probably replace your camera bodies every few years due to rapidly changing technology, so durability isn’t as important as it was in the past, when the same camera body could be used for decades.
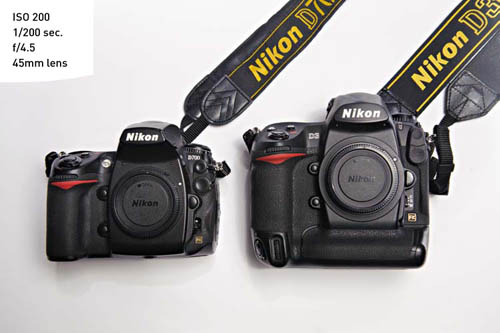
Figure 1.3. Camera bodies can vary quite a bit in terms of size and weight, so be sure to check out the models in person before buying. Featured here are the Nikon D700 (prosumer) on the left and the Nikon D3 (professional) on the right.
I recommend investing in the best-quality sensor available, but not necessarily the most expensive camera model. This often translates into a prosumer camera body, but some consumer models may have the best-quality sensors, too. Obviously, the landscape is changing all the time with the development and release of new models, so be sure to research the most current offerings and ask lots of questions to really understand the strengths and weaknesses of each model.
Although the sensor is the most important consideration when selecting a body, it’s not the only one. You need to see and feel the camera in person. If you have the opportunity to borrow or rent the body you’re considering and test it out, that’s a definite plus.
I highly recommend finding a reputable, professional camera store in your area. There you’ll find experienced, knowledgeable staff who use and understand the gear and can answer your questions, as well as make recommendations based on your specific requirements. Be aware that some large-scale, warehouse-style stores may be more interested in selling you whatever they happen to have in overstock rather than what will really meet your needs.
After you’ve narrowed your choices, hold each model in your hands. Does it feel balanced? Are the controls easily accessible and intuitively positioned? How about the weight? Can you envision being able to comfortably wield it (with lens attached) for nine straight hours at a wedding? I know some wedding photographers who struggle with carpal tunnel syndrome because of their gear, so weight is no small consideration.
Lenses
After you have your camera body, it’s time to invest in some high-quality glass. The quality of the lenses you use will affect color, contrast, and sharpness in the image (Figure 1.4). No matter how talented you are, if your lenses are substandard, your images will suffer.
If you’re interested in buying a particular lens, there are several ways to research it:
• Ask fellow wedding photographers about their experience with the lens.
• Read online reviews of the lens. Keep in mind that the reviewers may have different shooting priorities than yours.
• Borrow or rent the lens and try it out in similar situations to the ones you’ll be shooting in. As with a camera body, trying out a lens is really the best way to get a feel for it and decide if it’s right for you.
Figure 1.4. My 50mm prime lens gives me excellent sharpness and contrast, especially critical in this shot where the subject and the background are similar.

Lens speed is a huge consideration. Throughout this book, I’ll discuss all the ways that I use available light during virtually every part of the wedding day, for more natural and beautiful images. I frequently shoot at f/2.8 or wider. For my shooting style, slow lenses or zooms that open only to a range of, say, f/3.5–5.6 are virtually useless. Fast prime lenses and zooms that open to f/2.8 throughout the focal-length range are well worth the extra money (Figure 1.5).
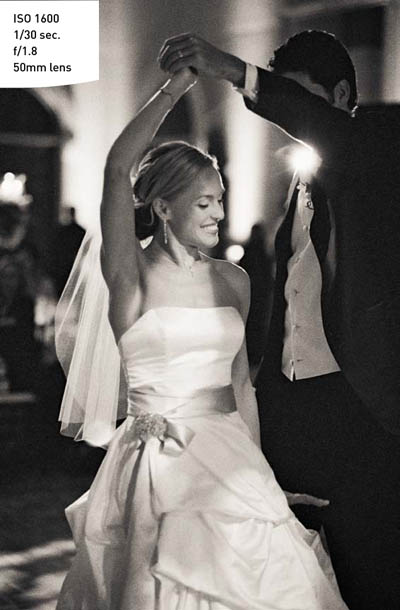
Every wedding photographer should have at least one lens that opens to at least f/1.8. This speed is really helpful in extremely low-light situations. Plus, it offers more room for creative expression by manipulating depth of field with wider aperture settings (Figure 1.6).
Figure 1.5. In darker interior spaces, an aperture of at least f/2.8 is essential so that I can hand-hold the camera and, thus, move about freely and shoot quickly, unencumbered by a tripod.

Figure 1.6. Aside from opening up the possibilities in low-light situations, the wide apertures of fast prime lenses offer more possibilities for creative expression.

You’ll pay a very steep premium for lenses that open even wider to f/1.4 or f/1.2. If you’re absolutely in love with the look of a super-shallow depth of field, you may find it worthwhile to spend the additional money for these lenses. In my opinion, though, for general wedding use, it’s generally not worth it—your money is better invested elsewhere, especially if you’re still building your gear collection.
Lighting
Although many camera models (particularly consumer and some prosumer models) come with a pop-up flash, you should use that flash only in the event of an emergency—if, say, your mounted flash unit dies just as the bride is walking down the aisle of the dark church. The built-in flash can cause red-eye, and longer zoom lenses can actually cast a shadow on the subject because the flash is so close to the lens.
Every flash has a guide number to indicate how powerful it is, and the level you need will depend on how you intend to use it. If you’ll use the flash to light large group shots, you’ll need significantly more power than if you intend to use it for dancing and party shots only.
If you’re considering a flash unit that’s a different brand from your camera, pay attention to whether the flash and the camera will be able to fully communicate with one another, so that you can shoot in Automatic or TTL mode. Sometimes a special adapter is required; in other situations, full communication just isn’t possible. Ask questions and test it out before you buy. Bring your camera to the store and set the whole thing up so you can see how the components work together.
Be sure that the flash head swivels so that you can bounce light from the ceiling, walls, and so on. Also, make sure that the flash accepts various types of diffusers. Some of the smaller models don’t have these features.
Bags
Many types of camera bags are available. I have a few different bags that I use for various types of shoots:
• A large rolling bag for weddings
• A shoulder bag that rides atop the roller if I need to bring additional lenses or lighting
• A smaller backpack that I use for portrait sessions, since I need less equipment and I want to keep it on my person at all times
If you decide on a rolling bag, make sure it can fit in airline overhead compartments so that you’ll be ready when you book that sweet destination wedding. Although bags certainly aren’t cheap, they are an investment and you shouldn’t skimp on quality. I bought an amazing Tamrac rolling bag shortly after I started shooting weddings. The $350 price tag seemed steep at the time, but 13 years later the bag is still as good as new, and I’ve never regretted the investment.
Building Your Gear Collection
All photographers have wish lists of cameras, lenses, and other items that they dream of owning one day, but most of us need to start more modestly and build our collections as we go. It’s definitely possible to make wonderful images with very simple gear. In this section, I offer suggestions on how to begin your collection of equipment and how to think about what the most logical next purchase might be.
Beginning gear
If you aren’t already shooting with a model that features the best sensor available, get hold of one as soon as you can! You’ll see a huge difference in your images, and the investment will be worth it.
Many wedding photographers use zoom lenses, but the best-quality ones are very expensive. Until you can afford one, I recommend using a selection of great-quality prime lenses as an alternative to poorer-quality, slower zoom lenses (like the kind that are often included as kit lenses with camera bodies) and those that do not have a consistent aperture of f/2.8 throughout the range of focal lengths.
Here’s a beginning gear list to get you started:
• One camera body (Note: Rent an additional body as a backup until you can buy one.)
• Two flashes (one as a backup)
• Normal lens, 50mm
• Wide lens, 35mm
• Telephoto lens, 85mm
• Tripod (lightweight carbon fiber)
Looking at Nikon as an example, you can purchase a 35mm f/2, a 50mm f/1.8, and an 85mm f/1.8 lens for under $1,000 total, which is close to half the price of one 24–70mm f/2.8 zoom, and the primes are all faster (Figure 1.7). With two camera bodies on hand, you can mount different lenses on each of them and easily carry both at the same time, so you have some choice in focal length at any given moment.
Figure 1.7. These three prime lenses will give you a great start with weddings.

If you have a camera with a cropped sensor, you might get 28mm, 35mm, and 85mm lenses instead, to compensate for the effect the sensor has on the perceived focal length of the lenses. Make sure that whatever lenses you buy can work with full-frame sensors as well; that way, if you upgrade your camera body, you won’t have to buy all new lenses.
The lenses listed in this section obviously don’t provide the flexibility in focal length of some of the zoom lenses, particularly on the telephoto end of the spectrum, but the affordability and great image quality are more important when you’re just starting out. These lenses will continue to be useful for many aspects of wedding work even as your gear collection expands.
Professional-level gear
By adding a few key pieces to the starter kit described in the preceding section, you’ll have a very serviceable collection:
• Second camera body
• Medium zoom lens, 24–70mm f/2.8
• Telephoto zoom lens, 70–200mm f/2.8
The added lenses are pricey but beautiful, sharp, and fast, and they’re the workhorses for many wedding photographers, myself included (Figure 1.8). With this equipment, you’ll have many more options at your disposal and many more ways to express your creative vision.
Figure 1.8. Very sharp, very fast zoom lenses are expensive but excellent. They’re the workhorses for many wedding photographers.

Dream gear
The following additions simply add a little icing on the cake, opening up more creative opportunities on the wedding day (Figure 1.9):
• Third camera body (for backup)
• Macro lens for close-ups of details
• Super-wide prime or zoom lens, such as 20mm or 17–35mm
• Video light to allow for no-flash shooting in low-light situations
• Strobe lighting kit for larger group shots
Figure 1.9. A macro lens for close-ups and a super-wide lens will give you even more options.
