
6. Post-Ceremony Portraits

Wedding Stage Three
The ceremony’s over, and you killed it. Congratulations! But you’ll have to hold the celebration, because it’s immediately on to the next thing—most often, family and group portraits, as well as portraits of the brand-new husband and wife. Time is of the essence, so pull out the shot list you prepared prior to the wedding and get ready to roll!
Poring Over the Picture
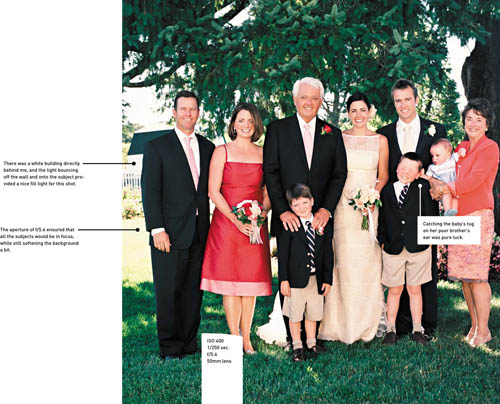
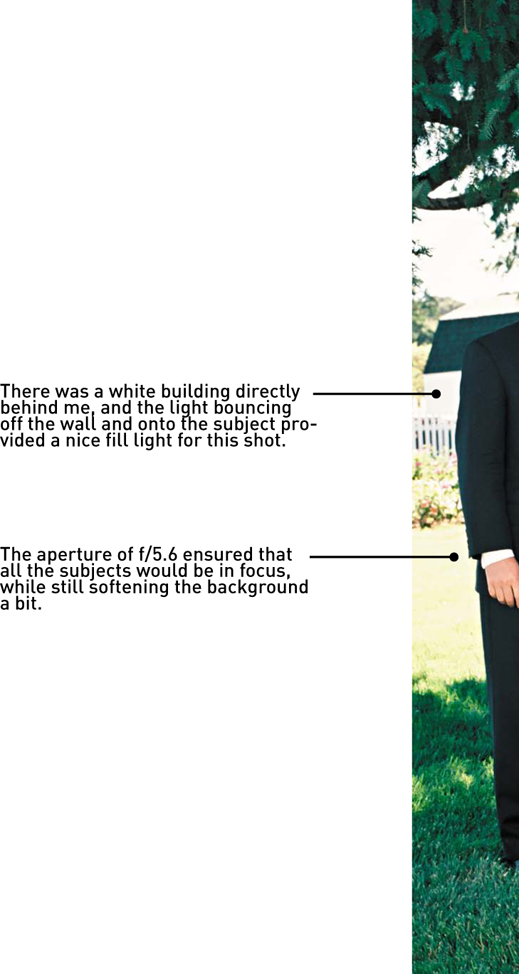
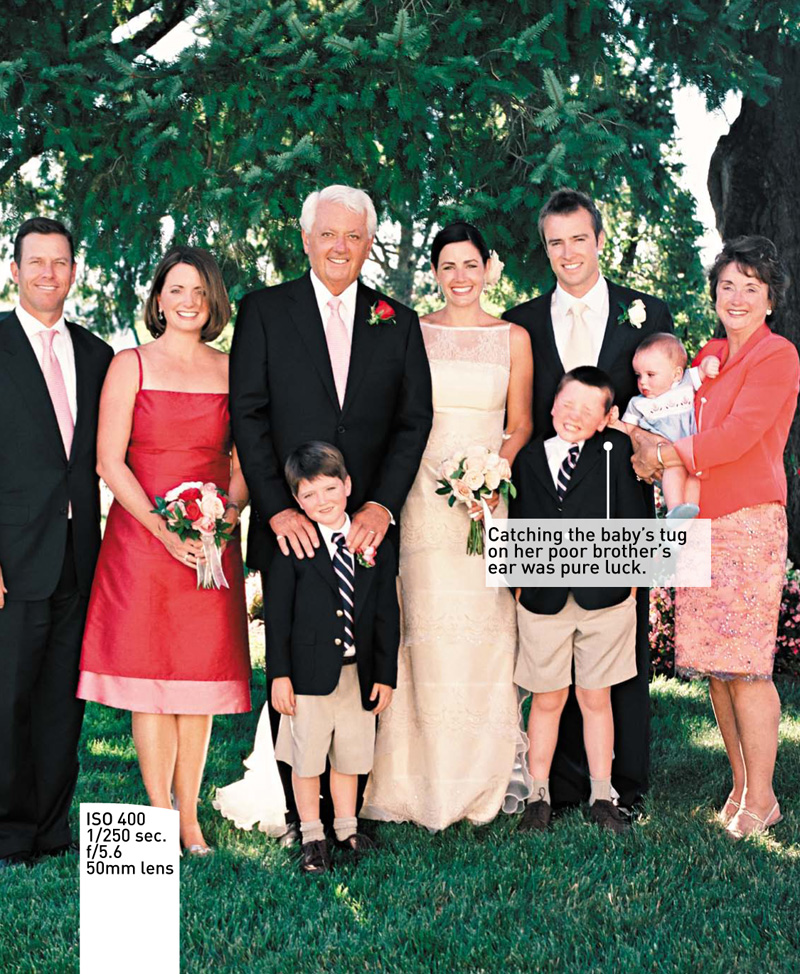
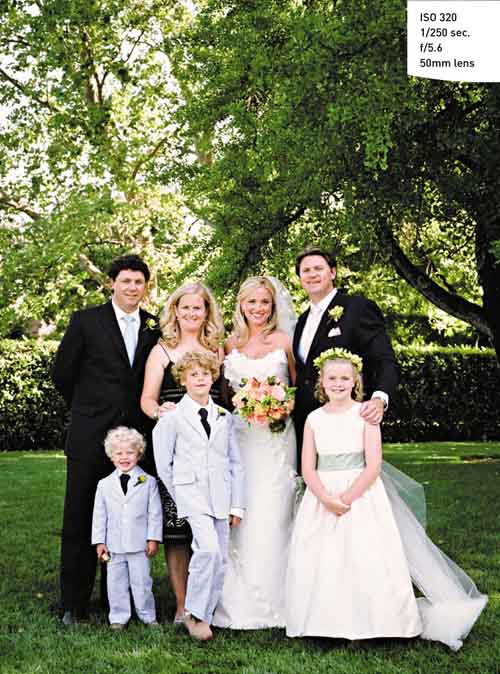
Open shade is always the most desirable lighting for family portraits, and the trees created a nice backdrop for this set of images. I always do the shots that include children first, to minimize their wait time. I didn’t even notice the baby’s antics until afterward!
Poring Over the Picture
The sun was still quite high when I did this portrait session with the couple, so I looked for shady areas. I was able to take them out again later in the evening to shoot some additional images around sunset.


Group Formals
When I’m shooting weddings, my joy is in capturing candid moments, but I also recognize the importance of family and group portraits. They create a historical document of the wedding and of the families that are present. I spend a lot of time planning a strategy for these formal portraits before each wedding so that, on the big day, I can make them beautiful, cover everything that is needed, and finish them up quickly. Nobody wants to spend hours on these! (See Chapter 3 for more on the planning phase.)
Although I spend most of the day staying in the background and shooting as unobtrusively as possible, when photographing the posed group shots, leadership is required. Don’t be afraid to command the attention of the group and corral people as necessary. Some groups are more docile than others, of course, but this is one part of the day where you really must take charge in order to keep things moving.
Outdoor lighting
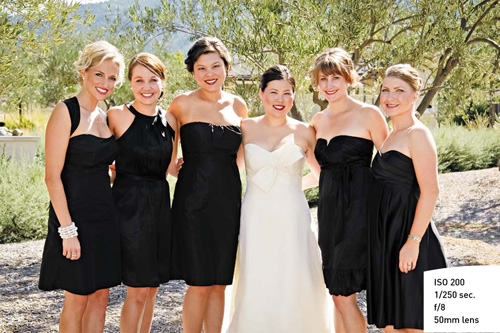
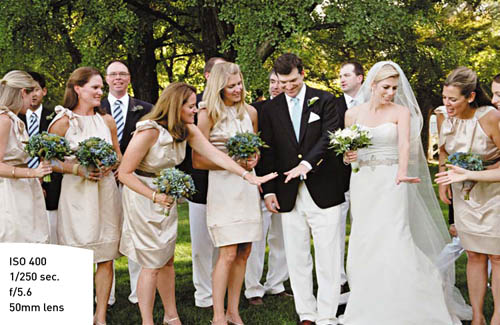
I prefer to do the group shots with available light, if possible, because I can start shooting so much more quickly if I don’t have to set up supplemental lighting and I don’t have to wait in between shots for the light to recharge. I do them outside if weather permits, and aside from the lighting advantages, I just prefer the more casual feeling of outdoor groupings. I always try to find a location with even, open shade (think of a cloudy day, or the smooth, undappled shade created by a building or a large canopy of trees). With this type of light, I can shoot the posed groups very quickly, and they look beautiful (Figure 6.1).
I can usually find something at the site that will work in this way, but obviously I need to have techniques to deal with situations where a nice, open shady spot simply doesn’t exist, or it’s pouring rain, or the wedding is taking place entirely at night.
Figure 6.1. Open shade provides smooth, even light for the group portraits and allows me to work very quickly through my list of shots.
If there is a pretty spot under the shade of a tree, but the light is dappled, I situate the group so that the sun is behind them, through the tree branches. This way, the dappled light falls on their backs and the light on their faces is nice and smooth (Figure 6.2).
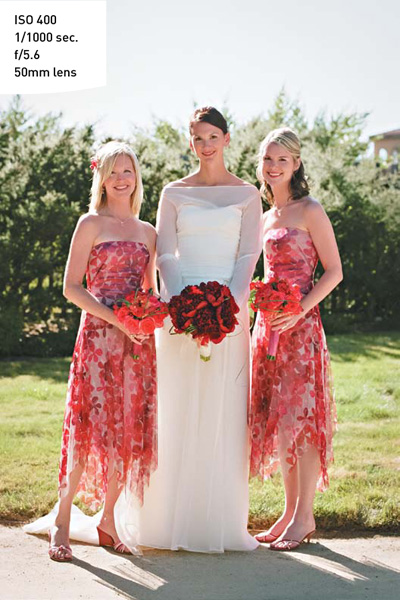
If there is no shade at all, and it’s a little later in the day (meaning, the light is already somewhat low and softened), I can often simply put the sun at their backs and meter for the shadows. If it’s the middle of the day, though, the sun will be so high that you can’t really avoid distracting shadows, and the background will blow out too much. In this case, I use fill flash to soften those shadows and even out the light with the background (Figure 6.3). I dial the flash down about two-thirds of a stop so that it doesn’t overpower the ambient light in the image.
Figure 6.2. When the shade is dappled, put the sun behind the group.
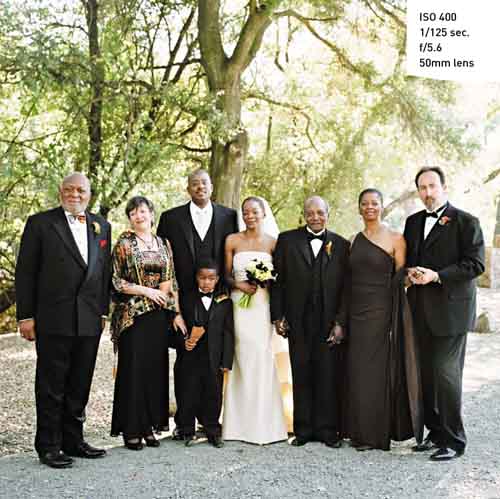
Figure 6.3. Fill flash can soften the shadows when the group portraits need to be taken in the bright sunlight.
Indoor lighting
For indoor group situations, I still try to find a way to work with available light if possible. For smaller groups, I can sometimes use window light. With bigger groups, I’ve sometimes been able to place them close to a bank of windows or an entrance, or under a skylight (Figure 6.5). In a couple of cases when it was raining very lightly, I stood outside to shoot the subjects as they stood in an entranceway with an overhang (Figure 6.6).
If none of these is an option, I sometimes simply use my on-camera flash to provide lighting. I find this works best if there is a fair amount of light in the scene, but just not quite enough to achieve the settings that I need (see the nearby sidebar for my recommendations on aperture and shutter speed for group shots).
Figure 6.5. The unique architecture made this a great choice for the group shots. With such a slow shutter speed, I mounted the camera on a tripod to avoid camera shake.
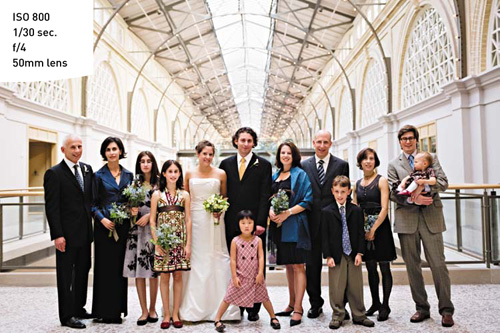
Figure 6.6. The subjects were protected from a very light rain by an overhang above the doorway, and the cloudy skies produced a soft, even light.
I never point a flash directly at the group, because it creates unattractive shadows, especially if there is more than one row of people. If the ceiling is low enough, I can bounce the light from the flash off the ceiling. To do this, simply point the flash at a 45-degree angle toward the ceiling when shooting. (I use my flash on the Through the Lens, or TTL, setting so that it always emits the correct amount of light for a proper exposure.) Some light will travel forward and directly illuminate the group, but most of it will hit the ceiling and bounce back down in a much more diffused form, and because it comes from above—like the sun—it looks more natural (Figure 6.7). Be aware that if the ceiling is colored, it can create an unwanted color cast on the subjects. And shoot slowly, making sure that the flash is fully recharged before each exposure.
Figure 6.7. I just needed a bit more light for these shots. The ceiling was low enough that I could simply bounce my flash off it, creating even light.

If I know from my scouting trip that I’ll be doing these group shots indoors and the ceiling is too high to bounce my flash, I bring strobe lights. These lights are big to lug around and take more time to set up, but they give a very nice quality of light and I never have to worry about the light being powerful enough to illuminate a whole group. I keep the setup as simple as can be, using one light, shot into an umbrella behind me (to soften and diffuse the light) and bouncing back on the group. I place the light directly behind me, and far above the camera (Figure 6.8).
To learn more about using strobe lighting, refer to Speedlighter’s Handbook by Syl Arena (Peachpit Press) for good, basic information, and Hot Shoe Diaries by Joe McNally (New Riders/Voices that Matter) for more anecdotal instruction on strobe lighting.
Figure 6.8. This was shot with the strobe and umbrella setup. Note that the long shutter speed allowed me to pull in some of the background, which otherwise might have looked completely dark.

Posing and lens choice
My goal with formal portraits is simply to create well-balanced, descriptive images that document the wedding party and family groupings in an elegant and attractive way. To do this, I have a two-step approach to posing the group:
1. I make sure that the most important people are next to the couple (for the wedding party shot, it’s the maid of honor and best man; for family shots, it’s usually the parents), and then I give some very general direction, such as “Everyone gather on either side of the couple!” and let them arrange themselves. This is because I don’t know the relationships between every person there, and, when left to their own devices, people will naturally (and quickly) place themselves next to the people they should—their own spouses, family members, and so on.
2. Once they’ve positioned themselves, I evaluate the group and make any adjustments necessary. I ask myself: Can I see all the faces? Is the distribution of people fairly even around the couple, in terms of numbers of people and how tall they are? Is anyone wearing sunglasses or holding a purse or drink? Do any of the men’s jackets look bunchy due to the way they’re standing? Are they standing in a straight line or a semicircle? For some reason, people naturally tend to group themselves in a semicircle, and this has the effect of making the people in the center—usually the bride and groom—look much smaller than the people on the sides. Once they’re in a nice, straight line, if I need to tighten the group a bit, everyone can turn slightly toward the center and take a small step in.
Now I’m ready to roll through the list I prepared prior to the wedding. Remember: The crowd is looking to you for leadership and to get this part of the day finished as quickly as possible. Don’t be afraid to exert your authority (with a smile, of course).
Keep an eye on how everyone is doing as you work your way through the list—especially the bride and groom, since they’re in nearly every shot. If they’re getting stiff, have them take a moment for a few deep breaths, shoulder rolls, and some silly stretchy faces to loosen things up.
Here are some additional tips to keep in mind as you work on the portraits:
• Bouquets: Ladies tend to hold their bouquets very high, blocking the details of their dresses. Instruct them to rest their wrist bones on their hip bones, and this will put the bouquets in just the right place and look more relaxed.
• Jackets: Sometimes the guys don’t want to fasten every jacket button, and they’re not sure if they should button only the top one or only the bottom one. They should button the top.
• Kids: When young children are in the shot, adults tend to interact with them, trying to get them to look at me. I ask the adults to just keep looking at me—not at the kids—so that when the little ones do glance my way, everything else is in place and I can catch the moment.
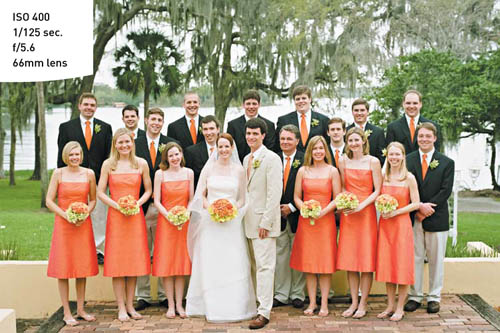
• Very large groups: Either find some steps for them to stand on, or get much higher than the group—for instance, shoot from a balcony or second-story window (Figure 6.9). The bigger the group, the more important this becomes!
Figure 6.9. For this large wedding party, I used the low wall to give height to the back row. I stood on a similar wall to get the camera higher, as well.
• Cropping: When framing the shots, keep in mind that clients often want to buy these images as 5x7 or 8x10 reprints. To have flexibility to crop the image to these sizes, you have to leave enough space around the group (Figure 6.10).
Figure 6.10. Be sure to leave enough space around the group so that the image can gracefully be cropped to a 5x7 (red) or 8x10 (green).
Moments to Watch For
When you’re photographing formal group portraits, you may think there’s no room for spontaneous moments to occur, but that’s not the case at all. Look for the following:
• Individuals within the group: I often capture quite nice portraits by homing in on specific people as they’re standing in the larger group (Figure 6.11).
• Friends and family members who are watching and waiting for their turn to join the group: There are often interesting moments to be found as people find ways to amuse themselves while waiting (Figure 6.12).
• The more casual moments that occur between the formal shots: You can find these particularly if the session takes place right after the ceremony, when the excitement level is high (Figure 6.13).
Figure 6.11. Zoom in on individual people while they are within the larger group for some nice portrait opportunities.
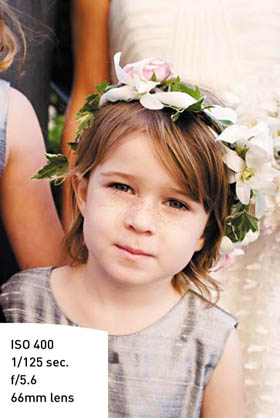
Figure 6.12. While assembling one of the family groupings, I spun around, saw this, and quickly shot one frame before turning back to the formal shot.

Figure 6.13. While we were setting up the shot of the entire bridal party, I noticed the bride and groom both showing off their rings.
Bride and Groom Portraits
One of my favorite parts of the day is the portrait session with the bride and groom. For the couple, this should be a pleasant interlude, a time when they can slip away from the crowd to simply be with one another and enjoy the wedding afterglow. For me, it’s an opportunity to create truly timeless images that capture all the love and joy that they experience on that day.
This is the time when I have more control over elements like setting, lighting, positioning, and so forth, but I don’t want the images to look phony or overly produced. Portraits that look very natural, intimate, and uncontrived are the most enduring and meaningful, even years later, and my entire portrait technique is built around the idea of capturing images that reflect this.
Locations
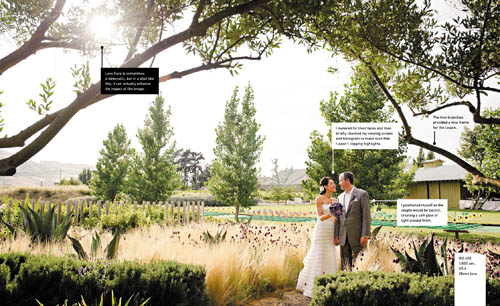
The first step in my strategy for capturing engaging, authentic portraits is to place the couple in a beautiful setting. During the scouting trip to the site, I look for various elements that I can use to create compelling compositions: lovely outdoor paths, picturesque trees, weathered fences, cool brick walls, dramatic arches, and so forth (Figure 6.14).
Ideally, the setting has some beautiful natural detail, without being too cluttered or distracting. Avoid compositions that have elements such as tree branches appearing to come out of your subject’s head. If you’re shooting in a public space such as the park or beach, you’ll need to be creative in blocking out the unwanted elements, such as people in the background. They can’t totally be avoided, but by paying close attention to your framing, you can often reduce their visibility by blocking them with objects in the foreground or with the couple.
If the portraits have to be taken indoors, I look for window light, elegant pieces of furniture, and architectural details—there is always something that I can use (Figure 6.15). And because I’ve thought it all out in advance, I’m able to make the most of the brief time that I have with the couple—often only about 20 minutes.
Figure 6.14. Using the tree branches to frame the couple created a compelling composition and enhanced the existing beauty of the setting.

Figure 6.15. For this indoor hotel wedding, the couple didn’t want to go outside at all. I seated them on a sofa near the window and zoomed in to minimize the less-than-interesting background and put the focus on them.
Lighting
Beautiful light for the portraits is perhaps even more important than a beautiful setting. Of course, I have my preferred time of day and type of light for shooting, but often I’m not shooting under those ideal conditions. As with the group portraits, I need to be flexible and have techniques to shoot beautiful portraits in many different types of situations. Because I time my location-scouting visits to be at approximately the same time of day that I’ll be shooting, I have a pretty good idea of where the prettiest pockets of light are.
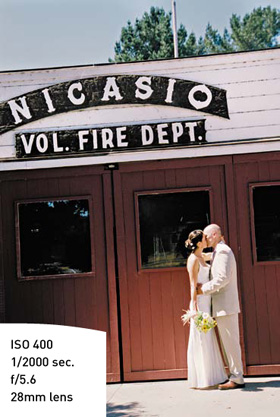
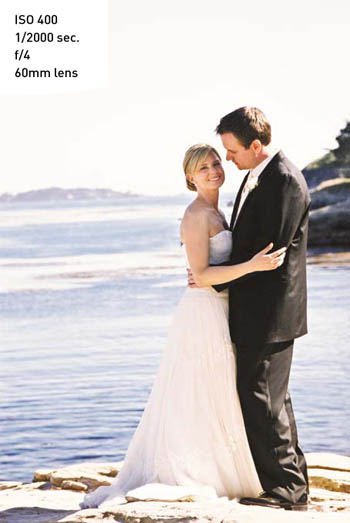
Depending on the schedule, it sometimes makes sense to break the couple’s portrait session into two mini-sessions—one early in the day, and the other right around sunset. The earlier session is often in the afternoon when the sunlight is still bright, and I approach it the same way that I described for the group portraits. I look for trees and other shady areas where I can find smooth, even light for their faces, and I position the couple so that they are backlit (Figure 6.16).
While I seek smooth shade for closer shots of the couple, I embrace the sunlight for wider images that take in the environment (Figure 6.17).
Figure 6.16. When the couple is backlit, the harsh shadows on their faces are avoided.
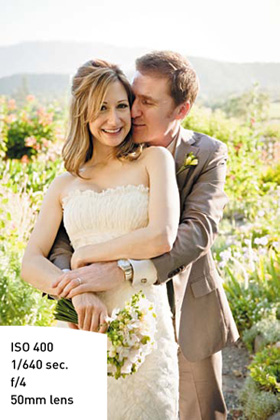
Figure 6.17. Shots like this one are about capturing the couple in an interesting setting, so I didn’t mind the bright sunlight or the shadows on the couple.
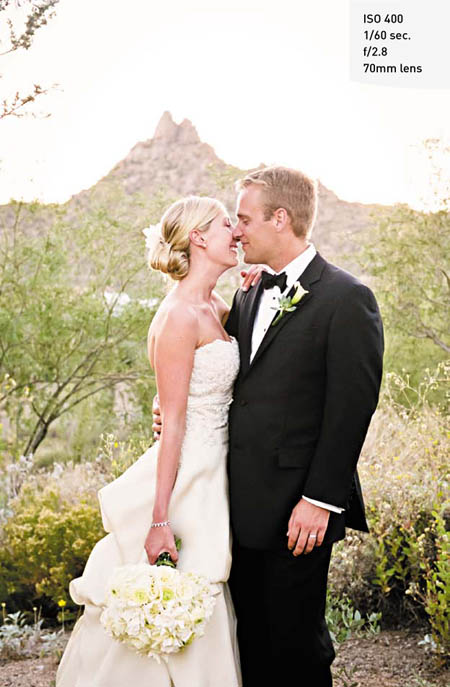
The most beautiful light for portraits is immediately following sunset. Once the sun dips below the horizon, you have 10 to 15 minutes of soft, glowing, golden, non-directional light (Figure 6.18). The light is warm, flattering, and simply wonderful, and you should try to take the couple outside for portraits if at all possible. When planning the timing with the wedding schedule, keep in mind that if the site is in a valley, the sun will dip out of sight sooner than the posted sunset time.
Figure 6.18. Everything looks beautiful in the soft, warm light that occurs just after the sun dips below the horizon.
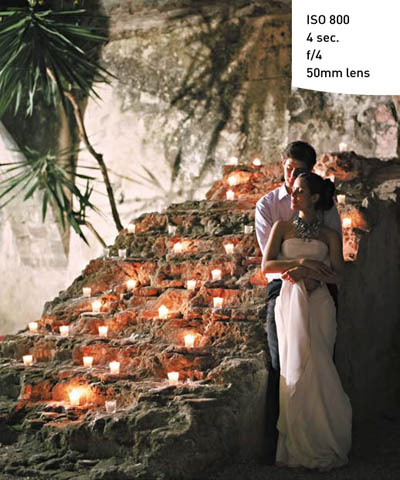
There are often interesting shots to be had once night falls. I look for areas that are illuminated by either overhead lighting, such as streetlights, or the uplighting that is sometimes used on the exterior of buildings. I sometimes have my assistant direct a video light at the couple; if you don’t have a video light, you can ask the videographer (if there is one) to help by shining his light on them. (See Chapter 8 for more on video light.)
The trick is to place the couple in a spot where they’re illuminated and where there is something illuminated behind them that you can capture with a long exposure. Meter for the couple, and don’t be alarmed if the shutter speed is measured in seconds, not fractions of seconds! The camera needs to be on a tripod, and you should instruct the couple to hold as still as possible for the duration of the exposure. Have them inhale and then exhale and hold their breath; then press the shutter. I have them close their eyes, because blinking would be captured as motion blur. After shooting, check the viewing screen and histogram to make sure that you aren’t clipping highlights in the background. I always bracket the exposure—meaning, I take a few extra shots, changing the exposure by one-half to one whole stop each time, just to make sure that one of the shots has a good exposure (Figure 6.19).
Figure 6.19. As I was leaving the reception, I saw this beautiful sea of candles. I simply had to ask the couple to give me five more minutes to take this long-exposure shot.
Lens choice
Within the very brief amount of time available to shoot the bride-and-groom portrait sessions, I need to really quickly capture a wide variety of shots. I routinely use two cameras, one with a wide- to normal-range zoom and the other with a telephoto zoom. My lenses of choice are the 24–70mm f/2.8 and the 70–200mm f/2.8. With these two lenses, I have a wide range of focal lengths covered and can rapidly shoot a particular scene in many different ways.
I use the wider lens to capture a sweeping view of the scene, incorporating the environment, beautiful views, and so on (Figure 6.20). I also can take medium shots that show the couple full length and include the setting but are not dominated by it (Figure 6.21). I tend to use color for both these types of shots.
Figure 6.20. With my wider lenses, I can capture scenic shots that take in the landscape.
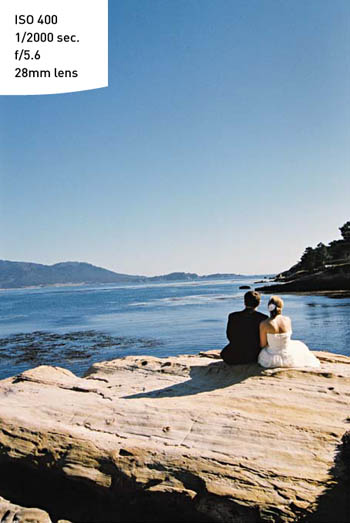
Figure 6.21. Focal lengths in the normal range (close to 50mm) are similar to the way our eyes see.
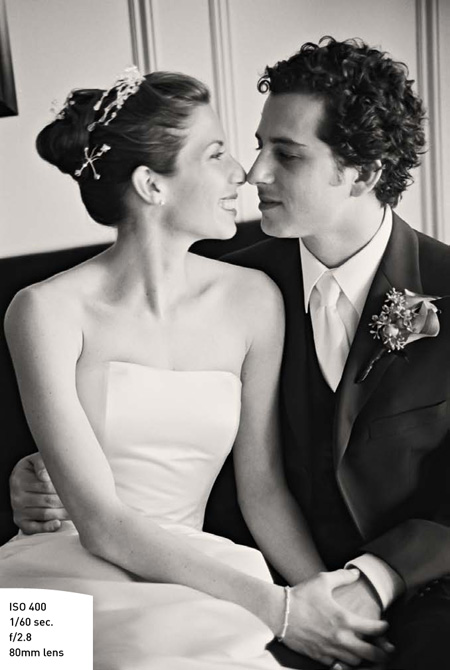
With the telephoto zoom, I can shoot very close and intimate shots while remaining some distance away (Figure 6.22). By giving the couple a bit of space, I allow them to experience the portrait session as a sweet moment between the two of them, away from the commotion of the wedding, which in itself is a real gift. And, of course, it helps bring out their most relaxed and natural selves, which is what I want to capture in photographs. I often choose black and white for these intimate images that are more concerned with expressing the emotion between the couple.
Figure 6.22. I often choose black and white for images like this, because it emphasizes the emo-tional content of the moment. Telephoto lenses allow me to get closer to the subject.

By using my lenses in this way, I can shoot several completely different types of portraits in the space of a few minutes. And I can shoot a great variety even if I’m limited to only one or two suitable settings in which to place the couple.
If you really can’t find a setting that is free of distracting or unattractive elements, just shoot with a very wide aperture to blur the background into a pretty, soft, indiscernible collage of color. This is another reason to invest in high-quality, fast lenses that open to at least f/2.8.
Posing
Once I’ve placed the couple in the loveliest spot with the best light I can find, I step back and allow them to be very natural within that setting. Most people simply aren’t comfortable in front of the camera, so the more I can help them forget that they’re being photographed, the more relaxed and genuine they’ll be. Strictly speaking, I don’t really pose my couples at all. I do set the stage for them to successfully “pose” themselves, simply by enjoying some time with the person they love.
I might direct them to sit in a certain place, to walk back and forth along a particular path, or to pause under a pretty tree. I may ask them to stop and glance back at me as they walk, or turn to one another and share a kiss. By giving general directions such as these, I give the couple space to make the movements their own, so they never feel unnatural. The overall effect is to gently encourage them to instigate their own sweet interactions with one another—and then I shoot like crazy. As things unfold, I’m constantly moving, looking for the best angle by changing my own position, not theirs.
I don’t run them through a set of predetermined poses or micromanage the placement of their heads, hands, and so on. That type of direction would only make them more self-conscious, and the photos would look stiff and contrived.
Figure 6.23. The slight motion blur in this image heightens the sweet sense of anticipation just before the kiss.
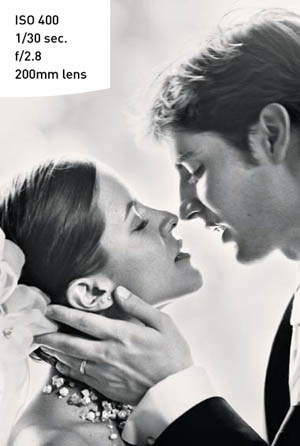
Figure 6.24. Walking shots have a natural look and keep the couple from getting stiff from standing too long in one place.

Moments to Watch For
When you’re photographing the bride and groom, watch for the following moments:
• Small gestures as they walk: Zoom in on the groom helping his bride manage the dress, his hand on her waist, the two of them holding hands, and so on (Figure 6.25).
• The in-between moments: Catch the limbo between shots. Sometimes I look down and pretend to fiddle with my camera for a moment just to give them the chance to stop reacting to me in any way. Then I quickly shoot the genuine moments that follow (Figure 6.26).
• Bridal details in action: Images of the dress, bouquet, shoes, hair flowers, veil, and so on while she’s wearing them have a very different feel than the still-life shots done earlier (Figure 6.27).
• The couple walking back into the reception area, after our session: I let them know they’re finished, and then I keep shooting as they reenter the party (Figure 6.28).
Figure 6.25. Capturing these small interactions add sweetness to the body of work.

Figure 6.26. I fake-adjusted my camera until the couple wasn’t paying the slightest bit of attention to me and then quickly captured this shot of them laughing with the maid of honor.

Figure 6.27. Details of the bride’s ensemble in action, as she’s wearing them, have a totally different energy than the still-life shots done earlier in the day.
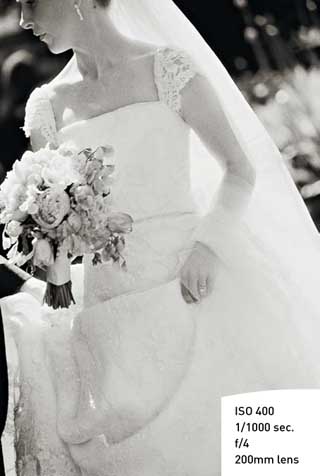
Figure 6.28. After releasing the couple from our portrait session, I always keep shooting as they rejoin the party.

Chapter 6 Assignments
Comparing Light
Shoot a series of portraits at the same location at different times of the day. Head out around noon, about two hours before sunset, and again just before sunset, and continue shooting after the sun dips below the horizon. Compare the images and see how the quality of the various types of light affects the look and feel of the images.
Experimenting with Natural Reflectors
Find some natural reflectors, such as light-colored buildings. Take practice portrait shots in midafternoon both with and without the fill light from the reflecting surface, and notice the difference it can make.
Keeping your subject backlit and without changing the angle to the sun, try placing your subject on light-colored gravel, grass, and a dark surface such as blacktop. Notice how the light reflects off the ground to provide fill light on the subject, and how the color of the ground impacts the amount and color of light that is reflected.
Shooting for Variety
Practice shooting portraits with a couple of friends. In particular, use lenses ranging from wide to telephoto, work as quickly as you can, and see how many distinct “looks” you can achieve in a single setting. This will help you learn to produce a wide variety of images even when you’re limited to only one or two shooting locations.
As you shoot, move from side to side, get low and shoot up on them, and get above them and shoot down. Experiment with how your positioning changes the perspective on the couple and how different angles and focal lengths impact the feel of the images.
Share your results with the book’s Flickr group!
Join the group here: flickr.com/groups/weddingsfromsnapshotstogreatshots