
2. Shooting Basics

Understanding Light, Exposure, and Composition
Photography, quite simply, is light.
The way that you see light and the way you choose to control it when making images are key to shaping the look of your work and developing your personal style. It all comes from you—the camera is merely the tool that helps you realize your vision. The more you understand the way your decisions about lenses, camera settings, and lighting impact the look and feel of the image, the more effective you’ll be in using your camera in specific, intentional ways to achieve the desired look.
This chapter isn’t a comprehensive review of all the fundamentals of photography, but it covers some of the basic principles and techniques I use at various points in a wedding to capture images that are authentic, emotional, and beautiful. For more in-depth information on exposure or composition, check out Exposure: From Snapshots to Great Shots by Jeff Revell or Composition: From Snapshots to Great Shots by Laurie Excell with John Batdorff, David Brommer, Rick Rickman, and Steve Simon (both published by Peachpit).
Poring Over the Picture
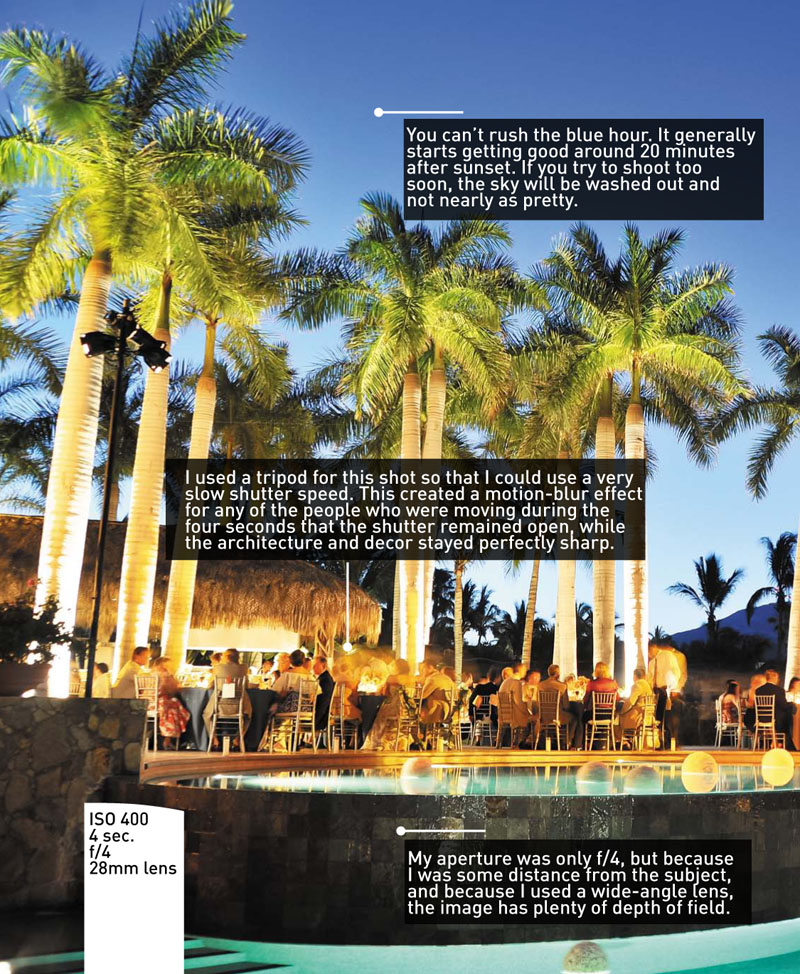
The blue hour is the twilight period shortly after sunset, the time in between full daylight and full darkness. Because the sun has dropped below the horizon, the light travels a much greater distance through the lower atmosphere (which scatters blue light) than at other parts of the day, and essentially hits the sky from below. These factors create amazing, vibrant colors when photographed. The blue hour is a magical time to capture beautiful overview shots of the wedding celebration.


Lighting
I shoot with available light as much as I possibly can, primarily because it makes for more visually nuanced images. But there are other good reasons for using available light: It allows me to shoot from a distance using telephoto lenses, without concern about whether light from a flash will make it all the way to the subject. Plus, even when shooting close in, the absence of flash makes my shooting far less intrusive for the wedding participants, so they feel more comfortable and less aware of the camera. This allows me to capture more natural, organic images (Figures 2.1 and 2.2).
Figure 2.1. Shooting with natural light with a telephoto lens allows me to stay in the background and capture natural, unscripted moments like this one.
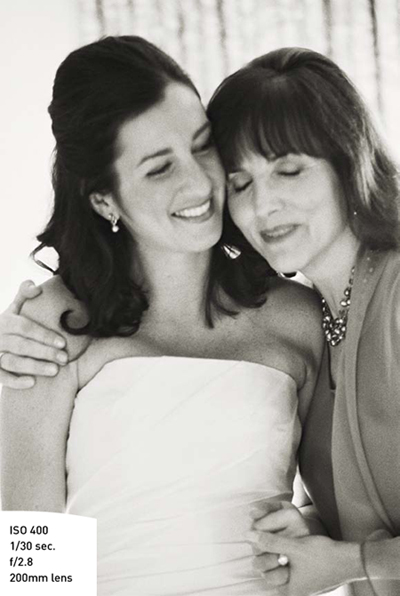
Figure 2.2. This was taken as the bride’s father gave his toast, and because my shooting style is very discreet, she was able to forget about my presence and simply enjoy the moment—and I was able to capture extremely natural images like this one.

I’m always acutely aware of light—its source, its direction, its color, its intensity—and the ability to really see light in this way informs my decisions about how to shoot in any given situation. Although there are a few instances in which I use a flash as fill light—for example, at a ceremony that is either extremely backlit or has dappled sunlight—for the most part I don’t use a flash at all during the day.
During some parts of the day, such as the portraits of the couple and family, I can mastermind the situation and direct the action to the places with the best light. At other times, such as the ceremony and many elements of the reception, I have to simply manage the situation as I find it and know how to add supplemental lighting when needed. The wedding day demands that you act as both designer, shaping what happens and where, and documentarian, capturing what’s happening in an effective way without the ability to change it. I’ll cover how to handle many specific lighting situations that typically arise as they relate to the stages of the wedding day in later chapters of this book.
Exposure
It all begins with exposure: the amount of light that is allowed to enter the camera and hit the sensor. For great image quality, you need just the right amount of light. Too much light creates a washed-out image with blown highlights, and too little light results in a too-dark image with no shadow detail. Camera sensors are getting better all the time, and although you can, to some extent, save over- or underexposed images in post-processing, your images will look a lot better (and you’ll spend a lot less time at the computer) if you get it right in-camera.
There are three basic ways to control the amount of light that hits the sensor: shutter speed (how long the shutter is open to allow light in), aperture (the size of the opening), and ISO (the sensitivity level of the sensor). Every exposure is a balancing act between these three elements. For any given lighting situation, innumerable combinations will give a correct exposure, but the way in which you choose to use them in combination has a huge impact on the way the image looks (Figure 2.3).
Shutter speed and motion
The shutter is the mechanical device that allows light into the camera, and shutter speed is the amount of time that the shutter remains open to allow light in for a particular shot. Shutter speed is measured in fractions of a second, so 1/500 sec. is a much faster shutter speed (the shutter is open for a much shorter period of time) than 1/8 sec.
Figure 2.3. I chose to meter for the shadows on the bride’s face, which rendered soft, glowing highlights, radiant skin, and a drop-off into the darker areas of the image that help focus attention on the bride’s expression.

The main way that shutter speed affects the final look of the image is by determining whether there is any blur in the image due to movement—either of the subject or of the camera—during the exposure. A fast shutter speed (say, 1/500 sec. or faster, depending on how quickly the subject is moving) will freeze the action of the subject. At a wedding, I make sure that I have a fairly fast shutter speed when the couple is recessing from the ceremony and if they make a formal entrance at dinner—at both these times, they can move really quickly!
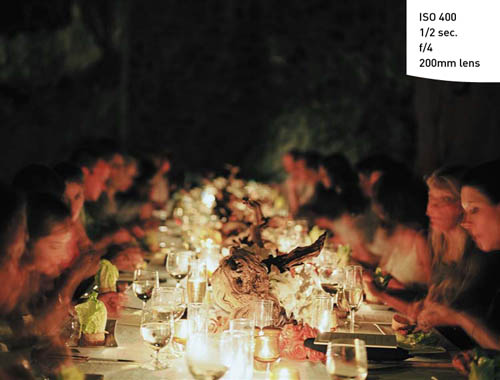
With slower shutter speeds, approximately 1/60 sec. or longer (depending on how quickly the subject is moving), you may capture some blur—either intentional or unintentional—due to the movement of the subject or of the camera while the shutter is open. Blur resulting from movement of the subject may be isolated to only part of an image (Figure 2.4). If blur is due to the movement of the camera (known as camera shake), then the entire image will be unsharp.
Figure 2.4. This is a dramatic example of shooting at night with a tripod and a very slow shutter speed. This technique creates the effect of motion blur for all the people in the shot, while the tabletop is perfectly sharp.
You can use motion blur intentionally to create various effects. It can be really effective in conveying a sense of movement in the image. Camera shake is generally to be avoided, but sometimes, it can create a softness that doesn’t necessarily detract from an image—it can even enhance the emotional impact (Figure 2.5). But in order to avoid unintentional, image-ruining motion blur, you must first know the speed at which you can hand-hold the camera without shaking, and then always be aware of the shutter speed you’re shooting to make sure you don’t go beyond your limit. I know that I can hand-hold pretty well at 1/15 sec. or even 1/8 sec., but I certainly feel more confident that I’ll avoid unintentional camera shake at 1/30 sec. or shorter.
To minimize camera shake at very slow shutter speeds, try leaning against a pillar or wall if possible, or rest the camera on a solid surface, such as a table. Take a breath, exhale, and hold it; then release the shutter. I often take several images in a row, all in the interest of nailing one perfectly sharp one. Unless my subjects are perfectly still, I need to keep in mind that their movement could also translate as motion blur in the image. I ask myself whether that’s the effect I want, and if it isn’t, I adjust my shutter speed accordingly.
Figure 2.5. I shot this while I was hustling from behind the guest to the side to get the shot. I was moving really quickly, as were the subjects, so some motion blur was captured—but in this case, it actually enhanced the feeling of movement and excitement.

Panning is a fun technique that captures the excitement of motion in an image in a very deliberate way. You do it by using a relatively slow shutter speed (the speed will vary depending on how fast the subject is moving and the level of motion blur you want to create) and tracking the subject with the lens as you press the shutter. If you’re tracking along with the movement, then the subject will be reasonably sharp, while the background will be captured in an exaggerated blur of motion. It takes a bit of experimentation and practice to get the feel for panning, but it’s a great way to convey the feeling of movement in an image (Figures 2.6 and 2.7).
Figure 2.6. An open getaway car provides the perfect opportunity for a quintessential panning shot.
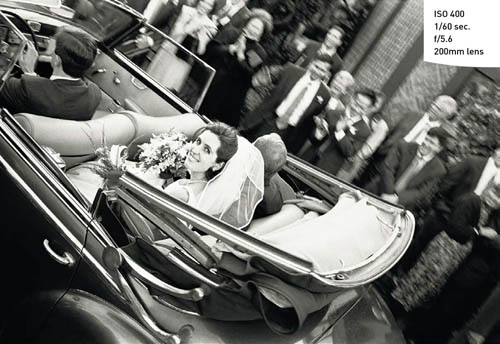
Figure 2.7. Tracking the couple from the balcony as they recess puts a different spin on the typical panning shot.

Aperture and depth of field
Every lens has a diaphragm that opens to allow light into the camera. Aperture is the size of the opening for a given shot, measured in f-stops. The larger the f-stop, the smaller the opening; the smaller the f-stop, the larger the opening (Figure 2.8). So, f/22 is a very small aperture, and f/1.4 is a very large aperture.
Figure 2.8. This is a typical aperture range. Note that the smaller the number, the larger the aperture.

The most important image feature to associate with aperture is depth of field—the distance between the nearest and farthest objects in a scene that appear acceptably sharp in an image. The smaller the aperture, the greater the depth of field; the larger the aperture, the shallower the depth of field. So, an image shot at f/22 will most likely be sharp throughout, even if there is a great distance between foreground and background; on the other hand, an image shot at f/1.4 will have very shallow depth of field—perhaps only a sliver of the image will be sharp.
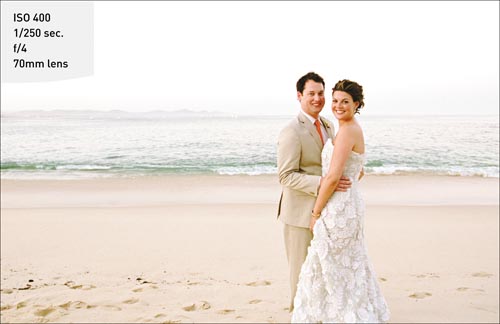
Shallow depth of field can lend an image a softness that’s really beautiful, especially for weddings. It creates a nice separation between the subject and the background and helps focus the viewer’s attention precisely where you want it (Figures 2.9 and 2.10).
Shooting with a shallow depth of field at a wedding also can be really practical, because it helps reduce or completely eliminate distracting background elements over which you have no control (Figure 2.11).
I rarely shoot with an aperture smaller than f/5.6 for most of the day; most often, I’m shooting at f/2.8 or f/4. Use caution when shooting with super-wide apertures like f/1.4.
Other factors aside from aperture affect depth of field. A longer lens (like a 200mm zoom) will create a shallower depth of field than a wide lens (like a 35mm). Your distance from the subject makes a difference, as well—the closer you are, the shallower the depth of field. Figure 2.10 is a good example of this.
Once, I was shooting the bride during toasting with an 85mm lens, and because it was so dark at the nighttime reception, my aperture was wide open at f/1.8. When I was close in to the bride, I found that, with her face at a three-quarter angle to me, I couldn’t get both of her eyes in focus—the depth of field was too shallow. That wasn’t the look I wanted, so I switched to a 50mm lens and bumped up the aperture slightly to f/2.2; the depth of field increased enough to achieve a sharp focus on both eyes.
Figure 2.9. The detail on this bride’s gown was lovely, but I wanted to concentrate the viewer’s attention on the bouquet. A wide aperture blurs the background just enough.

Figure 2.10. With a focal length of 80mm, an aperture of f/4 was enough to soften the background to a soft, romantic blur.

Figure 2.11. This background was very distracting, so I originally shot it with a very wide aperture. But because of the long lens (not the one I would normally use for this, but on my camera as I walked by) and my close distance to the subject, the depth of field was actually too shallow. I needed a smaller aperture to get the entire escort card in focus.

ISO
ISO is simply how sensitive the camera’s sensor is to light. A higher ISO, such as 1600, is more sensitive and, therefore, needs less light to expose properly, making it incredibly useful in darker environments. A low ISO, such as 200, is less sensitive, requires much more light, and is best in brighter situations.
The trade-off for using a high ISO is image quality. The higher the ISO, the more digital noise and grain appear in the image. For this reason, you should always shoot at the lowest ISO possible.
In just the past few years, though, sensor quality has vastly improved, and many cameras can now capture very high-quality images at ISOs of 1600, 3200, or higher. The images have relatively little grain and great color. This is an amazing development for natural-light shooting in darker situations (Figure 2.12).
Figure 2.12. I had only a few moments to shoot the decor in the room of this nighttime wedding. Because of the great high-ISO capabilities of my camera’s sensor, I was able to hand-hold and shoot really quickly. The color is beautiful, and digital noise is minimal.

Camera Modes
Most cameras give you four choices for how to meter for a scene: three automatic metering modes (Program, Shutter Priority, and Aperture Priority) and Manual mode. Refer to your camera manual for additional modes that may be available.
Using an automatic mode can be very helpful when you’re moving quickly between different lighting situations because, for the most part, you can trust the camera to make the necessary exposure adjustments while you continue shooting. An automatic mode is also great when subjects are rapidly moving between areas of light and dark (say, in and out of the shade of trees) or when events are moving along so quickly that you don’t have time to properly meter and set the camera yourself.
Program
In Program mode, the camera sets both the shutter and the aperture—all you have to do is point and shoot. I never use Program mode, because I want to be the one to make the exposure decisions.
If you’re just starting out, you may be tempted to use Program mode, but I encourage you to leave Program mode behind, if for no other reason than most cameras won’t allow you to shoot RAW when you’re in Program mode, and RAW is always preferable (see the sidebar below).
If you’re afraid of missing important shots because you don’t trust your abilities in Manual mode just yet, try Shutter Priority or Aperture Priority instead. As you get more comfortable shooting in these auto modes, you can start switching to Manual and get even greater control over your images.
Shutter Priority
In Shutter Priority mode, you set the shutter speed that you want and the camera decides what aperture to use for the proper exposure. You may want to use Shutter Priority when you’re photographing fast-moving subjects and you want a particular shutter speed to freeze the action.
Aperture Priority
In Aperture Priority mode, you set the aperture and the camera determines the appropriate shutter speed. Aperture Priority mode is helpful for maintaining a certain depth of field.
Although I shoot predominantly in Manual, I sometimes use Aperture Priority because, for me, depth of field is the most important consideration. When using Aperture Priority mode, I always keep an eye on my shutter speed to make sure it’s not slow enough to cause unintentional motion blur.
Manual
In Manual mode, you determine the shutter speed and aperture settings yourself.
I shoot in Manual mode for much of the day. As an available-light shooter, I’m often working with lighting situations that could potentially trick the camera into giving an incorrect exposure, and I feel more confident when I’ve actually metered the light myself. For example, if the scene is very backlit, it could confuse the camera. The same is true if the scene is either very light overall, or very dark. This is because the camera reads the light that is bouncing off a subject. If the subject is very light in color, more light reflects back to the camera, and it interprets the scene as brighter than it really is. It then underexposes the image to compensate. When the subject is very dark, the opposite happens—less light is reflected back, the camera thinks that the scene is darker than it is, and it overexposes the image. (This is a big danger in dark churches and synagogues—be careful!)
Figure 2.13. For a scene like this, the dark color of the door filling most of the camera frame could cause your camera to overexpose the image if it’s in an auto-exposure mode such as Program, Aperture Priority, or Shutter Priority. Switch to spot metering, and center the spot on a light to midtone value, such as the girl’s face, to get the correct exposure reading. Then switch your camera to Manual and dial it in.

Composition
Composition is simply the way you choose to arrange the elements of a photograph in your frame. There are many, many “rules” for achieving good composition, and I’ll briefly cover a few that I feel are most helpful for wedding photography—although I recommend approaching them more as guidelines than hard-and-fast rules.
Learn and practice these principles to help build a solid foundation in understanding composition. From there, you’ll be able to more effectively experiment, play, and bend and break the rules.
The rule of thirds
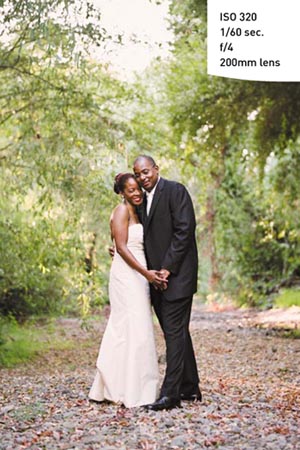
The rule of thirds is probably the most commonly cited principle of photographic composition. If you picture imaginary lines dividing your image into thirds both horizontally and vertically, you should place the most important elements of your composition along those lines, or at the points where the lines intersect (Figures 2.14 and 2.15). The rule of thirds can help you compose well-balanced and interesting images.
Figure 2.14. This image demonstrates the rule of thirds, with the focal point of this image in the lower-right. This rule can help you learn interesting ways to balance a composition.

Figure 2.15. Another example of the rule of thirds. This composition gives the image a very open feel, and it’s much more compelling than if the couple were smack-dab in the middle.
Leading lines
Leading lines can help you create engaging compositions. Lines can be used to lead the viewer’s eye through the image, as well as to direct attention to the area of the image that you want to highlight (Figures 2.16 and 2.17).
There are plenty of naturally occurring lines at every wedding—the ceremony aisle, banquet-style tables, strings of lanterns or lights, rows of ceremony chairs, a garden path or a hotel hallway. You can find lots of opportunities to use the principle of leading lines to great effect.
Figure 2.16. The lines formed by the long banquet-style tables lead the viewer straight into the image. This type of setup offers so many great ways to use leading lines.

Figure 2.17. The chandeliers form lines that draw the viewer right into the room.

Framing
Framing is a technique in which you use other objects to frame the main subject in a photograph (Figures 2.18 and 2.19). Some elements that you might work with at weddings include trees, arches, architectural details, doorways, and chuppahs. With an open mind and a little imagination, you’ll find that there are many, many ways to frame a subject. Don’t take the idea too literally—the framing elements don’t need to completely surround the subject in order to be effective.
Figure 2.18. This beautiful arbor provided the perfect frame for this portrait of the couple at their rehearsal dinner.
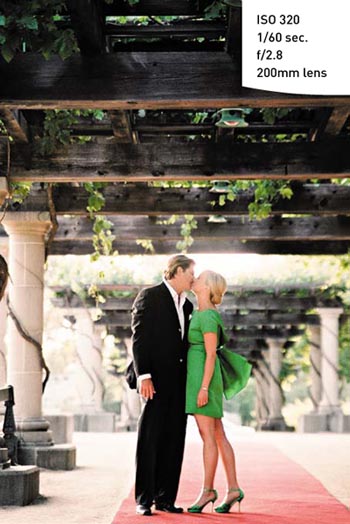
Figure 2.19. Frames don’t always have to be in the foreground. These trees in the background are wonderful framing elements.
Symmetry and patterns
Look for symmetry and patterns wherever strong graphic elements such as lines, shapes, or colors repeat themselves. These elements can be used to create arresting photographic compositions. Once you really start to notice, you’ll see that we’re surrounded by symmetry and patterns—and, thus, photo opportunities!
A well-designed wedding has many, many examples of symmetry—the decor of the ceremony (with, for example, identical urns of flower sprays on each side), the architecture at the altar of a church, the banquet-style table with the same floral arrangements stretching along both sides, and so on (Figure 2.20). Patterns may be formed by a sea of blooms in a floral arrangement (or the petals of an individual bloom), rows of perfectly placed escort cards, or a box of identical bouquets when viewed from above (Figure 2.21). A key to capturing a sense of pattern in a composition is to edit other elements out; telephoto lenses are useful for zooming in on the critical elements. Viewing the wedding with an eye to capturing its sense of symmetry and pattern will help you create truly compelling compositions.
Figure 2.20. I framed this shot very carefully to emphasize the beautiful symmetry of the scene.
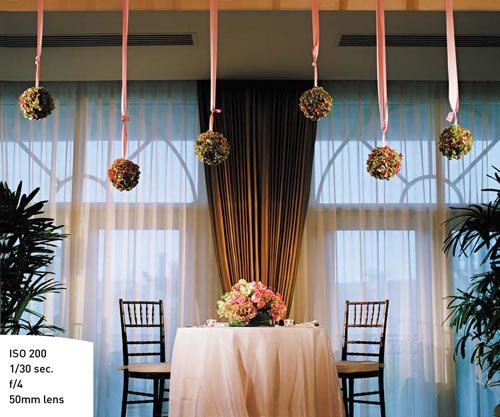
Figure 2.21. Sometimes, looking at a subject from another angle puts a whole different twist on things. When viewed from above, these identical bouquets created a pattern that made for a really nice composition.

Chapter 2 Assignments
Experiment with Aperture and Shutter Speed
Experiment with different combinations of shutter speed and aperture that achieve the same exposure. Remember that for every stop you go down with the shutter, you need to open up one stop with the aperture, and vice versa. For example, if the exposure is correct at 1/250 sec. at f/8, shoot the same subject at 1/60 sec. at f/11, and again at 1/2000 at f/2.8. They’re all correct exposures, but the images will look very different. This experiment will give you a sense of the many, many combinations of settings that are possible for correct exposure for any given scene. You can also use this exercise to see the effects of aperture on depth of field as you move through the range. And if you’re hand-holding, you’ll see the effects of motion blur (and camera shake) come into play as you hit the very slow shutter speeds.
Throw ISO in the Mix
Once you’ve done the previous assignment and you have a good feel for the relationship between shutter speed and aperture, add ISO into the equation. Change the ISO and notice how it affects the shutter and aperture settings that are required for a correct exposure. Having a really strong, foundational understanding of the idea that exposure is a balancing act between these three settings, and knowing how each setting impacts the final image, will empower you to make purposeful choices.
Practice Panning
Have a friend model for you and practice shooting him as he moves through your field of vision from one side to the other. Have him move at varying speeds—walking quickly, running, riding a bike. Practice your tracking skills by following the subject with your lens as he moves. Experiment with setting your shutter from 1/8 to 1/15 to 1/60 to 1/125, making sure to adjust your other settings accordingly to achieve the proper exposure. Notice how much motion blur each shutter speed causes. Notice also how the speed of the subject affects how slow the shutter must be to capture the sense of movement. For a car driving by, 1/125 sec. or faster might do it, while you’ll need a much slower speed like 1/30 sec. if the subject is walking.
Create Compositions
Take another look at the section on composition in this chapter. Then set out to either create or find examples of each compositional concept—the rule of thirds, leading lines, and so on. I suggest just walking out the door and around the neighborhood to see what you can find. At first, you might feel that looking for these types of compositions is a bit restrictive, but it can be really helpful in giving you a starting point, a way to begin to make sense visually of all that’s around us.
Share your results with the book’s Flickr group!
Join the group here: flickr.com/groups/weddingsfromsnapshotstogreatshots