
Chapter 2. Fundamental Concepts in Silverlight Development for Windows Phone
In This Chapter
• Understanding the role of XAP files
• Using the Application Deployment tool
• Enabling and identifying app capabilities using the Marketplace Test Kit
• The threading model for Silverlight graphics and animation
• Optimizing animation performance
• Enabling and reading the Frame Rate Counter
• Using memory and execution profiling to identify bottlenecks
• Retrieving device information using the DeviceStatus class
• Applying MVVM to a Windows Phone app
• Simplifying property change notification
• Using commanding with MVVM
• Validating method arguments
• Building a platform agnostic dialog service
This chapter provides an overview of some common pieces of phone infrastructure and describes various techniques that are useful when building Windows Phone apps.
This chapter begins with a look at the principal output of a Visual Studio Phone Application project: the XAP file. The chapter discusses its composition and shows how to deploy a XAP file to a developer unlocked device.
The chapter then looks at the security capability model of the phone and at how this model is used to notify the user of any potential dangers before downloading an app from the Windows Phone Marketplace. You also look at using the Marketplace Test Kit to determine the capability requirements of your app.
The chapter then examines the threading model of Silverlight for Windows Phone and examines various performance considerations when creating animations or hiding and showing visual elements. You see how the Windows Phone frame rate counter works and learn how to interpret each reading shown on the display.
The chapter then looks at the Windows Phone Performance Analysis tool. You see how to profile your app’s performance and memory usage, improve the responsiveness of your app, and help ensure that your app passes the Windows Phone Marketplace certification requirements.
The chapter then turns to the custom code and commonly used techniques that you see frequently throughout the book and that underpin many of the examples in subsequent chapters.
It is not uncommon to have many pages in a Windows Phone app, and having a solid codebase that contains a common infrastructure and frequently used services can save a lot of time. In fact, with more than 100 examples included in the downloadable sample code, creating the code for this book would have taken considerably longer without it.
The techniques demonstrated are tried and tested approaches that will help you build more maintainable apps and by the end of the book will be exceedingly familiar to you if they are not so already.
The overview of the custom infrastructure begins with an exposé of the Model-View-ViewModel pattern, and you see how it is applied in the downloadable sample code. You then examine how property change notification is implemented and see techniques for improving the traditional implementation of INotifyPropertyChanged so that it works effortlessly with multithreaded apps.
The chapter then looks at the commanding infrastructure used throughout the book and examines a custom ICommand that allows you to specify handlers for command evaluation and execution. There is also a brief overview of the argument validation system commonly used in the sample code to validate method arguments.
Finally, you look at a custom dialog service that enables you to ask the user a question from your viewmodel, while remaining compatible with unit testing.
Understanding the Role of XAP Files
The output of a Visual Studio project normally consists of a multitude of files, which may include assemblies, images, config files, manifest files, and so forth. XAP (pronounced zap) files contain project output that has been bundled up, ready for deployment.
XAP files have been around since the early days of Silverlight 2 (beta 1) and allow developers to easily deploy an entire Silverlight application to a remote server. On the Windows Phone platform, they are used to deploy an app to the Windows Phone Marketplace or to a developer unlocked device.
A XAP file is a compressed zip file that contains your project assemblies and resources, along with two application manifest files: AppManifest.xml and WMAppManifest.xml, both of which are located in the Properties directory of the project.
It is a Windows Phone Marketplace certification requirement that the XAP file contains both an AppManifest.xml file and a WMAppManifest.xml file. Both of these files are automatically generated when creating a new Windows Phone application from within Visual Studio. In nearly all cases, AppManifest.xml does not require changes by you. WMAppManifest.xml, however, may require editing depending on the capabilities supported by your app. This is discussed in the section “The Windows Phone Capabilities Model” later in the chapter.
When publishing to the Windows Phone Marketplace, your app’s XAP file is submitted as part of the publishing process.
To obtain the XAP file for your app, perform a build using a Release build configuration. You can then find the XAP file located in your app’s Bin/Release directory.
When submitting your application to the Windows Phone Marketplace, the XAP file that you submit must be built using a release configuration or it may fail the certification process.
The maximum allowed size of the XAP package file for Windows Phone Marketplace certification is 225MB.
The Application Deployment Tool
XAP files allow you to circulate your app to developers who have a developer unlocked device. This is done using the Application Deployment tool located in the Windows Start menu under the Windows Phone SDK. The tool allows you to navigate to select a XAP file and deploy it to a connected phone device (see Figure 2.1).
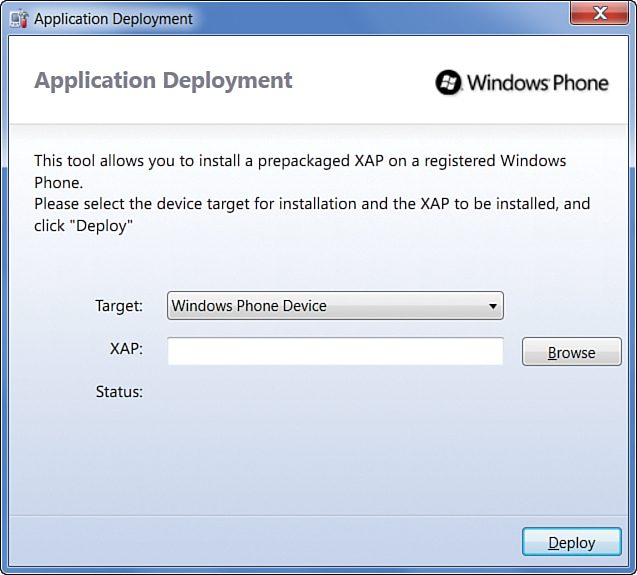
Figure 2.1. The Application Deployment tool
If you have not encountered XAP files before, they will certainly become relevant once you want to publish your first app to the Windows Phone Marketplace.
The Windows Phone Capabilities Model
Microsoft recognizes that making the user experience on the phone the best it can be helps to secure greater adoption of the platform. To this end, users should never regret installing an app, and one way to ensure this is by using a security model that requires users to opt-in to certain functionality within the app, called capabilities.
A capability is a phone resource that when used by your app may bring with it privacy or security concerns, or it may incur a cost that the user should be made aware of. Examples of capabilities include the camera, geographic location services, microphone, and SMS.
Capabilities are a way of disclosing to the user what an app is potentially able to do. Your app’s capabilities are displayed to potential users, those considering downloading the app from the Windows Phone Marketplace. It is at the user’s discretion whether to download your app; if a user does not want an app to have access to, for example, the phone’s camera, then the user may decide not to download that app.
Capabilities are defined in your app’s WMAppManifest.xml file. When a new Silverlight Windows Phone application is created, the full set of capabilities1 is included by default in the manifest file. The Windows Phone operating system grants security permissions to the application according to the capabilities listed in the manifest file. See Table 2.1 for a list of these capabilities.
1 All apart from one capability, the ID_HW_FFCCAMERA (front facing camera) capability, are included.
Table 2.1. Windows Phone Capabilities

When an app is submitted to the Windows Phone Marketplace, the XAP file is decompressed, validated, and repackaged. During this process the security capabilities of the app are discovered and written back to the WMAppManifest.xml file. As a result, if the manifest does not contain capabilities that are used by your app, these capabilities are inserted as part of the submission process.
The capabilities specified in the WMAppManifest.xml file before submission are relevant only while debugging your app. By removing unneeded capabilities from the manifest you ensure that no unintended capabilities have crept in during development.
Two capabilities, however, are exceptions to this process: ID_CAP_NETWORKING and ID_HW_FFCCAMERA.
If the ID_CAP_NETWORKING (networking) capability is removed from your app’s manifest, it will not be reinserted during the submission process; this enables you to prevent all network activity from your app if you want.
If the ID_HW_FFCCAMERA (front facing camera) capability is specified in your manifest file, it is not automatically removed during the submission process.
After submission to the Windows Phone Marketplace, and during the capability discovery process, the Microsoft Intermediate Language (MSIL) of the assemblies located in your XAP file are analyzed. If a phone API that requires a particular capability is detected, the capability is added to the WMAppManifest.xml file. This occurs even if the code is never called by your app at runtime. It is therefore important to be mindful that referencing other assemblies can inadvertently add security capabilities to your app if the other assemblies require capabilities. The security capability detection mechanism is not clever enough to walk your MSIL to discover whether it is actually used; it merely identifies the presence of the API.
To pass Windows Phone Marketplace certification, apps are not allowed to use P/Invoke or COM Interop.
Determining App Capabilities Using the Marketplace Test Kit
The Windows Phone SDK includes a tool for analyzing the capabilities required for your app. To analyze your app’s capability requirements, perform the following steps:
1. Build the app using a Release configuration.
2. Right-click on the launch project’s node in the Visual Studio Solution Explorer and select Open Marketplace Test Kit. The Automated Tests tab includes a Capability Validation test whose Result Details column indicates the capabilities used by the app (see Figure 2.2).
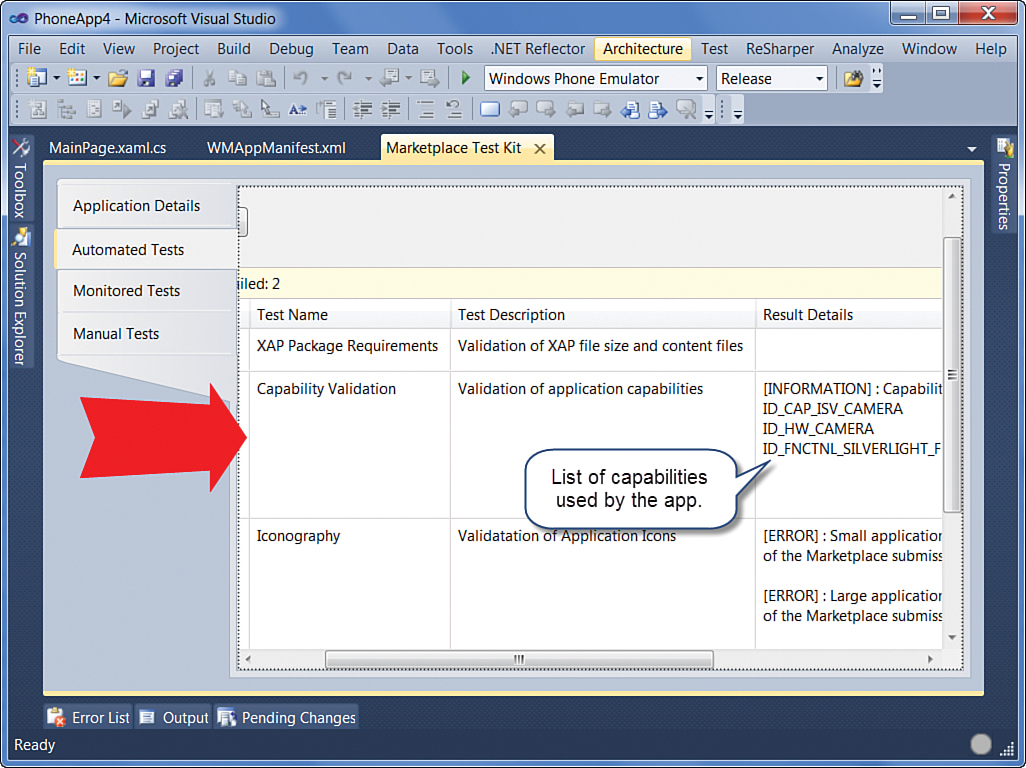
Figure 2.2. Viewing the list of required capabilities with the Marketplace Test Kit
3. Click the Run Tests button to begin the analysis process.
The Iconography and Screenshots automated tests fail if you have not specified any icons or screenshots for your app. This is to be expected and does not affect the outcome of the Capability Validation test.
The Marketplace Test Kit is a recent addition to the Windows Phone SDK (it was not present in the first release of the SDK) and offers numerous tests that can assist you in ensuring that your app is Marketplace ready. It can also save you time and the frustration caused by failing the Marketplace submission requirements.
The Threading Model for Silverlight Graphics and Animation in Windows Phone
Silverlight for Windows Phone uses two threads for graphics and animation: a UI thread and a composition thread. The composition thread was introduced with the second release (7.5) of the Windows Phone OS. The first release of the OS had issues with performance around user input. A single UI thread had been largely acceptable for Silverlight for the desktop and browser because both generally rely on the mouse for input. The phone, however, relies on touch, which, as it turns out, needs to be substantially more reactive to user input. When using a mouse, a slight delay does not unduly affect the user’s perception of your app, but when using touch, a slight delay can make the user feel like the device is broken. Thus, the composition thread was introduced in Windows Phone 7.52 to assist in rendering visuals by offloading some of the work traditionally done by the UI thread.
2 The composition thread was also introduced to Silverlight for the browser with Silverlight 5 but still lacks the auto-caching capabilities present in Silverlight for Windows Phone. Auto-caching is described in a moment.
The UI thread is the main thread in Silverlight for Windows Phone and handles user input, events, parsing and creation of objects from XAML, and the initial drawing of all visuals.
The composition thread aides the UI thread in handling graphics and animation, freeing up the UI thread and making it more responsive to user input. Storyboard-driven animations that run on the composition thread are cached and handled by the device GPU in a process called auto-caching.
While the composition thread frees the UI thread in some situations, the key to writing responsive applications is still making sure that the UI thread is not overloaded or blocked by user code, in event handlers for example. If you anticipate that a particular section of code will tie up the UI thread for a considerable amount of time, for more than, say, 50 milliseconds, then use a background thread to perform the activity. The web service APIs, for example, are all designed to be used asynchronously so that they do not block the UI thread.
If you are not familiar with the various mechanisms for spawning background threads, do not worry; you see many examples throughout the book.
The composition thread is used for animations involving the UIElement’s RenderTransform and Projection properties. Typically these animations include the following from the System.Windows.Media namespace:
• PlaneProjection
• RotateTransform
• ScaleTransform
• TranslateTransform
The composition thread is used only for scale transforms that are less than 50% of the original size. If the scale transform exceeds this amount, the UI thread performs the animation. In addition, the UIElement.Opacity and UIElement.Clip properties are handled by the composition thread. If an opacity mask or nonrectangular clip is used, however, the UI thread takes over.
Animations and Threads
The composition thread is ideal for handling storyboard animations because it is able to pass them to the device GPU for processing, even while the UI thread is busy. Code-driven animations, however, do not benefit from the composition thread as such animations are handled exclusively by the UI thread, frame by frame using a callback. They are, therefore, subject to slowdown depending on what else occupies the UI thread, and the animation will update only as fast as the frame rate of the UI thread.
Performance and Element Visibility
Silverlight provides two properties that allow you to hide or reveal UI elements: UIElement.Visibility and UIElement.Opacity—each of which has performance implications depending on how it is used.
The UIElement.Visibility property is handled by the UI thread. When an element’s Visibility property is set to Collapsed, the visual tree must be redrawn. The upside is that when collapsed, the UIElement is not retained in visual memory, and thus decreases the amount of memory used by your app.
Conversely, controlling the visibility of an element using the UIElement.Opacity property allows the element to be bitmap cached; the element is stored as a simple bitmap image after the first render pass. Bitmap caching allows Silverlight to bypass the render phase for the cached element and to use the composition thread to display the bitmap instead, which can free up the UI thread considerably. By setting the opacity of a cached element to zero, you hide the element without requiring it to be redrawn later. This, however, does mean that, unlike the Visibility property, the element is still retained in visual memory.
Avoid manipulating the UIElement.Opacity property without enabling bitmap caching. Set the UIElement.CacheMode property to BitmapCache, as shown in the following example:
<Path CacheMode="BitmapCache" ... />
Deciding Between Visibility and Opacity
Element opacity in conjunction with bitmap caching usually produces the best performance when hiding and revealing elements. There may be times, however, when the UIElement.Visibility property is better and is influenced by the number and complexity of the visual elements being rendered. In such cases it may require experimentation to determine the best approach.
Understanding the Frame Rate Counter
Developing for a mobile device requires particular attention to performance. Mobile devices have less computing power than desktop systems and are more susceptible to performance bottlenecks.
The Windows Phone SDK comes with a built-in control that allows you to monitor the performance of your app, including frames per second and memory usage.
By default, the frame rate counter is enabled in your app’s App.xaml.cs file if a debugger is attached, as shown in the following excerpt:
if (System.Diagnostics.Debugger.IsAttached)
{
// Display the current frame rate counters.
Application.Current.Host.Settings.EnableFrameRateCounter = true;
...
}
It is possible to enable or disable the frame rate counter programmatically at any time from your app.
The EnableFrameRateCounter property is somewhat of a misnomer, since the control also reports a number of other UI metrics, such as texture memory usage, as shown in Figure 2.3.
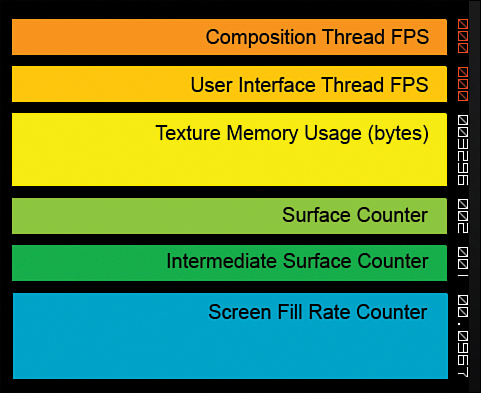
Figure 2.3. The Frame Rate Counter
Each field is updated periodically while the app is running. Table 2.2 describes each counter field.
Table 2.2. Frame Rate Counter Field Descriptions
The frame rate counter is a valuable tool for identifying performance bottlenecks in your app. For more detailed performance metrics turn to the Performance Analysis tool, discussed next.
The Windows Phone Performance Analysis Tool
Not only is performance important in ensuring that your app provides an enjoyable experience for your users, but it is also important in a stricter sense: for meeting the certification requirements of the Windows Phone Marketplace. Marketplace certification includes a number of performance related criteria that your app must adhere to. The requirements are as follows:
• An application must not exceed 90MB of RAM usage, except on devices that have more than 256MB of memory. Note that even though this specification exists, the Windows Phone hardware specifications for phone manufacturers state that all devices must have at least 256MB of RAM.
• If an application performs an operation that causes the device to appear to be unresponsive for more than 3 seconds, such as downloading data over a network connection, the application must display a visual progress or busy indicator.
• An app must display the first screen within 5 seconds after launch. You see how to work around this requirement for slow loading apps by creating a splash screen in Chapter 3, “Application Execution Model.”
• An app must be responsive to user input within 20 seconds after launch.
The Windows Phone Performance Analysis tool comes with the Windows Phone SDK and is integrated into Visual Studio, allowing you to analyze and improve the performance of your apps. The tool profiles your app during runtime to gather either execution metrics or memory usage information.
Execution profiling may include method call counts and visual profiling, allowing you to view the frame rate of your app over time, while memory profiling allows you to analyze your app’s memory usage.
To launch the tool select Start Windows Phone Performance Analysis from the Debug menu in Visual Studio. The profiling type can then be selected along with other advanced metrics by expanding the Advanced Settings node, as shown in Figure 2.4.
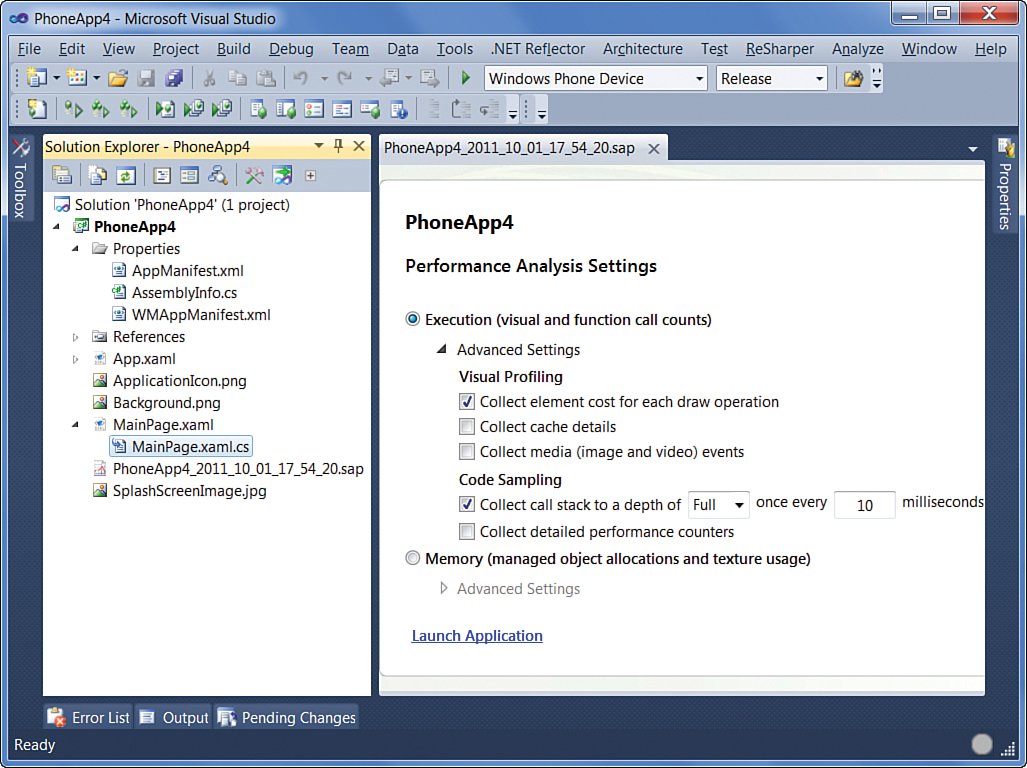
Figure 2.4. Configuring the Performance Analysis settings
To begin the profiling session, click the Launch Application link.
Whenever the Performance Analysis tool runs, it creates a .sap file in the root directory of your project. A .sap file is an XML file that contains the profiling information gathered during a profiling session and can later be opened by the profiling analysis tools built into Visual Studio.
When done putting your app through its paces, click the Stop Profiling link, shown in Figure 2.5. You can, alternatively, use the device’s hardware Back button to stop the profiling session.

Figure 2.5. Profiling in progress with the Performance Analysis tool
Avoid disconnecting the phone device to stop a profiling session, as this can lead to sampling errors. Instead always use the Stop Profiling link or the hardware Back button.
Once stopped, the analysis tools automatically parse the .sap file and present the analyzed data in a graph (see Figure 2.6).
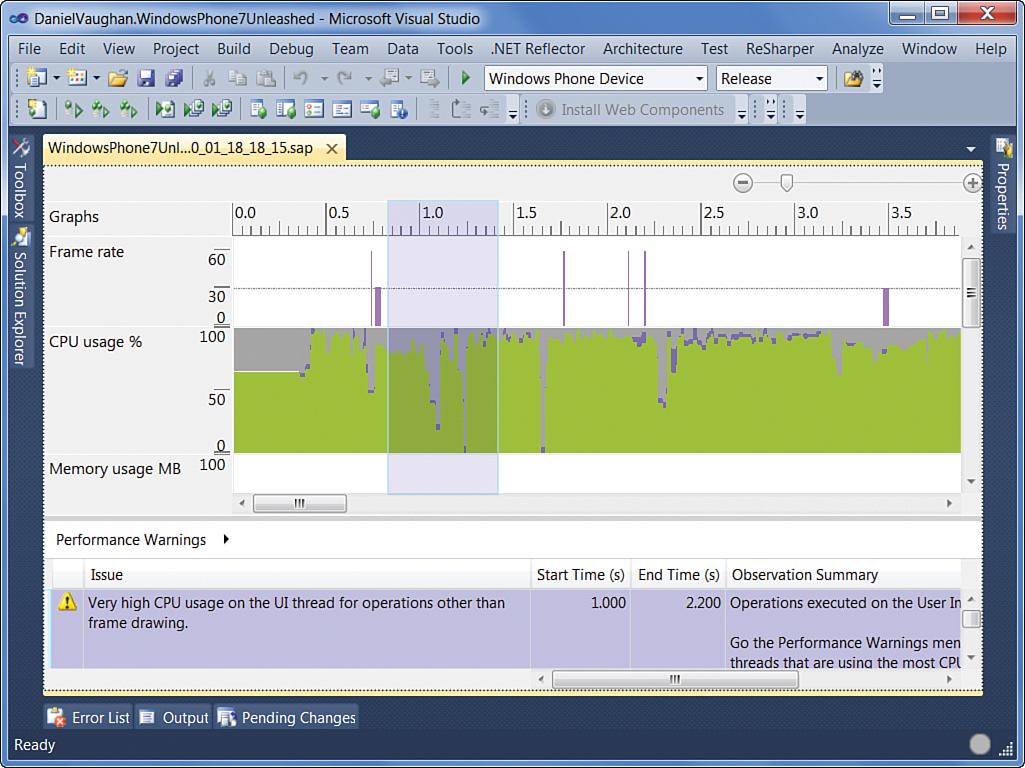
Figure 2.6. Viewing performance metrics in the Performance Analysis tool
The .sap file can be reloaded into the analysis tools by double-clicking on the .sap file in the Visual Studio Solution Explorer.
Each section of the analysis tools view is discussed in the following sections.
Frame Rate Graph
The Frame Rate graph displays the number of screen redraws (in frames per second) that the app completed at the particular point in the timeline.
The Frame Rate graph shows nonzero values for periods in the timeline where the application was updating the display in some way. Therefore, areas that appear to have a zero frame rate indicate that no updating was taking place and not necessarily that your app was not able to render any frames.
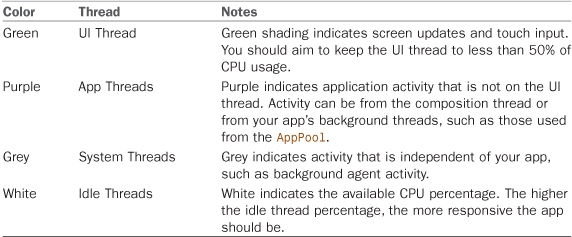
CPU Usage Graph
The CPU Usage graph displays the activity of various threads using different colors, as described in Table 2.3.
Memory Usage MB Graph
Memory Usage MB shows the amount of RAM being consumed by your app in megabytes, at any point along the timeline. This graph allows you to identify excessive memory usage.
Storyboards
Storyboards are displayed as an S flag on the timeline to indicate the occurrence of a storyboard event, and typically indicate the start of an animation. There are two kinds of flags: A red flag indicates a storyboard that is CPU-bound; a purple flag indicates a storyboard that is not CPU bound.
Image Loads
When an image is loaded into memory, an I flag is displayed on the graph. While JPG and PNG files might have a small size when stored in isolated storage, when displayed using an Image control for example, images are expanded into bitmaps and consume a lot more memory. Use the image load flag to identify places in your app where excessive memory consumption is taking place.
GC Events
When the CLR performs garbage collection, a G flag is displayed on the graph. Garbage collection reclaims memory and ordinarily decreases the value shown in the Memory Usage MB graph.
Viewing Detailed Profiling Information
Within the analysis tool, a region can be selected within the graph to view detailed performance warnings for that period. Much like Visual Studio’s Error List view, the Performance Warnings view identifies three types of items: Information, Warning, and Error items (see Figure 2.7).
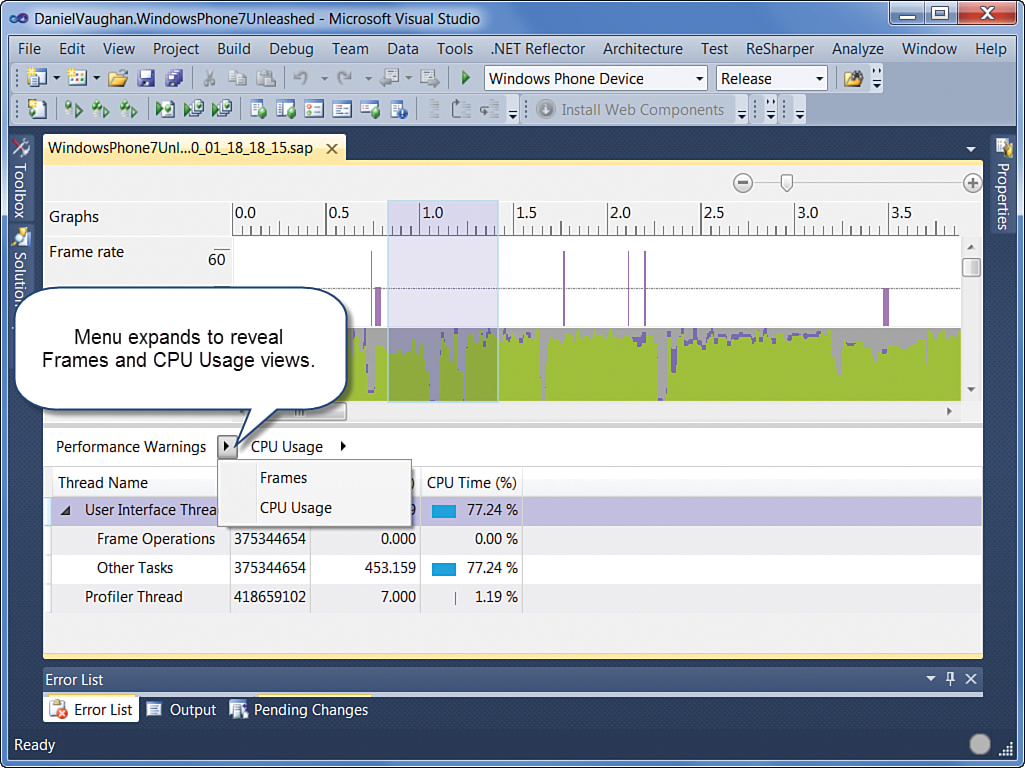
Figure 2.7. The Performance Warnings view
The Observation Summary provides advice on how to rectify each particular warning item.
The CPU Usage breadcrumb can also be expanded and allows you to view various other CPU related metrics, such as a function call tree.
The Performance Analysis tool provides detailed runtime performance metrics and allows you to identify the source of performance bottlenecks, enabling you to improve the responsiveness of your app and in turn the user experience for your app.
Device Status
The Microsoft.Phone.Info.DeviceStatus class is a static class used to retrieve information about the phone device, such as the device manufacturer, firmware version, and total memory available to your app.
Table 2.4 describes each property of the DeviceStatus class.
Table 2.4. DeviceStatus Properties
In the first release of the Windows Phone OS, the DeviceExtendedProperties class was used to retrieve many of the DeviceStatus property values. DeviceExtendedProperties has since been deprecated, and DeviceStatus takes its place for all but one piece of device information: the Windows Live anonymous id of the user, which is, in fact, the only value retrievable using the DeviceExtendedProperties class. Windows Live anonymous IDs are discussed in Chapter 28, “Background File Transfers.”
The downloadable sample code contains a DeviceStatusView.xaml page, which displays each of the DeviceStatus properties. The memory related values have been converted to megabytes to make them more easily understandable (see Figure 2.8).
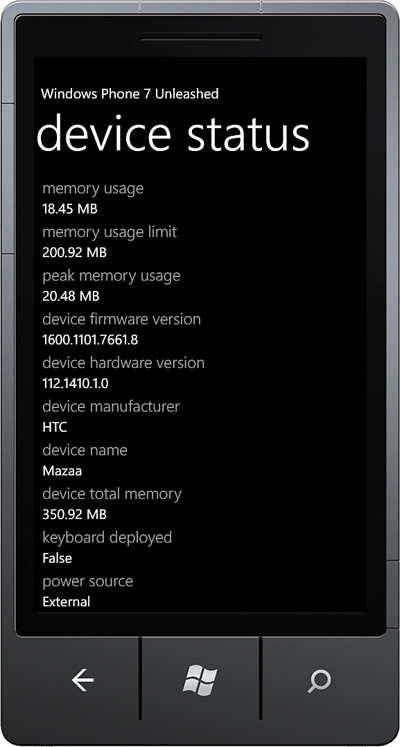
Figure 2.8. DeviceStatusView page
Calculating Available Memory
Windows Phone manufacturers are obligated to produce phones that have at least 256MB of RAM.
While many phones have more than 256MB of RAM, be mindful of the minimum specification and aim to support the lowest common denominator. Do not assume your app will be running on a device with more than 256MB of RAM.
To determine how much memory your app has to work with, use the DeviceStatus.ApplicationMemoryUsageLimit.
For example, if a particular task is estimated at costing an additional 10MB of memory, then determining whether the task will exceed the memory usage limit can be calculated as follows:
long requiredBytesEstimate = 10 * 1048576; /* 1048576 bytes equals 1 megabyte. */
if (DeviceStatus.ApplicationMemoryUsageLimit
>= DeviceStatus.ApplicationCurrentMemoryUsage + requiredBytesEstimate)
{
/* Perform expensive task. */
}
If your app attempts to allocate more memory than is available on the device—that is, if it exceeds the value of DeviceStatus.ApplicationMemoryUsageLimit, the application terminates with an OutOfMemoryException.
In addition to foreground app memory constraints, background tasks are limited to 6MB of memory. Background tasks and their memory usage requirements are discussed in Chapter 27, “Scheduled Actions.”
DeviceStatus Events
While DeviceStatus allows you to retrieve device information, it also includes the following two events:
• KeyboardDeployedChanged
• PowerSourceChanged
If the phone device has a hardware keyboard, such as a sliding keyboard, the KeyboardDeployedChanged event allows you to detect when the keyboard is extended.
The KeyboardDeployedChanged event can be subscribed to as shown:
DeviceStatus.KeyboardDeployedChanged += HandleKeyboardDeployedChanged;
The event handler can be used to determine whether the keyboard is deployed using the DeviceStatus class, as shown:
void HandleKeyboardDeployedChanged(object sender, EventArgs e)
{
bool keyboardDeployed = DeviceStatus.IsKeyboardDeployed;
...
}
PowerSourceChanged Event
When the phone device is connected to a user’s computer, it may be a good time to perform some processor intensive task that could potentially consume a lot of power, which would otherwise flatten the user’s battery. The PowerSourceChangedEvent allows you to detect when the user attaches or detaches an external power supply.
The PowerSourceChanged event can be subscribed to as shown:
DeviceStatus.PowerSourceChanged += HandlePowerSourceChanged;
The event handler can be used to retrieve the new PowerSource value from the DeviceStatus class, as shown:
void HandlePowerSourceChanged(object sender, EventArgs e)
{
PowerSource powerSource = DeviceStatus.PowerSource;
...
}
The DeviceStatus.PowerSourceChanged event is not raised on the app’s UI thread. All updates to visual elements must, therefore, be invoked on the UI thread, either directly by using the app’s global Dispatcher or indirectly via a custom property change notification system, discussed later in this chapter.
Avoid using DeviceState.PowerSource for determining whether to use the phone’s network connection to transfer a substantial amount of data. See Chapter 24, “Network Services,” to learn how to monitor network connectivity and how to determine the type of network connection being used.
Applying the Model-View-ViewModel Pattern to a Windows Phone App
A dominant pattern that has emerged in XAML UI based technologies, in particular WPF and Silverlight, is the Model-View-ViewModel (MVVM) pattern. MVVM is an architectural pattern largely based on the Model-View-Controller (MVC) pattern, which like the MVC pattern serves to isolate the domain logic from the user interface logic. In addition, MVVM leverages the strong data binding capabilities of XAML based technologies, which allows loose coupling between the view and the viewmodel so that the viewmodel does not need to directly manipulate the view. This eliminates the need for almost all code-beside, which has a number of benefits, including freeing interactive designers from writing view specific code.
The following are the principal elements of the MVVM pattern:
• Model—The model is responsible for managing and delivering data.
• View—The view is responsible for displaying data. The view is ordinarily a UI element, and, in the case of Silverlight for Windows Phone apps, it is a UserControl such as a PhoneApplicationPage.
• ViewModel—A bridge or intermediary between the model and the view, which commonly retrieves model objects and exposes them to the view. Often the viewmodel is designed to respond to commands that are bound to UI elements in the view. The viewmodel can be thought of as the model of the view.
With the release of the Windows Phone 7.1 SDK came Silverlight 4 and support for ICommands. The use of commands is discussed in the section “Using Commands” later in the chapter.
There are numerous benefits to using MVVM in your apps. MVVM can improve an app’s testability because it is easier to test code from a unit test that does not rely on surfacing UI objects. Testing apps is discussed further in Chapter 22, “Unit Testing.”
Placing application interaction logic in a viewmodel also makes it easier to redesign your app while reducing the need to refactor interaction logic. Occasionally you may like to reuse some of your UI logic in different apps or, to a lesser extent, on multiple platforms; for example, WPF and Silverlight. Decoupling interaction logic from any particular UI technology makes it easier to target multiple platforms.
Implementing the MVVM Pattern
There are two general approaches to MVVM viewmodel and view creation: view-first and viewmodel-first. The view-first approach sees the creation of the view before the viewmodel. Conversely, in the viewmodel-first approach, it is usually the viewmodel that creates the view. Both approaches have their pros and cons. Viewmodel-first potentially offers complete independence from the UI, allowing an app to be executed entirely without a UI; yet it suffers from various implementation challenges. View-first is far simpler to implement when page navigation is used, as is the case in a Silverlight for Windows Phone app.
In this book, the view-first approach is used exclusively.
MVVM in Silverlight relies on the assignment of a viewmodel to the view’s DataContext property. There are a number of commonly used techniques for marrying a viewmodel to its view. Some offer a high degree of flexibility at the cost of greater complexity and decreased visibility. The technique employed throughout this book, and the one I find to be adequate in most cases, has the viewmodel instantiated in the view’s constructor. In the following example a viewmodel is assigned to the view’s DataContext property:
public partial class FooView : PhoneApplicationPage
{
public FooView()
{
InitializeComponent();
DataContext = new FooViewModel();
}
...
}
With the DataContext set to the viewmodel, properties of the viewmodel can be used in data binding expression in the view’s XAML.
ViewModelBase Class
Silverlight for Windows Phone apps often consist of many pages. As such, a likely candidate for sharing common infrastructure across all viewmodels in an app is a viewmodel base class.
In the samples throughout this book, every viewmodel subclasses a custom ViewModelBase class that provides, among other things, navigation support, error validation, state preservation, and property change notification (see Figure 2.9). Each of these capabilities along with specific related topics is discussed in subsequent chapters.
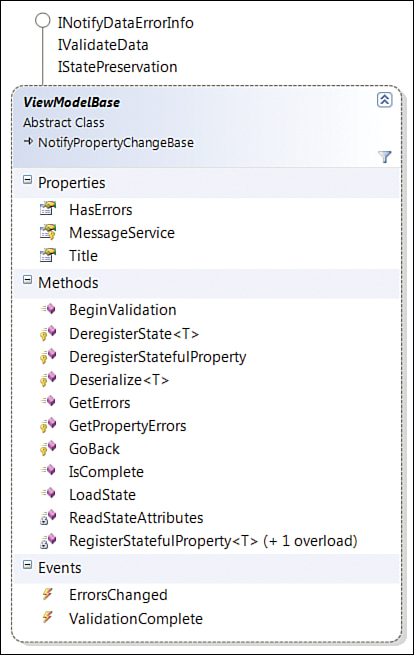
Figure 2.9. ViewModelBase class diagram
ViewModelBase inherits from a custom NotifyPropertyChangeBase class, which provides for property change notification, discussed in the next section.
Property Change Notification
A key aspect of MVVM in Silverlight relating to data binding is property change notification. Property change notification allows an object (the source, for example, a viewmodel) to signal to a FrameworkElement (the target) that a value needs updating.
There are two ways to implement change notification in a source class: either using dependency properties or by implementing INotifyPropertyChanged, which is frequently referred to as INPC.
The use of dependency properties is not recommended for viewmodels because it requires that the viewmodel class inherit from DependencyObject and that all property updates occur on the UI thread, which can lead to a lot of thread related plumbing code in the viewmodel and make your code less portable because of dependence on the Silverlight dependency property system.
Implementing INotifyPropertyChanged: The Traditional Approach
The INotifyPropertyChanged interface has a single event called PropertyChanged. The implementation of INotifyPropertyChanged ordinarily includes the following construct:
public event PropertyChangedEventHandler PropertyChanged;
protected virtual void OnPropertyChanged(string propertyName)
{
PropertyChangedEventHandler tempEvent = PropertyChanged;
if (tempEvent != null)
{
tempEvent(this, new PropertyChangedEventArgs(propertyName));
}
}
To determine whether the PropertyChanged event field has any subscribers, it is copied to a temporary local variable, which allows you to then test whether it is null in a thread safe manner. Without first obtaining a copy, another thread could potentially unsubscribe from the event after the null check but before the event is raised, which would inadvertently lead to a NullReferenceException being raised.
An alternative that avoids the null check is to assign the event to an empty handler, as shown:
public event PropertyChangingEventHandler PropertyChanging = delegate {};
A property is then able to signal to a subscriber of the event that a property value needs updating, like so:
string foo;
public string Foo
{
get
{
return foo;
}
set
{
if (foo != value)
{
foo = value;
OnPropertyChanged("Foo");
}
}
}
When setting a property that is the source property of a data binding, the update must occur on the UI thread or an UnauthorizedAccessException will ensue. Source properties can be set from non-UI threads using the application’s Dispatcher as shown in the following excerpt:
Deployment.Current.Dispatcher.BeginInvoke(
delegate
{
Foo = "bah";
});
There are a number of reasons why peppering your code with BeginInvoke calls is not a good idea. First, it imposes an unnecessary threading model on your viewmodel code. Second, it can lead to code that need not be executed on the UI thread, creeping in to the handler. And, third, it is pretty ugly.
The next section looks at extracting INPC into a reusable and UI thread friendly class.
Implementing INotifyPropertyChanged: An Alternative Approach
While there is nothing manifestly wrong with adding the OnPropertyChanged method to every class that implements INotifyPropertyChanged (apart from violating the DRY principle), it makes sense to extract the change notification code into a reusable class, as this allows you to not only reduce boilerplate code but also to add other features to the event raising code, such as improving support for multithreaded apps and implementing INotifyPropertyChanging (as well as INotifyPropertyChanged).
The downloadable sample code includes such a class called PropertyChangeNotifier. The ViewModelBase class delegates change notification to a PropertyChangeNotifier instance.
Throughout this book you frequently see viewmodel properties (with backing fields) resembling the following:
string foo;
public string Foo
{
get
{
return foo;
}
set
{
Assign(() => Foo, ref foo, value);
// Or use the following for frequently assigned properties:
// Assign("Foo", ref foo, value);
}
}
Here, rather than passing the property name as a loosely typed string, a lambda expression allows the Assign method to extract the name of the property.
A reference to the field is passed to the Assign method along with the new value.
A call to the base class Assign method updates the field value, while also offering the following advantages:
• The application’s Dispatcher is used to automatically raise the PropertyChanged event on the UI thread if called from a non-UI thread. This eliminates the need to add Dispatcher.BeginInvoke calls to a viewmodel to avoid cross thread errors.
• A lambda expression can be used, rather than a loosely typed string, to identify the property. This can help to prevent a property name mismatch if you forget to change the name string after renaming the property. While refactoring tools, such as Resharper, assist in detecting string name mismatches, mismatches can still be easily missed and often require careful attention during refactoring.
• A PropertyChanging event is also raised if there are any subscribers. PropertyChangeNotifier also implements the INotifyPropertyChanging interface as well as INotifyPropertyChanged and allows a subscriber to cancel an update if desired.
• PropertyChangeNotifier assists the viewmodel in remaining UI technology agnostic. For example, retrieving an application’s Dispatcher in WPF is done differently in Silverlight.
• PropertyChangeNotifier uses a weak reference to its owner, thereby preventing memory leaks from occurring when targets fail to unsubscribe from events.
• The single line Assign method reduces the amount of boilerplate code in properties.
Using a lambda expression to identify a property comes with a performance penalty, and for properties that are changed with high frequency, such as those responding to phone sensor events, it is recommended to use one of the other Assign method overloads that accept a string name instead.
The return value of the Assign method is an AssignmentResult enum value, whose values are described in the following list:
• Success—The assignment occurred and the field value now equals the new value.
• Cancelled—A subscriber to the PropertyChanging event cancelled the assignment. This relies on a custom extension to the INotifyPropertyChanging event.
• AlreadyAssigned—No assignment was made because the existing field value was already equal to the new value.
• OwnerDisposed—The PropertyChangeNotifier uses a weak reference to the object for which it is providing property changing monitoring. This value indicates that no assignment was performed because the owner object has been disposed.
Since property change notification is such a common requirement of model and viewmodel classes, for the sake of convenience a NotifyPropertyChangeBase class is also provided in the downloadable sample code. It leverages an instance of the PropertyChangeNotifier, and can be used as a base class for any class that needs INotifyPropertyChanged to be implemented.
The ViewModelBase class, in particular, inherits from this class (see Figure 2.10).
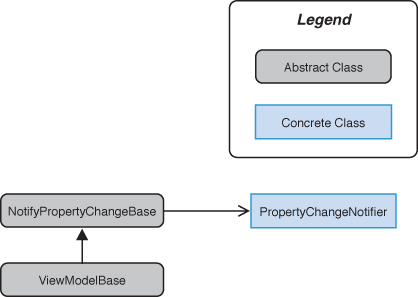
Figure 2.10. ViewModelBase inherits from NotifyPropertyChangeBase, which has a PropertyChangeNotifier.
The implementation details of the PropertyChangeNotifier are lengthy and are not included here. Instead, however, an article already covers the topic at http://danielvaughan.org/post/Property-Change-Notification-using-a-Weak-Referencing-Strategy.aspx.
Before moving on to commanding, I must affirm that you do not need to use the property notification system presented here in your own projects. If you are happy using the traditional approach to INPC, that is perfectly fine. Be mindful, however, that a lot of the phone SDK APIs have events that do not always return on the UI thread, and you may need to rely more heavily on the Dispatcher to prevent cross thread errors.
Using Commands
Silverlight for Windows Phone supports the ICommand interface for buttons and various other controls. Commands are useful because when exposed from a viewmodel they allow your view to bind to them just like other properties; when the user interacts with the visual element, the command is executed. This enables you to move your UI logic from event handlers to higher level classes.
The ICommand interface defines the following three members:
• CanExecute(object)—A method called by the Silverlight commanding infrastructure, which automatically sets the enabled state of the target control
• Execute(object)—A method that performs the logic of the command
• CanExecuteChanged—An event that signals that the Silverlight commanding infrastructure should reevaluate the executable state of the command by calling its CanExecute method
Within the downloadable sample code there is a default implementation of the ICommand interface called DelegateCommand<T>. This class has features such as object parameter type coercion, which, for example, enables you to use strings to represent enum values in binding expressions, which are automatically converted to the appropriate enum type.
In this book you commonly see commands defined as read only fields exposed using a property get accessor, as this excerpt from the MediaViewModel in Chapter 7, “Media and Web Elements,” shows:
readonly DelegateCommand playCommand;
public ICommand PlayCommand
{
get
{
return playCommand;
}
}
Most often you see commands instantiated in the viewmodels constructor.
The DelegateCommand constructor accepts an Action argument, which is carried out when the command is executed. In the following excerpt you see the instantiation of a command called playCommand that when executed sets a number of viewmodel properties:
public MediaViewModel()
{
playCommand = new DelegateCommand(
obj =>
{
PlayerState = PlayerState.Playing;
CanPlay = false;
CanPause = true;
});
...
}
DelegateCommand along with its generic counterpart DelegateCommand<T> also allow you to specify an Action that is used to evaluate whether the command is able to be executed.
Ordinarily the Silverlight commanding infrastructure is only supported on buttons (ButtonBase) and a couple of specialized controls. Some extra capabilities are provided in the ICommand implementation that allow you to wire the command to any FrameworkElement, such as in the following example, which shows a Silverlight Image element that when tapped causes an ICommand to be executed:
<Image Source="/Foo.png"
c:Commanding.Command="{Binding ViewCommand}"
c:Commanding.CommandParameter="{Binding FullScreen}" />
The event used to trigger command execution can be specified by using the Commanding.Event attached property. In subsequent chapters you see several examples of using these custom commanding attached properties.
Argument Validation
The book sample code commonly uses a custom ArgumentValidator class to ensure that method arguments are not null. You frequently see statements like the following at the beginning of a method:
string PerformSomeAction(string value)
{
stringField = ArgumentValidator.AssertNotNull(value, "value");
...
}
Here, if value is null, then an ArgumentNullException is raised. If not null, then the stringField field is set to the value in a fluent manner.
Microsoft has a far more feature rich argument validation tool called Code Contracts, which integrates into Visual Studio and can provide static checking as well as runtime checking, along with documentation generation. See http://bit.ly/10zWtK.
All the ArgumentValidator methods are fluent; they return the value passed to them so that they can be assigned to local variables or fields in a single statement.
The ArgumentValidator.AssertNotNull method is as follows:
public static T AssertNotNull<T>(T value, string parameterName) where T : class
{
if (value == null)
{
throw new ArgumentNullException(parameterName);
}
return value;
}
ArgumentValidator contains various other assertion methods for strings and numeric values, some of which are briefly discussed.
ArgumentValidator allows you to assert that an argument falls within a particular range. The following AssertLessThan method ensures that the value is less than a certain value:
public static double AssertLessThan(
double comparisonValue, double value, string parameterName)
{
if (value >= comparisonValue)
{
throw new ArgumentOutOfRangeException(
"Parameter should be less than "
+ comparisonValue, parameterName);
}
return value;
}
This then allows you to validate that a numeric value is less than, for example, 1:
ArgumentValidator.AssertLessThan(1, value, "value");
Other methods, such as AssertNotNullAndOfType, allow you to raise an exception if an argument is null or not of the expected type, and AssertNotNullOrWhiteSpace accepts a string and raises an ArgumentException if string.IsNullOrWhiteSpace(value) returns true.
A Platform Agnostic Dialog Service
Over the last few years, I have found myself doing a lot of cross-platform development, in particular Silverlight for the browser, WPF, and now Windows Phone development. Being able to abstract common tasks away from technology specific types, such as displaying simple dialogs, has made reusing code far easier. In addition, mocking certain types, which would otherwise cause a unit test to fail on a build server, such as displaying a message box, has proven invaluable.
In several places throughout the book you see the use of an IMessageService, which is used to display message dialogs to the user. The ViewModelBase class exposes the IMessageService as a MessageService property, and you see calls like the following:
MessageService.ShowMessage("Hi from Windows Phone!");
If you are itching to sink your teeth into more phone specific content, feel free to skip this section and return to it later.
The IMessageService interface describes a class that is able to display messages to the user, and to ask the user questions (see Figure 2.11).

Figure 2.11. IMessageService class diagram
There are various parameters for specifying captions and so forth, along with the ability to provide a message importance threshold value, so that the user can nominate to have messages filtered based on importance.
There are differences between the built-in dialog related enums in Silverlight and WPF. Hence, these types have been replaced with the technology agnostic enum types shown in Figure 2.11.
The Windows Phone implementation of the IMessageService is done by extending a single class, the MessageServiceBase class, and by overriding two abstract methods: one called ShowCustomDialog, the other AskQuestion (see Figure 2.12).
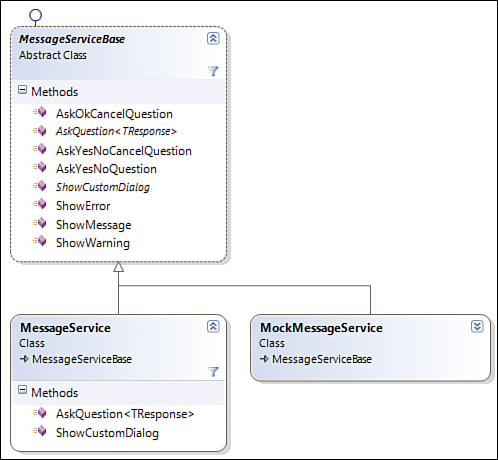
Figure 2.12. MessageService extends MessageServiceBase.
The ShowCustomDialog method uses the Dispatcher to display the dialog on the UI thread (see Listing 2.1). Extension methods are used to convert the native Silverlight MessageBoxButton enum values and MessageBoxResult enum values to the technology agnostic enum values.
Listing 2.1. MessageService Class (excerpt)
public partial class MessageService : MessageServiceBase
{
public override MessageResult ShowCustomDialog(
string message,
string caption,
MessageButton messageButton,
MessageImage messageImage,
MessageImportance? importanceThreshold,
string details)
{
/* If the importance threshold has been specified
* and it's less than the minimum level required (the filter level)
* then we don't show the message. */
if (importanceThreshold.HasValue
&& importanceThreshold.Value < MinumumImportance)
{
return MessageResult.Ok;
}
if (Deployment.Current.Dispatcher.CheckAccess())
{ /* We are on the UI thread,
and hence no need to invoke the call.*/
var messageBoxResult = MessageBox.Show(message, caption,
messageButton.TranslateToMessageBoxButton());
return messageBoxResult.TranslateToMessageBoxResult();
}
MessageResult result = MessageResult.Ok;
var context = new DispatcherSynchronizationContext(
Deployment.Current.Dispatcher);
context.Send(
delegate
{
var messageBoxResult = MessageBox.Show(
message, caption,
messageButton.TranslateToMessageBoxButton());
result = messageBoxResult.TranslateToMessageBoxResult();
}, null);
return result;
}
/* Content omitted. */
}
The downloadable sample code also contains a MockMessageService class that also inherits from MessageService and is designed to be used for unit testing purposes. It allows you to verify that code correctly displayed a message or asked a question. The absence of a mocking framework for Windows Phone makes it especially useful.
The MessageService can be used to display a message, or ask the user a question, from any viewmodel (see Figure 2.13).

Figure 2.13. Using the MessageService to display a message
You see how to use the IMessageService in greater detail in the next chapter.
By using an interface based approach, it affords the opportunity to substitute the IMessageService implementation for a mock implementation, or to even change the behavior of the IMessageService entirely.
These classes are, of course, included in the downloadable sample code. Yet, they also reside in the Calcium SDK repository at http://calciumsdk.com, where you can always find the most up-to-date code, freely available for use in your projects.
Summary
This chapter provided an overview of some common pieces of phone infrastructure and described various techniques that are useful when building Windows Phone apps.
The chapter began with a discussion of the deployment and composition of XAP files. The security capability model of the phone was then discussed, and you learned how to use the Marketplace Test Kit to determine the capability requirements of your app.
The chapter then examined the threading model of Silverlight for Windows Phone and you saw how the Windows Phone frame rate counter works.
You then learned about the Windows Phone Performance Analysis tool and saw how to profile your app’s performance and memory usage.
The chapter then turned to the custom code and commonly used techniques that you see used in subsequent chapters.
The overview of the custom infrastructure began with an exposé of the Model-View-ViewModel pattern, and you saw how it is applied in the downloadable sample code. How property change notification is implemented was discussed, and you saw techniques for improving the traditional implementation of INotifyPropertyChanged so that it works effortlessly with multithreaded apps.
The chapter then looked at the commanding infrastructure used throughout the book and gave a brief overview of the argument validation system commonly used in the sample code to validate method arguments.
Finally, you looked at a custom dialog service that enables you to ask the user a question from your viewmodel while remaining compatible with unit testing.