
Chapter 3. Application Execution Model
In This Chapter
• Application life cycle events
• Application and page state
• Running under the lock screen
• Splash screen and loading indicator creation
• Bookshop sample application
Understanding the events within the life cycle of a Windows Phone application is critical to providing an optimal user experience on the phone. The phone’s single application process model means that your app may be interrupted and terminated at any time. It is your responsibility to maintain the appearance of continuity across interruptions, to save your app’s state whenever an interruption occurs, and, if necessary, restore the state when the user returns to your app.
While the 7.5 release of Windows Phone OS includes support for fast application switching, where your app is kept in memory and its threads suspended, you still need to preserve the state of your app because there are no guarantees that an app will not be terminated if the device memory runs low.
Like localizability, app state preservation is an aspect of development that should not be deferred and is likely one of the biggest challenges you will face as a Windows Phone developer.
Traditionally, developers of Windows desktop applications have not been overly concerned with persisting runtime state. There is usually no need to maintain state for a desktop application, since the application remains in execution and resident in memory while it is open. This is in stark contrast to Windows Phone apps, where an application may be stopped and started many times during a single session.
Seasoned ASP.NET developers who recall the days before AJAX may feel slightly more at home developing for Windows Phone, with ASP.NET’s reliance on view state to overcome the transient nature of page state in which the lifespan of a web page is limited to the period before a postback occurs. This is not too dissimilar to the state model of the phone, although Silverlight has nothing like the view state system built into ASP.NET. For that you need to roll your own, and you see how to build an automated state preservation system in Chapter 25, “Isolated Storage and State Preservation.”
There is no doubt that the single application process model of the phone presents some challenge for developers, but it may also lead to better designed and more robust applications, with an emphasis on decoupling visual elements from their state so that it can be more readily preserved.
This chapter begins with an overview of the application execution model and examines the various application life cycle events, which are used to coordinate state persistence and restoration.
You see how to enable an app to run under the lock screen. You also look at page navigation and how to optimize the user experience by using a splash screen or a loading indicator.
Finally, the chapter delves into the sample application and looks at image caching, design-time data, and consuming a simple WCF service.
Exploring the Execution Model
The execution model of Windows Phone is designed to make the phone as responsive as possible and to maximize the battery life of the device. One way that this is achieved is by limiting the phone to a single running application. Multiple applications running in the background risk slowing the foreground application and may tie up the processor and cause the phone to consume more power.
While the phone’s execution model is limited to a single app being in execution at any time, Windows Phone allows the use of background tasks, which run periodically and are independent of your foreground app. These are explored in Chapter 27, “Scheduled Actions.”
In addition to greater responsiveness and extended battery life, the execution model provides users with a consistent navigation experience between applications. On Windows Phone, users are able to launch applications from the App List screen or from a tile on the Start Experience. The hardware Back button allows users to navigate backward, through the pages of a running application or through the stack of previously running applications.
The goal of transient state preservation and restoration is to provide the user with a simulated multiple application experience, where it seems to the user that your application was left running in the background, even though it may have been terminated by the operating system.
Application State
There are two types of application state: persistent and transient. Persistent state exists when an application launches. It is saved to a private storage area called isolated storage and may include data such as configurable settings or files.
Transient state is discarded when an application is closed. It is stored at the application level in the Microsoft.Phone.Shell.PhoneApplicationService.State dictionary or at the page level in the PhoneApplicationPage.State dictionary.
There is a single PhoneApplicationService instance for the entire app, and its state dictionary should be used only by objects running in the context of the application as a whole. A unique state dictionary is created for each page in your app, and you should use it rather than the PhoneApplicationService.State dictionary whenever possible.
The PhoneApplicationPage.State dictionary is accessible only during or after the OnNavigatedTo method is called, or during or before the OnNavigatedFrom method is called. If you attempt to access it too early or too late an exception is raised.
The PhoneApplicationPage.State dictionary is limited to 2MB for each page and 4MB for the entire app. You should, therefore, not use it for excessive storage.
Transient state may include results from web service calls, or data from partially completed forms (see Figure 3.1).
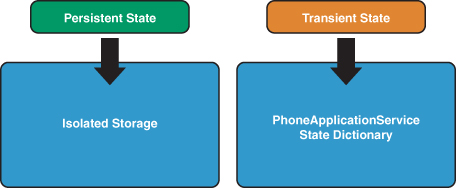
Figure 3.1. Persistent state and transient state storage locations
Life Cycle Events
The Microsoft.Phone.Shell.PhoneApplicationService exposes four life cycle related CLR events, which provide an application with the opportunity to save or load state (see Figure 3.2).
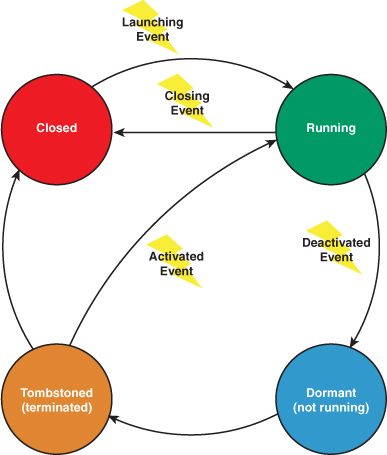
Figure 3.2. Application life cycle
Launching Event
When a user selects an application from the App List screen, or from a tile on the Start Experience, or when the application is being debugged, the application moves from the stopped state, to the running state. This represents a cold start. Use the Launching event to restore any persistent state from isolated storage that is not page specific. This event occurs after the App class is instantiated, but before the main page of an application is created.
The Windows Phone 7 Certification Requirements state that an application must render the first screen within 5 seconds after launch and activation, and be fully responsive within 20 seconds. A splash screen can be used to offset startup delay. Later in this chapter you see how to create a splash screen for an application.
The Launching and Activated events are mutually exclusive. That is, exactly one of these two events occurs when the application is being started. Likewise, the Deactivated and Closing events are also mutually exclusive; only one of these events occurs when the application is exiting.
Subscribing to Life Cycle Events Using the PhoneApplicationService
The PhoneApplicationService allows your app to be notified of the various life cycle events. The PhoneApplicationService is, by default, initialized in XAML by the application’s App instance, as shown in the following example:
<Application.ApplicationLifetimeObjects>
<!--Required object that handles lifetime events for the application-->
<shell:PhoneApplicationService
Launching="Application_Launching" Closing="Application_Closing"
Activated="Application_Activated" Deactivated="Application_Deactivated"/>
</Application.ApplicationLifetimeObjects>
The PhoneApplicationService is a singleton class, which exposes an instance of the class via a static property called Current. Code to handle the Launching, Closing, Activated, and Deactivated events can be placed in the App class, for which handlers are created when a new project is created, or directly in code by using the Current property of the PhoneApplicationService.
Subscription to the PhoneApplicationService.Activated event must occur via the App class. If subscription to the event is done in a UI element, the handler will not be called. This is because the PhoneApplicationService itself subscribes to the System.Windows.Application.Current’s Startup event. When the application raises the Startup event, the PhoneApplicationService notifies the operating system that it is ready to receive execution model events (that is, Launching, Closing, Activated, and Deactivated). This causes the PhoneApplicationService.Activated event (or the Launched event in the case of a non-tombstoned application) to occur almost immediately. Therefore, subscription to the event after this point has no effect. Moreover, event subscription is lost when an application is tombstoned; the application has, after all, terminated at that point. Thus, subscription to the Activated or Launching events from, for example, the MainPage constructor, will occur after the event has already been raised.
There may be times when it is tempting to promote certain kinds of transient state to persistent state. When launching your app, however, the user should feel like he is not resuming your app, but rather that it is indeed a new instance, a clean slate.
Persistent state is stored in isolated storage, while transient state is stored in the PhoneApplicationService.State dictionary, an IDictionary<string, object> that is maintained while the application is tombstoned, but abandoned when the application moves from the tombstoned state to the not running state.
Deactivation Event and Tombstoning
On entering the running state, an application must contend with being interrupted. Each interruption causes the PhoneApplicationService.Deactivated event to be raised. The app is then placed in a dormant state, where it remains in memory but its threads are suspended.
If an app is reactivated after being in the dormant state, there is no need for your app to restore its transient state, reducing its load time.
Detecting whether an app is returning from a dormant state can be done within the PhoneApplicationService.Activated event handler using the IsApplicationInstancePreserved property of the ActivatedEventArgs, as shown in the following excerpt:
void Application_Activated(object sender, ActivatedEventArgs e)
{
if (e.IsApplicationInstancePreserved)
{
/* Application was placed in the dormant state. */
}
else
{
/* Application state should be restored manually. */
}
}
When the device’s memory usage reaches a minimum threshold, the operating system may decide to tombstone your app.
When tombstoned, the operating system is aware that the application may be reactivated. If an application moves from being tombstoned back to the running state, it will be from a cold start, and all objects must be instantiated and persistent and transient state must be restored. The only differences between the tombstoned state and the closed state are that when tombstoned, the operating system retains the transient state dictionary for the app along with an identifier for the app, so that if activated, chooser and launcher events can be resubscribed. Launchers and choosers perform common tasks, such as sending email. You learn more about choosers and launchers in Chapter 12, “Launchers and Choosers.”
An application is deactivated when it is no longer the foreground application. The following is a list of causes for deactivation:
• The user presses the start button.
• The phone’s lock screen is engaged without having enabled running under the lock screen. Enabling your app to run under the lock screen is discussed in the section “Running Under the Lock Screen” later in the chapter.
• A launcher or a chooser is shown.
• The user selects a toast notification, which launches another application.
Saving Transient State
The Deactivated event provides an application with the opportunity to save its transient and persistent state.
Saving the transient state of a PhoneApplicationPage should be performed in its OnNavigatedFrom method, as you see later in the chapter.
The goal is to enable restoration of the application to its prior state before being tombstoned. It should be assumed, however, that when the Deactivated event occurs, the application is going to be closed, moving to the closed state. The user may, after all, opt not to resume the application, or may use the Start Experience to relaunch the application, rather than using the hardware Back button to return to the application. Moreover, if the user launches many other apps, your app may get bumped off the end of the Back button application stack.
The Visual Studio new project templates place an empty handler for the Deactivated event in the App class. See the following excerpt:
void Application_Deactivated(object sender, DeactivatedEventArgs e)
{
/* Save transient state like so:
* PhoneApplicationService.Current.State["DataContractKey"]
* = DataContract;
*/
/* Save persistent state like so:
* IsolatedStorageSettings.ApplicationSettings["Key"] = someObject; */
}
You can also subscribe to the Deactivated event elsewhere, in the following manner:
PhoneApplicationService.Current.Deactivated += OnDeactivated;
void OnDeactivated(object o, DeactivatedEventArgs args)
{
...
}
The operating system gives an app 10 seconds when the PhoneApplicationService.Closing event occurs, before it is forcibly terminated. If the time required to save your app’s state exceeds this amount, then its state should be saved periodically, and perhaps incrementally, while it is running.
The Windows Phone emulator terminates an application if it takes longer than 10 seconds to display its first visual. Therefore, when debugging an Activated or Launched event, if this time is exceeded the application exits and the debugger detaches before any UI elements can be shown.
Transient State Requirements
All objects to be stored in the PhoneApplicationService.State property must meet one of the following requirements:
• It is a primitive type.
• It is a known serializable reference type including decimal, string, or DateTime, with a matching System.Convert.ToString method signature.
• It is capable of being serialized using a DataContractSerializer. To achieve this, it must be decorated with a System.Runtime.Serialization.DataContract attribute. Each property or field intended for serialization must be decorated with the DataMember attribute, and in turn each serializable property or field type must be decorated with the DataContract attribute.
Storing an application’s transient state can be difficult because objects containing state often have event subscriptions to or from other objects that are not serialized. Also, types from third-party libraries are usually not decorated with the DataContract attribute, preventing serialization.
Restoring Transient State
When an app transitions from being tombstoned or dormant, back to the running state, the PhoneApplicationService.Activated event is raised. This provides an opportunity to restore the transient and persistent state of the app.
Restoring the transient state of a PhoneApplicationPage should be performed in its OnNavigatedTo method, as you see later in the chapter.
Restoring the transient state involves taking the user to the point where she was when the Deactivated event occurred, and may involve restoring the positions of UI elements, repopulating viewmodel properties, and so on. The goal is to provide the user with a seamless experience, and to emulate a multiple application-like environment, so that to the user the application appears as though it was left running in the background.
The following code demonstrates handling of the PhoneApplicationService.Activated event, to restore transient and persistent state:
void Application_Activated(object sender, ActivatedEventArgs e)
{
/* Restore persistent state like so: */
someObject = IsolatedStorageSettings.ApplicationSettings["Key"];
/* Restore transient state like so: */
DataContract = PhoneApplicationService.Current.State["DataContractKey"];
}
Saving Persistent State
Persistent state is usually stored whenever transient state is stored. In addition, your app should save its persistent state when it is closing, by subscription to the PhoneApplicationService.Closing event. Persistent state may include files or application settings, as shown in the following excerpt from the App class:
void Application_Closing(object sender, ClosingEventArgs e)
{
System.IO.IsolatedStorage
.IsolatedStorageSettings.ApplicationSettings["someObject Key"]
= someObject;
}
Running Under the Lock Screen
Users expect some kinds of apps to run under a lock screen. These apps include music players, mapping apps, stop watches, and so on.
In the first release of the Windows Phone OS, running under the lock screen was favorable to apps that wanted to avoid being tombstoned. These were apps that were slow to load or relied on complex state models. This was alleviated, however, with the introduction of fast application switching in Windows Phone 7.5. Now apps are placed in a dormant state and remain in memory.
Running under the lock screen is not an alternative to implementing efficient transient state persistency. Recall that an app may still be tombstoned if the phone runs low on memory.
The following steps outline how to enable your app to run under the lock screen:
1. Set PhoneApplicationService.Current.ApplicationIdleDetectionMode = IdleDetectionMode.Disabled.
2. Detect when the lock screen is engaged, or disengaged, by handling the PhoneApplicationFrame.Obscured and Unobscured events, respectively.
3. When the lock screen is engaged your app should reduce its processing to a bare minimum to minimize CPU usage and thus battery consumption.
4. When the lock screen is disengaged your app should resume from where it left off.
5. Optionally, you should prompt the user to allow him or her to opt-in to running under the lock screen, and/or provide an options setting for enabling or disabling running under the lock screen.
Lock Screen Management
I created a reusable class called LockScreenManager that makes it easy to manage your app’s lock screen policy. The class implements a custom ILockScreenManager interface that has the following three properties:
• RunningUnderLockScreen—Gets a value indicating whether the app is running under the lock screen
• RunningUnderLockScreenEnabled—Allows you to set whether the app is allowed to run under the lock screen
• UserPrompted—Allows your app to remember whether the user has been prompted to allow running under the lock screen
At your app’s first launch you query the UserPrompted property. If false, you present a dialog asking the user whether it is okay to run under the lock screen, and you set the RunningUnderLockScreenEnabled property accordingly. You subscribe to the PropertyChanged event of the LockScreenManager, and when the RunningUnderLockScreen property changes, it indicates that the lock screen has been either engaged or disengaged. LockScreenManager is a singleton and subclasses NotifyPropertyChangeBase for property change notification (see Listing 3.1). The private constructor attempts to retrieve the UserPrompted and RunningUnderLockScreenEnabled property values from isolated storage settings. It then subscribes to the PhoneApplicationFrame.Obscured and Unobscured events.
When the Obscured event is raised the RunningUnderLockScreen property is set.
The LockScreenManager class is located in the Shell directory of the WindowsPhone7Unleashed project.
Listing 3.1. LockScreenManager Class (excerpt)
public class LockScreenManager : NotifyPropertyChangeBase, ILockScreenManager
{
static readonly string promptedKey
= "UserPromptedToAllowRunningUnderLockScreen";
static readonly string runningEnabledKey = "RunningUnderLockScreenEnabled";
LockScreenManager()
{
IsolatedStorageSettings settings
= IsolatedStorageSettings.ApplicationSettings;
bool prompted;
if (settings.TryGetValue(promptedKey, out prompted))
{
UserPrompted = prompted;
}
bool enabledValue;
if (settings.TryGetValue(runningEnabledKey, out enabledValue))
{
RunningUnderLockScreenEnabled = enabledValue;
}
var frame = (PhoneApplicationFrame)Application.Current.RootVisual;
frame.Obscured += (o, args) => RunningUnderLockScreen = args.IsLocked;
frame.Unobscured += (o, args) => RunningUnderLockScreen = false;
}
...
}
When either of the UserPrompted or RunningUnderLockScreenEnabled properties is set, its new value is saved to isolated storage settings using a SaveSetting method, as shown:
void SaveSetting(string key, object value)
{
IsolatedStorageSettings settings
= IsolatedStorageSettings.ApplicationSettings;
settings[key] = value;
settings.Save();
}
When the RunningUnderLockScreenEnabled property is enabled the idle detection mode is disabled, which allows the app to run under the lock screen. If disabled, the app must be restarted or deactivated before the idle detection mode can be enabled or an InvalidOperationException is raised. This is a limitation of the phone OS. See the following excerpt:
public bool RunningUnderLockScreenEnabled
{
get
{
return runningUnderLockScreenEnabled;
}
set
{
var result = Assign(() => RunningUnderLockScreenEnabled,
ref runningUnderLockScreenEnabled, value);
if (result == AssignmentResult.Success)
{
if (runningUnderLockScreenEnabled)
{
PhoneApplicationService.Current.ApplicationIdleDetectionMode
= IdleDetectionMode.Disabled;
}
/* Idle detection mode cannot be enabled
until the application is restarted. */
SaveSetting(runningEnabledKey, runningUnderLockScreenEnabled);
}
}
}
The LockScreenView page and its associated LockScreenViewModel class demonstrate the use of the LockScreenManager, and are located in the ExecutionModel directory of the WindowsPhone7Unleashed.Examples project. The LockScreenViewModel uses the MessageService to ask the user whether she wants to opt-in to running under the lock screen. When the manager’s RunningUnderLockScreen property changes, a string is written to the Visual Studio Output view (see Listing 3.2).
Listing 3.2. LockScreenViewModel Class
public class LockScreenViewModel : ViewModelBase
{
public LockScreenViewModel() : base("lock screen settings")
{
LockScreenManager manager = LockScreenManager.Instance;
if (!manager.UserPrompted)
{
bool allow = MessageService.AskYesNoQuestion(
"Is it OK to run under the phone's lock screen?");
manager.RunningUnderLockScreenEnabled = allow;
manager.UserPrompted = true;
}
manager.PropertyChanged
+= (o, args) =>
{
if (args.PropertyName == "RunningUnderLockScreen")
{
Debug.WriteLine("RunningUnderLockScreen: "
+ manager.RunningUnderLockScreen);
}
};
}
public bool RunningUnderLockScreenEnabled
{
get
{
return LockScreenManager.Instance.RunningUnderLockScreenEnabled;
}
set
{
LockScreenManager.Instance.RunningUnderLockScreenEnabled = value;
}
}
}
The LockScreenView XAML has a Silverlight Toolkit ToggleSwitch control that is bound to the RunningUnderLockScreenEnabled viewmodel property, as shown in the following excerpt:
<StackPanel x:Name="ContentPanel">
<toolkit:ToggleSwitch
Header="run under lock screen"
IsChecked="{Binding RunningUnderLockScreenEnabled, Mode=TwoWay}" />
</StackPanel>
Figure 3.3 shows the ToggleSwitch located on the LockScreenView page with the Run Under Lock Screen setting enabled.

Figure 3.3. LockScreenView page
Running under the lock screen is the only way to allow your foreground app to run while the phone is idle. It should, however, be used with caution, because if an app continues to consume the device CPU, it may rapidly flatten the device battery.
Page Navigation
Windows Phone navigation in Silverlight is based on the Silverlight for the browser navigation model. The navigation class model looks a little different in the phone SDK however. Rather than Silverlight 4’s Frame and Page controls, Silverlight for Windows Phone apps use the subclasses PhoneApplicationFrame and the PhoneApplicationPage (see Figure 3.4).
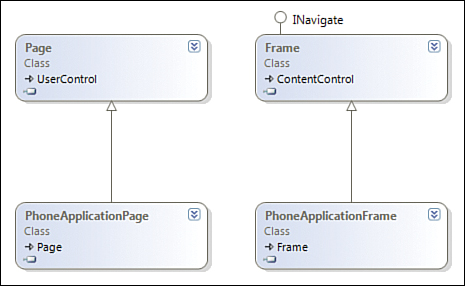
Figure 3.4. The PhoneApplicationFrame and PhoneApplicationPage classes are derived from the Frame and Page classes, respectively.
Frame and Page must not be used directly in your app. They are prohibited because of underlying differences in the way the Silverlight infrastructure interacts with the OS within the constrained environment of the phone.
Page navigation in Silverlight for Windows Phone works in much the same way as page navigation in a web browser. PhoneApplicationFrame is analogous to the web browser, coordinating page transitions within your app.
Figure 3.5 depicts the display elements of a Silverlight for Windows Phone app.
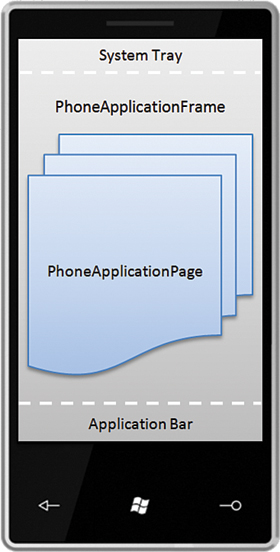
Figure 3.5. Display elements of a Silverlight for Windows Phone app
The PhoneApplicationFrame is the host for PhoneApplicationPages and reserves space for the system tray and the application bar. The PhoneApplicationPage consumes all remaining space after the system tray and the application bar.
There can be only one PhoneApplicationFrame for an application. Attempting to place a PhoneApplicationFrame within a PhoneApplicationPage causes the content to become infinitely nested at runtime, as the page will be forced inside the frame, the frame inside the page, and so on.
Navigation Using Unmapped URIs
There are numerous ways of allowing the user to perform page navigation. This section looks at using Buttons with code-beside to open external URLs, and at HyperlinkButtons, which can rely solely on XAML. In subsequent chapters you explore other techniques to perform navigation including the use of commands and a custom navigation service.
Internal URIs
When navigating to PhoneApplicationPages within an application, URIs either must be relative to the root directory of the project, and use the relative path syntax, as shown in the following excerpt:
Uri uri = new Uri("/DirectoryName/PageName.xaml", UriKind.Relative);
or they must use the relative component URI format, such as that used in the following example:
Uri uri = new Uri("/AssemblyName;component/PageName.xaml", UriKind.Relative);
The assembly name segment must be the name of an assembly that is locatable at runtime. The name of a project’s output assembly can be found in the project properties editor by right-clicking on the project node in the Solution Explorer and selecting Properties, or by pressing Alt+Enter.
The HyperlinkButton control can be used to allow the user to navigate directly to a page within your application, as shown:
<HyperlinkButton NavigateUri="/Directory/PageName.xaml" Content="Internal Page" />
External Navigation Using the Button Control
The Button control is a flexible way for determining user intent. A Button can be used for navigation by subscribing to its Click event, as shown in the following excerpt from the ProductDetailsView.xaml in the downloadable sample code:
<Button Click="Button_ExternalLink_Click"
Tag="{Binding Product.ExternalUrl}"
Content="External Page" />
The WebBrowserTask allows you to navigate to external URIs using the phone’s built-in web browser: Internet Explorer. This causes your app to be deactivated while the user views the page. You explore tasks in more detail in Chapter 12.
To provide the WebBrowserTask with the location of the web page, use the button’s Tag property. The Click event handler, which initiates the WebBrowserTask, is shown in the following excerpt:
void Button_ExternalLink_Click(object sender, RoutedEventArgs e)
{
FrameworkElement button = sender as FrameworkElement;
if (button == null || button.Tag == null)
{
return;
}
WebBrowserTask task = new WebBrowserTask
{
URL = button.Tag.ToString()
};
task.Show();
}
External Navigation Using the HyperlinkButton Control
The disadvantage of using a Button control for links to external content is that it does not provide the familiar look and feel of a hyperlink. The HyperlinkButton control provides an easier way for navigating to pages within an application. There is a trick to using the HyperlinkButton with external URIs. Set its TargetName property to _blank, as shown in the following example:
<HyperlinkButton TargetName="_blank" NavigateUri="http://create.msdn.com"
Content="http://create.msdn.com" />
Failing to set the HyperlinkButton.TargetName to _blank, when using an external URI, raises the Frame.NavigationFailed event when the button is tapped.
Hosting Web Content Within an App
An alternative to using the phone’s built-in Internet Explorer app is to host the content in a Microsoft.Phone.Controls.WebBrowser control.
The following excerpt from the WebBrowserView.xaml page, in the downloadable sample code, shows a WebBrowser placed within the main content grid of a page:
<Grid x:Name="ContentGrid" Grid.Row="1">
<phone:WebBrowser Source="{Binding Url}"/>
</Grid>
Here, the Source property of the WebBrowser is bound to the Url property of the viewmodel. The WebBrowser control is discussed in greater detail in Chapter 7, “Media and Web Elements.”
A dedicated web browser page can be used in your app to host all external content. To launch the dedicated web browser page, a relative URI can be constructed using the Binding.StringFormat property, as shown in the following excerpt:
<HyperlinkButton
NavigateUri="{Binding ExternalUrl, StringFormat=/WebBrowser/{0}}"
Content="External Page" />
Backslashes are used to escape the curly brackets in the StringFormat value.
The StringFormat property transforms the HyperlinkButton’s binding expression into the following:
string.Format("/WebBrowser/{0}", ExternalUrl);
URI mapping is used to pass the external URL as a query string parameter. This is explored further in a later section.
Passing Page Arguments Using Query Strings
Query strings allow for key value pairs to be embedded in a URL and passed to a page. Just like HTML web applications, Silverlight uses query string parameters for interpage communication.
The PhoneApplicationPage.NavigationContext property, which is initialized after the page is created, is used to retrieve the query string. Its QueryString property is an IDictionary of string key and value pairs. The following excerpt from the WebBrowserView.xaml, in the downloadable sample code, demonstrates how to retrieve a query string value:
void OnLoaded(object sender, RoutedEventArgs e)
{
string url;
if (NavigationContext.QueryString.TryGetValue("url", out url))
{
ViewModel.LoadPage(url);
}
}
Navigation History Stack
The Silverlight navigation infrastructure maintains a history of pages that have been loaded. Each time an app navigates to a different page, the current page’s OnNavigatedFrom method is called and the page is placed on the history stack (see Figure 3.6).
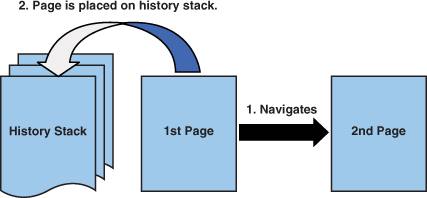
Figure 3.6. Pages are placed on the history stack.
While on the history stack, the page remains in memory unless the application is tombstoned or closed. This means that subscribing to the PhoneApplicationService.Deactivated event provides the page with the opportunity to save its transient state. It is, however, preferable to use the page’s OnNavigatedFrom method for the saving of page state.
Using the Deactivate event to save page state runs the risk of slowing down deactivation when all pages on the history stack are saving their state simultaneously.
Use the OnNavigatedFrom and OnNavigatedTo methods of PhoneApplicationPage to save both transient and persistent state.
Unlike Silverlight for the browser, in Windows Phone the page’s NavigationCacheMode property is not assignable, and it is set to Disabled by default. This means that internal caching of pages does not occur, and when navigating to a page that does not exist on the history stack, the page is always instantiated.
Restoration of transient state should occur with the page’s OnNavigatedTo method. The OnNavigatedTo method is called when the PhoneApplicationFrame navigates to the page. This is triggered by the following actions:
• Navigation to a specified page URI occurs using one of various navigation methods such as the PhoneApplicationFrame.Navigate method.
• The NavigationService.GoBack method is called.
• The user presses the hardware Back button.
• The page is the current page when the app moves from the tombstoned or dormant state to the running state.
• The page is the app’s start page and the app is launched.
When an application is activated, the frame navigates to the page that was active when the phone was dormant or tombstoned. The NavigationContext.QueryString is preserved, which means that there is no need to store this in the PhoneApplicationService.State dictionary.
URI Mapping
Relying on URIs that include the full path to each page in your app can make your app brittle and makes it harder to change the physical location of individual pages. If a page is moved, all references to that file must be updated. This can lead to maintainability issues as the size of the project grows.
The URI mapping system of Silverlight allows requests for a URI to be routed to another URI, and uses a single configuration point for the management of page URIs. Mapped URIs can be made shorter and are, thus, less subject to typographical errors. They also allow the exclusion of technology specific information, such as the .xaml page file extension, making it easier to retarget business logic for different platforms.
To use URI mapping, you must assign a System.Windows.Navigation.UriMapper instance to the UriMapper property of an app’s PhoneApplicationFrame. This can be done in XAML, as shown in the following excerpt from the App.xaml file in the downloadable sample code:
<Application
x:Class="DanielVaughan.WindowsPhone7Unleashed.Examples.App"
xmlns="http://schemas.microsoft.com/winfx/2006/xaml/presentation"
xmlns:x="http://schemas.microsoft.com/winfx/2006/xaml">
<Application.RootVisual>
<phone:PhoneApplicationFrame x:Name="RootFrame">
<phone:PhoneApplicationFrame.UriMapper>
<navigation:UriMapper>
<navigation:UriMapper.UriMappings>
<navigation:UriMapping
Uri="/ProductDetails/{productId}"
MappedUri="/Navigation/ProductDetailsView.xaml?productId={productId}" />
<navigation:UriMapping Uri="/WebBrowser/{url}"
MappedUri="/WebBrowser/WebBrowserView.xaml?url={url}" />
</navigation:UriMapper.UriMappings>
</navigation:UriMapper>
</phone:PhoneApplicationFrame.UriMapper>
</phone:PhoneApplicationFrame>
</Application.RootVisual>
<!-- Content omitted. -->
</Application>
The UriMapping class contains a Uri property and a MappedUri property. When navigation is requested from the Uri value, it is rerouted to the MappedUri property.
By using the curly brace syntax, as shown in the previous excerpt, a substring of the requested URI can be transplanted into the rerouted MappedUri value. This is especially useful when you want to target the same page using different URIs and allows the query string to be used to convey the action to be undertaken by the page.
In the previous excerpt you see a UriMapping for the ProductDetailsView page. The ProductDetailsView displays detailed information for a particular product, identified by a query string parameter. When navigating to the ProductDetails page, if the requested URL is /ProductDetails/2, this is rerouted to /Navigation/ProductDetailsView.xaml?productId=2.
If you were to request the ProductDetailsView page using the NavigationService, as shown in the following example, the request would be rerouted accordingly:
NavigationService.Source = new Uri("/ProductDetails/2", UriKind.Relative);
The product to be displayed can then be determined in the ProductsDetailsView by reading the productId query string parameter, as demonstrated in the following excerpt:
protected override void OnNavigatedTo(NavigationEventArgs e)
{
base.OnNavigatedTo(e);
string productIdString = NavigationContext.QueryString["productId"];
int productId = int.Parse(productIdString);
ViewModel.LoadProduct(productId);
}
You see later in this chapter how the viewmodel uses the product ID to retrieve the product information from a WCF service.
Navigation Using the NavigationService
The PhoneApplicationPage class exposes a public NavigationService property, which allows direct control over navigation.
The NavigationService cannot be used to launch Internet Explorer to view an external URL. Instead, use either the WebBrowserTask, or open the page within the app using the WebBrowserControl. See the previous sections on external navigation using the Button and HyperlinkButton controls.
The NavigationService.Navigate method causes the frame to load the specified PhoneApplicationPage, like so:
NavigationService.Navigate(
new Uri("/DirectoryName/PageName.xaml", UriKind.Relative));
The URI must be either a path relative to the project’s root directory, as shown in the previous example, or a relative component URI such as in the following example:
NavigationService.Navigate(
new Uri("/AssemblyName;component/PageName.xaml", UriKind.Relative));
The NavigationService cannot be used within the constructor of the PhoneApplicationPage because it is assigned after the page’s constructor has been called. Therefore, wait until the page’s OnNavigatedTo method is called or the Loaded event has occurred before using the NavigationService.
The NavigationService.Source property allows you to retrieve the URI of the current page. Setting the Source property performs the same action as using the Navigate method; the frame loads the page at the specified URI. See the following example:
NavigationService.Source = new Uri(
"/DirectoryName/PageName.xaml", UriKind.Relative);
Routing is also enabled for the NavigationService, which means that mapped URIs can be used instead of relative URIs.
If you examine the API of the NavigationService, you will likely wonder what the difference is between the CurrentSource property and the Source property. The answer is that the CurrentSource property does not change until navigation has completed. Conversely, the Source property changes as soon as navigation is initiated.
Backward Navigation
The NavigationService maintains the app’s navigation history, via an internal Journal instance. This allows the GoBack method of the NavigationService to move to the previous page in the history stack.
If the GoBack method is called, and the history stack is empty because the current page is the app’s start page, then an InvalidOperationException is raised. To determine whether the NavigationService is able to go back, query its CanGoBack property.
Forward Navigation
Unlike Silverlight for the browser, the GoForward method of the NavigationService does not allow forward navigation and raises an InvalidOperationException when called. Consequently, the CanGoForward property always returns false.
Handling Page Navigation
The PhoneApplicationPage extends the System.Windows.Controls.Page class, which has a number of virtual methods called when the page is brought into view or removed from view by the PhoneApplicationFrame (see Figure 3.7).
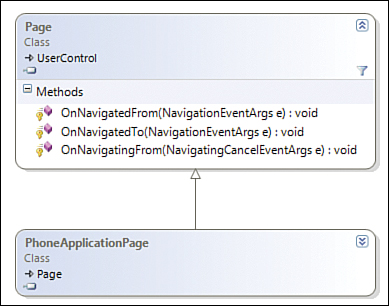
Figure 3.7. PhoneApplicationPage inherits Page navigation methods.
The OnNavigatingFrom method is called before a page is removed from view by the PhoneApplicationFrame, and the OnNavigatedFrom method is called after navigation occurs. Conversely, the OnNavigatedTo method is called when the frame brings the page into view.
Cancelling Navigation
The OnNavigatingFrom method offers the opportunity to cancel navigation using the NavigatingCancelEventArgs parameter.
NavigatingCancelEventArgs has the following properties:
• NavigationMode—An enum value that indicates the type of navigation. This value may be Back, Forward, New, or Refresh.
• Uri—The destination URI.
• Cancel—Setting this value to true cancels the navigation.
The NavigationCancelEventArgs class subclasses CancelEventArgs, which provides the Cancel property. By setting this property to true, the page can prevent the navigation from occurring, as shown in the following excerpt:
protected override void OnNavigatingFrom(
System.Windows.Navigation.NavigatingCancelEventArgs e)
{
base.OnNavigatingFrom(e);
MessageBoxResult boxResult = MessageBox.Show(
"Leave this page?", "Question", MessageBoxButton.OKCancel);
if (boxResult != MessageBoxResult.OK)
{
e.Cancel = true;
}
}
You should not attempt to cancel navigation in the OnNavigatingFrom method when the hardware Back button is pressed. Instead, override the OnBackKeyPress method to cancel the back key, which prevents navigation.
Cross-Page Communication
Once navigation has occurred, there remains an opportunity for the previous page to interact with the current page from the previous page’s OnNavigatedFrom method. This is achieved using the Content property of the NavigationEventArgs, which provides the destination PhoneApplicationPage object.
To see this in action, place a breakpoint in the OnNavigatedFrom method. When the breakpoint is hit, notice that the page being navigated to has already been instantiated and is provided in the Content property of the NavigationEventArgs (see Figure 3.8).
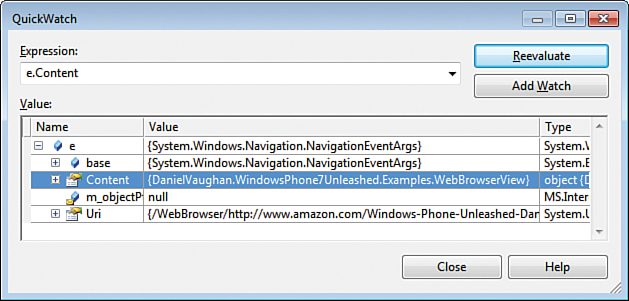
Figure 3.8. The Content property of the NavigationEventArgs contains the page being navigated to.
The Uri property of the NavigationEventArgs contains the URI of the destination page, including any query string that may be present.
If navigating to an external URI, or when the app is being deactivated, the Uri property of the OnNavigatedFrom method’s NavigationEventArgs is equal to app://external/.
Page Redirection
The OnNavigatingFrom method allows you to intercept a navigation event and to even cancel the navigation if needed. Additionally, there may be times when you want to redirect the user to a different URI based on some conditional logic.
The NavigationService, however, does not support overlapping navigation. That is, you are unable to cancel an existing navigation and immediately commence another.
You can, however, cancel navigation and schedule navigation to a different Uri using the page’s Dispatcher property, as shown in the following excerpt:
protected override void OnNavigatingFrom(NavigatingCancelEventArgs e)
{
if (e.Uri.ToString().Contains("RequestedUrl"))
{
e.Cancel = true;
/* Perform the redirect on the UI thread. */
Dispatcher.BeginInvoke(() => NavigationService.Navigate(
new Uri("RedirectUrl", UriKind.Relative)));
}
base.OnNavigatingFrom(e);
}
By using the Dispatcher to invoke the lambda expression, which performs the call to the NavigationService, you allow the current navigation to complete first. This works because the UI thread can be thought of as a queue of prioritized delegates, all waiting in turn to be executed. Once all the Navigating event handlers have been serviced, the delegate represented by the lambda expression will be taken out of the queue and performed by the UI thread. This technique, of using the Dispatcher to enqueue an action, is also useful when working with some UI controls, whose event handlers may be called before the control is finished reacting to a user action.
Hardware Back Button
The hardware Back button is analogous to the Back button on a web browser. However, when the user presses the Back button, past the first page of a phone app, the app is closed. This is in contrast to the phone’s hardware start button, which merely causes an app to be deactivated.
The hardware Back button should not be used for application-specific behavior. It is only for navigation, and if used otherwise, may cause your app to fail Windows Phone Marketplace certification.
To determine whether navigation is occurring because the hardware Back button was pressed or the navigation was initiated by a call to NavigationService.GoBack, use the NavigatingEventArgs.NavigationMode property as shown:
protected override void OnNavigatedFrom(NavigationEventArgs e)
{
base.OnNavigatedFrom(e);
if (e.NavigationMode == NavigationMode.Back)
{
// Back button pressed.
}
}
The Back key button can also be cancelled by overriding the PhoneApplicationPage.OnBackKeyPress, as shown in the following excerpt:
protected override void OnBackKeyPress(CancelEventArgs e)
{
base.OnBackKeyPress(e);
e.Cancel = true;
}
OnBackKeyPress is called before OnNavigatedFrom, and if the Back button is cancelled, then OnNavigatedFrom is not called at all.
The Windows Phone Marketplace certification requirements forbid cancelling the Back button in most cases. To maintain a consistent user experience, the Back button must only be used for backward navigation in the application. The following four certification requirements relate to use of the Back button:
• Pressing the Back button must return the application to the previous page or return to any previous page within the back stack.
• Pressing the Back button from the first screen of an application must close the application.
• If the current page displays a context menu or a dialog, the pressing of the Back button must close the menu or dialog and return the user to the screen where the context menu or dialog box was opened.
• For games, when the Back button is pressed during gameplay, the game can choose to present a pause context menu or dialog or navigate the user to the prior menu screen. Pressing the Back button again while in a paused context menu or dialog closes the menu or dialog.
For more information see section 5.2.4 of the Technical Certification Requirements at http://bit.ly/lYcurV.
Creating an Application Splash Screen
Windows Phone Silverlight projects have baked-in support for application splash screens. To create a splash screen it is simply a matter of placing a jpg image called SplashScreenImage.jpg, with the dimensions of 480 by 800 pixels, in the root directory of your project. Ensure that its Build Action is set to Content (see Figure 3.9).
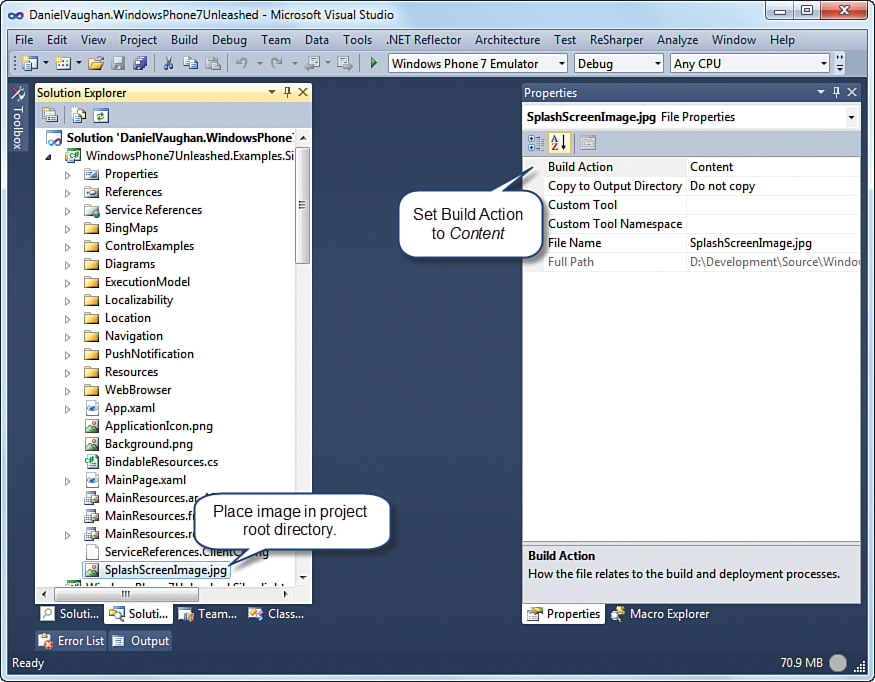
Figure 3.9. Creating an application splash screen
Using an image for a splash screen does not, however, prevent an application from being closed by the OS if the first page takes longer than 10 seconds to load. If your application’s first page takes longer than this to load, it is best to overlay the content with a loading indicator and perform the time consuming initialization on a background thread. Once loading is complete, the indicator can be dismissed.
The ProductsView and ProductsViewModel classes, located in the Navigation directory of the WindowsPhone7Unleashed.Examples project in the downloadable sample code, demonstrate this principle (see Figure 3.10).
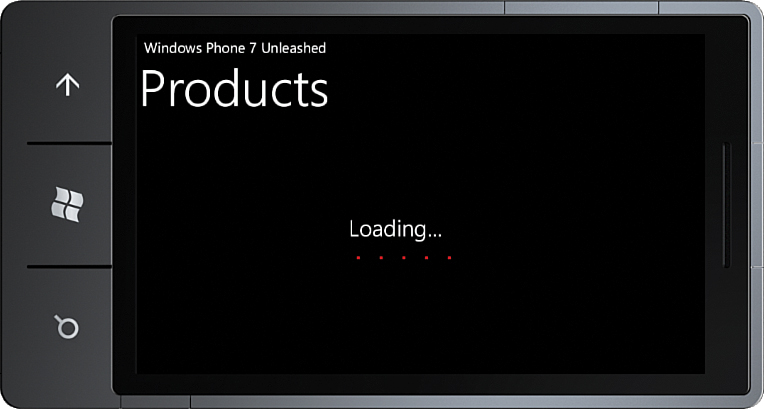
Figure 3.10. A custom loading screen
The ProductsView page uses a StackPanel to present an indeterminate progress bar to the user while the viewmodel is loading, as shown in the following excerpt:
<StackPanel Grid.Row="1"
Visibility="{Binding Loaded,
Converter={StaticResource BooleanToVisibilityConverter},
ConverterParameter=Collapsed}"
Height="150" >
<TextBlock Text="Loading..." Style="{StaticResource PhoneTextTitle2Style}"
HorizontalAlignment="Center" Margin="20"/>
<toolkit:PerformanceProgressBar IsIndeterminate="True" />
</StackPanel>
The Visibility property of the StackPanel is assigned via a binding to the viewmodel’s Loaded property. To convert the boolean Loaded property to a Visibility type, a custom IValueConverter called BooleanToVisibilityConverter is used (see Listing 3.3). The class is located in the ValueConverters directory of the WindowsPhone7Unleashed project, in the downloadable sample code.
Listing 3.3. BooleanToVisibility Class
public class BooleanToVisibilityConverter : IValueConverter
{
public object Convert(object value, Type targetType,
object parameter, CultureInfo culture)
{
string paramValue = (string)parameter;
if (value == null || (bool)value)
{
return paramValue == "Collapsed"
? Visibility.Collapsed : Visibility.Visible;
}
return paramValue == "Collapsed"
? Visibility.Visible : Visibility.Collapsed;
}
public object ConvertBack(object value, Type targetType,
object parameter, CultureInfo culture)
{
string paramValue = (string)parameter;
if (value == null || (Visibility)value == Visibility.Visible)
{
return paramValue != "Collapsed";
}
return paramValue == "Collapsed";
}
}
The ConverterParameter attribute determines what value to assign to the Visibility property if the binding value is true. If the Loaded property of the viewmodel is true, then the Visibility property will set to Visibility.Visible.
To hide the rest of the content during loading, the same technique is employed for the main content control.
<StackPanel Grid.Row="1" Margin="10"
Visibility="{Binding Loaded,
Converter={StaticResource BooleanToVisibilityConverter},
ConverterParameter=Visible}">
<ScrollViewer>
<!-- Content omitted. -->
<ScrollViewer>
</StackPanel>
Here the ConverterParameter attribute is set to Visible, so that its Visibility is set to Visible when the viewmodel’s Loaded property is true and Collapsed when it is false.
The code listings for the ProductsView page and associated files are provided in the following section.
Walking Through the Bookshop Sample Application
This chapter’s sample app provides the beginnings of a simple data driven e-commerce app that demonstrates the use of navigation, transient and persistent state, image caching, and WCF services. It allows the user to select from a list of books, retrieved from a WCF service, and to view each item’s details on a separate details page.
The ProductsViewModel class retrieves a list of Product objects from a WCF service. Each product has various properties such as a description, price, and an image URI.
The ProductsViewModel saves and restores its own transient state consisting of the list of products it retrieves from the WCF service (see Listing 3.4).
The code for this section resides in the Navigation directory of the WindowsPhone7Unleashed.Examples project in the downloadable sample code.
The viewmodel’s constructor determines whether transient state exists for itself. If so, it restores the list of Products or else it requests the list of products from the WCF using the BookshopServiceClient. The call occurs asynchronously, and the products list is populated once the call completes.
The ViewModelBase class subclasses the NotifyPropertyChangeBase class, which implements INotifyPropertyChanged. The source for NotifyPropertyChangeBase is located in the downloadable sample code, and was discussed in Chapter 2, “Fundamental Concepts in Silverlight Development for Windows Phone.”
Listing 3.4. ProductsViewModel Class (excerpt)
public class ProductsViewModel : ViewModelBase
{
readonly IDictionary<string, object> transientStateDictionary;
const string transientStateKey = "ProductsViewModel_Products";
public ProductsViewModel(
IDictionary<string, object> transientStateDictionary)
{
this.transientStateDictionary = ArgumentValidator.AssertNotNull(
transientStateDictionary, "transientStateDictionary");
LoadTransientState();
if (products != null)
{
return;
}
BookshopServiceClient client = new BookshopServiceClient();
client.GetProductsCompleted += (sender, args) =>
{
if (args.Error != null)
{
MessageService.ShowError("Unable to retrieve products.");
return;
}
Products = args.Result;
Loaded = true;
};
client.GetProductsAsync();
}
ObservableCollection<Product> products;
public ObservableCollection<Product> Products
{
get
{
return products;
}
private set
{
Assign(() => Products, ref products, value);
}
}
bool loaded;
public bool Loaded
{
get
{
return loaded;
}
private set
{
Assign(() => Loaded, ref loaded, value);
}
}
public void SaveTransientState()
{
transientStateDictionary[transientStateKey] = products;
}
public void LoadTransientState()
{
object transientState;
if (transientStateDictionary.TryGetValue(
transientStateKey, out transientState))
{
products = transientState as ObservableCollection<Product>;
if (products != null)
{
Loaded = true;
}
}
}
}
Within the OnNavigatingTo method of the ProductsView page, a ProductsViewModel is instantiated and assigned to the page’s DataContext. The ProductsViewModel is passed the transient state dictionary for the page (see Listing 3.5).
The OnNavigatingTo and OnNavigatedFrom methods are used to inform the viewmodel when to save its state.
Listing 3.5. ProductsView Class
public partial class ProductsView : PhoneApplicationPage
{
public ProductsView()
{
InitializeComponent();
}
ProductsViewModel ViewModel
{
get
{
return (ProductsViewModel)DataContext;
}
}
bool loaded;
protected override void OnNavigatedTo(NavigationEventArgs e)
{
Debug.WriteLine("ProductsView OnNavigatedTo");
base.OnNavigatedTo(e);
if (!loaded)
{
DataContext = new ProductsViewModel(State);
loaded = true;
}
ViewModel.LoadTransientState();
}
protected override void OnNavigatedFrom(NavigationEventArgs e)
{
base.OnNavigatedFrom(e);
Debug.WriteLine("ProductsView OnNavigatedFrom");
ViewModel.SaveTransientState();
}
}
Displaying the Product List
The list of products exposed by the ProductsViewModel.Products property is displayed using a ListBox control in the ProductsView page. The ListBox’s ItemTemplate has various controls that are used to display the details of each Product, as shown in the following excerpt:
<StackPanel Grid.Row="1" Margin="10"
Visibility="{Binding Loaded,
Converter={StaticResource BooleanToVisibilityConverter},
ConverterParameter=Visible}">
<ScrollViewer>
<ListBox ItemsSource="{Binding Products}" Height="610">
<ListBox.ItemTemplate>
<DataTemplate>
<StackPanel Orientation="Horizontal">
<Image Source="{Binding SmallImageUri}"
MaxWidth="150" MaxHeight="150"
Margin="0,0,10,10" />
<StackPanel Margin="5">
<TextBlock Text="{Binding Title}"
TextWrapping="Wrap" />
<TextBlock Text="{Binding Price,
StringFormat={0:C}}" />
<HyperlinkButton
NavigateUri="{Binding Id,
StringFormat=/ProductDetails/{0}}"
Content="View Details"
HorizontalAlignment="Left" Margin="0,10,0,0" />
</StackPanel>
</StackPanel>
</DataTemplate>
</ListBox.ItemTemplate>
</ListBox>
</ScrollViewer>
</StackPanel>
An Image control displays a thumbnail of the product, using the SmallImageUri property of the Product.
A string format is used to convert the Price property, which is a double value, to a currency formatted string using the format {0:C}. Similarly, a link is provided for the product details page, using the format /ProductDetails/{0}, and the value of the Product’s Id is substituted for the {0} placeholder. The UriMapping for this product details URI causes the application to reroute to the full URI of the ProductDetailsView.xaml page and includes the productId query string parameter.
Figure 3.11 shows the ProductsView displaying a list of books.
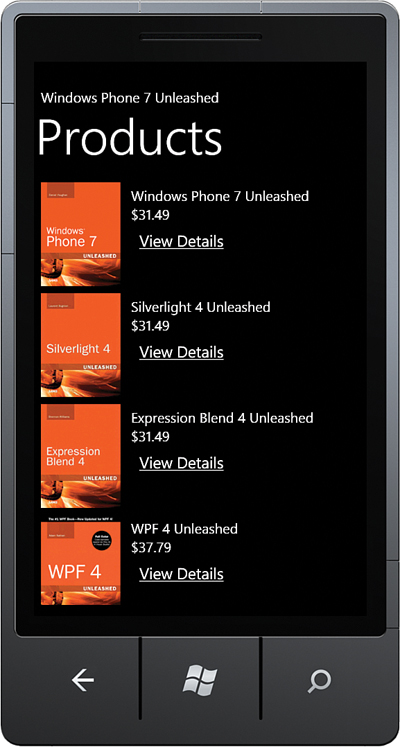
Figure 3.11. Products View
When the user presses the HyperlinkButton, he is directed to the ProductDetailsView.xaml page. This page displays the various properties of the product and includes a link for an external website, where the user can find more information about the product (see Figure 3.12).
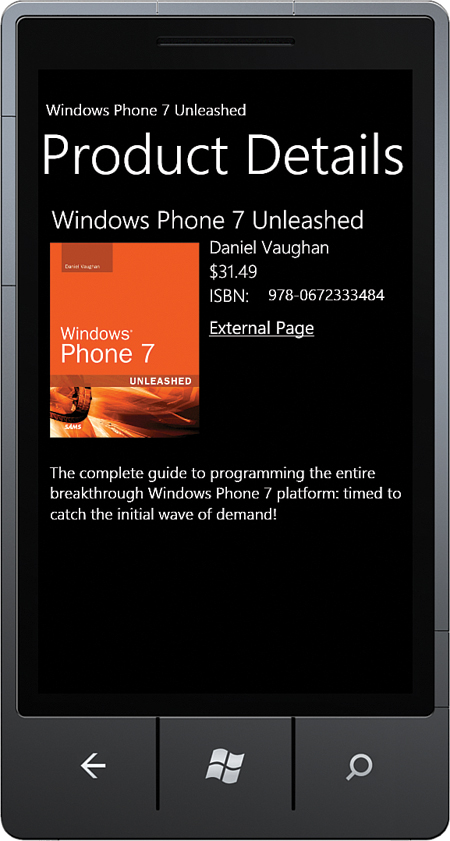
Figure 3.12. View a product’s details.
When navigating to the ProductDetailsView the page attempts to retrieve the productId query string parameter from the NavigationContext (see Listing 3.6).
Listing 3.6. ProductDetailsView Class (excerpt)
public partial class ProductDetailsView : PhoneApplicationPage
{
public ProductDetailsView()
{
InitializeComponent();
DataContext = new ProductDetailsViewModel(
PhoneApplicationService.Current.State);
}
ProductDetailsViewModel ViewModel
{
get
{
return (ProductDetailsViewModel)DataContext;
}
}
protected override void OnNavigatedTo(NavigationEventArgs e)
{ base.OnNavigatedTo(e);
string productIdString = NavigationContext.QueryString["productId"];
int productId = int.Parse(productIdString);
ViewModel.LoadProduct(productId);
}
protected override void OnNavigatedFrom(NavigationEventArgs e)
{ ViewModel.SaveTransientState();
base.OnNavigatedFrom(e);
}
}
The view then passes the parameter along to the ProductDetailsViewModel class, which handles the loading of the specified product (see Listing 3.7). The LoadProduct method first tests for the existence of the product in transient state. If not present, it retrieves the product using the service client.
Listing 3.7. ProductDetailsViewModel Class (excerpt)
public class ProductDetailsViewModel : ViewModelBase
{
const string transientStateKey = "ProductDetailsViewModel_Product";
readonly IDictionary<string, object> transientStateDictionary;
public ProductDetailsViewModel(
IDictionary<string, object> transientStateDictionary)
{
this.transientStateDictionary = ArgumentValidator.AssertNotNull(
transientStateDictionary, "transientStateDictionary");
}
public void LoadProduct(int productId)
{
object transientState;
if (PhoneApplicationService.Current.State.TryGetValue(
transientStateKey, out transientState))
{
product = transientState as Product;
if (product != null && product.Id == productId)
{
return;
}
}
BookshopServiceClient client = new BookshopServiceClient();
client.GetProductByIdCompleted += (sender, args) =>
{
if (args.Error != null)
{
throw args.Error;
}
Product = args.Result;
};
client.GetProductByIdAsync(productId);
}
Product product;
public Product Product
{
get
{
return product;
}
/* Setter is not private to enable sample data.
* See ProductDetailsViewSampleData.xaml */
internal set
{
product = value;
OnPropertyChanged("Product");
}
}
public void SaveTransientState()
{ transientStateDictionary[transientStateKey] = product;
}
}
When navigating away from the page, the viewmodel’s SaveTransientState method is called, which places the product in the state dictionary.
The ProductDetailsView.xaml page presents the product details via the viewmodel’s Product property (see Listing 3.8).
Listing 3.8. ProductDetailsView.xaml (excerpt)
<StackPanel Grid.Row="1"
Style="{StaticResource PageContentPanelStyle}"
d:DataContext="{d:DesignData Source=ProductDetailsViewSampleData.xaml}">
<TextBlock Text="{Binding Product.Title}" TextWrapping="Wrap"
Style="{StaticResource PhoneTextTitle2Style}"/>
<StackPanel Orientation="Horizontal">
<Image Source="{Binding Product.LargeImageUri,
Converter={StaticResource ImageCacheConverter}}"
MaxWidth="250" MaxHeight="250" Margin="10,10,0,10" />
<StackPanel>
<TextBlock Text="{Binding Product.Author}" TextWrapping="Wrap"
Style="{StaticResource PhoneTextTitle3Style}"/>
<TextBlock Text="{Binding Product.Price, StringFormat={0:C}}"
Style="{StaticResource PhoneTextTitle3Style}"/>
<StackPanel Orientation="Horizontal">
<TextBlock Text="ISBN"
Style="{StaticResource PhoneTextTitle3Style}" />
<TextBlock Text="{Binding Product.Isbn13}"
TextWrapping="Wrap"
Style="{StaticResource PhoneTextNormalStyle}" />
</StackPanel>
<HyperlinkButton
NavigateUri="{Binding Product.ExternalUrl,
StringFormat=/WebBrowser/{0}}"
Content="External Page"
Margin="0,10,0,0" HorizontalAlignment="Left" />
</StackPanel>
</StackPanel>
<TextBlock Text="{Binding Product.Description}"
Margin="10,20,0,10" TextWrapping="Wrap" />
</StackPanel>
The StackPanel includes a d:DataContext attribute that defines a design-time data context object, discussed in the next section.
Design-Time Data
It can be difficult and time consuming constructing a page or control without knowing how the content will appear at runtime. The dimensions of images can disturb the layout, as can the length of text and text wrapping settings. The d:DataContext markup extension, which exists in the http://schemas.microsoft.com/expression/blend/2008 namespace, allows you to simulate the runtime DataContext of a control with a design-time object (see Figure 3.13).
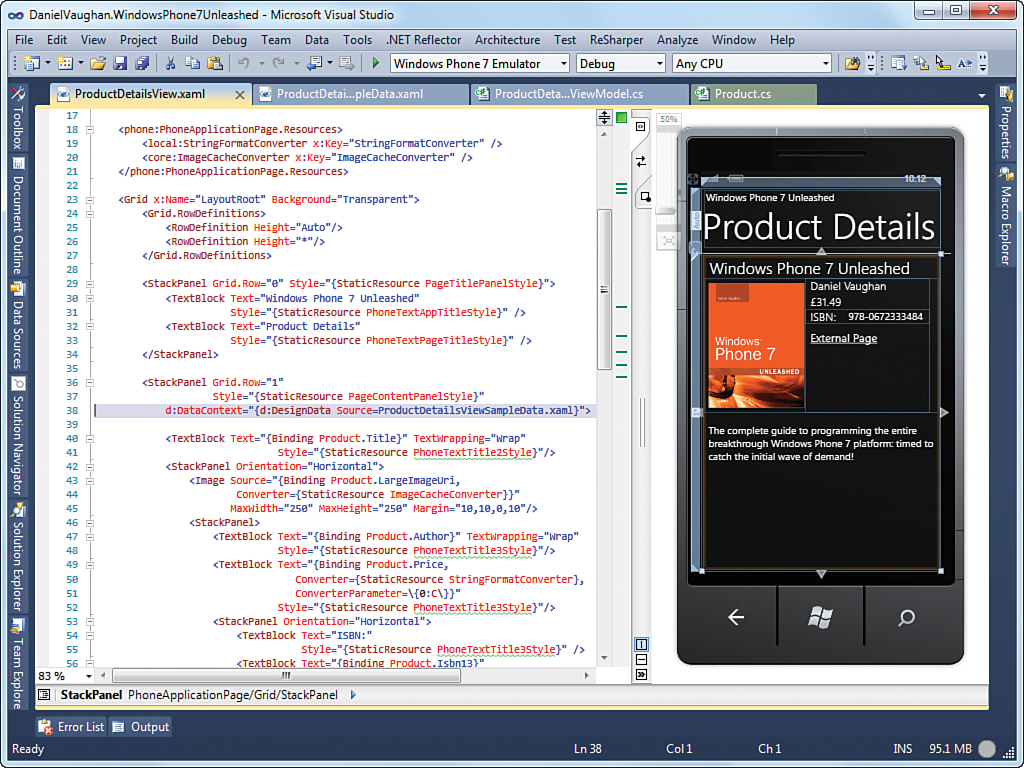
Figure 3.13. The d:DataContext markup extension provides for design-time sample data.
Here a design-time instance of the ProductDetailsViewModel class presents some sample data to improve the design-time experience of the developer or designer.
The content StackPanel includes a d:DataContext attribute, which causes a ProductDetailsViewModel instance to be loaded from a sample data file, as shown in the following excerpt:
<StackPanel Grid.Row="1"
Style="{StaticResource PageContentPanelStyle}"
d:DataContext="{d:DesignData Source=ProductDetailsViewSampleData.xaml}">
...
</StackPanel>
You can see that the d:DesignData markup extension has its Source property set to the location of a sample data file, ProductDetailsViewSampleData.xaml. The sample data file defines the property values of the viewmodel (see Listing 3.9). The design-time environment of Visual Studio or Expression Blend instantiates the sample viewmodel at design-time.
Listing 3.9. ProductDetailsViewSampleData.xaml
<local:ProductDetailsViewModel
xmlns:local="clr-namespace:DanielVaughan.WindowsPhone7Unleashed
.Examples.Navigation"
xmlns="http://schemas.microsoft.com/winfx/2006/xaml/presentation"
xmlns:BookshopServiceReference="clr-namespace:DanielVaughan
.WindowsPhone7Unleashed.Examples.BookshopServiceReference">
<local:ProductDetailsViewModel.Product>
<BookshopServiceReference:Product
Id="1"
Title="Windows Phone 7 Unleashed"
Author="Daniel Vaughan"
Description="The complete guide to programming..."
Price="31.49"
Isbn10="0672333481"
Isbn13="978-0672333484"
SmallImageUri="/DanielVaughan.WindowsPhone7Unleashed
.Examples.Silverlight;component/Navigation/Images/Product01Small.jpg"
LargeImageUri="/DanielVaughan.WindowsPhone7Unleashed
.Examples.Silverlight;component/Navigation/Images/Product01Large.jpg"
ExternalUrl="
http://www.amazon.com/Windows-Phone-Unleashed-Daniel-Vaughan/dp/0672333481/"
/>
</local:ProductDetailsViewModel.Product>
</local:ProductDetailsViewModel>
Notice the relative component URIs of the images. The design-time environment will fail to resolve the image location unless relative component URIs are used and the Build Action of the image is set to Resource.
Image Caching
While the viewmodel saves the result of the WCF service call, which allows the app to restore its state after being tombstoned, downloaded images are not saved in the state dictionary, but rather, the app relies on some custom image caching.
A custom IValueConverter, called ImageCacheConverter, is used to download the image from the specified image URI, as shown in the following excerpt:
<Image Source="{Binding Product.LargeImageUri,
Converter={StaticResource ImageCacheConverter}}" />
By using the ImageCacheConverter, images can be downloaded once and stored in isolated storage for an arbitrary period. Once that period has elapsed, the image will be downloaded again. This allows the application to work offline (see Listing 3.10).
Listing 3.10. ImageCacheConverter Class
public class ImageCacheConverter : IValueConverter
{
public object Convert(object value, Type targetType,
object parameter, CultureInfo culture)
{
if (EnvironmentValues.DesignTime)
{
return value;
}
string url = value as string;
if (url != null)
{
try
{
return ImageCache.GetImage(new BitmapImage(new Uri(url)));
}
catch (IsolatedStorageException e)
{
Console.WriteLine(e);
return value;
}
}
BitmapImage bitmapImage = value as BitmapImage;
if (bitmapImage != null)
{
return ImageCache.GetImage(bitmapImage);
}
return value;
}
public object ConvertBack(object value, Type targetType,
object parameter, CultureInfo culture)
{
throw new NotImplementedException();
}
}
The ImageCacheConverter can be used in conjunction with a URL or a BitMapImage. In the sample code, it is used with a URL, supplied by the product’s SmallImageUri and LargeImageUri properties. The ImageCache class maintains a dictionary of URI keyed cached images. It stores the dictionary in isolated storage, and when an image is requested, it attempts to locate it in the dictionary. If found it checks to ensure that the image has not expired, and then returns the image.
Many thanks to Peter Nowak (http://winphonedev.de/) for his image cache code, which I have adapted, with his permission, for use in the downloadable sample code.
The ImageCache class, in the downloadable sample code, maintains a list of ImageCacheItem objects, which represent cached images. The ImageCache.GetImage method is used to retrieve an image from the cache. If the image is not located in the cache, it is scheduled to be downloaded by the static ImageDownloader class.
The ImageDownloader coordinates an asynchronous download of the image file. It uses an HttpWebRequest to retrieve the image from a remote server, and then stores the downloaded file in isolated storage. Once downloaded, the Source property of the original image is assigned, which means that, if it is present in the UI, the image will appear (see the ImageDownloader class, located in the Data/ImageCache directory of the WindowsPhone7Unleashed project, in the downloadable sample code, for details).
Overview of the Sample Bookshop WCF Service
The Bookshop demo application includes a server-side component, which is used by both the ProductsViewModel and ProductDetailsViewModel classes, providing the application with a set of products to display. The server-side component is fairly arbitrary and is presented here merely for the sake of completeness.
The WCF service is called BookshopService and resides in the WindowsPhone7Unleashed.Web project of the downloadable sample code (see Listing 3.11).
Listing 3.11. BookshopService Class
[AspNetCompatibilityRequirements(
RequirementsMode = AspNetCompatibilityRequirementsMode.Allowed)]
public class BookshopService : IBookshopService
{
public IEnumerable<Product> GetProducts()
{
return ProductManager.Products;
}
public Product GetProductById(int productId)
{
return ProductManager.GetProductById(productId);
}
}
The BookshopService exposes static methods of the ProductManager class, shown in Listing 3.12. The ProductManager class creates an XDocument instance, using an XML file, to populate a list of Products.
Listing 3.12. ProductManager Class
public static class ProductManager
{
static readonly List<Product> products = new List<Product>();
public static IEnumerable<Product> Products
{
get
{
return products;
}
}
static ProductManager()
{
string path = HttpContext.Current.Server.MapPath(
"~/Services/Bookshop/Products.xml");
XDocument document = XDocument.Load(path);
foreach (XElement element in
document.Element("Products").Elements("Product"))
{
var product = new Product(element);
product.SmallImageUri
= ServerUtility.ResolveServerUrl(product.SmallImageUri);
product.LargeImageUri
= ServerUtility.ResolveServerUrl(product.LargeImageUri);
products.Add(product);
}
}
public static Product GetProductById(int id)
{
if (id < 0 || id > products.Count)
{
throw new ArgumentOutOfRangeException("id");
}
return products[id - 1];
}
}
The Product class contains the properties that are used to display each book’s details, such as Title and Author. The Product class also knows how to populate itself from an XElement. The explicit casting operators of the XElement class make it easy to extract the values to the Product properties, as can be seen in the following excerpt from the Product class:
public Product(XElement element)
{
if (element == null)
{
throw new ArgumentNullException("element");
}
Id = (int)element.Element("Id");
Title = (string)element.Element("Title");
Author = (string)element.Element("Author");
Description = (string)element.Element("Description");
SmallImageUri = (string)element.Element("SmallImageUri");
LargeImageUri = (string)element.Element("LargeImageUri");
Price = (double)element.Element("Price");
Isbn10 = (string)element.Element("ISBN-10");
Isbn13 = (string)element.Element("ISBN-13");
ExternalUrl = (string)element.Element("ExternalUrl");
}
Summary
Maintaining the appearance of continuity after an application has been tombstoned is one of the key challenges facing Windows Phone developers.
There are two types of application state: persistent and transient. Persistent state exists across application launches and is saved using isolated storage. Transient state is discarded when an application is closed and is stored in the Microsoft.Phone.Shell.PhoneApplicationService.State dictionary.
Transient page state should be stored when the Page.OnNavigatedFrom method is called and restored when the OnNavigatedTo method is called. Transient application state can be stored when the PhoneApplicationService.Deactivated event occurs and restored when the PhoneApplicationService.Activated event occurs.
Persistent state should be saved when transient state is saved and also when the application is closing using the PhoneApplicationService.Closing event.
In this chapter you saw an overview of the application execution model and examined the various application life cycle events, which are used to coordinate state persistence and restoration.
You saw how to enable an app to run under the lock screen and then looked at page navigation and how to optimize the user experience by using a splash screen or a loading indicator.
Finally, the chapter delved into the sample application and discussed image caching, design-time data, and consuming a simple WCF service.