
Chapter 2
The Development Environment
WHAT’S IN THIS CHAPTER
- How to build your applications
- Methods for testing applications
- Using the Windows Phone Emulator
- How to publish your applications
Before exploring the details of programming for Windows Phone 7 (WP7), you need to become familiar with the WP7 development environment. The development environment for a mobile platform usually includes an Integrated Development Environment (IDE) to write your applications, build tools to create the executables, source-level debugging tools to debug the application and tune performance, device emulators to simulate the device environment, and much more.
WP7 provides a developer with a friendly development environment by relying on the features of Visual Studio. In short, you don’t have to learn a new development tool to work with WP7. The WP7 development tools are almost as powerful as those that Visual Studio provides for developing desktop applications and games. At first sight these tools may even seem to be overkill for mobile development. However, by using these powerful tools to reduce the work of coding, developers can spend more time creatively thinking about application design and features. The following sections describe the WP7 development environment in detail.
Windows Phone Developer Tools provide the fundamental functionality required for WP7 development. You can obtain these tools and the corresponding release notes at http://create.msdn.com/home/getting_started The full installation package for Windows Phone Development Tools includes:
- Visual Studio 2010 Express for Windows Phone
- Windows Phone Emulator
- Microsoft Expression Blend for Windows Phone
- XNA Game Studio 4.0
- Silverlight and .NET Framework 4
- Samples and other software development kit (SDK) components
To download the installation package, you first need to download a smart installer. The installer can detect the current software setups on the development PC and then download a 357 MB file for the full installation. If Visual Studio 2010 Professional or higher is already installed, an add-in is also installed along with the Visual Studio 2010 Express for Windows Phone. Because of the limited localization support, the Windows Phone Developer Tools are currently available in only English, German, French, Italian, and Spanish.
To run the development environment, you need the following system requirements:
- OS: All editions (except Starter Edition) of Windows Vista (x86 and x64) Service Pack 2 or Windows 7.
- Hardware: 3GB disk space for installation and 2GB RAM to run the development environment. The emulator also requires a DirectX 10-capable graphics card with a Windows Display Driver Model (WDDM) 1.1 driver.
Compared with WP7 development, Android and iOS have different system requirements, and these are summarized in the accompanying sidebar.
ANDROID
- OS: Windows (XP, Vista, or Windows 7), Mac OS X 10.5.8 or later (x86 only), Linux.
- Hardware: 1GB disk space for installation (Java, Android SDK, Eclipse).
- Others: JDK 5 or JDK 6, Eclipse 3.4 IDE or later, Android SDK.
iOS
- OS: Mac OS X 10.5.x or later.
- Hardware: Intel-based Mac, 3GB disk space for installation, and 1GM RAM to run the development environment. If an Intel-based Mac is not available, Airplay SDK (http://www.airplaysdk.com/) provides an alternative way to develop iOS applications on a Windows-based PC.
- Others: Xcode IDE, Interface Builder, Instruments, and iOS SDK.
USING WINDOWS PHONE 7 DEVELOPER TOOLS
Now that you’ve configured the development environment, you can create a “Hello World!” application as your first Windows Phone 7 coding example. Using this simple example demonstrates how to use the Windows Phone Developer Tools.
This book includes source code for all downloadable examples. To open these example projects, please use File ⇒ Open command to open the solution file in the IDE.
Creating WP7 Applications with Visual Studio
Visual Studio provides easy-to-use wizards to create WP7 applications. The resulting solution includes a generated project structure and code skeleton. Use these steps to create a solution:
1. Open Visual Studio 2010 Express for Windows Phone. Windows starts the IDE for you.
2. Choose File ⇒ New Project. You’ll see the New Project dialog box shown in Figure 2-1. As shown in the figure, the two types of applications available are Silverlight application for Windows Phone and XNA game for Windows Phone. This example uses a Silverlight application.
FIGURE 2-1: Creating a new Windows Phone project

3. Select Windows Phone Application from the template list. You’ll see a description of this project in the right pane of the New Project dialog box as shown in Figure 2-1.
4. Type a name for the solution in the Name field. The example uses a name of HelloWP7.
5. Change the Location and Solution Name field entries if needed. The example uses the default location and solution name (which is the same as the project name found in the Name field).
6. Click OK. Visual Studio creates the project structure and generates a code skeleton with default settings and values as shown in Figure 2-2. Solution Explorer shows the files that the IDE creates for you based on the Windows Phone Application template. You’ll discover later in the chapter how these files are used. The Properties window lets you view and change properties and events of selected objects.
FIGURE 2-2: Visual Studio for Windows Phone 7

As in other Silverlight applications, eXtensible Application Markup Language (XAML, pronounced “zammel”) is used extensively in WP7 Silverlight applications. XAML files (.xaml) are normally used to define user interface (UI) elements, data binding, event handling, application properties, and other application features. In Solution Explorer, you can right-click a XAML file and choose View Designer from the context menu to open the XAML file in a designer window.
A XAML file is associated with a separate C# code-behind file (.cs), which contains the code used to handle events and manipulate the objects declared in XAML. In Solution Explorer you can right-click a XAML file and choose View Code from the context menu to open its code-behind file in an editor window.
At some point you’ll want to open the MainPage.xaml file so that you can create a UI for your application. When you open a XAML file, the designer shows the XAML file content in split mode by default (as shown in Figure 2-2). XAML View (the right editor pane) displays the XAML markup, and Design View (the left editor pane) shows a WYSIWYG representation of the UI elements and layouts. There is a thin toolbar between Design View and XAML View. You can use the controls in this toolbar to manipulate the viewing area of each view.
WP7 applications have controls the user interacts with to perform tasks, so you’ll want to add controls to your application. You can drag and drop common Windows Phone controls from the Toolbox to the Design View. In this way you can manipulate UI elements and layouts graphically. You can also manually edit the tags in the XAML file, and all changes will show in the Design View immediately for your review. You can use the Document Outline window to view the hierarchical relationship among UI elements and navigate to specific elements.
It’s time to customize the UI for the example a bit and add a small function to become comfortable with Visual Studio for Windows Phone. First, in the XAML View of MainPage.xaml file, locate the StackPanel element named TitlePanel. Set the Text property of the first TextBlock element, ApplicationTitle, to the string MY FIRST WP7 APPLICATION. You may notice that your changes appear immediately in the Design View while you are editing in the XAML View.
<!--TitlePanel contains the name of the application and page title-->
<StackPanel x:Name="TitlePanel" Grid.Row="0" Margin="12,17,0,28">
    TextBlock x:Name="ApplicationTitle" Text="MY FIRST WP7 APPLICATION"
       Style="{StaticResource PhoneTextNormalStyle}"/>
    TextBlock x:Name="PageTitle" Text="page name" Margin="9,-7,0,0"
       Style="{StaticResource PhoneTextTitle1Style}"/>
</StackPanel>
Code snippet HelloWP7HelloWP7MainPage.xaml
It’s time to add the first control to the application. The following steps tell you how:
1. Drag and drop a Button control from the Toolbox onto the Design View as shown in Figure 2-3. You can adjust the button size and position it as needed.
FIGURE 2-3: Adding UI elements and event handlers

2. Select the button and set the Content property in the Properties Window to Say.
3. Set the Name property to SayButton.
4. Click the Events tab in the Properties window to display a list of available events.
5. Locate the Click event. Press Enter in the textbox next to the Click event. The IDE generates an event handler in the code-behind file MainPage.xaml.cs.
6. Type the following event handler code in the SayButton_Click() event handler. Of course, a production application would perform a more useful task — this code is just for example purposes.
private void SayButton_Click(object sender, RoutedEventArgs e)
{
   PageTitle.Text = "Hello WP7";
}
HelloWP7HelloWP7MainPage.xaml.cs
For more information about using Visual Studio for Windows Phone development, please refer to Application Development in Visual Studio (http://msdn.microsoft.com/library/h8w79z10.aspx).
DIFFERENCES BETWEEN WP7 AND ANDROID DEVELOPMENT
If you’re used to creating applications for Android, you might find WP7 development a little confusing. Knowing how the two development environments compare can make the transition easier. The following list provides an overview of this comparison:
- IDE: Android does not have its own dedicated IDE; instead, Android provides the Android Development Tools (ADT) plug-in for Eclipse.
- Code generation: The code generation approach is the same as Visual Studio uses — ADT generates basic application project structure and code skeletons for the developer.
- UI design: Android developers may envy Windows Phone and iOS developers for the powerful UI design tools natively provided by the IDE. ADT has limited WYSIWYG UI design tools. In addition, Android developers have to check the UI implementation results by actually deploying the applications in the emulators or devices.
- UI and code-behind files: The UI and code-behind files are similar to those used for Windows Phone development. Android uses an XML file to structure the UI elements and layouts. The code-behind relies on a Java file to manage the application logic.
DIFFERENCES BETWEEN WP7 AND IOS DEVELOPMENT
Someone moving from iOS development to WP7 development will definitely see differences in the way the two platforms work. However, there are also some similarities that you should know about to make the transition easier. The following list provides an overview of how the two development environments contrast:
- IDE: iOS developers use Xcode and Interface Builder to program iOS applications. Unlike Windows Phone and Android, the iOS UI design tool, Interface Builder, is not part of the iOS coding IDE, which is Xcode. Interface Builder compares to an alternative Windows Phone UI development tool, Expression Blend, which serves a similar purpose.
- Code generation: Xcode uses the same approach as Visual Studio to generate code — it generates basic application project structure and code skeletons for the developer, using a template.
- Cross-platform development: iOS cross-platform development is similar to Windows Phone development, which follows the generic cross-platform Silverlight or Xbox/DirectX New generation Architecture (XNA) development. Developing iOS applications with Xcode adopts the same programming paradigms used in developing other Mac OS X applications.
- MVC pattern: Windows Phone, Android, and iOS use a similar approach for application design. iOS applications employ the MVC (Model-View-Controller) pattern. Using the MVC pattern decouples the application UI and the way it behaves so that they can be developed, tested, and maintained independently.
Testing WP7 Applications in the Windows Phone Emulator
The Windows Phone Emulator provides an environment in which you can test and debug your applications using the same actions and functions that you’d use when working with an actual Windows Phone device. However, the performance and user experience on the emulator differ from that of the physical device. The main limitations are:
- The graphics display more slowly because the emulator doesn’t benefit from hardware acceleration.
- The emulator doesn’t provide multi-touch operations. A multi-touch monitor used with Windows 7 can overcome this limitation, but not every multi-touch monitor is compatible with Windows 7 (learn more at http://www.microsoft.com/windows/windows-7/features/windows-touch.aspx).
Unlike emulators provided for the Android and iOS, the Windows Phone Emulator doesn’t include the full set of WP7 applications. However, a few applications are available, such as IE and Bing search. In addition, you can change the orientation or zooming settings of the emulator.
If you want to get a fully “unlocked” emulator, you can search “unlock windows phone emulator RTM” in your preferred search engine.
Now that you have a very simple “Hello World!” Windows Phone application ready, let’s use the Windows Phone emulator to test it. The following steps show how you’ll typically perform this task:
1. Select Windows Phone 7 Emulator in the Device List field in Visual Studio, as shown in Figure 2-4. (You also have the option of deploying your applications to an actual device, and you’ll learn how to perform this task in the next section.)
FIGURE 2-4: Selecting Windows Phone 7 Emulator in Visual Studio

2. Choose Debug ⇒ Start Debugging (or press F5). Visual Studio starts the emulator. After a short wait, you see an emulator window similar to the one shown on the left side of Figure 2-5.
FIGURE 2-5: Deploying and running applications in Windows Phone 7 Emulator

After the emulator window appears, it takes a while for the system to set up the emulator environment and deploy the application into the emulator. You can save time by leaving the emulator window open when you need to make changes to your application and then retest it.
Once your application appears in the emulator window, you can interact with it using the mouse and keyboard to simulate the touch inputs. If you have a touch-enabled monitor, you can directly touch the UI as you would if you were using an actual device. Click the Say button and the “page name” title will change to “Hello WP7” as shown on the right side of Figure 2-5.
You can also launch the Windows Phone Emulator from outside Visual Studio. The WP7 SDK installer creates a Windows Phone 7 Emulator shortcut in the Windows Phone Developer Tools folder in the Start menu of your PC.
Another way to launch the Windows Phone Emulator is through the command line. Open a command line window, type %ProgramFiles%Microsoft XDE1.0XDE (in a 64-bit PC, it should be %ProgramFiles(x86)%Microsoft XDE1.0XDE) and press Enter. A help window like the one shown in Figure 2-6 pops up to explain the options you can use to start a Windows Phone Emulator from the command line. Here is a typical command used to start a customized emulator (even though this command appears on multiple lines in the book, you type it on a single line at the command prompt):
"C:Program FilesMicrosoft XDE1.0XDE.exe" "C:Program FilesMicrosoft
SDKsWindows Phonev7.0EmulationImagesWM70C1.en-US.unlocked.bin"
/VMID {E575DA31-FC47-4766-853F-018D823B9EE6}
FIGURE 2-6: Command line option help for Windows Phone 7 Emulator

The Android and iOS IDEs both provide debuggers. Likewise, WP7 developers can debug applications using the debugger provided by Visual Studio. In addition to common debugging tasks such as setting break points and examining variable values, you can write run-time messages to the Output window to trace application behaviors. Choose View ⇒ Output to display the Output window in Visual Studio. The following example shows how to add debug output information to the SayButton_Click() event handler — when you run the application you see “Button is clicked” in the Output window:
private void SayButton_Click(object sender, RoutedEventArgs e)
{
   Debug.WriteLine("Button is clicked.");
   PageTitle.Text = "Hello WP7";
}
Code snippet HelloWP7HelloWP7MainPage.xaml.cs
To see this code in action, set a break point at the Debug.WriteLine() function as shown in Figure 2-7. When you step over that line of code using the debugger, the debug output message “Button is clicked” appears in the Output window. You can use the Back button on the emulator or the Stop Debugging command in Visual Studio to stop the application and cancel the current debugging session.
FIGURE 2-7: Debugging applications in Windows Phone 7 Emulator

WP7 EMULATOR CONSIDERATIONS FOR THE ANDROID DEVELOPER
Emulators vary considerably in their capabilities. You get used to certain features when working with the Android emulator that don’t appear in the WP7 emulator. The following list describes some of these differences so you don’t make assumptions that could cause problems as you develop your application.
- The official WP7 emulator does not contain a full set of basic applications that come with the Windows Phone 7 OS. You can overcome some of these issues by using the “unlock” version emulator provided by a third-party developer.
- Because isolated storage is available only while the emulator is running, any data you create while testing applications cannot persist on the WP7 emulator — the data is lost once the emulator closes.
- The telephony status, telephony actions, and location controls can’t be simulated and controlled in the WP7 emulator.
- Unlike the powerful debugging tool, Dalvik Debug Monitor Server (DDMS), shipped with the Android SDK, the WP7 debugging environment cannot provide functionality such as the port-forwarding service, screen capture, thread and heap information, and logcat.
Testing WP7 Applications on the Actual Windows Phone Device
When developing a mobile application, it’s important to confirm that every aspect of the application is working properly, using the actual device in addition to tests you perform using the emulator. Window Phone 7 Developer Tools make it possible to deploy and test WP7 applications on the actual device before publishing it to the marketplace, although it takes a little more effort to set it up.
Unlike the Android development environment, in which a developer can easily side-load an application to the actual device, WP7 developers follow a different course. The first step is to register and become a member of App Hub (http://create.msdn.com), a developer portal website created after WP7 launched in October 2010. The registered developer can then register a Windows Phone device for use in the development and debugging of WP7 applications. To register a development phone, launch the Windows Phone Developer Registration Tool that you’ll find in the Windows Phone Developer Tools folder of the Start Menu. Figure 2-8 shows the initial Windows Phone Developer Registration dialog box.
FIGURE 2-8: Using the Windows Phone Developer Registration Tool to register Development Windows Phone
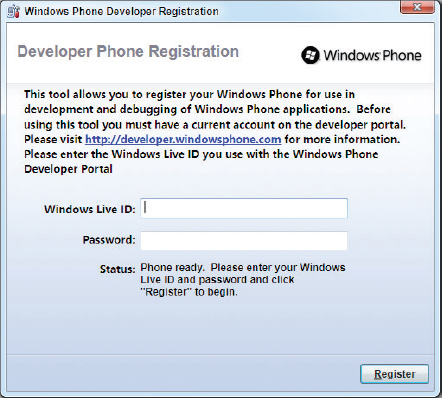
You need to install and launch the Zune software (the development phone will appear in Zune) while registering the development phone. When Zune is ready, you can connect your development phone to the PC. Zune software should keep running to maintain communications between the Windows Phone and the development PC. This requirement also applies to deploying applications to the phone and debugging on the phone.
Make sure the phone screen is unlocked and the Status label displays “Phone ready.” Enter the ID and password for your App Hub membership and then click Register. You can confirm whether the registration is successful or not by checking the Status label. Also, if the development phone has been registered successfully it should appear in the My Registered Devices list under your App Hub dashboard profile page, as shown in Figure 2-9. An individual developer can register a maximum of three devices for each App Hub account.
FIGURE 2-9: Registered devices list at App Hub profile page

Now you can test your WP7 applications on the actual device. To perform this task, select “Windows Phone 7 Device” in the Device list in Visual Studio and choose Debug ⇒ Start Debugging (or press F5). The IDE will deploy the application to the development phone. The debugging process is the same as when you use the Windows Phone 7 Emulator. Because the application has been deployed and persisted on the phone, you can use and test it as you would any other WP7 application, unless you unregister your development phone.
PUBLISHING WINDOWS PHONE 7 APPLICATIONS TO THE MARKETPLACE
Windows Phone 7 doesn’t currently allow you to side-load applications to the phone from a PC or use other methods to install applications on the phone. The only way for developers to distribute WP7 applications is to publish them to the Windows Phone Marketplace. In general, the job of building and publishing WP7 applications consists of the following steps:
1. Research the market and identify requirements.
2. Design, develop, and test application.
3. Prepare certification prerequisites.
4. Submit application to App Hub for certification.
5. Publicize application.
6. Maintain and update application.
In the sections that follow, you’ll walk through the Windows Phone Marketplace application certification submission process.
Preparation
The Windows Phone Marketplace application submission is handled by App Hub. You can submit up to five applications/games for free with your App Hub account. Each additional application/game costs $19.99. Two documents at App Hub are important to the success of a WP7 application submission and even that of the application itself. Although this section provides you with the basics of submitting your application, you need these reference documents to discover the submission details for your particular application.
- Windows Phone 7 Application Certification Requirements: This document (at http://go.microsoft.com/fwlink/?LinkId=183220) provides details about the policies and technical requirements your application must meet to pass the certification process and qualify for listing in the Windows Phone Marketplace.
- Best Practices for Application Marketing: Although this document (at http://create.msdn.com/home/about/app_submission_walkthrough_application_marketing) is intended to provide general guidelines on how to market your application, it contains many useful suggestions on how to prepare submission materials for your application.
The Windows Phone 7 requirements for application certification provide a significant amount of information, but the essentials can be summarized into four fundamental rules every WP7 application should follow:
- Applications should be reliable: No one wants to use an application that doesn’t work well. Of course, you want to ensure your application contains as few bugs as possible (the bug-free application is a myth). You also want to be sure that the application contains appropriate exception handling code so that, if it does experience an error, it can recover (or at least fail gracefully). It’s important to test all the things you expect the user to do as well as things the user shouldn’t do, but will probably try anyway.
- Applications should make efficient use of resources: Although Microsoft has specified the hardware requirements, and the Windows Phone devices are considered as high-end devices with powerful processing capability, developers should keep in mind that the mobile devices are still constrained in resources, especially those of battery and memory. So making efficient use of resources will not only provide a good user experience but will also benefit the whole Windows Phone ecosystem.
- Applications should not interfere with the phone functionality: The fundamental use of a smartphone is to make phone calls. Although smartphones have many additional features and functions, every application should still respect this fundamental phone functionality. The Windows Phone certification process gives this rule a very high priority.
- Applications should be free of malicious software: The emergence of the mobile application market makes it much easier to distribute mobile applications. However, this also brings many problems and concerns such as malicious software that violates the user’s privacy and identity. Among Windows Phone, Android, and iOS, the Windows Phone application certification process can be considered as rigorous. It is also the developer’s responsibility not to make malicious software.
In addition to these four fundamental rules, you should double-check some quantitative facts before you submit your application:
- Installation file size: The OTA (over-the-air) installation file may not exceed 20 MB. Applications in excess of that size will be downloaded via Wi-Fi or through a tethered connection to a PC running the appropriate Microsoft software.
- Maximum XAP size: The maximum size of the XAP package file is 225 MB.
- Breadth of use: The application must run on any Windows Phone 7 device, regardless of model, screen size, keyboard hardware, and manufacturer.
- Speed of rendering: The application must render the first screen within five seconds after launch.
- Responsiveness to input: Within 20 seconds after launch, the application must be responsive to user input.
- RAM limit: An application must not exceed 90 MB of RAM usage, except on devices that have more than 256 MB of memory.”
Again, you should check every requirement listed in the Windows Phone 7 certification requirements when your WP7 application is ready for the certification. To do so will ensure a smooth certification process and shorten the time to market.
Application artwork, which represents the application in the Windows Phone Marketplace catalog, is another engineering material you should prepare before the submission. All images should be in the PNG format. The application artwork package includes:
- Application tile artwork (icons): Applications will be shown in both the phone marketplace catalog and the PC marketplace catalog. For the phone marketplace catalog, there are two types of icons: small (99 × 99) and large (173 × 173). The small icon is used in the regular application list, while the large icon is used when the application is listed in the front page of the phone marketplace for promotion purposes. For the PC marketplace catalog, the icon size should be 200 × 200.
- Panoramic background art (optional): The size for panoramic background should be 1000 × 800. Sometimes the phone marketplace will select an application and use its panoramic background as the background image of the marketplace.
- Application screenshots: The size for screenshots should be 480 × 800. For each application, at least one and at most eight screenshots should be provided, so that users can check out some details about the application before they make purchases.
Submission
After you’ve prepared all the materials required to submit your application, you can perform the formal submission. The following steps describe the submission process:
1. Log in to your App Hub account and open the page at My Dashboard ⇒ Windows Phone ⇒ My Apps. You see the initial submission screen in Figure 2-10.
FIGURE 2-10: Login App Hub

2. Click on Submit an App. At this point, you can upload your application using the form shown in Figure 2-11. Click the plus sign in the Application Package field to upload your application’s binary .XAP package. You can also find some basic information about such things as application name, application platform, default language, version, notes, and requests for exceptions. You must provide a unique application name that differs from that of any other application you’ve submitted. The application name is different from the application title that you enter in the next step.
FIGURE 2-11: Uploading your application

Once you go to the next step, you can’t change the application name, application platform, or default language, so be careful of your inputs. As described in the Preparation section of this chapter, the .XAP package should be less than 225 MB. The upload process may take a while, depending on the file size and your Internet connection speed.
3. Click Next. You’ll see the description page shown in Figure 2-12 where you enter the application description. In this step, you provide a detailed description of your application. You can select from a total of 41 application categories, which are grouped into 16 top-level categories. You need to provide both the top-level category and sub-category of your application. If your application is a game and has been rated by the Entertainment Software Rating Board (ESRB), Pan-European Game Indicator (PEGI), or Unterhaltungssoftware Selbstkontrolle (USK), you must submit the rating certificate. If your application uses push notification, you should also provide the push notification certificates, which can be found at App Hub.
FIGURE 2-12: Entering the application description

4. Click Next. You’ll see the Upload App Artwork page shown in Figure 2-13, where you upload the application’s artwork. In this step, you upload the artwork associated with your application, which is used in the Windows Phone Marketplace catalog. All artwork must be in the PNG format and customized to the resolutions specified in the Preparation section of this chapter.
FIGURE 2-13: Uploading the artwork

5. Click Next. You’ll see the Price Your App page shown in Figure 2-14, where you supply a price for your application. In this step, you also specify the market for your application. You should set payee details in App Hub in order to receive payment when someone buys your application. By default, your application is sold to all markets; however, you have options to select specific markets.
FIGURE 2-14: Pricing the application

6. Click Next. You’ll see the Ready to Submit for Certification page shown in Figure 2-15, where you submit your application for certification. In this final step, you review the application submission details and submit your application to Microsoft for certification. You can choose to publish your application automatically after it passes certification, or you can manually control the time you want to publish your application.
FIGURE 2-15: Submitting for certification

7. Click Submit for Certification. Your application is sent to Microsoft for certification. The Post-Submission Actions section of this chapter that follows describes what to expect during this part of the process.
Post-Submission Actions
After submitting your application to Microsoft for certification, you can check its status in My Dashboard at App Hub. The possible certification status levels are:
- Submission in progress: You are in the middle of entering submission metadata and have not yet clicked the Submit for Certification button shown in Figure 2-15.
- Ready for testing: Your application has been submitted and is waiting to enter the test queue.
- Testing in progress: Your application is being tested. Microsoft tries to finish application testing within five business days, but it doesn’t make any guarantees.
- Ready for signing: Your application has passed the certification process and is waiting for Microsoft to digitally sign it before publication.
- Ready for publishing: You won’t see this status if you elect to automatically publish after passing certification. This status notifies you that you must publish your application manually.
- Published to marketplace: Your application has been published and is being listed in the Windows Phone Marketplace.
- Certification failed: Your application failed certification testing. In this case, you’ll receive an e-mail notification and test summary report to explain why the application failed. You can make the changes that Microsoft requests for certification and re-submit your application.
If your application has been published to Windows Phone Marketplace successfully, you can use Zune Redirection Service to create links to your application. After submitting your application, you can find the product ID of your application by clicking View Details at My Dashboard. If, for example, the product ID is 34432d66-ba01-e011-9264-00237de2db9e, then the link may look like: http://social.zune.net/redirect?type=phoneApp&id=34432d66-ba01-e011-9264-00237de2db9e. You can then use the links in your marketing materials such as e-mails, Short Message Service (SMS), web pages, and in-application links so that users can go directly to your application description in the Windows Phone Marketplace catalog.
As a responsible WP7 application vendor, you should keep updating your application in response to user feedback, bug reports, and Windows Phone updates.
Comparisons with Android and iPhone
Android Market and iPhone App Store are the two largest mobile application stores. Although Windows Phone Marketplace was launched in October 2009, it was a complete failure because it was rushed by the Windows Mobile 6.5 launch. However, Microsoft made a lot of improvements to Windows Phone Marketplace as part of the Windows Phone 7 launch and integration with Zune software. Table 2-1 compares these three mobile application stores side by side, not only from the developer point of view, but also from that of the user.
TABLE 2-1: Comparisons among Windows Phone Marketplace, Android Market, and iPhone App Store

Besides these basic comparisons, Windows Phone 7 has several advantages over iPhone and Android in terms of application store as described in the following list:
- A relatively small number of applications makes it is easy for the early birds in Windows Phone 7 development to stand out from the crowd.
- Both Windows Phone 7 and Microsoft’s popular game console, Xbox, support XNA-based game development, which potentially means that you can easily port your XNA-based games from one platform to another. In sum, you can get your game quickly onto the larger user base of two platforms instead of one.
- The new Windows Phone 7 Metro UI provides a whole new user experience to organize mobile information. Some existing applications come in three versions for these three different platforms and have proven that the WP7 version has a better UI and is easier to use.
- The Try and Buy model makes the application store purchase experience more pleasurable and benefits both end users and developers.
In this chapter, you discovered the basic Windows Phone 7 development experience and learned how to publish your applications on the Windows Phone Marketplace. This chapter also compared Windows Phone 7 with Android and iOS to show the pros and cons of Windows Phone 7 development.
Developing mobile applications in Windows Phone 7, Android, and iOS follows a similar model: IDE + emulator + application store. Silverlight, .NET, and XNA support in Windows Phone 7 makes it relatively easier to port the existing PC/Web/game applications to the Windows Phone 7 platform. Visual Studio, the best IDE so far, makes the development process more efficient. However, the Windows Phone 7 emulator definitely needs to provide more system-level controls and debugging functions. In addition, there is big potential for developers to jump into the new Windows Phone 7 platform by porting their Android and iOS applications to Windows Phone Marketplace.
In the next chapter, you’ll be introduced to the basic programming concepts of building a WP7 application.