
Chapter 6
Web Services and Push Notifications
WHAT’S IN THIS CHAPTER
- Consuming web services
- Parsing data
- How to manage push notifications
- Understanding interstitial ads
- How to create and display ads
Today’s smartphones come with mobile data service and the traditional voice call service. Wi-Fi is also a common component and widely used at home or in public places. This ubiquitous connectivity provides opportunities for mobile applications to access the Internet in various ways. Many websites offer web service APIs that a client can consume regardless of what software platforms the application runs on. This chapter looks into what Windows Phone 7 (WP7) provides for consuming web services. You’ll learn about the push notification service, a key service that can post data to applications on devices for a web service. This chapter also explores mobile advertising and major mobile advertising providers.
How do you consume popular web services on WP7? This section will answer that question. For those not familiar with web service technologies, a primer of web services is provided. Developers who have used web services on iOS and Android will find it useful to leverage their knowledge of those platforms in order to move to WP7. Therefore the section will also provide a brief coverage of using web services on iOS and Android, followed by a detailed discussion of making web service calls and parsing web service data on WP7.
A Primer of Web Services
This section will introduce key concepts in the web service domain, including the two major web service architectures: RESTful and SOAP, and the two dominating web service data formats: JSON and XML.
RESTful and SOAP Web Services
Two of the types of web service architectures used today are Representational State Transfer (REST) web services and Simple Object Access Protocol (SOAP) XML (eXtensible Markup Language) web services. People in the industry always refer to web services using this architecture as “RESTful” web services. With RESTful web services, resource (data) is presented as Uniform Resource Identifiers (URIs), upon which HTTP protocol methods such as GET, POST, PUT, and DELETE operate to consume the data or perform an operation. A typical use case of a RESTful call is direct communication between a client browser and a web server.
On the other hand, SOAP XML web services are more complicated and suitable for enterprise environments in which multiple nodes exist between the message sender and the receiver. A SOAP message is an XML document with structured data to be placed in the HTTP body; therefore, it is generally larger than a RESTful HTTP message.
SOAP web services have existed as a major web service architecture for more than 10 years; however, RESTful web services are becoming more popular among major websites because of their resource-centric rationale and developer-friendly URI-based interface. Both require the client application to know the structure of the expected web response data before parsing it. For RESTful, this is usually documented at the web service website, as shown in Table 6-1. For SOAP XML web services, Web Service Description Language (WSDL) is the common language that describes the provided web services.
TABLE 6-1: A Summary of Major Social Websites

Social network applications are among the most popular applications on smart devices such as phones and tablets. Table 6-1 is a summary of major social websites that offer web services.
You might frequently search for information and news web services on a mobile device. Table 6-2 shows examples of these services.
TABLE 6-2: Examples of Information and News Web Services

JSON and XML
RESTful web services use data payloads such as JavaScript Object Notation (JSON) and XML. Both are text-based data exchange formats. RFC 4627 defines JSON (http://www.ietf.org/rfc/rfc4627.txt), which is the dominating data format today because most web services support payload data in JSON format only, whereas some support both JSON and XML. This means that on mobile software platforms, developers need some helper classes to parse the JSON or XML payload returned from a web service.
JSON defines a simple representation of structured data with four primitive types (string, number, boolean, and null), and two structured types (object and array). An object element can contain primitive types or other objects and arrays. An example of a JSON message obtained from a Twitter web service follows. For simplicity, the message has been shortened with a reduced number of data items.
{
    Results: [
                 {
                   from_user_id: "1234567",
                   Profile_image_url:image_url,
                   From_user: "JohnDoe"
                 }
                  {
                   ...
                  }
               ],
               query: "wp7",
               since_id: 0
 }
In the preceding example, the message is written in an object named Results wrapped in curly brackets ({}). The Results object in turns contains an array, which is wrapped in square brackets ([]), and two primitive types: query and since_id. The array includes several objects that carry specific data fields.
CONSUMING WEB SERVICES ON IPHONE AND ANDROID
Fundamentally, consuming a web service encompasses two basic functions: making web-service calls and parsing response data. Both iOS and Android provide programming support for these basic scenarios so that developers can build sophisticated applications following published web service API specifications, such as those provided by Twitter and Facebook.
Consuming web services on the iPhone Operating System (iOS) is simple: the iOS SDK provides classes such as NSURLConnection, NSMutableURLRequest for HTTP-based web-request and response operations. The HTTP URL and associated headers are set in an NSURL object and an NSMutableURLRequest object. The delegate method for connectionDidFinishLoading processes the web response data found in the NSMultableData property.
If the response data received by the delegate is in JSON format, you can use some third-party JSON classes such as json-framework (http://code.google.com/p/json-framework/) or TouchJSON (https://github.com/schwa/TouchJSON) to parse it into a dictionary, because the iOS SDK does not provide a built-in JSON parser. On the other hand, if the response data is XML-based, you can use the iOS NSXMLParser class to parse it.
In some cases the message payload for either the request or response is large. You can add a compression HTTP header to provide better application performance.
Android offers more options for developers to implement web service calls:
- HttpClient classes in the Apache package (Org.apache.http.client.HttpClient interface and org.apache.http.impl.client.DefaultHttpClient class). A synchronous invocation looks like this:
HttpResponse org.apache.http.client.HttpClient.execute(HttpUriRequest request)
throws IOExc.eption, ClientProtocolException
Here is an asynchronous invocation:
HttpResponse org.apache.http.client.HttpClient.execute (HttpUriRequest request,ResponseHandler<? extends T> responseHandler) - HttpURLConnection class in java.net package. Here is how you use this class:
URL url = new URL(request_url);
HttpURLConnection connection = (HttpURLConnection) url.openConnection();
connection.setDoOutput(true);
connection.setRequestMethod("POST");
connection.setReadTimeout(20000);
connection.setConnectTimeout(20000);
OutputStream out = connection.getOutputStream();
For JSON messages, the Android SDK provides the org.json package for easy parsing. Here is an example of using org.json to parse a web response:
JSONObject json = new JSONObject(response_string);
JSONArray names = json.names();
JSONArray values = json.toJSONArray(names);
for(int i=0;i<valArray.length();i++)
{
     Log.i("JSON name: "+nameArray.getString(i)+"
"
         +"JSON value:"+valArray.getString(i)+"
");
}
Consuming Web Services on WP7
There are essentially two issues to consider when consuming web services from a mobile application:
- Performing HTTP web service calls synchronously and asynchronously
- Handling different data formats used by the web service
Some of the sample code snippets in this section are excerpted from the sample project SocialDemo, which is a simplified Twitter web service client. The SocialDemo sample project showcases a typical HTTP web client pattern, Open Authorization (OAuth) workflow pattern, as well as JSON data parsing and XML to Language-Integrated Query (LINQ) mapping. To try the sample project, you have to replace the application’s consumer key and consumer secret key in the TwitterConfig class with the keys you registered at the Twitter developer site. It’s helpful to have a basic understanding of OAuth 1.0a before you begin this example. For a good jumpstart guide, check out the Twitter OAuth sample at http://dev.twitter.com/pages/auth, and a getting-started guide at http://oauth.net/documentation/getting-started.
Making HTTP Calls
On WP7, you can use two classes to make an HTTP call:
- System.Net.WebClient
- System.Net.HttpWebRequest
The following sections describe how to use these two classes.
Using the System.Net.WebClient Class
The WebClient class provides two simple asynchronous methods to access web services with HTTP GET: DownloadStringAsync(), which places the response string in a parameter passed to the DownloadStringCompleted() event handler, and OpenReadAsync(), which uses a Stream object as a parameter of the OpenReadComplete() event handler. WebClient has limited HTTP control, making it mostly useful for simple web calls. The following example shows how to retrieve Twitter timeline tweets of a specific user in JSON format:
using System.Net;
. . .
try
{
    //Twitter streamline retrieval
    WebClient twitter = new WebClient();

    twitter.DownloadStringCompleted +=
        new DownloadStringCompletedEventHandler(
            twitter_DownloadStringCompleted);
    if(TwitterConfig.useJson == true)
        twitter.DownloadStringAsync(
            new Uri(TwitterConfig.StreamlineUri_json +
                TwitterConfig.screen_name));
    else
        twitter.DownloadStringAsync(
            new Uri(
                TwitterConfig.StreamlineUri_xml +
                TwitterConfig.screen_name));
}
catch (WebException we)
{
    Dispatcher.BeginInvoke(() =>
    {
        MessageBox.Show(we.Message);
    });
}
Code snippet SocialDemoSocialDemoMainpage.xaml.cs
The example above specifies a DownloadStringCompletedEventHandler method named twitter_DownloadStringCompleted(). Note that it checks a TwitterConfig object used in the SocialDemo project to determine what URI (either JSON-based or XML-based Twitter streamline URI) is required for the DownloadStringAsync() call. You can also use the WebClient class for HTTP POST by using the UploadStringAsync() and OpenWriteAsync() methods.
Web service calls usually support JSON, XML, Really Simple Syndication (RSS), and Atom as the response data formats. The API URL should indicate which format a client expects to receive. For example, the URL of a Twitter user timeline API is defined as follows:
http://api.twitter.com/version/statuses/user_timeline.format
where the “format” string can be json, xml, rss, or atom.
Using the System.Net.HttpWebRequest Class
Unlike WebClient, which adopts an event-based model for asynchronous communication, HttpWebRequest requires a System.AsyncCallback delegate. The requirement to use a delegate makes using HttpWebRequest more complex than using the event-based WebClient. HttpWebRequest is derived from System.Net.WebRequest. It provides fine-grained control over HTTP headers with class properties and the underlying asynchronous communication states. The following is an example of using HttpWebRequest. It uses two asynchronous patterns with corresponding AsyncCallback methods: one is HttpWebRequest.BeginGetResponse()and the other is System.IO.Stream.BeginRead().
using System.IO; // Stream class
using System.Diagnostics; // Debug class
using System.Text; // Encoding class

// State class to pass data to async call backs
public class RequestState
{
    public const int BUFFER_SIZE = 2048;
    public byte[] buffer;
    public WebRequest request { get; set; }
    public WebResponse response { get; set; }
    public Stream responseData;
    public RequestState()
    {
        buffer = new byte[BUFFER_SIZE];
        request = null;
        responseData = null;
    }
}

public class HttpCall
{
    public void StartAsyncCall()
    {

        try
        {
            System.Uri uri = new Uri("http://www.msdn.com");
            HttpWebRequest myHttpWebRequest =
                (HttpWebRequest)WebRequest.Create(uri);

            // Create a RequestState object to track state changes
            RequestState myRequestState = new RequestState();
            myRequestState.request = myHttpWebRequest;

            // Start an asynchronous Http request.
            IAsyncResult result =
                (IAsyncResult)myHttpWebRequest.BeginGetResponse(
                new AsyncCallback(ResponseCallback), myRequestState);

            // Now the main thread can wait
            // The MSDN online example has the "allDone.WaitOne()" to
            // keep the main thread waiting. Do NOT use it. It will block
            // your async threads from being called.

        }
        catch (WebException webe)
        {
            Debug.WriteLine("Web exception status: " + webe.Status);
        }
        catch (Exception e)
        {
            Debug.WriteLine(e.Message);
        }
Code snippet SocialDemoSocialDemoHttpCall.cs
The corresponding call-back method for the HTTP request is shown below. This method ends the HTTP request and issues another asynchronous method, Stream.BeginRead(), to obtain the response data. The name of the call back in this case is ReadDataCallBack, which is also shown below.
private void ResponseCallback(IAsyncResult asynchronousResult)
{
    try
    {
        RequestState myRequestState =
            (RequestState)asynchronousResult.AsyncState;
        HttpWebRequest myHttpWebRequest2 =
            (HttpWebRequest)myRequestState.request;

        // Get the response stream
        myRequestState.response = myHttpWebRequest2.
            EndGetResponse(asynchronousResult);
        Stream responseStream =
            myRequestState.response.GetResponseStream();
        myRequestState.responseData = responseStream;

        // Start async call to read the response data
        // when the buffer is filled, the call back will be called
        IAsyncResult asynchronousInputRead =
            responseStream.BeginRead(
            myRequestState.buffer,
            0,
            RequestState.BUFFER_SIZE,
            new AsyncCallback(ReadDataCallBack), myRequestState);
    }
    catch (WebException webe)
    {
        Debug.WriteLine("Web exception status: " + webe.Status);
    }
    catch (Exception e)
    {
        Debug.WriteLine(e.Message);
    }
}
Colde snippet SocialDemoSocialDemoHttpCall.cs
The following is the ReadDataCallback() method which eventually completes reading of the response data and closes the stream.
private void ReadDataCallBack(IAsyncResult asynchronousResult)
{
    try
    {
        RequestState myRequestState =
            (RequestState)asynchronousResult.AsyncState;
        Stream responseStream = myRequestState.responseData;
        int read = responseStream.EndRead(asynchronousResult);

        // Read the HTML stream
        if (read > 0)
        {
            // There is still data in the buffer, get it
            Debug.WriteLine(
                Encoding.UTF8.GetString(myRequestState.buffer, 0, read));

            // Launch another read
            IAsyncResult result = responseStream.BeginRead(
                myRequestState.buffer,
                0, RequestState.BUFFER_SIZE,
                new AsyncCallback(ReadDataCallBack),
                myRequestState);
        }
        else
        {
            // Done. Close the stream and response.
            responseStream.Close();
            myRequestState.response.Close();
        }
    }
    catch (WebException webe)
    {
        Debug.WriteLine("Web exception status: " + webe.Status);
    }
    catch (Exception e)
    {
        Debug.WriteLine(e.Message);
    }
}
Code snippet SocialDemoSocialDemoHttpCall.cs
Parsing JSON Data
Parsing JSON data is done using the System.Runtime.Serialization.Json.DataContractJsonSerializer class (System.Servicemodel.Web.dll) in Silverlight on WP7. DataContractJsonSerializer uses the underlying serialization engine in Microsoft Windows Communication Foundation (WCF), which has been discussed in Chapter 5. This class is able to deserialize a JSON string into a list of objects of a custom type that you define to match the data format in the string. It can also serialize these objects into a JSON string, although this feature isn’t used very often for the examples in this book.
The key to using DataContractJsonSerializer is to parse JSON data returned from a web service by establishing a data contract for a published web service API between the client (the application) and the web service. To perform this task, you create a JSON data item class, which is the contract class that matches the defined JSON data format of the web call response. The DataContractJsonSerializer class can infer the data contract using the contract class, and thus can obtain a list of such class objects from the response data.
For example, as mentioned above, Twitter provides a web service call that returns the timeline — the latest tweets — of a given screen name. The following HTTP GET call will return the latest tweets from President Obama:
http://api.twitter.com/1/statuses/user_timeline.json?screen_name=barackobama
To see the response from Twitter in a web browser, install the JSONView add-on (https://addons.mozilla.org/en-US/firefox/addon/jsonview/) for Firefox, and then enter the URL. One example of the response for this call is shown below. To save space only some of the data items are shown.
[

      {
          o in_reply_to_status_id: null
          o truncated: false
          o created_at: "Sun Nov 28 17:03:28 +0000 2010"
          o geo: null
          o favorited: false
          o source: "<a href="http://www.hootsuite.com"
rel="nofollow">HootSuite</a>"
          o in_reply_to_status_id_str: null
          o id_str: "8928974595952640"
          o place: null
          o
            user: {
                + profile_background_color: "77b0dc"
                + description: "44th President of the United States"
                + geo_enabled: false
                + profile_use_background_image: true
                + favourites_count: 0
                + url: http://www.barackobama.com
                + follow_request_sent: false
                + lang: "en"
                + verified: true
                + profile_background_image_url:
http://a3.twimg.com/profile_background_images/174596417/newtwitter-OFA-v5.jpg
                + created_at: "Mon Mar 05 22:08:25 +0000 2007"
                + location: "Washington, DC"
                + profile_link_color: "2574ad"
                + notifications: false
                + profile_background_tile: false
                + id_str: "813286"
                + listed_count: 118778
                + following: true
                + profile_sidebar_border_color: "c2e0f6"
                + profile_image_url:
http://a3.twimg.com/profile_images/784227851/BarackObama_twitter_photo_normal.jpg
                + name: "Barack Obama"
                + time_zone: "Eastern Time (US & Canada)"
                + followers_count: 5989763
                + id: 813286
                + utc_offset: -18000
                + friends_count: 709157
                + screen_name: "BarackObama"
            }
          o retweet_count: null
          o in_reply_to_user_id: null
          o id: 8928974595952640
          o retweeted: false
          o text: "This West Wing Week: the traditional Thanksgiving turkey
pardon and a NATO summit in Portugal. http://OFA.BO/o3j5Wa"
      },
{...},
{...}
]
The response data for the Twitter streamline call is an array of tweet objects. Each tweet object contains some string fields and number fields, and a user object that includes several string and number fields to identify the user who posted the tweet.
The JSON data item class (our contract definition class) for a single tweet does not need to map all the fields in a response; only those that will be used by the application should be specified. For example, if the application will use the three fields user.screen_name, user.profile_image_url, and text (the tweet text), the data item class TwitterStatusItem should be as simple as the example class TwitterStatusItem shown in Listing 6-1. (Please note the embedded private class TwitterUser, which maps the user object in each tweet object. The DataContract and DataMember directives are critical for establishing the data contract.)
LISTING 6-1: Twitter status data contract class, SocialDemoSocialDemoTweetStatus.cs
using System.Runtime.Serialization; //DataContract

[DataContract]
public class TwitterStatusItem
{
    //"User" object
    [DataContract]
    public class TwitterUser
    {
        //"screen_name" item
        private string screen_name;
        [DataMember(Name = "screen_name")]
        public string Screen_name {
            get { return screen_name ?? "";}
            set { screen_name = value;}
        }

        //"profile_image_url" item
        private string profile_img;
        [DataMember(Name = "profile_image_url")]
        public string Profile_img {
            get { return profile_img ?? "";}
            set { profile_img = value;}
        }
    }

    private TwitterUser twitterUser;
    [DataMember(Name = "user")]
    public TwitterUser User
    {
        get {
            return twitterUser ??
                new TwitterUser { Screen_name = "", Profile_img = ""};
        }
        set { twitterUser =  value; }
    }

    //"text" item
    private string text;
    [DataMember(Name = "text")]
    public string Text
    {
        get { return text ?? ""; }
        set { text = value; }
    }
}
With the Twitter status data contract class in place, you can create a helper class to facilitate JSON string parsing. The helper class is agnostic in terms of the data contract class it uses, as shown in Listing 6-2.
LISTING 6-2: A JSON helper class, SocialDemoSocialDemoJsonHelper.cs
using System.Runtime.Serialization.Json; //DataContractJsonSerializer class
using System.IO; //MemoryStream class
using System.Text; //Encoding class

namespace SocialDemo
{
    //Helper methods for JSON string serialization and deserialization
    public class JsonHelper
    {
        public static string Serialize<T>(T obj)
        {
            string retVal = string.Empty;
            MemoryStream ms = null;
            try
            {
                DataContractJsonSerializer serializer =
                    new DataContractJsonSerializer(obj.GetType());
                ms = new MemoryStream();
                serializer.WriteObject(ms, obj);
                retVal = Encoding.UTF8.GetString(
                    ms.ToArray(), 0, (int)ms.Length);
            }
            catch
            {
                throw;
            }
            finally
            {
                if(ms != null)
                    ms.Dispose();
            }
            return retVal;
        }

        //Deserilize a JSON string
        public static T Deserialize<T>(string json)
        {
            MemoryStream ms = null;
            T obj = default(T);
            try
            {
                obj = Activator.CreateInstance<T>();
                ms = new MemoryStream(Encoding.Unicode.GetBytes(json));
                DataContractJsonSerializer serializer =
                    new DataContractJsonSerializer(obj.GetType());
                obj = (T)serializer.ReadObject(ms);
            }
            catch
            {
                throw;
            }
            finally
            {
                if(ms != null)
                {
                    ms.Close();
                    ms.Dispose();
                }
            }
            return obj;
        }
    }
}
To use the JsonHelper helper method, just pass the Twitter streamline response as a string object, and indicate the desired data type — a list of TwitterStatusItem objects — to the helper class, as shown below. A complete example of using both the JSON helper class and XML parsing is shown in the following section.
List<TwitterStatusItem> tweets =
   JsonHelper.Deserialize<List<TwitterStatusItem>>(e.Result);
listStatus.ItemsSource = tweets;
Code snippet SocialDemoSocialDemoMainPage.xaml.cs
The code above uses a ListBox.ItemTemplate data binding method for the listbox listStatus. Items of this listbox template are one-to-one mapped to a field of the TwitterStatusItem class in the XAML file (User.Profile_img, User.Screen_name, and Text). To show the data on the UI, you need to set the ItemSource property of the listbox object to a collection of TwitterStatusItem object as shown above. The following is an example of the listbox control in the XAML file.
<!--ContentPanel - place additional content here-->
<Grid x:Name="ContentPanel" Grid.Row="1" Margin="12,0,12,0">
    <ListBox Height="607" HorizontalAlignment="Left" Name="listStatus"
             VerticalAlignment="Top" Width="456"
             DataContext="{Binding}" ItemsSource="{Binding}">
        <ListBox.ItemTemplate>
            <DataTemplate>
                <StackPanel Orientation="Horizontal" Height="132">
                    <Image Source="{Binding User.Profile_img}"
                           Height="73" Width="73"
                           VerticalAlignment="Top" Margin="0,10,8,0"/>
                    <StackPanel Width="370">
                        <TextBlock Text="{Binding User.Screen_name}"
                                   Foreground="Gold" FontSize="28" />
                        <TextBlock Text="{Binding Text}"
                                   TextWrapping="Wrap" FontSize="24" />
                    </StackPanel>
                </StackPanel>
            </DataTemplate>
        </ListBox.ItemTemplate>
    </ListBox>
</Grid>
Parsing XML Data
Silverlight for WP7 provides two classes to parse XML data: System.Xml.XmlReader or System.Xml.Linq. Note that XmlReader provides forward-only, read-only access to a stream of XML data, meaning that you have to navigate through the entire XML stream to retrieve the nodes of interest.
The System.Xml.Linq option is easier to use and provides more structured output. With XML to Linq mapping, you can obtain node values of the XML string using a SQL-like syntax. For example, the Twitter streamline call for screen name BarackObama with XML as the data format is:
http://api.twitter.com/1/statuses/user_timeline.xml?screen_name=barackobama
The response in XML format is as follows:
<statuses type="array">

<status>
 <created_at>Thu Dec 02 20:04:24 +0000 2010</created_at>
 <id>10424062266310656</id>
 <text>
  Jews have lit Hanukkah candles as symbols of resilience in times of peace and
  in times of persecution. Their light inspires us to hope.
 </text>

 <source>
 <a href="http://www.hootsuite.com" rel="nofollow">HootSuite</a>
 </source>
 <truncated>false</truncated>
 <favorited>false</favorited>
 <in_reply_to_status_id/>
 <in_reply_to_user_id/>
 <in_reply_to_screen_name/>
 <retweet_count/>
 <retweeted>false</retweeted>
 <user>
  <id>813286</id>
  <name>Barack Obama</name>
  <screen_name>BarackObama</screen_name>
  <location>Washington, DC</location>
  <description>44th President of the United States</description>
  <profile_image_url>
    http://a3.twimg.com/profile_images/784227851/
    BarackObama_twitter_photo_normal.jpg
  </profile_image_url>
  <url>http://www.barackobama.com</url>
  <protected>false</protected>
  <followers_count>6019488</followers_count>
  <profile_background_color>77b0dc</profile_background_color>
  <profile_text_color>333333</profile_text_color>
  <profile_link_color>2574ad</profile_link_color>
  <profile_sidebar_fill_color>c2e0f6</profile_sidebar_fill_color>
  <profile_sidebar_border_color>c2e0f6</profile_sidebar_border_color>
  <friends_count>708982</friends_count>
  <created_at>Mon Mar 05 22:08:25 +0000 2007</created_at>
  <favourites_count>0</favourites_count>
  <utc_offset>-18000</utc_offset>
  <time_zone>Eastern Time (US & Canada)</time_zone>
  <profile_background_image_url>
    http://a3.twimg.com/profile_background_images/174596417/    newtwitter-OFA-v5.jpg
  </profile_background_image_url>
  <profile_background_tile>false</profile_background_tile>
  <profile_use_background_image>true</profile_use_background_image>
  <notifications>false</notifications>
  <geo_enabled>false</geo_enabled>
  <verified>true</verified>
  <following>false</following>
  <statuses_count>1124</statuses_count>
  <lang>en</lang>
  <contributors_enabled>false</contributors_enabled>
  <follow_request_sent>false</follow_request_sent>
  <listed_count>119259</listed_count>
  <show_all_inline_media>false</show_all_inline_media>
 </user>
 <geo/>
 <coordinates/>
 <place/>
 <contributors/>
</status>
...
</statuses>
The root node is statuses, which contains an array of status nodes, each of which represents a tweet item. Each status node has a user sub-node carrying the user information, in addition to the tweet data sub-nodes such as text and created_at.
To model the data of interest in the above XML response, you define a data item class as follows. You’ll use this class for the LINQ query.
public class TwitterStatusItem_forxml
{
    private string name;
    public string Name
    {
        get { return name ?? ""; }
        set { name = value; }
    }

    private string profile_img_url;
    public string Profile_img_url
    {
        get { return profile_img_url ?? ""; }
        set { profile_img_url = value; }
    }

    private string text;
    public string Text
    {
        get { return text ?? ""; }
        set { text = value; }
    }
}
Code snippet SocialDemoSocialDemoTwitterStatus.cs
Then use LINQ to map the received XML data onto a listbox named listStatus, as shown in Listing 6-3. Note the example also shows how to use the JSON helper class created earlier.
LISTING 6-3: An example of using Linq with XML data, SocialDemoSocialDemoMainpage.xaml.cs
using System.Xml.Linq; //Linq-to-xml

void twitter_DownloadStringCompleted(object sender,
    DownloadStringCompletedEventArgs e)
{
    if (e.Error != null) return;
    if (TwitterConfig.useJson == true) //The response data is JSON
    {
        try
        {
            var data = e.Result;
            List<TwitterStatusItem> tweets =
                JsonHelper.Deserialize<List<TwitterStatusItem>>(data);
            listStatus.ItemsSource = tweets;
        }
        catch (Exception ex)
        {
            Dispatcher.BeginInvoke(() =>
            {
                MessageBox.Show(ex.Message);
            });
        }
    }
    else //The response is XML
    {
        XElement xmlTweets = XElement.Parse(e.Result);
        //Binding the Linq data to the Listbox.
        //Note: you need to modify the listStatus data binding
properties
        //in the xaml to match the members of TwitterStatusItem_forxml
        listStatus.ItemsSource =
            from tweet in xmlTweets.Descendants("status")
            select new TwitterStatusItem_forxml
            {
                Name = tweet.Element("user").Element("screen_name").Value,
                Text = tweet.Element("text").Value,
                Profile_img_url =
                  tweet.Element("user").Element("profile_image_url").Value
            };
    }
}
The XElement object xmlTweets represents the XML document in the web call response string. The XElement.Descendants() method with the parameter status returns an IEnumerable <XElement> interface instance that Linq uses to create a number of TwitterStatusItem_forxml objects for the received status nodes in the XML document. Those objects are then bound to a listbox control listStatus. Note that because the data item class has changed from TwitterStatusItem to TwitterStatusItem_forxml, in the XAML file the listbox template items must be modified to bind to the fields in the TwitterStatusItem_forxml class.
OAuth
OAuth is the standard authorization protocol used by most web services today. OAuth enables a web service and its client to engage in a well-defined workflow such that the client can access protected resources provided by the web service.
Before OAuth is widely used, a mobile application and a web service usually perform basic authentication that requires the application to pass a user’s credential for each web service call. This also means the application must obtain and store a user’s user name and password (encrypted) locally on the device, which could potentially be a security concern, as such sensitive information may be leaked. With OAuth, the application does not need to do that at all, since during OAuth the web service will push an authorization URL to the application with which the user’s credential can be entered and posted directly back to the web service.
OAuth performs three basic steps as follows (assuming the developer has already received a consumer key and consumer secret from the web service provider for his or her application) from a client’s perspective:
1. Pass the consumer key and the consumer secret to get an authorized request token and request token secret. The specification refers to the combination of both the request token and the request token secret as an oauth token at this stage of authorization process. Your code needs to compose a base string and sign it using the consumer secret. All required parameters can be either URL encoded or put in an HTTP header.
2. Launch the authorization URI with the request token attached to start the authorization flow so the user can authorize the application at the authorization website. The web service will reply with an oauth_verifier upon success.
3. Pass the request token and oauth_verifier to request an access token and an access token secret. Again the application code must compose a specific base string and sign it using the combined consumer secret key and request token secret.
Once the client receives the access token and access token secret (collectively called the OAuth token), it can launch web API calls that require an access token as one parameter. These calls must also have a signature attached. The signature is computed using a specific base string and the combined consumer secret key and access token secret.
There is no need to implement the OAuth workflow for your app from scratch. A third-party wrapper library would be a better choice. The sample project in this chapter, SocialDemo, relies on the Hammock OAuth library to facilitate OAuth with the Twitter web service (http://hammock.codeplex.com/).
Many mobile applications enable a user to receive notifications from the Web even if the application is not running. This creates an always-on, always-connected user experience. The following section will discuss three types of WP7 push notifications, and how to use them in your applications.
Why Push Notifications?
The word “push” in push notifications tells you that the message is initiated on a web server and sent to an application running on a mobile device. This is in contrast to the other message-passing scheme in which it is the mobile application that periodically polls the server for updates. The reason the push scheme is widely used on mobile devices is that mobile devices have a limited battery life — if multiple applications on a mobile device wake up and poll servers, the device is constantly doing something, which reduces battery life.
Another important issue with getting notifications from the Web is that a mobile application most likely does not run all the time. Except for those that create a background service, applications will be closed when they are not in the foreground of the screen, in which case they will not be able to receive any notifications as they are not running at all.
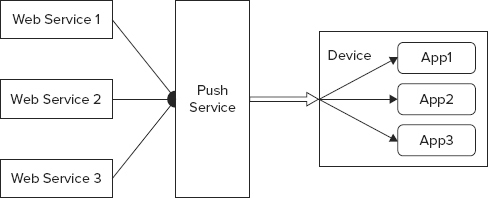
The push notification approach addresses these issues by creating a single dedicated on-device service to communicate with a proxy service on the Internet. All the applications that require timely updates from their respective servers can share the same communication pipe between the on-device service and the proxy service. Using this approach, these applications do not need to actively poll their servers, as notifications will be pushed to them instead. In addition, they do not need to keep running in order to receive updates; the system can launch them when the on-device service receives messages for them. From the application’s perspective, it looks as if the messages (notifications) are pushed from the Internet to the device and then dispatched by the device OS to the application, even if the application is not running at that moment.
Push Notification Architecture
Developers who are familiar with Windows Mobile 6.x should recall the push e-mail technology that Microsoft created for that platform. In essence, the device maintains a persistent network connection to the Exchange server (using heartbeats). This allows Microsoft Exchange Servers to deliver any new incoming e-mail notifications promptly to the e-mail application on the device.
WP7 (along with iOS and Android) has adopted a similar approach. The difference is that a systemwide dedicated communication pipe provides the persistent connection for all applications on the device. Any web service can post specific notifications to the proxy service, which in turn forwards the notifications to applications on the device. The overall architecture will look like Figure 6-1.
FIGURE 6-1: Push service architecture
Now let’s look at the actual implementations of push notification services on iOS and Android. If you are quite familiar with these technologies, you can skip this section and move on to the discussion of WP7 notifications.
Apple APNs
Apple doesn’t allow developers to write background services other than those it specifically supports. Such a limitation is designed to improve battery life and handle low-memory situations on the system. For an application that constantly communicates with a server on the Internet, even if it’s not in the foreground, Apple provides a push notification system that leverages a single on-device software entity to communicate with a special-purpose server in a well-regulated manner. This limitation ensures that Apple has total control over what an application communicates and how communication occurs between an application and its server on the Internet when the application is in the background (i.e., not running).
Apple started to provide push notification services in iPhone OS 3.0. At the center of its architecture is the so-called Apple Push Notification service (APNs), which receives push notifications from providers, and then delivers them to specific applications on target devices using a best-effort approach. All messages originate from providers, which are specialized web servers used by mobile applications. Both providers and target devices establish secure persistent IP connections with APNs.
Suppose a provider receives a new message to deliver to an application on a particular device (for example, the provider might receive a notification that new tweets are available for a given topic). It creates a notification that consists of a device token to identify the target device and specialized JSON data as a payload. This data includes a text message to display to the user, a sound to play, a badge on the application icon, and other tweet data. The notification is sent to APNs using a Secure Sockets Layer (SSL) channel. The APNs then routes the notification to the target device. If the target application isn’t running when the notification arrives, the system plays or shows the alert text message, sound, or badge value. When the application is running, iOS delivers it to the application directly. The notification payload has a size limit of 256 bytes.
One of the big questions to answer is how the iOS knows which application is about to receive the notification from APNs.
The three parties use the device token as a unique identifier for an application running on a specific device. When the application is first installed on the device, the system registers it. During the registration process, APNs generates the device token and passes it back to the application, which in turns sends it to its provider. When the provider receives the token it can start to use the token as part of a notification. APNs maintains a mapping list between a device and its device tokens (a device may have several applications registered for different notifications and therefore have several device tokens). When APNs receives a new notification, it knows exactly where to forward that notification. If the device is not on, the system saves the push notifications and delivers them later when the device is on. In addition, APNs also provides feedback to providers, which may contain those device tokens that are no longer registered to receive specific notifications. Providers should use the feedback to remove the unregistered devices from the target device token list.
Developers don’t need to develop providers from scratch, although, they can surely do so by programming on a web server and obtaining the required certificate from Apple. Instead, they can use third-party provider services to host their provider code. Boxcar (http://boxcar.io), Notifo (http://notifo.com) and MonoPush (www.monopush.com) are among the popular third-party provider services for iPhone.
Google C2DM
Google Android enables the traditional service for application development. Developers can write a background service that handles communication between an application and a server on the Internet. However, a poorly written background service may drain the battery quickly if it performs too many polling operations. In addition, it’s fairly difficult for individual developers to build a push notification solution. For this reason Google started to provide Cloud To Device Messaging (C2DM) with Android 2.2 Froyo. Google applications such as Gmail and Calendar have used C2DM even before Froyo.
Three major parties are involved in C2DM: the application server, usually a web server where messages are generated; Google’s C2DM service that forwards the message to the device; and applications running on a target device.
The identities in Table 6-3 are used in Android’s C2DM architecture:
TABLE 6-3: Android C2DM Credentials
| CREDENTIALS | DESCRIPTION | EXAMPLE |
| Sender ID | Used in the device application C2DM registration process as part of the intent data. A Google account developer chooses a sender identifier for the application he or she develops. | [email protected] |
| Application ID | Used in the device application C2DM registration process as part of the intent data. | Not exposed. The registration service will obtain the application ID. |
| Registration ID | Provided as an identifier C2DM that assigns to the application after a successful registration. The application should pass this information to its application server. C2DM may refresh registration IDs. | A 119-byte array: APA91bFT3_LQS4w15wjSUcGyvLq-0HbUhGyjvegKB7S92YWKllfuvjIHq8Td WNXd2-UqmIx1AxFBNIHebhu9s OSa8IPfiUHBJ_uZnLcSDjflOva_zYFmjSk |
| Sender Auth Token | Assigned by Google as an authentication token for the application server in the ClientLogin response. The Sender Auth Token is also used in the POST header when a push notification is sent from the application server to C2DM. | In the ClientLogin response header: Auth=DQAAAGgA...dk3fA5N |
To enable C2DM, an application on the device must first register with Google programmatically and get a registration ID. This is done in an Intent object call to com.google.android.c2dm.intent.REGISTER. The extra data items placed in the registration intent must have the strings app and sender, respectively, as shown in the following code:
Intent registrationIntent = new
    Intent("com.google.android.c2dm.intent.REGISTER");
registrationIntent.putExtra("app",PendingIntent.getBroadcast(context,
    0, new Intent(), 0));
registrationIntent.putExtra("sender", senderId);
context.startService(registrationIntent);
Upon a successful registration, the registration ID is assigned by C2DM and sent back to the device. The device broadcasts the com.google.android.c2dm.intent.REGISTER intent, and the application that registered the intent can retrieve it. The application can retrieve the intent using the following code and send it to the application server:
String registrationId = intent.getStringExtra("registration_id");
if (intent.getStringExtra("error") != null) {
        // Registration failed, backoff and retry later.
    } else if (intent.getStringExtra("unregistered") != null) {
        // unregistration done, new messages from the authorized sender
will be rejected
    } else if (registrationId != null) {
       // Send the registration ID to the 3rd party site that is sending
the messages.
}
When the application server is about to push a message to the application on the device, it posts an HTTP message to the C2DM service (https://android.apis.google.com/c2dm/send). The message contains the registration ID and message payload. The header of this HTTP message contains the auth token that was obtained from Google.
The C2DM service routes the received HTTP message to the device using the registration ID if the device is online. Otherwise, it will queue the message and send it once the device goes online. This portion of the communication is transparent to the application.
Once the device receives the HTTP message from C2DM, it sends an Intent broadcast to target applications. The application wakes up to process the message it has received in its com.google.android.c2dm.intent.RECEIVE intent receiver method, onReceive(). The intent received by the application encapsulates the payload in a number of extras. The app must define a C2DMBaseReceiver class that extends the com.google.android.c2dm.C2DMBaseReceiver class, instead of using the com.google.android.c2dm.C2DMBaseReceiver class directly. The following code shows a simple onReceive() implementation:
protected void onReceive(Context context, Intent intent) {
   if (intent.getAction().equals("com.google.android.c2dm.intent.RECEIVE")) {
      // Get the message from intent.extras
   }
}
The application server role is quite common — it just needs to send a specially formatted HTTPS POST message to the Google C2DM service. Developers can use Google App Engine or other web services to host their application servers. Of course, the application server must first authenticate itself against the C2DM server by passing its ClientAuth token to C2DM. The message has a size limit of 1,024 bytes.
When writing an Android application that uses C2DM, you need to set several permissions in the application’s Manifest file, AndroidManest.xml, so the Android application run time can properly grant specific permissions.
Push Notifications on WP7
WP7’s push notification architecture is similar to that on iOS and Android but much simpler in terms of the effort required to build the client on the device. The Microsoft Push Notification Service (MPNS) is actually a special Windows Live web service application running in the cloud. The application server can be a standard web application that communicates with the push server. Microsoft recommends using WCF, Microsoft’s web service-oriented framework, for building the application server used in a push notification scenario. On the client side developers must understand three types of push notifications: toast, tile, and raw, as well as the steps used to register and receive these notifications from the application server.
The sample code referenced in this section is excerpted from the sample solution PushNotification, which includes two projects: PushNotificationClient and PushServerEmulator. The PushServerEmulator project implements a desktop program that emulates an application server to communicate with MPNS and send all three types of push notifications. The PushNotificationClient project is a device application that receives and processes all three types of supported push notifications. The contents of these notifications are event reminders, which are formatted and delivered to the device application using toast, tile, or raw notification.
To try the sample PushNotification solution, start to run the solution (which will run both projects) and make sure the desktop application runs on the PC, and the device application runs on the device emulator or a real device. Then you must let the PushServerEmulator application know the registered MPNS channel URI (for example, http://sn1.notify.live.net/. . .). You can copy this URI from the console output of the PushNotificationClient project and paste it into one of the three channel textboxes in the PushServerEmulator UI. Then from the PushServerEmulator application you can send notifications to the application on the device.
Basics
The key concepts in WP7 Push Notification architecture are explained as follows.
- Notification channel: A channel represents the application’s registration with the MPNS. Before receiving push notifications, an application must first open a channel with MPNS so MPNS can deliver notifications to it. An app can only have one channel open per device. But a single channel can receive one, two, or all three types of push notifications. MPNS will keep the channel open for some time even if the application on the device is tombstoned (that is, deactivated because the user invokes a launcher, a chooser, or presses the Start button. For more details of the application execution model, please see Chapter 4). Therefore, the application should always use the channel name to check whether the channel is already open, and use it without reopening it. The HttpNotificationChannel class models a notification channel.
- Toast notification: A toast is a push notification that will appear on the top of the device screen when the receiving application is not in the foreground. If the receiving application is in the foreground, then the application should handle the toast, and no message will appear on the top of the screen. A toast is like the pop-up message on iOS and the floating message that appears in the notification area on Android. An app must first bind to toast in order to receive toast notifications. Binding indicates to the OS that the underlying app will receive toast notifications; this is similar to the com.google.android.c2dm.intent.RECEIVE intent used by an Android app to receive push messages.
- Tile notification: A tile is a rectangular picture on the home screen that serves as a shortcut to an application. A tile is like the Home screen widget on Android. On WP7 the user can simply press and hold the application name in the program list, and then click Pin to Start to create a tile for it. A tile can have three types of data: a background image that can change dynamically or according to a schedule; a tile title string; and a number that appears in the top right corner of the tile. A tile notification is a push notification that is designated to change some or all the data associated with the tile for the underlying app. The app does not need to process received tile notifications.
- Raw notification: A raw notification is a user-defined HTTP message sent to the application (sometimes developers use the term raw http notification as well). In contrast to toast and tile notifications, where the WP7 shell takes control when it receives a notification, only the application can process a raw notification using a specific event handler. The format of a raw notification is completely up to the application developer. However, to make the processing easier, Microsoft recommends using either XML or JSON.
When an Android device receives a push notification from C2DM, its targeted application will wake up automatically and the system will call the corresponding intent receiver (even if the app doesn’t come to the foreground). However, on iOS and WP7, if the targeting app is not in the foreground, the user can simply dismiss the toast notification, without waking up the application.
Channel Establishment and Binding
As mentioned in the Basics section of this chapter, you should use the HttpNotificationChannel class to create and manage a notification channel. Once the application creates and opens a channel, it should set up event handlers to process various channel events. In addition, the application needs to tell the operating system what types of push notifications the channel should bind to. This will allow the system shell to handle received push notifications from this channel and display toast and tile updates on the device.
Your application should use the following steps to create the channel:
1. Call HttpNotificationChannel.Find() to determine if the named notification channel already exists.
2. If no such channel exists, the application creates the channel object, defines channel event handlers (so that the application can retrieve the assigned Channel URI), and then opens the channel by calling HttpNotificationChannel.Open(). At this point, the channel should bind to desired types of push notifications.
3. If the named channel already exists, use it as long as the channel URI isn’t null. If it is, there may be a problem with the channel. Close the app and retry.
Listing 6-4 shows an example of the channel creation logic in the MainPage class in the PushNotificationClient project. Note the SetupChannelEventHandlers() routine and BindChannelToTileToast() routine. They are wrappers for setting up channel event handlers and binding the channel to toast and tile notifications.
LISTING 6-4: An example of channel establishment, PushNotificationPushNotificationClientMainPage.xaml.cs
using Microsoft.Phone.Notification; //HttpNotificationChannel class
using System.IO; //Stream reader class
using System.Diagnostics; //Debug class

private void SetupChannel()
{
    Debug.WriteLine(
        "Checking if there is an existing notification" +
        "channel with the name available");
    httpChannel = HttpNotificationChannel.Find(channelName);
    if (null == httpChannel)
    {
        //We need to create the channel object first
        httpChannel = new HttpNotificationChannel(channelName);

        //Setup channel event handlers
        SetupChannelEventHandlers();

        //Open the notification channel
        try
        {
            httpChannel.Open();
        }
        catch (Exception e)
        {
            Debug.WriteLine("Exception: " + e.Message);
        }
    }
    else
    {
        if (null != httpChannel.ChannelUri)
        {
            //There is already a channel with the give name; reuse it
            ChannelUri = httpChannel.ChannelUri;
            Debug.WriteLine("There is already a channel");
            Debug.WriteLine("Channel Uri: " + ChannelUri.AbsoluteUri);
            SetupChannelEventHandlers();
            BindChannelToTileToast();
        }
        else
        {
            Debug.WriteLine("Error: channel exists but not opened");
            MessageBox.Show("Error: channel exists but not opened." +
                "Close the app and retry.");
            ChannelUri = null;
        }
    }
}
The SetupChannelEventHandlers() should register four event handlers for the following events associated with the channel just created: channel URI change, raw (HTTP) notification received, shell and toast notification received, and error occurred.
LISTING 6-5: An example of setting up channel event handlers, PushNotificationPushNotificationClientMainPage.xaml.cs
private void SetupChannelEventHandlers()
{
    //When there is a new URI for the channel
    httpChannel.ChannelUriUpdated +=
            httpChannel_ChannelUriUpdated);

    //When there is a raw notification
    httpChannel.HttpNotificationReceived +=
        new EventHandler<HttpNotificationEventArgs>(
            httpChannel_RawNotificationReceived);

    //When there is a toast notification
    //and if the app is in not running, system shell will handle it
    //Otherwise, the following handler will be called to handle it
    httpChannel.ShellToastNotificationReceived +=
        new EventHandler<NotificationEventArgs>(
            httpChannel_ShellToastNotificationReceived);

    //When something bad happens
    httpChannel.ErrorOccurred +=
        new EventHandler<NotificationChannelErrorEventArgs>(
            httpChannel_ErrorOccurred);
}
The BindChannelToTileToast() method basically calls HttpChannelNotification.BindToShellToast() and HttpChannelNotification.BindtoShellTile(). Here is an example of the BindChannelToTileToast() method:
LISTING 6-6: An example of toast channel binding, PushNotificationPushNotificationClientMainPage.xaml.cs
private void BindChannelToTileToast()
{
   try
   {
      if (httpChannel.IsShellToastBound == false)
      {
         Debug.WriteLine("Binding to toast notifications");
         httpChannel.BindToShellToast();
      }
   }
   catch (Exception)
   {
      //Already bound; do nothing
   }

   try
   {
      if (httpChannel.IsShellTileBound == false)
      {
         Debug.WriteLine(
            "Binding to tile notifications with a remote picture");

         //Here we need to register all the tile background images that
         //may be used by this tile
         //Then later the push server can indicate which remote/local
         //image to use in the tile notification
         Collection<Uri> uris = new Collection<Uri>();
         Uri x = new Uri(
            "http://media.wiley.com/assets/1135/98/event.gif");
         uris.Add(x);

         httpChannel.BindToShellTile(uris);
      }
   }
   catch (Exception)
   {
      //Already bound; do nothing
   }
}
The caveat with HttpChannelNotification.BindToShellTile() is that there are two overloaded methods for this purpose: one that doesn’t require any input arguments and the other that requires an input argument of Collection type. Both indicate to the system shell that the channel will be used to deliver some tile notifications. The difference between these two methods is that the latter provides a collection of local and remote URIs to the system. When a tile notification contains a tile image item that’s in the specified collection, it will use the image item as the background image of the tile. Microsoft places some restrictions on remote pictures: the picture cannot be larger than 80 KB and the download time cannot exceed 15 seconds or the image will not be loaded.
The first time the channel is opened by the open()call from an application, MPNS will create a unique channel URI and assign it to the application. Then MPNS will pass that channel URI back to the application in the URI changed event handler. Both the application web server and MPNS use that unique channel URI to identify where to send a push notification (the particular app on a specific device).
Sending Push Notifications
To send push notifications to a WP7 application, the application server must generate specially defined HTTP messages and send them to the MPNS. Unlike iOS and Android, where a single push notification format is used, WP7 uses three types. The following section shows the steps required for sending notifications from an application server to MPNS using the sample code in the PushServerEmulator project.
A toast notification is defined as follows:
string toastMessage = "<?xml version="1.0" encoding="utf-8"?>" +
"<wp:Notification xmlns:wp="WPNotification">" +
   "<wp:Toast>" +
      "<wp:Text1><string1></wp:Text1>" +
      "<wp:Text2><string2></wp:Text2>" +
   "</wp:Toast>" +
"</wp:Notification>";
A tile notification is defined as follows. The tile image path can be either a local or a remote path. If this is a remote path, then it should be listed in the Collection that passed as the only parameter to the BindToTile() call.
string tileMessage = "<?xml version="1.0" encoding="utf-8"?>" +
"<wp:Notification xmlns:wp="WPNotification">" +
   "<wp:Tile>" +
      "<wp:BackgroundImage><background image path></wp:BackgroundImage>" +
      "<wp:Count><count></wp:Count>" +
      "<wp:Title><title></wp:Title>" +
   "</wp:Tile> " +
"</wp:Notification>";
A raw notification can be any format. But it is recommended that you should put your messages in XML or JSON so they can be easily parsed on the client.
The code that sends the push notification to MPNS simply launches an HTTP POST method to the channel URI that was passed from the application when it created the notification channel.
Note that the payload data for a toast notification contains one or more strings, whereas the payload of a tile notification includes a tile image URI, a number, and a text string combined. For raw notification, the payload can be any format, as long as the device app can recognize and process it. In the sample project PushServerEmulator, the raw notification payload is a well-formatted XML document consisting of some event data. The composition of the XML document is done in the BuildRawNotification() method. Listing 6-7 shows the SendMessage() method that accommodates all three notification types:
LISTING 6-7 An example of sending Push Notifications, PushNotificationPushServerEmulatorMainWindow.xaml.cs
// Send all three types of push messages.
// Parameter "type": message type. 1:toast, 2:tile, 3:raw.
// Parameter "channelUri": channel Uri.
// Parameter "message": text string as message body.
// Parameter "tileNum": number to be carried in the tile message.
private void SendMessage(
    int type,
    string channelUri,
    string message,
    string tileNum)
        {
            if (null == channelUri || string.IsNullOrEmpty(message))
                return;

            HttpWebRequest sendNotificationRequest;
            try
            {
                sendNotificationRequest =
                    (HttpWebRequest)WebRequest.Create(channelUri);
            }
            catch (Exception exc)
            {
                MessageBox.Show(exc.Message);
                return;
            }

            sendNotificationRequest.Method = "POST";
            //Indicate that you’ll send toast notifications!
            sendNotificationRequest.ContentType = "text/xml;; charset=utf-8";
            sendNotificationRequest.Headers = new WebHeaderCollection();

            byte[] messagePayload = null; //The payload
            if (type == 1)
            {
                sendNotificationRequest.Headers.Add(
                    "X-WindowsPhone-Target", "toast");
                //Possible batching interval values for toast
                //notifications:
                // 2: The message is delivered immediately.
                // 12: The message is delivered within 450 seconds.
                // 22: The message is delivered within 900 seconds.
                sendNotificationRequest.Headers.Add(
                    "X-NotificationClass", "2");

                //Create xml envelope
                //The message will be formatted into the <wp:Text1> node
                string messageTemplate =
                    "<?xml version=’1.0’ encoding=’utf-8’?>" +
                    "<wp:Notification xmlns:wp=’WPNotification’>" +
                      "<wp:Toast>" +
                        "<wp:Text1>{0}</wp:Text1>" +
                      "</wp:Toast>" +
                    "</wp:Notification>";
                //Wrap custom data into envelope
                messagePayload = UTF8Encoding.UTF8.GetBytes(
                    string.Format(messageTemplate, message));
            }
            else if (type == 2)
            {
                //Indicate this is a tile notification
                sendNotificationRequest.Headers.Add(
                    "X-WindowsPhone-Target", "token");
                sendNotificationRequest.Headers.Add(
                    "X-NotificationClass", "1");

                //Create xml envelope
                //A Uri of a remote picture is sent.
                //Note this Uri must be first indicated to the device
                //system when the device app calls BindToShellTile().
                //The other two data items are an integer value as the
                //number attached to the tile and a string as tile title.
                string x = "http://media.wiley.com/assets/1135/98/event.gif";
                string messageTemplate =
                    "<?xml version=’1.0’ encoding=’utf-8’?>" +
                    "<wp:Notification xmlns:wp=’WPNotification’>" +
                      "<wp:Tile>" +
                        "<wp:BackgroundImage>" +
                          x +
                        "</wp:BackgroundImage>" +
                        "<wp:Count>{0}</wp:Count>" +
                        "<wp:Title>{1}</wp:Title>" +
                      "</wp:Tile>" +
                    "</wp:Notification>";
                //Wrap custom data into envelope
                string messageText =
                    string.Format(messageTemplate, tileNum, message);
                messagePayload = UTF8Encoding.UTF8.GetBytes(messageText);
            }
            else
            {
                //Raw notification does not need X-WindowsPhone-Target header
                sendNotificationRequest.Headers.Add(
                    "X-NotificationClass", "3");

                //"message" is already formatted before being passed here
                messagePayload = UTF8Encoding.UTF8.GetBytes(message);
            }

            //Set Content Length
            sendNotificationRequest.ContentLength = messagePayload.Length;

            //Push data to stream
            using (Stream requestStream =
                sendNotificationRequest.GetRequestStream())
            {
                requestStream.Write(
                    messagePayload, 0, messagePayload.Length);
            }

            //Start to get reponse
            HttpWebResponse response;
            try
            {
                response =
                    (HttpWebResponse)sendNotificationRequest.GetResponse();
            }
            catch (Exception exc)
            {
                MessageBox.Show(exc.Message);
                return;
            }
            string notificationStatus =
                response.Headers["X-NotificationStatus"];
            string notificationChannelStatus =
                response.Headers["X-SubscriptionStatus"];
            string deviceConnectionStatus =
                response.Headers["X-DeviceConnectionStatus"];

            txtStatus.Text = notificationStatus;
            txtChannel.Text = notificationChannelStatus;
            txtConnection.Text = deviceConnectionStatus;
        }
Handling Push Notifications
On the device side, there is no need to process tile notifications in your application because the system shell handles all tile notifications. However, the application will most likely process toast messages and raw HTTP messages if any. These messages give the application an opportunity to update the UI and internal state with received notification data.
For a newly received toast notification, the handling occurs when the system raises the HttpNotificationChannel.ShellToastNotificationReceived channel event. Recall that when the application creates a new notification channel it also sets up some event handlers. One of the event handlers is for the toast notification event:
httpChannel.ShellToastNotificationReceived += new

EventHandler<NotificationEventArgs>(httpChannel_ShellToastNotificationReceived)
;
The ShellToastNotificationReceived event is raised only when the underlying application is in the foreground. When the application is in the background, the system shell displays the toast in the notification area and the application does not need to do anything.
A toast notification consists of a list of key-value pairs, making it handy to use Dictionary<string, string> to process it. The following Listing 6-8 shows how to retrieve all key-value pairs from the toast message and add them to a text box named txtMessage.
LISTING 6-8: An example of handing a toast notification, PushNotificationPushNotificationClientMainPage.xaml,cs
void httpChannel_ShellToastNotificationReceived(
    object sender, NotificationEventArgs e)
{
    // A toast notification is a list of key-value pairs
    if (e.Collection != null)
    {
        Dictionary<string, string> collection =
            (Dictionary<string, string>)e.Collection;
        StringBuilder messageBuilder =
            new StringBuilder();

        Dispatcher.BeginInvoke(() =>
        {
            txtMessage.Text += "Received toast: ";
        });

        foreach (KeyValuePair<string, string> kvp in collection)
        {
            // Display the message
            Dispatcher.BeginInvoke(() =>
            {
                txtMessage.Text += kvp.Key + ":" + kvp.Value;
            });
        }
        Dispatcher.BeginInvoke(() =>
        {
            txtMessage.Text += "
";
        });
    }
}
A raw notification is delivered to the application only when the application is in the foreground. Otherwise the raw notification is simply dropped. The handling of a raw HTTP message really depends on the way your server-side application builds the message. If the raw HTTP message is created as an XML document as suggested, then it’s fairly simple to parse the receive message as an XML document on the device application side. Listing 6-9 in the following shows an example of this scenario. The code uses LINQ queries to parse a received XML document in the raw HTTP message. The XML document consists of an EventReminder element which has four string sub-elements: Date, Time, Location, and Notes. To see how the XML document is composed on the server side, please refer to BuildRawNotification() in the MainWindow.xaml.cs in the PushServerEmulator project.
LISTING 6-9: An example of handling raw notifictaions, PushNotificationPushNotificationClientMainPage.xaml.cs
void httpChannel_RawNotificationReceived(
object sender, HttpNotificationEventArgs e)
{
XDocument document;
using (var reader = new StreamReader(e.Notification.Body))
{
string payload =
reader.ReadToEnd().Replace('�', ' '),
document = XDocument.Parse(payload);
}
string eventDate =
(from c in document.Descendants("EventReminder")
select c.Element("Date").Value).FirstOrDefault();
string eventTime =
(from c in document.Descendants("EventReminder")
select c.Element("Time").Value).FirstOrDefault();
string eventLocation =
(from c in document.Descendants("EventReminder")
select c.Element("Location").Value).FirstOrDefault();
string eventNotes =
(from c in document.Descendants("EventReminder")
select c.Element("Notes").Value).FirstOrDefault();
StringBuilder eventDetails =
new StringBuilder("Received Raw event: ");
eventDetails.Append(eventDate + ", ");
eventDetails.Append(eventTime + ", ");
eventDetails.Append(eventLocation + ", ");
eventDetails.Append(eventNotes);
Debug.WriteLine(eventDetails);
Dispatcher.BeginInvoke(() =>
{
txtMessage.Text += eventDetails + "
";
});
}The core of the app store business model is that developers can earn money by selling their apps and share revenue with the platform provider. For those who are reluctant to pay for the apps, developers can make their application free in the application store and use advertising to recover the cost of development. This section discusses advertising in a mobile application.
Mobile Advertising Basics
Advertising is essential to online business. Google made a fortune by building an advertising business model upon its successful search engine technologies. Social network sites, news portals, and many other types of websites use text, pictures, video, or flash advertisements to create a revenue source based on the user’s impressions (ads being viewed), clicks, and subsequent actions such as the user’s purchase of the advertised item or decision to sign up for a service. The Yankee group has estimated that the U.S. online advertising market will grow to $50.3 billion in revenue in 2011 (http://www.marketingcharts.com/interactive/us-online-advertising-market-to-reach-50b-in-2011-3128/).
When it comes to mobile advertising, the Mobile Marketing Association (MMA) has published guidelines of media channels upon which ads are delivered:
- Mobile web: Websites that are optimized for mobile devices
- Messaging: Short Message Service (SMS) and Multimedia Messaging Service (MMS)
- Mobile apps: Applications (including games) that are downloaded from a variety of app stores (iPhone AppStore, Android Market, Windows MarketPlace, and Nokia Ovi) and installed on a device
- Mobile video and TV: Video clips that are optimized for mobile
The most commonly used advertising methods for mobile applications are banner ads and interstitial ads.
- Banner ad: A banner ad is an ad unit that is normally displayed at the top or bottom of the screen. It may consist of text, pictures, and flash images. Once the user clicks a banner ad, then a web page, an app store item, a phone call dial pad, or an application is displayed as the ad target.
- Interstitial ad: An interstitial ad is a full-screen image or video shown at a certain time when the app is running, such as at the beginning of the app run, when the app is about to exit, or when a game is paused by the user. Interstitial ads may include a menu to offer more choices than just being clickable. The developer normally provides a Skip menu item so the user can skip the video playback and jump to the app.
Both banner ads and interstitial ads are independent of the application’s content and logic. There are other mobile advertising methods in which ad units are embedded in the application as part of the content. But the majority of today’s mobile ads are either banner or interstitial ones, which are commonly supported by popular mobile advertising providers.
The mobile advertising industry consists of three parties: in the center are the ad providers such as Apple iAd and Google AdMob. Advertisers create ad campaigns with the ad provider, and pay for this. Ad publishers, such as application developers and website owners, get paid by displaying ads pulled from the provider’s ad inventory. Figure 6-2 explains this model.
FIGURE 6-2: The model for purchasing and displaying ads

Some terms are frequently used in the mobile advertising domain. Table 6-4 shows a list of these terms.
TABLE 6-4: Terms Used in Mobile Advertising
| TERM | DESCRIPTION |
| Impression | Number of impressions , i.e., the number of times the ad units are displayed and viewed by a user |
| CPM (Cost Per Mille) | Cost of 1,000 impressions that advertisers pay for. Also known as Cost Per Thousand (CPT) |
| CPC (Cost Per Click) | Cost per each user click that advertisers pay for. Also known as Pay Per Click (PPC) |
| CPA (Cost Per Action) | Cost per each user action (such as purchase, form submission, etc.) that advertisers pay for |
| eCPM (effective CPM) | Estimate of the amount of money a publisher can receive by switching to CPM from CPC or CPA |
| CTR (Click-Through Rate) | Ratio of number of clicks to number of impressions |
Mobile Advertising Providers
For most mobile app developers, the easiest way to add mobile ads into their apps is to select a mobile advertising provider and follow its instructions to pull ads off the provider’s ad inventory. Two of the most popular mobile advertising solutions are Apple iAd and Google AdMob. The Microsoft Ads Solution appears later in this chapter.
Apple iAd
Apple iAd came with iOS 4 in 2010. Ads delivered by iAd have a unique feature: the ad is within the app, meaning that once a user clicks a banner ad in an app, a full-screen advertisement will appear within the application. This is in contrast to AdMob’s ad delivery method in which users are often directed to a web page in the browser, which is outside the application. The consequence of staying within the app is that users are more likely to click the banner ads because they know they aren’t leaving the app. Figure 6-3 shows an iAd banner ad at the bottom of the screen in the KOMO news app, and the subsequent full screen ad once the banner ad is clicked.
FIGURE 6-3: An iAd banner ad, in bottom-of-screen and full-screen mode (courtesy of KOMO News, Fisher Communications, Inc.)

With iAd, advertisers can build interactive, full-screen ads to improve CTR (Click-Through Rate) once the ads are shown.
The advertising revenue is split between Apple and mobile developers, with Apple taking 40 percent of the total amount generated.
There are concerns over the high cost of ad development by advertisers. In many cases the ad itself can be a full-featured application, which incurs additional cost compared to simply redirecting the user to a web URL.
Google AdMob
Google AdMob is the largest mobile advertising provider at the time of writing. In fact, when Google acquired AdMob for $750 million in 2009, the Federal Trade Commission put the deal on hold while conducting antitrust investigations on the acquisition. It was eventually cleared after Apple acquired the Quattro Wireless mobile ad network and launched its iAd platform. Unlike iAd, which can be used in iOS apps only, AdMob can be used on iOS, Android, and WP7. Figure 6-4 shows an example of an AdMob banner ad in a CNet news app.
FIGURE 6-4: AdMob banner ad in a CNet news app

Once registered at www.admob.com, developers can log in and submit information about the app in order to obtain the AdMob SDK. To place AdMob ads into the app, follow the instructions in the SDK to add the AdMob library into the project and use the appropriate SDK classes to request ads from the AdMob network.
Adding Ads to WP7 Apps
The official way of adding ads to a WP7 app is by using the Microsoft AdCenter AdControl provided by the Microsoft Advertising SDK for Windows Phone (http://msdn.microsoft.com/en-us/library/ff973722(v=msads.10).aspx). Download and install the SDK before adding ads to your WP7 applications. There are custom Silverlight AdMob controls (such as MoAds: https://bitbucket.org/jacob4u2/moads/wiki/Home) created by third parties, but it’s unclear whether Microsoft will approve those ads for Microsoft MarketPlace certification.
Microsoft AdCenter is yet another mobile advertising solution which actually combines both Microsoft and Yahoo’s ad inventory. Its support for WP7 application development is still preliminary as it does not offer interstitial ads at the time of writing — only banner ads are provided. Some unique features of the Microsoft AdCenter provider are listed below:
- Ad revenues are split 30-70 between Microsoft and publishers (developers), with publishers taking the 70 percent. Note that iAd and AdMob pay 60 percent to publishers.
- Ads in a WP7 application are paid for by the number of impressions instead of the number of clicks.
- Microsoft AdCenter boasts an “Ad Exchange” technology that is capable of choosing the most relevant and valuable ads among multiple ad networks (including Millennial Media, Where, InMobi, and MobClix). When an ad request with specific target information from a WP7 app is sent to AdCenter, several ad networks will bid, in real time, for the opportunity to show their ad for this request, and the highest bid will win.
The first step in using Microsoft AdCenter is to register at Microsoft PubCenter: https://pubcenter.microsoft.com. You need to obtain two piece of information before adding ads to your app:
- Application ID: Microsoft will assign a unique application ID to each app you want to use with AdCenter ads. The test app ID is test_client.
- Ad Unit ID: The ad unit ID is associated with the PubCenter account. At the time of writing, only banner ads are supported, which will result in either a click-to-web action or a click-to-call action. The test ad unit IDs are TestAd, Image480_80, and Image300_50.
Once you register your application at the PubCenter website, you need to create some ad units with the specified categories and unit format at the PubCenter website. The ad network will generate ad unit IDs and use the indicated categories to select ads for requests from the application.
In a WP7 Silverlight project, first add a reference to Microsoft.Advertising.Mobile.dll that should be in the directory of the Microsoft Advertising SDK for Windows Phone. On the application page where you want to add the AdCenter ad, you can either create an AdControl instance in the code or simply drag and drop the AdControl onto the page. AdControl’s application ID and ad unit ID must be specified in both cases.
ADD ADCONTROL TO IDE TOOLBOX
To add AdControl to the toolbox of the Visual Studio IDE, right-click on the Toolbox and select Choose Items. When promoted, select AdContro from the Windows Phone Components list.
The following code shows an example of generating an AdControl programmatically in the application. This code is excerpted from the AdControlDemo sample project. To try this code, replace the application ID parameter of the AdControl constructor with the one you received when you registered your application at PubCenter.
using Microsoft.Advertising.Mobile.UI; //AdControl class
...
AdControl adControl = new AdControl(
    "731820c8-xxxx-xxxx-xxxx-xxxxxxxxxxxx", //ApplicationID
    "26033", //ad unit ID registered at Pubcenter
    AdModel.Contextual, //Contextual is the only supported model
    true); //Enable auto refreshing of ads every 60s by default

adControl.AdSelectionKeywords = "iPad";

adControl.Width = 480;
adControl.Height = 80;
adControl.VerticalAlignment = VerticalAlignment.Bottom;

Grid grid = (Grid)this.LayoutRoot.Children[1];
grid.Children.Add(adControl);
Code snippet AdControlDemoAdControlDemoMainPage.xaml.cs
Alternatively, you can simply place an AdControl control onto your XAML page, and the IDE automatically adds the following code to MainPage.xaml. Note that it uses a different Ad Unit Id from the one that was created in the application code.
<!--ContentPanel - place additional content here-->
        <Grid x:Name="ContentPanel" Grid.Row="1" Margin="12,0,12,0">
            <my:AdControl
               Name="adControl1"
               Height="116"
               Width="480"
               HorizontalAlignment="Left"
               VerticalAlignment="Top"
               Margin="-16,43,0,0"
               ApplicationId="731820c8-xxxx-xxxx-xxxx-xxxxxxxxxxx"
               AdUnitId="26031"/>
        </Grid>
Code snippet AdControlDemoAdControlDemoMainPage.xaml
Figure 6-5 shows the output from this application, which includes two ad units.
FIGURE 6-5: Adding ads to an application

The Microsoft PubCenter for Mobile online community (http://community.microsoftadvertising.com/forums/32.aspx) may provide some useful information on AdControl problems.
Consuming web services: Building web service clients on WP7 involves leveraging Silverlight .NET framework classes such as WebClient and HttpWebRequest that are included in Silverlight. JSON data serialization can be done using DataContractJsonSerializer, whereas XML data parsing can be done using LINQ. The sample project SocialDemo included in this chapter provides examples of these use cases.
In terms of supporting HTTP web methods, iOS, Android, and WP7 all provide APIs that can be used to implement frequently used web call scenarios. However, WP7 is unique in that its asynchronous communication pattern is easier to grasp and implement than that of Android and iOS. In addition, The Extensible Application Markup Language (XAML) data binding is also handy for UI update. On the other hand, a big limitation of WP7 compared to Android and iOS is that it does not provide APIs for network socket communication, which is in many cases the only way to build more sophisticated network applications.
Push notifications: A push notification service is essential to major mobile application frameworks because it creates the always-connected experience for the user. Battery life concerns for mobile devices have driven Apple, Google, and Microsoft to offer a dedicated push notification infrastructure, together with on-device components that facilitate push notification development. Developers have access to the Apple Push Notification service, the Google Cloud to Device Messaging, and the MPNS. Among the three, Microsoft’s design is the most flexible in terms of the notification types it provides. Moreover, the push communication modeling using channels makes it easier to set up notification receivers in an application. In summary, here is a list of observations that might be useful to developers who want to consider WP7 push notifications in their applications:
- Consider using tile notifications for applications that are registered for push notification. Tile is a unique feature on WP7 (not seen on iOS and Android yet), and push notification will make it live.
- Remember that push notification delivery isn’t guaranteed across the three platforms, meaning that the notifications may get lost. It may be necessary to build an acknowledgment mechanism between the application and the application server for critical notifications.
Mobile advertising: As demonstrated in this chapter, adding ads from major ads providers, such as iAd, AdMob, and AdCenter, is fairly straightforward. AdMob seems to have a larger mobile ad inventory and is supported on iOS, Android, and likely WP7 using a custom Silverlight control. In addition, AdMob supports user-generated in-house ads with which developers can cross-promote their other apps by pointing to web URLs or app store URLs. Microsoft AdCenter for WP7 is still in its infancy with very limited ad types.
One of the issues you might wonder about is how you can leverage multiple providers in a single application. On Android, Google provides a solution called AdWhirl (http://www.adwhirl.com) that can retrieve ads from multiple ad networks, including AdMob, Google AdSense for Mobile Applications (AFMA), Millennial Media, Quattro, and ZestADZ. Microsoft AdCenter for WP7 provides similar capability with multiple built-in ads networks.
You might also wonder how to maximize your revenue. The rule of thumb is to choose and display ads that are most relevant to your application’s target audience. For this the Microsoft AdCenter solution has built-in properties such as country, gender, location, postal code, and income range as demographic targeting parameters for the AdControl object. AdMob’s AdView offers the keywords attribute in order to filter ads. Be sure to leverage the ad provider’s online analytics tool to track the ad’s display performance, and adjust the ad’s filtering settings accordingly.
As more and more mobile applications embrace social capabilities over the Web, location-based services and applications have become popular. The next chapter will discuss creating WP7 applications that use location data and Bing maps.