
Chapter 8
Graphics
WHAT’S IN THIS CHAPTER?
- Defining basic 2D and 3D graphics terms
- Understanding when to use XNA
- Using the XNA game loop
- Drawing 2D and 3D graphics with XNA
Developers have greatly improved the user experience on mobile devices by leveraging high-performance graphics and animations. And not surprisingly, many best-selling mobile applications have also relied on great graphics. It’s important for developers to understand how to draw graphics in the Windows Phone 7 (WP7) platform.
Graphics is an area that even many seasoned software developers are unfamiliar with. That’s why this chapter begins with a basic glossary of graphics terms. However, if you’ve already created graphics on the iOS or Android platform, you can certainly skip the “Graphics Fundamentals” section. Next, you’ll learn how graphics are handled in WP7 at a conceptual level, and how techniques differ when working with the iOS and Android.
The most important concept you’ll learn in this chapter is how to work with the graphics API in the XNA (New generation Architecture) framework. XNA is a set of programming tools that’s built on top of the .NET framework and provides both powerful graphics and a formidable gaming engine. Unlike Silverlight, XNA is not an event-driven framework. Instead, it utilizes the game loop concept. In this chapter, you’ll learn how to draw 2D or 3D graphics using XNA and how to implement animations and enable special effects in WP7.
RUNNING XNA GRAPHICS ON WP7 EMULATOR
To run XNA graphics on the WP7 emulator, the graphics card of your computer needs to support Direct X version 10 or above and the Driver mode needs to be WDDM 1.1 or above. Otherwise, you will still be able to compile the code, but when you debug your program in the emulator you will get the following error message: “The current display adapter does not meet the emulator requirements to run XNA Framework applications.”
Note that all the sample code in this chapter will NOT run on an emulator that does not meet the driver requirements. However, you will be able to run the sample applications on a physical Windows Phone 7 device.
To find out the display adapter driver of a Windows computer, you can use the DirectX Caps Viewer tool (http://msdn.microsoft.com/en-us/library/ee417852(VS.85).aspx). Or use the DxDiag command and then choose the Display tab. If the driver of your computer does not meet the requirements, a possible work-around is to update the display driver. For example, you can go to the Microsoft Download Center (http://www.microsoft.com/downloads/en/default.aspx) and type “DirectX End-User Runtime Web Installer” in the search box and then choose the right installer for your computer.
In this section, you’ll learn about the basics of drawing graphics on mobile platforms. The discussion includes everything from graphics-related terms to the fundamental techniques used to manipulate 2D and 3D graphics. This section also prepares you to use the APIs in the XNA framework to display graphics on WP7.
Basic 2D and 3D Graphics Glossary
Let’s begin by studying a little of the jargon used with computer graphics. The most basic display element of a computer monitor or a smartphone screen is the pixel, which is the smallest unit in the digital imaging world. Each pixel is used to present a tiny portion of an image. In color image systems, each pixel is typically represented by three basic color elements: Red (R), Green (G) and Blue (B). The total number of bits used to represent the information of a color is called color depth. For example, if 8 bits are used to present R, G, and B, respectively, then the color depth is 24 bits. And the total number of colors it can represent is 224, which is about 16 million colors. On current WP7 devices, the screen size is 480 pixels × 800 pixels, but there are plans to support screens with fewer pixels (480 × 320) in the future.
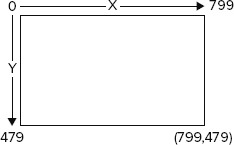
In the 2D graphics world, images are rendered using screen coordinates to define pixel position. Figure 8-1 shows the 2D coordinate system of a WP7 screen in landscape mode. The x axis represents the width. The numbers start from 0 at the left corner and stop at 799 at the right corner. The y axis represents the height, with 0 as the top and 479 as the bottom. In such 2D coordinate systems, the top left pixel is represented by (0,0) and bottom right pixel is represented by (799,479).
FIGURE 8-1: 2D coordinates on Landscape mode WP7
The term sprite refers to a kind of 2D image that you render on the screen. It differs from pictures that you display on the screen, even though you can use a single sprite to render the entire screen. (Rendering is the process of drawing an image on the screen in a way that emulates a 3D environment or provides a realistic presentation.) For example, if a simple gaming application is composed of 20 small pictures (or scenes), you can construct 20 sprites to represent those pictures in your program. Each sprite represents one of those 20 small pictures. In a different scenario, you can build a very large sprite, but display only a portion of it on the screen at any given time. This is actually a popular technique used to generate 2D animations.
The concept of 3D graphics discussed in this chapter refers to a 2D picture that also shows the depth of an image using shadows and variations in color and shade to make it appear as a real object in the real world. It is not the type of 3D that you’ve experienced when watching a movie such as Avatar with a pair of giant goggles. To better understand 3D techniques in the digital imaging world, it is necessary to introduce the 3D coordinate system (Figure 8-2).
FIGURE 8-2: Right-handed 3D coordinates system

Figure 8-2 illustrates the right-handed three-dimensional coordinate system. The value of x increases from left to right; the value of y increases from bottom to right; and negative z values refer to the forward direction. Thus the position of a point in a 3D coordinate system can be determined by the values of its 3D coordinates (x, y, and z).
In mathematical terms, a vector is a group of values. A set of 3D coordinates is a vector of 3 that identifies the position of a point in 3D space. You can also use vectors to specify the magnitude and direction of object movement. People can then use various vector calculations, such as addition, subtraction, and multiplication, to describe the movement of a point object. To facilitate calculation, a homogeneous component called the w property is also introduced in 3D graphics.
An object may move or rotate in a 3D space. To calculate the new coordinates of an object, computer graphics rely on a matrix. A typical 4 × 4 matrix (16 float values) is defined as follows to assist in computing any 3D transformation:
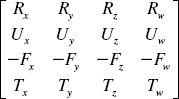
The first row represents the right vector of the coordinate space, the second row represents the up vector of the coordinate space, the third row represents the backward direction of the coordinate space, and the last row represents the translation vector. For example, the following matrix describes an object that rotates Θ degrees (in radians) on the X axis:

You might get intimidated by all the equations behind 3D graphics. However, the good news for developers is that APIs provide all the different transformation matrices. As a result, you don’t have to memorize different equations and specify all 16 float values used in a transformation matrix in your program. The more important consideration is how to use the built-in methods to manipulate a 3D object shown on the screen.
To be able to use the 3D libraries in the WP7 developer tools and the developer tools for iOS and Android OS, you need to understand the process of projecting a moving 3D object on a 2D screen. A typical process involves three fundamental concepts:
- World space: The world space defines the geometry of an object using 3D coordinates. When an object moves, rotates, or scales in 3D space, you can use the transformation matrix described earlier to compute the geometry of the new location.
- View: In a 3D space, an object may appear differently depending on where the viewer is located. For example, when you look at your car from the side, it looks different than when you look at it from the front. In 3D graphics, the term camera is borrowed from the real world as the viewer. To correctly render 3D graphics, you need to specify the location of the camera.
- Projection: As the name implies, the projection process simply projects a 3D scene onto a 2D space. This is also the last step of 3D rendering in your program.
You can understand this process better by using a photographer analogy. Let’s say you want to take a picture of your WP7 phone. The first thing you need to do is to put your phone in a place with good lighting conditions. The 3D location and physical layout of your phone can be described in world space. You can describe the act of moving the phone, such as rotating it, by calculating the movement using the transformation matrix in the world space. Next you need to set up your camera. You need to ask yourself questions such as, “Do you need a side view, a front view or a top view? Do you need a close-up of a button or a simple portrait?” By positioning the camera differently, you can get the picture you want. Adjusting the camera location defines the process of specifying the view location. The last action is pressing the shutter, which is equivalent to projecting a 3D object onto a 2D space. And the final picture you get from your camera is the 2D graphics rendered on the screen.
Now you know the basics of 2D graphics and 3D graphics, let’s take a quick overview of how WP7, iOS and Android handle 2D and 3D graphics in application development.
Drawing Graphics on Smartphones
When working with WP7, both the Silverlight framework and the XNA framework support drawing graphics. The focus of this chapter is drawing graphics using the XNA framework because XNA utilizes the Microsoft low-level graphic engine DirectX and is better suited to rapidly creating 2D and 3D graphics with animations.
The Silverlight framework uses the Extensible Application Markup Language (XAML) to create graphics. With just a few lines of code, you can easily create different lines or shapes. The following example uses the System.Windows.Shapes.Ellipse class to create a 100-pixel by 100-pixel circle with 2 pixels of black outline and is filled with blue color on the screen (light gray in this illustration):
<Ellipse Fill="Blue"
   Height="100"
   Width="100"
   StrokeThickness="2"
   Stroke="Black"
/>
The result of the image is illustrated in Figure 8-3.
FIGURE 8-3: Create a circle with Silverlight

Although the Silverlight framework offers a rich collection of basic shapes and lines and allows you to draw and animate 2D graphics with ease, it doesn’t provide full 3D graphics support. The 3D transformation applies only to Silverlight elements, which are currently 2D elements. So if your application needs to animate a 3D model, such as the human body, you’ll need to use the XNA framework to fully unleash the graphics power and perform 3D transformation on 3D objects. The “When Do You Use XNA?” section of this chapter provides more details about the differences between the two frameworks and helps you decide what framework to use to better fit the needs of your application.
To work with 2D and 3D graphics in XNA, there are basically two approaches. One option is to build the application graphics using XNA primitives. The other option is to rely on a third-party application to generate 2D pictures or 3D models, and then add them in your program as references. The second approach is better because drawing a graphic or building a 3D model with XNA is not a straightforward process — you don’t get to see the results until you compile and execute the application. In addition, if you want to create the same mobile applications on WP7, iOS, and Android platforms, you’ll have to spend a significant amount of time rewriting the code used to re-generate the 2D picture or 3D model on different platforms. You’ll learn how to work with 2D and 3D graphics with XNA in the “Drawing Graphics with XNA” section of this chapter.
You also have several choices when rendering graphics on the iOS platform. When working with 2D graphics you can use a slightly different markup language called Extensible Hypertext Markup Language (XHTML). Together with JavaScript, XHTML allows a developer to handle basic shapes, videos, and animations with ease. You can also use the iOS SDK to render graphics in your iOS application. The Cocoa layer uses the Objective-C language to manipulate high-level GUI objects such as UIImage, UIColor, and UIFont. And the Quartz Core Graphics layer uses the C language to draw basic vector graphics, such as lines and shading.
When creating high-performance 3D graphics, the iOS resorts to using Open Graphics Library for Embedded Systems (OpenGL ES). OpenGL offers a collection of cross-language and cross-platform APIs that applications can use to produce high-performance 2D and 3D graphics. OpenGL ES is a lightweight version of OpenGL developed for embedded systems such as smartphones. Two widely used OpenGL ES versions are 1.X and 2.X. OpenGL ES 2.X introduces a new shading language and offers more controls for developers. The benefit of using OpenGL ES 2.X is that it can minimize the cost and the power consumption of graphics subsystems. But it isn’t backward compatible with OpenGL ES 1.X and using this functionality also requires that the developer write more code to achieve the same functionality that OpenGL ES 1.X provides (see http://www.khronos.org/opengles/2_X/ for details). Devices such as the iPhone 3GS and 4G support openGL ES 2.0, but devices such as the first generation iPod touch, iPhone, and iPhone 3G support only OpenGL ES 1.1. Developers will need to determine which version of the OpenGL ES APIs to use in their programs, based on platform requirements.
Similarly the Android platform provides several techniques to render graphics. For basic shapes and images, you can use a custom 2D graphics library. The android.graphics.drawable and android.view.animation packages provide you sufficient functions to manipulate 2D graphics. For example, the following code snippets show how to draw a circle with a radius of 100 pixels centered at (200,300) and filled with blue color:
Paint paint = new Paint();
paint.setColor (Color.BLUE);
paint.setStyle (Paint.Style.FILL);
canvas.drawCircle (200,300,100,paint);
To support high-performance graphics, Android also relies on APIs from OpenGL ES. At a very high level, the following steps show how to use the OpenGL ES APIs in Android applications (see http://developer.android.com/guide/topics/graphics/opengl.html for additional details):
1. Set up a custom view, such as a GLSurfaceView.
2. Obtain a handle to an OpenGLContext.
3. In your view’s onDraw() method, get a handle to a GL object, and use its methods to perform GL operations.
As of this writing, Android only fully supported OpenGL version 1.0. So features that appear in version 1.1, such as a vertex buffer, aren’t supported on all Android devices. For developers who want their applications to reach more Android users, you’d better stick to OpenGL ES 1.0 for now.
In summary, all three platforms offer two major techniques to render graphics. One is for simple 2D shapes and animations, such as Silverlight XAML and XHTML. The other is for high-performance graphics, such as OpenGL ES and DirectX.
There are a lot of debates among developers as to which 3D APIs are better, OpenGL or DirectX. The major benefits of OpenGL are obvious: it’s royalty-free, it’s cross-platform, and it arguably supports more features. When developing high-performance graphics applications on WP7, your only viable option is DirectX with XNA. And the good news is that DirectX is a lot easier to learn and to use in your WP7 program.
You’ve learned the basics of handling graphics on smartphones. It’s time to work through a few examples to understand how to render 2D and 3D graphics on WP7. But before jumping into the code, you need to make a decision about using the Silverlight framework or the XNA framework.
When Do You Use XNA?
When you create a WP7 application using Visual Studio 2010, you need to choose between the Silverlight Framework and the XNA framework. And no, you can’t use both frameworks in a single application, even though you can use a number of Silverlight APIs in your XNA applications and vice versa.
As stated earlier in this chapter, Silverlight is perfect for creating 2D shapes and animations. But this fact doesn’t mean you should always use Silverlight if your application only needs 2D graphics. As a matter of fact, many 2D games use the XNA framework because the XNA framework graphics engine provides a 3D graphics pipeline. It leverages the graphic card’s hardware acceleration, particularly the GPU (Graphic Processing Units), to render both 2D graphics and 3D graphics on screen. So if there are a lot of 2D animations in your applications, using Silverlight will overwhelm the WP7 CPU with graphics calculations and slow your application down.
Table 8-1 is a good guideline provided by Microsoft to help you decide which framework to choose in your application (see http://msdn.microsoft.com/library/ff402528.aspx for details).
TABLE 8-1: Silverlight or XNA
| USE SILVERLIGHT | USE XNA |
| For an event-driven application. | For a high performance game framework. |
| To rapidly create Rich Internet Application-style user interface. | To rapidly create multi-screen 2D and 3D games. |
| To use Windows Phone controls. | To manage models, meshes, sprites, textures, and effects in the XNA Content Pipeline. |
| To embed video content inside your application. | |
| To use a web browser control. |
If you decide to use the Silverlight framework, you can still call many XNA framework APIs except those in the Microsoft.Xna.Framework.Game class and the Microsoft.Xna.Framework.Graphics namespace.
If, on the other hand, you pick the XNA framework, you can also use many classes in the Silverlight framework except many (but not all) classes in the System.Windows namespace.
Game Loop
Enough said about graphics and XNA; let’s start a WP7 application and learn the game loop concept in the XNA framework. Use the following steps to create the solution:
1. Start Microsoft Visual Studio Express 2010 for Windows Phones. Windows displays the Visual Studio Express 2010 IDE.
2. Choose File ⇒ New Project. You’ll see the New Project dialog box shown in Figure 8-4.
FIGURE 8-4: Creating a new XNA Project

3. Choose the Visual C#/XNA Game Studio 4.0 folder from the left panel. You can see a list of templates in the middle pane.
4. Highlight the Windows Phone Game (4.0) template. You’ll see a description of this template in the right pane of the New Project dialog box.
5. Type rolling2D in the Solution Name field and the Name field. Click OK. Visual Studio creates a blank application for you.
Double-click the Game1.cs file in Solution Explorer. The IDE opens the Game1.cs file for editing. You’ll notice XNA has already generated some lines of code for you. Listing 8-1 shows the code used to create the rolling2D namespace.
LISTING 8-1: Code Automatically Generated XNA Code, Game1.cs
public class Game1 : Microsoft.Xna.Framework.Game
{
    GraphicsDeviceManager graphics;
    SpriteBatch spriteBatch;

    public Game1()
    {
        graphics = new GraphicsDeviceManager(this);
        Content.RootDirectory = "Content";

        // Frame rate is 30 fps by default for Windows Phone.
        TargetElapsedTime = TimeSpan.FromTicks(333333);
    }

...

    protected override void Initialize()
    {
        // TODO: Add your initialization logic here
        base.Initialize();
    }

    ...
    protected override void LoadContent()
    {
        // Create a new SpriteBatch, which can be used to draw textures.
        spriteBatch = new SpriteBatch(GraphicsDevice);

        // TODO: use this.Content to load your game content here
    }

...

    protected override void UnloadContent()
    {
        // TODO: Unload any non ContentManager content here
    }

...

    protected override void Update(GameTime gameTime)
    {
        // Allows the game to exit
        if (GamePad.GetState(PlayerIndex.One).Buttons.Back ==
            ButtonState.Pressed)
        this.Exit();

        // TODO: Add your update logic here

        base.Update(gameTime);
    }

...

    protected override void Draw(GameTime gameTime)
    {
        GraphicsDevice.Clear(Color.CornflowerBlue);

        // TODO: Add your drawing code here

        base.Draw(gameTime);
    }
}
The layout of an XNA application looks very different from a Silverlight application. The automatically generated code contains the constructor for your Game1 class and five methods: Initialize(), LoadContent(), UnloadContent(), Update(), and Draw(). There are no UI controls, no event-driven methods, and no main function. In fact, an XNA application is simply a loop, termed a game loop, that repeats itself until the application meets certain exit criteria.
The XNA Framework supports two types of game loops: a fixed time-step loop and variable time-step loop. In the fixed time-step mode, each loop always consumes the same amount of time. The default loop time on a WP7 system is one thirtieth of a second, or 30 loops per second, which is fast enough to vividly produce action-oriented video games. If a loop has performed all the requested actions, and it isn’t time for the next loop, the system simply stays idle until the time expires for the current loop.
In the variable time-step mode, WP7 systems simply execute all the actions in your program. When it reaches the end of the loop, it starts from scratch without checking game time. By default, WP7 uses a fixed time-step game loop. If you want to write an XNA application in the variable time-step mode, you need to set the IsFixedTimeStep property of the game class to false. Benchmarking software is a good example that uses the variable time-step game loop.
A majority of the XNA applications are written using the fixed time-step game loop. This is also the focus of this chapter. Figure 8-5 illustrates how a fixed time-step game loop is processed in XNA.
FIGURE 8-5: Fixed time-step game loop in XNA
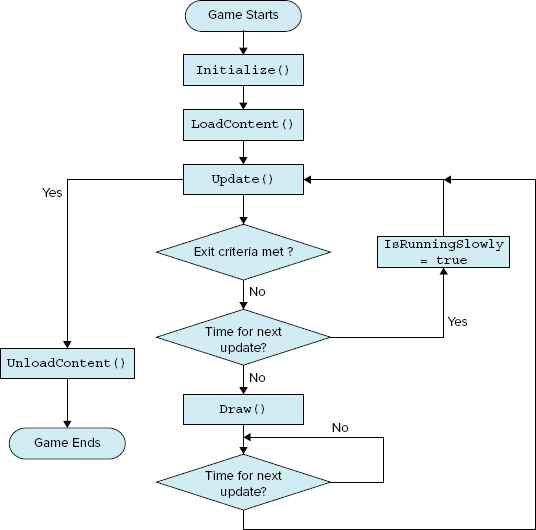
An XNA application starts with an Initialize() method call that occurs just once during application execution. For many applications, you don’t have to add any code to the default Initialize() method. The application then executes the LoadContent() method (called once during application execution). In this method, you typically need to load resources into your application, such as 2D pictures, or 3D models.
At this point, the application enters the game loop by executing the Update() method, which is where you implement your game logic. The program checks to determine whether it meets the exit criteria in the Update() method. The default behavior occurs when the user clicks the Back button, and the program executes the UnloadContent() method and terminates itself.
After the Update() method executes, the program checks to determine whether it’s time for the next update. If there is still time available for the current game loop, the application executes the Draw() method, in which the application updates the screens if necessary.
Another check on the time for the next game loop occurs at this point. If it isn’t time for the next game loop, the application stays idle until the time arrives. Otherwise, the application starts the loop again by running the Update() method. If for any reason, the Update() method takes more than a loop time to run, the application skips the Draw() method and the loop restarts by calling the Update() method again. In addition, the application sets the IsRunningSlowly property to true. If you’re concerned that your XNA application may not be able to run as fast as it should on a slower WP7 phone, you’ll need to check the status of IsRunningSlowly property in your Update() method.
Textures and Sprites
In the game loop subsection, you created an empty XNA project called “rolling2D” and have learned how the game loop works. You will now add code to this project and understand how to manipulate 2D graphics in the XNA framework.
In the Visual Studio 2010 IDE, open the Solution Explorer window. You’ll see two projects, as shown in Figure 8-6. One is rolling2D and the other is rolling2DContent(Content). Right-click the rolling2DContent(content) entry and when a context menu appears, choose Add ⇒ Existing Item. In the Add Existing Item window, select square60 and click Add.
FIGURE 8-6: Adding resources to an XNA Project

After you add the picture to the content, you’ll notice the IDE has added the square60.png file to the rolling2DContent(Content) project, and the Asset Name property value is simply square60, as shown in Figure 8-7.
FIGURE 8-7: Asset Name of newly added picture

Now it’s time to edit the Game1.cs file as shown in Listing 8-2.
LISTING 8-2: WP7 2D graphics demo, rolling2D
olling2DGame1.cs
using System;
using System.Collections.Generic;
using System.Linq;
using Microsoft.Xna.Framework;
using Microsoft.Xna.Framework.Audio;
using Microsoft.Xna.Framework.Content;
using Microsoft.Xna.Framework.GamerServices;
using Microsoft.Xna.Framework.Graphics;
using Microsoft.Xna.Framework.Input;
using Microsoft.Xna.Framework.Input.Touch;
using Microsoft.Xna.Framework.Media;

namespace rolling2D
{

    public class Game1 : Microsoft.Xna.Framework.Game
    {
        GraphicsDeviceManager graphics;
        SpriteBatch spriteBatch;

        public Game1()
        {
            graphics = new GraphicsDeviceManager(this);

            //Make the graphic occupy the entire screen
            graphics.PreferredBackBufferHeight = 480;
            graphics.PreferredBackBufferWidth = 800;

            //Enable only Landscape Mode
            graphics.SupportedOrientations = DisplayOrientation.LandscapeLeft;
            Content.RootDirectory = "Content";
            TargetElapsedTime = TimeSpan.FromTicks(333333);
        }

        protected override void Initialize()
        {
            base.Initialize();
        }

        Texture2D rollingPic;
        Vector2 position = new Vector2(20, 100);
        Random rnd = new Random();

        protected override void LoadContent()
        {
            // Create a new SpriteBatch, which can be used to draw textures.
            spriteBatch = new SpriteBatch(GraphicsDevice);

            // TODO: use this.Content to load your game content here
            rollingPic = this.Content.Load<Texture2D>("square60");
        }

        protected override void UnloadContent()
        {
            // TODO: Unload any non ContentManager content here
        }

        protected override void Update(GameTime gameTime)
        {
            // Allows the game to exit
            if (GamePad.GetState(PlayerIndex.One).Buttons.Back
                ==  ButtonState.Pressed)
                this.Exit();

            //Increase X value by 3 in each iteration
            position.X += 3;
            if (position.X >= 800)
            {
                position.X = 0;
                //set the new Y value to a random number
                position.Y = rnd.Next(1, 420);
            }

            base.Update(gameTime);
        }

        protected override void Draw(GameTime gameTime)
        {
            GraphicsDevice.Clear(Color.CornflowerBlue);

            // TODO: Add your drawing code here
            this.spriteBatch.Begin();

            this.spriteBatch.Draw(this.rollingPic,
                new Rectangle((int) position.X,(int) position.Y,60,60),
                Color.White);

            this.spriteBatch.End();

            base.Draw(gameTime);
        }
    }
}
In the Game1() constructor, the PreferredBackBufferHeight property is set to 800 and the PreferredBackBufferWidth property is set to 480. This makes the graphic occupy the entire screen. The next property, SupportedOrientations, is set to DisplayOrientation.LandscapeLeft. This makes the application work in only one orientation: the display is rotated counterclockwise 90 degrees into a landscape mode. If more orientations are needed in your application, you can use the bitwise or operation to set the corresponding bit flags of supported orientations. For instance, to support both LandscapeLeft and LandscapeRight, you can use the following code snippet:
graphics.SupportedOrientations =
    DisplayOrientation.LandscapeLeft | DisplayOrientation.LandscapeRight;
Three objects are declared in the body of the Game1 class:
- rollingPic is a Texture2D object used to hold the 2D image that you want to render on the screen.
- position is a Vector2 object and has an initial value of (20,100). Vector2 is a class in the XNA framework that contains two values. It’s typically used to represent the x and y value on a 2D plane.
- rnd is a Random object that you use to generate a random y value.
The application uses the Content.Load() method to load the asset to rollingPic in the LoadContent() method.
In the update() method, the value of X is increased by 3 three times. When the value of X is greater than or equals to 800, the picture is outside the display area. At this point, the value of X is reset to 0, and the value of Y is set to a random number within the height of the screen.
In the draw() method, the program begins by setting the color of the background to CornflowerBlue by calling GraphicsDevice.Clear(Color.CornflowerBlue). It then uses the SpriteBatch class methods to draw the pictures on screen. SpriteBatch is the class in the XNA framework that can draw one or many sprites directly on the screen. The sequence is simple:
1. Call the SpriteBatch.Begin() method to start the drawing process.
2. Call the SpriteBatch.Draw() method to display content on screen.
3. Call the SpriteBatch.End() method to end the drawing process.
The SpriteBatch.Draw() method is a heavily overloaded method that can take seven different parameters. This program uses the most basic form: SpriteBatch.Draw(Texture2D, Rectangle, Color). This call adds a sprite to a batch of sprites for rendering using the specified texture, destination rectangle, and color. Note that the last parameter, Color, is not the color you use to paint a picture; instead it is a color to tint a picture. What it does is multiply the color value of the Texture2D object with the value of the Color parameter and render the new color on the screen. When Color.White is used in the program, the call retains the original color. If you build and run the application, you’ll see a square box moving from the top to the bottom (in portrait mode) of your WP7 screen. Figure 8-8 shows typical output from this example.
FIGURE 8-8: Rolling 2D square box in action

This simple example demonstrates the basics of rendering 2D graphics using the XNA framework. It’s a fairly straightforward process. You add the picture (or asset) to the project and read it to a Texture2D object. You then define how you’d like to treat the picture as time elapses. Finally, the code draws the picture in the timeline you define, using the SpriteBatchDraw() method.
Animation
The basic idea behind animation is to display multiple pictures in sequence during a short timeframe. This is similar to the process used to make motion pictures.
In the next example, you’ll see how to create animation using the XNA framework. To better illustrate the concept, I took six pictures of a toy in different positions. Then I resampled each picture to 480 pixels × 320 pixels and tiled the pictures together in a single .jpg file, as shown in Figure 8-9.
FIGURE 8-9: Six frames of a toy

This single picture, toyAnimation.jpg, contains the six frames needed to create the sample animation application. Use the following steps to create a new project:
1. Start Microsoft Visual Studio Express 2010 for Windows Phones. Windows displays the Visual Studio Express 2010 IDE.
2. Choose File ⇒ New Project. You’ll see the New Project dialog box.
3. Choose the Visual C#/XNA Game Studio4.0 folder from the left panel. You’ll see a list of templates in the middle pane.
4. Highlight the Windows Phone Game (4.0) template. You’ll see a description of this template in the right pane of the New Project dialog box.
5. Type ToyAnimation in the Solution Name field and the Name field. Click OK. Visual Studio creates a blank application for you.
6. Right-click the ToyAnimationContent (Content) project in Solution Explorer and choose Add ⇒ Existing Items from the context menu. You’ll see the Add Existing Item dialog box.
7. Choose toyAnimation and click Add. You’ll see the toyAnimation.jpg file added to the ToyAnimationContent (Content) project.
In Game1.cs, add a Texture2D object, and edit the LoadContent() and Draw() methods as shown in Listing 8-3.
LISTING 8-3: Displaying a portion of a sprite to get the animation effect, ToyAnimation ToyAnimationGame1.cs
GraphicsDeviceManager graphics;
SpriteBatch spriteBatch;

Texture2D texture;

...

protected override void LoadContent()
{
    // Create a new SpriteBatch, which can be used to draw textures.
    spriteBatch = new SpriteBatch(GraphicsDevice);

    // TODO: use this.Content to load your game content here
    texture = Content.Load<Texture2D>("toyAnimation");
}

protected override void Draw(GameTime gameTime)
{
    GraphicsDevice.Clear(Color.CornflowerBlue);

    // TODO: Add your drawing code here

    int num = (int)(gameTime.TotalGameTime.TotalMilliseconds/500) % 6;

    spriteBatch.Begin();

    spriteBatch.Draw(texture, new Vector2(180,80),
        new Rectangle(0, num * 320, 480, 320), Color.White);
    spriteBatch.End();

    base.Draw(gameTime);
}
The texture object is used to hold the 2D picture file, toyAnimation.jpg. You load the image by calling the Content.Load<>() method. In this case num is an integer that ranges from 0 to 5 and increases by one every half second. When it reaches 5, it returns to 0 during the next loop. The key part of the program that generates the animation effect is this line of code:
spriteBatch.Draw(texture, new Vector2(180,80),
        new Rectangle(0, num * 320, 480, 320), Color.White);
This call draws a picture on screen with the top left of its corner located at (180,180). The source picture (or sprite) is texture, but code doesn’t render the entire picture on screen. Instead, it only renders a rectangular area expressed by the coordinates (0, num * 320, 480, 320).
If you build the application and execute it, you’ll see that the wheel of the toy is rotating slowly.
3D Graphics
In this example, you learn how to manipulate 3D graphics using the XNA framework.
As stated earlier in this chapter, you should use third-party software to create a 3D model and then import this model into the XNA application. Otherwise, you’ll spend more time working with the graphics primitives the XNA Framework provides to create the image, and the 3D model you build is unlikely to export to other programs.
There are many 3D model formats. XNA supports the .x and .fbx format, which are owned and developed by Autodesk. There are also many 3D modeling applications that you can choose from. For example, Blender (http://www.blender.org/) is a free application you can use to create a model in .fbx format. In this example, I used Softimage Mod Tools (http://autodesk.com/softimage) and created something very similar to a Rubik’s cube but without any colors. The text rendering of the model is shown in Figure 8-10.
FIGURE 8-10: 3D model of a cube

Now follow the steps below to create a new project to render 3D graphics on your WP7 phones.
1. Start Microsoft Visual Studio Express 2010 for Windows Phones. Windows displays the Visual Studio Express 2010 IDE.
2. Choose File ⇒ New Project. You’ll see the New Project dialog box.
3. Choose the Visual C#/XNA Game Studio 4.0 folder from the left panel. You see a list of templates in the middle pane.
4. Highlight the Windows Phone Game (4.0) template. You’ll see a description of this template in the right pane of the New Project dialog box.
5. Type cube3D in the Solution Name field and the Name field. Click OK. Visual Studio creates a blank application for you.
6. Right-click the “cube3DContent(Content)” project in Solution Explorer and choose Add ⇒ Existing Items from the context menu. You’ll see the Add Existing Item dialog box.
7. Choose cube1.fbx (which you can download from the Wrox.com site for this chapter) and click Add. You’ll see the cube1.fbx file added to the Cube3DContent(Content) project.
In Game1.cs, add the variables and edit LoadContent(), Update(), and Draw() methods as shown in Listing 8-4.
LISTING 8-4: XNA 3D graphics demo, cube3Dcube3DGame1.cs
public class Game1 : Microsoft.Xna.Framework.Game
{
    GraphicsDeviceManager graphics;
    SpriteBatch spriteBatch;

    Model cube3d;

    float aspectratio;
    float rotation = 0.0f;
    Vector3 cubepostion = new Vector3(0, 2, 5);
    Vector3 cameraposition = new Vector3(0.0f, 15.0f, 30.0f);

...

    protected override void LoadContent()
    {
        // Create a new SpriteBatch, which can be used to draw textures.
        spriteBatch = new SpriteBatch(GraphicsDevice);

        // TODO: use this.Content to load your game content here
        cube3d = Content.Load<Model>("cube1");
        aspectratio = graphics.GraphicsDevice.Viewport.AspectRatio;
    }
    ...

    protected override void Update(GameTime gameTime)
    {
        // Allows the game to exit
        if (GamePad.GetState(PlayerIndex.One).Buttons.Back
            == ButtonState.Pressed)
            this.Exit();

        // TODO: Add your update logic here
        rotation += (float)gameTime.ElapsedGameTime.TotalMilliseconds *
            MathHelper.ToRadians(0.05f);

        base.Update(gameTime);
    }

    protected override void Draw(GameTime gameTime)

    {
        GraphicsDevice.Clear(Color.CornflowerBlue);

        // TODO: Add your drawing code here
        Matrix[] trans = new Matrix[cube3d.Bones.Count];
        cube3d.CopyBoneTransformsTo(trans);

        foreach (ModelMesh mmesh in cube3d.Meshes)
        {
            foreach (BasicEffect ef in mmesh.Effects)
            {
                ef.LightingEnabled = true;

                ef.DirectionalLight0.Enabled = true;
                ef.DirectionalLight0.DiffuseColor = Color.Violet.ToVector3();

                ef.World = trans[mmesh.ParentBone.Index]*
                    Matrix.CreateScale(1.0f) *
                    Matrix.CreateRotationX(rotation) *
                    Matrix.CreateRotationY(rotation*0.3f)*
                    Matrix.CreateRotationZ(rotation*0.7f) *
                    Matrix.CreateTranslation(cubepostion);

                ef.View = Matrix.CreateLookAt
                    (cameraposition, Vector3.Zero, Vector3.Up);

                ef.Projection = Matrix.CreatePerspectiveFieldOfView
                    (MathHelper.ToRadians(45.0f), aspectratio, 1.0f, 200.0f);
            }
            mmesh.Draw();

        }

        base.Draw(gameTime);
    }
}
Two float values, aspectratio and rotation, describe the aspect ratio of the display and how many degrees in radians you want the model to rotate after each animation frame. The code instantiates two Vector3 objects to define the positions of the cube and the camera. A Model object, cube3d, is declared in the body of Game1 class. It is later used in the LoadContent() method to read the 3D model from cube1.fbx. The update() method doesn’t do much other than update the rotational value in degrees. The equation implies the rotation speed is about 50 degrees every second.
In XNA, a 3D model consists of multiple parts called ModelMesh. For example, a 3D model of a four-door passenger car will have a ModelMesh for the body of the vehicle, four ModelMesh instances of wheels, and four ModelMesh instances of doors. The ModelBone class in XNA describes how the ModelMesh objects are positioned. Each ModelMesh has a ParentBone property, which contains the transform matrix of this ModelMesh to its parents. To render a 3D model in the XNA framework, you will need to call the Draw() method of each ModelMesh.
The key functions of this application are all in the Draw() method. First, the code creates an array of matrices based on the number of bones (a collection of ModelBone) in the 3D model. Next, the code calls the cube3d.CopyBoneTransformsTo(trans) method to store the transformation information to the trans matrices. Finally, the program iterates every ModelMesh of cube3d.
At this point, you may want to place a spotlight on the rotating cube. The following three lines show how to project a violet directional light onto the cube.
ef.LightingEnabled = true;
ef.DirectionalLight0.Enabled = true;
ef.DirectionalLight0.DiffuseColor = Color.Violet.ToVector3();
code snippet cube3Dcube3DGame1.cs
The task of rotating the cube comes next. The following code shows how to define the rotation action and then perform the actual rotation:
ef.World = trans[mmesh.ParentBone.Index]*
    Matrix.CreateScale(1.0f) *
    Matrix.CreateRotationX(rotation) *
    Matrix.CreateRotationY(rotation*0.3f)*
    Matrix.CreateRotationZ(rotation*0.7f) *
    Matrix.CreateTranslation(cubepostion);
Code snippet cube3Dcube3DGame1.cs
Note that ef.world uses transformation matrix to calculate the new 3D coordinates of the transformation. Matrix.CreateScale(1.0f) keeps the size of the model unchanged. Matrix.CreateRotationX() rotates the model on the x axis. Matrix.CreateRotationY() rotates the model on the y axis. And Matrix.CreateRotationZ() rotates the model on the z axis. Matrix.CreateTranslation() moves the model to the specified location (3D coordinates).
In order to display the graphic on screen, you must define a camera location and then tell the application to render the 3D object onto a 2D projection. The following code shows how to perform this task:
ef.View = Matrix.CreateLookAt
    (cameraposition, Vector3.Zero, Vector3.Up);

ef.Projection = Matrix.CreatePerspectiveFieldOfView
    (MathHelper.ToRadians(45.0f), aspectratio, 1.0f, 200.0f);
Code snippet cube3DGame1.cs
The Matrix.CreateLookAt() method defines the location of the camera, and the Matrix.CreatePerspectiveFieldOfView() method finally renders the 2D projection of the 3D model.
If you build and run this project, you’ll see a violet cube rotating on all three axes. A sample screenshot is shown in Figure 8-11.
FIGURE 8-11: 3D model of a cube

This chapter explains the basics of rendering 2D and 3D graphics on WP7. Even though the math behind the 3D graphics pipeline is complex, using the APIs is not that difficult. You’ve discovered how to create an XNA application and how the XNA game loop works. You’ve also learned how to render a 2D image on WP7, and how to make it animate. The last example of this chapter also demonstrates the power of 3D graphics and how easy it is to manipulate 3D graphics using the XNA Framework.
You’re probably amazed by how simple it is to render complex graphics using the XNA Framework. Don’t forget that you can easily create a copy of your XNA program for either the Windows platform or the Xbox360 platform. If you need to build a high-performance graphics application from scratch, WP7 has a clear advantage because it’s easy to learn and simple to use. Graphics are typically associated with gaming applications. You’ll want to read other books or search online for discussions on how to detect collisions, and react to user inputs in the WP7 environment.
In the next chapter, you’ll learn about writing applications that provide a multimedia experience to the user.