
Chapter 7
Leveraging Location and Maps
WHAT’S IN THIS CHAPTER?
- Locating frameworks on smartphones
- Getting the current location
- Using GPS on the WP7 Emulator
- Using the Bing Maps control
- Showing locations on Bing Maps
Location-based applications are becoming one of the most popular categories of mobile application across major mobile OSs. GPS enables applications to obtain accurate geographic location information, which is essentially a built-in component on smartphones, together with the required cellular data and sometimes a Wi-Fi location database. Each mobile OS has to provide an easy-to-use location framework that allows developers to programmatically use location data, maps, and map overlays for a wide range of scenarios. Windows Phone 7 (WP7) is no exception.
This chapter starts with an overview of the location framework on three smartphone platforms: WP7, iOS, and Android. In addition, you’ll see examples that show you how to get the location information on WP7 and demonstrate how to use the Bing Maps Control. In particular, you’ll learn how to acquire current geographical location information using the System.Device.Location namespace and how to test your location-aware applications on WP7 emulators. In addition, you’ll find out how to use Bing Maps web services to convert addresses (such as a street name) to geographic coordinates. You’ll also discover how to use the Microsoft.Phone.Controls.Maps namespace to draw and navigate maps on WP7 devices. An example is also given to illustrate how to track your current location on a Bing map. At the end of the chapter, a brief introduction is given to help you leverage other Bing Maps web services to implement more advanced functions in your application, such as getting turn-by-turn directions.
Location-aware applications have gained momentum on the smartphone because they enable users to better connect with the surrounding world. To acquire location information, a smartphone can utilize three types of location services: Global Positioning System (GPS), cell-site triangulation, and Wi-Fi positioning.
Many high-end smartphones are now equipped with a GPS chip. This enables users to retrieve location information from satellites orbiting the earth, 24 hours a day, 7 days a week. Typical GPS units found in a smartphone belong to a type called assisted GPS (aGPS). Unlike a stand-alone GPS system that relies solely on radio signals from the satellites to retrieve information, an aGPS system also uses additional network resources, such as assistance servers, to speed up the locating process and to improve accuracy when the satellite signal strength is poor.
Compared to other positioning technologies, a GPS system can often retrieve location information more accurately. The precision of civilian GPS units is 10 to 20 meters (about 33 to 65 feet) in many cases. But these units also suffer from two major problems. One is the line-of-sight problem. If a GPS receiver is not able to see the satellites, it may not be able to receive any location data. Therefore, when a GPS-capable smartphone is inside a building or a tunnel, it simply cannot locate itself using just the GPS system. The other problem is power consumption. If your smartphone application requires the GPS sub-unit to remain running continuously, it will soon drain the battery.
Cell-site triangulation can track the position of a cell phone by measuring power levels and the antenna patterns a cell phone can receive from multiple cell base stations. In urban areas where there are more cell antenna towers, cell-site triangulation can achieve a precision of less than 50 meters (about 164 feet). Wi-Fi positioning is another technique that can be used to locate a cell phone. The idea is to use a public database that records the location of Wi-Fi hotspots. The accuracy of Wi-Fi positioning has not been fully studied, but it is considered to be one of the low-accuracy positioning technologies.
The current smartphone OS trend is to use a combination of all three positioning techniques to achieve better accuracy and reduce power consumption. On WP7, the System.Device.Location namespace provides a set of managed APIs to start and stop location services. As of this writing, the APIs allow developers to set two different levels of accuracy: Default and High. When the accuracy level is set to High, GPS positioning is generally used and it drains battery faster. When the accuracy level is set to Default, WP7 devices normally rely on a combination of cell-site positioning and Wi-Fi positioning to provide location information.
The geographical position information acquired from the positioning systems is in the format of geographical coordinates, in which the combination of a latitude value and a longitude value is used to pinpoint a unique location on the globe. For example, latitude 38.897687 and longitude −77.03654 represents the location of the White House. But geographical coordinates aren’t easy for human beings to understand. People want to see the location on a map and require the location information in a format that’s easier to comprehend, such as the mailing addresses we use in our daily lives.
WP7 provides the Microsoft Bing Maps services to developers. A number of APIs are available in the Microsoft.Phone.Controls.Maps namespace. Developers can use those APIs to show the location, add pushpins, and draw directions on a map. In addition, Microsoft Bing Maps services offer a set of web services using the Simple Object Access Protocol (SOAP). With the help of Bing Maps SOAP services, developers can easily translate the geographic coordinates to human-readable addresses, a process termed geocoding. Developers can also use the Bing Maps SOAP services to search for Points of Interests (POI) and driving directions, and to retrieve imagery data. To use the service in your application, you’ll need to acquire Bing Maps keys. The process of creating Bing Maps keys is explained later in this chapter.
Bing Maps web services are also offered in Representational State Transfer (REST) fashion, which allows the query to be sent as parameters in a URL. From a developer’s point of view, using Bing Maps SOAP services and REST services are very similar except that the search service (such as POI) is not available through the REST interface, at least not as of this writing. For more information about the differences between SOAP and REST, please refer to Chapter 6. For illustration purposes, this chapter uses Bing Maps SOAP services in the sample code.
Because location is a piece of privacy-related information (you may not want everyone to know where you are), an application needs to obtain end-user permission to turn on location services. On WP7, this is handled by enabling the ID_CAP_LOCATION capability in the WMAppManifest.xml file.
Despite the platform and API differences, the development process for location-aware applications on WP7, iOS, and Android share a number of similarities. On iOS, you’ll need to check if the location service is permitted by users and import the CoreLocation.framework into your Xcode project to acquire location data. Beginning with iOS 4.0, a low-power location-monitoring service is also supported that uses cell-site positioning to track user locations (http://developer.apple.com/library/ios/#documentation/Miscellaneous/Conceptual/iPhoneOSTechOverview/CoreServicesLayer/CoreServicesLayer.html). To display a map and support more advanced location features, such as routing services, iOS relies on Google Maps APIs. Developers need to register and acquire keys to use the Google Maps service.
Similar features and workflows can also be found on the Android platform. The application needs to claim either the ACCESS_COARSE_LOCATION or ACCESS_FINE_LOCATION permission in the Android manifest file to use this feature. After obtaining the user’s permission, you can use the android.location package to access the location information, and use the Google maps external library to draw maps on Android-powered devices. Developers are also expected to register with and obtain keys to utilize Google Maps services.
Minimizing power consumption and maintaining reasonable accuracy and performance are always the major challenges for location-aware mobile applications. You can apply the following best practices to WP7, iOS, and Android:
- Choose the right level of accuracy: Choosing high accuracy or fine-location will turn on the smartphone’s GPS units and drain the battery faster than under normal conditions. If your application doesn’t need a high level of accuracy, consider using default or coarse accuracy.
- Determine the frequency of updates: Fewer updates will make your application consume less power. The downside is it will also reduce the precision of the results. You need to determine a reasonable trade-off to balance accuracy and power consumption.
- Decide when to stop listening: If your application isn’t actively using the location services all the time, consider stopping listening to the status changes when they’re not needed.
- Prepare for a lack of data events: In case the location data isn’t available, you’ll need to determine whether to wait for the data to become available or to use the cached data. In some situations, you may want to temporarily suspend your application. No matter what you decide, you should keep users informed about the situation and not staring at a frozen screen, wondering what’s going on.
Testing location-aware applications on phone emulators is troublesome for developers. The Android platform seems to provide better support than the other two platforms. Android developers can use Eclipse, the Dalvik Debug Monitor Server (DDMS), or the geo command in the emulator console to simulate location-related events. However, Android is significantly better than the simulation environment on WP7 and iOS. In the next section, you’ll learn how to use the Microsoft Developer Network (MSDN) GPS emulator to test your WP7 location-aware applications in the comfort of your office or home.
Table 7-1 summarizes the location and map services on three different platforms.
TABLE 7-1: Location and Maps Support on WP7, Android, and iOS


In short, from the developer’s point of view, writing a location-aware application on WP7, iOS, or Android is very similar, in spite of the differences of each SDK.
In this section, you’ll learn how to acquire the current location on WP7. The first example shows how to get geographic coordinates and use the GPS emulator. The second example explains how to translate a human-readable address into geographic coordinates.
Geographical Data
The location information acquired using positioning technologies such as GPS is in the format of a geologic coordinate. In the first example you learn how to use the classes in the System.Device.Location namespace to retrieve information.
Many developers like to start testing location-aware applications in a simulated environment to save time and energy. It’s necessary to address the simulation issue first. The WP7 phone emulator that comes with the SDK doesn’t emulate location changes. However, it’s possible for developers to write a mock application that can simulate the location changes. During the debugging process, you can let your phone application use the mock application as the location service provider. Alternatively, you can use one of the GPS emulator applications contributed by other developers.
The GPS emulator application you’ll use in this chapter is from MSDN (http://create.msdn.com/education/catalog/article/GPS-Emulator). You can download the zip file directly from the MSDN site. However, the description provided by MSDN is a bit hard to follow and more information than necessary is presented to use the emulator. Therefore, simply download all the files from the GPS Emulator.
The two most important files in the folder are GpsEmulator.exe and GpsEmulatorClient.dll. You can use GpsEmulator.exe to simulate location movement and add GpsEmulatorClient.dll to your application to listen to the location events. Note that to launch GpsEmulator.exe in Windows Vista or Windows 7, you’ll need to right-click on the program and choose Run as Administrator from the context menu. Click Yes when asked if you want to allow this program to make changes to your computer. A screenshot of the emulator program is shown in Figure 7-1.
FIGURE 7-1: Windows Phone GPS Emulator
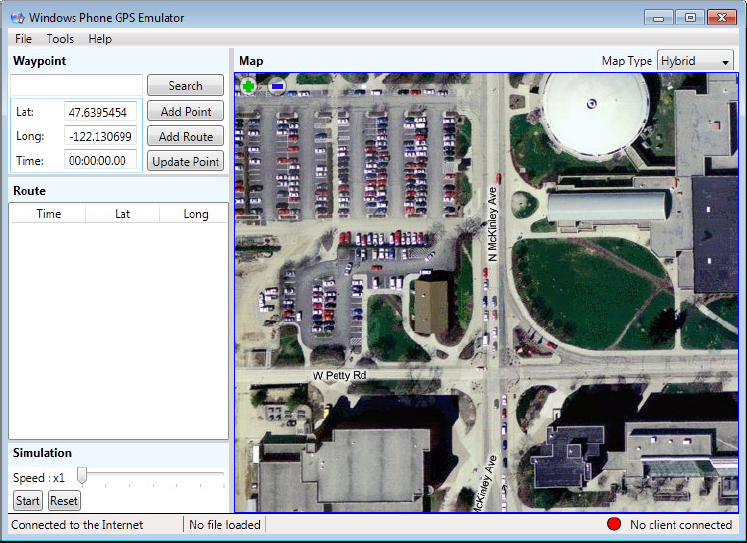
Using this emulator, you can create a simulated route by adding waypoints and clicking on the map. Alternatively, you can load the BSU.route file by clicking on File ⇒ Open.
For now, you can put this emulator tool aside and start working on a simple location-aware application. Use the following steps to create the solution:
1. Start Microsoft Visual Studio Express 2010 for Windows Phones. Windows starts the Visual Studio Express 2010 IDE.
2. Choose File ⇒ New Project. You’ll see the New Project dialog box.
3. Choose the Visual C# Silverlight for Windows Phone templates from the left panel. Highlight the Windows Phone Application template. You’ll see a description of this template in the right pane of the New Project dialog box.
4. Type currentLocationTxt in the Solution Name field and the Name field. Click OK. Visual Studio creates a blank application for you.
Change the page title, add 10 TextBlocks, and 3 Buttons as described in Listing 7-1.
LISTING 7-1: UI layout, currentLocationTxtcurrentLocationTxtMainPage.xaml
<!--TitlePanel contains the name of the application and page title-->
<StackPanel x:Name="TitlePanel" Grid.Row="0" Margin="12,17,0,28">
    <TextBlock x:Name="ApplicationTitle" Text="MY APPLICATION"
               Style="{StaticResource PhoneTextNormalStyle}"/>
    <TextBlock x:Name="PageTitle" Text="My Location" Margin="9,-7,0,0"
               Style="{StaticResource PhoneTextTitle1Style}"/>
</StackPanel>

<!--ContentPanel - place additional content here-->
<Grid x:Name="ContentPanel" Grid.Row="1" Margin="12,0,12,0">
    <TextBlock Height="40" Name="timeLabel" FontWeight="Bold" Text="Time"
               Margin="20,20,0,0" VerticalAlignment="Top" Width="120"
               FontSize="24" HorizontalAlignment="Left" />
    <TextBlock FontSize="20" FontWeight="Normal" Height="40"
               Margin="140,20,0,0" Name="timeStr" Text="" Width="280"
               HorizontalAlignment="Right" VerticalAlignment="Top" />
    <TextBlock FontSize="24" FontWeight="Bold" Height="40" Width="120"
               HorizontalAlignment="Left" Margin="20,110,0,0"
               Name="statusLabel" Text="Status" VerticalAlignment="Top" />
    <TextBlock FontSize="20" FontWeight="Normal" Height="40" Width="280"
               HorizontalAlignment="Right" Margin="0,110,0,0"
               Name="statusStr" Text="" VerticalAlignment="Top" />
    <TextBlock Height="40" Name="latLabel" FontWeight="Bold" Text="Latitude"
               Margin="20,200,0,0" VerticalAlignment="Top" Width="120"
               FontSize="24" HorizontalAlignment="Left" />
    <TextBlock FontSize="20" FontWeight="Normal" Height="40"
               Margin="140,200,0,0" Name="latStr" Text="" Width="280"
               HorizontalAlignment="Right" VerticalAlignment="Top" />
    <TextBlock Height="40" Name="longLabel" FontWeight="Bold" Text="Longitude"
               Margin="20,290,0,0" VerticalAlignment="Top" Width="120"
               FontSize="24" HorizontalAlignment="Left" />
    <TextBlock FontSize="20" FontWeight="Normal" Height="40"
               Margin="140,290,0,0" Name="longStr" Text="" Width="280"
               HorizontalAlignment="Right" VerticalAlignment="Top" />
    <TextBlock Height="40" Name="accuLabel" FontWeight="Bold" Text="Accuracy"
               Margin="20,380,0,0" VerticalAlignment="Top" Width="120"
               FontSize="24" HorizontalAlignment="Left" />
    <TextBlock FontSize="20" FontWeight="Normal" Height="40"
               Margin="140,380,0,0" Name="accuStr" Text="" Width="280"
               HorizontalAlignment="Right" VerticalAlignment="Top" />
    <Button Content="Stop" Height="72" HorizontalAlignment="Left"
            Margin="20,529,0,0" Name="stopBtn" VerticalAlignment="Top"
            Width="120" Click="stopBtn_Click" />
    <Button Content="High" Height="72" HorizontalAlignment="Left"
            Margin="165,529,0,0" Name="highBtn" VerticalAlignment="Top"
            Width="130" Click="highBtn_Click" />
    <Button Content="Low" Height="72" HorizontalAlignment="Left"
            Margin="319,529,0,0" Name="lowBtn" VerticalAlignment="Top"
            Width="131" Click="lowBtn_Click" IsEnabled="True" />
</Grid>
The layout of the UI is shown in Figure 7-2.
FIGURE 7-2: UI layout of currentLoctionTxt

Now from Solution Explorer, right-click on References, and choose Add Reference from the context menu, as shown in Figure 7-3.
FIGURE 7-3: Add References
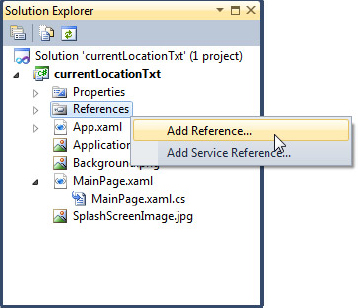
When you see the Add Reference dialog, choose the Browse tab and select the GpsEmulatorClient.dll you downloaded earlier. Click OK.
In the System.Device.Location namespace, the GeoCoordinateWatcher class exposes the location service. To use the GPS Emulator, however, you’ll need to add the following three lines at the top of the MainPage.xaml.cs file.
#define GPS_EMULATOR        // defining a compiler GPS symbol.
using GpsEmulatorClient;    //Namespace for GpsEmulator
using System.Device.Location;   //Namespace for the actual location service
Code Snippet currentLocationTxtcurrentLocationTxtMainPage.xaml.cs
The benefit of defining a GPS_EMULATOR macro is that it can make you quickly switch from the emulating environment to the actual testing environment. When the macro is defined, the new GeoCoordinateWatcher object uses the emulator namespace. If you comment out the first two lines of code, then the application instantiates a GeoCoordinateWatcher object (which is found in the System.Device.Location namespace). This is achieved by using a conditional compile statement.
The operation of this application is fairly simple. When a user clicks the High button, the location service starts in high-accuracy mode; otherwise, when the user clicks the Low button, the location service runs in low-accuracy mode. And the Stop button stops the location services. The returned geographic data is printed on the screen as text strings. The C# code of currentLocationTxt is shown in Listing 7-2.
LISTING 7-2: Displaying current geo-coordinates, currentLocationTxtcurrentLocationTxtMainPage.xaml.cs
public partial class MainPage : PhoneApplicationPage
{
    #if GPS_EMULATOR
             GpsEmulatorClient.GeoCoordinateWatcher watcher;
    #else
             System.Device.Location.GeoCoordinateWatcher watcher;
    #endif

    // Constructor
    public MainPage()
    {
        InitializeComponent();
    }

    private void stopBtn_Click(object sender, RoutedEventArgs e)
    {
        if (watcher != null)
        {
            watcher.Stop();
        }
        statusStr.Text = "Location service is turned off";
        timeStr.Text = System.DateTime.Now.ToString();
        latStr.Text = "";
        longStr.Text = "";
        accuStr.Text = "";
        highBtn.IsEnabled = true;
        lowBtn.IsEnabled = true;
    }

    //Start the location service with desired accuracy
    private void startLoation(GeoPositionAccuracy accu)
    {
        //change status info
        statusStr.Text = "Starting Location Service...";

        #if GPS_EMULATOR
            watcher = new GpsEmulatorClient.GeoCoordinateWatcher(accu);
        #else
            watcher = new System.Device.Location.GeoCoordinateWatcher(accu);
        #endif

        watcher.MovementThreshold = 20; //Set to 20 meters

        // Add event handlers for StatusChanged and PositionChanged events
        watcher.StatusChanged += new EventHandler
            <GeoPositionStatusChangedEventArgs>(statusChanged);
        watcher.PositionChanged += new EventHandler
            <GeoPositionChangedEventArgs<GeoCoordinate>>(positionChanged);

        // Start acquiring data
        watcher.Start();

    }

    //event handler of position changes
    void positionChanged(object sender,
        GeoPositionChangedEventArgs<GeoCoordinate> e)
    {
        this.Dispatcher.BeginInvoke( () => changeUIposition(e) );

    }

    void changeUIposition(GeoPositionChangedEventArgs <GeoCoordinate> e)
    {
        if (watcher.Status == GeoPositionStatus.Disabled) return;

        latStr.Text = e.Position.Location.Latitude.ToString("0.00000");
        longStr.Text = e.Position.Location.Longitude.ToString("0.00000");
        timeStr.Text = System.DateTime.Now.ToString();
    }

    //event handler of status changes
    void statusChanged(object sender, GeoPositionStatusChangedEventArgs e)
    {
        this.Dispatcher.BeginInvoke( () => changeUIstatus(e) );
    }

    void changeUIstatus(GeoPositionStatusChangedEventArgs e)
    {
        switch (e.Status)
        {
            case GeoPositionStatus.Disabled:
                //service is disabled or unsupported.
                statusStr.Text = "location service is not enabled";
                break;

            case GeoPositionStatus.Initializing:
                //service is initializing.
                statusStr.Text = "initializing...";
                break;

            case GeoPositionStatus.NoData:
                //service is working, but it cannot get location data
                statusStr.Text = "Sorry, data unavailable";
                break;
            case GeoPositionStatus.Ready:
                //service is working and is receiving data
                statusStr.Text = "Ready";
                break;
        }

        timeStr.Text = System.DateTime.Now.ToString();
    }

    private void highBtn_Click(object sender, RoutedEventArgs e)
    {
        accuStr.Text = "High Accuracy";
        startLoation(GeoPositionAccuracy.High);

        //turn off high accuracy button and turn on low accuracy button
        highBtn.IsEnabled = false;
        lowBtn.IsEnabled = true;
    }

    private void lowBtn_Click(object sender, RoutedEventArgs e)
    {
        //turn on high accuracy button and turn off low accuracy button
        accuStr.Text = "Low Accuracy";
        startLoation(GeoPositionAccuracy.Default);

        //turn on high accuracy button and turn off low accuracy button
        highBtn.IsEnabled = true;
        lowBtn.IsEnabled = false;
    }
}
In method private void startLocation(GeoPositionAccuracy accu), the code begins by creating a GeoCoordinateWatcher object and MovementThreshold is set to 20 meters. This is a small threshold and should be accurate enough for many applications. Event handler statusChanged()is then added to the event queue when the StatusChanged event is triggered. Event handler positionChanged()is added to the event queue when the PositionChanged event occurs. Because getting geographic data is a background process, it can’t update the contents of a control that is created on the UI thread. To solve this problem, you call the Dispatcher.BeginInvoke() method and declare the actions needed to update the UI content. In this example, when the current position is changed, changeUIposition() is invoked to update the latitude and longitude information, and changeUIstatus() is invoked to update the status information.
Four different statuses are defined in the GeoPositionStatus enumeration to reflect the status of a location provider:
- Ready: A location provider is available and can supply data.
- Initializing: A location provider is initiating. For a GPS receiver, it may take a few minutes to obtain its signal.
- NoData: A location provider is enabled but has no data.
- Disabled: A location provider is disabled.
While GpsEmulator.exe is still running, you can start debugging the application. The result is shown in Figure 7-4.
FIGURE 7-4: Running currentLocationTxt

Civilian Data
Imagine someone asks you, “Hey, what’s your home address in geographic coordinates?” Your response is probably, “What?!” Well, we human beings remember and find locations based on street addresses, or what could be termed as civilian data. So if your application requires that users input location information, expect users to enter a street address. Since most of the location-related APIs speak only geographical data, it’s necessary to create a process that translates the information between geographical data and civilian data. This translation process is often called geocoding. The forward geocode service translates street names or entity names into geographical data, and reverse geocoding locates possible street names from geographic coordinates.
On WP7, geocoding is offered as a web service. You can add the Bing Maps geocode service to your application as a service reference. Before you do so, be sure to create a Bing Maps account and create an application ID for your application. Otherwise, your application won’t be able to get responses from the Bing Maps web services.
Open your web browser and type the following URL: https://www.bingmapsportal.com/. Follow the online instructions and create a free Bing Maps account with your Windows Live ID. Once you sign in, you can then create up to five application IDs for your map applications. Figure 7-5 shows a screenshot of the web page.
FIGURE 7-5: Create or view Bing Maps key

After obtaining a Bing Maps key, use the following steps to create a new project:
1. Start Microsoft Visual Studio Express 2010 for Windows Phones. Windows starts the Visual Studio Express 2010 IDE.
2. Choose File ⇒ New Project. You’ll see the New Project dialog box.
3. Choose the Visual C# Silverlight for Windows Phone templates from the left panel. Highlight the Windows Phone Application template. You’ll see a description of this template in the right pane of the New Project dialog box.
4. Type street2Geo in the Solution Name field and the Name field. Click OK. Visual Studio creates a blank application for you.
5. In Solution Explorer, right-click on Service References. You’ll see the dialog box shown in Figure 7-6.
FIGURE 7-6: Add service references.

6. Choose Add Service Reference. You will see the Add Service Reference dialog box.
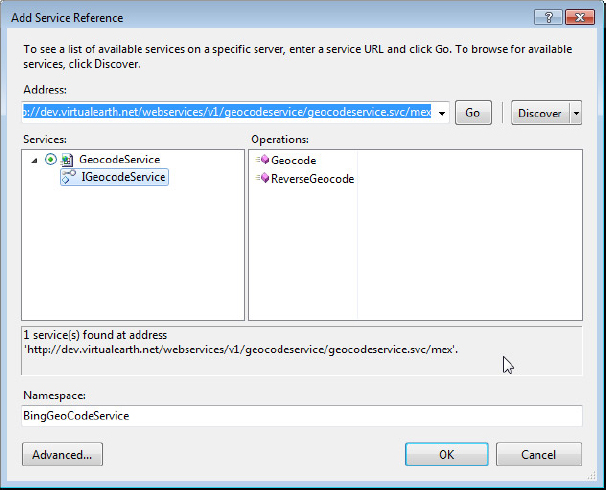
7. Type http://dev.virtualearth.net/webservices/v1/geocodeservice/geocodeservice.svc in the Address field, and type BingGeoCodeService in the Namespace field, as seen in Figure 7-7.
FIGURE 7-7: Enter web service URL.

8. Click Go and you’ll see that the IDE discovers a new service. This confirms the geocode web service is available to your application, as seen in Figure 7-8.
FIGURE 7-8: Geocode service found.
9. Click Advanced, and you’ll see a Service Reference Settings dialog box.
10. Uncheck the Reuse types in the referenced assemblies checkbox, as shown in Figure 7-9. If you don’t uncheck this option, you’ll get a warning message in your IDE: “Custom tool warning: Unable to load one or more of the requested types. . .”
FIGURE 7-9: Clear type reuse.

11. Click OK twice. You’ll see that the web service is now added to the solution, as shown in Figure 7-10.
FIGURE 7-10: GeoCodeService is added to your project.

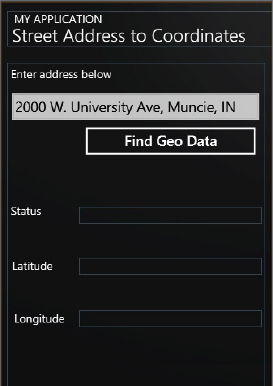
At this point, you can add a few UI controls to the project, as shown in Listing 7-3. Figure 7-11 shows the UI layout of this project.
FIGURE 7-11: UI Layout of street2Geo
LISTING 7-3: UI Layout of street2Geo project, currentLocationTxtcurrentLocationTxtMainPage.xaml
<!--TitlePanel contains the name of the application and page title-->
<StackPanel x:Name="TitlePanel" Grid.Row="0" Margin="12,17,0,28">
    <TextBlock x:Name="ApplicationTitle" Text="MY APPLICATION"
               Style="{StaticResource PhoneTextNormalStyle}"/>
    <TextBlock x:Name="PageTitle" Text="Street Address to Coordiantes"
               Margin="9,-7,0,0" FontSize="32" FontWeight="Bold"
               Style="{StaticResource PhoneTextTitle1Style}" />
</StackPanel>

<!--ContentPanel - place additional content here-->
<Grid x:Name="ContentPanel" Grid.Row="1" Margin="12,0,12,0">
    <TextBox Height="72" HorizontalAlignment="Left" Margin="-4,42,0,0"
             Name="streetInput" Text="2000 W. University Ave, Muncie, IN"
             VerticalAlignment="Top" Width="460" />
    <TextBlock Height="30" HorizontalAlignment="Left" Margin="6,6,0,0"
               Name="inputLbl1" Text="Enter address below"
               VerticalAlignment="Top" Width="423" />
    <Button Content="Find Geo Data" Height="72" HorizontalAlignment="Left"
            Margin="127,103,0,0" Name="findBtn" VerticalAlignment="Top"
            Width="323" Click="findBtn_Click" />
    <TextBlock Height="36" HorizontalAlignment="Left" Margin="6,248,0,0"
               Name="statusLbl" Text="Status" VerticalAlignment="Top"
               Width="115" />
    <TextBlock Height="36" HorizontalAlignment="Left" Margin="9,345,0,0"
               Name="latLbl" Text="Latitude" VerticalAlignment="Top"
               Width="115" />
    <TextBlock Height="36" HorizontalAlignment="Left" Margin="12,437,0,0"
               Name="longLbl" Text="Longitude" VerticalAlignment="Top"
               Width="115" />
    <TextBlock Height="30" HorizontalAlignment="Left" Margin="127,254,0,0"
               Name="statusStr" Text="" VerticalAlignment="Top"
               Width="323" />
    <TextBlock Height="30" HorizontalAlignment="Left" Margin="127,345,0,0"
               Name="latStr" Text="" VerticalAlignment="Top" Width="323" />
    <TextBlock Height="30" HorizontalAlignment="Left" Margin="127,437,0,0"
               Name="longStr" Text="" VerticalAlignment="Top" Width="323" />
</Grid>
Now implement the constructor method and button-click event handler. You will also need to create a method (showResult() in this example) as the event handler when the results of the query are returned. The C# code of MainPage.xaml.cs is shown in Listing 7-4.
LISTING 7-4: Using Bing Maps geocode web service, street2Geostreet2GeoMainPage.xaml.cs
using System;
using System.Collections.Generic;
using System.Linq;
using System.Net;
using System.Windows;
using System.Windows.Controls;
using System.Windows.Documents;
using System.Windows.Input;
using System.Windows.Media;
using System.Windows.Media.Animation;
using System.Windows.Shapes;
using Microsoft.Phone.Controls;
using street2Geo.BingGeoCodeService;  //namespace for the web services
using System.Collections.ObjectModel; //namespace for filters collection

namespace street2Geo
{
    public partial class MainPage : PhoneApplicationPage
    {
        GeocodeServiceClient geocodesvc;

        // Constructor
        public MainPage()
        {
            InitializeComponent();

            //create a new service client object.
            geocodesvc =
                new GeocodeServiceClient("BasicHttpBinding_IGeocodeService");

            //Add an event handler when query is completed
            geocodesvc.GeocodeCompleted += new EventHandler
                <GeocodeCompletedEventArgs>(showResult);

        }

        private void showResult(object sender, GeocodeCompletedEventArgs e)
        {
            //Confidence.High=0, Medium=1; Low=2;
            //Select the most confident result
            var geoResult = (from r in e.Result.Results
                             orderby (int)r.Confidence ascending
                             select r).FirstOrDefault();

            if (geoResult == null)
            {
                statusStr.Text = "No results found. Try again.";
                latStr.Text = "";
                longStr.Text = "";
                return;
            }
            statusStr.Text = "Yes, found it!";
            latStr.Text = geoResult.Locations[0].Latitude.ToString();
            longStr.Text = geoResult.Locations[0].Longitude.ToString();
        }

        private void findBtn_Click(object sender, RoutedEventArgs e)
        {
            GeocodeRequest req =  new GeocodeRequest();

            req.Credentials = new BingGeoCodeService.Credentials();
            req.Credentials.ApplicationId = "Enter your Bing Maps Key here";
            req.Query = streetInput.Text;

            req.Options = new GeocodeOptions();
            req.Options.Filters= new ObservableCollection<FilterBase>();

            ConfidenceFilter filter = new ConfidenceFilter();
            filter.MinimumConfidence = Confidence.High;

            req.Options.Filters.Add (filter);

            try
            {
                geocodesvc.GeocodeAsync(req);
            }
            catch //Get error
            {
                statusStr.Text = "Bad address. Try again.";
                latStr.Text = "";
                longStr.Text = "";
            }

        }
    }
}
To get this application running, you’ll need to pass your Bing Maps key to the req.Credentials.ApplicationId property.
The basic idea behind this code is to create a new GeocodeServiceClient object named geocodesvc in the constructor and add an event handler showResult()to update the UI content when the results are returned. In the button-click event handler findBtn_Click(), you create a new GeocodeRequest object req; set the Query field based on users’ input; set the confidence level to high; then use the GeocodeAsync() method to call the Bing Maps SOAP web services.
The GeocodeServiceClient class has an overloaded constructor. Don’t use the most basic form of the constructor that requires no parameters even though the application will compile. This is because without knowing the type of services offered, a GeocodeServiceClient object may not be able to establish a connection to the web service provider. In this example, the connection type is set to BasicHttpBinding_IGeocodeService.
Web services may return more than one result for a query. If you only care about the result with the most confidence, whose numeric value is 0, you can order the results by the confidence level in ascending order and print the first result from the array.
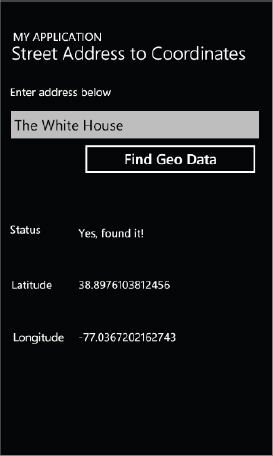
When you compile and run the program, you’ll be able to get the latitude and longitude information from a street name or entity name, as shown in Figure 7-12.
FIGURE 7-12: Running street2Geo
So far you’ve learned how to acquire location information and how to translate civilian data to geographical data. To end users, however, nothing is more straightforward than seeing the location on a map. In this section, you’ll learn how to use the Bing Maps control to present location information.
Using the Bing Map Control
To use the Bing Map control in your application, you’ll need to have a Bing Maps account and create a key (ApplicationID) for your application. In the following example, you’ll learn how to use the Bing Map control to easily center a map, zoom in and out, and add a pushpin to the map. Use the following steps to create a new project:
1. Start Microsoft Visual Studio Express 2010 for Windows Phones. Windows starts the Visual Studio Express 2010 IDE.
2. Choose File ⇒ New Project. You’ll see the New Project dialog box.
3. Choose the Visual C# Silverlight for Windows Phone templates from the left panel. Highlight the Windows Phone Application template. You’ll see a description of this template in the right pane of the New Project dialog box.
4. Type simpleMap in the Solution Name field and the Name field. Click OK. Visual Studio creates a blank application for you.
5. From Toolbox, select the map control and drop it to the center of the Designer. Performing this step automatically loads a few libraries needed for the Bing Map control, such as Microsoft.Phone.Controls.Map, System.Device, System.Runtime.Serialization, and System.ServiceModel.
6. Add a button and a slider to the Designer and follow Listing 7-5 to change the name, size, and other attributes of the controls. The UI layout is shown in Figure 7-13.
FIGURE 7-13: UI Layout of simpleMap project

LISTING 7-5: UI Layout of simpleMap project, simpleMapsimpleMapMainPage.xaml
<!--TitlePanel contains the name of the application and page title-->
<StackPanel x:Name="TitlePanel" Grid.Row="0" Margin="12,17,0,28">
    <TextBlock x:Name="ApplicationTitle" Text="MY APPLICATION"
               Style="{StaticResource PhoneTextNormalStyle}"/>
    <TextBlock x:Name="PageTitle" Text="Bing Map" Margin="9,-7,0,0"
               Style="{StaticResource PhoneTextTitle1Style}"/>
</StackPanel>

<!--ContentPanel - place additional content here-->
<Grid x:Name="ContentPanel" Grid.Row="1" Margin="12,0,12,0">
    <my:Map Height="526" HorizontalAlignment="Left" Margin="0,6,0,0"
            Name="map1" VerticalAlignment="Top" Width="456"
            DataContext="{Binding}" LogoVisibility="Collapsed">
        <my:Map.CredentialsProvider>
            <my:ApplicationIdCredentialsProvider
                ApplicationId="Enter your key here"/>
        </my:Map.CredentialsProvider>
    </my:Map>
    <Button Content="Satellite" Height="72" HorizontalAlignment="Left"
            Margin="0,529,0,0" Name="modeBtn" VerticalAlignment="Top"
            Width="160" Click="modeBtn_Click" />
    <Slider Height="95" HorizontalAlignment="Left" Margin="172,529,0,0"
            Name="zoomSlider" VerticalAlignment="Top" Width="284"
            Maximum="20" Value="15" BorderThickness="1"
            Background="Black" Foreground="Blue"
            ValueChanged="zoomLevel_ValueChanged" Minimum="1" />
</Grid>
Note that you’ll need to enter your own Bing Map key in the ApplicationID line. In this simple map application, you can click the button to toggle between the road mode and aerial mode (satellite mode), and use the slider to zoom in and out. The Bing Map zoom level ranges from 0 to 21, with 0 showing the entire world and 21 showing close-ups of a particular location. The Bing Map Control has a ZoomBarVisibility property and is set to Collapsed on WP7 by default. This is because the zoom bar is too small to operate on a phone. In addition, if the viewable area of the map is too small, only a portion of the zoom bar will be visible on the map, thus making the built-in zoom control useless. In this example, we use a larger slider control to change the zoom level of the map.
Listing 7-6 shows how you can use just a few lines of code to easily manipulate a Bing Map control.
LISTING 7-6: Using Bing Maps control, simpleMapsimpleMapMainPage.xaml.cs
using System;
using System.Collections.Generic;
using System.Linq;
using System.Net;
using System.Windows;
using System.Windows.Controls;
using System.Windows.Documents;
using System.Windows.Input;
using System.Windows.Media;
using System.Windows.Media.Animation;
using System.Windows.Shapes;
using Microsoft.Phone.Controls;
//add Maps namespace
using Microsoft.Phone.Controls.Maps;
using System.Device.Location;

namespace simpleMap
{
    public partial class MainPage : PhoneApplicationPage
    {

        bool isRoadmode = false;
        Pushpin pinBSU; //

            //Add the pushpin to the map
        // Constructor
        public MainPage()
        {
            InitializeComponent();

            //Set the location of the pushpin

            pinBSU = new Pushpin();
            pinBSU.Location = new GeoCoordinate
                    (40.2002810100341, -85.4102575778961);
            pinBSU.Content = "BSU";

            //Initial Location
            map1.ZoomLevel = zoomSlider.Value;
            map1.Center = pinBSU.Location;

            map1.Children.Add(pinBSU);
        }

        private void modeBtn_Click(object sender, RoutedEventArgs e)
        {
            if (isRoadmode) {
                map1.Mode = new RoadMode();
                modeBtn.Content = "Satellite";
                isRoadmode = false;
            }
            else
            {
                map1.Mode = new AerialMode();
                modeBtn.Content = "Road";
                isRoadmode = true;
            }

        }

        private void zoomLevel_ValueChanged(object sender,
            RoutedPropertyChangedEventArgs<double> e)
        {
            if (zoomSlider != null)
                map1.ZoomLevel = zoomSlider.Value;
        }
    }
}
The constructor method creates a Pushpin object and sets the Location property to the geographic coordinates of Ball State University. You can then add this Pushpin object to the list of map1.Children, which is of type UIElementCollection.
When you compile and run the project, you’ll see that the location of Ball State University is shown on a map with a “BSU” pushpin at the center of the map. The screenshot of this project is shown in Figure 7-14.
FIGURE 7-14: Running simpleMap

Now that you’ve gained a better understanding of the Bing Map control, you’re ready to explore how to use both the location service and the map control in your application.
Combining the Location Service and Bing Map
In this example, you’ll write an application that can track the movement of your phone on the map. Most of the knowledge required to build this application has already appeared previously, so this section doesn’t require detailed instructions.
Create a new Silverlight Windows Phone project titled TrackMe. Add a Bing Map control and two buttons to the Designer, and add GpsEmulatorClient.dll to the References. Follow Listing 7-7 and change the locations and other properties of the controls.
LISTING 7-7: UI Layout of TrackMe project, TrackMeTrackMeMainPage.xaml
<!--TitlePanel contains the name of the application and page title-->
<StackPanel x:Name="TitlePanel" Grid.Row="0" Margin="12,17,0,28">
    <TextBlock x:Name="ApplicationTitle" Text="MY APPLICATION"
           Style="{StaticResource PhoneTextNormalStyle}"/>
    <TextBlock x:Name="PageTitle" Text="Track me on map" Margin="9,-7,0,0"
           Style="{StaticResource PhoneTextTitle1Style}" FontSize="48" />
</StackPanel>

<!--ContentPanel - place additional content here-->
<Grid x:Name="ContentPanel" Grid.Row="1" Margin="12,0,12,0">
    <my:Map Height="547" HorizontalAlignment="Left" Margin="0,6,0,0"
            Name="map1" VerticalAlignment="Top" Width="456"
            CopyrightVisibility="Collapsed" LogoVisibility="Collapsed">
        <my:Map.CredentialsProvider>
            <my:ApplicationIdCredentialsProvider
                ApplicationId="Enter your Key Here"
        </my:Map.CredentialsProvider>
    </my:Map>
    <Button Content="Satellite" Height="72" HorizontalAlignment="Left"
            Margin="0,561,0,0" Name="modeBtn" VerticalAlignment="Top"
            Width="223" Click="modeBtn_Click" />
    <Button Content="Start" Height="72" HorizontalAlignment="Left"
            Margin="227,561,0,0" Name="onOffBtn" VerticalAlignment="Top"
            Width="223" Click="onOffBtn_Click" />
</Grid>
Note that you’ll need to enter Bing Map key in the ApplicationID line. And the UI layout is shown in Figure 7-15.
FIGURE 7-15: UI Layout of TrackMe

The C# code for this project is shown in Listing 7-8.
LISTING 7-8: Display current location on map, TrackMeTrackMeMainpage.xaml.cs
#define GPS_EMULATOR // defining a compiler GPS symbol.

using System;
using System.Collections.Generic;
using System.Linq;
using System.Net;
using System.Windows;
using System.Windows.Controls;
using System.Windows.Documents;
using System.Windows.Input;
using System.Windows.Media;
using System.Windows.Media.Animation;
using System.Windows.Shapes;
using Microsoft.Phone.Controls;
using Microsoft.Phone.Controls.Maps; //for Maps
using System.Device.Location;   //Namespace for the actual location service
using GpsEmulatorClient;        //Namespace for GpsEmulator

namespace TrackMe
{
    public partial class MainPage : PhoneApplicationPage
    {
        #if GPS_EMULATOR
            GpsEmulatorClient.GeoCoordinateWatcher watcher;
        #else
            System.Device.Location.GeoCoordinateWatcher watcher;
        #endif

        bool isRoadmode;
        bool isStarted;

        Pushpin curLoc;

        // Constructor
        public MainPage()
        {
            InitializeComponent();

            isRoadmode = true;
            isStarted = false;

            curLoc = new Pushpin();
            curLoc.Content ="Me";
            curLoc.Location = new GeoCoordinate
                (40.2002810100341, -85.4102575778961);

            map1.Center = curLoc.Location;
            map1.ZoomLevel = 18;
            map1.Children.Add(curLoc);
        }

        private void onOffBtn_Click(object sender, RoutedEventArgs e)
        {
            if (isStarted)  //Turn off GPS
            {
                if (watcher != null)
                {
                    watcher.Stop();
                }
                isStarted = false;
                onOffBtn.Content = "Start";
            }
            else          // Turn on GPS
            {
                #if GPS_EMULATOR
                    watcher = new GpsEmulatorClient.
                        GeoCoordinateWatcher(GeoPositionAccuracy.High);
                #else
                    watcher = new System.Device.Location.
                        GeoCoordinateWatcher(GeoPositionAccuracy.High);
                #endif

                watcher.MovementThreshold = 20;

                // Add event handlers for PositionChanged events
                watcher.PositionChanged += new EventHandler
                        <GeoPositionChangedEventArgs<GeoCoordinate>>
                        (positionChanged);
                watcher.Start();

                onOffBtn.Content = "Stop";
                isStarted = true;
            }
        }

        //event handler of position changes
        void positionChanged(object sender,
            GeoPositionChangedEventArgs<GeoCoordinate> e)
        {
            this.Dispatcher.BeginInvoke( () => changeUIposition(e) );
        }

        void changeUIposition(GeoPositionChangedEventArgs <GeoCoordinate> e)
        {
            curLoc.Location = e.Position.Location;
            map1.Center = curLoc.Location;
        }

        private void modeBtn_Click(object sender, RoutedEventArgs e)
        {
            if (isRoadmode) {
                map1.Mode = new AerialMode();
                modeBtn.Content = "Road";
                isRoadmode = false;
            }
            else{
                map1.Mode = new RoadMode();
                modeBtn.Content ="Satellite";
                isRoadmode = true;
            }
        }


    }
}
In the constructor method, a Pushpin object, curLoc, is created and its Content and Location properties are initialized; curLoc is also added to the map control map1. The map is re-centered at the location of curLoc with a zoom level of 18, which will provide enough details about the surroundings.
When the Start button is clicked, a GeoCoordinateWatcher object, watcher, is instantiated with the accuracy set to high. The MovementThreshold is set to 20 meters so that a relatively small movement will raise a PositionChanged event, which in turn will trigger the event handler positionChanged(). To update the foreground UI control, Dispatcher.BeginInvoke() is called to explicitly invoke the ChangeUIPosition() method, and the map is re-centered at the current location.
Now start the GpsEmulator.exe program and then execute this project; you’ll see that the position of the phone is now shown at the center of a map. A sample screenshot of the WP7 emulator running with GpsEmulator is shown in Figure 7-16.
FIGURE 7-16: Running TrackMe

If you need to display a route on a map, such as driving directions or traffic information, you can add the waypoints to a LocationCollection object and then use a MapPolyline object to display it on the map. If shapes are necessary in your application, you can add additional MapLayer objects to the map and use MapPolygon objects to draw the shapes over the map.
In addition to displaying location information on a map, you are also encouraged to leverage location and maps to build cool new applications. For example, you can develop applications that combine social networking with location information to track friends and families (e.g., http://www.locimobile.com/android/); applications that use GPS data to track a hike (e.g., My Tracks http://www.geardiary.com/2010/04/07/review-my-tracks-for-android/); and applications that combine location with mobile commerce (e.g., shopkick, http://www.shopkick.com/). With the advent of NFC in mobile landscape, you may also be interested in developing applications that can combine location, social networks, and mobile commerce to offer ubiquitous mobile experiences to end users.
This chapter introduces the fundamentals of location services and the Bing Map control on WP7. You have learned how to acquire the current location and how to test your application with a GpsEmulator program. You’ve also discovered how to use the Bing Maps SOAP web services to translate civilian data to geographical data. This chapter also explains how to use the Bing Map control and how to integrate the location service with the map control in your application.
From the developer perspective, developing location-aware applications on the WP7 platform is on a par with developing similar applications on iOS and Android. And strategies to develop a good location-aware application are almost identical on all three platforms; you need to find the trade-off point between accuracy, performance, and power consumption. In addition to the geocode web service, Bing Maps also offers Imagery service, Route service, and Search service. In addition, you can also use Microsoft Expression Blend 4 to quickly develop a map application. Readers are encouraged to try more map services and alternative development tools to gain deeper understanding of this topic.
In the next chapter, you’ll learn about an exciting topic: Graphics. And you will also find out about a very powerful programming framework: XNA.