
6. Manage folders and files
In this chapter
You will find it much easier to locate files and correctly identify them if they are logically organized and given names that clearly describe their contents. You use File Explorer to manage and work with the folders and files that are stored on your computer.
Every file and folder has properties—information that describes the file and its content. Some properties are created automatically by Windows or by the app you create or edit the file in. You can assign other properties that you want.

TIP You can use file properties to automatically populate information within files and in file-management systems such as Microsoft SharePoint. You can display, sort, and group by file properties in File Explorer. For more information, see “Change the File Explorer display options” in Chapter 5, “Explore files and folders.”
When managing large files or a lot of files, you can compress them to save space or simply to manage them as one unit.
This chapter guides you through procedures related to creating, renaming, compressing, moving, copying, deleting, and restoring files and folders, and working with folder and file properties.
Create and rename folders and files
Many apps (such as email apps and web browsers) automatically store files in a default location, but most apps allow you to specify storage locations for the files you create. You could save everything in your Documents folder, but that would soon get unwieldy. If you use a logical system for naming and organizing folders and files, you can always find what you need.
One common approach is to store all your private files in subfolders of your Documents folder, and to store all files that you expect to share with others in subfolders of the Public Documents folder. A benefit of this approach is that Windows can automatically back up these locations to OneDrive or to an external hard drive.
Wherever you store your files, give some thought to a logical naming convention that works for you and within your organization. Here are some things to consider:
Unique identification Ideally, the name of a file or folder will contain all the information that you need to identify it independently of the folder structure you store it in. For example, if you save a purchase order document as 12345.docx in the folder structure AccountingDocumentsPurchase Orders2017October, much of the information is lost when you email the document or otherwise remove it from the folder structure. An informative file name such as PurchaseOrder_12345_2017-10-31 is much more useful and you won’t need to store the file in such a complex folder structure.
Sort order File names that incorporate dates will sort in numerical order. To keep them in logical order, enter the date in year-month-day order and use numeric month equivalents. (For example, 2017-10-31 sorts by year, then month, then day, whereas 10-31-2017 sorts by month, then day, then year.)
Web addresses If you store files and folders in the cloud, spaces in the file name or path are converted to the character code %20. This presents two problems:
When linking to a file online, the path is difficult to parse. For example:
https://sharepoint.contoso.com/files/purchase%20order%template.docx
When downloading files with names that contains spaces, some systems convert the spaces to underscores (_).
You can avoid these issues by not using spaces in file names.
Readability Long file names, especially those that don’t contain spaces, can be difficult to parse. You can maintain descriptive yet readable file names by using internal capitalization (commonly called camel caps) or by using underscores or hyphens to separate words. For example:
PayStub_Smith-Jane_2017-10-31
Whatever file naming convention you decide on, use it consistently. If you work within an organization, discuss, agree on, and communicate the naming convention to avoid confusion.
To create a folder
In File Explorer, do either of the following:
In the content pane, navigate to the location where you want to add the new folder. Then on the Home tab, in the New group, select New Folder.
In the Navigation pane, right-click the folder to which you want to add the new folder (as a subfolder), point to New, and then select Folder.
The default name New folder is automatically selected for editing.
Enter the name you want to assign to the folder to replace the selected text.
To rename a file or folder in the content pane
In the content pane, select the file or folder you want to rename.
Do one of the following to activate the name for editing:
Select the file or folder again (this equates to a slow double-click).
On the Home tab, in the Organize group, select Rename.
Right-click the file, and then select Rename.
Press F2.
Enter the new name, and then press Enter.
To rename a file or folder in the Navigation pane
Right-click the file or folder, and then select Rename.
Enter the new name, and then press Enter.
Compress folders and files
When you buy a computer these days, it likely comes with a hard drive capable of storing hundreds, if not thousands, of gigabytes (GB) of information. A gigabyte is 1 billion bytes, and a byte is a unit of information that is the equivalent of one character. Some of your files will be very small—1 to 2 kilobytes (KB), or 1000 to 2000 characters—and others might be quite large—several megabytes (MB), or several million characters. Small files are easy to copy and move around; large files or large groups of files are more time-consuming to copy and move from one place to another, or to send by email, unless you compress them.
You can compress individual files or entire folders. The result is a compressed folder that is identified by a zipper on its folder icon.
TIP Compressing is frequently referred to as zipping. Compressed folders are also called zip files. The term zip was adopted by the original file-compression technology developer to indicate that compressed files would move quickly from one location to another.
The reduction in size when you compress a file depends on the compression method and the type of file. Many image file formats are already highly compressed. Microsoft Office file types that end in x (.docx, .xlsx, and .pptx, which have been the default file formats since Office 2007) are actually collections of content definition files that have been compressed and given a different extension. Therefore, compressing a folder that contains Word documents or images might have little effect on the folder size.
You open and display the contents of a compressed folder in File Explorer just as you do any other folder. The Extract tool tab on the ribbon indicates that you’re displaying the contents of a compressed folder rather than a standard folder.

You can easily add, replace, or remove files within a compressed folder.
To compress one or more files
In the content pane, select the file(s) or folder(s) you want to compress.
Do either of the following:
Right-click any file in the selection, select Send to, and then select Compressed (zipped) folder to create a compressed folder with the same name as the file you right-clicked.
On the Share tab, in the Send group, select Zip to create a compressed folder with the same name as the first selected file.
The compressed folder name is selected so that you can change it. Edit the name as necessary, and then press Enter.
To display the contents of a compressed folder
In the Navigation pane, select the compressed folder.
In the content pane, double-click the compressed folder.
To work with files in a compressed folder
To add a file or folder, drag it into or onto the compressed folder.
To replace a file, drag the new file into the compressed folder and then select Copy and Replace.
To remove a file or folder, open the compressed folder in File Explorer and then delete the file or folder from the content pane.
To extract all files from a compressed folder
Do either of the following:
Right-click the compressed folder, and then select Extract All.
Select or open the compressed folder and then, on the Extract tool tab, select Extract all.
The default extraction location is a new folder with the same name as the compressed folder, created in the folder that contains the compressed folder.

If you want to extract the files to a folder other than the one indicated in the Files Will Be Extracted To This Folder box, select Browse and then, in the Select a destination dialog box, navigate to the folder you want.
In the Extract Compressed (Zipped) Folders dialog box, select Extract.
To extract selected files from a compressed folder
Open the compressed folder in File Explorer.
Select the file or files that you want to extract.
Do one of the following:
Drag the selection from the content pane to the folder into which you want to extract the files.
On the Extract tool tab, in the Extract To gallery, select the folder you want to extract the selected files to.
On the Extract tool tab, in the Extract To group, select the More button, select Choose location, and then in the Copy Items dialog box, browse to the folder and select Copy.
Move and copy folders and files
It is often necessary to move or copy folders and files from one location to another. When you move something to a new location, it is essentially deleted from the original location and copied to the new location. When you copy something to a new location, a copy remains in each location.
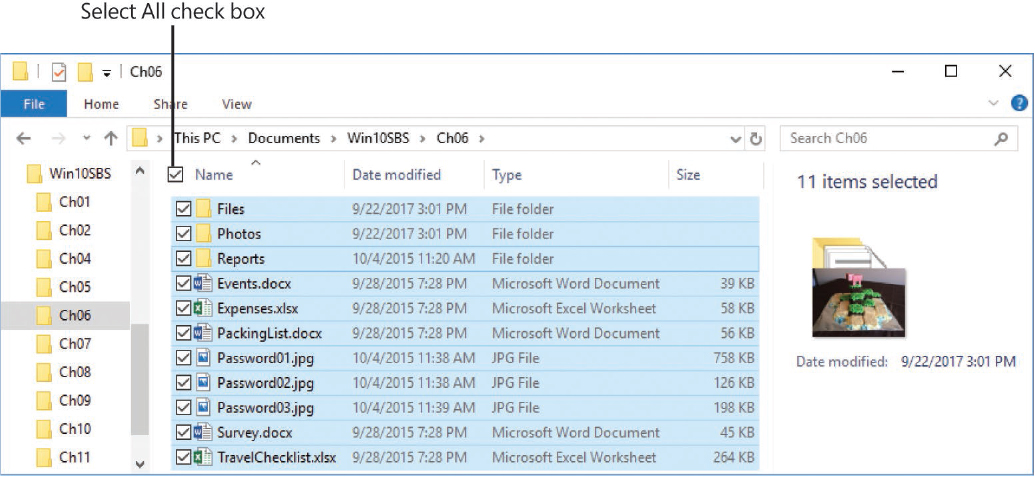
Before you move or copy items, you need to select them. There are various ways to select individual or multiple files in the File Explorer content pane. When multiple files are selected, the Details pane indicates the number of items and the total size of the selection. (Because the file sizes in the content pane are rounded up, the total in the Details pane will be more accurate.) If both folders and files are included in the selection, the Details pane indicates the number of items but not the cumulative size. You have the option of displaying check boxes in File Explorer to make it easy to select multiple files.

SEE ALSO For information about the File Explorer Details pane, see “Get to know File Explorer” in Chapter 5, “Explore files and folders.”
When you cut or copy a folder or file, the item is stored in a storage area called the Clipboard so that you can then paste one or more copies of it elsewhere. In addition to copying files and folders to other locations, you can also make copies of files in the original folder; when you do, File Explorer appends - Copy to the original file name to create the new file name.
When you move or copy a folder or file by dragging it, the item is not stored on the Clipboard.
To select all the items in a folder
On the Home tab, in the Select group, select Select All.
Press Ctrl+A.
When item check boxes are shown, select the check box to the left of the first column header.
To select multiple contiguous items
Select the first item, hold down the Shift key, and then select the last item in the group you want to select.
TIP It sometimes helps to group or sort the items to gather the ones you want to select.
To select multiple noncontiguous items
Select the first item, and then hold down the Ctrl key and select each additional item.
When item check boxes are shown, select the check box to the left of each item you want to select.
To copy selected items to the Clipboard
On the Home tab, in the Clipboard group, select Copy.
Right-click the selection, and then select Copy.
Press Ctrl+C.
To cut selected items to the Clipboard
On the Home tab, in the Clipboard group, select Cut.
Right-click the selection, and then select Cut.
Press Ctrl+X.
To paste items from the Clipboard
On the Home tab, in the Clipboard group, select Paste.
Right-click a blank area in the folder, and then select Paste.
Press Ctrl+V.
To move selected items to a different folder
On the Home tab, in the Organize group, select Move to and then either select the destination folder or select Choose location and browse to the destination folder.
Cut the files to the Clipboard, navigate to the new folder, and then paste the files into the folder.
Display the original folder and the new folder in two File Explorer windows. Use the left mouse button to drag the selected items to the new location.
Display the original folder and the new folder. Use the right mouse button to drag the selected items to the new location. Then select Move Here on the menu that appears when you release the mouse button.
To copy selected items to a different folder
On the Home tab, in the Organize group, select Copy to, and then either select the destination folder or select Choose location and browse to the destination folder.
Copy the files to the Clipboard, navigate to the new folder, and then paste the files into the folder.
Display the original folder and the new folder in two File Explorer windows. Hold down the Ctrl key and use the left mouse button to drag the selected items to the new location. Release the mouse button, and then release the Ctrl key.
Display the original folder and the new folder. Use the right mouse button to drag the selected items to the new location. Then select Copy Here on the menu that appears when you release the mouse button.
TIP You can make copies of another item in the same folder; the copies are appended with numbers to give them unique file names.
Delete and restore folders and files
Removing a file from your computer is a two-step process: You first delete the file, which moves it to the Recycle Bin—a holding area on your hard drive from which it’s possible to restore an item if you realize you need it. Then you empty the Recycle Bin, which permanently erases its contents. By default, Windows prompts you to confirm the deletion of files and folders. If you prefer, you can turn off this setting.
TIP If you aren’t sure whether you will need some files, consider backing them up to a DVD, an external hard drive, or an inexpensive cloud-based storage service such as Microsoft OneDrive.
There are some situations in which deleting something does not send it to the Recycle Bin. The most common are deleting from a shared network drive or an external USB drive.
If you realize immediately that you mistakenly deleted a file, you can often recover it by pressing Ctrl+Z to undo the deletion. If you realize it later, you can usually recover a deleted file or folder by opening the Recycle Bin, locating the item, and restoring it. You can recover a deleted file from the Recycle Bin at any time until you empty the Recycle Bin. You can’t open and work with files directly from the Recycle Bin.
You can search the contents of files in the Recycle Bin just as you can search the contents of files in other folders. If you activate the search box when the Recycle Bin is selected, both the Search and Recycle Bin tool tabs are displayed. Assuming that deleted files are listed in the content pane, you can search for any that match the text you enter in the search box.

TIP If you want to occasionally bypass the Recycle Bin, you can do so by holding down the Shift key when you press the Delete key or select the Delete button.
To delete an item
In the content pane, select the file or folder.
Do either of the following:
Press the Delete key.
On the Home tab, in the Organize group, select Delete.
In the Delete File dialog box that opens, select Yes to confirm the deletion and send the file to the Recycle Bin.
TIP You cannot delete a file by pressing the Backspace key.
To restore a deleted item
On the desktop, double-click the Recycle Bin.
Locate the file you want to restore. If it isn’t at the top of the list, here are a couple of tricks:
Sort by Name, Original Location, Date Deleted, or another column, if you know any of that information.
If you remember part of its name, enter that into the search box. This opens the Search tool tab.
Select the files you want to recover.
On the Recycle Bin Tools tool tab, in the Restore group, select Restore the selected items to return the items to the location from which they were deleted.
To turn off confirmation when deleting items
On the desktop, right-click the Recycle Bin, and then select Properties to display the Recycle Bin Properties dialog box.
Clear the Display delete confirmation dialog check box.
Select OK to apply your changes.
Recycle Bin size
The Recycle Bin is intended to be a place to temporarily store files that you think you no longer need. Keep in mind, however, that the contents of the Recycle Bin take up space on your hard drive. By default, 10 percent of a drive up to 40 GB in size is allocated to the Recycle Bin, plus 5 percent of any space over 40 GB. If your hard drive is divided into partitions and the Recycle Bin is on a 10 GB partition, only 1 GB is available for deleted files.
When deleting a very large file, Windows might inform you that the file is too large to store in the Recycle Bin and that it will delete it permanently. If you’re sure you won’t need to recover the file, you can allow Windows to delete the file; if not, you can cancel the deletion. On a small hard drive or drive partition, you might see this “too large” message quite often.
You might need to restrict the amount of space that is used by the Recycle Bin, or you might want to instruct Windows to bypass the Recycle Bin entirely. Both of these options are available from the Recycle Bin Properties dialog box.

To manage the Recycle Bin actions, locate the Recycle Bin on the desktop, right-click it, and then select Properties. Set the maximum size as you see fit, and then select OK to apply your changes.
Work with folder and file properties
Every folder and file has certain properties that describe it or determine how it can be used. Although you can see some of these properties in Details view in File Explorer, you can see the full set by selecting that file or folder in File Explorer and selecting the Properties command on the Home tab.
The Properties dialog boxes for folders and files are similar, but not identical.
View folder properties
The Properties dialog box for a folder typically has four tabs; five if version history is enabled. The tabs are:
General The General tab displays the folder’s name, some statistics about it, and a few attributes. You can edit the name and the attributes, though it is easier to edit the name in File Explorer.

The Read-only attribute is one that you will change most often. The Read-only attribute can be selected, cleared, or marked with a square box. If the attribute is selected, all the files in the folder and all the subfolders are read-only. If the attribute is cleared, all the files in the folder and all the subfolders are editable. And if the attribute is marked with a square, the folder and subfolders contain a mix of read-only and editable files.
Sharing Options on this tab control whether a folder is shared.
Security You can use the options on this tab to assign the folder’s access permissions to specific users or groups.
Previous Versions If you have enabled File History in Control Panel or PC Settings, all the files in specified folders are backed up periodically. Each backup is separate, so you can view and restore a specific version. You can use this tab to review the contents of the folder after each backup.
SEE ALSO For information about file versions and version history, see “Back up data” in Chapter 15, “Protect your computer and data.”
Customize The Properties dialog box for some folder types includes a Customize tab, which has some interesting options that you can set.

Optimize this folder for On this menu you can set the folder to one of five types: General, Documents, Pictures, Music, or Videos. This setting determines the file layout when you open the folder and whether a tool tab is displayed on the File Explorer ribbon when you select the folder.
Folder pictures Use this setting to assign an image to be displayed for the folder in the Details pane, or when the folder appears in an icon view that is larger than Small Icons.
Folder icons Use this setting to replace the default icon with one that you choose.
File Properties dialog boxes are very similar to those for folders. As with folder Properties dialog boxes, the content depends on the type of file you have selected. The file Properties dialog box includes a Details tab, which isn’t present in folder Properties dialog boxes. The information on this tab varies with the file type. The tab also provides an option to remove personal information.

Remove file properties
Selecting the Properties button on the Home tab opens the Properties dialog box for the selected item. If you select the arrow below the Properties button instead of the Properties button itself, you are presented with two options (if you have selected a folder, only the first option is enabled):
Properties Selecting this option displays the Properties dialog box for the selected item and is the same as selecting the Properties button.
Remove Properties Selecting this displays a dialog box in which you can choose to remove all the properties that can be removed, or only selected ones. One reason to do this is to remove personal information that is stored with some file types.

Some file types have no properties that can be removed. Others, such as Word documents, have a long list.
TIP The information displayed in the Remove Properties dialog box varies depending on the type of file selected when you choose the command.
To display the Properties dialog box for a folder or file
In File Explorer, select the folder or file you want to display properties for.
Do any of the following:
Right-click the file or folder, and then on the shortcut menu, select Properties.
On the Home tab, in the Open group, select the Properties button) not the arrow).
On the Home tab, select the Properties arrow, and then select Properties.
To remove personal information from a file
In File Explorer, select the file from which you want to remove personal information.
Do any of the following:
On the Home tab, in the Open group, select the Properties arrow, and then Remove properties.
In the Open group, select the Properties button to open the file’s Properties dialog box, and then on the Details tab, select the Remove Properties and Personal Information link at the bottom.
Right-click the file and select Properties, and then at the bottom of the Details tab, select Remove Properties and Personal Information.
In the Remove Properties dialog box, do either of the following:
Select Create a copy with all possible properties removed, and select OK.
Select Remove the following properties from this file, select the properties you want to remove, and select OK.
Key points
Choose a naming convention for files and folders that works for you and your organization, and apply it consistently.
You can compress folders and files to save space or to manage multiple items as a single unit.
You can move files and folders between locations in File Explorer, or make multiple copies of files.
If you accidentally delete a file, you can restore it from the Recycle Bin. Restoring a file returns it to the location from which it was deleted.
You can display, edit, and remove file properties from within File Explorer.
 Practice tasks
Before you can complete these practice tasks, you need to copy the book’s practice files to your computer. The practice files for these tasks are located in the Win10SBSCh06 folder. The introduction includes a complete list of practice files.
Create and rename folders and files
Display the practice file folder in File Explorer, and then perform the following tasks:
In the practice file folder, create a subfolder and name it MyFiles.
Rename the MyFiles folder as MySBSFiles.
Rename the Events document as Newsletter.
Compress folders and files
Display the practice file folder in File Explorer, and then perform the following tasks:
In the content pane, select the three Password files.
Save the selected files to a compressed folder, and name it PasswordPhotos.
Extract the files from the PasswordPhotos compressed folder to the Photos folder.
Move and copy folders and files
Display the practice file folder in File Explorer, and then perform the following tasks:
Select all the items in the folder, and then release the selection.
Select three items that are next to each other (listed contiguously) in the folder, and then release the selection.
Select three items that are not next to each other in the folder, and then release the selection.
Copy the Expenses workbook to the Clipboard. Open the Reports folder, and paste a copy of the Expenses workbook in that folder.
Return to the Ch06 folder. Cut the Survey document to the Clipboard, and then paste it into the Files subfolder.
Delete and restore folders and files
Display the practice file folder in File Explorer, and then perform the following tasks:
Delete the Photos folder and all its contents.
Navigate to the Recycle Bin. Then restore the Photos folder and all its contents.
Work with folder and file properties
Display the practice file folder in File Explorer, and then perform the following tasks:
Display the properties of the Photos folder.
Display the properties of the Password01 file.
Display the properties of the Expenses workbook. Determine whether the file is read-only. If it is, change that property.
Add your name as one of the properties of the Expenses workbook. Then use the commands in the Remove Properties dialog box to remove that property from the file.