
15. Protect your computer and data
In this chapter
For many people, computers and other “smart” devices have become an integral part of their lives. Even if you aren’t totally dependent on them, the failure of one or more of them would be at least inconvenient.
The power of modern laptops and tablets means that you can carry your information with you and easily access it for work or play. But mobile devices are more susceptible to being lost or stolen than the clunky desktop computer you abandoned, and if that happens, you could lose valuable information, and it might be misused by others.
Modern computers are reasonably robust, but the only absolute guarantee you can expect from any hardware device is that if you continue to use it long enough, it will eventually fail. A serious hardware failure might leave you stranded at a critical point in a work project, or unable to access information you need from the internet. Fortunately, it’s relatively easy to get back up and running quickly these days if you make use of the Windows 10 tools that are available to protect your computer and the data on it, to recover that data if the hardware fails, and to prevent others from accessing your data if your computer is stolen.
This chapter guides you through procedures related to updating system files, configuring update options, configuring privacy settings, restoring computer functionality, backing up data manually or automatically, and restoring your system.
Manage Windows updates
The code behind operating systems is usually in a constant state of change. This might be to resolve internal or external issues—for example, threats from new viruses or the need to improve drivers for the devices you can connect to your computer. Microsoft has stated that Windows 10 will be the last version of Windows (a great reason to buy this book!), but the actual meaning of that statement is that the company plans to maintain and update this version of Windows for the foreseeable future rather than to immediately begin the development of a new version. This is in part a reflection of the agile software development methodology that Microsoft has embraced. The methodology involves multiple function-specific teams completing rapid, collaborative development cycles and continually refining processes, rather than one long-term development process driven by management.
Update Windows system files
Windows Update is part of the Update & Security category of settings. Windows Update automatically checks for, downloads, and installs updates to the operating system (including the built-in Windows Defender security software), and related files, such as device drivers, on a regular basis. If your computer is turned off or is offline when the time comes to check, you might not get an update when it first becomes available to you, but you can manually check for updates whenever you want; this is an especially good idea if your computer has been turned off for a while (for example, if you don’t use it often or go on a long vacation).
If Windows Update locates available updates, it starts the process of downloading and installing them. Sometimes Windows Update delays certain update processes until a time that you’re not using your computer. You can choose to run those processes immediately if you want to.
If you install an update and later wish you hadn’t, you can uninstall it.
To display the Windows Update settings pane
Open the Settings window, select Update & Security, and then select Windows Update.

To check for and install Windows updates
Display the Windows Update settings pane.
In the Update status area, do one of the following:
If no updates are currently shown, select Check for updates.
If updates are available, select Install Now.
If Windows needs to restart the computer to complete the installation of updates, first ensure that you don’t need to use the computer for the next 15–60 minutes. Then save any files you’re working in, close any running apps, return to this pane, and select Restart Now.
To display your update history
In the Windows Update settings pane, at the bottom of the Update status area, select View installed update history.

To uninstall an update
Display the View installed update history settings pane.
At the top of the pane, select Uninstall updates.
In the Installed Updates window, select the update that you want to remove, and then on the menu bar, select Uninstall.


TIP The View Installed Update History pane displays updates installed since the last major release of Windows. If you’ve recently installed the Fall 2017 Creators Update or another major update, the update history might be empty.
Configure update options
Unlike previous versions of Windows, Windows 10 automatically checks for and installs updates to ensure that the security measures on your computer are current. Depending on the advanced option settings, if updates are available for Windows, the computer will either quietly install them while you aren’t using it, or ask you to initiate the installation.
You also have some options for the types of updates you get and the way they’re delivered to your computer. For example, Windows Update can also check for updates to other Microsoft products (such as Word, Outlook, and Skype) that are installed on your computer, and can optimize the delivery of updates by downloading them to your computer through other computers connected to yours through a local network or internet connection.
You can configure the following advanced options for Windows Update:
When the computer restarts Updates are automatically downloaded and installed, but you can specify the times that you use the computer so that Windows Update will not restart your computer during your workday, if a restart is necessary. Windows Update displays a reminder when a restart is necessary, but you can opt to display additional notifications.
What products you get updates for In addition to updating operating system files and drivers, you can update other Microsoft products and featured apps through Windows Update. It’s a good idea to select this option because many apps and tools don’t automatically update.
How soon you get upgrades With some Windows 10 editions, including Professional, Enterprise, and Education (but not Home), you can defer upgrades to your computer. When you defer upgrades, new Windows features won’t be downloaded or installed for several months after they’re available. Deferring upgrades doesn’t defer security updates, but it does prevent you from getting the latest Windows features as soon as they’re available.
How updates are delivered This is a new and interesting feature for Windows 10. If you have several Windows 10 computers on your network and you enable this option, one computer does the download, caches the files on the network, and then sends the files to the other computers. This can substantially reduce the bandwidth you consume each month.
There is also an option, called Delivery Optimization, that allows your local computers to pass updates to and from known computers on your local network and unknown computers through the internet. This is the default update distribution model for Windows 10 Home and Windows 10 Professional. (The Enterprise and Education editions of Windows 10 are configured to pass updates to and from local network computers only.) This process helps to distribute security updates faster, but can increase your bandwidth usage. If you want more information about this, you can select the Learn More link.
Get Insider Builds You can sign up with the Windows Insider program to receive preview builds of upcoming Windows 10 versions. These builds have been tested by the product team, but they have not been released to the general public yet. You’ll have earlier access to new features, but you might also have to deal with issues in those features. Microsoft suggests that you do not install a preview build on a computer that is critical to your happiness or business. If something is drastically wrong with the preview build, you might end up having to reformat and reinstall Windows from scratch.

IMPORTANT If you decide to get Insider builds, be sure to read the topics “Restore computer functionality” and “Back up data” later in this chapter.
Windows chooses a time to install updates and restart your computer based on your activity on the computer and the working hours you stipulate, so there’s less chance of interrupting your work. You can configure a time span of up to 18 hours per day during which Windows won’t restart your computer without first notifying you.

To configure update installation options
In the Windows Update settings pane, in the Update settings section, select Advanced options.
In the Advanced options pane, do any of the following:
Select or clear the Give me updates for other Microsoft products when I update Windows check box.
If available, select or clear the Defer upgrades check box.
Select Delivery Optimization, and turn on or off Allow downloads from other PCs. If you turn it on, select whether you want to accept only downloads from computers on your network (the safest option) or also from computers on other networks (the potentially faster option).
To specify times that Windows should not restart your computer
Display the Windows Update settings pane.
In the Update settings area, select Change active hours.

Set the Start time and End time to indicate the time during which you don’t want Windows to automatically restart. Then select Save.
To set a specific restart time
In the Windows Update settings pane, in the Update settings section, select Restart options.
Turn on Schedule a time, and then set the time and day you want Windows to restart your computer.
To configure restart notifications
In the Windows Update settings pane, in the Update settings section, select Restart options.
Turn on Show more notifications.
Configure privacy settings
Privacy, or at least some illusion of privacy, is important to most people. When you use a computer regularly, much of your life takes place inside that box. The operating system, the apps you use, and the sites you visit all have access to bits of information about you. Windows 10 privacy settings can limit how much of that information the apps and devices that are connected to your computer can see, and, to some extent, what the apps and devices can use that information for.
Much of the emphasis of the privacy settings is on how Microsoft and other companies can use any information they gather to present you with advertising that is theoretically more pertinent to your lifestyle than random advertising might be. From that point of view, because you are going to be presented with ads anyway, it seems like a benefit to have those ads more accurately related to your interests.
In the end, it is up to you to consider the benefits, or lack thereof, in sharing your information.
TIP The placement of ads on websites provides a way to defray the expense of offering you free information. If the site is useful to you and the ads aren’t too distracting, then this might be acceptable. But a lot of sites show up in web searches that exist only to barrage people with ads. Your browser can block pop-up ads, but it can’t automatically block inline ads. If you are tired of waiting for these ads to load before you can start scrolling through the page, search the internet for “remove ads from your browser” and peruse the results. Some of the options are pretty amazing.
In Windows 10, you can configure general privacy settings and additional settings for the following 18 categories of information:
Account info |
Camera |
Microphone |
App diagnostics |
Contacts |
Notifications |
Automatic file downloads |
Other devices |
|
Background apps |
Feedback & diagnostics |
Radios |
Calendar |
Location |
Speech, inking, & typing |
Call history |
Messaging |
Tasks |

Instead of going into a lot of detail about all of these privacy settings, this chapter takes you on a quick tour and leaves it up to you to explore those areas that interest you. Sharing some of this information can be beneficial to you, and most is not harmful. Here is a bit of information that might be helpful:
Your advertising ID is a unique ID that is connected to the email address you use to sign in to Windows 10. If you use a Microsoft account to sign in to OneDrive, Office 365, email, and other computers, Microsoft will accumulate information from all sources of these under this one ID.
Many settings refer to apps that might use your information.
Windows 10 preinstalls a lot of apps that you might never use. You can turn off the ability for the app to access your data in the settings, but if you don’t want to use the app at all, it is better to uninstall it.
TIP This works only for apps that came from the App Store. If the app is part of Windows, such as Mail or Maps, then you can’t uninstall it.
You can control settings specific to each category, and within many categories you can turn on or off access for specific apps. For example, in the Microphone category, you can either prevent all apps from using your device’s microphone or allow the use of the microphone and then turn access on or off for specific apps.

After you select a privacy category, there is generally a pause as Windows scans your installed apps to identify those that might need access to this category. Windows then lists these below the heading Choose Apps That Can… use or access the feature. If no apps are listed, then no currently installed apps need the feature in this category. Only Store apps appear in this list; desktop apps don’t. So you could, for example, turn off camera access for the OneNote or Skype Store app, but not for the corresponding desktop app.
Some location features, such as geofencing, are applicable only if you have installed apps that use them.
The Speech, inking, & typing options include features that allow Windows and Cortana to “get to know you better.” If you plan to use Cortana, don’t turn off Getting To Know You.
Additional settings that are related to privacy and advertising in Microsoft products are available at account.microsoft.com/privacy/ad-settings. That page also includes links to more information about how Microsoft might use your information.
If you use your computer to manage your life, especially if that computer is portable, leaving many of the privacy settings enabled makes sense. It is useful to you if your computer (and Cortana) know where you are and which meetings you have scheduled and who you are exchanging email with. And sharing information about typing, voice recognition, and other activities with Microsoft can certainly help them improve Windows and their apps in the future. Give some thought to what is useful to you to share, and what isn’t.
To manage privacy settings
In the Settings window, select Privacy.
Review the options in each pane. Consider how each might impact you.
Turn on each option you want to use, and turn off those you don’t.
Restore computer functionality
Computer software tends to be updated frequently, in an effort to improve its operation, introduce new features, or increase security. But every update is also an opportunity for a little bug to creep in and cause problems. And a few years of updates, even when perfectly harmless on their own, can have the effect of scrambling the computer’s brain to the point that it performs at less than ideal speeds.
Windows 10 offers several options for recovering from system problems. In order of impact, these include:
Reverting to a system restore point, which rolls back app and driver changes that have occurred since the restore point was created but retains documents and other files created by those apps. This is often a simple fix when a problem is introduced with an app or driver update.
Resetting the PC, which offers three levels of change:
Removing all apps and reverting to default settings, but retaining files.
Removing all apps and files, and reverting to default settings.
Removing all apps and files, reverting to default settings, and cleaning the hard drive. If you’re planning to physically part ways with your computer, this option provides the highest level of security for your personal information.
Reverting to a clean installation of Windows by using the Fresh Start feature, which reinstalls and updates Windows 10 and retains your files and settings, but removes any apps that aren’t installed with Windows. This is almost like having a brand-new computer.
TIP Depending on your computer system and whether you participate in the Windows Insider program, it might also be possible to revert to a previous version of Windows 10. On systems that support this option, it is available in the Recovery pane of the Update & Security settings page.
Regardless of the option you select, take the time to consider the steps you need to take to protect any software licenses that have been activated on your computer. If you use Office 365 apps, you can easily reinstall them from the cloud. However, if you select a restore process that uninstalls an Adobe app, for example, the license that is assigned to your computer will be void, and it’s a relatively difficult process to regain access. Before initiating a process that uninstalls an Adobe app, be sure to start the app and use the command on the Help menu to deactivate it on your computer, thus making the license available for reuse.
Create and revert to restore points
The internet is a wonderful resource, but it also exposes your computer to viruses, hackers, and other potentially harmful things.
If your computer starts performing poorly, especially if that happens just after performing updates or perhaps downloading something that installed obnoxious adware that you can’t seem to get rid of, you can restore Windows to an earlier point in time, called a restore point. Doing this doesn’t change your personal files, but it might remove recently installed apps and drivers (which could be a good thing if they are the cause of the problem).
System restore points are automatically added before significant changes are made, but if you are about to do something that makes you a bit nervous, it doesn’t hurt to set one manually.
You create restore points from the System Protection tab of the System Properties dialog box.
TIP You can create a restore point for any drive but generally need to do so for only your system drive.

When you want to restore your computer to an earlier restore point, you open the System Properties dialog box and display the System Protection tab. From there, you select the System Restore button to start the System Restore wizard.

Only the last few restore points are displayed. You can select the Show More Restore Points check box to display any others that exist.
To create a system restore point
Open File Explorer. In the Navigation pane, right-click This PC, select Properties, and then select System protection to display the System Protection tab of the System Properties dialog box.
In the Protection Settings section, select the drive you want to create a restore point for, and then select Create….
In the Create a restore point dialog box, enter a description, and then select Create. Windows creates the restore point, and informs you after it is done.

To revert to a saved system restore point
Open the System Properties dialog box and display the System Protection tab.
Select System Restore… to start the System Restore wizard. Read the introduction message, and then select Next to display the Restore Your Computer To The State It Was In Before The Selected Event page.
Select a restore point from the list, or if the restore point you want to use isn’t listed, select the Show more restore points check box to add automatic restore points to the list, and then select a restore point.
Select Scan for affected programs to have the wizard search and display a list of programs and drivers that will be deleted or restored. Make a note of any programs or drivers you might need to reinstall after you restore your computer, and then select Close to return to the wizard.
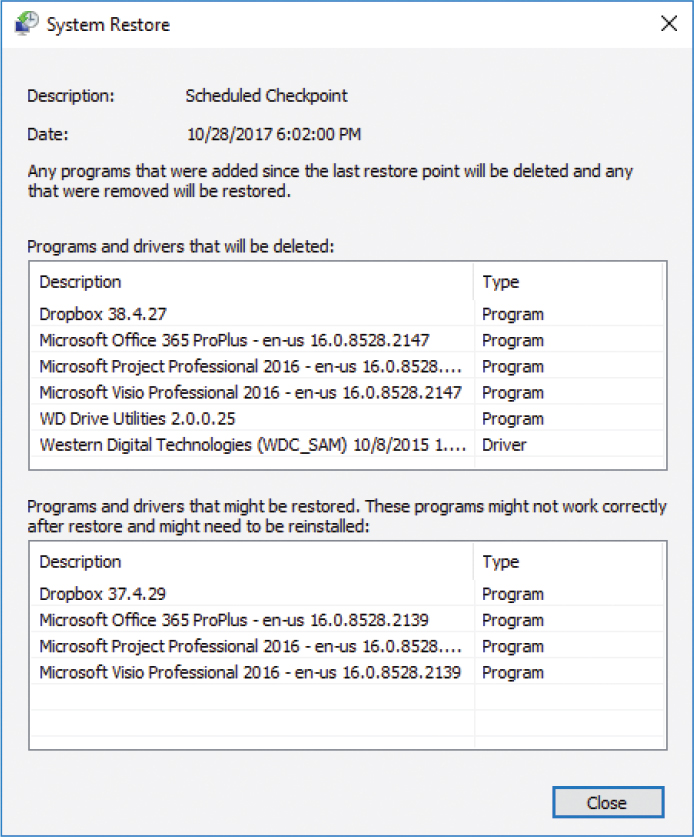
Repeat steps 3 and 4 until you locate the checkpoint that you want to restore to. Then select Next to restore your computer to the selected restore point.
Refresh or reset your computer
The ability to reset your computer was first introduced with Windows 8, and has proven to be a good recovery path that requires less effort than wiping your computer, reinstalling Windows and all your apps, and recovering all your data. Refreshing retains your personal files, and resetting removes them. These two options have been rolled into the Reset This PC wizard.
Resetting your computer is a more serious action than restoring to a saved restore point; it is a bit like upgrading to a fresh version of Windows 10. Here’s what happens when you reset your computer:
You have the option of keeping your personal files (files stored in your My Documents folder).
Your computer settings are reset to the defaults.
Your Store apps remain installed, and your desktop apps are uninstalled. Desktop apps that were installed by the computer manufacturer might be reinstalled. A list of the removed apps is saved as a file on your desktop.
Resetting your computer reinstalls Windows and deletes all apps that weren’t included in the original installation. This is a drastic action. If you plan to continue using this computer, you will want to back up all files to another location and make sure you have setup files for any desktop apps you will want to reinstall. Your computer should restart and then take a while (10 minutes to several hours, depending on various things) to complete the reset. After the reset is done, you will need to re-create your account and reinstall any missing apps.
If you’re experiencing problems with your computer, first try restoring it to a saved restore point. If that doesn’t solve the problem, you can escalate to resetting the computer but keeping your files, and then to resetting it completely (removing everything).
To reset your computer and keep your files
In the Settings window, select Update & Security, and then select Recovery.
In the Reset this PC section, select Get started to display your reset options.

Select Keep my files. Windows scans your computer in preparation for the reset, and displays a list of apps that will be removed.

Review the list of apps that will be removed. If any of the apps are from Adobe or another manufacturer that requires you to release the license before you can reuse it, deactivate the apps before continuing the Reset process. When you’re ready to continue, select Next.
If you upgraded to Windows 10 within the past 30 days, the wizard warns you that resetting your computer will prevent you from being able to roll back to the previous version of Windows.
IMPORTANT If you want to retain the ability to roll back to your previous version of Windows using your current license, select Cancel at this point.
When you’re ready to commit to the process, select Next, and then select Reset.
Your computer should restart and then take a while (10 to 60 minutes, depending on variables such as your internet connection speed) to complete the reset.
To reset your computer without keeping your files
In the Settings window, select Update & Security, and then select Recovery.
IMPORTANT If you have any installed apps from Adobe or another manufacturer that requires you to release the license before you can reuse it, deactivate the apps before continuing the Reset process.
In the Reset this PC section, select Get started to display your reset options.
Select Remove everything.

If you want to ensure that all personal data is removed from the computer, select Remove files and clean the drive. Otherwise, select Just remove my files.
If you upgraded to Windows 10 within the past 30 days, the wizard warns you that resetting your computer will prevent you from being able to roll back to the previous version of Windows.
IMPORTANT If you want to retain the ability to roll back to your previous version of Windows using your current license, select Cancel at this point.
When you’re ready to commit to the process, select Next, and then select Reset.
To revert to a clean installation of Windows 10
In the Settings window, select Update & Security, and then select Recovery.
In the More recovery options section, select Learn how to start fresh with a clean installation of Windows. Then if prompted to do so, provide permission to switch to Windows Defender.

In the Windows Defender Security Center, on the Fresh start page, select Get started. In the User Account Control dialog box that prompts you to allow Windows Defender to make system changes, select Yes.
In the Fresh start window that opens, read the description, and then select Next. Windows scans your computer in preparation for the refresh, and displays a list of apps that will be removed.
Review the list of apps that will be removed. If any of the apps are from Adobe or another manufacturer that requires you to release the license before you can reuse it, deactivate the apps before continuing the Reset process. When you’re ready to continue, select Next.
If you upgraded to Windows 10 within the past 30 days, the wizard warns you that resetting your computer will prevent you from being able to roll back to the previous version of Windows.
IMPORTANT If you want to retain the ability to roll back to your previous version of Windows using your current license, select Cancel at this point.
When you’re ready to commit to the process, select Next, and then select Start.
Back up data
Although it would be nice to believe that every “new and improved” computer will be the last one we need, the reality is that your computer will eventually wear out, be unable to support the latest technologies, fall off the kitchen counter, or get left at an international airport (and you’ll never get that one back).
If you maintain a fresh backup of your data and have a system recovery drive, you will recover from a device disaster a lot faster and with less data loss than someone who isn’t prepared.
Your computer, operating system, and apps are important, but they can be replaced. The personal files that are on your computer—the documents you have written, pictures you have taken, and other data—are much harder to replace. They might be worth many times the cost of a new computer. It is ironic that backing up data is so easy, and that so few people do it consistently.
These days, it’s reasonably simple to store all your data in the cloud. If your organization uses Office 365, you can store work files in SharePoint and OneDrive for Business, and personal files in OneDrive. Even if you’re committed to the online lifestyle, though, you probably have a few files that remain on your hard drive. It’s good to have a process in place for backing up these files either manually or automatically. This topic discusses the tools you can use to do that.
Back up data to OneDrive
OneDrive is free online storage that comes with your Microsoft account. If you have a Microsoft account, and use it to sign in to your computer, a link to your OneDrive cloud storage is automatically created in C:Users[your account]OneDrive.
TIP At the time of the Windows 10 Fall 2017 Creators Update release, Microsoft is providing 5 GB of free OneDrive storage with your Microsoft account, or 1 terabyte (TB) for Office 365 subscribers. But Microsoft offers various ways to accumulate more storage. Go to onedrive.live.com/ about and select See Plans to see the available plans for your location.
If your organization uses Office 365, you might have both a personal OneDrive account and a OneDrive for Business account. This topic is specific to personal OneDrive accounts, but much of the information also applies to OneDrive for Business accounts.
OneDrive is more than just a storage location; it is a storage location you can use to synchronize access to your files from every computer you sign in to with your Microsoft account, and from which you can share files with other people.
Every computer you sign in to with your Microsoft account credentials should automatically display your OneDrive folder in File Explorer and keep the files synchronized with those on your other devices. If you have OneDrive and OneDrive for Business accounts, these are differentiated by name in File Explorer, and by icon color in the taskbar notification area.

The Files On Demand feature of OneDrive makes it possible to see all your online files from your computer without filling your storage space with local copies. In File Explorer, the Status icon indicates whether you have an offline copy on your computer that syncs with the online version.
Icon |
Status |
Description |
|
Online only |
Available to edit if your device is connected to the internet; available locally thereafter |
|
Locally available |
Offline copy that can be removed to free up storage space |
|
Always keep on this device |
Offline copy that you want to retain offline |
The online/offline status of a file is specific to the device you’re working on. If you don’t want files to take up space on your device, change them to Online Only to retain the version on OneDrive and any other devices you’ve downloaded it to. Don’t delete the file, because doing so deletes the online version and any other offline versions! If you do accidentally delete a file, you can recover it from OneDrive online.
You can also sign in to your OneDrive online account and from there connect to the hard drive of any other Windows 10 computer that you sign in to with the same account, and that has OneDrive set up properly. You sign in to OneDrive online by using your Microsoft account credentials. From here you can view and share the files that are backed up to OneDrive from the computers you sign in to by using your Microsoft account.
You can access your files on OneDrive from pretty much any device, including Windows, Android, Mac OSX, iOS, Windows Phone, and Xbox systems. All you have to do is install the OneDrive app (or OneDrive for Business if you have an account of that type) from the appropriate app store.
If you work on multiple computers, you can store all your files on OneDrive so that you have access to the most up-to-date versions from any computer. If you store files locally on computers, OneDrive can help you to access those files, if you need to, by using the Fetch feature. Fetching files is a method of remotely accessing a Windows 10 computer from another computer by using your OneDrive account. You must enable the fetching of files on the computer that you intend to access remotely, and the computer must be turned on and connected to the internet.
To display your synchronized files on a connected computer
Open File Explorer. In the Navigation pane, select OneDrive or OneDrive – Personal if you have the personal and business versions.
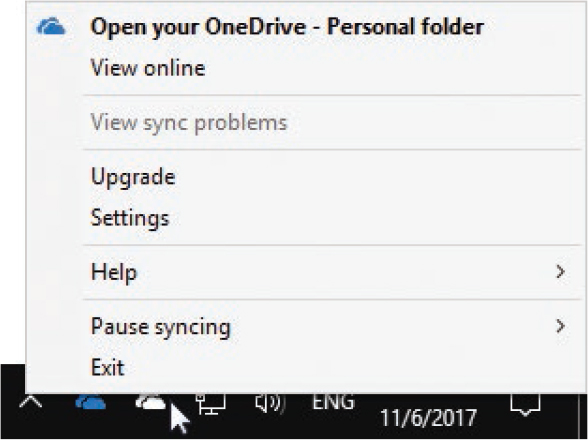
In the taskbar notification area, select the OneDrive icon. Then on the title bar of the OneDrive pane, select the Open folder icon.
TIP If the OneDrive icon isn’t on the taskbar, select the Show Hidden Icons icon and then select the OneDrive icon from the hidden icons panel.
In the taskbar notification area, right-click the OneDrive icon, and then select Open your OneDrive folder.
To open OneDrive online
Open your browser and go to onedrive.live.com.
In the taskbar notification area, right-click the OneDrive icon, and then select View online.
In the taskbar notification area, select the OneDrive icon. On the title bar of the OneDrive pane, select the menu button (⋮), and then select View online.

To quickly access OneDrive files you’ve recently worked with
In the taskbar notification area, select the OneDrive icon.
In the OneDrive pane, point to the file you want to open, select the menu button that appears to the right of the file name, and then select Open.
TIP From the file-specific menu, you can open or share files or open the online storage location.
To store files on OneDrive
Drag, or copy and paste, files from other locations to your OneDrive folder in File Explorer.
You can place your original working files, such as Word documents, on OneDrive, and access and edit them there. Or you might want to work on your files elsewhere on your hard drive and drop a copy in OneDrive occasionally.
To recover a file deleted from OneDrive
Open OneDrive online.
In the left pane, select Recycle bin.
In the recycle bin, do either of the following:
To restore all the deleted files to their original locations, on the menu bar, select Restore all items.
To restore one or some of the files, select the check box to the left of each file you want to restore. Then on the menu bar, select Restore.
To manage OneDrive settings
In the taskbar notification area, right-click the OneDrive icon.
On the OneDrive shortcut menu, select Settings to open the Microsoft OneDrive dialog box.

To specify the folders you want to synchronize to a computer
Open the Microsoft OneDrive dialog box.
On the Account tab, select Choose folders to display a list of the folders on your OneDrive site, the amount of data that is stored in each folder, and the amount of storage space that is available on your computer.
In the folder list, select the check boxes for the folders you want to synchronize with the computer, and clear the check boxes for the folders you don’t want to synchronize. As you change your selections, OneDrive keeps track of the storage space requirements.

Select OK in each of the open dialog boxes to implement your changes.
TIP You configure folder synchronization independently on each computer that you connect to OneDrive, and you can make different selections on different computers. For example, you might want to synchronize your Pictures folder on your personal laptop and not on your work computer.
To enable the fetching of files from a computer
Open the Microsoft OneDrive dialog box.
On the Settings tab, select the Let me use OneDrive to fetch any of my files on this PC check box.
Select OK to close the dialog box.
Exit and then restart the OneDrive app by following these steps:
In the taskbar notification area, right-click the OneDrive icon, and then select Exit.
On the Start menu, in the app list, scroll or jump to the OneDrive entry, and select it.
IMPORTANT You must enable file-fetching on each computer that you want to be able to fetch files from.
To fetch files remotely
Open OneDrive online.
In the left pane, select PCs to display a list of the computers associated with your Microsoft account that the OneDrive app is installed on.
In the PCs list, select the name of the computer you want to fetch files from to display a list of the files available on that computer.

Navigate to the file you want to fetch, right-click it, and select Download.
It is a good idea to go through this process a few times before you really need to use it, to become familiar with the process when you aren’t under pressure.
Automatically back up data by using File History
If you use your Microsoft account to sign in to Windows 10, you can take advantage of OneDrive to back up files to the cloud and share them among your computers. But it is also nice to have an offline backup that maintains versions and allows you to restore earlier versions. The File History feature in File Manager helps you with this task.
File History can automatically back up each version of files that are in your libraries, contacts, favorites, and on your desktop. If you have files or folders elsewhere that you want backed up, you can move them into one of your existing libraries or create a new library. If you have a OneDrive account that is associated with your account, it is technically included under your Users account, so it is also included in the File History backup.
To activate File History
In the Settings window, select Update & Security, and then select Backup to display the File History controls.
TIP Before you configure a File History storage location, the Backup pane displays an Add A Drive button. After you select a drive, the button changes to an Automatically Back Up My Files toggle button that is set to On.
To begin using File History, select Add a drive. Windows searches your computer and displays a list of the connected drives that you can back up files to by using File History.

Do either of the following:
To configure File History to use a connected external drive, select the drive from the list.
To configure File History to use a shared network folder, select Show all network locations, and then select the network folder.
In the Backup pane, select More options to display the backup frequency and scope settings.
In the Backup options pane, review the Back up these folders list. If you want to exclude any of these folders from the backup, select the folder, and then select Remove.

TIP If the Back Up These Folders list includes your local OneDrive or OneDrive for Business folders or subfolders, or other folders that contain files that are backed up elsewhere, it’s probably a good idea to remove them.
To add a folder to the Back up these folders list, select Add a folder. In the Select Folder dialog box, browse to and select the folder you want to include, and then select Choose this folder.
If you want to specifically exclude a subfolder of a folder that you’re backing up, scroll to the Exclude these folders section near the bottom of the Backup options pane, and select Add a folder. In the Select Folder dialog box, browse to and select the folder you want to exclude, and then select Choose this folder.
When you finish adding and removing folders, scroll to the top of the Backup options pane, and do the following:
Ensure that the Total Space available in the selected backup location exceeds the Size Of Backup. If it doesn’t, change the backup location or remove folders from the backup.
Expand the Back up my files list, and then select a frequency between Every 10 minutes and Daily.
Expand the Keep my backups list, and then select a retention period from 1 month to Forever, or select Until space is needed to have File History manage the retention period based on available storage space.
To start using File History, select Back up now.
TIP You can also set up and manage File History from Control Panel. A few advanced settings there are not yet available in Settings.
To view versions of a file that has been backed up
In File Explorer, browse to and select a file that has been backed up.
On the Home tab, in the Open group, select History.
A file viewer displays the most recently backed up version of the file. The day, date, and time of the file backup, and the number of available backups, are displayed at the top of the window.

You can do any of the following:
Select the Restore button (the circular arrow in the green circle) to restore that version of the file to its original location.
Select the Previous version or Next version button (to the left and right of the Restore button) to display a different version of the file.
To manage file versions
In File Explorer, select a file you have previously backed up. Right-click the file, and then select Restore previous versions to display the Previous Versions tab of the file’s Properties dialog box.

Select a file version to enable the Open and Restore buttons, and then do any of the following:
Select Open to open a read-only version of the file in its default app.
Select the Open arrow, and then select Open in File History to display the versions in the File History viewer.
Select Restore to restore the selected version to the file’s original location.
Select the Restore arrow, and then select Restore To to select a different location.
Back up and restore your system
You can back up an entire drive (or drives) to a system image that contains all operating system and user files, configuration information, and apps. The system image includes everything required to restore the drive to the state you capture in the image. This is a complete restoration to the imaging point, unlike the restorations provided by File History, restore points, or Reset Your PC, which bring back specific portions of the information that is stored on your hard drive. If you create a system image before your hard drive crashes, you can install a new hard drive, restore that image, and be ready to work with all your apps and data that you saved with that image.
IMPORTANT Because a system image is generally needed only if the hard drive crashes and you can’t boot up, its usefulness depends on having the image files available on some form of external media. If the old hard drive is still functional, you can restore the system image to that hard drive to return it to the state it was in at the imaging point. If the hard drive no longer functions, it might not be practical to install a new hard drive and restore the image to it. You should consult an expert.
You might choose to create periodic system images to ensure that you have a recent one available. When you do, the first image you create is a complete image of the drive, and each subsequent image stores only the changes from the previous image. Because of this layered storage model, it is possible to restore the most recent image or an earlier one. In this way, restoring to a system image is similar to reverting to a specific restore point.
Backup images safeguard your data in the event of system failure, but you need to be able to start up (boot) your computer after you wipe the hard drive clean. You can start up your computer from a bootable DVD that contains installation files. You might have received a DVD from your computer manufacturer when you bought the computer. If you didn’t, you will need to create some kind of boot media. Windows 10 allows you to create a bootable USB recovery drive.
You can quickly and easily create a recovery drive that you can use to boot up and troubleshoot problems with your computer. The recovery information is stored on a USB drive. The USB drive must have a capacity of at least 8 GB, although it might require as much as 16 GB or 32 GB. Windows will scan your computer at the beginning of the imaging process and tell you how large a drive you need. The drive doesn’t have to be blank, but the process of creating the boot image reformats the drive and deletes its contents, so be sure to back up anything you want that is on the drive.
IMPORTANT A bootable recovery drive must be created in the same operating system type (32-bit or 64-bit) that you will boot into later. Ideally, you will create it on the same operating system you have backed up.
If you ever need to restore from a system image, the process will depend on whether your computer can still boot into Windows.
If the computer can boot into Windows, follow the process described in “To restore a system image from within Windows 10,” later in this topic.
If the computer can’t boot from the hard drive and you created a USB recovery drive as described in the procedure “To create a bootable USB recovery drive,” you should be able to boot from that; however, the process takes a bit of effort and varies based on the specific computer.
If the computer can’t boot into Windows at all, follow the process described in “To boot from a recovery drive or disc,” later in this topic.
TIP If you are using a wireless or USB keyboard, your ability to get in to the BIOS will depend on the order in which the drivers for it are loaded. After you do get in, touch controls and the mouse most likely will not work.
To create a system image backup
Open Control Panel, and then do one of the following:
In Category view, in the System and Security area, select Backup and Restore (Windows 7).
In Large Icons or Small Icons view, select Backup and Restore (Windows 7).
In the left pane, select Create a system image to start the Create A System Image wizard. The wizard scans your system for storage devices that meet the requirements.

Select the location for the image. If you have created previous images, it is best to use the same location, if there is room, so all your images are in one place. Then select Next to display the backup settings.

Review and confirm the backup settings, and then select Start backup to start the backup. Windows displays a progress bar during the backup process. You can stop the process from the progress bar if you need to.
After the backup is complete, the wizard asks whether you want to create a system repair disc.
TIP Creating a system repair disc is a good idea. You can boot your computer from it, and it contains Windows system recovery tools that you can use to restore your computer from a system image.
Select Yes, insert a blank disc in your CD/DVD drive, and then select Create disc.
After the disc is complete, select Close and then select OK to finish the process.
TIP Your first backup will take quite a while. Subsequent ones to the same location take less time.
To restore a system image from within Windows 10
Shut down all running apps.
Do one of the following to restart your computer in troubleshooting mode:
On the Start menu, select Power. Then hold down the Shift key and select Restart.
In the Settings windows, select Update & Security, select Recovery, and then in the Advanced startup section, select the Restart now button.
On the Choose an option screen, select Troubleshoot.
On the Troubleshoot screen, select Advanced options.
On the Advanced options screen, select System Image Recovery. Your screen will briefly go blank, and then display the message that Windows is preparing System Image Recovery.
If the computer is configured with user accounts for more than one Microsoft account, follow the System Image Recovery instructions to select your account and enter the password.
The system locates and displays drives that contain image files. Select the image you want to use, select Next, and then continue to the end of the wizard.
To create a bootable USB recovery drive
Do either of the following:
On the Start menu, in the app list, select the Windows Administrative Tools folder, and then select Recovery Drive.
Open Control Panel in Large Icons or Small Icons view, and then select Recovery.
A User Account Control message box opens. Agree to the request to allow the Recovery Media Creator to make changes to your computer. The Recovery Drive wizard starts.

If you want to boot from a USB flash drive, clear the Back up system files to the recovery drive check box.
If you haven’t already done so, insert the flash drive into a USB port and wait until it is recognized. Then select Next.

If multiple drives are available, select the one you want to use, and then select Next.
IMPORTANT Everything on the drive you select will be deleted. If you routinely back up files to an external USB hard drive, it might be among the USB drives listed. If you select the wrong device, all your backups will be gone.
Read and heed the warning that everything on the drive will be deleted. Make sure this is what you intend to do. Then select Create to start the process. A progress bar displays the progress.
After the process completes, select Finish to close the window.
TIP You can follow the first few steps in the recovery process to confirm that you can boot from this drive.
To boot from a recovery drive or disc
Power your computer all the way down and then turn it back on.
If the boot process goes far enough to display the key to press to enter Setup, press it. This may be F8 or Del or some other key.
IMPORTANT Read the instructions on the screen, read your computer documentation, and search the web for more information before you make any changes in Setup. Making changes that you don’t fully understand can cause problems.
In the BIOS Setup Utility, press your keyboard arrow keys to select an option such as Boot Options, Boot Order, or something else that includes the word Boot.
IMPORTANT The BIOS Setup Utility varies by computer make and model, so instructions are necessarily a bit vague. Basic instructions are usually included on the BIOS setup screen. If you have problems, search the web for information specific to your computer.
In the Boot Priority Order section (or something similar), select 1st Boot Device and press Enter to display a list of devices.
Select Removable Device or CD&DVD, depending on what you want to boot from, and then press Enter.
IMPORTANT Depending on your hardware and BIOS, there might be other changes. It is best to read your computer manual or search for information about that model.
After making the changes, press F10 to save and exit.
Your computer should now boot from the USB drive and display the Options screen that appears in step 1 of the procedure “To restore a system image from within Windows 10.” Follow those directions from this point forward.
Key points
Windows 10 self-manages the update process. You can configure update options to control how and when your computer gets updates.
You can specify which apps have access to your calendar, camera, contacts, and other information to protect your privacy.
If a software change causes a problem, you can revert to a system restore point to undo the change. If your computer becomes truly sluggish, you can reset it or revert to a clean installation of Windows.
You can use the free OneDrive storage that comes with your Microsoft account to store files or file backups that you want to keep safe or have available from multiple computers.
If you turn on file fetching, you can access files stored on any Windows 10 computer through OneDrive.
The File History feature will automatically back up selected folders on a regular basis; you can restore older versions of files that are saved by File History.
You can create a system image backup that allows you to do a complete restoration of your computer system in the event of a hardware failure.
 Practice tasks
No practice files are necessary to complete the practice tasks in this chapter.
Manage Windows updates
Perform the following tasks:
Display the Windows Update pane.
Check for updates, or, if there are updates waiting, install them.
Display the update installation options, and configure the settings the way you want them.
Configure privacy settings
Perform the following tasks:
Display the Privacy page of the Settings window.
Review the settings in each pane. Consider the implications of sharing that information, and configure the settings the way you want them.
Restore computer functionality
Perform the following tasks:
Create a restore point.
In the Settings windows, select Update & Security, select Recovery, and then in the Advanced startup section, select the Restart now button to display the Troubleshooting screen. Investigate the options that are available from this screen so you’re familiar with them if you need them in the future.
Display the Recovery pane of the Update & Security settings page. Explore the options to reset your computer, but do not complete the process.
Back up data
Perform the following tasks:
In the notification area of the taskbar, locate the OneDrive icon.
From the OneDrive shortcut menu, open the Microsoft OneDrive dialog box. Display each tab in turn, and consider the available options.
Review the folders that are synchronized to this computer, and configure OneDrive to synchronize only the folders you want.
If you work on multiple computers and want to be able to fetch files from this computer, enable that feature. (Don’t forget to exit and restart the OneDrive app.)
Open OneDrive online and review the site options, which change from time to time and might be different from those shown in this book.
Display the File History pane.
If File History has not yet been configured, scan your computer system for a storage drive. If File History locates a suitable drive, do the following:
Add the storage drive to File History.
Display the File History options. Review the list of folders that File History backs up. Modify the list as necessary to include the folders that you want to back up, and exclude folders that you don’t want to back up.
Set the backup frequency, and specify how long you want to keep each version.
Start the File History backup process.
If File History has been configured, do the following:
Display the File History options. Review the list of folders that File History backs up, and modify the list as necessary.
Review the backup frequency and the length of time File History retains each version. Modify these as necessary.
Open one of the folders that File History backs up, and display a previous version of a file.
Back up and restore your system
There are no practice tasks for this topic.