
13. Manage power and access options
In this chapter
Your power settings determine how long your computer will sit idle before reducing power consumption by turning off the screen or going into sleep mode.
One factor in your computer’s power usage that you can control is the screen brightness. A brighter screen uses more power. You can manage the screen brightness independently or as part of a power plan.
Screen brightness, in addition to the color of the light coming from the screen, can cause eyestrain and sleeplessness. The Night Light feature introduced with the Fall 2017 Creators Update of Windows 10 can help mitigate the negative effects of spending too much time in front of your computer screen.
Microsoft takes wellness and accessibility seriously, and this is apparent in the company’s early and continued commitment to the Windows Ease Of Access features that provide alternative methods for information input and output. Anyone can use these features to enhance their computing experience.
This chapter guides you through procedures related to changing the screen brightness, configuring power options for corded and battery-powered computers, and configuring Windows accessibility features.
Change the screen brightness
You might have heard the term blue light for the light that shines from a television, computer, or mobile device screen. Health professionals advise that people should avoid blue light for an hour before going to bed, because it can contribute to sleeplessness.
When you’re working in a dark room, a brighter screen can cause more eyestrain than a dimmer screen. You can adjust the screen brightness, and you can now also change the color tone from blue light to warmer colors, by using the Night Light feature.
You can turn the Night Light feature on and off manually, or schedule it to turn on and off automatically.
To change the screen brightness
Display the Action Center, expand the Quick Actions section if it’s collapsed, and then select Brightness to cycle through screen brightness settings in 25-percent increments.

Open the Settings window. Select System, and then Display. In the Brightness and color section, drag the Change brightness slider, or click or tap on either side of the slide box, to adjust the screen brightness to a percentage of the maximum level configured for your screen.

The brightness changes immediately, so you can slowly move the slider until the screen is exactly as bright as you want it in your current lighting conditions.
To turn Night Light on or off
Display the Action Center, expand the Quick Actions section if it’s collapsed, and then select Night light.
In the System settings window, select Display. In the Brightness and color section, turn on Night light.
To configure Night Light screen color
In the System settings window, select Display.
In the Brightness and color section, select Night light settings.
On the Night light settings page, drag the Color temperature at night slider, or click or tap on either side of the slide box, to adjust the color.

To configure automatic Night Light start and end times
In the Brightness and color section of the Display system settings pane, select Night light settings.
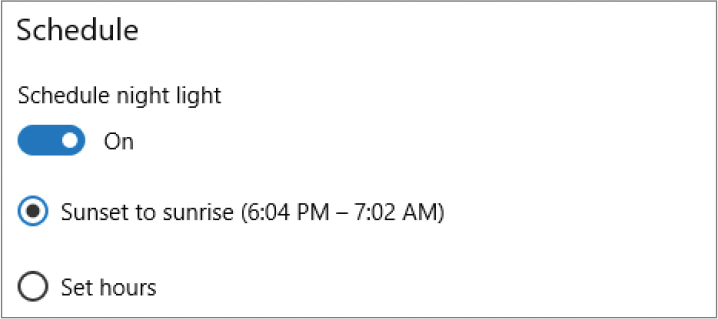
In the Schedule section of the Night light settings pane, turn on Schedule night light, and then do either of the following:
To link the on and off times to your local sunset and sunrise, select Sunset to sunrise.
To schedule specific on and off times, select Set hours, and then set the Turn on and Turn off times.

IMPORTANT If Sunset To Sunrise is unavailable, select Location Settings, and in the Location pane of the Privacy settings page, turn on Location Service. Then select the Back button in the upper-left corner of the Settings window to confirm that Sunset To Sunrise is turned on.
If your Sunset To Sunrise schedule shows times from 12:00 AM to 12:00 AM, leave and then return to the Night Light Settings page to update the sunset and sunrise times.
Configure power options
Reducing power consumption is obviously of higher priority if your device is running on battery power. On battery-powered computers, such as laptops and tablets, you can separately configure settings that are in effect when the device is plugged in and when it runs on battery power.
The screen brightness can have a significant effect on the length of time a battery charge powers a computer. In the previous topic, you learned about independently adjusting the screen brightness. You can also manage it as part of a power plan.
Each Windows 10 computer has a set of built-in power plans that define three settings:
When to turn off the display
When to put the computer to sleep
How bright to make the display
The built-in power plans vary based on the computer type and manufacturer, but usually include the following:
Power Saver This power plan prioritizes power conservation over performance. The screen is less bright and computer processes turn off earlier.
High Performance This power plan prioritizes the user experience over power conservation. The screen is brighter and the computer remains idle for a longer time before turning off processes.
Balanced This power plan uses less power than High Performance and has higher performance values than Power Saver.
You can choose a preconfigured power plan, modify individual elements of a power plan, or even create your own. Creating a custom plan is similar to editing an existing plan, but you name and save it so you can easily apply it at any time. If you decide you no longer need a custom power plan, you can delete it.
To configure the power management settings
Open the Settings window. Select System, and then select Power & sleep. The Power & Sleep pane displays the current length of inactive time you want the computer to wait before it turns off the screen and then goes to sleep.


TIP A laptop or other battery-powered computer has separate “on battery power” and “when plugged in” lists; a desktop computer has only the “when plugged in” lists.
In the Screen section of the Power & sleep pane, in each available list, select a time from 1 minute to 5 hours, or Never, to indicate the period of inactivity after which you want the screen to turn off (but the computer to continue running).
In the Sleep section of the Power & sleep pane, in each available list, select a time from 1 minute to 5 hours, or Never, to indicate the period of inactivity after which you want the computer to enter Sleep mode.
TIP The Sleep timeout must be equal to or greater than the Screen timeout. Setting the Sleep value to less time than the Screen value lowers the Screen value to match; setting the Screen value to more time than the Sleep value raises the Sleep value to match.
The power setting changes take effect immediately.
To choose a built-in power-management plan
Display the Power & sleep settings pane.
In the Related settings section of the pane, select Additional power settings to open the Power Options window of Control Panel.
If Show additional plans appears below the plan descriptions, select it to display hidden power plans.

To compare plan settings, select the Change plan settings link to the right of each plan name, peruse the settings, and then select the Back button to return to the Power Options window.
In the Power Options window, select the preconfigured power option you want.
To modify an existing power plan
Open the Power Options window of Control Panel.
Select Change plan settings to the right of the plan that you want to modify, to open the Edit Plan Settings window for the plan.

TIP A laptop or other battery-powered computer has separate “on battery power” and “when plugged in” lists; a desktop computer has only the “when plugged in” lists.
For each available power source, do the following:
To the right of Turn off the display, select a time from 1 minute to 5 hours, or Never, to indicate the period of inactivity after which you want to turn off the screen when the computer is running on that power source.
To the right of Put the computer to sleep, select a time from 1 minute to 5 hours, or Never, to indicate the period of inactivity after which you want the computer to enter Sleep mode when it is running on that power source.
To the right of Adjust plan brightness, move the slider to indicate how bright you want the screen to be when the computer is running on that power source.
In the Edit Plan Settings window, select Save changes to apply your changes to the power plan and return to the Power Options window. If you modified the currently active plan, changes to the brightness are immediately apparent.
TIP If you decide you don’t like the screen brightness you set, you can change it at the bottom of the Power Options window. The change will be applied to the current plan and automatically saved with it.
To create a custom power plan
Open the Power Options window of Control Panel.
In the left pane, select Create a power plan to open the Create A Power Plan window.

Select one of the default plans as the starting point for your new plan, then provide a name for your custom power plan. Then select Next to display the Edit Plan Settings window.
For each available power source, select times in the Turn off the display list and the Put the computer to sleep list, and move the Adjust plan brightness slider to indicate how bright you want the screen to be when the computer is running on that power source.
In the Edit Plan Settings window, select Create to create the custom power plan and return to the Power Options window.
To edit advanced settings of an existing power plan
Open the Power Options window of Control Panel.
Select Change plan settings to the right of the plan that you want to modify.
At the bottom of the Edit Plan Settings window, select Change advanced power settings to open the Power Options dialog box.

If the plan shown at the top of the Power Options dialog box is not the one you want to modify, expand the list, and select the plan you want to customize.
Scroll through the available settings and select the expand button (+) to expand any category of interest.
If the settings you want to change are unavailable (dimmed), you can select the Change settings that are currently unavailable link above the list and provide administrator permission, if necessary, to make the changes.
If you change settings, select Apply or OK to apply the changes.
Make your battery last longer
The Battery Saver feature is available only on battery-powered devices (such as laptops). Battery Saver conserves battery power (and thereby extends battery life) by regulating background activity and hardware settings.
In the Battery system settings pane, the Battery progress bar indicates the remaining battery charge; the note below the bar indicates whether the battery is currently discharging or charging.

TIP The Battery settings pane is available only on battery-powered devices.
To reset a power plan to its defaults
Open the Power Options window of Control Panel.
Select Change plan settings to the right of the plan that you want to restore.
At the bottom of the Edit Plan Settings window, select the Restore default settings for this plan link, and then select Yes in the Power Options message box that opens.
Windows automatically turns the Battery Saver feature on when the battery charge falls below 20 percent, but you also have the option of turning it on whenever the device is running on battery power. To manually start Battery Saver, display the Battery settings pane, and then turn on Battery Saver Status Until Next Charge. This setting is available only when the computer is running on battery power, not when it’s plugged in.
To modify the battery charge level at which Battery Saver turns on, select the Turn Battery Save On Automatically... check box, and then move the slider to select the charge level you want.

To delete a custom power plan
Open the Power Options window of Control Panel.
Apply any power plan other than the one you want to delete.
Select Change plan settings to the right of the plan that you want to delete.
At the bottom of the Edit Plan Settings window, select the Delete this plan link, and then select OK in the Power Options message box that opens.
TIP You can delete only custom power plans. You can’t delete built-in power plans.
Configure Windows accessibility features
Are the words on the screen too small to read easily? Do you wish the icons were larger? Does it take you a while to locate the cursor because it is so skinny? Windows 10 has accessibility features that make it easier for you to get information from the computer (output features), and other features that make it easier for you to provide information to the computer (input features).
Windows 10 includes a group of tools (collectively known as Ease Of Access features) that are specifically designed to help people interact with the computer by making content easier to access or providing alternative input and output methods. The tools include the following:
Closed captions Text narrations of audio content that display as videos play.
High Contrast Color schemes that make individual user interface elements stand out on the screen.
Magnifier A panel that magnifies the screen under the mouse pointer up to nine times. You can move and resize the magnification panel.
Narrator A text-to-speech tool that reads menu commands, dialog box options, and other screen features out loud, telling you what options are available and how to use them. It also reads your keystrokes to you as you type them, and tells you the pointer location on the screen as you move the mouse.

SEE ALSO For information about high-contrast themes, see “Apply and manage themes” in Chapter 2, “Personalize your working environment.”
When you turn on an accessibility feature, it remains on until you turn it off.
If you sign in to multiple computers by using your Microsoft account credentials, you can configure the accessibility settings on one computer, and then have Windows 10 synchronize the settings across all computers.
SEE ALSO For information about synchronizing Ease Of Access settings across devices, see “Customize your sign-in options” in Chapter 11, “Manage user accounts and settings.”
You can turn on the High Contrast, Magnifier, Narrator, On-Screen Keyboard, Sticky Keys, or Filter Keys features from the Welcome screen, before you sign in to Windows. When you’re signed in to Windows 10, you can manage most of the accessibility features from the Ease Of Access settings page.

Accessibility features are also still available from the Ease Of Access Center in Control Panel. If you’re unsure which features would be helpful to you, you can answer a series of questions, and Windows will recommend accessibility settings based on your answers.

Many of the accessibility features have keyboard shortcuts, but those aren’t of much use when you’re working on a device that doesn’t have an external keyboard. To simplify the process for users of tablets and other handheld Windows 10 devices, you can configure Windows 10 to launch Magnifier, Narrator, or the On-Screen Keyboard when you press the external Windows button and Volume Up button on those devices.
To display Ease of Access settings
To display the Ease Of Access settings page, do either of the following:
Open the Settings window, and then select Ease of Access.
Press Win+U.
To display the Ease Of Access Center
Display Control Panel in category view, select Ease of Access, and then select Ease of Access Center.
To get accessibility setting recommendations from Windows
Display the Ease of Access Center.
Select the Get recommendations to make your computer easier to use link.
On the Eyesight, Dexterity, Hearing, Speech, and Reasoning pages, select the check box for each statement that applies to you, and then select Next.
On the Recommended settings page, review the accessibility options that Windows recommended in response to your selections. Select or clear any additional check boxes that you want to, and then select Apply or OK.
To configure a device hardware shortcut for an accessibility tool
Display the Ease of Access Center.
In the Explore All Settings section, select Make touch and tablets easier to use.
In the Launching common tools section, expand the list, and then select the accessibility tool that you want to start when you press the Windows button and Volume Up button on your device.
In the Make touch and tablets easier to use window, select Apply or OK to implement the change.
High-contrast settings
A high-contrast theme displays text and background colors that might be easier to see and cause less eyestrain. When you apply a high-contrast theme, it affects all the content that you display on your screen. Some content, such as a busy webpage image, is not visible when a high-contrast theme is applied. Windows comes with four high-contrast themes. You can preview and modify the color palettes of each of the high contrast themes in the Settings window.

It takes Windows a bit longer (about 10 seconds) to apply a high-contrast theme than it does to make other changes. Windows displays a Please wait screen while it applies the theme.
To preview and apply a high-contrast theme
Open the Settings window, select Ease of Access, and then select High contrast.
In the High contrast settings pane, expand the list, and then select one of the four high-contrast themes to preview the theme colors that are assigned to the background, text, hyperlinks, disabled text, selected text, and button text.

Select the theme you want, and then select Apply.
To apply the most recent or default high-contrast theme
To reapply the most recent high-contrast theme (or to apply High Contrast #1 if you haven’t yet applied a high-contrast theme), press left Alt+left Shift+Print Screen, and then select Yes in the message box that appears.
To modify the High Contrast settings
Do one of the following to display Ease Of Access Center:
In the taskbar search box, enter ease, and then select Ease of Access Center.
In Category view of Control Panel, select Ease of Access, and then Ease of Access Center.
In Large Icons or Small Icons view, select Ease of Access Center.
In the Quick access to common tools section, select Set up High Contrast to open the Make The Computer Easier To See window.
In the High Contrast section, select or clear the check boxes for the keyboard shortcut, warning message, and sound alert.

To revert to a regular contrast theme
Press left Alt+left Shift+Print Screen.
In the High Contrast settings pane, select None in the Choose a theme list, and then select Apply.
Open the Personalization window of Control Panel, and select the theme you want to apply.
Windows displays a Please wait screen while it applies the theme.
Magnifier settings
You can use the Magnifier tool to magnify all or part of the screen up to 1600 percent of its usual size. For digital artists, in addition to people with vision problems, this can be very useful. Magnifier has three magnification modes:
Full Screen Magnifies the entire screen. This is the default mode until you change it.
Lens Magnifies a rectangular portion of the screen behind the pointer. By default, the lens is 30 percent of the width and height of the screen. You can set each dimension to from 10 percent to 100 percent of the screen size.
Docked Splits the screen vertically into two panes, one with the standard view and one with magnification. The magnification pane displays the content at the pointer location. You can change the height of the magnification pane.

Magnifier has many configurable options, including:
The zoom level, from 125 to 1600 percent.
The zoom level increments, from 25 percent to 400 percent.
The tracking options, which by default follow the pointer, keyboard focus, text insertion point, or Narrator cursor.
Automatic start options.
Optional color inversion and bitmap smoothing.
The appearance of the on-screen Magnifier menu.
When Magnifier is running, you control its settings from the Magnifier menu window. When the window is not in use, it can collapse to a magnifying glass (if you select this option). You redisplay the menu by selecting the magnifying glass.

To turn on Magnifier
Press Win+Plus sign (on the numeric keypad) or Win+Equal sign (on the numeric key row above the letters).
On the Ease of Access settings page, select Magnifier. Then in the Magnifier settings pane, turn on Magnifier.
In the Ease of Access Center, in the Quick access to common tools section, select Start Magnifier.
To turn off Magnifier
On the Magnifier menu bar, select the Close button (the X).
In the Magnifier settings pane, turn off Magnifier.
Press Win+Esc.
To change the Magnifier mode
On the Magnifier menu bar, select Views, and then select Docked, Full screen, or Lens.
In the Magnifier settings pane, in the Magnifier mode section, expand the list, and then select Docked, Full screen, or Lens.
Press any of the following keyboard shortcuts:
To display the Docked view of Magnifier, press Ctrl+Alt+D.
To display the Full Screen view of Magnifier, press Ctrl+Alt+F.
To display the Lens view of Magnifier, press Ctrl+Alt+L.
To change the Magnifier Lens size
With Magnifier turned on or off, use any of the above methods to set the Magnifier mode to Lens.
Display the Magnifier settings pane. In the Magnifier mode section, drag the scroll boxes below and to the right of the Change lens size preview.

To change the Magnifier level of magnification
On the Magnifier menu bar, select the Plus sign (+) or Minus sign (-).
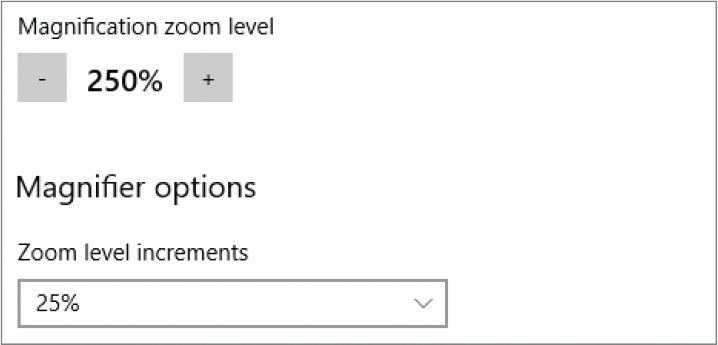
In the Magnifier settings pane, select the plus sign or minus sign adjacent to the current magnification zoom level.
Press Win+Plus sign or Win+Minus sign.
The magnification changes in the increments that are set in the Magnifier Options dialog box. The default increment is 100%.
To change the Magnifier magnification increment
Display the Magnifier settings pane.
In the Magnifier options section, expand the Zoom level increments list, and then select 25%, 50%, 100%, 150%, 200%, or 400%.
To change the appearance of the inactive Magnifier menu bar window
In the Magnifier settings pane, in the Magnifier options section, select or clear the Collapse to magnifying glass icon check box.
To automatically start Magnifier
In the Magnifier settings pane, in the Magnifier options section, do either of the following:
To automatically start Magnifier when you sign in to Windows, select the Start Magnifier after sign in check box.
To automatically start Magnifier after Windows starts, from the Lock screen, select the Start Magnifier automatically before login for all users check box.
TIP You can start Magnifier manually from the Lock screen by selecting the Ease Of Access icon and then Magnifier.
To invert the colors of the magnified area to their color spectrum opposites
In the Magnifier options section of the Magnifier settings pane, select the Invert colors check box.
Narrator and Audio Description settings
Windows 10 includes two tools that can provide descriptions of visual content: Narrator and Audio Descriptions.
Narrator reads out loud the labels, descriptions, and instructions for on-screen elements. For example, when you select a category in the Settings window, Narrator might tell you the name of the category, how many category options there are, and that you can double-click to open the category pane. You can select from multiple Narrator voices and adjust the speed of the voice to match your listening speed. You can also specify the interface items that you want Narrator to identify for you.
For those people who sign in to multiple computers with Microsoft accounts, and synchronize settings across those computers, here’s a warning: turning on Narrator on one computer turns on Narrator on all the computers, and you’ll have to turn it off individually on each computer. This might be exactly what you want, but be prepared, if you’re signed in to four separate computers around the house, that things can get a bit noisy. If you want to turn on Narrator (or any of the Ease Of Access tools) on only one computer, turn off the synchronization of Ease Of Access settings on that computer first.
SEE ALSO For more information about synchronizing settings among computers, see “Customize your sign-in options” in Chapter 11, “Manage user accounts and settings.”
Audio Descriptions are spoken descriptions of video content that are provided with the video. In the television and movie industries, these supplemental audio tracks (also referred to as video descriptions) are often provided with special versions of films that are called Descriptive Video Service (DVS) versions. Sometimes the audio is provided by professional voiceover performers reading scripted descriptions of the film activity, and other times it’s simply a recording of the actors and director watching the film and talking about it.
In Windows 10, you can turn on the Audio Description feature, and if a video has an audio description, it will play with the video. No additional configuration is possible.
To turn on Narrator
On the Ease of Access settings page, select Narrator. Then in the Narrator settings pane, turn on Narrator.
In the Ease of Access Center, in the Quick access to common tools section, select Start Narrator.
To select a Narrator voice
Display the Narrator settings pane.
In the Voice section, expand the list, and then select the voice you want.
Drag the Speed and Pitch sliders to adjust the Narrator voice until you can understand it best.
TIP If you’ve installed additional languages, the Voice list includes voices for those languages with language and region designations. For more information about installing languages, see “Manage regional and language settings” in Chapter 12, “Manage computer settings.”
You configure the Narrator voice separately from the text-to-speech voice, so changing one doesn’t change the other. For information about configuring text-to-speech settings, see “Manage speech settings,” also in Chapter 12.
To configure audio narration options
Display the Narrator settings pane, and scroll to the Sounds you hear section.

Turn on the features you want Narrator to read aloud.
To configure visual narration options
Display the Narrator settings pane, and scroll to the Cursor and keys section.

Turn on the features you want Narrator to display.
To turn on Audio Description for videos
In the Ease of Access Center, select Make the computer easier to see.
In the Hear text and descriptions read aloud section, select the Turn on Audio Description check box. Then select Apply or OK to apply the change.
Keyboard and mouse settings
The traditional method of entering text into an app or other computer interface is by typing it on an external keyboard. However, mobility problems can make typing difficult. Windows 10 includes a variety of tools to help with entering text, including the following:
Filter Keys Causes Windows to ignore brief or repeated keystrokes, or slows the repeat rate.
Mouse Keys Enables you to move the cursor around the screen by pressing the arrow keys on the numeric keypad.
On-Screen Keyboard Displays a visual representation of a keyboard on which you can tap individual keys by using your finger, tablet pen, or other pointing device.
Speech Recognition Allows you to control Windows, control running apps, and dictate text by speaking into a microphone.
SEE ALSO For information about speech recognition, see “Manage speech settings” in Chapter 12, “Manage computer settings.”
Sticky Keys Makes it easier to use the keyboard with one hand by making the Ctrl, Shift, and Alt keys “stick down” until you press the next key.
Toggle Keys Sounds an audio signal when you press the Caps Lock, Num Lock, or Scroll Lock key. A high-pitched sound plays when the keys are activated, and a low-pitched sound plays when the keys are deactivated.
The mouse is an integral part of most desktop computer experiences. By default, the mouse pointer is represented by a small arrow that moves around the screen as quickly as you move the mouse, and sometimes fades out of sight when the mouse is still. It can be difficult not only to find the pointer, but also to track its progress across the screen. If you’re working in a screen-presenting situation—for example, sharing your screen in an online meeting, or presenting content on a large screen in a conference room, it is even more difficult for your audience members to follow the mouse movements because they aren’t controlling the mouse.
You can simplify things for yourself and for other people by enlarging the pointer and changing its color. If you have difficulty moving the mouse, you can opt to control it by using the numeric keypad.
In addition to these Ease Of Access features, you can configure other useful mouse features such as “mouse trails” that can be very helpful. For information about keyboard and mouse configuration options that aren’t related to the Ease Of Access features, see Chapter 7, “Manage peripheral devices.”
To turn on keyboard accessibility features
In the Settings window, select Ease of Access, and then select Keyboard.
In the Keyboard settings pane, turn on any of the following options:
On-Screen Keyboard
Sticky Keys
Toggle Keys
Filter Keys
TIP You can also display a taskbar icon for the On-Screen Keyboard by rightclicking an empty area in the taskbar and selecting Show Touch Keyboard Button. You can then select that icon to display the keyboard when you need it.
In the Other Settings section of the Keyboard pane, turn on the accessibility options you want for keyboard shortcuts.

To configure mouse accessibility features
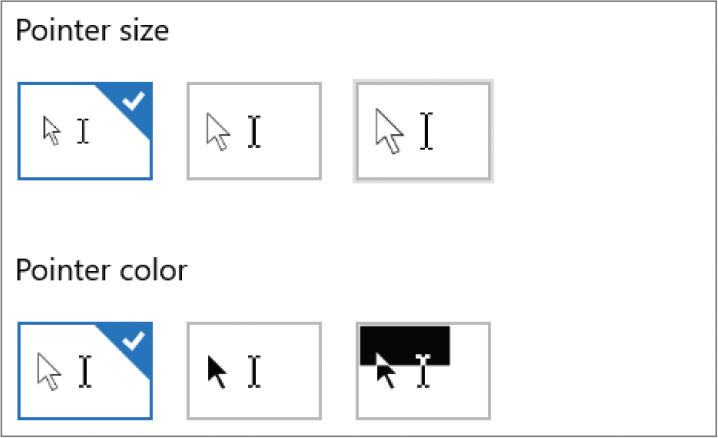
In the Settings window, select Ease of Access, and then select Mouse.
In the Mouse settings pane, select the pointer size and color you want.
To start Mouse Keys, turn on Use numeric keypad to move mouse around the screen.
When Mouse Keys is turned on, turn on or off Hold down Ctrl to speed up and Shift to slow down and Use mouse keys when Num Lock is on.

Key points
You can control the brightness of your screen manually or automatically. A dimmer screen saves power and causes less eyestrain.
The Night Light feature changes the screen light to warmer tones to lessen eyestrain and the increase in brain activity caused by blue light–emitting devices.
Turning off the screen and putting your computer to sleep are two ways to conserve power when you’re not actively using the computer. You can specify the length of inactivity after which Windows should automatically take these actions. On a battery-powered device, you can configure separate settings for when the computer is plugged in and when it’s running on battery.
Windows 10 has many accessibility features that help users to interact with the computer.
 Practice tasks
No practice files are necessary to complete the practice tasks in this chapter.
Change the screen brightness
Perform the following tasks:
Display the Action Center, and then cycle through your brightness changes.
Adjust the screen brightness to suit your current working environment.
Turn on Night Light.
Experiment with the Night Light color temperature setting to understand the difference between colors on the warm and cool ends of the spectrum.
Turn off Night Light.
If you want to, configure Night Light to turn on automatically from sunset to sunrise. If necessary, turn on Location Settings to support this.
Configure power options
Perform the following tasks:
Display the Power & sleep settings pane, and configure the screen and sleep times as you want them. If your computer is running on battery power, configure the settings for when the computer is plugged in and when it is running on battery power.
Open the Power Options window of Control Panel. If Show additional plans appears near the bottom of the window, select it to display any hidden power-management plans.
Display the settings for each plan on your computer, and consider which is best for you.
Modify a built-in power plan. Then reset the plan to its defaults.
If none of the power-management plans fits your needs, create a custom plan. Otherwise, apply a standard plan.
Configure Windows accessibility features
Display the Ease Of Access Center, and then perform the following tasks:
Complete the Get recommendations to make your computer easier to use wizard to familiarize yourself with the situations in which you might benefit from using the various accessibility tools.
Locate a webpage that contains text and graphic elements, and display it in your default internet browser.
Apply a high contrast theme. Look for differences in the user interface elements and in the webpage content.
Start Narrator, and then configure Narrator to use the voice and speech cadence that you prefer.
Display a webpage, the Start screen, the Settings window, any category page, and then any apps or files you want, to gain experience with the information Narrator provides. (Wait each time as Narrator provides you with information.)
IMPORTANT To select a button when Narrator is on, you must first select once to read the description, and then twice to invoke the select event.
Exit Narrator, and display the Ease of Access settings page.
Start Magnifier, and experiment with using it to view different screens and documents. Then exit Magnifier.
Display the touch keyboard, and experiment with navigating around Windows and entering text without using an external keyboard. Then close the touch keyboard.
Display the Ease Of Access Center, and explore other settings that interest you. Select the links, and try out these features:
Turn on Sticky Keys, and experiment with using it to enter text that contains capital letters.
Turn on Mouse Keys, and practice using it to move the cursor around on the screen.
Turn on Filter Keys, and try using it with an app of your choice.
Exit any running accessibility tools.