Chapter 4. Scheduled actions
- Scheduling reminders
- Using the DatePicker and TimePicker controls
- Executing tasks with a background agent
- Integrating with the Lock Screen
You learned in the last chapter that a dormant application can’t perform any work. How can you create killer applications if they can’t do any work in the background? The answer lies with the Scheduled Action Service. In this chapter you’ll create a sample application to explore alarms, reminders, and background tasks—three different kinds of scheduled actions. Scheduled actions allow your application to alert the user or execute background work when your application isn’t running. Background agents are the mechanisms applications use to perform tasks when an application isn’t running. You can use alarms and reminders to notify a user about important tasks and allow the user to easily restart an application.
As we acknowledge in chapter 3, the multitasking limitations imposed on applications may seem severe to application developers. Microsoft has imposed these limitations to ensure that the user has the best overall experience possible. Background tasks aren’t allowed to affect or slow down foreground application, nor are they allowed to perform tasks that will quickly drain the phone’s battery.
In this chapter you’ll create a sample application named ScheduledActions, which uses the ScheduledActionService to schedule reminders and periodic tasks and implements an example background agent. The background agent will update the application’s Live Tile, and ultimately the Lock Screen, with information about upcoming reminders.
4.1. Working on a schedule
A great number of use cases require an application to perform work on a periodic basis. This work may entail reminding the user that an online auction is about to close so they can log on and ensure they’re the top bidder. Another example might be a CRM application that checks in with a web service to download new sales leads to the device.
Windows Phone empowers developers to build these types of applications with scheduled actions and the Scheduled Action Service. Scheduled actions are named actions that have beginning and expiration times. Once a scheduled action is registered, the Scheduled Action Service will execute the action at the appropriate time.
Two forms of scheduled actions are provided: notifications and tasks. Notifications consist of alarms and reminders and are displayed to the user at the appropriate time. The user can dismiss or snooze a notification and can tap the content of the notification to launch the application that created it. A scheduled task is nothing more than a request that the Scheduled Action Service launch an application’s background agent, allowing the application to perform background processing.
In this section you’ll create a new sample application that you’ll use throughout the remainder of this chapter. The completed sample application is shown in figure 4.1. The sample application will create, update, and delete scheduled actions. Later in the chapter, you’ll add a background agent to the application that will monitor upcoming reminders and update the application’s Live Tile and the phone’s Lock Screen.
Figure 4.1. The ScheduledActions sample application showing three reminders and a status message indicating that the user disabled the application’s background agent

Create the new sample application using the Windows Phone App project template, name the project ScheduledActions, and be sure to select version 8.0 as the target operating system. Open up MainPage.xaml in the editor so that you can add the basic user interface elements displayed by the application. Start by dividing the ContentPanel Grid control into two rows:
<Grid x:Name="ContentPanel" Grid.Row="1" Margin="12,0,12,0">
    <Grid.RowDefinitions>
        <RowDefinition Height="Auto" />
        <RowDefinition Height="*" />
    </Grid.RowDefinitions>
</Grid>
You’ll use the first row to display messages about the background agent later in the chapter. Add a LongListSelector to the second row of the ContentPanel (you’ll add controls to display details of each notification to the DataTemplate later):
<phone:LongListSelector x:Name="notificationList" Grid.Row="1">
    <phone:LongListSelector.ItemTemplate>
        <DataTemplate>
            <StackPanel Margin="12">
            </StackPanel>
        </DataTemplate>
    </phone:LongListSelector.ItemTemplate>
</phone:LongListSelector>
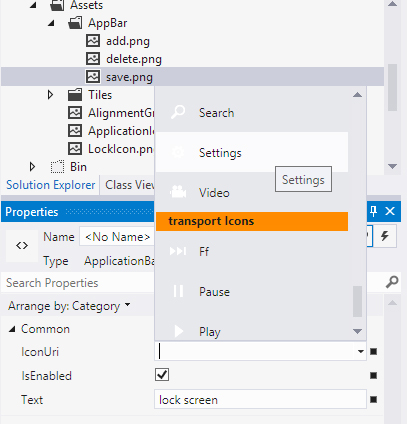
The application displays two buttons in the ApplicationBar, and each button displays an image. The images used for the application bar must be added to the project. The easiest way to add images to the project is by using the application bar button property editor, because it adds the images automatically when you pick an image for the application bar button. The property editor is shown in figure 4.2.
Figure 4.2. Adding an icon with the property editor. Icons included in the Windows Phone SDK appear in the popup selection list. Once an icon is selected, it’s added to the /Assets/AppBar project folder.
The following listing shows the ApplicationBar markup for MainPage.xaml as well as the click event handlers that are called when the buttons are tapped.
Listing 4.1. ApplicationBar markup and click event handlers

Listing 4.1 adds two buttons to the application bar. Each button uses one of the images ![]() provided by the Windows Phone SDK that’s copied into your project. Each button wires up its Click event
provided by the Windows Phone SDK that’s copied into your project. Each button wires up its Click event ![]() to an event handler in the code-behind. For the time being, add an empty implementation for Settings_Click to MainPage.xaml.cs. When the user taps the Add Reminder button, the application displays a new page where the user can enter
the details for the reminder. The new page will be named ReminderPage.xaml and is displayed using the NavigationService
to an event handler in the code-behind. For the time being, add an empty implementation for Settings_Click to MainPage.xaml.cs. When the user taps the Add Reminder button, the application displays a new page where the user can enter
the details for the reminder. The new page will be named ReminderPage.xaml and is displayed using the NavigationService ![]() from inside the AddReminder_Click method.
from inside the AddReminder_Click method.
4.1.1. Adding the Reminder page
When the user taps the Add Reminder button, or later when they tap an existing reminder displayed on the main page, the application will navigate to a new page where the user can edit, save, and delete a reminder. Add the new page using the Windows Phone Portrait Page template and give the page the name Reminder-Page.xaml. In figure 4.3, you can see that the Reminder page displays five input controls and corresponding labels for the various reminder properties. The controls used are TextBox, TimePicker, DatePicker, ListPicker, and PhoneTextBox. All but TextBox come from the Windows Phone Toolkit.
Figure 4.3. The controls used on the ReminderPage to edit the reminder properties. A TextBlock is used for the TextBox’s label, but the labels for the other four controls are provided through their Header properties.

You read about using the Windows Phone Toolkit in chapter 2. Remember that you need to use the NuGet package manager to add a reference to the toolkit before using any of its components. To add a reference to a NuGet package such as the Windows Phone Toolkit, select Project > Manage NuGet Packages. Once the Manage NuGet Packages dialog appears, type Windows Phone Toolkit in the Search Online input control, select the toolkit package from the search results list, and click Install.
Because ReminderPage.xaml is using toolkit components, an XML namespace declaration must be added at the top of the file:
xmlns:toolkit="clr-namespace:Microsoft.Phone.Controls;assembly=Microsoft.Phone.Controls.Toolkit"
Once the toolkit reference is added to the project, you’re ready to add the input controls to the content panel of ReminderPage.xaml, as shown in the following listing.
Listing 4.2. XAML markup declaring the ContentPanel for the Reminder page

Start by changing the ContentPanel from a Grid to a StackPanel ![]() . The page has five input controls: a TextBox, a TimePicker, a DatePicker, a ListPicker, and a Phone-TextBox. Each of these controls is bound to a property of the reminder object that will be edited by the page. Note that both the
TimePicker and DatePicker are bound to the same property
. The page has five input controls: a TextBox, a TimePicker, a DatePicker, a ListPicker, and a Phone-TextBox. Each of these controls is bound to a property of the reminder object that will be edited by the page. Note that both the
TimePicker and DatePicker are bound to the same property ![]() . In order to keep the two controls from interfering with each other, the binding mode OneTime is specified in the Binding markup.
. In order to keep the two controls from interfering with each other, the binding mode OneTime is specified in the Binding markup.
The Reminder page also needs a couple of application bar buttons to allow the user to save and delete a reminder. Add the following markup to ReminderPage.xaml:
<phone:PhoneApplicationPage.ApplicationBar>

   <shell:ApplicationBar >
      <shell:ApplicationBarIconButton Text="save"
         IconUri="/Assets/AppBar/save.png" Click="Save_Click" />
      <shell:ApplicationBarIconButton Text="delete"
         IconUri="/Assets/AppBar/delete.png" Click="Delete_Click" />
   </shell:ApplicationBar>
</phone:PhoneApplicationPage.ApplicationBar>
Because you’re probably not familiar with the three different toolkit picker controls, the next couple of sections take a deeper look into how they work.
4.1.2. DatePicker and TimePicker
The native Windows Phone calendar application uses a couple of unique controls for picking date and time. The Windows Phone Toolkit provides managed implementations of these pickers with the DatePicker and the TimePicker controls. These two picker controls, shown in figure 4.4, are both composed of a button that displays the current value and a secondary page with scrolling selectors.
Figure 4.4. Time and date pickers provided by the Windows Phone Toolkit. The left image contains the page shown to the user when a TimePicker is tapped, and the right image is the corresponding page for the DatePicker.

Both picker controls expose a DateTime property named Value. When you declare dates or times in XAML, the string is converted using the TimeTypeConverter class, which expects an English format. The pickers raise a ValueChanged event when the Value property is changed.
Keep in mind a couple of caveats when using the DatePicker and TimePicker controls. The first centers on the checkmark and delete icons that appear on the application bar of the secondary picker pages. The application bar requires icons to be in files shipped in the application’s XAP file. You may have noticed that a new folder named Toolkit.Content was added to your project when you added the NuGet reference to the Windows Phone Toolkit. The folder contains four images, but only two of them are necessary for the date and time pickers. The necessary files are named ApplicationBar.Check.png and ApplicationBar.Cancel.png, respectively, for the checkmark and delete icons.
The second caveat stems from how the picker controls display their secondary selector pages. When the user taps the picker, the control navigates to the secondary page. This means the page hosting the picker control is pushed onto the navigation stack, and the OnNavigatedFrom method override will be called. When the user returns from the selector page, the host page’s OnNavigatedTo method override is called. You need to make sure any code you place in the page’s navigation methods responds correctly when the picker’s secondary pages are displayed and dismissed.
With the DatePicker and TimePicker controls, you can add features to your application so it behaves like the native phone applications. Native applications also use another type of picker to expose lists of choices to the user.
4.1.3. Making choices with the ListPicker
In other applications written for other platforms, you might use a ComboBox control to display a list of choices and allow the user to pick one of them. The version of ComboBox that comes with the Windows Phone isn’t intended to be used by developers. Instead of a ComboBox, you should use the ListPicker control found in the Windows Phone Toolkit, as shown in figure 4.5.
Figure 4.5. The ListPicker displays a list when tapped. If the list contains five or fewer items, the control is expanded in place. If the list contains more than five items, the list is shown on a new page.

The ListPicker control works differently depending on how many items are in the list that it manages. If the list has five or fewer items, the picker expands in place and displays all five items. This means you might need to put the ContentPanel of the page into a ScrollViewer—otherwise the bottom of the control might be expanded off the bottom edge of the screen.
When the list has more than five items, the ListPicker displays the list in a full-screen secondary page. Like the date and time pickers, the list picker will trigger navigation events when the full mode list is displayed and dismissed.
The ListPicker for the sample application displays six items. Each item represents one of the recurrence options available for a reminder. The six items come directly from the RecurrenceInterval enumeration defined in the namespace. The following snippet uses the Enum.GetValues method to build an array of all the possible RecurrenceInterval values, which is used as the ItemsSource of the ListPicker:
using Microsoft.Phone.Scheduler;

public ReminderPage()
{
   InitializeComponent();
   RecurrenceInterval[] values = (RecurrenceInterval[])
         Enum.GetValues(typeof(RecurrenceInterval));
   listPicker.ItemsSource = values;
}
Because six items are displayed in the list, the ListPicker displays the list using a full-mode secondary page. By default, the text used to display the full-mode list may be too small and too crowded. Providing a custom item template for a full mode list is a good idea, as shown in the following listing.
Listing 4.3. Implementing a custom full-mode item template

The DataTemplate used as the FullModeItemTemplate is simple, containing a single TextBlock inside a Grid. To provide enough finger room between items in the list, the margin uses the PhoneTouchTargetOverhang theme resource ![]() . Another theme resource, PhoneTextLargeStyle, is used to make the text easier to read
. Another theme resource, PhoneTextLargeStyle, is used to make the text easier to read ![]() .
.
The sample application’s skeleton is now in place and ready for you to create, update, and delete scheduled actions. You perform each of these operations using the Scheduled Action Service.
4.2. Introducing the Scheduled Action Service
The Scheduled Action Service is implemented as a singleton by the Scheduled-ActionService class, which is found in the Microsoft.Phone.Scheduler namespace. The class provides methods for adding, updating, and removing scheduled actions. Scheduled actions are retrieved from the service either as a list or individually by name. Scheduled actions can only be seen and modified by the application that created them. The Scheduled Action Service doesn’t expose actions created by other applications.
Scheduled actions are defined by the ScheduledAction class, which is the base class for both the ScheduledNotification class and the ScheduledTask class. These last two classes are base classes for other scheduled action classes we’ll look at later in the chapter. Table 4.1 describes each of the properties exposed by the Scheduled-Action class.
Table 4.1. ScheduledAction properties
|
Property name |
Description |
|---|---|
| BeginTime | The DateTime when the action will be triggered for the first time. BeginTime must represent some point in the future when the action is scheduled. |
| ExpirationTime | The DateTime after which the action will no longer be triggered. ScheduledNotifications that have been snoozed by the user won’t be triggered after the expiration time has passed. The expiration time defaults to DateTime.MaxValue. ExpirationTime must be greater than BeginTime when the action is scheduled. |
| IsScheduled | A read-only property, IsScheduled is true if the ScheduledAction will be invoked at some point in the future. IsScheduled is false if the user disables a task or dismisses a nonrecurring notification, or when the action’s ExpirationTime has passed. Recurring notifications remain scheduled when the user dismisses the notification. |
| Name | A unique identifier for the ScheduledAction. |
The sample application displays every scheduled notification registered with the Scheduled Action Service. The application invokes the GetActions method, which returns a collection of actions. The collection of actions is then displayed in the LongListSelector you added to MainPage.xaml. The code to retrieve the actions is added to the OnNavigatedTo method of MainPage and is shown in the following listing.
Listing 4.4. Building a list of notifications

First, create a new List variable to contain the alarms and reminders that will be displayed in the user interface. Obtain a collection of notifications
from the Scheduled Action Service by calling the GetActions method. GetActions is a generic method and expects the calling code to declare which type of scheduled action is to be returned. The sample
application could display both alarms and reminders, so the code invokes GetActions with the ScheduledNotification ![]() type, the base class for both the Alarm and Reminder classes. The notifications collection is sorted by the BeginTime property using the OrderBy extension method. Obtain another reference to the notification by calling the Find method
type, the base class for both the Alarm and Reminder classes. The notifications collection is sorted by the BeginTime property using the OrderBy extension method. Obtain another reference to the notification by calling the Find method ![]() with the name of the target item. Add each item returned by Find to the items list. Finally, assign the items list to the LongListSelector’s ItemSource property.
with the name of the target item. Add each item returned by Find to the items list. Finally, assign the items list to the LongListSelector’s ItemSource property.
Tip
The Scheduled Action Service has an odd behavior—the notifications returned by GetActions are cached clones. Calling GetActions returns the cached instances. If an action’s state has changed, such as when an alarm is shown to and dismissed by the user, the cached copy isn’t updated. When the Find method is called, the cache is updated and the most recent state of the action is available. The code in listing 4.4 calls Find to force an update of the cache.
When you created MainPage.xaml in section 4.1, you added a DataTemplate to the LongListSelector but only declared an empty StackPanel inside the template. You need to add user interface components to display the properties of the scheduled notifications that were added to the LongListSelector. The following listing contains the fully declared DataTemplate.
Listing 4.5. Displaying a notification in the LongListSelector

The DataTemplate contains several TextBlock instances ![]() , each one displaying a different ScheduledAction property. The TextBlocks are styled using theme resources provided by the XAML framework. Some of the TextBlocks make use of the StringFormat binding markup
, each one displaying a different ScheduledAction property. The TextBlocks are styled using theme resources provided by the XAML framework. Some of the TextBlocks make use of the StringFormat binding markup ![]() to display in a more user-friendly format.
to display in a more user-friendly format.
You now have a user interface that will display scheduled notifications to the user. At this point, the user interface remains blank, because there are no scheduled notifications to display. You need to implement the code to create some alarms and reminders.
4.2.1. Scheduling a reminder
Scheduled notifications are alarms and reminders that are registered with the operating system. Due to limitations imposed by the Windows Phone operating system, an application can’t directly notify the user unless the application is running. With a scheduled notification, an application can schedule an alarm or a reminder and know that the user will be notified at the appropriate time, even if the application isn’t running.
Scheduled notifications are implemented in two related classes, Alarm and Reminder. Both the Alarm and Reminder classes are derived from the Scheduled-Notification class. As mentioned earlier, ScheduledNotification derives from ScheduledAction. ScheduledNotification extends its base class with additional properties called Content and RecurrenceType.
The Content property allows the application a place to display a message to the user when the notification is triggered. The Content property is a string with a maximum length of 256 characters.
The RecurrenceType property allows an application to create notifications that are triggered more than once. The recurrence patterns defined in the Scheduler API include daily, weekly, monthly, and yearly patterns. A notification is triggered at the appropriate time interval after the BeginTime. For example, if the recurrence pattern is daily, and the BeginTime is specified as 8:00 a.m. Monday, July 4, the notification will be triggered every day at 8:00 a.m. until the ExpirationTime has passed.
Note
The ScheduledActions sample application you build here will create only reminders. Creating alarms follows a similar pattern. We leave it as an exercise for you to add alarms to the project.
The ScheduledActions sample application defines a button allowing the user to create a Reminder. Figure 4.6 shows how a reminder would appear to a user. For comparison, we show an alarm on the right side of the figure. When the user taps the title or content of a notification, the operating system will launch the host application’s main page.
Figure 4.6. A reminder and an alarm as displayed to the user. Reminders can display a custom title and allow the user to choose a custom snooze interval. Alarms display only a stock title.

The observant reader will notice that a Reminder displays a custom title, whereas an Alarm always displays Alarm as the title. The title displayed by the Reminder is specified using the Title property. Another difference between Alarms and Reminders is that Reminders can specify a NavigationUri property, whereas Alarms have a Sound property.
The Alarm.Sound property is a Uri to any supported audio file located in the application’s installation folder. The sound file must be added to the project with its build action property set to Content.
The Reminder.NavigationUri property is used by the operating system when the user taps the title or content of a Reminder. The operating system will launch the host application but will use the NavigationUri instead of the default page as the starting page.
A user of the sample application creates a new reminder by tapping the Add Reminder button on the main page application bar. Earlier in the chapter, you implemented the Add Reminder button’s click event handler to use the Navigation-Service to navigate to ReminderPage.xaml. Although you’ve created the UI for the Reminder page and set up the controls to data bind to a Reminder object, you haven’t created a Reminder object. The following listing shows how a Reminder is created in the Reminder page’s OnNavigatedTo method.
Listing 4.6. Creating a reminder

A new member field ![]() is needed to keep track of the reminder object being edited by the page. Remember that the three picker controls will cause
OnNavigatedTo to be called when their secondary pages are dismissed, so you need to create a Reminder object only when the NavigationMode is New
is needed to keep track of the reminder object being edited by the page. Remember that the three picker controls will cause
OnNavigatedTo to be called when their secondary pages are dismissed, so you need to create a Reminder object only when the NavigationMode is New ![]() . Reminders must have unique names, and you start by constructing a new Reminder with a name built from a Guid. Assign the BeginTime property to the current time, assign the Title property
. Reminders must have unique names, and you start by constructing a new Reminder with a name built from a Guid. Assign the BeginTime property to the current time, assign the Title property ![]() to a default value, and fill in the NavigationUri. Set the newly constructed reminder object to the page’s DataContext to enable binding to all the controls created earlier.
to a default value, and fill in the NavigationUri. Set the newly constructed reminder object to the page’s DataContext to enable binding to all the controls created earlier.
When a reminder is displayed to the user and they click the reminder title, the application will be launched with the specified navigation URI. Our sample doesn’t define a special page and doesn’t perform any special processing when receiving an URI. Your application may choose to display the reminder details in a special page or trigger other customized application logic when it receives a Reminder’s navigation URI.
When the user is finished editing the reminder, they tap the Save button on the application bar. In response to the click event, the code-behind schedules the reminder with the Scheduled Action Service and dismisses the page. The click event handler implementation is shown in the following listing.
Listing 4.7. Saving the reminder

Before registering the reminder with the ScheduledActionService, a few of its properties need to be validated or adjusted. If the user left either the Title or Content properties blank, the properties are assigned a default value ![]() . A new DateTime value is constructed using the month, day, and year from the DatePicker and the hour, minute, and second from the TimePicker
. A new DateTime value is constructed using the month, day, and year from the DatePicker and the hour, minute, and second from the TimePicker ![]() . The reminder is registered with the Scheduled-ActionService using the Add method
. The reminder is registered with the Scheduled-ActionService using the Add method ![]() , and the page is dismissed with a call to NavigationService.GoBack. The call to the ScheduledActionService is wrapped in a try/catch statement so that the user is notified
, and the page is dismissed with a call to NavigationService.GoBack. The call to the ScheduledActionService is wrapped in a try/catch statement so that the user is notified ![]() and has a chance to fix any errors.
and has a chance to fix any errors.
The begin time must be manually constructed because the Reminder object doesn’t notify the binding engine when its BeginTime is changed and the two picker controls get out of sync. This step wouldn’t be necessary if the Reminder object were wrapped with another object that raised property change notifications, or if you were using a ViewModel that adhered to the Model-View-ViewModel pattern.
Tip
You might wonder what the first few lines of listing 4.7 do. The TextBox control has an interesting quirk when updating bound data. It tries to be efficient with data-binding updates and may not have updated the bound field when the Save_Click event handler was called. In this listing you check to see if the currently focused control is a TextBox. If it is, ask for the Binding-Expression object connected to the control’s Text property and use the BindingExpression’s UpdateSource method to ensure the value is copied from the TextBox to the reminder.
You now know how to create scheduled notifications. Creation is only one of the create, update, and delete operations provided by the ScheduledActionService. The next operation we examine is updating or editing an existing notification.
4.2.2. Editing a notification
Once created, ScheduledNotifications can be modified by an application. Notifications are modified using the Replace method provided by the ScheduledAction-Service. The Replace method accepts an instance of ScheduledNotification, and the notification’s Name property identifies which ScheduledNotification is to be replaced. The ScheduledActionService overwrites the saved notification with the values specified in the passed-in notification.
The sample application allows a user to edit an existing reminder by tapping one in the list displayed on the main page. With a few minor changes, the Reminder page can be reused to both add and edit reminders. First, you need to subscribe to the SelectionChanged event raised by the LongListSelector:
<phone:LongListSelector x:Name="notificationList" Grid.Row="1"
      SelectionChanged="NotificationList_SelectionChanged">
The implementation of the NotificationList_SelectionChanged method needs to retrieve the tapped or selected reminder and then send identifying information to the Reminder page. Query string parameters should be used to send information between pages. The following listing shows how to send the selected reminder’s Name property to the Reminder page.
Listing 4.8. Sending a reminder’s Name to the Reminder page

Before doing any work, the event handler asks the LongListSelector for the currently selected item. If the LongListSelector doesn’t have a selected item ![]() , the event handler doesn’t perform any work. When a scheduled notification is selected, its Name property is added to the URI used to navigate to ReminderPage.xaml, and the NavigationService is used to navigate to the new page
, the event handler doesn’t perform any work. When a scheduled notification is selected, its Name property is added to the URI used to navigate to ReminderPage.xaml, and the NavigationService is used to navigate to the new page ![]() .
.
At this point the Reminder page doesn’t know what to do with the name passed in the query string. The reminder page’s OnNavigatedTo method needs to be changed to look for and use the value passed in the name parameter, as shown in the following listing.
Listing 4.9. Using the name parameter to find an existing reminder

The code is changed by adding a new if/else statement, placing the previously existing Reminder construction code into the else block. The if statement condition checks for the key “name” in the QueryString dictionary ![]() . If the “name” key exists, then the corresponding value is read and used in a call to the Find method of the ScheduledActionService
. If the “name” key exists, then the corresponding value is read and used in a call to the Find method of the ScheduledActionService ![]() . The found reminder is used as the data context, and all the controls show values from the existing reminder.
. The found reminder is used as the data context, and all the controls show values from the existing reminder.
Another minor change is required in the Save_Click method. The existing code only knows how to add new reminders. The Replace method must be used when updating already existing scheduled notifications. The new code is shown in the following listing.
Listing 4.10. Saving an edited reminder using Replace

As with the OnNavigatedTo method, a new if/else block is added, with the existing code placed into the else block. A call to the Find method is used as the condition ![]() for the if statement, and a call to the Replace method is placed inside the if block.
for the if statement, and a call to the Replace method is placed inside the if block. ![]() .
.
When you created the Reminder page, you created two ApplicationBar buttons. You’ve implemented only one of the buttons. The second button allows the user to delete a notification.
4.2.3. Deleting a notification
The Delete Reminder button on the Reminder page isn’t yet implemented. Reminders and all other forms of ScheduledActions are deleted with the Remove method of the ScheduledActionService. The Remove method accepts the name of the scheduled action to remove. The sample application removes a reminder in the Delete button’s click event handler, as shown in the following code.
void Delete_Click(object sender, EventArgs e)
{

   if (ScheduledActionService.Find(reminder.Name) != null)
       ScheduledActionService.Remove(reminder.Name);
   NavigationService.GoBack();
}
Because the Reminder page might be editing a brand-new reminder, you first check that the current reminder exists by calling the scheduled action service’s Find method. If the reminder does exist, the Remove method is called with the reminder’s name.
Once created, a ScheduledNotification will be managed by the Scheduled-ActionService until the application removes the notification or the application is uninstalled. ScheduledNotifications are also removed if Visual Studio’s Rebuild Solution option is used to build the project. A user can now use the sample application to create reminders for all the important events in their busy life. To make life even easier, and so that they can spend less time messing with their phone, the application should display details about upcoming reminders in its Live Tile. But the application can’t update its Live Tile unless it’s running. What you need is a way to update the Live Tile even when the application isn’t running. What you need is a background agent.
4.3. Creating a background agent
Sometimes an application needs to run in the background to be useful. The Windows Phone allows an application to execute certain kinds of tasks in the background. Background tasks include playing or streaming audio as well as custom tasks that execute periodically. Background processes are called background agents. In this section we show how to create a scheduled task agent to perform work periodically in the background, even when the application isn’t running. (We look at audio background agents in chapter 9 when building an application that integrates with the Music + Videos Hub.)
The ScheduledActions background agent will update the application’s Live Tile, and ultimately the Lock Screen, with information about upcoming reminders. The number of remaining reminders left in the day is displayed as a count on the front of the tile, whereas the time and title of the next reminder is shown on the back of the tile. Figure 4.7 demonstrates the front and the back of the application’s Live Tile.
Figure 4.7. Screenshots showing the front and back of the ScheduleActions application’s Live Tile. The front of the tile reports that there’s one more reminder today, whereas the back of the tile shows the time and title of the next reminder.

An application’s scheduled task agent can run two types of scheduled tasks, both of them represented by classes derived from ScheduledAction. The first type of scheduled task executes once every half hour and is defined by the PeriodicTask class. The second type of background process is defined by the class named Resource-Intensive-Task. Resource-intensive tasks execute only if the device is plugged in and fully charged, connected to Wi-Fi or a computer, and screen locked. Both PeriodicTask and ResourceIntensiveTask are derived from ScheduledTask, which is derived from ScheduledAction.
Scheduled tasks aren’t necessarily run exactly 30 minutes apart. The Scheduled Action Service coordinates the timing and execution of scheduled tasks. Waking up the device and powering on the sensors and radios is an expensive process. The Scheduled Action Service will power up once, execute all scheduled tasks, and power down. This is one of the methods employed by the Windows Phone to maximize battery life.
An application schedules a ScheduledTask with the ScheduledActionService using a process similar to scheduling a ScheduledNotification. An application can schedule only one PeriodicTask and one ResourceIntensiveTask. Unlike a ScheduledNotification, the user isn’t notified when a ScheduledTask is triggered. Instead, the operating system notifies the host application through a ScheduledTaskAgent. ScheduledTaskAgents are defined in background agent projects.
Scheduled task agents are limited in the types of work they can do. They aren’t allowed to access the camera, radio, accelerometer, compass, or gyroscope. Scheduled task agents can’t add new scheduled actions or new background file transfers or show launchers or choosers. A complete list of unsupported APIs and restrictions is in Microsoft’s SDK documentation on MSDN at http://mng.bz/ETjT.
You’re going to create a ScheduledTaskAgent that executes a PeriodicTask. Periodic tasks and resource-intensive tasks differ only in the schedule they run on and the amount of time they’re allowed to execute.
4.3.1. Background agent projects
The ScheduledActions sample application needs a background agent to execute a periodic task that scans all scheduled notifications and updates the application’s Live Tile with information about upcoming reminders. To add a background agent, you need to add a new project to the ScheduledActions solution. Use the New Project Wizard and select the Windows Phone Scheduled Task Agent project template. Name the new project NotificationsUpdateAgent and be sure to select the Add to Solution option in the wizard.
The new project will contain a single source code file named ScheduledAgent.cs. Open ScheduledAgent.cs and find the class named ScheduledAgent. The generated ScheduledAgent class is derived from the ScheduledTaskAgent. ScheduledTaskAgent is one of three classes derived from the base BackgroundAgent class. The other background agent classes are used for playing audio files and are covered in more depth in chapter 9.
The next step is to reference the new background agent project in the Scheduled-Actions project. Using the Add Reference dialog, add a project reference to the NotificationsUpdateAgent project from the ScheduledActions project. In addition to adding the project reference, you need to update the WMAppManifest.xml file in the ScheduledActions project so that it contains a new ExtendedTask element:
<ExtendedTask Name="BackgroundTask">
    <BackgroundServiceAgent Specifier="ScheduledTaskAgent"
        Name="NotificationsUpdateAgent"
        Source="NotificationsUpdateAgent"
        Type="NotificationsUpdateAgent.ScheduledAgent" />
</ExtendedTask>
Add the ExtendedTask element to the Tasks element immediately following the DefaultTask element.
Along with generated diagnostic code, the newly added ScheduledAgent contains a method named OnInvoke, which is called by the Windows Phone framework to inform the agent that a ScheduledTask has been triggered. The agent will be passed to the triggered ScheduledTask object. The same background agent can execute both periodic tasks and resource-intensive tasks.
4.3.2. Executing work from the background agent
You’re building a background agent to update the application’s Live Tile. The tile will be updated by code in the ScheduledAgent class generated by the project template. Open the ScheduledAgent.cs file and add a new method named UpdateDefaultTile to look for any ScheduledNotifications that will occur during the remainder of the day and update the application’s Live Tile. The method implementation is shown in the following listing.
Listing 4.11. Updating a Live Tile

In order to find only those notifications remaining in the current day, the current date is used to construct endOfDay with the time set to 11:59:59 p.m. The endOfDay variable is used in a LINQ expression that filters and orders the list of notifications returned by the GetActions method ![]() . With the list ordered, the FirstOrDefault LINQ extension method is used to retrieve the upcoming notification. If there’s an upcoming notification, a message is constructed
using its BeginTime and Title. The ShellTile static property ActiveTiles returns the primary Live Tile and any other tile pinned to the Start Screen. The primary Live Tile is always in the list
and is always the first one in the list
. With the list ordered, the FirstOrDefault LINQ extension method is used to retrieve the upcoming notification. If there’s an upcoming notification, a message is constructed
using its BeginTime and Title. The ShellTile static property ActiveTiles returns the primary Live Tile and any other tile pinned to the Start Screen. The primary Live Tile is always in the list
and is always the first one in the list ![]() . A new instance of StandardTileData is constructed, and its Count and BackContent properties are assigned. The primary tile is updated with a call to the Update method
. A new instance of StandardTileData is constructed, and its Count and BackContent properties are assigned. The primary tile is updated with a call to the Update method ![]() .
.
The UpdateDefaultTile method needs to be called from the agent’s OnInvoke method:
protected override void OnInvoke(ScheduledTask task)
{
   UpdateDefaultTile();
   NotifyComplete();
}
With the scheduled task agent implemented and ready to do work, you need something that will trigger the background agent. Scheduled task agents are triggered by ScheduledTasks. In the next section you’ll learn how to create a PeriodicTask from within the ScheduledActions application.
4.3.3. Scheduling a PeriodicTask
As with ScheduledNotifications, a PeriodicTask is scheduled with the Scheduled Action Service. Periodic tasks are instantiated, have their properties set, and are scheduled by invoking the Add method. ScheduledTask extends ScheduledAction by adding a Description property. The Description property is shown to the user in the background tasks settings application. The ScheduledTask doesn’t define the code that’s executed when the task is triggered—that code is defined by the background agent.
The sample application schedules the periodic task when the application is launched. You learned in the last chapter that the PhoneApplicationService raises a Launching event when a new instance of an application is launched by the operating system. The App class generated by the project template contains a Launching event handler named Application_Launching. Open App.xaml.cs and modify the Application_Launching event handler to create a new PeriodicTask, as detailed in the following listing.
Listing 4.12. Creating a PeriodicTask

Creating a PeriodicTask should feel familiar to you by now, because PeriodicTasks, Alarms, and Reminders are all forms of ScheduledActions. A Guid isn’t included in the task’s name, because the application will only create a single PeriodicTask. Assign the Description property with text that describes the work performed by the background task ![]() . The call to the Add method is surrounded by a try/catch block to catch any exceptions that might be thrown, particularly when the user has permanently
disabled background tasks for applications. If an exception is thrown, report the failure
. The call to the Add method is surrounded by a try/catch block to catch any exceptions that might be thrown, particularly when the user has permanently
disabled background tasks for applications. If an exception is thrown, report the failure ![]() by assigning the AgentStatus property.
by assigning the AgentStatus property.
Note
We’re using the += operator to append messages to AgentStatus. You’ll append other messages to the AgentStatus string in the following sections.
You haven’t yet defined the AgentStatus property used in listing 4.12. Add a new automatic property to App.xaml.cs named AgentStatus:
public string AgentStatus { get; private set; }
In order to display the agent status on the screen, add another TextBlock to MainPage.xaml’s ContentPanel. Place the TextBlock inside a Border and use the contrast background and styles to make the status messages stand out:
<Border Grid.Row="0"
    Background="{StaticResource PhoneContrastBackgroundBrush}">

    <TextBlock x:Name="agentMessage" TextWrapping="Wrap"
       Style="{StaticResource PhoneTextContrastStyle}"  />
</Border>
Next, add a line to MainPage’s OnNavigatedTo method to assign the TextBlock’s Text property:
agentMessage.Text = ((App)Application.Current).AgentStatus;
No message is displayed to the user when the periodic task is successfully created. Once created, the task will continue to execute twice an hour until its ExpirationTime. Unlike alarms and reminders, a scheduled task expires after two weeks.
4.3.4. Scheduled tasks expire after two weeks
By default, tasks are created with a maximum expiration time of 14 days in the future. The developer can schedule a task with a shorter expiration time. Any attempt to specify an expiration time more than two weeks in the future will result in an exception. The two-week limit requires the application to continuously reschedule the task to ensure that it’ll be running as expected. This limitation also ensures that unused applications aren’t draining device resources.
A good practice is to reschedule the task every time the application is launched. Update the Application_Launching method so that it looks for and removes any previously scheduled periodic task. Add the following snippet to the Application _Launching method, right before the try/catch block:
updateTask = ScheduledActionService.
    Find("NotificationUpdateTask") as PeriodicTask;
if (updateTask != null)
{
    if (updateTask.ExpirationTime < DateTime.Now)
        AgentStatus += "The background task was expired. ";
    ScheduledActionService.Remove(updateTask.Name);
}
Before removing the previously scheduled task, the snippet checks the expiration time. If the expiration time is in the past, the user is notified that the existing task has expired.
A few different types of applications have background agents that are automatically rescheduled. The operation system will automatically reschedule a background agent if it updates the application’s Live Tile and the tile is pinned to the Start Screen or if the application has been chosen by the user to update the Lock Screen. Resource-intensive background agents of a Photos Hub extension application also get automatically updated if they upload photos and the user has enabled them in the Photos + Camera Settings page. You can read more about Photos Hub extension applications in chapter 9.
Even though the sample application might be automatically rescheduled, it’s a good idea to programmatically renew the agent in case the Live Tile isn’t pinned. Two-week expiration dates aren’t the only things that prevent a periodic task from executing on schedule. The user can choose to disable your application’s periodic task.
4.3.5. User-disabled tasks
PeriodicTasks can be disabled by the user in the Settings application. Figure 4.8 shows a screenshot of the Background Tasks page of the Settings application. If you examine the figure, you’ll see how the text assigned to the Description property is shown to the user.
Figure 4.8. The Background Tasks page of the Settings application displays the periodic task’s description and allows a user to disable the task. In the image on the right, the user has disabled the periodic task but will allow the application to recreate the task the next time it runs.

When the user has checked the Turn Back On option, the application will be allowed to remove and recreate the periodic task. If the option isn’t checked, the Scheduled Action Service will throw an exception when attempting to recreate the task. An application can detect whether the user has disabled a task using the Is-Enabled property. Add a check to the Application_Launching method to set the AgentStatus if the task has been disabled. The new code should be added inside the statement checking for null:
if (updateTask != null)
{
    if (!updateTask.IsEnabled)
        AgentStatus += "The background task was disabled by the user. ";
...
}
Only periodic tasks can be disabled. Resource-intensive tasks are listed in the Advanced page of the Background Tasks Settings application. The user can see the list of resource-intensive tasks but can’t disable them.
4.3.6. When things go awry
Earlier in the chapter you learned that a background agent notifies the operating system that work was successfully completed using the NotifyComplete method. In a perfect world, the scheduled agent would always succeed, but we don’t live in a perfect world. When the background agent fails to complete its work, it should call the Abort method.
The Abort method informs the Scheduled Action Service that the agent is unable to continue working. When the agent aborts, the Scheduled Action Service sets the IsScheduled property of the associated ScheduledTask to false and ceases to trigger the agent.
Other scenarios will also cause the background agent to fail. Background agents are limited to 11 MB of memory, and when a background process exceeds the memory quota, it’s terminated. Periodic tasks are limited to 25 seconds of execution time and are terminated if the NotifyComplete method isn’t called before the time limit is reached. An unhandled exception will also terminate the background agent. The exit status of the background agent is reported by the LastExitReason property of the scheduled task. The LastExitReason property returns one of the values in the Agent-ExitReason enumeration. The possible agent exit reasons are listed in table 4.2.
Table 4.2. Values of the AgentExitReason enumeration
|
Name |
Description |
|---|---|
| Aborted | The background agent called the Abort method. The scheduled task’s IsScheduled property has been set to false. |
| Completed | The background agent called the NotifyComplete method. |
| ExecutionTimeExceeded | The background agent failed to call NotifyComplete before its allocated time limit expired. Periodic tasks have a time limit of 25 seconds. |
| MemoryQuotaExceeded | The background agent attempted to allocate more than 11 MB of memory. |
| None | The background agent has not run. |
| Other | An unknown error occurred. |
| Terminated | The background agent was terminated early by the operating system due to conditions unrelated to the agent. |
| UnhandledException | The background agent failed to handle an exception produced during execution. |
The host application should examine the LastExitReason property of its periodic tasks and at a minimum report the error condition to the user; you’re going to implement error reporting in the sample application. The sample application reports agent errors through the AgentStatus property. Add the following snippet to the Application_Launching method, inside the check for the null statement:
if (updateTask.LastExitReason != AgentExitReason.Completed
    && updateTask.LastExitReason != AgentExitReason.None)
{
    AgentStatus += string.Format("The background task failed to complete
     its last execution at {0:g} with an exit reason of {1}. ",
        updateTask.LastScheduledTime, updateTask.LastExitReason);
}
You ignore the Completed and None exit reasons. All other exit reasons result in a message that reports the exit reason and the last time the background agent was scheduled to run.
The notification sample is nearly complete. Each time the application starts up, the PeriodicTask that triggers the background agent is renewed, and its ExpirationTime is reset to a full two weeks. The application also handles various error conditions that may occur, displaying status information to the user. At this point you should launch the application in different circumstances and get a feel for how the background agent might be affected. Disable the background task, either with or without the Turn Back On option checked. What status messages do you see when you restart the application?
Unless you’re patient and waited half an hour or more, you probably haven’t seen the background agent execute. Fortunately, Microsoft has provided an API to trigger early execution of background agents to enable developers to test them.
4.3.7. Testing background agents
In normal situations a periodic task is called only every 30 minutes. Resource-intensive tasks are scheduled even less predictably. Can you imagine having to wait half an hour for your background agent to trigger before you could debug and step through your code? The ScheduledActionService class provides the LaunchForTest API to give the developer control over when background agent execution is triggered.
The LaunchForTest method accepts the name of the ScheduledTask and a Time-Span value describing how soon the task should be triggered. The LaunchForTest method can be used by either the host application or by the scheduled agent. Add a call to LaunchForTest to the end of the Application_Launching method of the sample application:
if (updateTask != null)
    ScheduledActionService.LaunchForTest(updateTask.Name,
       TimeSpan.FromSeconds(3));
Debug the application again, and a breakpoint in OnInvoke should be hit within a few seconds.
LaunchForTest will execute only when an application is deployed to a device using the Windows Phone SDK tools. When debugging your project with a background agent, the debugger will continue to run even after the application has stopped. This allows your agent to be debugged even when the application isn’t running.
There’s one more feature to add to the ScheduledActions sample application: updating the Lock Screen.
4.4. Updating the Lock Screen
The Windows Phone 8 Lock Screen provides simple important information at a glance. Phone users can peek quickly at their phone and continue on with their busy lives. Applications can participate in the Lock Screen in several ways: by being a wallpaper provider, a detailed notification provider, or a quick status provider.
In this section you’ll update the ScheduledActions sample application so that it provides both quick and detailed status to the Lock Screen. You’ll also allow the user to quickly launch the Launch Screen Settings application from the sample application. Figure 4.9 shows how a user can select the ScheduledActions application as a Lock Screen provider and what the notifications look like.
Figure 4.9. In the left-hand image, the user has selected the ScheduledActions application as the detailed status provider and the third quick status provider. The image on the right demonstrates how both detailed and quick status appear on the Lock Screen.

Surprisingly, you don’t have to make any changes to the ScheduledActions code to enable the reporting of detailed and quick status. The Lock Screen reads the detailed status from an application’s Live Tile—specifically the BackContent property. The quick status is also read from the Live Tile, from the Count property. The Scheduled-Actions application and background agent already update the Live Tile. Even though no code changes are required, a few changes to the project are necessary. First, a quick status icon must be added to the project, and then the WMAppManifest.xml file needs a couple of changes.
The quick status icon is a normal image file sized at 38 * 38 pixels. This book’s sample code (found at www.manning.com/binkley/) contains a file named LockIcon.png placed in the project’s Assets folder, which is a scaled-down copy of the FlipCycleTile-Small.png file generated by the project template.
Open the WMAppManifest.xml file with the XML editor and look for the tile template child element of the PrimaryToken element. Update the DeviceLockImageURI element to contain the path to the quick status icon file:
<PrimaryToken TokenID="ScheduledActionsToken" TaskName="_default">
   <TemplateFlip>
      ...
      <DeviceLockImageURI IsRelative="true"
            IsResource="false">AssetsLockIcon.png</DeviceLockImageURI>
   </TemplateFlip>
</PrimaryToken>
Unless you changed the project’s tile template, the sample project uses TemplateFlip for its tile template element.
While you have the WMAppManifest.xml file open, you need to add two more elements. Both elements are named Extension and are children of the Extensions element. If the Extensions element isn’t in WMAppManifest.xml, add it immediately after the Tokens element:
<Extensions>
   <Extension ExtensionName="LockScreen_Notification_IconCount"
      ConsumerID="{111DFF24-AA15-4A96-8006-2BFF8122084F}"
      TaskID="_default" />
   <Extension ExtensionName="LockScreen_Notification_TextField"
      ConsumerID="{111DFF24-AA15-4A96-8006-2BFF8122084F}"
      TaskID="_default" />
</Extensions>
The extension element with ExtensionName LockScreen_Notification_IconCount tells the operating system that the application extends the Lock Screen and provides quick status notifications. The LockScreen_Notification_TextField extension element signals that the application provides status notifications. The ConsumerID attribute identifies the application or feature being extended—in this case, the Lock Screen.
Note
A third Lock Screen extension named LockScreen_Background is used to signal that an application provides wallpaper or background images for the Lock Screen.
With the new icon and the WMAppManifest.xml changes in place, the Scheduled-Actions application is now a Lock Screen provider. Once the application is installed, the user can open the Launch Screen Settings application and choose Scheduled-Actions to provide details and/or quick status notifications. To make it easier for the user to find the Settings application, an application can provide a button to launch the Settings application directly. You added a button to MainPage.xaml early in the chapter, along with a Click event handler. Open MainPage.xaml.cs, find the event handler, and add the following implementation:
using Windows.System;

void Settings_Click(object sender, EventArgs e)
{
   Launcher.LaunchUriAsync(new Uri("ms-settings-lock:"));
}
The Launcher class, found in the Windows.System namespace, is a service that runs native or third-party applications, as well as launches the appropriate application for any particular file. In the preceding snippet, we’re using ms-settings-lock:, which is a registered URI, to launch the built-in Lock Screen Settings application. In the next chapter you’ll learn how to launch other built-in applications. In chapter 11 you’ll learn how to register a custom URI and use the Launcher class to launch your own applications.
4.5. Summary
In this chapter you learned how to use the Scheduled Action Service to implement features normally found in background applications. The Scheduled Action Service allows an application to schedule alarms and reminders, notifying the user at important points in time and providing a quick link back into the application. The Scheduled Action Service is also used to schedule work with periodic and resource-intensive tasks. Scheduled tasks are used to trigger an application’s background agent to perform work even when the application isn’t running in the foreground.
We looked at a few more controls from the Windows Phone Toolkit. The date and time pickers can be used to provide the same user experience found in native Windows Phone applications like Alarms and Calendar. You also learned how to use the ListPicker instead of a combo box control when providing the user with a list of options to choose from.
Limitations of the operating system prevent applications from directly accessing features in native applications such as the Phone Dialer, Email, Calendar, and Contact database. In the next chapter you’ll learn how to use launchers and choosers to integrate with the native applications. You’ll also learn how to use the User Data API to read from the Calendar and the Contacts database.