Chapter 7. Storing data
- Working with application settings
- Saving files in local storage
- Database operations
- Upgrading databases
Most applications require some form of data storage—from user preferences and user-created data to local caches of data stored in a cloud application or web service. Some of the data storage concepts discussed in this chapter will be familiar to .NET Framework developers because they’re limited versions of the same storage technologies that have existed in the .NET Framework for many years. Other concepts are new to the Windows Runtime, and this may be your introduction to them. In this chapter you’ll learn about the differences between the storage APIs in the .NET Framework and the storage APIs provided in the Window Phone SDK. For starters, the Windows Phone security model limits storage available to third-party applications to the local storage sandbox.
Each application is allotted its own sandbox on the phone, isolated from all other applications and from the operating system. The application’s sandbox is separated into two folders, as shown in figure 7.1. The first folder, often referred to as appdata or the install folder, contains the installed application files. The second folder, called the local folder, IsolatedStorage, or isostore, stores files created or downloaded by the application.
Figure 7.1. Application file system overview

Developers access the local folder with the .NET Framework class Isolated-Storage-Settings from the System.IO.IsolatedStorage namespace or with the Windows Runtime classes StorageFolder and StorageFile from the Windows.Storage namespace. Developers can also use a relational database in the form of SQL Server Compact Edition, accessed via the LINQ to SQL framework found in the System.Data.Linq namespace. IsolatedStorageSettings provides a simple mechanism for storing data, removing the burden of messing with FileStreams. Windows.Storage exposes a more robust API for manipulating directories and files.
Developers using the .NET Framework are used to accessing long-term storage with classes from the System.IO namespace including File, FileInfo, Directory, DirectoryInfo, Path, FileStream, and others. Because of the Windows Phone sandbox, many of these classes have been removed or have been changed to throw MethodAccessExceptions when used by applications and games. Silverlight developers should be aware that shared site settings and storage have been removed from IsolatedStorage for Windows Phone. Without access to the storage device, or shared site storage files, applications can’t share local data with other applications.
The size of isolated storage in Silverlight for the browser applications is controlled by a quota. The quota is initially limited to 1 MB. The application can request quota increases, which must be approved by the user. Isolated storage for Windows Phone applications is effectively unlimited. The quota limit defaults to the maximum long value, and an exception is thrown if you call the IncreaseQuotaTo method.
To demonstrate using the IsolatedStorage, StorageFolder, StorageFile, and LINQ to SQL APIs, you’ll build a sample application that reads and writes data using application settings, local storage files, and a relational database.
In the next section, you’ll prepare a sample application that will interact with the three different data repositories you’ll create later in the chapter.
7.1. Creating the High Scores sample application
The sample application, shown in figure 7.2, manages a list of high scores for a fictional game. It contains an application bar button for adding a randomly generated score, as well as a button for deleting the entire HighScore table. The sample application only shows high scores; you’re not going to build a real game in this chapter.
Figure 7.2. The High Scores sample application

First, you’ll build the sample application and implement add and delete functionality without worrying about storing the high scores list. You’ll then implement reading and writing the high scores list using a few simple repository methods. Start your sample application by creating a new Windows Phone App project in Visual Studio. Name the new project DataStorage.
The first thing you’ll implement is a class to represent the high scores. Create a new class named HighScore and add properties for Name, Score, LevelsCompleted, and Date:
public class HighScore
{
    public HighScore() { Date = DateTime.Now; }
    public string Name { get; set; }
    public int Score { get; set; }
    public int LevelsCompleted { get; set; }
    public DateTime Date { get; set; }
}
The properties are all simple automatic properties, and the Date field is initialized in the class constructor.
7.1.1. Displaying the high scores list
High scores are displayed to the user using a LongListSelector on the main page of the application. The following listing shows the MainPage XAML markup for the content panel.
Listing 7.1. Displaying high scores


The LongListSelector consumes the entire content panel. Define the data template to be a Grid divided into two columns and three rows ![]() . Several TextBlocks are arranged inside the Grid and are bound to properties of the HighScore object
. Several TextBlocks are arranged inside the Grid and are bound to properties of the HighScore object ![]() displayed in the LongListSelector. The Name, Date, and LevelsCompleted values are stacked in the first column, and the Score value is shown in a larger font, spanning all three rows
displayed in the LongListSelector. The Name, Date, and LevelsCompleted values are stacked in the first column, and the Score value is shown in a larger font, spanning all three rows ![]() of the second column.
of the second column.
Add two buttons to the application bar for adding new scores and clearing the entire list. Add the following application bar markup to MainPage.xaml:
<phone:PhoneApplicationPage.ApplicationBar>
    <shell:ApplicationBar>
        <shell:ApplicationBarIconButton Click="add_Click"
            IconUri="/Assets/AppBar/add.png" Text="add" />
        <shell:ApplicationBarIconButton Click="clear_Click"
            IconUri="/Assets/AppBar/delete.png" Text="clear" />
    </shell:ApplicationBar>
</phone:PhoneApplicationPage.ApplicationBar>
As with many of the applications in this book, you’re using icons from the Windows Phone SDK, and if you use the property editor, the icons will automatically be added to your project.
You’ll add the ApplicationBarIconButton Click events soon, but first you need to create a collection to hold the high scores list in the page’s code-behind file.
Listing 7.2. Creating a collection of HighScores

An ObservableCollection is used to hold all the high scores. The collection is defined as a field in the MainPage class ![]() and is instantiated in the MainPage_Loaded event handler, which is wired up in the MainPage constructor
and is instantiated in the MainPage_Loaded event handler, which is wired up in the MainPage constructor ![]() . Finally, the collection is assigned to the ItemsSource property
. Finally, the collection is assigned to the ItemsSource property ![]() of the LongListSelector you named HighScoresList.
of the LongListSelector you named HighScoresList.
7.1.2. Managing the high scores list
Now that you have the collection created in the code-behind and displayed with XAML markup, you need to implement the logic for adding and clearing the list of high scores. A new HighScore is created with random values when the user presses the Add application bar button. The following listing details how a HighScore is generated and added to the collection.
Listing 7.3. Adding a HighScore with random values

A new HighScore is generated with the help of the Random class ![]() , a pseudo-random number generator that you place in a new field named random. Define the add_Click event handler, and generate random values for the score, the level, and three characters that make up the name
, a pseudo-random number generator that you place in a new field named random. Define the add_Click event handler, and generate random values for the score, the level, and three characters that make up the name ![]() . The random values are used to construct a new HighScore object. Insert the score into the highscores collection using an insertion-sort technique
. The random values are used to construct a new HighScore object. Insert the score into the highscores collection using an insertion-sort technique ![]() .
.
Clearing the list is much easier. Inside the Click event handler, call the Clear method on the collection:
void clear_Click(object sender, EventArgs e)
{
    highscores.Clear();
}
The shell of the sample application is now complete. You can run the application, add a few high scores, and clear the list. When you exit the application and restart, the high scores list is empty once again. Because the topic of this chapter is data storage, the sample is far from complete. The application should be storing the high scores list and reloading the list when the application restarts.
Throughout the rest of this chapter, you’ll look at three different methods for storing data: application settings, local storage files, and LINQ to SQL. Before we examine the details of each method, you should abstract the data layer from the user interface using a high scores repository.
7.1.3. Defining a high scores repository
You now have a working application, but the application doesn’t store the list of high scores. To hide the details of the data storage implementation, you’ll create a high scores repository to load, save, and clear the list of high scores. In this section you’ll define the new repository type and modify the sample application to use the methods to access the high scores data.
Add a new class to the project using Visual Studio’s Add New Item feature. Name the class HighScoreSettingsRepository. The new class declares Load, Save, and Clear methods, which you’ll implement in the next section:
public class HighScoreSettingsRepository
{
    public List<HighScore> Load(){ return new List<HighScore>(); }
    public void Save(List<HighScore> highScores) {}
    public void Clear(){}
}
Now you’re ready to update the MainPage class to use the repository. MainPage should initialize the high scores collection from the repository during construction. MainPage should also call the Save method when new HighScores are generated and the Clear method when the collection is cleared. Start by declaring a new member field for the repository and constructing a new instance:
HighScoreSettingsRepository repository = new HighScoreSettingsRepository ();
Now update the code in the loaded event handler to load the highscores list from the repository:
void MainPage_Loaded(object sender, RoutedEventArgs e)
{
    var results = repository.Load();
    highscores = new ObservableCollection<HighScore>(results);
    HighScoresList.ItemsSource = highscores;
}
The best time to save the list of high scores is after adding a new HighScore to the collection. Add the following line of code to the end of the add_Click method:
repository.Save(highscores.ToList());
The repository’s Clear method should be called when the ObservableCollection is cleared. Add a call to the Clear method to the end of the clear_Click method:
repository.Clear();
With the call to the Clear method, all the repository functionality has been wired up. Wired up—but not yet implemented. To implement the first of three different repository implementations, you need to learn how to store data with application settings.
7.2. Storing data with application settings
Application settings provide a convenient API to store user preferences, application state, or other forms of data. They can store both simple and complex objects using key-value pairs. Application settings are accessed through a static property on the Isolated-StorageSettings class. The property, called Application-Settings, returns an instance of the IsolatedStorageSettings class. Isolated-StorageSettings implements a Dictionary interface with each setting paired with a unique key.
Objects placed in the settings dictionary must be serializable. When objects aren’t serializable, an exception will be thrown when the settings are written to the storage device. Application settings are stored in a file written to local storage, as shown in figure 7.3.
Figure 7.3. Application settings are written to a file in the local storage folder.

Note
Any action that clears local storage will remove the file, and application settings will be lost. Such actions include uninstalling an application and using the Rebuild Solution command in Visual Studio.
IsolatedStorageSettings can be found in the System.IO.IsolatedStorage name-space, and you need to add a using statement to any code file that makes use of application settings.
Start by implementing the Load method for the new repository. Within the Load method, declare a list of HighScore objects and call the IsolatedStorageSettings method TryGetValue to initialize the list:
public List<HighScore> Load()
{
    List<HighScore> storedData;
    if (!IsolatedStorageSettings.ApplicationSettings.
        TryGetValue ("HighScores", out storedData))
    {
        storedData = new List<HighScore>();
    }
    return storedData;
}
If a key-value pair doesn’t exist in application settings, TryGetValue will return false, and you’ll create an empty list so that you always return a valid collection.
Next, implement the Save method. Add the list of high scores to application settings using the Item property of the dictionary:
public void Save(List<HighScore> highScores)
{
    IsolatedStorageSettings.ApplicationSettings ["HighScores"] = highScores;
    IsolatedStorageSettings.ApplicationSettings.Save();
}
Values placed in the application settings dictionary aren’t immediately written to disk. The values are usually saved when the application hosting the settings is terminated. Writes can be forced using the Save method.
Implement the Clear method by making a call to the settings class’s Remove method. The Remove method will clear out the HighScores key but will leave all other application settings data intact. You can also force a write of the data by calling the Save method:
public void Clear()
{
    IsolatedStorageSettings.ApplicationSettings.Remove("HighScores");
    IsolatedStorageSettings.ApplicationSettings.Save();
}
The IsolatedStorageSettings class also implements a Clear method. The Clear method will remove every key-value pair stored in the settings dictionary. You could’ve used the Clear method because you only have a single key-value pair, but using the Clear method wouldn’t be appropriate in any applications using multiple key-value pairs.
Your repository implementation is complete, and you can now use the settings repository in your application. Run the application, add a few high scores to the list, and exit with the Back button. Restart the application, and this time you should see the high scores reloaded and displayed in the user interface. Saving data to application settings is simple and only requires a serializable object to be stored in the settings dictionary. When your application requires a more complex data model, you should consider writing the data to files in local storage.
7.3. Serializing data to local storage files
Access to the file system is restricted on the Windows Phone. Instead of accessing the file system with the Directory and File classes found in the System.IO namespace, Windows Phone developers use StorageFolder and StorageFile found in the Windows.Storage namespace. Windows.Storage provides the basic file system APIs for managing files and directories. Windows Phone applications aren’t allowed to use the traditional System.IO classes for managing files and directories, nor are they allowed to see the file system outside the sandbox. A few of the file system methods provided by the StorageFolder class are described in table 7.1.
Table 7.1. File system management methods provided by Windows.Storage
|
Method |
Description |
|---|---|
| CreateFileAsync | Asynchronously creates a new empty file in the storage folder and returns a StorageFile |
| CreateFolderAsync | Asynchronously creates a new folder |
| DeleteAsync | Asynchronously deletes a folder |
| GetFileAsync | Asynchronously gets a file from the storage folder and returns a StorageFile |
| GetFolderAsync | Asynchronously gets a child folder from the storage folder and returns a StorageFolder |
You may have noticed that all the methods in table 7.1 work asynchronously. In the past, working with asynchronous methods was a nasty business, with spaghetti code spread across various invoker and callback methods. Code written for Windows Phone 8 can use the new async and await keywords to keep the code clean.
You’re going to create a high scores repository that reads and writes data to an XML file using the Windows.Storage APIs. As shown in figure 7.4, the data file will be named HighScores.xml and stored in a new folder named HighScores.
Figure 7.4. High scores are written to an XML file located in a new folder in local storage.

Add a new class to the sample application project and call it HighScoreFile-Repository. The new class will have nearly the same interface as the HighScore-SettingsRepository, with one notable change to the load method. The HighScoreSettingsRepository will load high scores asynchronously. In the application settings repository you built in the last section, the list of high scores was implicitly serialized by the framework. In the file storage repository, you’re responsible for serializing the list. To help with serialization, you’ll use the XmlSerializer.
7.3.1. Serializing high scores with the XmlSerializer
The XmlSerializer class is found in the System.Xml.Serialization namespace. The assembly containing the XmlSerializer class isn’t automatically added to the project references by the Windows Phone App project template. To use XmlSerializer you must manually add an assembly reference to System.Xml.Serialization.dll.
You’ll use XmlSerializer in both the LoadAsync and Save methods of the new HighScoreFileRepository class. The implementation of the LoadAsync method is shown in the following listing.
Listing 7.4. Loading scores from a file


The method is named LoadAsync, instead of Load, to follow the naming conventions established by Microsoft where asynchronous methods have Async appended to the end of their name. The async keyword ![]() is required on a method declaration whenever it uses the await keyword. A reference to the application’s local storage folder is retrieved through the LocalFolder property of the singleton ApplicationData instance. Using the local folder instance, the code searches for a subfolder named HighScores and then a file named highscores.xml
is required on a method declaration whenever it uses the await keyword. A reference to the application’s local storage folder is retrieved through the LocalFolder property of the singleton ApplicationData instance. Using the local folder instance, the code searches for a subfolder named HighScores and then a file named highscores.xml
![]() , retrieving references to each using the GetFolderAsync and GetFileAsync methods, respectively.
, retrieving references to each using the GetFolderAsync and GetFileAsync methods, respectively.
The await keyword is placed before the calls to GetFolderAsync and GetFileAsync. When the compiler sees the await keyword, it generates a bunch of code to set up an asynchronous call. When the LoadAsync method is executed, execution is stopped, and control is yielded to the caller. Once the asynchronous method following the await keyword completes, the next line of code in LoadAsync is executed. Because there are three uses of await in LoadAsync, the code is stopped three different times before finally opening the file and loading the high scores. Without the await keyword and the compiler’s support for asynchronous programming, the LoadAsync method would have been implemented with four or five separate methods.
Once the file is opened via OpenReadAsync, its data is read by XmlSerializer. An XmlSerializer class is created, and the Deserialize method is used to read the persisted list and assign it to the return variable ![]() . OpenReadAsync returns an instance of IRandomAccessStreamWithContentType, which is a WinRT concept. XmlSerializer doesn’t know how to use WinRT concepts, so the AsStreamForRead extension method is used to convert IRandomAccessStreamWithContentType to a Stream that can be used by the serializer.
. OpenReadAsync returns an instance of IRandomAccessStreamWithContentType, which is a WinRT concept. XmlSerializer doesn’t know how to use WinRT concepts, so the AsStreamForRead extension method is used to convert IRandomAccessStreamWithContentType to a Stream that can be used by the serializer.
The first time the application runs, the local folder will be empty, and GetFolderAsync will throw a FileNotFoundException. If the folder, and subsequently the file, doesn’t exist, it means that there’s no high scores data to return. If no data exists, an empty list is returned, constructed
in the catch block ![]() .
.
It’s interesting to note that although the method is declared as returning a Task, the code returns a List. This is another example of how the compiler simplifies asynchronous programming. Behind the scenes, the compiler is adding code to construct the Task instance and return it to the caller.
What if the HighScores directory doesn’t exist? You know that it won’t exist the first time you run the application. The directory must be created by your code. The file repository’s Save method, shown in the following listing, will create the directory if it doesn’t exist.
Listing 7.5. Saving high scores to a file

If the directory doesn’t exist, such as the first time the application runs, the Save method adds a new directory to the root of local storage. The code uses Create-Folder-Async with the OpenIfExists option ![]() . A new highscores.xml file is created with the CreateFileAsync method. When called with the ReplaceExisting option, CreateFileAsync
. A new highscores.xml file is created with the CreateFileAsync method. When called with the ReplaceExisting option, CreateFileAsync ![]() creates a new file, or overwrites an existing file, and returns an unopened StorageFile. The file is opened asynchronously, and an output stream suitable for writing data is retrieved. The output stream will be
used to write data to the file and should be closed when it’s no longer needed. You place the code using the stream inside
a using block, which will automatically call close and clean up the file handle for you. The list of high scores is written to the XML file using the Serialize method of the XmlSerializer class
creates a new file, or overwrites an existing file, and returns an unopened StorageFile. The file is opened asynchronously, and an output stream suitable for writing data is retrieved. The output stream will be
used to write data to the file and should be closed when it’s no longer needed. You place the code using the stream inside
a using block, which will automatically call close and clean up the file handle for you. The list of high scores is written to the XML file using the Serialize method of the XmlSerializer class ![]() . The AsStreamForWrite extension method is used to convert the WinRT IOutputStream instance to a .NET Framework Stream instance usable by the XmlSerializer.
. The AsStreamForWrite extension method is used to convert the WinRT IOutputStream instance to a .NET Framework Stream instance usable by the XmlSerializer.
7.3.2. Deleting files and folders
The last repository method you need to implement is Clear. The file repository implements Clear by deleting the HighScores folder. Deleting the folder deletes the file as well:
public async Task Clear ()
{
   StorageFolder localFolder = ApplicationData.Current.LocalFolder;
   StorageFolder scoresFolder = await localFolder
         .GetFolderAsync ("HighScores");
   await scoresFolder.DeleteAsync();
}
Once created, the HighScores.xml file and the HighScores folder will continue to exist in local storage. Files and folders in local storage are deleted when a user uninstalls an application, but they remain unchanged when a user upgrades an application to a new version.
The final step before running the application is to update the MainPage class to declare and instantiate a HighScoreFileRepository:
HighScoreFileRepository repository = new HighScoreFileRepository();
You should remove or comment out the HighScoreSettingsRepository that was added earlier in the chapter. You also need to update the MainPage_Loaded event handler, marking it as async and calling LoadAsync with the await keyword:
async void MainPage_Loaded(object sender, RoutedEventArgs e)
{
   var results = await repository.LoadAsync();
   highscores = new ObservableCollection<HighScore>(results);
   HighScoresList.ItemsSource = highscores;
}
The file repository demonstrates file and directory management within local storage available to an application. Some data models match nicely with a file-based storage solution. Other data models work better with a relational database solution.
7.4. Working with a database
Windows Phone ships with a built-in relational database engine, allowing applications to store data in a local database. The built-in database engine is a version of SQL Server Compact Edition. The bad news is that you can’t use raw SQL to interact with the database. The data access API for working with local databases is LINQ to SQL.
Note
LINQ to SQL for Windows Phone only works with local databases. If your application needs to work with a remote database, you should consider using the OData API. You can learn more about OData at www.odata.org.
LINQ to SQL is an object-relational mapping (ORM) technology that was introduced with version 3.5 of the .NET Framework for desktop and server applications. Applications work with objects defined in a programming language, whereas relational databases work with tables, records, and fields defined by the database schema. An ORM is responsible for mapping the objects in the application with rows and fields in a database table. In the sample application, you work with HighScore objects. LINQ to SQL will transform HighScore objects into rows in the HighScore table of your database, and rows in your database into HighScore objects.
The LINQ to SQL libraries contain the following namespaces:
- System.Data.Linq
- System.Data.Linq.Mapping
- Microsoft.Phone.Data.Linq
- Microsoft.Phone.Data.Linq.Mapping
The System.Data.Linq and System.Data.Linq.Mapping namespaces contain a subset of the LINQ to SQL APIs that are found in the desktop libraries. The Microsoft .Phone.Data.Linq and Microsoft.Phone.Data.Linq.Mapping namespaces contain phone-specific extensions to LINQ to SQL.
Throughout the remainder of this chapter, you’ll learn how to modify your sample application to use a local database. You’ll learn how to read and write high scores data to the local database using LINQ expressions. And you’ll learn how to create and delete databases and work with read-only databases that are included in the application’s XAP deployment package.
First, you need to learn how to define your database schema using LINQ to SQL classes and attributes.
7.4.1. Attributing your domain model
The Windows Phone implementation of LINQ to SQL allows two different methods of defining a local database schema. The first method, covered in this section, uses attributes attached to the classes defined in your code. The second method, which is beyond the scope of this book, uses XML files to define the mapping.
LINQ to SQL provides attribute classes to define tables, columns, and indexes. One-to-one, one-to-many, and many-to-many relationships between tables are also declared using attributes. The LINQ to SQL attributes supported by Windows Phone are listed in table 7.2.
Table 7.2. LINQ to SQL attributes
|
Attribute |
Description |
|---|---|
| Association | Declares an association between two classes, resulting in a relationship between two tables in the database. |
| Column | Declares a column in a table and maps the fields of an object to the column. The Column attribute has several properties that are used to describe the column. |
| Index | Declares an index for a table. Multiple indexes can be declared for the same table. The Index attribute is found in the Microsoft.Phone.Data.Linq.Mapping namespace. |
| Table | Declares a table in the database and identifies the type of object stored in the table. The database table name can be customized with the attribute’s Name property. |
With the Table, Column, Index, and Association attributes, you can create an entire database schema. You can create a multicolumn index by providing a comma-separated list of names for the Columns property.
The sample High Scores application is fairly simple and can be implemented using a single database table. Start the implementation by adding a few attributes to the existing HighScore class. The new HighScore code is shown in the following listing.
Listing 7.6. Updating the HighScore class

Add using statements for the namespaces ![]() System.Data.Linq.Mapping and Microsoft.Phone.Linq.Mapping so you can easily use the Table, Index, and Column attributes. Start defining the database schema by adding the Table attribute to the HighScore class. Also add the Index attribute
System.Data.Linq.Mapping and Microsoft.Phone.Linq.Mapping so you can easily use the Table, Index, and Column attributes. Start defining the database schema by adding the Table attribute to the HighScore class. Also add the Index attribute ![]() to the HighScore class, declaring a database index using the Score column. Add a Column attribute to each of the fields in the HighScore class. Create a new Id field
to the HighScore class, declaring a database index using the Score column. Add a Column attribute to each of the fields in the HighScore class. Create a new Id field ![]() , declaring that the field is the primary key for the table and that its value is created by the database.
, declaring that the field is the primary key for the table and that its value is created by the database.
The attributed HighScore class defines how the HighScore table will be built in the database. Each row in the table will be mapped to a HighScore object by LINQ to SQL. You may be wondering how LINQ to SQL combines all tables to define the database and how you access the tables from code. The database itself is represented by LINQ to SQL with the data context.
7.4.2. Defining the data context
Each LINQ to SQL database is represented by a custom data context implementation. The data context is the API used to access data in the database. It defines the tables, caches reads, and tracks changes to objects. The data context knows what has changed and performs the appropriate SQL update statements. Your code tells the data context when to add a new object or delete an existing object, and the data context issues the appropriate insert or delete commands. Changes, insertions, and deletions are queued up in memory until LINQ to SQL is asked to submit the changes to the database, which happens when the SubmitChanges method is called. The data context performs all changes using transactions.
Later in the chapter, you’ll look at how to use the data context in create, read, update, and delete (CRUD) operations. First, let’s look at how to define a data context for your HighScores database. Each custom data context is derived from the Data-Context base class found in the System.Data.Linq namespace. In this sample application, you’ll create a new class named HighScoresDataContext and derive it from the DataContext class:
using System.Data.Linq;
public class HighScoresDataContext : DataContext
{
    public Table<HighScore> HighScores;
    public HighScoresDataContext(string path) : base(path) { }
}
For each table that should be created in the database, there must be a matching field in the DataContext class. The field will be of type Table<T>, where T is the LINQ to SQL attributed class that will be stored in the table. In the sample application, you have only one table to hold HighScore objects, so your data context defines a Table<HighScore> field.
The only other change you make to the HighScoresDataContext class is to implement a constructor. The constructor will accept a connection string and pass it along to the base class. The connection string can provide database details such as the filename of the database, the maximum size of the database, the read/write mode used to open the database file, and other options. Sample connection strings are shown in table 7.3.
Table 7.3. Sample database connection strings
|
Connection string |
Description |
|---|---|
| /file1.sdf | Open the database located in the local storage file named file1.sdf. Open the database in read/write mode. |
| isostore:/file1.sdf | Same as /file1.sdf. |
| /folder1/file1.sdf | Open the database located in local storage in the folder called folder1, in the file called file1.sdf. |
| datasource='appdata:/file1.sdf';mode=read only | Open the database located in the application’s install folder, in the file called file1.sdf. Open the database in read-only mode. |
| datasource='/file1.sdf'; max database size=512 | Open the database located in the local storage file called file1.sdf. Allow the database to grow to 512 megabytes. |
| For a complete list of connection string parameters, see the local database connection strings for Windows Phone documentation on MSDN at http://mng.bz/3dVS. | |
The simplest connection string requires only a filename. The DataContext class will look in the root folder of the application’s local storage for a file with the given name. Database files can exist in folders other than the root folder. Read-only database files can also be read from the application’s installation folder using the appdata: prefix. The default maximum value for a database is 32 MB.
Now that you have a data context class and have defined database mapping attributes on the HighScore class, you’re ready to create the database.
7.4.3. Creating the database
At this point you’ve defined your database schema and data context and are ready to use the database in your High Scores sample application. You’ll be loading and saving high scores using the same repository pattern you’ve been using throughout this chapter. You’re going to add a new repository class to your project. Name the new class HighScoreDatabaseRepository and implement empty Load, Save, and Clear methods.
Your new repository class will use a HighScoresDataContext to read and write high scores to a database file in local storage. As shown in figure 7.5, the database file will be named highscores.sdf and will be placed in a folder named HighScoreDatabase.
Figure 7.5. High scores are written to a database located in a new folder in local storage.

Before you create the database, you declare the data context as a field in the repository and instantiate it in an Initialize method. The following listing details the repository class definition and Initialize method.
Listing 7.7. Creating the HighScores database

Before you create a new data context, ensure that the HighScoreDatabase folder exists by calling CreateFolderAsync ![]() . Instantiate a new HighScoresDataContext object, specifying a file named highscores.sdf in the HighScoreDatabase folder
. Instantiate a new HighScoresDataContext object, specifying a file named highscores.sdf in the HighScoreDatabase folder ![]() . Check whether the file has been created using the DatabaseExists method. If the database doesn’t yet exist, ask the data context to create one
. Check whether the file has been created using the DatabaseExists method. If the database doesn’t yet exist, ask the data context to create one ![]() .
.
Because of the Initialize method, the database repository differs from the settings and file repositories implemented earlier in the chapter. The Initialize method must be called before the repository is used, and the best place to make the call is in the MainPage_Loaded event handler:
HighScoreDatabaseRepository repository = new HighScoreDatabaseRepository();
async void MainPage_Loaded(object sender, RoutedEventArgs e)
{
   await repository.Initialize();
   var results = repository.Load();
   highscores = new ObservableCollection<HighScore>(results);
   HighScoresList.ItemsSource = highscores;
}
You’re now ready to implement the remaining repository methods. The Load, Save, and Clear methods will use database create, read, update, and delete (CRUD) operations provided by the data context.
7.4.4. CRUD operations
Usually, when working with databases, the developer has to keep track of which items are new, which have been updated, and which have been deleted. LINQ to SQL frees the developer from these tedious bookkeeping tasks. The data context tracks which objects have been updated and issues the appropriate update statements when changes are submitted. New objects are created in the normal fashion (using the new keyword) and are inserted into the table. To delete an object, the developer removes the object from the table.
Reading data
We’re getting ahead of ourselves—before you can work with objects loaded from a database, you must first be able to read them from the database. Your HighScoreDatabaseRepository class reads high scores from the database when the application calls the Load method. The LINQ to SQL table is a queryable collection, which allows you to use LINQ expressions to retrieve data from the table:
public List<HighScore> Load()
{
    var highscores = from score in db.HighScores
                     orderby score.Score descending
                     select score;
    return highscores.ToList();
}
In the Load method, you query the HighScore table using a LINQ expression built with the integrated query language. Select HighScore objects and sort them in a descending order of score. Then convert the collection to a list and return.
Behind the scenes, the LINQ to SQL framework converted the LINQ expression into a true SQL select statement. The SQL statement was sent to the SQL Server CE database, which returned a result set. LINQ to SQL then transformed the result set into a collection of HighScore objects. The list of high scores was returned to the application and displayed in the user interface as it was when you used application settings and local storage files.
Creating new high scores
The user of the application creates a new high score by tapping the Add button. The button’s click handler creates a new HighScore object, inserts it into the list of high scores, and then asks the repository to save the list. LINQ to SQL tracks HighScore objects that it creates, but it doesn’t automatically track objects created by application code. A new object can be added to the list of tracked objects using either the Insert-OnSubmit or InsertAllOnSubmit methods provided by the Table class.
The InsertOnSubmit method accepts a single object. The new object will be added to the internal list of tracked objects and will be added to the database the next time the SubmitChanges method is called. InsertAllOnSubmit works with a collection of new objects.
The HighScoreDatabaseRepository doesn’t provide a mechanism for registering new objects with the repository, and you don’t need to change the interface. Instead, you can add logic to the Save method to detect when unmanaged objects have been added to the collection:
public void Save(List<HighScore> highScores)
{
    var newscores = highScores.Where(item => item.Id == 0);
    db.HighScores.InsertAllOnSubmit(newscores);
    db.SubmitChanges();
}
You detect when a HighScore object is new by looking at the value of the Id field. You added the Id field to the HighScore class because the database required a primary key, and you declared that the field’s value would be generated by the database. This means that objects with a field value of zero have never been added to the database. Use a regular LINQ Where expression to find new HighScore objects in the list. Once you’ve identified new objects, use the InsertAllOnSubmit method to register them as new objects with the LINQ to SQL table.
Wrap up your implementation of the Save method by calling SubmitChanges on the DataContext. The DataContext will generate SQL insert statements for any new records. After the new scores are submitted to the database, LINQ to SQL reads the generated Id values and updates the HighScore objects so that their Id fields won’t be zero.
Note that if you’d changed a value in an existing field, the changes would also have been submitted to the database with a SQL update statement. We’ll take a close look at how LINQ to SQL updates changed data later in this chapter. First, let’s look at how to delete data.
Deleting data
The sample application allows the user to reset the list of high scores by tapping the Clear button. The button’s click handler calls the repository’s Clear method. LINQ to SQL tracks HighScore objects that it reads from the database, but it doesn’t automatically know when to remove an object from the database. An object can be removed from the database using either the DeleteOnSubmit or DeleteAllOnSubmit methods provided by the Table class.
When deleting a single object, use the DeleteOnSubmit method. The deleted object will be added to the internal list of tracked objects and will be removed from the database the next time the SubmitChanges method is called. DeleteAllOnSubmit works with a collection of objects.
The HighScoreDatabaseRepository assumes that Clear will delete all high scores records. Your implementation of the Clear method reads all the high scores from the HighScores table and then calls DeleteAllOnSubmit to delete every high score:
public void Clear()
{
    var scores = from score in db.HighScores
                 select score;
    db.HighScores.DeleteAllOnSubmit(scores);
    db.SubmitChanges();
}
When the SubmitChanges method is called, the appropriate SQL delete statements are generated and sent to the database.
The HighScoreDatabaseRepository is now fully implemented. Run the application and add a few new high scores. Exit and restart the application, and you should see the high scores reloaded from the database and displayed in the user interface. Clear the list and restart the application, and you should see a blank screen.
Now that the basic create, read, and delete operations are working, let’s take a closer look at how LINQ to SQL implements update operations.
Updating data
By default the database context stores two instances of each object. The first object is returned as part of the query, and the second object is an unchanged internal copy. It uses the internal copy to determine when an object has been changed. When the Submit method is called, LINQ to SQL walks through each object it knows about and compares it to the internal copy. If the two objects differ in any way, LINQ to SQL generates a SQL update expression to store the changes.
Note
If you’re not making changes to a database, you can improve performance by setting the DataContext’s ObjectTrackingEnabled property to false. When object tracking is false, the DataContext doesn’t generate internal copies of tracked objects.
In order to demonstrate how to update objects with LINQ to SQL, you’ll add an editing feature to your sample application. You’ll allow the user to edit the name associated with the HighScore object, as shown in figure 7.6.
Figure 7.6. Editing the name associated with a high score

The user will edit the name with a standard TextBox control. In MainPage.xaml, replace the TextBlock that displays the name with a TextBox:
<TextBox Text="{Binding Name, Mode=TwoWay}" />
Add an application bar button that the user can tap to force a save of changes:
<shell:ApplicationBarIconButton Click="save_Click"
    IconUri="/Assets/AppBar/save.png" Text="save" />
Implement the save_Click event handler. Inside the event handler, you call the repository’s Save method as you do when a new high score is generated:
using System.Windows.Input;
void save_Click(object sender, EventArgs e)
{
    var nameInput = FocusManager.GetFocusedElement() as TextBox;
    if (nameInput != null)
        nameInput.GetBindingExpression(TextBox.TextProperty)
            .UpdateSource();
    repository.Save(highscores.ToList());
}
You may wonder what the first few lines of the snippet do. The TextBox control has an interesting quirk when updating bound data. It tries to be efficient with data-binding updates and may not have updated the HighScore’s Name field when the save_Click event handler is called. In this snippet, you get the TextBox that has focus and ask for the BindingExpression object connected to the control’s Text property. You use the BindingExpression’s UpdateSource method to ensure the name is copied from the TextBox to the HighScore object before you call the Save method.
You don’t need to change the repository’s Save method implementation. LINQ to SQL maintains an internal copy of the changed HighScore object. When the SubmitChanges method is called, LINQ to SQL figures out which high scores have been updated and saves the changed objects to the database.
Developers can help the database context use fewer resources by using objects that implement the INotifyPropertyChanged interface. When serving up an object that reports it’s own changes, LINQ to SQL doesn’t generate an internal copy of the object. Instead it adds an event handler that listens to the PropertyChanged event. When the PropertyChanged event is raised, LINQ to SQL records the change internally. Then when the SubmitChanges method is called, the DataContext uses the list of changed objects to generate the appropriate SQL update expressions.
LINQ to SQL uses the underlying LINQ framework to provide powerful capabilities when working with collections and databases. Though describing the full features of LINQ is beyond the scope of this book, there are a couple more LINQ features you should understand. LINQ expressions are used to search for records in the database. We’ll look at a couple simple alternative query expressions before discussing how to use precompiled query expressions to improve application performance.
7.4.5. Searching for data
The High Scores sample application uses a single query expression to return an ordered list of every high score in the database. What if you wanted a list of the scores for the third level in your fictional game? If you were writing a traditional SQL expression, you’d add a where clause comparing the LevelsCompleted column with the value 3. LINQ to SQL allows you to use a similar technique:
var highscores = from score in db.HighScores
                 orderby score.Score descending
                 where score.LevelsCompleted == 3
                 select score;
In this snippet a where clause has been added to the LINQ expression. Note that this where clause uses C# comparison operators. You’ll add support for this scenario to the HighScoreDatabaseRepository by altering the Load method declaration to accept a level number:
List<HighScore> Load(int level = 0);
Here you’re using C# optional argument syntax to specify a default value for the level argument. You set the default level value to zero, which means return all levels. When the level isn’t zero, you should return only the high scores for the requested level. This is accomplished by using a where clause in the LINQ expression. Update the database repository’s Load method, as shown in the following listing.
Listing 7.8. Loading scores for specific levels

Begin updating the Load method in the HighScoreDatabaseRepository by adding the level argument ![]() . Wrap the existing query
. Wrap the existing query ![]() with an if statement, executing the default query when the requested level has the value of zero. Execute a query containing a where expression
with an if statement, executing the default query when the requested level has the value of zero. Execute a query containing a where expression ![]() when a specific level is requested.
when a specific level is requested.
Because your application always uses the same two queries, you can improve performance a bit by compiling the queries once and using compiled queries in your Load method.
7.4.6. Compiling queries
When LINQ to SQL encounters a query expression, the framework parses the expression, turning LINQ syntax into a SQL statement. This parsing must be performed every time the query is executed. To minimize the performance hit of constantly reparsing the same expression, LINQ provides a mechanism to compile an expression once and reuse it over and over.
Compiled LINQ expressions are represented in code with the Func<TResult> class. The Func class is a form of Delegate, representing a reference to a method that returns the type specified with the TResult generic type parameter. There are several variations of the Func class, allowing for anywhere from zero to four parameters.
You need two compiled queries, which means you need two member Func fields to represent them:
Func<HighScoresDataContext, IOrderedQueryable<HighScore>> allQuery;
Func<HighScoresDataContext, int, IQueryable<HighScore>> levelQuery;
The first compiled query represents the search for all high scores and is a Func class that accepts one argument, a HighScoresDataContext, and returns an IOrdered-Queryable, which is an ordered collection of HighScore objects. The second compiled query represents the search for the high scores for a specified level and is a Func class that accepts two arguments: the data context and the specified level.
The queries are compiled using the CompiledQuery utility class found in the System.Data.Linq namespace. This class is part of the LINQ to SQL implementation and provides a Compile method. You compile the two queries in the HighScoreDatabaseRepository constructor, which you’ll have to create. The allQuery Func is generated with the following code snippet:
allQuery = System.Data.Linq.CompiledQuery.Compile(
    (HighScoresDataContext context) =>
        from score in context.HighScores
        orderby score.Score descending
        select score);
The second compiled query is generated with a similar expression, but includes a level argument and a where clause in the query:
levelQuery = System.Data.Linq.CompiledQuery.Compile(
    (HighScoresDataContext context, int level) =>
        from score in context.HighScores
        orderby score.Score descending
        where score.LevelsCompleted == level
        select score);
With the newly compiled queries at your disposal, you can simplify the Load method. The new Load method implementation uses the allQuery and levelQuery Func objects instead of inline LINQ expressions:
if (level == 0)
{
    highscores = allQuery(db);
}
else
{
    highscores = levelQuery(db, level);
}
If you think using a compiled query looks like calling a method, you’re right. Compiled queries are instances of a Func, and the Func class is a form of a delegate. Delegates are references to methods.
7.4.7. Upgrading
When you’re building applications and databases, it’s rare that the data model is perfectly designed before the first release. Applications evolve, either because of new features that weren’t thought of during initial design or because existing features didn’t quite solve the problems the application was built to solve. What do you do when you need to change the database schema for an existing database when the user installs a new version of your application?
Database upgrade algorithms usually involve a series of SQL statements that alter and drop tables and columns in the database. The database support in Windows Phone doesn’t allow SQL statements to be issued directly against the database. The Windows Phone LINQ to SQL implementation supports a few database upgrade scenarios. These scenarios are focused on additions to the database schema. New tables can be added to the database. New columns and indexes can be added to existing tables. New associations between tables can also be added to the database schema.
To demonstrate updating an existing database, let’s pretend that version 1.0 of your application has already been released and users have installed the application on their phones. In version 1.1 of the application, you’ll add a field to the HighScore class, which corresponds to adding a column to the database used to store the sample application data. When the user upgrades from version 1.0 to 1.1 of your application, the data stored in the application’s local storage folder is left intact. The first time version 1.1 of the application runs, it executes code to upgrade the database created by version 1.0 of the application.
To see the upgrade code in action, make sure you run the application and create the database before making the modifications described in this section. Once you have an existing database, open the HighScore class and add a new Difficulty field:
[Column] public string Difficulty { get; set; }
Database updates are performed using the DatabaseSchemaUpdater class found in the Microsoft.Phone.Data.Linq namespace. To create instances of DatabaseSchema-Updater, an extension method named CreateDatabaseSchemaUpdater has been added to the DataContext class. The following listing details how to create and execute an update.
Listing 7.9. Upgrading an existing database

The database upgrade code is added to the HighScoreDatabaseRepository’s constructor in an else block following the check for database existence ![]() . The updater is created with a call to CreateDatabaseSchemaUpdater. Examine the current version of the database
. The updater is created with a call to CreateDatabaseSchemaUpdater. Examine the current version of the database ![]() . When the database is at version 0, you know it was created by version 1.0 of the application and that you need to add the
new column to the HighScore table. The column is added with the AddColumn method
. When the database is at version 0, you know it was created by version 1.0 of the application and that you need to add the
new column to the HighScore table. The column is added with the AddColumn method ![]() . Change the database version to the value 1. When all the changes are complete, commit the changes to the database with the Execute method. The Execute method applies all the requested changes in a single transaction.
. Change the database version to the value 1. When all the changes are complete, commit the changes to the database with the Execute method. The Execute method applies all the requested changes in a single transaction.
Debug the application and step through the database update code. If the database exists and is at version 0, the new column will be added to the HighScore table. If you exit the application and run it a second time, the database will be at version 1 and the upgrade code will be skipped.
There’s a small problem with updating databases. The versioning scheme is an extension to LINQ to SQL specific to Windows Phone. The core LINQ to SQL code doesn’t understand versioning, and databases are always created with a schema version of 0. As shown in figure 7.7, version 1.1 of your application also creates a database with a schema version of 0. A database upgraded by version 1.1 of the application will have a schema version of 1.
Figure 7.7. Database schema as created and upgraded by the application

To demonstrate the problem, uninstall the High Score sample application (or use the Rebuild Solution option in Visual Studio). The first time you run the application, the database will be created at version 0, but this time version 0 contains the Difficulty column. Exit the application and run it again. The database update code will try to execute but will generate an exception because the Difficulty column already exists.
How can you fix this problem? You can use the DatabaseSchemaUpdater to set the schema version immediately after you create the database. Before you change the version 1.1 code that creates and upgrades the database, back up and start the process over. Comment out the difficulty field in the HighScore class and the else block with the upgrade code in the HighScoreDatabaseRepository constructor. Uninstall the application from the phone so that the current database is deleted. Deploy and run the code so that a database with schema 0 is created.
Now you’re ready to fix the database’s create and update code in version 1.1. The new code is shown in the following listing.
Listing 7.10. A better database upgrade implementation
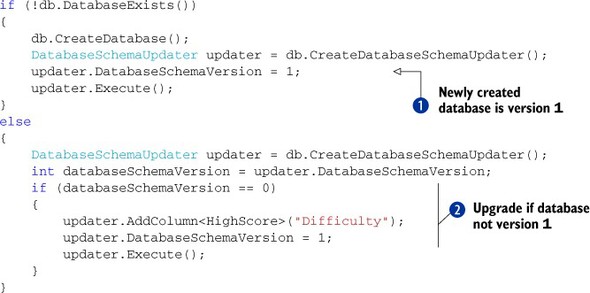
Change the database creation code to record version 1 in DatabaseSchemaVersion ![]() . When the version of the schema is 0, upgrade
. When the version of the schema is 0, upgrade ![]() the database by adding the Difficulty column and changing the database version to 1.
the database by adding the Difficulty column and changing the database version to 1.
Run the application, and your database with schema version 0 should be upgraded to schema version 1. Run the application a second time, and the update code should find the schema version of 1. Now uninstall the application and redeploy it. The first time you run the application after deploy, you create the database with a schema version of 1. The next time you run the application, the updater reports version 1, and the new code decides that there’s no work to perform.
We’re nearly finished with our coverage of LINQ to SQL. The one other feature of LINQ to SQL that’s unique to Windows Phone concerns deploying and using a read-only reference database.
7.4.8. Adding a read-only database to your project
Not all applications require writable databases, and some databases are intended for read-only scenarios. Consider a database that contains ZIP codes and tax rates for a CRM application or a dictionary of words for a word scramble game. Read-only databases can be included in your XAP deployment package in the same way that audio files, icons, and other content files can be included.
Read-only databases can be used directly from the application install folder and don’t need to be copied into local storage. The connection string that’s supplied to the DataContext allows you to specify the application installation folder as the location for a database file. How do you create the database file to begin with? One solution may be to create a Windows Phone project specifically to generate the database. The database generator project would share the data model classes along with the data context. The data model and data context could be placed in a shared assembly project or could be directly used in both projects using linked files.
The database generator project would call the data context’s CreateDatabase method to create the database file. Once created, the database generator would create objects and insert them into the appropriate Table objects. When the database is fully created, the application can exit.
For the next step, you need the product ID from the generator project’s WMApp-Manifext.xml file. The manifest file resides in the project’s Properties folder. Find and open the file and look for the product ID:
<App xmlns="" ProductID="{c81a71a5-6f9f-4999-bc30-8f7cd48e1909}"
Fire up the Isolated Storage Explorer tool introduced in chapter 1. For this task, you’ll take a snapshot of local storage, which will copy all the files in local storage to a location on your computer’s hard drive. Figure 7.8 shows the results of downloading a snapshot to the C: empsnapshot folder.
Figure 7.8. Taking a snapshot with the Isolated Storage Explorer. Before taking the snapshot, the devices are enumerated, and the appropriate device index is used in the subsequent invocation of ISETool.

Once the snapshot is copied, you can find the SDF file and copy it into your project by clicking Visual Studio Project > Add Existing Item. Mark the file’s build action as Content, and it’ll be included in the application’s XAP file.
Now when your application is deployed, the database will also be deployed. When the application is running, the reference database can be opened with the following connection string:
datasource='appdata:/file1.sdf';mode=read only
One advantage of a read-only database is apparent when working with a large dataset. A dictionary of words could easily be stored in an XML file and loaded into memory. Loading large datasets into memory becomes impractical, if not impossible, when the database size approaches 100 MB. Using LINQ to SQL, an application can query for and load only a subset of the database, reducing the memory footprint required by the application.
7.5. Summary
In this chapter we presented three solutions for storing application data in the Windows Phone file system. You now know how to store application data between runs of an application. Simple sets of data can be stored in application settings using Isolated-StorageFile. Documents, text files, and binary data can be written to files using the Windows.Storage APIs provided by WinRT. The last alternative involves relational databases, SQL Server CE, and LINQ to SQL.
LINQ to SQL is a broad subject, and many topics require more detail than we can provide in this book. For more depth on LINQ to SQL, see the MSDN documentation. There are also several books devoted entirely to the subject.
We also showed how to use the Isolated Storage Explorer tool to copy data from a phone, specifically for generating read-only databases. The ISETool can also be used to load data into local storage, which is ideal for restoring a test device to a known state, allowing for the execution of specific test cases.
Some of the data storage concepts discussed in this chapter should be familiar to .NET Framework developers, because they’re limited versions of the same storage technologies that have existed in the .NET Framework for many years. Other concepts, specifically those found in WinRT, are likely new to you unless you’ve already learned how to build Windows Store applications for Windows 8. In the next chapter you’ll learn how to use the PhotoChooserTask, the CameraCaptureTask, and the Photo-Camera classes to develop camera-based applications.