Chapter 9. Integrating with the Photos and Music + Videos Hubs
- Loading and saving pictures in the media library
- Viewing and sharing photos
- Recording voice with the microphone
Windows Phone contains several built-in applications, including the Phone Dialer, Email, Camera, Bing search, Photos Hub, and Music + Videos Hub. In chapters 5 and 8 you learned how to use launchers and choosers and the PhotoCamera class to interact with the built-in applications. Most of these interactions consisted of sample applications launching the built-in applications. In this chapter you’re going to learn how to make the Photos Hub and Music + Videos Hub launch your application.
The built-in applications use navigation URLs to launch your application and pass information. The Photos Hub uses extensibility features to display a list of applications in the hub panorama, as well as in various menus displayed throughout the hub. When viewing a picture, the user can choose to share, edit, or view the picture with your application. In this chapter you’re going to extend the Photo-Editor sample application from chapter 8 to use Photo Extensibility for Windows Phone. Along the way, you’ll learn to use the MediaLibrary from the XNA Framework to read and write pictures to the phone’s picture albums.
The other built-in application you’ll learn to extend is the Music + Videos Hub, which lets the user play or watch several different types of audio and video. Music and audio may be stored in the phone media library, but they may also be stored in third-party applications or streamed from the internet. Applications that play audio report information to the Music + Videos Hub, which displays information to the user in the pages of the hub’s panorama control.
In this chapter you’ll build a sample application that records voice using the phone’s microphone and saves the recording to a wave file in local storage. The sample application will report information about the voice recording to the Music + Videos Hub, and the user will then be able to play the voice recordings from the Music + Videos Hub. We also show you how to create and use a background agent to play the voice recordings even when the application isn’t running in the foreground.
We have a lot to cover, so let’s get started with updating the PhotoEditor sample application to read and save pictures in the media library.
9.1. Working with pictures in the media library
You’re going to continue working with the PhotoEditor application you created in the last chapter. When you last left the PhotoEditor, the user was able to edit pictures and save them to local storage. The Photos Hub is where you want to save pictures, because this is where the user expects to see all pictures on the device. The Media-Library class provides the API you need to save pictures to the Photos Hub.
The MediaLibrary class from the XNA Framework provides access to songs, play-lists, and pictures in the device’s media library. The media library plays a huge role in Windows Phone because it’s useful when you want to integrate your applications with the phone’s built-in applications.
The MediaLibrary class has six properties, and we categorize them into pictures and audio/videos. We cover only picture-related properties in this section.
9.1.1. Exposing pictures
The two picture-related classes in the MediaLibrary namespace are Picture and PictureAlbum. Each Picture class instance provides information about a picture via the Name, Date, Height, Width, and Album properties. Picture albums are containers for pictures and other picture albums. The collection of pictures in a PictureAlbum is accessed through the album’s Pictures property. The other PictureAlbums contained in the album are exposed with the Albums property. You can also retrieve the parent PictureAlbum via the Parent property.
Pictures and PictureAlbums are exposed by several properties of the Media-Library class. Table 9.1 lists the picture-related properties of the MediaLibrary.
Table 9.1. MediaLibrary properties that expose pictures
|
Description |
|
|---|---|
| Pictures | A single collection of Picture objects representing every picture in the Camera Roll, Saved Pictures, and Sample Pictures albums. |
| RootPictureAlbum | The root of the picture album hierarchy. This is the PictureAlbum parent of the Saved Pictures, Camera Roll, Sample Pictures, and Favorite Pictures albums. |
| SavedPictures | A collection of Picture objects representing every picture in the Saved Pictures album. |
Let’s talk about the RootPictureAlbum property of MediaLibrary. RootPicture-Album provides everything (including photo albums) from the root folder. To better understand the differences between the Pictures and RootPictureAlbum properties, look at the portable device folder, shown in figure 9.1. This folder is added to your desktop system when you plug a real phone into your computer’s USB port. On the phone, the root folder is named Pictures, and this is what RootPictureAlbum returns. Usually there aren’t any pictures in the root folder, but it may have two or more default folders.
Figure 9.1. Phone picture albums in the Windows File Explorer. A portable device folder is added to the computer node in the File Explorer hierarchy. The Pictures library shown in File Explorer is equivalent to the RootPictureAlbum property of the MediaLibrary class.

The Camera Roll folder is the default location where all photos that the user has taken with the phone’s camera are stored automatically. The Sample Pictures folder is created by Windows Phone the first time the Photos Hub is launched, and the Saved Pictures folder is the default place where a user saves all images from the internet or an application.
Note
In the Photos Hub, the user is able to view photos from SkyDrive, Facebook, and other social networking sites, but those aren’t stored on the device. Social networking photos can be saved to the Saved Pictures folder on the phone by tapping the Save to Phone menu item in the application bar while viewing the photo.
The Pictures property of the MediaLibrary returns the collection of pictures that have been stored in the media library. Due to the integration with Facebook, Windows Live, and other photo-providing applications, more pictures may be visible in the Photos Hub than are reported by the MediaLibrary. MediaLibrary doesn’t provide any information about online photos that haven’t been saved to the device yet. You can query all other photos that have been taken with the phone camera, downloaded, or synced from computers.
The last picture-related MediaLibrary property is SavedPictures. SavedPictures returns the collection of pictures stored in the Saved Pictures album. This is a convenient property, saving you the hassle of navigating the album hierarchy from Root-PictureAlbum. The Saved Pictures album is also the only album in the MediaLibrary that an application can use when saving pictures.
9.1.2. Saving pictures to the media library
In chapter 8 you learned how to save a picture to a file in local storage. An edited photo seems out of place in local storage. All the other pictures on the phone are stored in the Photos Hub and synchronized with the Windows Phone software on the PC. Now that you have a good understanding of the MediaLibrary, we can talk about how to save photos in the Photos Hub.
Tip
Use of the MediaLibrary requires the ID_CAP_MEDIALIB_PHOTO capability to be declared in WMAppManifest.xml.
Launch Visual Studio and open the PhotoEditor project. Find the Save_Click method in MainPage.xaml.cs and update the code to match the following listing.
Listing 9.1. Saving a picture to the media library

Before you can use the MediaLibrary class, declare that you’re using the Microsoft .Xna.Framework.Media namespace ![]() . Alter the method to save the image in a MemoryStream instead of a stream attached to a StorageFile
. Alter the method to save the image in a MemoryStream instead of a stream attached to a StorageFile ![]() . Create a Media-Library instance and call the SavePicture method
. Create a Media-Library instance and call the SavePicture method ![]() , passing in the memory stream. The MediaLibrary doesn’t care whether a picture with the name customphoto.jpg already exists. Pictures won’t be overwritten, and two pictures
will be created. When shown in Windows File Explorer on the PC, the duplicate copies are named customphoto(1).jpg, customphoto(2).jpg,
and so on.
, passing in the memory stream. The MediaLibrary doesn’t care whether a picture with the name customphoto.jpg already exists. Pictures won’t be overwritten, and two pictures
will be created. When shown in Windows File Explorer on the PC, the duplicate copies are named customphoto(1).jpg, customphoto(2).jpg,
and so on.
Once you’ve implemented the new Save_Click code, you can run the sample project from Visual Studio. Use the Choose Picture menu option to select one of the existing pictures in the Photos Hub. Once the picture is displayed in the PhotoEditor application, click the Edit button followed by the Save button (see figure 9.2). The application should display the message “Image saved to media library” if the photo was saved successfully. You can then go the Photos Hub and check the Saved Pictures album, where you’ll see the new image.
Figure 9.2. Selecting, editing, and saving a photo in the sample application

Adding pictures to the Photos Hub is one form of integration with the Photos Hub. We’ll look at other methods later in the chapter. First, let’s look at how to read a picture from the library.
9.1.3. Retrieving a picture from the media library
Retrieving a list of all pictures from the media library is easy: instantiate a Media-Library instance and use the Pictures property. The Pictures property returns a collection of Picture objects representing every picture in the Camera Roll, Sample Pictures, and Saved Pictures albums. If you only want a collection from the Saved Pictures album, use the SavedPictures property instead.
The Picture class not only provides image details through the Name, Date, Width, and Height properties, but also provides access to the stream of bytes that compose the image contained in the picture file. The Picture class provides access to two image streams: the full-size image and a small thumbnail image. These two image streams are accessed via the GetImage and GetThumbnail methods respectively.
Update the PhotoEditor application to open and edit a picture from the media library. Open MainPage.xaml and add a new menu item to the ApplicationBar:
<shell:ApplicationBarMenuItem Text="open from library"
    Click="OpenFromLibrary_Click" />
The new menu item is wired up to a click event handler called OpenFrom-Library_Click. Open MainPage.xaml.cs and add the implementation for the new event handler. The OpenFromLibrary_Click implementation is shown in the following listing.
Listing 9.2. Reading a picture from the media library

Start by obtaining a collection of all pictures in the Save Pictures album. Iterate over the collection and find the first
picture named customphoto.jpg ![]() . After you find it, use the PictureDecoder class to convert the stream returned from Picture.GetImage
. After you find it, use the PictureDecoder class to convert the stream returned from Picture.GetImage ![]() into a WriteableBitmap. Update the user interface, filling the photoContainer and displaying the name of the picture’s album and the full path to the picture’s file. Retrieve the path to the picture’s
file using the GetPath extension method from the MediaLibraryExtensions class. If a picture isn’t found, fill the user interface with a gray rectangle
into a WriteableBitmap. Update the user interface, filling the photoContainer and displaying the name of the picture’s album and the full path to the picture’s file. Retrieve the path to the picture’s
file using the GetPath extension method from the MediaLibraryExtensions class. If a picture isn’t found, fill the user interface with a gray rectangle ![]() .
.
You now know how to load an image from the MediaLibrary from within your sample application. In the next section you extend the Photos Hub so that a user can open the picture in your sample application directly from the Photos Hub.
9.2. Editing and sharing from the Photos Hub
The Photos Hub, shown in figure 9.3, is where a user can see all their photos that have been taken with the phone, synced from the computer, and downloaded from the internet or email. The Photos Hub is integrated with Windows Live and Facebook, and all photos uploaded to those websites are displayed in the Photos Hub as well.
Figure 9.3. Four different sections of the panorama can be seen in this Photos Hub. The first image presents a list of categories. The second shows the pictures the user has identified as their favorites. The third is a running list of new pictures added to the user’s social networks. The last image shows the apps list, which provides a list of applications registered as Photos Hub extensions.

The apps list is shown only when the user has installed applications that extend the Photos Hub. Let’s see how you can register the PhotoEditor sample application as a Photos Hub extension.
9.2.1. Extending the Photos Hub
The app picker in the Photos Hub is extended with a feature known as Photo Extensibility for Windows Phone. The advantage of Photo Extensibility is that users don’t need to leave the Photos Hub to use your application. It’s already integrated inside the Photos Hub, and the user can use it directly from the Photos Hub. Applications register with the Photos Hub by including an Extension element in the WMAppManifest.xml file found in the project’s Properties folder:
<Extensions>
  <Extension ExtensionName="Photos_Extra_Hub"
    ConsumerID="{5B04B775-356B-4AA0-AAF8-6491FFEA5632}"
    TaskID="_default" />
</Extensions>
The Extension element is placed inside the Extensions element, immediately after the Tokens element. The Extension element has three attributes called ExtensionName, ConsumerID, and TaskID. The ConsumerID field is the unique ID of the application that’s being extended, and the unique ID representing the Photos Hub is {5B04B775-356B-4AA0-AAF8-6491FFEA5632}, which is detailed in the Photo Extensibility documentation on MSDN. The TaskID is the name of the task in your application that should be navigated to when the user taps the application in the Apps page of the Photos Hub. In Windows Phone, the only supported TaskID is the task called _default. We talk about an application’s default task in chapter 2.
Note
The default manifest editor in Visual Studio doesn’t support the extensibility options. To add an Extension element to WMAppManigest.xml, you need to open the file with the XML editor by right-clicking the file in the Solution Explorer and choosing Open With from the menu.
The ExtensionName is defined by the application being extended. The Photos Hub defines three extensions named Photos_Extra_Hub, Photos_Extra_Viewer, and Photos_Extra_Share. Photos_Extra_Hub is the name of the Apps page extension. The other two extensions allow an application to participate in the edit and share pickers, which are available when viewing a single picture in the Photos Hub.
Open the WMAppManifest.xml file for the PhotoEditor and add a Photos_Extra_Hub extension element. Rebuild the PhotoEditor application and deploy it to your Windows Phone device or emulator. Launch the Photos Hub and look for the PhotoEditor in the list on the Apps page. Tapping PhotoEditor will launch the application using the normal startup routine.
Extending the apps picker is the first of three extension points exposed by the Photos Hub. The second extension point you’re going to implement in the Photo-Editor is Photos_Extra_Viewer, which lets an application extend the photo viewer.
9.2.2. Extending the photo viewer
One of the cool things about Windows Phone is that it allows developers to register a picture-related application (such as PhotoEditor) as an extension to the Windows Phone built-in photo viewer application. This enables a user viewing photos to use your application directly from the photo viewer. Figure 9.4 shows the photo viewer displaying Share and Edit menu items when the user opens an individual photo. If the user taps one of these menu items, they’re taken to the list of photo extensibility applications installed on the device.
Figure 9.4. The photo viewer page showing installed Photos_Extra_Image_Editor applications

When the user taps the application’s name in the picker, the application is launched and is expected to display the selected picture.
Now it’s time to turn the PhotoEditor application into a photo viewer extension. Add an Extension element with the name Photos_Extra_Viewer to the WMApp-Manifest.xml file:
<Extension ExtensionName="Photos_Extra_Image_Editor"
    ConsumerID="{5B04B775-356B-4AA0-AAF8-6491FFEA5632}"
    TaskID="_default" />
Once you’ve rebuilt and deployed the application to a Windows Phone device, launch the Photos Hub and choose a photo. Expand the application bar’s menu and select the Apps menu item to see the list of photo viewer applications. You should see your PhotoEditor sample application in the list.
Determining which picture the user is viewing
When the photo viewer launches your application, it passes a token identifying the selected photo. The token is passed as a query string parameter in the navigation URI. The token can then be passed to the XNA MediaLibrary to retrieve the corresponding Picture object. Let’s see how to use the token in your sample application, as detailed in the next listing.
Listing 9.3. Using the Photos Hub token to display the selected photo

You’re updating the OnNavigatedTo method in MainPage.xaml.cs that you created in the last chapter. Get the query string parameters sent to the application
from the Query-String property of NavigationContext ![]() . Check whether a token was passed from the Photos Hub
. Check whether a token was passed from the Photos Hub ![]() in the FileId parameter. If it was, save the value in the token variable. Get the picture from MediaLibrary by using the token that you received
in the FileId parameter. If it was, save the value in the token variable. Get the picture from MediaLibrary by using the token that you received ![]() . Display the image in the photoContainer control and update the message displayed in the imageDetails TextBlock. You also display the value of the "Action" parameter, which in the case of Photos_Extra_Image_Editor extensions is EditPhotoContent.
. Display the image in the photoContainer control and update the message displayed in the imageDetails TextBlock. You also display the value of the "Action" parameter, which in the case of Photos_Extra_Image_Editor extensions is EditPhotoContent.
You can easily debug applications that are launched by the Photos Hub. Start the application with the debugger in the normal fashion. Visual Studio maintains a debug session for your application, even though it may not be running, so when the Photos Hub launches PhotoEditor, the debugger reattaches to the application. Try this for yourself by placing a breakpoint in the OnNavigatedTo method and performing the following steps:
1. Press the Start button on the phone or emulator to return to the Start Screen.
2. Tap the Photos Hub tile to fire up the Photos Hub.
4. Select Edit from the application bar menu.
A photo viewer extension is typically an application that displays or edits a picture. The last Photos Hub extension we’ll discuss is for applications that share pictures with social networking, messaging, or other web-based applications.
9.2.3. Sharing pictures from your Photos Hub extension
The Windows Phone Photos Hub has built-in support for sharing pictures with social-networking applications, text messaging, email, and SkyDrive. Third-party developers can register a picture-sharing application as an extension to the Photos Hub. This lets the user activate your application from the Share menu that appears from several locations in the Photos Hub, one of which is shown in figure 9.4. The Share menu activates the share picker, which displays all applications registered as Photos_Extra_Share extensions. You’ll now turn the PhotoEditor application into a share picker extension. The first step is to add an Extension element with the name Photos_Extra_Share to the WMAppManifest.xml file:
<Extension ExtensionName="Photos_Extra_Share"
    ConsumerID="{5B04B775-356B-4AA0-AAF8-6491FFEA5632}"
    TaskID="_default" />
When the Photos Hub launches a sharing application, it passes the pictures token to the application. As with an edit picker application, a share picker extension receives the pictures token in the query string parameter named FileId. Share picker applications receive ShareContent in the Action query string parameter. Because the Photo-Editor application already looks for and handles Action and FileId query string parameters, you need make no further change in the sample code.
This wraps up the PhotoEditor application you’ve been working on for a chapter and a half. The application integrates with the camera and the Photo Chooser and extends the Picture Hub. But the Picture Hub isn’t the only application that provides extension points. The next application you learn how to extend is the Music + Videos Hub.
9.3. Playing and recording with the Music + Videos Hub
You’ll first learn about the Music + Videos Hub from an end-user point of view. Then you’ll see how to develop an application that integrates with this hub.
The Music + Videos Hub is the central place where you can find all music, videos, and podcast activity on the device. You launch the Music + Videos Hub from its tile on the Start Screen or from its icon in the Application List. Let’s take a look at the architecture of this hub. It’s divided into the five sections shown in figure 9.5:
- Collection —The central view for playing music, videos, podcasts, and radio, and for accessing the marketplace.
- History —Contains the list of music, videos, playlists, artists, and podcasts that the user has recently played.
- New —Contains the list of new music, videos, or podcasts that have recently been synced to the phone or downloaded from the store. This list is updated when media is added to the device or when the user creates an object in a Music + Videos application.
- Apps —Contains the list of applications installed on the device that integrate with the Music + Videos Hub.
- Xbox —Contains links to Xbox companion apps such as Xbox SmartGlass and links to content available from the Xbox Music Store.
Figure 9.5. The five different sections of the Music + Videos Hub. The first image is the list of media collections in the media library. The second lists the media recently played by the user. Newly downloaded media is shown in the third section. The app picker lists applications that extend the Music + Videos Hub. The last section contains links to the Xbox Music Store.

When you’re developing for the Music + Videos Hub application, keeping these five sections in mind is crucial.
To demonstrate how to integrate with the Music + Videos Hub, you need a new sample application. The application will use the phone’s microphone to record voice recordings. You may use this feature to create a pronunciation training program that helps users record their voice and practice until they can pronounce properly. People who like to learn languages may find such a program useful.
When a new file is recorded, your application will create an item in the new section of the Music + Videos Hub. The application will also allow the user to play their recordings, which will create items in the Music + Videos History view. Because the sample application integrates with the Music + Videos Hub, it’ll be shown in the apps list. When the user taps any of the items you add to the history, new, or apps section, your application will be launched by the Music + Videos Hub.
Start by creating a new Windows Phone App project named VoiceRecorder (shown in figure 9.6). The media and microphone APIs you’ll use are in the XNA Framework, which is part of .NET for Windows Phone and so is automatically referenced by your project.
Figure 9.6. The VoiceRecorder sample application

Tip
Use of the microphone requires the ID_CAP_MICROPHONE capability to be declared in WMAppManifest.xml
There’s one incompatibility between XNA and XAML: The two frameworks use different event systems. To record voice data, you need to use the XNA event system. That means you need to pump the XNA dispatcher to get the microphone events to fire. We’ll first take a look how to enable the XNA Framework events in a XAML application.
9.3.1. Enabling XNA Framework events
XNA Framework events are dispatched by the Update method of the FrameworkDispatcher class. In XNA Game projects, the Framework-Dispatcher is called automatically by the XNA Framework. The XAML Framework doesn’t automatically call XNA’s FrameworkDispatcher. Because you’re using XNA’s Microphone class in a XAML project, you have to call FrameworkDispatcher.Update manually to dispatch messages that are in the XNA Framework’s message queue.
The Update method must be called several times each second to properly process each event. An efficient method for dispatching an XNA event is to place the call to Update inside the Tick event handler of a DispatchTimer object. Add a new DispatchTimer field called xnaTimer to the App class in App.xaml.cs, and include a few necessary namespaces:
using System.Windows.Threading;
using Microsoft.Xna.Framework;
DispatcherTimer xnaTimer;
Initialize the field in the App constructor, wiring up the Tick event with a lambda expression:
xnaTimer = new DispatcherTimer{ Interval = TimeSpan.FromMilliseconds(16) };
xnaTimer.Tick += (sender, e) => FrameworkDispatcher.Update();
xnaTimer.Start();
The lambda expression makes a call to the Update method. The Tick event is raised every 16 milliseconds, or about 60 times per second. That’s all you need to do to enable XNA events in a XAML project. With this bit of housekeeping done, you can move on to the user interface.
9.3.2. Building the user interface
Your sample application will have two application bar buttons to start and stop recording, shown in figure 9.7. When the user taps the Record button, the application will start recording from the microphone. The user taps the Stop button to stop the recording. The sample application will store the voice recording in local storage and add the filename to the playlist. The user can tap the Play button to play the recorded audio file.
Figure 9.7. The Stop and Record application bar buttons in the VoiceRecorder sample application

The following listing shows the markup for the application bar and the content panel that you need to add to MainPage.xaml.
Listing 9.4. Adding controls to MainPage.xaml


The ApplicationBar contains two buttons to start and stop a recording ![]() . The buttons use custom images, which you can find in the book’s sample source code. You’ll implement the button click handlers
later in the chapter, but you might want to create empty implementations so your code will compile. The main part of the user
interface is built using a LongListSelector to display each voice recording stored in local storage. The LongListSelector’s ItemTemplate displays the name of each recording and the date and time when the file was recorded. The template also places a Button
. The buttons use custom images, which you can find in the book’s sample source code. You’ll implement the button click handlers
later in the chapter, but you might want to create empty implementations so your code will compile. The main part of the user
interface is built using a LongListSelector to display each voice recording stored in local storage. The LongListSelector’s ItemTemplate displays the name of each recording and the date and time when the file was recorded. The template also places a Button ![]() next to each item in the list. The button is used to start and pause playback of the recording. You use data binding to store
the filename in the button’s Tag property. The button displays an image from the Windows Phone SDK image library.
next to each item in the list. The button is used to start and pause playback of the recording. You use data binding to store
the filename in the button’s Tag property. The button displays an image from the Windows Phone SDK image library.
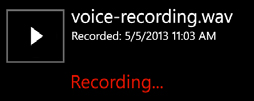
The listing declares a TextBlock containing the message “Recording...” that’s initially hidden ![]() . The TextBlock will be shown to the user when the application is actively recording from the microphone, as shown in figure 9.8. The message is hidden once recording stops.
. The TextBlock will be shown to the user when the application is actively recording from the microphone, as shown in figure 9.8. The message is hidden once recording stops.
Figure 9.8. The Play button and recording message as displayed in the VoiceRecorder user interface
Once you’ve added the required controls in XAML, you need to initialize the microphone. The microphone is represented by the XNA Framework class called Microphone. The Microphone is a singleton and is accessed through the static Default property. Before using the Microphone class, you need to set the BufferDuration property and wire up the BufferReady event in the MainPage constructor:
public MainPage()
{
    InitializeComponent();

    Microphone.Default.BufferDuration = TimeSpan.FromSeconds(1);
    Microphone.Default.BufferReady += microphone_BufferReady;
}
While recording, the Microphone stores audio data in an internal buffer. When the buffer is full, the Microphone raises the BufferReady event. The BufferDuration field specifies how much audio will fit into the buffer. Expressed another way, the BufferDuration determines the TimeSpan between each BufferReady event.
There’s one last bit of supporting code you need before you can start recording audio with the Microphone. You need a simple class to hold the title and recording date. Create a new class named VoiceRecording with Title and Date properties:
public class VoiceRecording
{
    public string Title { get; set; }
    public DateTime Date { get; set; }
}
The LongListSelector’s ItemsSource property must be initialized in the MainPage constructor to a new ObservableCollection of VoiceRecording objects:
using System.Collections.ObjectModel;
recordingList.ItemsSource = new ObservableCollection<VoiceRecording>();
With the new class in place, you’re ready to move on to the main feature of the sample application—recording audio with the Microphone.
9.3.3. Recording audio
The Microphone raises the BufferReady event once after recording audio for the duration specified in the BufferDuration property. In the BufferReady event handler, audio data should be copied from the Microphone into a storage location. In the sample application, this audio data is temporarily copied into a byte array and then written to a MemoryStream. Add two new fields to the MainPage class for the byte array and the MemoryStream:
using System.IO;
MemoryStream audioStream = null;
byte[] audioBuffer = null;
The BufferReady event is an XNA Framework event and is raised by the FrameworkDispatcher. In the event handler, you get the data from the microphone and write that data to the MemoryStream:
void microphone_BufferReady(object sender, EventArgs e)
{
    int count = Microphone.Default.GetData(audioBuffer);
    audioStream.Write(audioBuffer, 0, count);
}
The Microphone’s GetData method copies data into the audioBuffer byte array and returns the number of bytes written. Use the count of bytes written to the buffer when writing to the audioStream.
The BufferReady event isn’t triggered until the user starts recording with the microphone. The user starts a recording by tapping the Record button in the user interface. The Record button is wired to the record_Click method, detailed in the following listing.
Listing 9.5. Recording with the Microphone

The Microphone has a property named State that you check to determine whether the microphone is already on. If not, start the microphone. When the microphone is recording,
the recordingList LongListSelector is disabled, and the recording message in shown to the user ![]() . The user can’t select or play any existing recordings while the current track is being recorded. The temporary byte array and Memory-Stream are allocated
. The user can’t select or play any existing recordings while the current track is being recorded. The temporary byte array and Memory-Stream are allocated ![]() before you start recording. Recording is started by calling the Start method of the singleton Microphone instance.
before you start recording. Recording is started by calling the Start method of the singleton Microphone instance.
Recording continues until the user taps the Stop button and triggers the stopRecord_Click event handler. The following listing shows the implementation of the stopRecord_Click event handler.
Listing 9.6. Stopping the recording

Before you do any work in the stopRecord_Click method, check whether the microphone’s state is Started. After the microphone has been stopped, write the contents of the MemoryStream to a file in local storage ![]() and clean up the temporary variables. The recording list is re-enabled, and the recording message is hidden once again. Create
a new VoiceRecording instance and add it to the items displayed in the LongListSelector
and clean up the temporary variables. The recording list is re-enabled, and the recording message is hidden once again. Create
a new VoiceRecording instance and add it to the items displayed in the LongListSelector ![]() .
.
The listing calls through to a method named WriteFile to save the audio data in a file. The audio data recorded by the Microphone is stored in raw PCM data format. To make the raw PCM data into a real audio file, you must wrap the audio data with a media container. In this application, you’re using a wave file container format. A wave file is merely a header block followed by the audio data. The following listing shows the implementation of the WriteFile method.
Listing 9.7. Saving audio data to isolated storage


Start by getting a reference to the local storage folder and creating a new file. Generate a new filename ![]() by specifying the GenerateUniqueName value of the CreationCollisionOption enumeration. GenerateUniqueName tells CreateFileAsync to append a number in parentheses to the end of the desired file. Next, open a .NET Stream for the file and create a BinaryWriter. Use the BinaryWriter to write the wave header
by specifying the GenerateUniqueName value of the CreationCollisionOption enumeration. GenerateUniqueName tells CreateFileAsync to append a number in parentheses to the end of the desired file. Next, open a .NET Stream for the file and create a BinaryWriter. Use the BinaryWriter to write the wave header ![]() and WaveFormatEx information. Write the PCM data stored in the MemoryStream to the end of the file
and WaveFormatEx information. Write the PCM data stored in the MemoryStream to the end of the file ![]() .
.
Note
Details of the wave header and the PCM format are beyond the scope of this book. You can read more about wave files on MSDN at http://mng.bz/6Xe9.
In listing 9.7 you added the newly saved voice recording to the display. You should be displaying all the voice recordings saved in local storage. You’ll now create a new method called DisplayRecordingNames to read the names of all the recordings and add them to the recordingList. Override MainPage’s OnNavigatedTo method and add a call to the new method. The DisplayRecordingNames implementation is shown in the following listing.
Listing 9.8. Displaying stored recordings
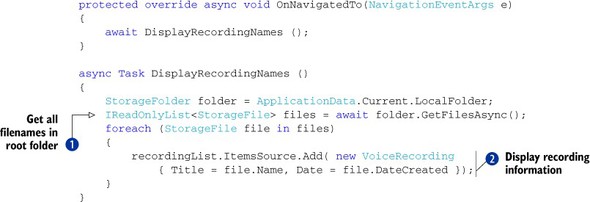
After opening the storage device, get a list of every StorageFile in the root folder ![]() . Loop over the list, retrieving the filename and the date the file was created, adding each recording to the LongList-Selector
. Loop over the list, retrieving the filename and the date the file was created, adding each recording to the LongList-Selector ![]() . The results are shown in figure 9.9.
. The results are shown in figure 9.9.
Figure 9.9. The sample application displaying several recordings in the LongListSelector

If you run the VoiceRecorder application now, you’ll be able to press the Record button and speak into the phone. Your voice will be recorded, and when you press Stop the recording will be saved into a wave file in isolated storage. The next feature you’ll implement is playing the voice recording.
9.3.4. Playing audio
In addition to providing the Microphone class to record audio, the XNA Framework provides classes to play audio files. The two classes you’re going to use in the VoiceRecorder application are Sound-Effect and SoundEffectInstance. The Sound-Effect class represents an audio file or stream. The SoundEffectInstance wraps the SoundEffect, allowing the developer to start, pause, and stop playback of a SoundEffect.
The SoundEffect class can work with and decode several different types of media containers and audio formats, including wave and PCM. A SoundEffect is initialized using a stream containing the audio file. The following listing demonstrates how to open a file stream, initialize a SoundEffect, create a SoundEffectInstance, and start playback.
Listing 9.9. Playing the recorded voice

Add a new field to the MainPage class ![]() to hold the currently playing voice recording. Create a new method named PlayFile that’s responsible for opening and playing an audio file. The method opens the file stream in read-only mode
to hold the currently playing voice recording. Create a new method named PlayFile that’s responsible for opening and playing an audio file. The method opens the file stream in read-only mode ![]() . The file stream is used to create a new SoundEffect using the static FromStream method
. The file stream is used to create a new SoundEffect using the static FromStream method ![]() . The audioPlayerInstance field is assigned to the SoundEffectInstance class returned from the CreateInstance method. Start playback using the Play method of the SoundEffect-Instance.
. The audioPlayerInstance field is assigned to the SoundEffectInstance class returned from the CreateInstance method. Start playback using the Play method of the SoundEffect-Instance.
The PlayFile method accepts a filename from the calling code. In this case, the calling code is the Click event handler for the Play button declared in the ListBox ItemTemplate. The event hander code is detailed in the following listing.
Listing 9.10. Handling Click events for the Play button
void play_Click(object sender, EventArgs e)
{
    if (audioPlayerInstance != null &&
        audioPlayerInstance.State == SoundState.Playing)
    {
        audioPlayerInstance.Pause();
    }
    else
    {
        var button = (Button)sender;
        string filename = (string)button.Tag;
        PlayFile(filename);
    }
}
When the user taps the Play button in the ListBox, you examine the State property to see whether the audio player is currently playing an audio file. If so, stop playback by calling the Pause method and exit the event handler. If the audio player isn’t busy, you get the filename from the Tag property of the Button control. The Button control is sent to the event handler in the sender property. Remember that in listing 9.4 you bound the Button’s Tag property to the filename in the LongListSelector Item-Template. You send the retrieved filename to the PlayFile method.
You’ve now created a simple voice recorder for Windows Phone. Run the application, and you should see a list of voice recordings. Tap the Play button next to one of the recordings, and you should hear that recording play through the phone’s speaker or headphones. Applications that play audio files—music tracks in particular—should consider extending the Music + Videos Hub.
9.4. Playing recorded audio in the Music + Videos Hub
In section 9.2 of this chapter you learned that the Photos Hub enables extensions with Extension elements in the WMAppManifest.xml file. The Music + Videos Hub doesn’t work with Extension elements when figuring out which applications to display in the apps list. How can you make the VoiceRecorder sample application show up in the apps list? The answer is simple.
The App element in the WMAppManifest.xml file includes an attribute named HubType. When the HubType attribute is set to 1, your application will be shown in the apps list of the Music + Videos Hub.
Note
Updating the HubType attribute in WMAppManifest.xml is used for development and testing. When an application is submitted to the Windows Phone Store, the certification process automatically determines the HubType and overwrites WMAppManifest.xml accordingly.
Certain requirements must be met when creating a Music + Videos Hub application, which we cover later in the section. Here’s an example of an App element:
<App xmlns=""
     ProductID="{ dbf1198b-6030-495a-bc4c-0abcc8e2d521}"
     Title="VoiceRecorder" RuntimeType="Silverlight"
     Version="1.0.0.0" Genre="apps.normal"
     Author="VoiceRecorder author"
     Description="Sample description"
     Publisher="VoiceRecorder"
     PublisherID="{8ff41791-6c68-4370-a64d-c6dad1b4f1dc}"
     HubType="1" >
When you play any kind of media from a Music + Videos Hub application, you need to integrate with the built-in Music + Videos Hub. That means that your application needs to meet the following requirements:
- Now Playing —When you play any media from your application, the media’s details should be displayed in the Now Playing list in Music + Videos Hub.
- History —Once the media track has finished playing in your application, you need to add the media’s details to the History view.
- New —When the user adds new media to your application, such as creating a new voice recording or purchasing a new song through the application, that media’s details should be added in the New view list in the hub.
Microsoft established the Music + Videos requirements to ensure a consistent user experience for all media applications.
9.4.1. Fulfilling Music + Videos Hub requirements
The Windows Phone class library provides the MediaHistoryItem and MediaHistory classes that you can use to fulfill these three requirements. The certification guidelines say that any application using the MediaHistoryItem and MediaHistory classes is considered to be a Music + Videos application. We’ll look first at creating a Media-HistoryItem, as shown in the following listing.
Listing 9.11. Creating a MediaHistoryItem

The Music + Videos Hub requires media artwork when displaying media items. In this example, the artwork is coming from a file
named either artwork173.jpg or artwork358.jpg that’s been added to the project using a build action of Content. You use the GetResourceStream API to load the file and get access to its image stream ![]() . The MediaHistoryItem class has three properties that must be assigned a value
. The MediaHistoryItem class has three properties that must be assigned a value ![]() . The Source property isn’t used by the hub but is still required to have a non-null value. The Title property contains the name of the media and is displayed in the hub with the artwork.
. The Source property isn’t used by the hub but is still required to have a non-null value. The Title property contains the name of the media and is displayed in the hub with the artwork.
The Windows Phone certification requirements define specific rules about the images used in the MediaHistoryItem. The images must be JPEGs. The tile image must include your application title or logo. The Now Playing image must be 358 pixel * 358 pixels in size. The History and New item images must be 173 pixels * 173 pixels in size.
One other MediaHistoryItem property is PlayerContext ![]() , which is a dictionary of strings that can be used by an application to identify the media item. The entries placed in PlayerContext are returned to the application when the user selects the media item in the hub.
, which is a dictionary of strings that can be used by an application to identify the media item. The entries placed in PlayerContext are returned to the application when the user selects the media item in the hub.
The MediaHistory class is what you use to integrate with the Music + Videos Hub. There’s only one instance of the MediaHistory class, which is accessed via the Instance property. An application updates the Now Playing information in the hub via MediaHistory’s NowPlaying property. The best time to update the NowPlaying property in your sample application is in the PlayFile method, right after Sound-EffectInstance.Play is called:
MediaHistory.Instance.NowPlaying = createMediaHistoryItem(filename, false);
When using the NowPlaying property, the artwork should be a 358 * 358 pixel image. When creating media artwork, you should be careful to keep the overall size of the image file under the value specified by MediaHistoryItem.MaxImageSize, which is about 16 KB.
The NowPlaying property can also be used by your application to retrieve the information about the last media item it was playing. This may be handy if the user has exited your application and restarts it sometime in the future. You can restart the last item played. NowPlaying will only return the last MediaHistoryItem played by your application. It won’t return media history for items added by other applications.
When your application has finished playing a media item, it should update the recently played list. The sample application isn’t implemented to detect when the SoundEffect class finished playing, so you’re going to cheat and update the recently played list right after you call SoundEffectInstance.Play:
MediaHistory.Instance.WriteRecentPlay(
    createMediaHistoryItem(filename, true));
Using the WriteRecentPlay API will cause a new tile to appear in the Music + Videos Hub History view. Your artwork for the recent play tile should be 173 * 173 pixels.
When your application acquires a new media item, it should update the New item list. You acquire new media items when the user has finished a recording, and the new file is written to local storage. Update the WriteFile method and add a call to WriteAcquiredItem:
MediaHistory.Instance.WriteAcquiredItem(
    createMediaHistoryItem(fullFileName, true));
Using the WriteAcquiredItem API will cause a new tile to appear in the Music + Videos Hub New view, as shown in figure 9.10. Your artwork for the new item tile should be 173 * 173 pixels.
Figure 9.10. When using the MediaHistory methods, tiles representing an application’s media files are displayed in the Music + Videos Hub.

Run the application, create a voice recording, and play it back. Switch to the Music + Videos Hub, and you should see a listing in both the New items list and the History list. It’s expected that when you tap the listing in the hub, the VoiceRecorder application will be launched, and the selected recording will be played. Let’s take a look at how to determine when your sample application is launched by the Music + Videos Hub.
9.4.2. Launching from the Music + Videos Hub
When the user taps the tile representing your media items in the History or New view in the Music + Videos Hub, your application will be launched and the MediaHistoryItem’s PlayerContext values will be sent to your application as query string parameters. You can read the query string parameters from the NavigationContext’s QueryString property in the OnNavigatedTo override method:
protected override await void OnNavigatedTo(NavigationEventArgs e)
{
    await DisplayRecordingNames();
    IDictionary<string, string> queryStrings =
        NavigationContext.QueryString;
    if (queryStrings.ContainsKey("vrec-filename"))
    {
        PlayFile(queryStrings["vrec-filename"]);
    }
}
Remember that in listing 9.11 you saved the voice recording filename in the MediaHistoryItem’s PlayerContext dictionary with the vrec-filename key. In OnNavigatedTo you check whether the query string contains a parameter named vrec-filename. If the parameter is present, you pass the parameter’s value to the PlayFile method.
In this section you’ve learned how to integrate an application with the Music + Videos Hub, which is the single access point for all media on the Windows Phone. Applications that play or create media should consider using the MediaHistory class to report now-playing and history information. When a foreground application plays audio files, playback stops once the user switches to another application. Windows Phone applications can use background agents to continue playing audio files when the user switches tasks.
9.5. Playing recorded audio with a background agent
Background agents, introduced in chapter 4, enable an application to execute tasks and perform work even when their host application isn’t running. The Windows Phone SDK provides two background agents exclusively for playing audio. The background audio agents and their supporting classes are defined in the Microsoft .Phone.BackgroundAudio namespace. The AudioPlayerAgent allows applications to play local or remote audio files. The AudioStreamingAgent can be used to play audio streamed to the device. In this section you add an AudioPlayerAgent to the Voice-Recorder application to enable background playing of the recorded audio.
AudioPlayerAgents are created using the Windows Phone Audio Playback Agent project template. Add a new audio playback project to the Visual Studio solution containing the VoiceRecorder project and name the new project VoiceRecorderPlayback-Agent. Using the Add Reference dialog, add a project reference to the Voice-Recorder-PlaybackAgent project from the VoiceRecorder project.
The project template created one class named AudioPlayer in the VoiceRecorderPlaybackAgent project. Derived from AudioPlayerAgent, the AudioPlayer class is generated with four overrides called OnPlayStateChanged, OnUserAction, OnError, and OnCancel. Before we talk about each of these overrides, let’s discuss how the foreground application communicates with the background agent.
Applications communicate with the background agent through the BackgroundAudioPlayer class. Playback is controlled using the Play, Pause, and Stop methods. The audio player also provides FastForward, Rewind, SkipNext, and SkipPrevious methods. Playback progress can be read with PlayerState, Position, and BufferProgress properties.
Now that you have a background audio agent, you need to update the Voice-Recorder to use the BackgroundAudioPlayer instead of a SoundEffectInstance to play and pause audio files. The application tells the BackgroundAudioPlayer which audio file to play using the Track property. Open MainPage.xaml.cs, find the PlayFile method, and replace the code that opens the file stream and uses the Sound-Effect class and the audioPlayerInstance field with the code in the following snippet:
using Microsoft.Phone.BackgroundAudio;
void PlayFile(string filename)
{
    Uri fileUri = new Uri(filename, UriKind.Relative);
    BackgroundAudioPlayer.Instance.Track = new AudioTrack(
        fileUri, filename, "Windows Phone 7 in Action", null, null, null,
        EnabledPlayerControls.Pause);
    BackgroundAudioPlayer.Instance.Play();
...
}
Once the track is specified, you ask the background agent to play the voice recording by calling the BackgroundAudioPlayer’s Play method. Access the singleton instance of the BackgroundAudioPlayer using the static Instance property.
The Track property is of type AudioTrack, and you construct a new AudioTrack by specifying the URI to the voice recording’s location in local storage along with the title and artist. You use the filename as the track’s title and the string “Windows Phone 8 in Action” as the track’s artist. You also specify that only the Pause button should be enabled in the Universal Volume Control (UVC).
The host application isn’t the only process that controls background audio playback. Background audio agents automatically integrate with the UVC. Normally, the UVC allows the user to fast forward, rewind, skip previous, and skip back. When you created the AudioTrack, you specified that only the Pause button should be enabled, and the UVC for the VoiceRecorder (shown in figure 9.11) disables the Rewind/Skip Previous and Fast Forward/Skip Next buttons.
Figure 9.11. Voice recordings in the Universal Volume Control

Remember that the user can pause the voice recording within the VoiceRecorder application by pressing the Play button during playback. You need to replace the pause code in the play_Click method so that it also uses the BackgroundAudioPlayer instead of the audioPlayerInstance field:
private void play_Click(object sender, EventArgs e)
{
    if (BackgroundAudioPlayer.Instance.PlayerState == PlayState.Playing)
    {
        BackgroundAudioPlayer.Instance.Pause();
    }
    ...
}
The BackgroundAudioPlayer reports the current playback state through the PlayerState property and the PlayState enumeration. The PlayState enumeration defines a dozen different states, including Playing, Paused, and Stopped. In this code, if the state is Playing, you call the Pause method.
Note that calling the Play or Pause methods from the foreground applications doesn’t result in the voice recording playing. When the foreground application calls Play, Pause, or the other playback control methods, a message is sent to the background agent. It’s the responsibility of the background agent to handle the foreground requests. The BackgroundAudioPlayer delivers messages to the background agent with the OnUserAction override method.
The OnUserAction method is sent information about the action to be performed through a UserAction enumeration value. Possible actions include Stop, Pause, Play, SkipNext, SkipPrevious, FastForward, Rewind, and Seek. The VoiceRecorder sample application uses only Play and Pause, so those are the only actions your background agent will support.
The AudioPlayer class generated by the project template contains a default implementation of OnUserAction. Open the AudioPlayer.cs file and review the generated code. When the user action is Play or Pause, the corresponding method on the passed-in BackgroundAudioPlayer instance is invoked. Calling the Play methods from the background application does cause the audio file playback to start or continue. You learned in chapter 4 that the NotifyComplete method is called by a background agent to inform the operating system that it has successfully completed its work.
Use the OnPlayStateChanged override method to detect when the audio track has finished or stopped. OnPlayStateChanged will be called with Stopped and then with Shutdown when the user picks a song from the music library. OnPlayStateChanged is called with TrackEnded once the audio track finishes.
You’ve now created a simple voice recorder for Windows Phone. There are a lot of ways that you can improve this application to end up with a more professional voice recorder. This is an example—we’ll leave those improvements for you.
9.6. Summary
You started the chapter by updating the PhotoEditor sample application introduced in chapter 8. You learned about the Pictures and Music + Videos Hubs. You now understand that those hubs are the applications where all photos, songs, videos, and podcasts are stored in your phone. We analyzed the Photos Hub from both the end-user and developer perspectives. You registered the PhotoEditor application as an extension of Photos Hub with Photo Extensibility for Windows Phone.
We explored recording voice using the Windows Phone microphone and extending the Music + Videos Hub. Any application that plays audio files should consider making use of audio background agents for playing or streaming while other applications are running in the foreground. In the next chapter you’ll learn how to use the phone sensors, such as the accelerometer and the gyroscope.