
There are several different kinds of networks, each with their own limitations and advantages. A simple “peer-to-peer” workgroup can comprise as few as two computers connected with a single cable or pair of wireless adapters. This is ideal in a home office or small business setting, where individual systems can be linked together with minimal effort and configured to share resources. A shared folder, for example, is merely a standard folder residing on a single computer, made accessible to any other computer on the network through Windows Explorer as though it were actually on each computer’s hard disk.
Larger organizations typically deploy networks based on the client/server topology. Client/server networks are different from peer-to-peer networks not so much in technology employed as in the roles the different computers play. For example, one computer on the network, which might be running Unix or Windows, takes on the role of the mail server, while another is configured to handle such tasks as printing, storage of data and applications, backup, and user authentication. The rest of the computers — the clients — are used to retrieve email from the mail server, send print jobs to the print server, and store data on the file server.
A seemingly different kind of connection, usually involving a measly telephone line or a more modern high-speed broadband connection, allows access to the Internet from a single PC. Again, this is more of a matter of the roles the different computers play than the actual technology involved in establishing the connection.
Tip
It can get more complicated, say, if you want to connect a workgroup to the Internet or create a workgroup across the Internet. Both of these tasks involve the combination of several different technologies, the results of which can be very interesting and are all discussed later in this chapter.
Windows supports most types of networking out of the box, but the actual process involved in setting up a given form of networking can be quite confusing, and troubleshooting a network can drive you nuts.
To start building a network, you should understand a few basic networking concepts:
- The distinction between local and remote resources
A local resource (such as a directory or printer) is one that resides on or is physically connected to your computer. Conversely, a remote resource is one that resides on another computer connected to yours over a network. For example, a particular web page on http://www.annoyances.org is a remote file, but an HTML file on your own hard disk is a local file. And a printer connected to your PC’s USB port is a local printer, while one that is wired to another computer on your network is a remote printer. (And naturally, what’s local to you may be remote to someone else.) In some cases, local and remote resources may appear indistinguishable on the surface, but details concerning how each is accessed and configured may be different. And, as they say, the devil is in the details.
- LAN versus WAN
LAN stands for Local Area Network, a designation typically referring to a network contained in a single room or building. A peer-to-peer workgroup is an example of a LAN.
Likewise, WAN stands for Wide Area Network, or a network formed by connecting computers over large distances. The Internet is an example of a WAN.
- Ethernet
Ethernet is the technology upon which the vast majority of local area networks is built. A standard Ethernet connection is capable of transferring data at a maximum of 10 Mbps (see Bandwidth), and a Fast Ethernet connection can transfer data at 100 Mbps. A device capable of communicating at both speeds is typically labelled “10/100.”
Most modern Windows computers come with Ethernet adapters (also called NICs, or Network Interface Cards) preinstalled; for older computers, NICs are cheap and commonly available.
- WiFi
WiFi is a trendy shorthand term for wireless networking based on the 802.11b standard, which allows data to be transferred at a maximum of 11 Mbps (real-world speeds tend to be closer 3.5-4.5 Mbps, however). The newer 802.11g standard is much faster (54 Mbps), backward-compatible with 802.11b, and only marginally more expensive than its slower cousin. (WiFi is now used to describe both standards.) Windows XP Service Pack 2 improves Windows built-in support for WiFi dramatically, as discussed throughout the rest of this chapter.
Tip
Almost everything in this book that applies to wired networks also applies to wireless connections. See the wireless section later in this chapter for a bunch of wireless-only tips and tricks.
Bluetooth is a different wireless networking standard, incompatible with WiFi. It’s an inexpensive, low-power technology and is commonly used in high-end cell phones, handheld PDAs, and some laptops (typically via a USB Bluetooth dongle). For instance, you can use a Bluetooth headset with a Bluetooth-enabled cell phone, and dispense with the cumbersome cord. Or, you can surf the web with your Bluetooth-enabled handheld PC connected to the Internet wirelessly via your Bluetooth phone. There are even tiny remote-controlled toy cars that you can drive with your Bluetooth phone (truly illustrating the noble role of technology in our lives).
- Bandwidth
Bandwidth is the capacity of a network connection to move information (the size of the pipe, so to speak). Bandwidth is measured in Kbps (kilobits per second) for slow connections, such as analog dialup Internet connections; Mbps (megabits per second) for fast connections such as DSL, cable, or Ethernet LAN connections; and Gbps (gigabits per second) for the kinds of connections used by huge corporations and Internet providers.
Tip
Bandwidth can be shared. If a network connection is capable of transferring data at, say, 1.5 Mbps, and two users are simultaneously downloading large files, each will only have roughly 0.75 Mbps (or 768 Kbps) of bandwidth at their disposal.
Ethernet-based local networks can support transfer rates at either 10 Mbps or up to 100 Mbps. High-speed T1, DSL, and cable modem connections typically transfer data up to 1.0 to 1.5 Mbps, while the fastest analog modems communicate at a glacial 56 Kbps, or 0.056 Mbps.
To translate a bandwidth measurement into more practical terms, you’ll need to convert bits to bytes. There are eight bits to a byte, so you can determine the theoretical maximum data-transfer rate of a connection by simply dividing by 8. For example, a 384 Kbps connection transfers 384 / 8 = 48 kilobytes of data per second, which should allow you to transfer a 1 megabyte file in a little more than 20 seconds. However, there is more going on than just data transfer (such as error correction), so actual performance will always be slower than the theoretical maximum.
- Protocols
A protocol is the language, so to speak, that your computer uses to communicate with other computers on the network. A network is built by installing hardware and configuring various network protocols, most of which are named with cryptic acronyms.
- TCP/IP
TCP/IP is a protocol, or more accurately, a collection of protocols, used in all Internet communications and by most modern LANs. For those of you excited by acronyms, the TCP/IP specification includes TCP (Transmission Control Protocol), IP (Internet Protocol), UDP (User Datagram Protocol), and ICMP (Internet Control Message Protocol).
The amazing thing about TCP/IP, and the reason that it serves as the foundation of every connection to the Internet, is that data is broken up into packets before it’s sent on its way. The packets travel to their destination independently, possibly arriving in a different order than the one in which they were sent. The receiving computer then reassembles the packets (in the correct order) into data.
- TCP Ports
TCP/IP data moves into and out of your computer through ports, which are opened by the software that use your network connection. For example, your email program uses port 25 to send mail (using the SMTP protocol) and port 110 for retrieving email (using the POP3 protocol). Other commonly used ports are listed in Appendix C.
- IP addresses
An IP address is a set of four numbers (e.g.,
207.46.230.218) that corresponds to a single computer or device on a TCP/IP network. Each element of the address can range from 0 to 255, providing 2564 or nearly 4.3 billion possible combinations. On the Internet, dedicated machines called domain name servers are used to translate named hosts, such as http://www.microsoft.com, to their respective numerical IP addresses and back again.No two computers on a single network can have the same IP address, but a single computer can have multiple IP addresses (one for each network to which it’s connected).
To connect two different networks to each other, while still maintaining two separate sets of IP addresses, you’ll need either a bridge or a router. Provided that you install two network adapters in your PC, Windows XP can act as a bridge; just highlight two connections in your Network Connections window (discussed later in this chapter), and select Bridge Connections from the Advanced menu. A router, on the other hand, is a physical device you can use to connect your LAN to the Internet; since it acts as an effective firewall, though, it’s a good idea even if you have only one PC.
- Firewalls, and why you need one
A firewall can be used to restrict unauthorized access to your system from intruders, close backdoors opened by viruses and other malicious applications, and eliminate wasted bandwidth by blocking certain types of network traffic.
A firewall is a layer of protection that permits or denies network communication based on a predefined set of rules. These rules are typically based on the TCP port through which the data is sent, the IP address from which the data originated, and the IP address to which the data is destined.
The problem is that an improperly configured firewall can cause more problems than it ends up preventing. Windows XP includes a rudimentary firewall feature, described later in this chapter, but software-based firewalls simply don’t work as well as hardware firewalls, such as routers.
- Switches, access points, and routers
A switch allows you to connect more than two computers together — using cables — to form a local network (Figure 7-1). (Note that a hub does pretty much the same thing as a switch, but much less efficiently.) Without a hub or switch, the most you could do is connect two computers to each other with a crossover cable (discussed later in this chapter).
A wireless access point is essentially a switch (or a hub) for a wireless network, allowing you to connect multiple computers wirelessly. Without an access point, you could only connect two computers wirelessly in “ad hoc” mode (more on wireless access points later in this chapter).
Finally, a router is a device that connects two networks, and routes traffic between them. For example, a router can connect a peer-to-peer workgroup to the Internet, allowing you to share an Internet connection with all the computers in your office (see Section 7.3.2, later in this chapter, for details). Most routers also double as switches, just as wireless routers double as wireless access points. Plus, any modern router (wireless or otherwise) will have a built-in firewall (typically superior to a software firewall that runs on your computer), so you can basically get everything you need in one inexpensive package.
Now, this book only touches the surface of a large and complex topic, but it should help you get a handle on the drivers, hardware, and workarounds required to set up some of the more common types of networks quickly and painlessly. Maybe, once all the frustrations are whisked away, you might even have some fun.
There are many types of networks and nearly limitless combinations of networking technologies, but for the purposes of this chapter, most situations can be covered by considering two basic types of network setups: workgroups and Internet connections. Strictly speaking, there isn’t a lot of difference between these two, at least as far as Windows XP is concerned. The distinction is made primarily to help you plan the topology of your networking environment.
Tip
Drawing a diagram of the physical layout of the computers and devices on your network can help you visualize the topology and plan the cables, routers, antennas, and aspirin you’ll need to complete the job.
Wiring can vary in complexity and cost, depending on your needs, budget, and the layout of your office. (See the ??? sidebar for additional help.) For example, if you have two or more desktop computers in the same room, wiring is a simple matter of adding a switch (or hub) and one category-5 patch cable for each machine, as shown in Figure 7-1.

Figure 7-1. An example of a peer-to-peer network (LAN) comprised of three computers connected with a switch (or hub); the printer is connected to one of the computers, which shares it with the others
If you only have two computers, you can eliminate the hub and simply connect them with an inexpensive category-5 crossover cable, as shown in Figure 7-2. Total cost: $3.99.

Figure 7-2. A quick-and-dirty hubless workgroup; given its limitations, however, it’s best suited as a temporary solution
Of course, thanks to wireless technology (e.g., WiFi or 802.11), the whole concept of wiring a network can be considered optional. However, there are a few drawbacks. First of all, wireless equipment is more expensive than simple cabling, and the technology can be temperamental, resulting in a lot of frustration until you get it working.
Warning
Wireless networking is not as fast as wired Ethernet. Wireless data is transferred at a maximum throughput of 11 Mbps (or 54 Mbps for “wireless-G” connections), and this speed decreases rapidly as reception worsens. Fast Ethernet connections allow data to be transferred at 100 Mbps, reception notwithstanding. While the speed difference won’t matter for an Internet connection (typical broadband is only about 0.5-1.5 Mbps), an Ethernet connection will allow you to transfer files between computers in your workgroup in half the time.
The most compelling reasons to use a wireless LAN are portability, distance, and convenience. A wireless LAN adapter in your laptop would mean, for example, that you could have Internet access anywhere in your house or office, and without having to hassle with wires. (Naturally, your mileage will vary with any interference or natural obstacles present in your environment). Distance is an issue, for instance, when you’d otherwise have to extend a wire from one end of a building to another, drilling holes in walls and such. Of course, distance also degrades wireless signals, but this can be dealt with by adding aftermarket antennas or a repeater (also called a “range expander”). Figure 7-3 shows a typical wireless network with four computers (three PCs and one PDA).
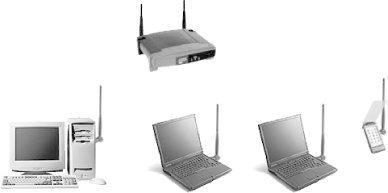
Figure 7-3. A wireless router acts as both a wireless access point and a switch, allowing you to connect any number of computers (and even WiFi-enabled PDAs) to form a wireless LAN (WiFi antennas are typically internal, and are shown here only for illustrative purposes)
It’s also important to realize that you don’t have to commit solely to one technology or another. For instance, you can mix and match wireless and wired networks, which may mean only purchasing wireless equipment for laptops, or those computers that would otherwise be very difficult to wire. Figure 7-4 shows a simple peer-to-peer network with two wired desktop computers and a wireless connection to a laptop.

Figure 7-4. You can mix and match wired and wireless devices with a wireless router; these three computers are on the same network, despite the different means of connection
There’s one crucial aspect of wireless networking that simply doesn’t exist on a wired network: intruders. By default, most wireless routers have no security features enabled, meaning that any WiFi-enabled computer within range can connect to your workgroup and use your Internet connection. See Section 7.5.1 and Section 7.5.2, both later in this chapter, for help securing your wireless network and connecting to someone else’s unsecured wireless network, respectively.
When including an Internet connection, you have several choices. The old-school approach, illustrated in Figure 7-5, involves a single computer connected directly to the Internet (via broadband, dial-up, or whatever). The aforementioned PC then serves as a gateway (thanks to Internet Connection Sharing, discussed later in this chapter) and shares the Internet connection with the other computers on the LAN.
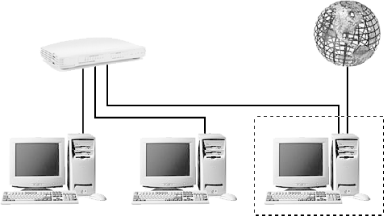
Figure 7-5. A simple workgroup with three computers, one of which has a shared Internet connection (see the next section, “Configuring Network Connections,” for the significance of the dotted rectangle)
There are several downsides to Internet Connection Sharing. For one, it can be temperamental and frustrating to set up. Performance and security leave a lot to be desired, and it tends to be slow. Also, one computer (the gateway) must always be on for the others to have Internet access, and that computer must have two network adapters.
The preferred method is to use a wireless router, as shown in Figure 7-6.

Figure 7-6. A wireless router makes it easy to share an Internet connection and offers better security than the old-school gateway approach—note the wireless print server
The router is a sole unit (the little box with two antennas in Figure 7-6) that plays a whole bunch of valuable roles on your network:
- A switch,
through which a local network (LAN) consisting of wired and wireless computers is built.
- A wireless access point,
connecting any number of wireless PCs, handhelds, and other devices to your LAN.
- A router,
bridging your local network to the Internet, thus providing Internet access to all the computers on your LAN. Plus, if you’re using a broadband connection that requires a username and password (e.g., PPPoE), the router will log in automatically for you, and keep you logged in.
- A DHCP server,
which automatically assigns IP addresses to computers in your local network (typically starting with 192.168.1.2, where 192.168.1.1 is the router itself), allowing them to peacefully coexist on your network.
- A firewall,
preventing any and all communication from the outside world, except that which you specifically allow. (This is done through your router’s port-forwarding feature.)
- A print server,
to which you can connect a USB or parallel-port printer, and print from any computer (without sharing).
Warning
Historically, the print server tended to be the proverbial straw that broke the proverbial camel’s back, in that such all-in-one devices tended to be unreliable. Some people have had great success with routers with built-in print servers, while others haven’t been so lucky. For this reason, you may wish to use a standalone (or even wireless) print server, separate from your router.
Routeres are discussed throughout the rest of this chapter. If you don’t yet have one, do yourself a favor and pick one up. They’re cheap and, as shown here, do quite a lot. Even if you only have a single PC (no network), the firewall feature of a router provides excellent security, far better protection than Windows XP’s built-in firewall (even the one that comes with Service Pack 2).
The Network Connections window, shown in Figure 7-7, is the central interface you use to configure the networking features in Windows XP. Go to Control Panel → Network Connections or right-click the My Network Places icon and select Properties to open the Network Connections Window.

Figure 7-7. The Network Connections window, shown here with the default common tasks pane, is where you configure and manipulate all network resources in Windows XP
If you haven’t done so already, select Details from the View menu to see all the pertinent information at once. Then, simplify the listing by going to View → Arrange Icons by and turn off the Show in Groups option.
Tip
If you don’t see Network Setup Wizard or New Connection Wizard here, you’re probably viewing Network Connections from Windows Explorer (with the folder-tree pane). To fix the problem, go to Tools → Folder Options → General tab, select Use Windows classic folders, and click OK.
As its name implies, Network Connections lists all of the networking connections configured on your computer. In the rather-full example window in Figure 7-7, there are two wired Ethernet connections, one WiFi wireless connection, one analog (dial-up) connection, a IEEE-1394 (Firewire) connection, and a Bluetooth wireless connection. The computer that owns these connections is illustrated in Figure 7-5 earlier in this chapter, the one encapsulated by the dotted rectangle. This rectangle, called a control volume, shows the scope of Windows XP’s awareness of its role in your network.
Windows doesn’t care how many computers are on your network, whether your network is wired or wireless, or even what kind of broadband Internet connection you have. The only thing you need to worry about in the context of this window is the individual connections attached to your PC.
A connection icon for each network adapter (NIC) installed in your system should appear automatically in your Network Connections window. Install a new network adapter, and—assuming it has been properly set up—it will show up there as well.
Additionally, you might have one or more connection icons for
any virtual connections, such as dial-up connections (for your analog or ISDN modem),
PPPoE connections (for broadband connections requiring
a login), and VPN (Virtual Private Networking) connections. You can
add a new virtual connection by double-clicking New Connection Wizard, or, if you if you have
the common tasks pane enabled, by clicking Create a new connection. You can also go to
Start → Run, type
icwconn1, and click OK.
The New Connection Wizard is fairly self-explanatory, but what may not be obvious is that you cannot use it to add a new hard-wired connection. Instead, as mentioned above, such connections are added automatically as soon as Windows detects the corresponding hardware. If you’re having trouble getting Windows to recognize a hard-wired network connection, see Chapter 6.
The four options on the first page of New Connection Wizard are:
- Connect to the Internet
You’ll only need this option to add a dial-up Internet connection or to configure PPPoE (used by DSL or cable connections that require a username and password, as discussed later in this chapter). If you have a high-speed connection with a static IP address (including many DSL or cable connections), you won’t need this wizard.
The next page has three choices, the second of which, Set up my connection manually, will be the appropriate choice in most cases. The first option is basically only for those who wish to sign up for MSN (Microsoft’s online service), and the third simply starts the setup program on whatever CD is inserted in your drive.
- Connect to the network at my workplace
This option is only used to set up a remote connection to a business network, either through a dial-up connection or through VPN (Virtual Private Networking). See Section 7.4.1, later in this chapter, for details.
- Set up a home or small office network
This simply closes the New Connection Wizard and starts the Network Setup Wizard, discussed in the next section.
- Set up an advanced connection
The last entry here is used to set up other types of connections, such as PC-to-PC connections using a serial or parallel cable, and setting up your computer as a VPN host (discussed later in this chapter).
After creating a new connection, rename it so that it is easier to distinguish from any other connections you may have. To make other changes to the new connection, right-click it and select Properties, as described next
Tip
Any network connection that can be added with the New Connection Wizard can be copied by right-clicking and selecting Create copy. Create a copy of a dial-up connection, for example, to set up two similar connection profiles without having to enter all the information twice. Copies are also handy for creating backups of connections so that you can experiment with different settings without losing a working profile. Note that if you only want to add alternate phone numbers, you can right-click the connection, select Properties, and click Alternates.
The Network Connections window lists all hardware and software connections currently configured on your computer. And if you’re using the Details view, as shown in Figure 7-7, you’ll also see such pertinent information as the type of connection, whether or not it is enabled and connected, the name of the hardware device to which it corresponds, and a few other useful tidbits.
Right-click any connection icon and then select Properties to view the settings for the particular connection. This is where most of your network settings will be configured. A typical connection properties sheet is shown in Figure 7-8.
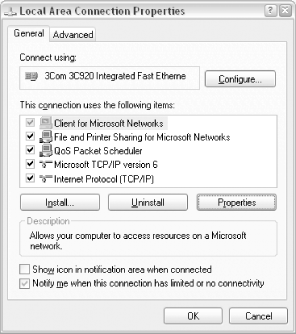
Figure 7-8. Right-click a connection and select Properties to view and modify the settings for the connection
Tip
If you’ve configured your Start Menu to “expand” Network Connections (Control Panel → Taskbar and Start Menu → Start Menu tab → Customize), you can also right-click the menu items right in your Network Connections menu and select Properties.
Depending on the type of connection you’re viewing, the tabs that appear across the top of the dialog will vary. In addition, tabs by the same name will have different meanings for different connections, which can make things even more confusing. For example, for LAN or high-speed Internet connections, the list of the currently installed services and protocols is shown in the middle of the General tab page, but it appears in the Networking tab for any dial-up or broadband connections. Fortunately, the list itself is the same in all situations, and that’s what matters. Figure 7-8 shows the entries installed for a typical network connection.
Among the usual suspects here are Client for Microsoft Networks, an essential component for connecting your computer to a Microsoft network, File and Printer Sharing for Microsoft Windows, the service responsible for sharing files and printers over the aforementioned Microsoft Network, and Internet Protocol (TCP/IP).
Highlight Internet Protocol (TCP/IP) in the list, and click Properties to view the TCP/IP Properties window shown in Figure 7-9. This dialog is used, among other things, to either specify the IP address for static IP connections or to instruct Windows to accept whatever IP address it is assigned.

Figure 7-9. The properties sheet for the TCP/IP protocol allows you to set the IP address, DNS server addresses, and other settings required by some connections
All network connections that use the TCP/IP protocol (explained at the beginning of this chapter) have an IP address, including your Internet connection and any connections to your local workgroup. However, it’s not always necessary to actually set an IP address. Use the following tips to help you determine whether or not you need to set the IP address for a particular connection, as well as which IP address you should use should the need arise.
Tip
No two computers on the same network should have the same IP address. This applies to two computers on your local network and two computers on the Internet on opposite ends of the planet.
- Internet connection
If your Internet connection has a dynamic (changing) IP address, select the Obtain an IP address automatically option and leave the rest of the fields blank. These fields typically apply to dial-up connections, as well as DSL and cable connections that require a login with a username and password (see the discussion of PPPoE, later in this chapter).
In some cases, Windows will be able to detect the IP address and other settings for Internet connections that have static IP addresses. If Windows cannot auto-detect your settings, you’ll have to enter the IP address, subnet mask, gateway, and nameserver addresses, as provided by your Internet service provider.
- Workgroup (LAN) connection
In the example in Figure 7-9, the IP address is set to
192.168.0.1, which implies that this connection is used to hook the computer up to a Microsoft workgroup. In fact, the entire192.168.0.xxxsubnet — which includes192.168.0.1,192.168.0.2,192.168.0.3, and so on — is typically used by Windows to form its workgroups.It’s up to you whether or not the computers in your local workgroup have fixed IP addresses. If you leave these fields blank, you’ll be relying on your router or switch to automatically assign an unused IP address to your computer each time it’s powered on. If you specify fixed IP addresses for all of the computers in your LAN, it will take a little bit of extra initial effort, but the reward will typically be a more reliable and responsive peer-to-peer workgroup. Unless you have a specific reason to do otherwise, you’ll usually be better off specifying IP addresses for all the PCs in your LAN.
It’s also possible to mix and match static-IP and dynamic-IP computers on the same network, but you’d be asking for trouble. For example, say you have three computers, one set to
192.168.0.1, one set to192.168.0.2, and the third set to nothing. Then, say you boot up the first and third computers, and the third automatically assumes the192.168.0.2address, since it’s available. The result: when the second computer is eventually booted, it will be unable to join the network since its fixed IP address will have already been taken.It’s possible for a computer to have more than one IP address. For example, the right-most computer in Figure 7-5 has two connections: one for the workgroup and one for the Internet connection. Each connection will have its own IP address, either specified in the TCP/IP properties window or assigned automatically.
Tip
Windows 95/98/Me computers can have trouble connecting to XP machines in the same network, although, in theory, they’re supposed to be compatible with one another. If this happens, try specifying static IP addresses for all computers in your LAN, and then make sure that no computers are using the obsolete NetBEUI protocol.
Also of interest in the connection-properties windows is the Advanced tab, used to enable Internet Connection Sharing and Windows XP’s built-in firewall feature, both described later in this chapter.
The Authentication tab, found in the properties windows of LAN or high-speed Internet connections, is used only for wireless networks, despite the rather ubiquitous-sounding name. (This has nothing to do with user authentication, which is discussed in Chapter 8.) Likewise, the Security tab, found in dial-up and broadband connections, is used only to control how the username and password are transmitted across the connection, and is not related to any actual security features in Windows XP.
By default, all hard-wired network connections (also known as LAN or high-speed Internet connections) are enabled when Windows starts, and are connected (if possible).
Dial-up and broadband (including PPPoE) connections, on the other hand, need to be manually connected before they will function. Simply double-click (or right-click and select Connect) to initiate a manual connection. And when you’re done, right-click the entry and select Disconnect.
Double-click any connected connection to view its Status window, shown in Figure 7-10. Among the items of interest are Duration, which shows how long the connection has been active, and Activity, which shows how much data has been sent and received (in packets). The size of each packet depends on your MTU setting (discussed later in this chapter), but this value is usually in the neighborhood of 1500 bytes. So, this example Status window shows that 484 packets (roughly 726 kb) have been sent and 371 packets (roughly 557 kb) have been received.

Figure 7-10. Double-click a connection icon in the Network Connections window or system tray to view its connection status
If you’re working with a wireless connection, the Status window will also show the strength of the connection signal (up to five little green bars), plus the View Wireless Networks button. See the Wireless section of this chapter for more information on the Choose a Wireless Network window.
All connections, by default, have an icon that appears in the notification area (tray) when they’re connected; double-click this icon to view the Status window, or right-click the icon for other options. To enable or disable the tray icon for any type of connection, right-click the connection in the Network Connections window, select Properties, and change the Show icon in notification area when connected option (located under the General tab) as needed.
LAN or high-speed Internet connections can be enabled or disabled by right-clicking their icons and selecting Enable or Disable, respectively. (You can also double-click a connection and click Enable or Disable in its Status window.) Disabling devices in this way is the same as disabling them from Device Manager and has the same effect as physically uninstalling them from your computer.
In addition to Properties, Enable/Disable, and Connect/Disconnect, there are other items available on some connection icons’ context menus, depending on the connection type:
- Repair
The Repair command reinstalls the drivers associated with the connection. If a connection does not appear to be working, try disabling it and then re-enabling it (or disconnecting and then reconnecting, if applicable). If that doesn’t work, you can try using the Repair feature, but the odds that it will do anything useful are fairly remote.
- Set as Default Connection/Cancel as Default Connection
This option is available only for dial-up and broadband (PPPoE) connections, and is used to decide which connection is “dialed” when Windows needs to automatically connect to the Internet. Go to Control Panel → Internet Options → Connections tab to configure this feature. A black checkmark in a circle will appear over the connection icon for any connection that is set as the default.
- Bridge Connections
Simply put, a network bridge allows data to be transferred between two (or more) different networks. In effect, a bridge turns your computer into a router of sorts, but with the advantage of allowing you to combine two otherwise incompatible networks. Windows XP supports only one bridge at any given time, but a single bridge can contain as many different connections as you want. Most users will have absolutely no use for this feature. To initiate a network bridge, select at least two connection icons, right-click, and select Bridge Connections (or go to Advanced → Bridge Connections) to create a network bridge between the connections.
- View Available Wireless Networks
This opens the Choose a Wireless Network window; see the Wireless section of this chapter for more information.
That about does it for the Network Connections window. You can use the tools in this window to build and configure your network, as described throughout the rest of this chapter.