
If you’re on a wireless network and you’re not using Windows XP Service Pack 2, it means you’re still suffering with the weak WiFi support built into the original release of Windows XP. Go ahead and upgrade to SP2 now; don’t worry, I’ll wait.
{Sounds of fingers tapping and whistling off-key.}
Got it? Good. The solutions in this section show you how to set up a simple wireless network and connect that network to the Internet, as well as connect your wireless devices to other people’s wireless networks, and prevent others from sneaking on to your network. All of this is possible without wires, and the most amazing thing is that it actually works.
Tip
If you want to do a whole lot more with your wireless network, check out Wireless Hacks (O’Reilly). Among other things, it shows you how to extend the range of your wireless network from a few yards to several miles with home-made antennas. Very cool.
If you’ve read other solutions in this chapter, you’ve probably seen routers mentioned several times (if not, drop back to Section 7.1.2 to read up).
A router allows you to connect your computer (or your workgroup) to the Internet, while simultaneously protecting you with its built-in firewall. A wireless router does the same thing, but it also adds a wireless access point, allowing you to connect any number of WiFi devices to each other and to the Internet.
A typical WiFi setup is shown in Figure 7-3 (see, no wires), but you’ll probably want something closer to the setup shown in Figure 7-6, in which a wireless router provides Internet access to all your computers. Here’s how to set this up and configure the security measures that should have been enabled out of the box:
Plug your DSL or cable modem (or whatever broadband connection you’re using) into your router’s WAN or Internet port.
Plug one or more computers into the numbered ports on your router. Or, if you want to connect wirelessly, see Section 7.5.2 later in this chapter.
Dispense with the software that comes with your router. Instead, open a web browser on one of the computers and type the IP address of your router into the address bar. In most cases, this is
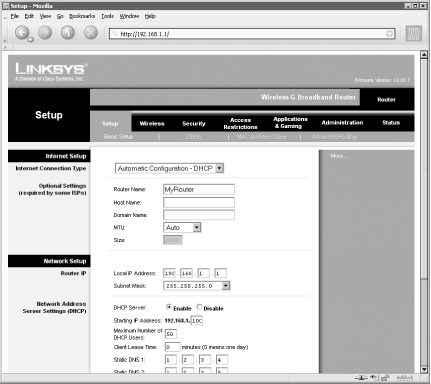
192.168.1.1, but your router may be different; refer to your router’s documentation for details. (You may also need to log in with a username and password at this point.)Assuming your connection to your router is working, your router’s setup page will look something like the one in Figure 7-17. Of course, your router’s setup page will probably look different, but most of the same settings will still be there.
Figure 7-17. Most routers use a web-based setup, meaning that you can configure your router from any computer, running on any platform, as long as it has a web browser
Tip
If you can’t connect to your router, the most likely cause is that your computer is not on the same subnet as the router. The first three numbers of your computer’s IP address must mach the first three numbers of your router’s IP address, but the fourth number must be different. For instance, if your router is at
192.168.0.5, then the example here won’t work; change the IP address of your computer to somethjng like192.168.1.17to connect to the router. Of course, you can try the Obtain an IP address automatically in your TCP/IP settings as described in Section 7.1.3 earlier in this chapter, but this doesn’t always work.Choose your connection type from the list. If your Internet connection requires a username and password, select PPPoE. If your ISP has provided an IP address for your connection, select Static IP. Otherwise, choose Automatic Configuration - DHCP.
If you’ve selected PPPoE or Static IP, you’ll probably need to enter the IP addresses of your ISP’s DNS servers (your ISP should provide these numbers for you).
Click Apply or Save Settings at the bottom of the page when you’re done.
At this point, you should have Internet access; go ahead and test it by opening a second browser window (Ctrl-N) and visiting any web site.
Next, go to your router’s wireless setup page. This is either a link in the main menu or a tab across the top of the page, as shown in Figure 7-18.
Choose a new name (SSID) for your wireless network, and turn off the Wireless SSID Broadcast option.
Warning
Your SSID is the backdoor into your wireless network. If you broadcast your SSID, anyone with an SSID sniffer will be able to find it in a matter of seconds (see Section 7.5.2 later in this chapter), and connect to your network. The same danger exists if you use your router’s default; probably a million people around the globe are using the SSID “linksys,” which makes it a good guess for anyone trying to gain access to your network.
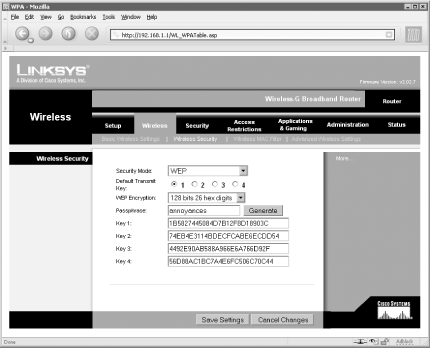
Next, you’ll want to set up encryption for the best wireless security. This page will either be accessible through a button on the current page entitled WEP or Encryption, or (in the case of the example in Figure 7-18), a separate tab. Make sure to click Apply or Save Settings on this page first, if needed.
WEP, or Wireless Encryption Protocol, prevents anyone from connecting to or spying on your wireless network unless they have your WEP key. Figure 7-19 shows a typical WEP setup page.
Choose WEP for the security mode (if available), and then choose the highest WEP encryption level supported by your router (here, it’s 128-bit). Higher levels provide better protection, but also mean longer (and harder to type) WEP keys.
Some routers allow you to choose a passphrase , a word on which the WEP keys are based. Although Windows XP doesn’t support the passphrase, some third-party devices do. In the example shown in Figure 7-19, I typed
annoyancesand clicked Generate to create the 26-digit WEP keys.Once you commit this change, you’ll need to enter one of the keys that appear here into each computer that connects to your wireless network, so take this opportunity to record the key before you save changes.
Highlight the first key (Key 1), and press Ctrl-C to copy it to the clipboard. Then, open your favorite text editor (e.g., Notepad), and press Ctrl-V to paste it into a new, empty document. Save the file on your desktop; this will allow you to easily paste it into various dialog boxes later on, which is easier than having to type it.
Warning
If you enable WEP for your wireless network, but you subsequently can’t connect to it wirelessly, it most likely means that you’ve gotten the WEP key wrong. To fix the problem, you’ll have to either connect to it with a cable and change the settings or, as a final resort, reset the router as described in your router’s documentation.
Click Apply or Save Settings at the bottom of the page when you’re done.

See the next section, Section 7.5.2, for help connecting your computer to your (or someone else’s) wireless network. See Section 7.5.4, later in this chapter, for ways to take advantage of your new wireless network. See the ??? sidebar for ways to improve reception (and thus performance of your wireless network).
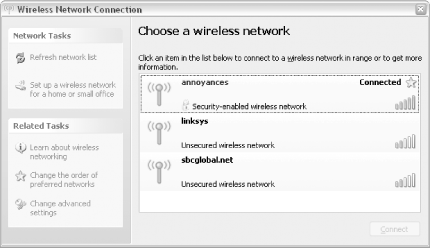
Probably the most significant change in SP2 is the substantial improvement of the WiFi support built into Windows XP. The centerpiece of these improvements is the “Choose a wireless network” window shown in Figure 7-20.
A WiFi sniffer is a program (or device) that scans for and lists the WiFi networks within range. This is where the Broadcast SSID setting discussed in the previous section, Section 7.5.1, comes into play. If you’re broadcasting your SSID, any sniffer within range will see it.
In the Network Connections window, double-click an unconnected Wireless connection to open the “Choose a wireless network” window. (You can also right-click the icon in your system tray or Network Connections window and select View Available Wireless Networks.) Windows XP will automatically perform a scan and display the results; in all, it should take less than 5 seconds. Click Refresh network list to repeat the scan.
To connect to a network in the list, highlight it and click
Connect. If no security is in effect,
Windows will establish a connection without any further ado. But if
there’s any WEP encryption, you’ll be asked to type a WEP key. Note
the little padlock next to the first network listed in the dialog box
in Figure 7-20, which
tells you that the only network with encryption is annoyances; you’ll be able to connect to the
other networks without any special permission or additional
information.
But what if you’ve turned off the SSID broadcast feature, as described in Section 7.5.1 earlier in this chapter? If your network doesn’t show up in the list, simply click Set up a wireless network for a home or small office (on the left side of the “Choose a wireless network” window shown in Figure 7-20). This will start the Wireless Network Setup Wizard (which is also accessible through My Network Places).
Click Next and then type your network’s SSID in the Network name (SSID) field, as shown in Figure 7-21.
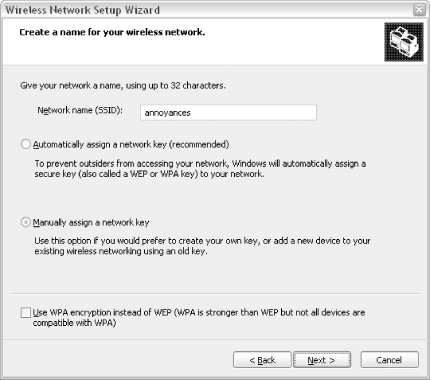
Figure 7-21. You’ll need to run the Wireless Network Setup Wizard to connect to your wireless network if you’ve opted not to broadcast your SSID
If you’ve enabled WEP encryption, select Manually assign a network key and click Next. On the next page, type (or paste) your WEP key into the Network key field.
As illustrated in Figure 7-19, many routers allow you to set more than one key; unless you have specific reason to do otherwise, just use the first one (Key 1) in Windows XP.
The length of the key you type is shown to the right of the field. If you’re using 64-bit encryption, the key will be 10 characters long (or 5 if you’re not typing hex codes); if you’re using 128-bit encryption, the key will be 26 characters long (or 13 if you’re not typing hex codes).
Tip
Unless you enjoy typing incomprehensible hex codes, turn off the Hide characters as I type option. Then, highlight the text in the Network key field, press Ctrl-C to copy it to the clipboard, click in the Confirm network key field, and press Ctrl-V to paste a copy of the key. If you stored your WEP in a text file, as suggested in Section 7.5.1, you can paste it into both boxes here, and avoid the tedious typing altogether.
Click Next. You’ll then be given the opportunity to save your settings on a USB flash drive, theoretically making subsequent setups easier; why there’s no option to save to a CD writer, floppy drive, or simply a file on your desktop is a mystery. Select Set up a network manually if you don’t have a USB flash drive handy, or if you don’t need to set up any more computers. Click Finish when you’re done.
From now on, your wireless network will show up in the “Choose a wireless network” list whenever it’s detected, even if you’ve chosen not to broadcast your SSID. If it doesn’t show up at this point, it means you’ve either mistyped the SSID here or in the router setup page (an incorrect WEP key won’t cause a problem until you try to connect.)
If there’s a problem with your newly added network, click Change advanced settings (on the left side of the “Choose a wireless network” window) to open the Properties window for your wireless connection. Choose the Wireless Networks tab, highlight your network in the list, and click Properties (as shown in Figure 7-22).

Figure 7-22. You may have to fiddle with XP’s WiFi settings to get it to connect to secure WiFi networks
Here, you’ll have a second chance to enter your WEP key, but you won’t have the luxury of being able to see the characters as you type them (as in the Wireless Network Setup Wizard). The easiest way to deal with this is to open Notepad, type (or paste) your key there, and then copy (Ctrl-C) and paste (Ctrl-V) it into both the Network key and Confirm network key fields.
While you’re here, choose the Connection tab. The Connect when this network is in range option (it’s on by default) determines whether or not Windows XP will automatically connect to this network when it’s available. In most cases, you’ll want to leave this option checked.
Tip
Now, if you’re in the enviable position of having access to more than one WiFi network regularly, and wish to have Windows connect automatically to more than one network, you can prioritize them. Just return to the Wireless Networks tab (Figure 7-22), highlight a network, and click Move up or Move down.
Click OK to save your settings when you’re done. If all is well, Windows should reattempt the wireless connection automatically. If it doesn’t, you’ll need to return to the “Choose a wireless network” window (Figure 7-20), highlight the network, and click Connect.
See the next section, Section 7.5.3, for ways to protect your computer when using someone else’s Internet connection.
WiFi tends to be temperamental, not to mention annoying and tear-your-hair-out frustrating. Among the things that can make it difficult to connect to a wireless access point, these are the most common:
- Drivers and firmware
If you ever have any trouble with your wireless router, visit the manufacturer’s web site and see if there’s newer firmware available for it. Likewise, make sure you’re using the latest drivers for your WiFi PCI and PC Card adapters.
- WiFi settings
Make sure both your router and your other equipment are communicating on the same channel (channel 6, 2.437 Ghz, is the typical default) and are using the same SSID.
- Encryption
Are you using encryption, as described in Section 7.5.1? If so, you’ll need to make sure that the Windows encryption settings exactly match those in your router’s setup page. Check the security mode (e.g., WEP or WPA), the encryption level (40-bit, 64-bit, or 128-bit), and the WEP keys (use Key 1 unless you have reason to do otherwise). If all else fails, try disabling encryption all around to see if it works at all. Then, add one security feature at a time.
- Speed
Are you using an 802.11g router? If so, you can probably set it to operate only at 802.11b speeds, only at 802.11g speeds, or both. Note that if you select “G-only,” no older 802.11b equipment will be able to connect to it.
- Reception, Interference, and Performance
Your wireless network relies on good reception to achieve reliable performance. See the ??? sidebar, earlier in this chapter, for ways to improve reception.
Since one of the biggest advantages of wireless networking is portability, it should stand to reason that you should be able to connect to your wireless network with something you can hold in the palm of your hand.
To that end, a number of handheld computers now come with WiFi support. Figure 7-23 shows the WiFi sniffer that comes with some Palm OS-powered handheld computers, allowing you to identify and connect to any available WiFi network.
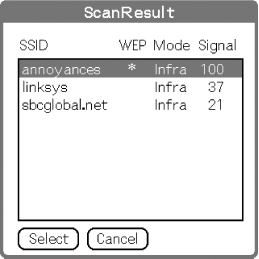
Figure 7-23. The WiFi sniffer on a Palm OS-powered handheld PDA shows the same wireless SSIDs as Windows XP’s built-in WiFi sniffer
A handheld sniffer can be a very valuable tool when setting up a wireless network. Among other things, you can test the range of your wireless router with a handheld sniffer more easily than by lugging around a laptop or desktop PC, allowing you to subsequently adjust the placement of your router for optimal range.
The point of wireless networking is not necessarily to do away with a few feet of cables, but to make a network do things it could never do before. For instance, if you have a portable computer equipped with wireless, you should be able to walk into any airport, coffee shop, hotel, or college dormitory and connect to the Internet in a matter of seconds. In more populated areas, it’s not uncommon to walk down the street and have your pick of WiFi networks. (See the ??? sidebar for an extra consideration.)
As described in Section 7.5.2 earlier in this chapter, you can connect to any unsecured wireless network that Windows XP’s built-in WiFi sniffer is able to detect. (The exceptions, of course, are those networks requiring a paid subscription or account access, but that’s a different story.) This applies to networks you encounter while you’re on the road, as well as those that are in range of your home or office.
The problem is that by connecting to these networks, you’re exposing your computer to the full array of viruses, hackers, and other dangers present on any network.[3] The solution is to take action to protect your computer (or workgroup), and the necessary steps depend on the scenario.
Say you’ve just sat yourself down at a sidewalk cafe, and pulled out your laptop. (This scenario also applies to hotel rooms, airports, and coffee shops.) You boot up Windows, open the “Choose a wireless network” window as described in Section 7.5.2, find a local network, and connect for approximately 20 minutes to check your email. When you’re done, you’ll likely never use this network again.
Now, if you typically use your laptop from behind a wireless router at home (as described in Section 7.5.1 earlier in this chapter), you’ll want to take some extra steps to secure your computer before you connect elsewhere. Since you won’t have your router with you on the road, and thus won’t have any dedicated firewall hardware, you’ll want to employ the built-in Windows Firewall software (or a third-party firewall solution), as described in Section 7.6.2 later in this chapter. This will provide minimal protection, insufficient for the long haul.
Say you just moved into an apartment complex (or have a small business in an office building) that provides free wireless Internet. Naturally, you would never want to connect your computer or workgroup to this wireless free-for-all without some sort of reliable, long-term firewall solution. Now, since this is not your own private Internet connection, you can’t just plug in a router to facilitate your firewall. But you can add another device, a wireless bridge, in order to build an “island” of sorts, in a sea otherwise filled with danger.
Figure 7-24 shows a sample setup involving a wireless bridge and a router. The two dotted rectangles represent the scope of the two different WiFi networks in effect: your own private, encrypted wireless network is shown on the right, and the public network is illustrated on the left. (Your bridge and router actually form a tiny, third network, complete with its own set of IP addresses separate from those in either of the two wireless networks.)

Figure 7-24. Use a wireless bridge in conjunction with a wireless router to protect your workgroup when connecting to a public Internet connection
Warning
This can be tricky to set up, and may require some trial and error to get it right. Depending on your specific hardware and your needs, you may need to adjust this procedure somewhat. For the simplest setup, make sure your bridge and router are manufactured by the same company.
Here’s how you set it up:
Use the “Choose a wireless network” window as described in Section 7.5.2 to find the name (SSID) of the wireless network to which you’d like to connect. Connect to the network temporarily to confirm that it actually works.
Obtain a wireless bridge, and follow the procedure laid out in its documentation to set it up with the aforementioned public wireless network. (This typically involves plugging it directly into your PC or one of the numbered ports of your router.) While you’re here, obtain the IP address of your bridge; it’ll be something like
192.168.1.1or192.168.0.1.When you’re done setting up the bridge, connect it directly to the WAN port of your wireless router. (This is the port into which you’d normally plug a DSL or cable modem.)
Connect your PC to your router and use a web browser to open up your router’s setup page, as described in Section 7.5.1, earlier in this chapter.
Configure your wireless router so that it has a Connection Type of Static IP. (Refer to your router’s documentation for the specific details on this and the next few settings.)
In the router setup, set the Gateway address to the IP address of your bridge that you obtained in step 2.
Then, set the IP address of the Internet connection (as the router sees it) to a fictitious IP address in the same subnet as your bridge. This means that the first three numbers of both IP addresses should be the same, but the fourth should be different. That is, if your router is located at
192.168.1.1, then you could set the IP address of your Internet connection to something like192.168.1.2or192.168.1.73.Finally, set the DNS server addresses in your router setup to the IP addresses of your Internet Service Provider’s DNS servers.
Tip
If you don’t know what Internet Service Provider you’re using, connect your PC directly to the wireless network in question. Open a web browser, type http://annoyances.org/ip in the address bar, and press Enter; this will show the IP address of your Internet connection. Then, open a Command Prompt window (see Chapter 10) and type
nslookupip_address, whereip_addressis the set of four numbers reported by Annoyances.org. This should give you the name of your ISP, plus some extra stuff. So, you might see something likedsl456.eastcoast.superisp.net, which means your ISP is "superisp.net.” Then, it’s only a matter of visiting their web site and determining their DNS server addresses from their online documentation!Complete the setup of your router as explained in Section 7.5.1, earlier in this chapter, and make sure to enable WEP encryption and any other security settings at your disposal.
This should do it. The bridge funnels the public Internet connection into your router, and your router funnels it to the computers in your workgroup. The router acts like a firewall, provided that you connect all your computers directly to your personal WiFi network, and not the public, unsecured one.
Among other things, your bridge/router combination will serve as a repeater (aka range extender), and should boost the signal strength and might even improve performance over connecting directly.
As soon as you have your wireless network up and running, you’ll probably be inclined to do away with as many cables as you can. This feeling is normal; there’s no need to seek psychiatric help or psychic guidance.
There are ways to add support for wireless networking to nearly any computer or device, further illustrating what you can do with a wireless network:
- Desktop computer
Add a wireless PCI card just as you would an Ethernet NIC (network interface card). When shopping for a WiFi NIC, look for a card with an adjustable, external antenna (versus merely a nub.) Another alternative is a USB-based WiFi adapter, which will be easier to install, but probably at the expense of some performance.
- Laptop computer
WiFi PC Cards (PCMCIA adapters) have been available for some time, but if you have a modern laptop, you most likely have a better choice. For about the same price as the aforementioned PC Card, an internal Mini-PCI adapter will typically offer better range (thanks to the internal antenna that is likely already present in your laptop), without the clumsy protrusion of a PC Card. (See the “Handheld PDA” entry below for information on using Bluetooth with your laptop.) Another solution can be found in the ??? sidebar.
- Printer
Although you can connect a printer to a WiFi-equipped PC and share it with the rest of your network (as explained in Chapter 8), a better choice is to connect your printer directly to your wireless network. Among other things, this means you don’t have to connect any cables to your laptop to print a document,[4] and you have the option of placing the printer in a more convenient location. To do this, you’ll need a wireless print server, either a standalone unit or one integrated with your wireless router. Then, simply install the software that comes with your print server to create a virtual printer port on your PC, to which your printer’s drivers connect and send documents.
- TiVo
One of the biggest hassles of using a Digital Video Recorder (DVR) is that you need to connect it to a phone line so that it can download the latest program data. If you have a newer DVR (such as Series-2 TiVo) that comes with built-in networking support, you can use a USB-based WiFi adapter and finally cut the cord. If you have an older Series-1 TiVo, you’ll need to add a TurboNet card (available at http://www.9thtee.com/) and then connect that to an external WiFi bridge. Alternatively, you can use a AirNet card (also available at http://www.9thtee.com/) along with a PCMCIA 802.11b adapter you provide, but its range will be more limited than the aforementioned bridge. See TiVo Hacks (O’Reilly) for more ways to modify your TiVo.
- Video Game Console
Own a Playstation2, XBox, or other network-capable video game console? Just plug a wireless bridge (sometimes called a wireless game adapter) into your console’s Ethernet port, and play head-to-head games without the network cables stretched across your living room.
- Handheld PDA
As introduced in the beginning of this chapter, there are two prevailing wireless technologies: WiFi and Bluetooth. While some handhelds come with built-in WiFi, a larger percentage support Bluetooth (and only a select few play for both teams). Although only WiFi-equipped handhelds can connect to the WiFi networks discussed throughout this chapter, you’ll need Bluetooth support if you want to connect to the Internet with your Bluetooth-equipped cell phone. (The same goes for laptops; get an inexpensive Bluetooth USB dongle to connect your Windows PC to your cell phone wirelessly and surf the web from the park or even the train!)
Now, some higher-end PDAs come with WiFi or Bluetooth support built in, while others have special expansion cards that provide connectivity. You can get a WiFi SecureDigital (SD) card or a Bluetooth SD card that will fit in many PalmOS and PocketPC handhelds, but if you only have one SD slot, you’ll have to remove your memory card. If you need the wireless support, you may prefer to replace your PDA with one that has WiFi or Bluetooth (or both) built in, and do away with the awkward protrusion of the expansion card.
- Digital camera
Some high-end digital cameras now have WiFi options, allowing you to send your photos to the hard disk of a nearby computer wirelessly, either in batches or immediately after you take them. Unfortunately, this only works in the studio (as opposed to outdoors), where you’d be in range of your wireless router. At the time of this writing, there are no wireless cards you can conveniently insert in place of your digital film, but it shouldn’t be long.
- Video camera (webcam)
Get a WiFi-enabled Internet video camera, and place it anywhere within range of your network. Then, use your PC to view a live video feed wirelessly. Or, use it in its server mode, and let anyone in the world see how much coffee is left in your coffee pot. (See Chapter 9 for a simple WSH script that works with webcams.)
- Home stereo
Several companies sell WiFi music players that connect your MP3 collection on your computer to your component stereo system and allow you to hear your music on something better than the tinny computer speakers you’re likely using now.
- Car stereo
At the time of this writing, a WiFi-enabled MP3 player in your car is only vaporware, but keep your eyes open. Soon, manufacturers promise us, you’ll be able to send digital music to your car wirelessly. I can’t wait for my car stereo to catch an airborne virus.
There’s virtually no limit to the number of devices you can make wireless, provided that they support some form of networking already. If all else fails, a wireless bridge, as illustrated in Section 7.5.3, earlier in this chapter, should allow you to connect just about anything to your wireless network.
[3] This may be reason enough to keep strangers out of your own WiFi network; see Section 7.5.1, earlier in this chapter, for help securing your network.
[4] A number of years ago, printer manufacturers started including infrared ports on some printers, allowing laptops with infrared port to print to them wirelessly. This was never much of a success, which probably explains why it’s now nearly impossible to find a laptop (or printer, for that matter) with an infrared port.