
There are actually three different User Accounts dialogs in Windows XP, each with a different design and “intended audience,” so to speak. The problem is that each window has a few options not found in the other, so no single window can be used exclusively to handle all tasks.
- User Accounts
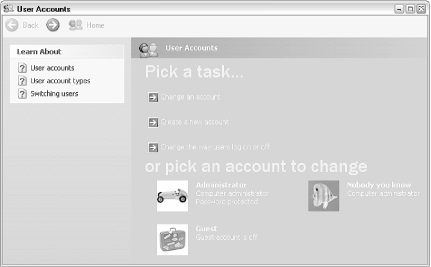
The primary user accounts interface, accessible by going to Control Panel → User Accounts and shown in Figure 8-1, is the one that most users see. It’s large, friendly, and, unfortunately, somewhat cumbersome. But, given the “administrator” stigma behind user accounts, it’s not surprising that Microsoft has gone to great lengths (some feel too far) to make this window less intimidating and easier to use than its counterparts in earlier versions of Windows.
Figure 8-1. You can add, delete, or modify user accounts in the User Accounts dialog, but not much else
Adding, customizing, and removing user accounts is extremely easy and, for the most part, self-explanatory in this window, and that is admirable. But sometimes you’ll need one of the alternate dialogs, listed below, to accomplish some of the more advanced tasks, such as managing groups and configuring Windows to log in a password-protected account automatically.
Note that this window is the only place you can choose a user’s picture, shown in both the login dialog and at the top of the new-style Start Menu (see “Massaging the Start Menu” in Chapter 2). The primary User Accounts dialog is also the only place you can choose between the Welcome Screen and the standard Login screen, as discussed in Section 8.3.1, later in this chapter.
- User Accounts 2
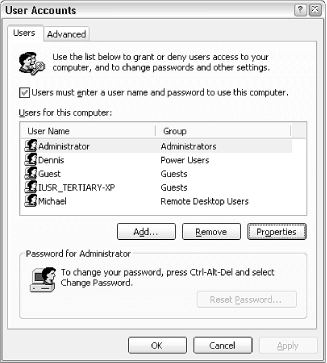
Some additional settings, discussed later in this chapter, can be changed only with the alternate User Accounts window, which, incidentally, is identical to the one found in Windows 2000. To open the old-style User Accounts dialog, select Run from the Start Menu, type
controluserpasswords2, and click OK. This dialog is shown in Figure 8-2.Figure 8-2. The “other” User Accounts dialog can do many things otherwise impossible in the standard User Accounts window
Like the primary User Accounts window, you can add new users, as well as rename or remove existing accounts. But here, you have more control over a user’s permissions and restrictions. You can access accounts that would otherwise be hidden in the User Accounts window, such as the Administrator account (see Section 8.3.5, later in this chapter) and the IUSR account used by the IIS web server. See Section 8.3.1, also later in this chapter, for another use of this dialog.
- Local Users and Groups
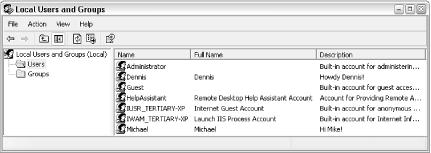
The third way to manage user accounts in Windows is to use the Local Users and Groups policy editor (lusrmgr.msc), shown in Figure 8-3. The Local Users and Groups window (LUaG) is actually a Microsoft Management Console (mmc.exe) snap-in, like the Disk Management utility (see Chapter 5), and therefore can be accessed remotely if necessary. Figure 8-3 shows the LUaG dialog in all its glory.
Figure 8-3. The Local Users and Groups window gives you the most control over user accounts, but at the expense of a rather sparse and intimidating Registry Editor-like interface
LUaG is where you’ll want to go to manage groups, set the automatic expiration of passwords, and change the location of a user’s home directory. Just double-click any entry in the Users or Groups categories to change their properties. Or, right-click in an empty area of the right pane to add a new user or group.
Groups can be useful when you have a bunch of users. For example, say you wish to make a folder accessible to several users (as described later in this chapter); instead of having to specify each one individually, all you would need to do is specify the group. Note that once the group has been set up here, you can use the User Accounts 2 dialog to assign new or existing members to that group.
Warning
Use the alternate User Accounts dialog and the Local Users and Groups window with caution, as both allow you to disable all accounts with administrator privileges. If this happens, the computer will be completely inaccessible by any administrator, and you’ll probably have to reinstall just to log in.
What can be confusing is finding the right place to accomplish a specific task regarding user accounts. Table 8-1 shows a bunch of different tasks and where to go to accomplish them.
Table 8-1. The various places user-account tasks can be performed
Task | User Accounts | User Accounts 2 | Local Users and Groups |
|---|---|---|---|
| |||
|
|
| |
|
| ||
Assign a user to multiple groups |
| ||
|
| ||
| |||
|
| ||
| |||
| |||
| |||
|
| ||
| |||
| |||
|
|
| |
Remove any user |
|
| |
|
|
| |
| |||
| |||
| |||
| |||
| |||
|
For the most part, adding, removing, and modifying user accounts is a fairly self-explanatory process, so I won’t go into every excruciating detail here. Here are some tips for working with user accounts:
Press Ctrl-Alt-Del and then click Change Password to change your own password. This is the only way to change the password of an account when you’re not an administrator.
If you have a lot of users coming and going, use the Local Users and Groups window to have passwords automatically expire. This not only forces users to change their own passwords regularly, but automatically blocks users who haven’t logged in a while.