
A script is simply a list of commands that are placed one after another and stored in a text file. Script commands are like building blocks: the more commands and programming techniques you learn, the broader your palette will be for making useful scripts. Some of the simpler building blocks will be used in this section of the chapter to illustrate the way scripts are built. Advanced users may prefer to skip to subsequent sections, which cover more advanced topics.
To run a script, just double-click on the script file icon; you’ll probably never need to run the Scripting Host program (wscript.exe) directly.
Tip
There are actually two script interpreters (engines) included with Windows XP. WScript.exe is a native Windows interpreter and is used in most cases. CScript.exe is a console interpreter, which is used when you want the script output to be sent to the console (Command Prompt). You can use CScript.exe at any time by right-clicking a script file and selecting Open with Command Prompt.
When the Scripting Host runs the script, the commands are executed in order, one by one. You can leave Notepad open to make changes and additions while you test the script (big screens are especially handy for this sort of thing).
You can quickly open an existing script file for editing by right-clicking on it and selecting Edit. This will, by default, open Notepad, although you might want to associate the Edit action for .vbs files with a more powerful text editor (see Section 4.3.3).
The process of putting a script together essentially involves typing commands and then running the scripts to test them. In the following topics, we’ll cover the background concepts necessary to complete many tasks with scripts:
Using variables to store and manipulate information
Asking for and displaying information with the InputBox and MsgBox commands
Creating interactive scripts with conditional statements
Using loops to repeat a series of commands
Making building blocks with subroutines and functions
Extending scripts with object references
The use of variables is essential when some interaction is required by a script. A variable can be assigned a value, which is subsequently used or simply recalled later in the script. For example, the following two commands:
MyName = "joe user"
MyShoeSize = 12
assign two different variables to two different values. The first variable, MyName, is assigned a text string, while the second, MyShoeSize, is assigned a numeric value. You can also assign variables to values in terms of other variables:
MyIQ = MyShoeSize + 7
This statement, when placed after the two preceding lines, will
result in the variable MyIQ
having a value of 19 (12 plus 7). When a variable name appears on the
left side of an equals sign, its value is being manipulated. When it
appears on the right side of an equals sign or within some other
command, its value is simply being read. You can carry out more
complex mathematical operations using various combinations of
parentheses and the standard operators (+, -,
*, /, and ^
for addition, subtraction, multiplication, division, and
exponentiation, respectively).
Some scripts are ideally suited to run in the background and perform a sequence of tasks, and then simply exit when those tasks are complete. Others require some sort of user interaction, either in the form of asking the user for input or informing the user when something has gone wrong. For example, this command:
MyName = InputBox("Please enter your name.")will display a prompt on the screen when the script is run, asking for some text to be typed. When you enter some text and click OK, the script places the text you’ve typed into the variable MyName and continues on to the next command.
Now, collecting and rearranging information does no good without
the ability to spit out a result. The versatile MsgBox function allows you to display a
simple message, as follows:
MsgBox "Hello, Hello Again."
Combining the principles we’ve covered so far, consider the following code:
MyAge = InputBox("Please type your age.")
NewAge = MyAge + 5
MsgBox "In 5 years, you will be " & NewAge & "."
The first line does two things: it first asks the user to type
something, and then assigns the typed text to the variable MyAge. The second line creates a new
variable, NewAge, assigns the
user’s input to it, and adds five. Note the lack of any error checking
in this example: if the user enters something other than a number,
this code will cause a WSH error, and the script will end early. The
third line then uses the & operator to
concatenate (glue together) a text string and the NewAge variable and displays the result in
a message box. Notice that plain text is always enclosed in quotation
marks, but variables are not. If we were to enclose the NewAge variable in quotation marks, the
script would simply print out the text NewAge instead of whatever value is stored
in the variable.
The MsgBox statement can also
be used like this:
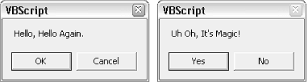
Response = MsgBox("Here's My Message", 17, "Message Title")which allows it to be used for not only displaying a message,
but recording the response as well. The 17 is the sum of a few different values,
which specify the options used to customize the message box. Figure 9-1 shows two sample
message boxes, each with different buttons and icons.
To choose the buttons that are displayed by the MsgBox function, specify:
0 for OK |
1 for OK &
Cancel |
2 for Abort, Retry, &
Ignore |
3 for Yes, No, &
Cancel |
4 for Yes &
No |
5 for Retry &
Cancel |
To choose the icon that is displayed, specify:
16 for a red “X”
(error) |
32 for a question mark
(query) |
48 for an exclamation
mark (warning) |
64 for a blue “I”
(information) |
Additionally, you can add:
256 to give the second
button the focus (dotted lines) |
512 to give the third
button the focus |
4096 to make the message
box “system modal” (i.e., all applications are suspended until the
user responds to the message box) |
So, to have a message box with the Yes and No
buttons, to have the question mark icon, and to have No be the default, you would specify a value of
4 + 32
+ 256 =
292. The two message boxes in Figure 9-1 have values of
17 (that’s OK, Cancel,
and the “X” icon) and 292,
respectively. Note that it’s good practice not to
add the values together (like I did in the first example with 17), but rather to leave them separated,
like this:
Response = MsgBox("Here's My Message", 16 + 1, "Message Title")This way, it’s easier to understand and modify later on.
When the user responds to the message box, the Response variable will be set to:
1 if the user clicked
OK |
2 for Cancel |
3 for Abort |
4 for Retry |
5 for Ignore |
6 for Yes |
7 for No |
The next step is to write code that can perform different
functions based on this recorded response. See the subsequent
“Creating Interactive Scripts with Conditional Statements” topic for
details on using the results from a MsgBox statement to determine what happens
next in a script.
Conditional statements allow you to redirect the flow depending on a condition you determine, such as the value of a variable. Take, for example, the following script:
Response = MsgBox("Do you want to continue?", 32 + 4, "Next Step")
If Response = 7 Then WScript.Quit
MsgBox "You asked for it..."
The first statement uses the MsgBox function, described in the previous
topic, to ask a question. The value of 32 +
4 specifies Yes and
No buttons, as well as the question
mark icon. If the user chooses Yes,
the value of the Response
variable is set to 6; if No is chosen, Response is set to 7.
The next statement uses the vital If...Then structure to test the value of the Response variable. If it’s equal to 7
(meaning the user clicked No), then
the script exits immediately (using the WScript.Quit statement). Otherwise, script
execution continues to the next command.
Here’s another example using a slightly more complex version of
the If statement:
MyShoeSize = InputBox("Please type your shoe size.")
MyIQ = InputBox("Please type your IQ.")
If MyShoeSize > MyIQ Then
  MsgBox "You need to read more."
Else
  MsgBox "You need larger shoes."
End If
One of the nice things about VBScript is that most of the
commands are in plain English; you should be able to follow the flow
of the program by just reading through the commands. Before you run
the previous script, try to predict what will happen for different
values entered at each of the two InputBox statements.
This script uses the If...Then structure to redirect output
depending on the two values entered at runtime (when the script is
actually being executed). It should be evident that the first message
is displayed if the value of MyShoeSize is larger than the value of
MyIQ. In all other cases
(including when both values are equal), the second message is
displayed. Note also the use of End
If, which is required if the
If...Then structure spans more than
one line, as it does in this example.
The If...Then structure can
have as many elements as you need. For example:
Crashes = InputBox("How many times a day does Windows crash?")
If Crashes <= 3 Then
  MsgBox "You lucky sod..."
ElseIf Crashes = 4 or Crashes = 5 Then
  MsgBox "The national average: good for you!"
Else
  MsgBox "Take two aspirin and call me in the morning."
End If
accommodates three different ranges of answers to the question
posed by the first line of code (thanks to the ElseIf line). Note also the use of or on the fourth line; you can also use the
and operator, or a combination of
the two, in your scripts. Use parentheses to group conditions in more
complex statements.
Another useful structure is the For...Next loop, allowing you to repeat a series of commands a
specified number of times:
SomeNumber = InputBox("How many lumps do you want?")
TotalLumps = ""
For i = 1 To SomeNumber
  TotalLumps = TotalLumps & "lump "
Next

Rem -- The next line displays the result --
MsgBox TotalLumps
The For...Next loop repeats
everything between the two statements while incrementing the value of
the variable i with each
iteration, ending the loop when i
equals the value of the variable SomeNumber. Each time we go through the
loop, another “lump” is added to our variable, TotalLumps. When the loop is finished, the
contents of the TotalLumps
variable are displayed.
Notice the use of the concatenation operator (&) in the middle of the loop, which adds
a new lump to the variable. Those new to programming might be put off
by the fact that we have the TotalLumps variable on both sides of the
equals sign.[1] This works because the scripting host evaluates
everything on the right side of the equals sign (adds it all up) and
then assigns it to the variable on the left side.
Note also the TotalLumps=""
statement before the For...Next
loop; this empties the variable before we start adding stuff to it.
Otherwise, whatever might be assigned to that variable before the loop
would still be kept around—something we didn’t anticipate or want.
It’s good programming practice to prepare for as many different
situations as can be imagined.
Also good practice is the use of spaces, indentations, and
remarks to make the code easier to read without affecting the
execution of the script. The Rem
command (shown earlier) is used to include remarks
(comments that are ignored when the
script is run), allowing you to label any part of the script with
pertinent information. In place of the Rem command, you can also use a single
apostrophe ('), which has the advantage of being used on the same line
as another command.
As you write these scripts, think about the formatting as you would in writing a word-processor document; scripts that are easier to read are easier to debug and easier to come back to six months later.
A subroutine allows you to encapsulate a bit of code inside a single command, making it easy to repeat that command as many different times as you want, just as if it were a built-in command in VBScript. Simply include the entire subroutine anywhere in a script, and then type the name of the subroutine elsewhere in the script to execute the subroutine.
A function is essentially the same thing as a subroutine, except
that it has a result, called a return value. Both subroutines and
functions accept input variables, listed in parentheses after their
respective Sub and Function
statements.
Tip
To those who are familiar with macros in a word processor, subroutines are similar. In fact, Microsoft Word, Excel, and Access (in Office 95 and later) save their macros as VB subroutines.
Consider Example 9-1, which compares the contents of two text files. At the heart of this example are the two structures at the end of the script, although their specific position in the script is not important. WSH separates all subroutines and functions before executing the script; they won’t be executed unless they’re called, and the variables used therein are unrelated to variables used elsewhere in the main script. Whenever it encounters the name of a subroutine or function in the script body, it executes it as though it were a separate script. Try to follow the execution of the script, command by command.
Example 9-1. Using functions and subroutines
Filename1 = InputBox("Enter the first filename")
Filename2 = InputBox("Enter the second filename")

If Not FileExists(Filename1) Then
  MsgBox Filename1 & " does not exist."
ElseIf Not FileExists(Filename2) Then
  MsgBox Filename2 & " does not exist."
Else
  Call RunProgram("command /c fc " & filename1 & _
                " " & filename2 & " > c:	emp.txt", True)
  Call RunProgram("notepad c:	emp.txt", False)
End If

Function FileExists(Filename)
  Set FileObject = CreateObject("Scripting.FileSystemObject")
  FileExists = FileObject.FileExists(Filename)
End Function

Sub RunProgram(Filename, Wait)
  Set WshShell = WScript.CreateObject("WScript.Shell")
  RetVal = WshShell.Run(Filename, Wait)
End Sub
One of the most important aspects of both subroutines and
functions is that they can accept one or more input variables, called
parameters or
arguments. The parameters that a subroutine
accepts are listed in parentheses after the subroutine definition and
are separated with commas (if there are more than one). Then, using
the Call statement, the values you wish to pass to the
subroutine (which are placed in the parameter variables when the
script is run) are listed in parentheses.
This way, the same subroutine or function can be called
repeatedly, each time with one or more different variables. Functions
(such as FileExists in this
example) can also return a single variable (usually dependent on the
outcome of some operation).
The first structure defines the FileExists function (discussed later in this
chapter), which is passed a filename and returns a value of True (-1) if the file exists and False (0) if it does not. The FileExists function is called twice, once
for each filename entered when the script is run (Filename1 and Filename2 ). The If...Then structures (see Section 9.1.3 earlier in
this chapter) first call the function, then redirect the flow based on
the result of the function.
The second structure defines the RunProgam subroutine, also called from the
script two times. RunProgram simply
runs the program filename passed to it; because it’s a subroutine and
not a function, there is no return value. In theory, you could use
functions exclusively, and simply ignore the return values of those
functions that don’t use them; the benefit of subroutines, though, is
that you don’t have to think about handling a return value at
all.
In FileExists and RunProgram, Filename is a variable (shown in
parentheses) in which passed data is placed so that it can be used
inside the subroutine or function. It’s considered a local variable;
that is, it has no value outside of the subroutine or function.
The most important consequence of this design—the separation of the code into subroutines and functions—is that it makes it easy to reuse portions of code. Experienced programmers will intentionally separate code into useful subroutines that can be copied and pasted to other scripts. Just think of programming as building something out of Lego© blocks; the smaller the blocks, the more versatile they become.
It’s worth mentioning that, in the case of subroutines, the
Call statement is not strictly
necessary. For example, the line:
Call RunProgram("notepad c: emp.txt", False)is equivalent to:
RunProgram "notepad c: emp.txt", False
Note that in removing the Call keyword, I’ve also had to remove the
parentheses around the arguments. Personally, I like using the
call command, as it makes
references to my custom subroutines more distinct and easier to find,
but others might prefer the simpler form.
The solutions in the subsequent topics are presented as either subroutines or functions. I’ve used subroutines for code that performs an action, such as copying a file or writing information to the Registry. When a result is expected, such as reading information from the Registry or finding the date of a file, a function is used instead.
You should be able to place these subroutines and functions directly into your scripts and call them with a single command. It’s up to you to put the pieces together to accomplish whatever tasks you have in mind. Feel free, also, to alter these routines to suit your needs.
[1] In traditional algebra, we couldn’t have a statement like this; it would be like saying x=x+1, which has no solution. However, this is not an equation; it’s a instruction that you want carried out. Besides, you’re supposed to have forgotten algebra years ago.