Chapter 11. Graphics and Multimedia
Hacks 99-107
XP is Microsoft’s first attempt to truly integrate multimedia hardware and graphics-playing abilities. In previous versions of Windows, things such as movie making, music recording, CD burning, and graphics seemed an afterthought rather than a core part of the operating system.
But with XP, that changed. It’s not only that Microsoft dressed up the operating system to make it look better; XP also now offers Windows Media Player, a fully featured piece of music and entertainment software, and Windows Movie Maker, which lets you create home movies and videos.
In this chapter, you’ll find hacks for improving your created movies, burning CDs more easily, importing lyrics into iTunes and the iPod, converting graphics among formats, and more.
Image Conversion in a Pinch
When you need to convert images from one format to another or shrink the size of existing images, try these two graphics tools.
I frequently have to convert graphics from one format to another. For example, I might need to convert a high-quality, very large bitmap TIFF file to a much smaller GIF or JPEG for posting to the Web. Sometimes, I need to shrink the size of a file, while keeping the same format—for example, when sending a picture via email to relatives or friends. When I’m creating my own icons [Hack #19] , I need to convert graphics to the .ico format. Also, I sometimes work with an artist who needs a file in a particular format.
XP’s built-in Paint program can’t really do the trick. It can convert only a handful of graphics formats (for example, it can’t handle .pcx or .ico format), and it won’t let you customize the graphic; for example, you can’t alter the compression of .jpg files to make them smaller. Also, it can’t do batch conversions; to convert a file you have to open it and then save it in a different format.
For the kind of image conversion I do, I don’t need a full-blown graphics program like Photoshop that carries a full-blown price tag of up to $600 (Photoshop Elements is an alternative, but that’s not free either). Instead, I turn to the freeware and shareware programs detailed in the rest of this hack.
IrfanView
For most image-conversion chores, I turn to the free program IrfanView (http://www.irfanview.com), which is named after its creator, Irfan Skiljan. It lets you convert images individually or in batches, handles a wide variety of formats, and gives you a great deal of control over the conversion. For example, when converting to a JPEG, you can set the image quality, whether to save as color or grayscale, and whether to save as a progressive graphic—one that gradually paints on the screen as it downloads over the Web.
To do a batch conversion, after you run the program choose File → Batch Conversion, browse to the directory that has the files you want to convert, and select them. Choose the output format and any options you want to apply to the files. For example, for a certain project I needed to convert a group of large graphics in TIFF format to JPEG format, and the resulting files had to be very small, in grayscale, and in progressive format. Figure 11-1 shows the options I chose in IrfanView.

If you need to convert only an individual file, call up the file, save it in whatever format you want, and use options like those shown in Figure 11-1.
IrfanView does much more than image conversion. I use it as my all-purpose file viewer, for example. It also works with scanners to bring images into your PC, and it includes basic image-editing tools.
Image Converter .EXE
One thing IrfanView can’t do is display before-and-after pictures of the graphic you’re converting. For example, you can’t preview what the converted picture will look like after it is converted. This can make image conversion a hit-or-miss affair: first you’ll have to choose your conversion options, then convert the image, and then finally look at the output. If you’re not happy with the results, you have to start back at the beginning, choose different options, and hope this time it works.
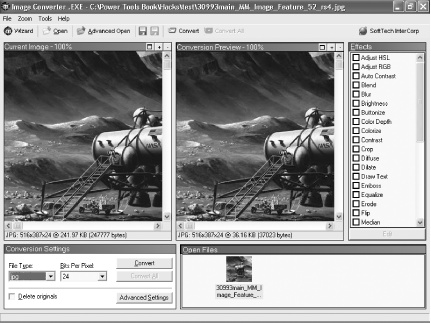
Image Converter .EXE (http://www.stintercorp.com/genx/imageconverter.php) shows you a side-by-side comparison of the before-and-after images, before you do the actual conversion. It also shows you the size of each image. That way, before you do the conversion, you can keep tweaking it until you have the size and quality you want. Figure 11-2 shows an example of shrinking a JPEG file while still trying to retain as much detail and quality as possible. The image on the left is the original image and is 242KB. The one on the right is only 36KB, but there is very little difference in the quality of the two, so I chose to save the one on the right.
The program does batch conversions, and it lets you convert files one at a time. It also lets you edit and add a wide variety of special effects when you convert, such as changing the color depth and contrast, adding a motion blur, posterizing the image, and more. The program is shareware and free to try, but you’re expected to pay $35 if you decide to keep it.
See Also
Paint Shop Pro (http://www.paintshoppro.com) is an excellent all-around graphics program that also does image conversion, including batch image conversion. It’s shareware and free to try, but it has a registration fee of $99.
The Quintessential Player, available for free from http://www.quinnware.com, does a very good job of converting music from one digital format to another. For details, see [Hack #104] .
Problem-Free CD Burning
XP lets you easily record digital music to your PC and burn music CDs. Here’s how to make sure your digital music doesn’t skip, pop, crackle, or hiss, as well as other advice on CD burning.
Windows Media Player lets you burn CDs, as well as rip digital music from CDs and put them on your hard disk; but, as anyone who has ever burned and ripped music knows, the process is never problem-free. When you rip music, you might find that your digital music files skip and pop. And when you burn CDs, you might find that those CDs skip and have similar problems as well.
I’ve had many problems like that myself, particularly when copying opera CDs, which, as you’ll see later in this hack, suffer from a nagging problem that causes most copied CDs to skip at least several times per CD.
What to Do If Your Digital Music Files Skip and Pop
When you rip music from CDs or old LPs, you might find that the digital music you rip to your PC skips and pops. There can be many causes for skipping and popping, so this section provides a number of ways to fix a variety of problems.
Cleaning up .wav files
If you’re recording from old LPs, the problem most likely isn’t with your computer. You’re probably recording the music faithfully, but the vinyl on the LP has been damaged, so the resulting digital music suffers from skips and pops. You can solve the problem by cleaning up the skips and pops using downloadable software.
Both WAVclean (http://www.excla.com/WAVclean/English) and Wave Corrector (http://www.wavecor.co.uk) will eliminate pops, skips, crackles, hisses, and similar noises from music you record from old LPs. Both programs require a several-step process.
First, record the digital music using Windows Media Player or similar ripping software. You’ll have to record in .wav format because that’s the only format these programs handle. Next, clean up the .wav files with one of the programs. Which one you use depends on whether you want to automate the cleanup or take a hands-on approach, and on how bad the problems are that you want to correct. WAVclean is the more automated of the two; load the .wav file, select Scrub, and choose from basic settings, and it eliminates hisses and crackles. It won’t, however, clean up deeper scratches, so it’s best for recordings that suffer from just hissing and crackling.
With Wave Corrector, on the other hand, you see an actual oscilloscope view of the music files, with pops and similar problems highlighted in blue. You can either have the program make the edits to the file itself, or preview the edits and do the correcting yourself. Wave Corrector also includes a recording feature so that you don’t have to use Media Player or other ripping software, such as Musicmatch Jukebox (http://www.musicmatch.com) or Quintessential Player (http://www.quinnware.com).
Once you’ve cleaned up the music, you can convert it to .mp3, .wma, or .ogg digital music to save on your hard disk using Musicmatch Jukebox or Quintessential Player, or you can burn directly from a .wav file to a CD using Windows Media Player, Musicmatch Jukebox, or similar software.
Both programs are shareware and free to try, but you are expected to pay if you continue using them. WAVclean costs $30 to register, and Wave Corrector costs $45.
Other advice for reducing skips and pops
If you’ve recorded the digital music from a CD rather than an LP, the problem might be dirt and grime on the original CD, and physically cleaning it might solve the problem. Wipe the bottom of the CD clean. The bottom of the CD might be scratched, and that can cause problems as well. In that case, you can try some of the CD-cleaning devices sold at music stores and computer stores.
Tip
Don’t let your friends and family stomp around during recording! With enough movement, CD players can skip just like turntables, for those of you who remember such antiques.
Additionally, if the ripping software you’re using allows it, try slowing down the speed with which you rip your music, or ripping it at a lower bit rate.
Tip
Windows Media Player doesn’t let you adjust the speed with which you rip music, but it does let you alter the music’s bit rate. Musicmatch Jukebox lets you adjust the ripping speed as well as the bit rate.
Finally, if you have a very old CD drive, the drive itself might be a problem. With some older, slower drives, when you rip music you’ll frequently get skips. If that’s your problem, the only solution will be to buy a newer drive.
What to Do If Your Burned Music CDs Skip
On occasion, your source and the digital music files will be free of skips, but when you burn a CD, the resulting CD skips. Sometimes, if you slow down the speed that you burn to a CD, you’ll solve the problem. Most burning software will let you adjust your burning speed. In Windows Media Player, choose Tools → Options → Devices and highlight your CD drive. Then, click Properties and choose the Recording tab, as shown in Figure 11-3. From the “Select a write speed” drop-down box, choose a slower speed than Fastest. Also, close all other programs when you’re burning a CD so that all your CPU, RAM, and system resources are devoted to CD burning.

If that doesn’t solve the problem, try using analog rather than digital CD writing. Choose Tools → Options → Devices, highlight the CD drive you want to use analog playback, click Properties, and go to the Audio tab. From the Copy section, choose Analog. If that still doesn’t work, go back to the same tab and choose “Use error correction.” This will slow down the CD burning process even further, but it might solve the problem.
What to Do If Long Selections Are Interrupted by Skips
On opera CDs, or any CD with particularly lengthy pieces, a single aria or other musical selection is sometimes spread out over two or more contiguous tracks. When a CD player plays the CD, the aria sounds as if it were one track; the music flows smoothly, without interruption. However, Windows Media Player and similar burning software, such as Musicmatch Jukebox, automatically add pauses between tracks when you burn to a CD, so when you rip music from the opera CD and then burn it, the aria will be interrupted.
Some software lets you eliminate the pause between tracks when you burn to a CD. But then it eliminates all pauses, so the entire opera plays as if it were one long, single track, with no pauses, and you can’t listen to it.
What’s a Cecilia Bartoli or Renée Fleming fan to do?
You can solve the problem by using a program that makes an exact duplicate of an entire CD, instead of copying individual files. Both Exact Audio Copy (http://www.exactaudiocopy.de) and Nero Burning ROM (http://www.nero.com) will do that. They’ll make images of the CD and then let you use those images to burn a CD. I’ve found that opera CDs burned with them generally don’t have the unnatural pauses. Exact Audio Copy is free, while Nero Burning ROM is shareware and free to try, but $69 if you keep using it.
See Also
Save Streaming Music to Your PC
Build up a digital music collection by saving files in MP3 format when you listen to Internet radio stations.
When I’m at my PC, I spend a fair amount of time listing to streaming Internet radio stations, such as that which you can find at http://www.shoutcast.com, http://www.live365.com, or the many radio stations available directly from Windows Media Player and Musicmatch Jukebox.
Tip
To listen to radio stations with Windows Media Player, first launch it by choosing Start → All Programs → Accessories → Entertainment → Windows Media Player, and then click the Radio Tuner button.
Often, I’ll want to listen to a particular song again after hearing it—for example, a pavan by the English Renaissance composer John Dowling that I don’t have on my CD collection. But because radio stations stream music to your PC, that music apparently can’t be called back up and listened to again. Same deal with sample clips on Amazon.com and other sellers of digital music—once you’ve listened to the clip, you can’t save it like other files.
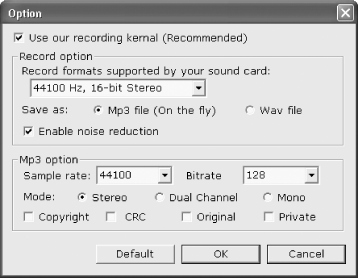
However, there is a way to save streaming music or any streaming audio to your PC as a digital music file. Super Mp3 Recorder (http://www.supermp3recorder.com) lets you capture streaming music in MP3, Ogg, and WAV formats. It’s shareware and free to try, but if you continue to use it, you’re expected to pay $19.95, or $29.95 for the Professional version, which lets you do sound editing and automatically start recording at preset times.
To record streaming music, install and run the program, then choose Option, which will bring up the screen shown in Figure 11-4. This screen lets you choose which format to record your music. Unless you’re planning to edit the sound file, choose MP3 as your recording format because WAV produces files that are extremely large.
Click OK and return to Super Mp3 Recorder’s main screen. Now click Volume Control. This lets you not only set the volume control, but also choose from which input you want to record. The program can record from a CD player, microphone, auxiliary input, and several other sources. By default, it’s enabled to record only from a CD, so you have to choose the Wave Out option if you’re recording from an audio stream.
By default, the recorded music files are stored in the C:Program FilesSuper Mp3 Recorder Professional folder. To change the location, click the Browse button and choose a new folder.
Now you’re ready to record. Listen to your radio station (or any other streaming input) and, when you want to record, click the Start Recording button. The program will tell you it has started recording, show you how long you’ve been recording, and display information about your recording format, as shown in Figure 11-5.
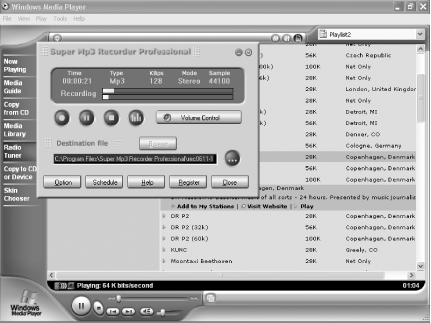
The program’s controls work like a CD player’s, so you can pause and stop recording. When you’ve finished recording, go to the location where you’ve chosen to save your files, and the music file will be there, ready to play. The file will have an odd name, such as rec0611-143130.mp3. If you want it to have a more understandable filename, before you start recording give it a filename of your choosing in the “Destination file” box, shown in Figure 11-5.
See Also
RipCast Streaming Audio Ripper is a similar program, but is designed to work with SHOUTcast servers that deliver streaming MP3 files, so it won’t work for all streaming audio formats. It’s shareware and free to try, but you’re expected to pay $9.98 if you continue to use it. It’s available from Internet download sites and from http://www.xoteck.com/ripcast.
Import Lyrics into iTunes and iPod
For all you karaoke-obsessed individuals, there are a number of ways to incorporate song lyrics into an iPod and iTunes workflow.
Whenever “It’s the End of the World (As We Know It)” by R.E.M. comes on the radio, are you and your friends prone to getting into near-violent arguments over what you think Michael Stipe is singing? Do you find yourself correcting your girlfriend when she is (incorrectly) singing along to songs in the car? Do you love to get drunk and serenade countless strangers at every karaoke event you trip across? If you answered yes to any of these questions, this hack is for you. I’m going to walk you through a few available options to bring lyrics into iTunes and your iPod.
Sure, you could launch Firefox or Internet Explorer and manually look up the lyrics to your favorite songs on Absolute Lyric (http://www.absolutelyric.com) or a similar site, but then again, it is the 21st century. It’s time to start acting more like The Jetsons and less like The Flintstones; it’s time to automate.
Two good lyric-hunting options available to Windows users are Canto Pod and EvilLyrics.
Canto Pod
Canto Pod (http://www.staylazy.net/canto; donateware), powered by Sharedlyrics.net, is a lyric-searching program for all flavors of Windows. On first launch of Canto Pod, you will need to register for a free account with Sharedlyrics.net. After registering, you will be taken to a preferences pane where you select your iPod and enter your login name and password. After logging in, click Save, and you will be taken to the main Canto Pod page shown in Figure 11-6.
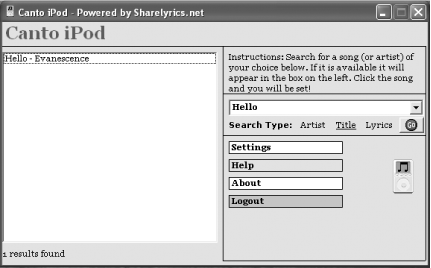
Once Canto Pod finds lyrics to your song in the Sharedlyrics.net database, you simply double-click the song you want, and Canto Pod uploads the lyrics to your iPod as a Contacts file. As an added bonus, it works with any generation of iPod. Unfortunately, however, at this time the Sharedlyrics.net database seems to be a bit sparse.
EvilLyrics
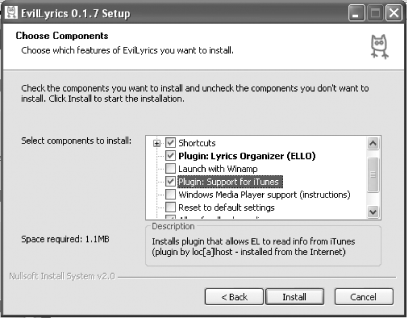
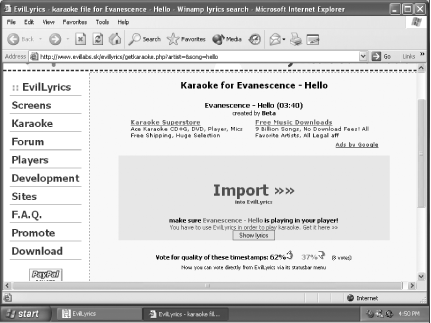
EvilLyrics (http://www.evillabs.sk/evillyrics/index.php; donateware), a Windows program that works with a variety of players, including iTunes, is probably the most comprehensive and best working of all the lyric-oriented programs I’ve seen. To use it, download and install the program. Make sure you check the box to install the iTunes plug-in during setup, as shown in Figure 11-7.
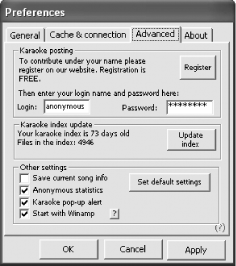
Immediately after installing the program, you are going to want to update the karaoke index by navigating to the preferences pane and selecting the Advanced tab shown in Figure 11-8. Click the “Update index” button and wait for a notice that the index has been updated. Click Apply and then OK to close the Preferences dialog box.
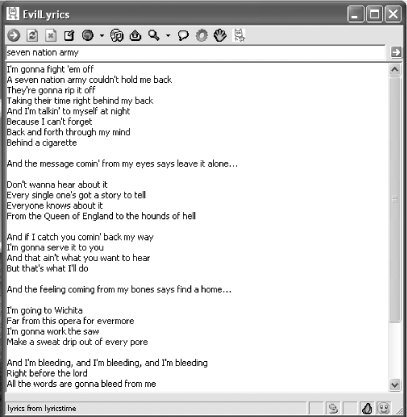
The interface is simple. You can either type in a search or simply start playing a song in your player of choice while EvilLyrics is open; it will automatically start searching for matches to the currently playing song. After conducting a search, as shown in Figure 11-9, you can launch the results in your web browser of choice to see if a timed karaoke version of the file is available and to see a rating of its timing by other users.
From the web page, you simply click Import into EvilLyrics to download the karaoke file. If you click the in-browser option, the information for the current search shows up in your browser, as shown in Figure 11-10.
Once the file loads in EvilLyrics, click the magnifying glass to launch a little window with the lyrics. If you click this button at the beginning of the song, the lyrics should scroll along line by line, nicely in sync with the tune. Call all your friends over and throw a karaoke dinner party!
Hacking the Hack
Remember that if you have a third-generation iPod or later, you can simply save the lyrics to your favorite songs as plain-text files in your iPod’s Notes folder for portable reading. Consider including links to the song files on your iPod so that you can pull up a song’s lyrics on the iPod and click the link to begin playing that song as you read along. To find out how to create this type of link in your notes, see iPod and iTunes Hacks by Hadley Stern (O’Reilly).
—C. K. Sample III
Convert from Apple iTunes Format
Apple iTunes doesn’t allow you to freely copy your music to devices other than your iPod. This hack shows you how to strip iTunes digital rights management so that you can use your files however you’d like.
I love my iPod and the iTunes Music Store is truly “the killer app.” I love the convenience of being able to buy “that one song” that I remember from 1978 without having to buy an entire album.
The iTunes software itself is a mixed bag. It’s slow starting up and it uses a lot of memory compared to other music players. I’d like to be able to listen to music I’ve purchased without having to run the iTunes program. I would also like to be able to listen to the songs I bought from the iTunes Music Store on something other than my iPod. This part of the hack will show you how to strip the digital rights management (DRM) features from your purchased music so that you can choose the time and place you listen to your music.
This hack will discuss technical aspects of doing this. I won’t discuss the legal or ethical issues related to digital music because I’m a simple country engineer, not a lawyer. I might not have legal training, but I’m a pretty fair judge of what is right and what isn’t. The tools I am about to describe might be able to be used by some to step over the line from fair use to something that is not legal. Just remember, just because you can do something, it doesn’t mean you should.
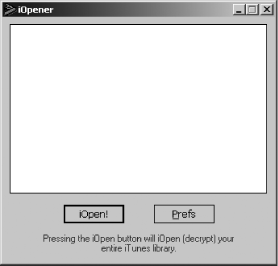
The software used in this hack is called iOpener, and it can be found at http://hymn-project.org/download.php. If that site disappears, you might need to rely on Google or another search engine to find it. Download the binary version of the program, not the source files. The filename will be something like iOpener-0.2-setup.zip.
Before you perform this hack, you need to take a few precautions. I’ve read reports on the Internet where some users claim iOpener rendered their original files unplayable. I’m skeptical because I’ve used it without any problems, but it’s better to be safe than sorry. The first thing you need to do is copy your iTunes music to a safe location. Most likely, your iTunes music is in a folder called My DocumentsMy MusiciTunesiTunes Music.
Once you’ve made copies of your audio files, install iOpener on a machine that is already authorized to play protected iTunes content. Start the iOpener program and have your iTunes username and password ready. iOpener works by looking at all the files in your iTunes Library and Purchased Music folders. If protected iTunes files are in there, it will use your username and password to unlock them. It will not work for music that was purchased using a different account name. Once iOpener has found and converted the music files, it won’t try to convert them again. iOpener also converts whenever you add new files to the iTunes Library and Purchased Music folders. This can make iTunes very slow, especially the first time you launch it, so be prepared for a long wait if you have a lot of music in these folders.
You can manually start the conversion process by clicking the iOpener icon in the taskbar and choosing Show iOpener. You will see the screen shown in Figure 11-11. In the main screen, you click the button labeled iOpen! and the program will start doing its job. The Prefs button allows you to tell iOpener to back up your music prior to converting (recommended) and whether to convert music every time you add files (it’s up to you). That’s the program in its entirety. It isn’t flashy and it doesn’t have sexy features, but it does do this one thing, and it does it well.
After iOpener converts the files, you can look around in your iTunes music folders. Notice that you now have two copies of every song. One of the files has a .m4p file extension and the other has a .m4a file extension. The .m4p file is a DRM-protected iTunes file and the .m4a file is an unprotected AAC audio file.
Your iTunes Music Store login name and account information are stored within the unprotected AAC file. All you’ve done to this point is remove the playback restrictions from the file. In fact, the author of iOpener did this deliberately and I agree with his reasoning. Play it smart and don’t use this power for evil.
At this point you have unprotected AAC files. But there’s not much you can do with them, so you need to convert them to another format such as MP3 or Ogg Vorbis [Hack #104] that can be used by a variety of devices.
A good choice for conversion is the Quintessential Player, available for free from http://www.quinnware.com. For details on how to install and use it, see [Hack #104] . You’ll need an input plug-in to read the AAC format. Go to the Quinnware web site and look for the MP4 plug-in. Download the plug-in and run the installer on your computer.
Start the Quintessential Player after you’ve installed the M4P plug-in. Load the unprotected iTunes files into the Playlist Editor using the Add or + button or by dragging and dropping files from Windows Explorer. Remember, you want the files with the .m4a extension, not files with a .m4p extension. Right-click any of the files in the playlist and choose Convert → Convert All Files → Ogg Vorbis if you’re going to convert the files to Ogg Vorbis, or choose another format to which you want to convert them. The software will now go about converting the files.
When the conversion is complete, the converted files will be in the output directory that you specified in the Ogg Vorbis encoder settings [Hack #104] . You’ll be able to use the files in any way you want.
Tip
For this hack to work, your machine must have already been authorized
by iTunes to play protected files. That means you have to play at
least one iTunes Music Store file using iTunes before attempting this
hack. Also, some files might not convert cleanly in Quintessential.
You might have to use the command-line tool hymn
(http://hymn-project.org; free)
to do the conversion and then open the
hymn-converted file in
Quintessential.
Use Ogg Vorbis for Digital Music
Ogg Vorbis is the most compact digital music format, with the highest quality at the lowest file size. You can rip and burn with Ogg Vorbis, convert existing music files to Ogg Vorbis, and convert Ogg Vorbis to other file formats.
The best format for digital music is one you might never have heard of—Ogg Vorbis. Its sound quality is much better than the MP3 or Windows Media formats: it’s much better than MP3 when it comes to compressing the audio, and it rivals the AAC format for sound quality. Additionally, software and hardware manufacturers are free to use Ogg Vorbis in their products as they see fit without licenses or royalties. It also means you can use it as well. Other popular formats, even MP3, are burdened by patents or terms of use that can prevent their use or adoption.
Ogg refers to the format of the file that contains the information. Vorbis refers to the method used to encode the audio. Ogg is a format that can handle many different types of media, not just audio. Video, spoken word, and streaming data uses exist for the Ogg format, and all of them go by different names. Generally speaking, though, when people refer to Ogg, they really mean Ogg Vorbis.
In this hack, you’ll learn how to create Ogg Vorbis files from your CDs and how to convert existing music files to Ogg. Then, we’ll discuss some of your playback options for Ogg Vorbis audio files.
Ripping CD Audio to Ogg Vorbis
The group that designed the Vorbis encoder also wrote software to do the encoding. This encoder has been incorporated into quite a few pieces of software that will rip CDs and encode the music to Ogg Vorbis, including Winamp (http://www.winamp.com), dMC CD Audio Input (http://www.dbpoweramp.com), and the Quintessential Player (http://www.quinnware.com).
I’ll focus on the Quintessential Player (a.k.a. QCD) because it gave me the features I wanted at the right price (free). Download the installer for QCD from the Quinnware web site at http://www.quinnware.com. There is usually a download link on the main page. You will also need to visit the plugin gallery, find the QCD plug-in that supports Ogg Vorbis, and download it to your PC. First install QCD, and then install the QCD Ogg Vorbis plug-in. It might be necessary to reboot your computer after installation.
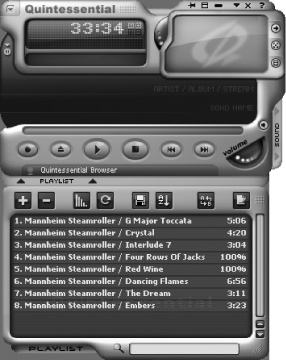
When you run the program, it looks like Figure 11-12. QCD is meant to be in front when you need it and be out of the way when you don’t need it. Therefore, it doesn’t have the usual “menu bar and square border” look that other programs do. The small button in the upper left brings up the menus. You can also right-click most anywhere in the player and bring up the menus.
With QCD running, click the menu button in the top left or right-click in the main player area. Look for the menu item called Preferences or press Ctrl-P. In the list of options on the left side, search for the item called Encode Format and click it. You should see the screen shown in Figure 11-13. Choose Ogg Vorbis from the list of choices. (If you do not see that choice, you did not install the Ogg Vorbis plug-in correctly.)
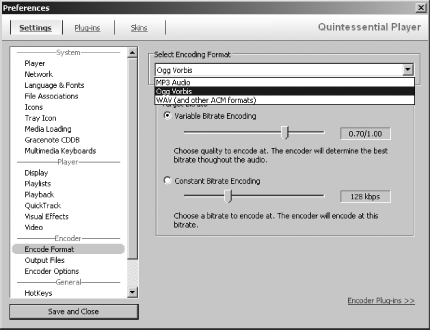
Your choices with Ogg Vorbis encoding are variable bit rate (VBR) encoding and constant bit rate (CBR) encoding. Your best choice is a VBR setting of 5, which will have very good playback quality: better than 160Kbps CBR in MP3 and with about the same file size.
After you’ve chosen the encoding format and settings, choose Output Files, which is directly beneath Encode Format. This screen allows you to customize where you want your ripped files to be stored and how you want the files named. Make your choices, and you’re ready to start ripping.
Insert an audio CD into your CD player. Dismiss any screens that might appear as a result of having the “autorun” feature enabled; you want to be inside QCD and you don’t want any other programs interfering. In QCD, find the button labeled Add or + in the playlist editor and choose the audio CD you wish to import into QCD.
Once you’ve loaded the audio tracks into QCD, you can begin the encoding process. Right-click inside the playlist editor on one of the track names, as shown in Figure 11-14.
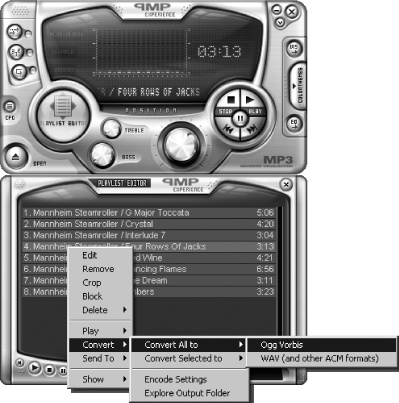
Choose the Convert menu item, then choose the Convert All To menu item, and finally choose the Ogg Vorbis menu item. This should start the ripping and encoding process. At this point, you should step back from your computer and let it do its job without having to compete with you doing other tasks. It shouldn’t take more than 15 minutes to rip and encode a 74-minute audio CD, and you’ll have all the files in the Ogg Vorbis format when you’re done.
Converting Existing Audio Files to Ogg Vorbis
Imagine taking a photograph of someone with a Polaroid© camera or a cell phone camera. Place that picture on top of a table and then take a photograph of that picture. Do you think the copied photograph will look very flattering? Would you want that copied photograph to be your only memento of your grandparents? Probably not. You would not want to lose any of the picture quality any more than you would want to lose music quality in your audio files.
MP3 and Ogg Vorbis are both lossy formats. That means they both discard some of the audio signal to make the encoding as efficient as possible. The part of the audio signal that is discarded is the stuff most of us can’t hear very well or don’t care to hear. Then again, maybe it is something you want to hear. When you convert files from one lossy format to another, you are compounding the loss of audio information in the first format when you encode the second time. It’s no different from taking a photograph of a photograph.
Having said that, sometimes it’s not possible to start with the original recording or the film negative. I wanted to point out that converting lossy formats leads to degraded sound quality. If you are comfortable with that, so am I.
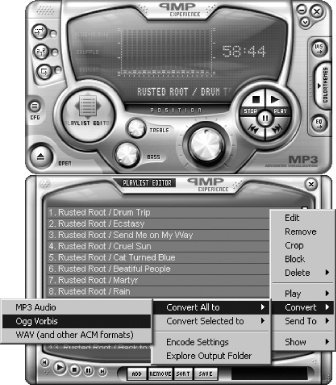
Converting MP3 files to Ogg Vorbis is a snap using the Quintessential Player. Load existing media files into the Playlist Editor using the Add or + button or by dragging files from Windows Explorer. Figure 11-15 shows a number of MP3 audio files queued up in QCD. Right-click any of these files and choose Convert → Convert All Files → Ogg Vorbis just like you did earlier. This time, instead of ripping from the audio CD, you are converting from MP3 to Ogg Vorbis.
Converting from MP3 to Ogg Vorbis takes about half as long as it takes to rip an audio CD to Ogg Vorbis. When the conversion is complete, the converted files will probably be in the same folder as the MP3 files, unless you changed the output directory in the Ogg Vorbis encoder settings.
Playback Choices for Ogg Vorbis
The Quintessential Player is one of many PC-based players. When choosing a player, it’s entirely up to you to decide what features you want, and there are so many that it’s not possible to review them all here. Instead, Table 11-1 lists some of the more popular players and their web sites. I’ll let you decide.
|
Program |
Cost |
Web site |
Additional software required for Ogg Vorbis playback? |
|
Quintessential Player |
Free (send the author a postcard if you like it) |
No | |
|
WinAmp |
Free for the Lite version $14.95 for the Pro version |
No | |
|
Windows Media Player 9 and 10 |
Free (bundled with Windows XP) |
Yes; download and install from http://www.illiminable.com/ogg/ | |
|
iTunes |
Free |
Yes; download and install from http://qtcomponents.sourceforge.net/ | |
|
dbPowerAmp |
Free |
No |
In addition to using your PC, you can also use your Palm Powered or PocketPC device to play Ogg Vorbis audio. Flash- and hard drive-based players are also available. Kenwood produces a home theater receiver that supports Ogg Vorbis. Device manufacturers aren’t lining up too quickly to support the format, but it is a steady improvement. The company that owns the patent on MP3 started enforcing its rights and because of that, manufacturers are increasingly adopting Ogg Vorbis. I’m hoping we will see more of this trend in the future.
For your Palm Powered handheld, there are two players: AeroPlayer by Aerodrome Software and Pocket Tunes by NormSoft. I have used both of these products with Ogg Vorbis files and they both work great. AeroPlayer and PocketTunes each cost $14.95 and can be downloaded from http://www.palmgear.com. Pocket PC users have a variety of choices available at http://www.pocketgear.com. MortPlayer is a freeware playback option that gets good reviews, and Pocket Player is a highly rated commercial package that costs $19.95.
If you want a dedicated music player, you have a good selection to choose from. As of this writing, the Apple iPod does not support Ogg Vorbis and I wouldn’t hold my breath waiting for it. The iRiver 700 and 800 series Flash players support Ogg Vorbis, as do their hard drive-based players. Go to http://www.iRiverAmerica.com for details. The Rio Karma is another hard drive-based player that supports Ogg Vorbis (http://www.rioaudio.com).
Ogg Vorbis is a promising piece of technology that has a bright future. Open standards and quality software choices make it a great choice for manufacturers and software developers. Exceptional acoustic properties and compression ratios should help as well. If hardware manufacturers will adopt it, it might someday unseat MP3 as the format of choice.
See Also
For more information about Ogg Vorbis, including technical details, go to http://www.xiph.org and its affiliated web sites.
—Eric Cloninger
Hack Windows Media Player with TweakMP
Windows Media Player isn’t the most convenient media player, CD ripper, or CD burner around. But the TweakMP PowerToy gives it extra features and convenience.
Not everyone is a fan of Windows Media Player. It can be confusing and awkward to use, and lacks some basic, useful features. A free, simple utility from Microsoft, the TweakMP PowerToy, can solve those problems. Anyone who uses Windows Media Player should download and use it.
Tip
Microsoft says the TweakMP PowerToy is “unsupported,” which means the company won’t answer technical support questions if you run into trouble using it. On the other hand, when was the last time Microsoft answered any of your technical support questions, including ones for all its supported products, such as Windows XP and Microsoft Office?
First, head to the basic information page about the TweakMP PowerToy, at http://www.microsoft.com/windows/windowsmedia/9series/player/plugins/tweakmp/readme.aspx.
When you get there, you might see it’s a version behind Windows Media Player itself. As of this writing, Windows Media Player is up to Version 10, but TweakMP says it’s written for Version 9. That doesn’t matter; TweakMP Version 9 works fine with Windows Media Player Version 10. And by the time you read this, TweakMP might have been updated.
Scroll down the page to “Installing the plug-in,” click the link that leads to the download page, and then scroll down the download page until you see TweakMP PowerToy Plug-in for Windows Media Player. Click to download the file, and then double-click the downloaded file to install it.
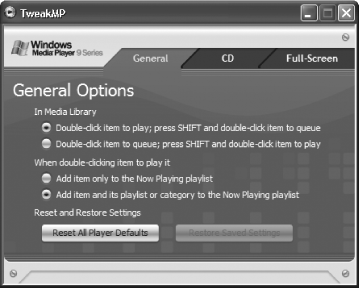
Once it’s downloaded, fire up Windows Media Player and choose Tools → Plug-ins → TweakMP to run the utility. A screen like that pictured in Figure 11-16 will appear.
Each tab controls a different set of features. The General tab controls overall operation of Windows Media Player; the CD tab controls how you can rip and burn CDs; and the Full-Screen tab controls how Windows Media Player works in full-screen mode. Here’s what you need to know about what each tab does.
General
This tab lets you control how to play files, and add them to a queue to be put on a playlist. You have the choice of playing the item (double-click) or adding it to a playlist (Shift-double-click). And you can choose what should happen when you play a file. Should it be added to the Now Playing playlist, or do you want to add the item and its entire category or playlist to the Now Playing playlist? The General tab is shown in Figure 11-16.
CD
This is probably the TweakMP PowerToy’s most useful tab, and it has the single feature that makes the download worth it: it automatically levels the volume of files when you burn a CD. Typically, if you burn a CD from files you’ve gathered from different sources or ripped from different CDs, the volume on each is different. So, the burned CD might have some tracks that play too softly and others that play too loudly. But the TweakMP PowerToy will automatically level all the tracks so that they play at the same relative volume. To do this, all you need to do is check the box next to “Automatically level the volume of files when copying to an audio CD,” as shown in Figure 11-17.
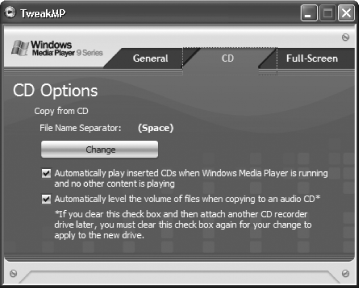
Another useful feature is the ability to change the separator used
between the filename details (such as the title of the song and its
artist) when you rip files from a CD. By default, a space is put
between them. But this tab will let you use another character or set
of characters up to five characters long instead. (You
can’t use ,
/, :, *,
?, <,
>, or |.) Just click the
Change button, type the character or characters in the
“File name separator” box, and
click OK.
This tab also lets you control whether Windows Media Player will automatically play a CD when you insert it into the drive.
Full-Screen
The Full-Screen tab, shown in Figure 11-18, lets you control Windows Media Player’s full-screen mode.
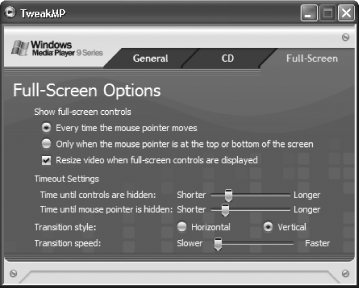
Windows Media Player’s full-screen mode operates when it is maximized, and this tab controls its behavior. So, this tab controls whether the full-screen controls should appear whenever the mouse cursor moves, or only when it’s at the top or bottom of the screen, and whether the video portion of the screen should be resized when the full-screen controls are displayed. You can also control the time it takes before the controls hide when there is no mouse movement, and the time it takes to hide the mouse pointer when there is no mouse movement. You can also control transitions when the controls fade in and out.
See Also
Fix Windows Media Player’s Privacy Problems
Lurking beneath Windows Media Player’s slick exterior are potential invasions of your privacy. Here’s how to fix them.
XP’s Windows Media Player poses potentially serious privacy problems that, theoretically, could allow Microsoft to track what DVDs you play and could allow for the creation of a supercookie on your PC that would let web sites exchange information about you. There are things you can do, however, to protect your privacy when you use Windows Media Player.
If you use Windows Media Player to play DVD movies, whenever a new DVD is played Media Player contacts a Microsoft server and gets the DVD’s title and chapter information. The server, in turn, identifies your specific version of Media Player, uses a cookie to identify the DVD you’re watching, and then records information about the DVDs you watch onto a database on your hard disk in C:Documents and SettingsAll UsersApplication DataMicrosoftMedia Index.
Microsoft claims the cookie used is an anonymous one that can’t personally identify you. The company also says it does not keep track of what DVDs individuals watch, and that the database created on your PC is never accessed from the Internet. Instead, the company says, it’s used only by your own computer; the next time you put a DVD in your drive that you’ve played before, Media Player will get information from that database instead of getting it from a Microsoft web server.
Still, Microsoft has had its share of problems with privacy before, so you might or might not trust the company to keep the information private. There are two solutions to the problem. You can change your cookie controls to the highest level [Hack #35] so that your PC will reject all cookies. That carries with it its own set of problems, however, because then you won’t be able to use customization and other features of many web sites. A better solution is to open Media Player and choose File → Work Offline. That way, Media Player won’t contact a Microsoft server.
As for the so-called supercookie Windows Media
Player creates, it’s a unique ID number in the form
of a 128-bit GUID
assigned to
your player and stored in the Registry. You can find it in
HKEY_CURRENT_USERSoftwareMicrosoftWindowsMediaWMSDKGeneralUniqueID.
This ID number can be retrieved by any web site through the use of
JavaScript. The ID number is called a
supercookie because it can be retrieved by
any web site. Normally, web sites can retrieve
only cookies they create and put on your PC, so it becomes difficult
for web sites to share information about you. However, this
supercookie can be retrieved by any site to track you, and web sites
can share this information with each other, allowing them to create a
sophisticated profile about your Internet usage. Additionally, cookie
blockers can’t block its use.
There’s an easy way to fix the problem and protect your privacy, though. From Windows Media Player, choose Tools → Options → Player. In the “Internet settings” section, uncheck the box next to “Allow Internet sites to uniquely identify your Player.” That’s all it takes; the problem will be fixed.
If you download and install Windows Media Player, you can stop these privacy problems before they begin if you pay attention to the installation questions. During the installation, look for the screen asking you for your privacy preferences, as shown in Figure 11-19.

The Enhanced Content Provider and Customer Experience Improvement Program options are the ones that can be problematic. When you check boxes in those areas, Windows Media Player will report on your music and movie use to Microsoft and will also put the supercookie on your PC. So, if privacy is a concern of yours, just say no.
See Also
For more information about Windows Media Player privacy issues, read articles about it by privacy expert Richard Smith at http://www.computerbytesman.com/privacy/supercookie.htm and http://www.computerbytesman.com/privacy/wmp8dvd.htm.
Make Videos with Windows Movie Maker
You can make better home movies and other videos with XP’s built-in video maker.
XP is Microsoft’s most media-aware operating system and it comes with Windows Movie Maker, built-in software for making and editing videos and home movies. (To run it, choose Start → All Programs → Accessories → Windows Movie Maker.) But making videos properly with it can be tricky, so check out these tips on how to make better home movies and videos.
Capture the Video Properly
Windows Movie Maker lets you edit movies and add special effects and titles, but it all starts with capturing the video properly. So, first make sure you bring the video into your PC in the best way.
If you have an analog video camera or videotape, you need some way of turning those analog signals into digital data. You can do this via a video capture board, or by using a device you can attach to your FireWire or USB port. If you’re going the route of a video capture board, make sure the board has XP-certified drivers; otherwise, you might run into trouble. To find out whether a board has XP-certified drivers, search the Windows Compatibility List at http://www.microsoft.com/windows/catalog.
If you have a USB port, you can import analog video with DVD Express, Instant DVD 2.0, or Instant DVD+DV, all available from http://www.adstech.com. They’re hardware/software combinations; to get the video into your PC, connect the analog video device to the USB Instant Video or USB InstantDVD device, and then connect a USB cable from the device to the USB port on your PC. (A similar product, called the Dazzle Digital Video Creator, will do the same thing. For details, go to http://www.dazzle.com.)
Check your system documentation to see what type of USB port you have. If you have a USB 1.1 port, you won’t be able to import high-quality video, and you’d be better off installing a video capture card. USB 2.0 will work fine, though.
If you have a FireWire-enabled PC, you’re also in luck because its high-speed capacity is also suitable for importing video. You’ll have to buy extra hardware, called SCM Microsystems Dazzle Hollywood DV-Bridge. Plug your RCA cable or S-Video cable into Hollywood DV-Bridge, and then plug a FireWire cable from Hollywood DV-Bridge into your FireWire port, and you’ll be able to send video to your PC. It’s available at online stores such as http://www.buy.com.
Once you’ve set up the hardware and your camera, recording the video is easy. Open Windows Movie Maker, choose File → Record, start the camera or video, and click Record.
Capturing Video with a Digital Video Camera
If you have a digital video camera or webcam, you shouldn’t need any extra hardware to capture video from it, as long as you have a FireWire port on your PC. These devices generally include built-in FireWire ports (the cameras might call the port an IEEE-1394 port or an i.Link port). If you don’t have a FireWire port on your PC, you can install a FireWire port card. These generally cost much less than $100. Make sure the card is Open Host Controller Interface (OHCI)-compliant.
When you plug your digital camera into a FireWire port and turn it on, Windows will ask you what you want to do with the camera. Tell it you want to Record in Movie Maker, and it will launch Movie Maker to the Record dialog box with a video showing in the preview window.
Best Settings for Recording Video
Before you start recording, you’ll see a preview of your movie in the Record dialog box, shown in Figure 11-20. This is your chance to change your video settings, and choosing the proper setting is perhaps the most important step in creating your video.
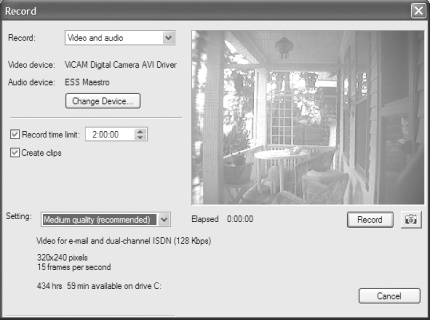
Look at the Setting drop-down box in Figure 11-20. This box lets you choose the quality of the video you’re creating, which is the most important setting. What you choose for this setting will depend on the input source; digital video cameras, for example, let you record at a higher quality than analog video cameras, so they will give you a wider range of options. Movie Maker comes with a number of preset profiles, including three basic ones: High, Medium, and Low quality. When you choose your profile, Movie Maker tells you how many hours and minutes of recording time you have, based on your disk space and the disk requirements of the profile. For example, you might have 193 hours of recording time based on the High setting, but 1,630 hours based on the Low setting.
Those three profiles aren’t your only choices, though. You can choose from a much wider variety of profiles (as a general rule, I suggest doing that), based on what you plan to do with the eventual video. Do you plan to post the video on the Web? Just play it back at home? Run it on a personal digital assistant? These other profiles are designed for specific purposes like those.
To select the profile, choose Other in the Setting drop-down list. Underneath it, a new drop-down list appears, shown in Figure 11-21, with a range of profiles from which you can choose. They’re prebuilt for specific uses—for example, recording video to post on the Web, for color PDA devices, and for broadband NTSC (National Television System Committee), which is standard TV.
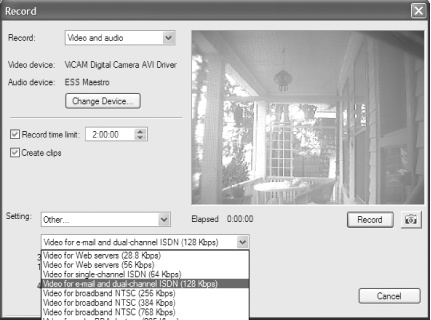
Whenever you choose a profile, you’ll see underneath it the frame size of the video and the frames per second. If you choose a profile from Other, you’ll also see the video bit rate. Here’s what the settings mean:
- Video display size
The size of the video, in pixels—for example, 740 480, or 320 240.
- Frames per second
The number of frames captured per second. For smooth video, you need 30 frames per second, which is the “high-quality” setting. The medium- and low-quality settings record at 15 frames per second.
- Video bit rate
The bit rate of the recorded video—the higher the bit rate, the greater the quality.
- Audio bit rate and properties
These settings aren’t shown in the Windows Movie settings, but they vary according to which profile you choose. Audio properties are measured in kilohertz (kHz)—the higher the number, the greater the quality. Audio bit rate measures the bit rate—again, the higher the bit rate, the greater the quality.
To help you make the best choice among profiles, Table 11-2 shows the settings for all the Movie Maker profiles.
|
Profile name |
Video display size |
Video bit rate |
Audio properties |
Audio bit rate |
|
Video for web servers (28.8Kbps) |
160 120 pixels |
20Kbps |
8kHz |
8Kbps |
|
Video for web servers (56Kbps) |
176 144 pixels |
30Kbps |
11kHz |
10Kbps |
|
Video for single-channel ISDN (64Kbps) |
240 176 pixels |
50Kbps |
11kHz |
10Kbps |
|
Video for email and dual-channel ISDN (128Kbps) |
320 240 pixels |
100Kbps |
16kHz |
16Kbps |
|
Video for broadband NTSC (256Kbps) |
320 240 pixels |
225Kbps |
32kHz |
32Kbps |
|
Video for broadband NTSC (384Kbps) |
320 240 pixels |
350Kbps |
32kHz |
32Kbps |
|
Video for broadband NTSC (768Kbps) |
320 240 pixels |
700Kbps |
44kHz |
64Kbps |
|
Video for broadband NTSC (1500Kbps total) |
640 480 pixels |
1,368Kbps |
44kHz |
128Kbps |
|
Video for broadband NTSC (2Mbps total) |
640 480 pixels |
1,868Kbps |
44kHz |
128Kbps |
|
Video for broadband film content (768Kbps) |
640 480 pixels |
568Kbps |
44kHz |
128Kbps |
|
Video for broadband film content (1500Kbps total) |
640 480 pixels |
1,368Kbps |
44kHz |
128Kbps |
|
Video for color PDA devices (150Kbps) |
208 160 pixels |
111Kbps |
22kHz |
32Kbps |
|
Video for color PDA devices (225Kbps) |
208 160 pixels |
186Kbps |
22kHz |
32Kbps |
|
DV-AVI (25Mbps) |
720 480 pixels (NTSC); 720 525 pixels (PAL) |
1,411Kbps |
48kHz |
16Kbps |
Tips for Making Your Own DVDs
If you use Movie Maker to make or copy your own videos and burn them to DVDs, consider these tips:
The USB 1.0 standard is not fast enough to connect a camera or other video input to your PC. Its throughput of 11Mbps isn’t fast enough for capturing high-quality video, which is 30 frames per second with 24-bit color at a resolution of 640 480, and requires speeds of at least 210Mbps. USB 2.0, which has a speed of 480Mbps, and FireWire, which has a speed of 400Mbps, will work, however.
Make sure you have a substantial amount of free hard-disk space if you’re going to burn your videos to DVDs. The video will be cached onto your hard disk before it’s burned to DVDs, so you’ll typically need several free gigabytes.
Defragment your hard drive [Hack #94] before creating and burning DVDs for best performance. If you have a second hard drive, use that for DVD creation rather than your primary hard drive. Regardless of the speed of your CPU, turn off any background applications that are running when you import video and create your DVD.
If you’re burning high-quality video to a DVD, figure that you’ll be able to fit about an hour’s worth on a single DVD. At a lower quality (lower bit rate), you can fit up to about two hours on a DVD. Keep in mind, though, that if you write at the lower bit rate, the DVD might not be able to be played on a set-top DVD player, though it will work on your PC’s DVD player.
There’s no single accepted standard for DVD burning, so not all DVD disks that you burn will work on all set-top DVD players. Generally, most set-top DVD players will play DVD-R discs, but all of them might not play DVD-RW or DVD+RW disks. Manufacturer information can’t always be trusted, but check the companies’web sites for the latest details.
After you’ve created your video and you’re ready to burn it to a DVD, set aside plenty of time. It can take up to two hours to burn a one-hour DVD, depending on your CPU and drive speed.
See Also
If you want features beyond those offered by Windows Movie Maker, try a variety of software from Ulead Software, including Ulead VideoStudio, Ulead DVD Movie Factory, and Ulead DVD Workshop. They go far beyond basic video-editing tools, and they let you use transitions and add special effects and menus. The software also includes backgrounds, preset layouts, and music you can add to your videos. In addition, they will burn to DVD, VCD, and SVCD and can save files in a variety of video formats. They’re shareware and available to try for free, but you’re expected to pay if you keep using them. For details, go to http://www.ulead.com.