Chapter 8. Security
Hacks 75-82
From the moment you turn on your PC and connect to the Internet or a network, you’re in danger. Snoopers and intruders might try to get into your system; crackers might try to install Trojans to take control of your computer or turn it into a zombie and use it to launch attacks against other PCs or web sites. Day by day, the Internet and networks become increasingly dangerous places to be.
The hacks in this chapter, though, show you how you can use the Internet and networks and still be safe. You’ll learn how to hide files and folders using encryption, how to test your PC’s vulnerabilities, how to use firewalls to harden your PC against attacks, and more.
Hide Folders and Files with the Encrypting File System
Protect all the information on your PC from prying eyes using XP Professional’s built-in encryption scheme.
If you have Windows XP Pro, you can use the Encrypting File System (EFS) to encrypt your files so that no one else can read them.
EFS lets you encrypt only the files and folders of your choice; you can encrypt a single file or folder or all your files and folders. Encrypted files and folders show up in Windows Explorer in green, so you can tell at a glance which have been encrypted. You can work with encrypted files and folders transparently. In other words, after you encrypt them, you open and close them as you normally would any other file. They’re decrypted on the fly as you open them, and then decrypted as you close them. You’re the only person who can read or use the files. Encryption is tied to your account name, so even other accounts on the same computer won’t be able to read or use them, unless you specifically grant access to certain accounts.
Tip
Each time you encrypt a file, EFS generates a random number for that file called the file encryption key (FEK). EFS uses that FEK to encrypt the file’s contents with a variant of the Data Encryption Standard (DES) algorithm, called DESX. (DESX features more powerful encryption than DES.) The FEK itself is encrypted as well using RSA public key-based encryption.
EFS does have a few minor limitations you should be aware of:
EFS works only on NTFS volumes. If you have a FAT or FAT32 volume, you’ll have to convert it to NTFS [Hack #30] if you want to use EFS.
EFS won’t work on compressed files. You’ll have to decompress them if you want to encrypt them. Similarly, if you want to compress an encrypted file, you’ll have to decrypt it.
EFS can’t encrypt files in the C:Windows folder or any files marked with the
Systemattribute.
When you work with encrypted files and folders, they seem to behave like any other files on your hard disk. In fact, though, their behavior is somewhat different, and you might notice files you thought were encrypted suddenly become decrypted for no apparent reason. So, before you turn on encryption, you should understand the common actions you can take with encrypted files and folders, and what the results will be. Table 8-1 lists what you need to know.
|
Action |
Result |
|
Move or copy unencrypted files into an encrypted folder. |
The files are automatically encrypted. |
|
Move or copy encrypted files from an encrypted folder to an unencrypted folder. |
The files remain encrypted. |
|
Move or copy encrypted files from an encrypted folder to a non-NTFS volume. |
The files are decrypted, though first you are given a warning and a chance to cancel the move or copy operation. |
|
Back up files using XP’s backup utility. |
The backed-up files and folders remain encrypted. |
|
Rename an encrypted file. |
The file remains encrypted after it is renamed. |
|
Delete an encrypted file. |
The restorable file in the Recycle Bin remains encrypted. |
Encrypting Files and Folders
To encrypt a file or folder, right-click the file or folder and choose Properties → General → Advanced. The Advanced Attributes dialog box appears, as shown in Figure 8-1.
Tip
If no Advanced button appears on the Properties dialog box, it means you aren’t using NTFS, so you can’t use encryption.

Check the box next to “Encrypt contents to secure data.” Note that you can’t check both this box and the “Compress contents to save disk space” box. You can either compress the item or encrypt it, but not both.
Click OK and then OK again. If you’re encrypting a folder, the Confirm Attributes Changes dialog box appears, as shown in Figure 8-2. You have a choice of encrypting the folder only, or encrypting the folder plus all subfolders and all the files in the folder and subfolders. If you encrypt the folder only, none of the files currently in the folder will be encrypted, but any new files you create, move, or copy into the folder will be encrypted.

If you’re encrypting a file in an unencrypted folder, the Encryption Warning box will appear, as shown in Figure 8-3. You have the choice of encrypting the file only, or the file and the parent folder. As a general rule, you should encrypt the folder as well as the file because if you encrypt only the file, you might accidentally decrypt it without realizing it. Some applications save copies of your files and delete the original; in those instances, the files become decrypted simply by editing them. If you encrypt the folder as well, all files added to the folder are encrypted, so the saved file is automatically encrypted. Click OK after you make your choice.

Note that you won’t be able to encrypt every file on
your system. Files that have the System attribute,
as well as files located in C:Windows and its
subfolders, can’t be encrypted.
Decrypting Files and Folders
You decrypt files and folders in the same way that you encrypt them. Right-click the file or folder, choose Properties → General → Advanced, clear the check from the box next to “Encrypt contents to secure data,” and click OK and then OK again.
Letting Others Use Your Encrypted Files
When you encrypt files, you can still share them with others and let them use them as if they were not encrypted—a process that XP defines as transparent. You’ll be able to share them this way only with other users on the same computer or with others on your network. You designate who can use the files and who can’t. To allow specified people to use your encrypted files, right-click an unencrypted file and choose Properties → General → Advanced. The Advanced Attributes dialog box appears. Click Details. The Encryption Details dialog box appears, as shown in Figure 8-4. It lists all the users who are allowed to use the file transparently. Click Add.

The Select User dialog box appears. Choose the user you want to be able to use your encrypted files, and click OK. Only users who have Encrypting File System certificates on the computer will show up on this list. The easiest way for someone to create a certificate is to encrypt any file; that automatically creates a certificate.
Encrypting and Decrypting from the Command Line
If you prefer the command line to a
graphical interface, you can encrypt and decrypt using the
cipher.exe command-line tool. To find out the
current state of encryption of the directory you’re
in, type cipher without parameters at a command
prompt. cipher tells you the state of the
directory. For individual files, it lists a U next
to files that are not encrypted, and an E next to
those that are encrypted.
When used with parameters, cipher can encrypt and
decrypt files and folders, show encryption information, create new
encryption keys, and generate a recovery agent key and certificate.
To encrypt or decrypt a folder or file, use the complete path,
filename (if you’re acting on a file), and any
appropriate switches, as outlined in Table 8-2.
The /E switch encrypts folders or files, and the
/D switch decrypts them. To perform the task on
multiple folders or files, separate them with single spaces. For
example, to encrypt the Secret and
Topsecret folders, issue this command:
cipher /E Secret Topsecret
Note that you can use wildcards with the
cipher
command. Using the
command line instead of the graphical interface is particularly
useful for performing bulk or batch operations—for example,
simultaneously encrypting or decrypting multiple folders or files, or
types of files within folders. Let’s say, for
example, you want to encrypt every .doc file in
the Secret and Topsecret
folders, but not touch any other files in those folders. You issue
this command:
cipher /E /A Secret*.DOC Topsecret*.DOC
Table 8-2 lists the most useful command-line
switches for cipher. For more help, type
cipher /? at the command
line.
|
Switch |
What it does |
|
|
Acts on individual files within folders. |
|
|
Decrypts the specified folder. |
|
|
Encrypts the specified folder. |
|
|
Forces encryption on all specified objects, including those that have already been encrypted. |
|
|
Displays all files in a folder, including those that have hidden or
system attributes. By default, hidden or system attributes are not
displayed when using the |
|
|
Continues to perform the specified operation, even if errors are
encountered. By default, |
|
|
Creates a new file encryption key for the user running
|
|
|
Generates an EFS recovery agent key and certificate, then writes them to a .pfx file (containing the certificate and a private key) and a .cer file (containing only the certificate). |
|
|
Performs the operation on the folder and all its subfolders. |
|
|
Updates the user’s file encryption key or recovery agent’s key on every encrypted file. |
|
|
Lists every encrypted file and does not update the user’s file encryption key or recovery agent’s key. |
|
|
Lists only basic information about the file or folder. |
|
|
Wipes data from available, unused disk space on the drive. Normally, when a file is deleted in XP, only the entry in the filesystem table is deleted; the data itself remains untouched until another file overwrites it. This switch deletes all the data in those previously deleted files. It does not harm existing data. |
Test Your Security with Shields UP!
Head to this web site for a thorough, free check of your PC’s vulnerabilities.
Do you really know how secure your PC is from intruders? Probably not. But there’s a free online tool that will probe your PC for online security vulnerabilities and report to you on the results.
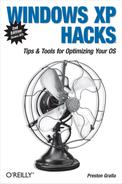
The Shields UP! site is run by the Gibson Research Corporation, and it tests your machine, trying to make connections to a handful of the most well-known and vulnerable Internet ports on your PC. The site runs two tests, reports to you on the results, and then explains what the reports mean—where you’re vulnerable and how serious those vulnerabilities are. It also has a great deal of useful information about Internet security, as well as free and for-pay security software you can download. Visit the site at http://www.grc.com. You might have to do some clicking around to find the tests, but keep clicking Shields UP! and you’ll eventually get there.
The best use for the site is to test your PC’s vulnerabilities, then install a firewall[Hacks #Section 8.4 and Section 8.5] and see the results of what you’ve done. It’ll tell you whether there are any remaining vulnerabilities you need to fix. Figure 8-5 shows the results of a probe of a PC without a firewall. It’s relatively secure, but could be more secure because the site has found ports, even though they’re closed. Figure 8-6 shows that the PC is operating in “stealth mode” after the installation of the firewall—the PC doesn’t even appear to exist.

Protect Your Computer with the New Windows Firewall
XP SP2 turns on the Windows Firewall by default, so you’re automatically protected from incoming attacks. Here’s how to configure the Windows Firewall for maximum protection and flexibility and use it to log potential attacks and send information about the intruders to your ISP.
The moment you connect to the Internet, you’re in some danger of intrusion, especially if you have a broadband connection. PCs with broadband connections are tempting targets because their high-speed connections are ideal springboards for attacking other networks or web sites.
Whenever you’re connected, your system is among many constantly being scanned for weaknesses by crackers (malicious hackers) and wannabes (often called script kiddies ) sending automated probes looking for vulnerable PCs. In fact, these kinds of probes are so common and incessant, you can think of them as the background radiation of the Internet.
One of the best ways to protect yourself against these probes and more targeted attacks is to use a firewall. Firewall software sits between you and the Internet and acts as a gatekeeper of sorts, only allowing nonmalicious traffic through.
Tip
If you have a home network, your router might offer firewall protection. For details on how to optimize that protection and get the most out of other router features, see [Hack 50] and [Hack #68] .
In this hack, we’ll look at how to get the most out of the Windows Firewall, the firewall built into XP SP2, which is turned on by default when you install SP2.
Tip
Before SP2, the firewall was called the Internet Connection Firewall (ICF). It was much the same as the Windows Firewall although with some differences, notably in how you access the firewall and its features.
The Windows Firewall offers basic Internet security by stopping all unsolicited inbound traffic and connections to your PC and network, unless your PC or another PC on the network initially makes the request for the connection. However, it will not block outgoing requests and connections, so you can continue to use the Internet as you normally would for browsing the Web, getting email, using FTP, or similar services.
Tip
If you use the Windows Firewall or another type of firewall, you can run into problems if you run a web server or an FTP server, or if you want to allow Telnet access to your PC. Because firewalls block unsolicited inbound communications, visitors won’t be able to get to your sites or get Telnet access to your PC. However, you can allow access to these resources, while still retaining firewall protection [Hack #80] .
If you’re sharing an Internet connection through a PC, only the PC that directly accesses the Internet should run the Windows Firewall. All the other PCs will be protected. Don’t run the Windows Firewall on any of those other PCs because you’ll cause connection problems. And don’t use the Windows Firewall with a Virtual Private Network (VPN) [Hack #82] .
The Windows Firewall has one serious drawback: it won’t protect you against Trojans, such as the Back Orifice Trojan. Trojans let other users take complete control of your PC and its resources. For example, someone could use your PC as a launch pad for attacking web sites and it would appear you were the culprit, or he could copy all your files and find out personal information about you, such as your credit card numbers if you store them on your PC.
The Windows Firewall won’t stop Trojans because it blocks only incoming traffic, and Trojans work by making outbound connections from your PC. To stop Trojans, get a third-party firewall. The best is ZoneAlarm [Hack #78] .
When you install XP SP2, you’re automatically protected because it turns on the Windows Firewall. There’s a chance, though, that the firewall has been turned off. To make sure it’s turned on, click Security Center from the Control Panel. When the Security Center appears, there should be a green light next to the Firewall button, and it should say ON, as shown in Figure 8-7.

If it’s not on, click the Windows Firewall icon at the bottom of the screen, click ON, and then click OK.
Allow Programs to Bypass the Firewall
The Windows Firewall offers protection from inbound threats, but it can also cause problems. A variety of software needs to be able to accept inbound connections, so the firewall blocks them from working. Instant messaging programs and FTP programs, for example, both need to be able to accept these kinds of connections, and the Windows Firewall blocks them.
Usually, but not always, the first time you run one of these programs, you’ll get the warning from the Windows Firewall shown in Figure 8-8. The warning will show you the name of the program and the publisher and will ask if you want to keep blocking the program. If you’d like to allow the Windows Firewall to let the program function, click Unblock. To keep blocking the program, click Keep Blocking. As for the Ask Me Later choice, it doesn’t really ask you later. It lets the program accept incoming connections for just this one time when you run it. After you exit, the next time you run the program, you’ll get the same warning.

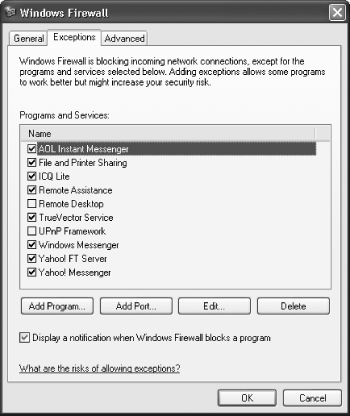
That’s well and good, but the Windows Firewall won’t always pop up this alert. So, you might find that some programs don’t work with the firewall on, but you won’t get a warning about them. In that case, you can manually tell the Windows Firewall to let it through by adding programs to its exceptions list.
To do so, choose Control Panel → Security Center → Windows Firewall. Then, click the Exceptions tab, shown in Figure 8-9. This tab lists all the programs for which the firewall will accept inbound connections. If a program is listed here but doesn’t have a check next to it, it means the firewall blocks it. To tell the firewall to stop blocking inbound connections for the program, check the box next to it and click OK.

Tip
When you get a warning from the Windows Firewall and click Ask Me Later, the program will be listed on the Exceptions tab, with no check next to it.
To add a program to the exceptions list, click Add Program to bring up the window shown in Figure 8-10. Choose a program from the list and click OK, and then click OK again to add it to your list. If the program you want to add isn’t listed in the Add a Program dialog box, click the Browse button to find it and then add it.

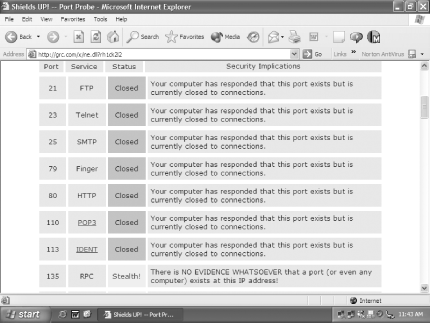
There might be some programs for which you want to grant access to only certain people and not others. Maybe, for example, you want to allow an instant messenger program to work only with people on your own network. There’s a way to do that.
First, add the program to the exceptions list. Then, highlight the program and click Edit → Change Scope. The Change Scope dialog box appears, as shown in Figure 8-11. Choose “My Network (subnet) only,” click OK and then OK again, and the firewall will let only inbound connections from your network. To allow inbound connections for the program for only specific IP addresses, choose “Custom list,” type in the IP addresses you want to allow, and then click OK and OK again.
Tip
If you want to allow inbound connections to any servers on your system, such as web servers, or if you want to open up specific ports in the firewall, see [Hack #80] .
Track Firewall Activity with a Windows Firewall Log
The Windows Firewall can do more than just protect you from intruders; it can also keep track of all intrusion attempts so that you can know whether your PC has been targeted, and what kinds of attacks the Windows Firewall has turned back. Then you can send that information to your ISP so that it can track down the intruders.
Tip
If you have a home network, you can get add-on software that will automatically log all intrusion attempts and help you track down intruders as well [Hack #68] .
First, create a Windows Firewall log. From the Security Center, choose Windows Firewall → Advanced, and click the Settings button in the Security Logging section. The dialog box shown in Figure 8-12 appears.

Choose whether to log dropped packets, successful connections, or both. A dropped packet is a packet that the Windows Firewall has blocked. A successful connection doesn’t mean an intruder has successfully connected to your PC; it refers to any connection you have made over the Internet, such as to web sites. Because of this, there’s usually no reason for you to log successful connections. If you do log them, your log will become large quickly, and it will be more difficult to track only potentially dangerous activity. So, your best bet is to log only dropped packets.
After you’ve made your choices, choose a location for the log, set its maximum size, and click OK. I don’t let my log get larger than 1MB, but depending on how much you care about disk space and how much you plan to use the log, you might want yours larger or smaller.
The log will be created in a W3C Extended Log format (.log) that you can examine with Notepad or another text editor or by using a log analysis program such as the free AWStats (http://awstats.sourceforge.net). Figure 8-13 shows a log generated by the Windows Firewall, examined in Notepad.

Each log entry has a total of up to 16 pieces of information associated with each event, but the most important columns for each entry are the first eight.
Tip
In a text editor, the names of the columns don’t align over the data, but they will align in a log analyzer.
Table 8-3 describes the most important columns.
|
Name |
Description |
|
Date |
Date of occurrence, in year-month-date format |
|
Time |
Time of occurrence, in hour:minute:second format |
|
Action |
The operation that was logged by the firewall, such as
|
|
Protocol |
The protocol used, such as |
|
Source IP (src-ip) |
The IP address of the computer that started the connection |
|
Destination IP (dst-ip) |
The IP address of the computer to which the connection was attempted |
|
Source Port (src-port) |
The port number on the sending computer from which the connection was attempted |
|
Destination Port (dst-port) |
The port to which the sending computer was trying to make a connection |
|
size |
The packet size |
|
tcpflags |
Information about TCP control flags in TCP headers |
|
tcpsyn |
The TCP sequence of a packet |
|
tcpack |
The TCP acknowledgment number in the packet |
|
tcpwin |
The TCP window size of the packet |
|
icmtype |
Information about the ICMP messages |
|
icmcode |
Information about the ICMP messages |
|
info |
Information about an entry in the log |
The source IP address is the source of the attack. You might notice the same source IP address continually cropping up; if so, you might have been targeted by an intruder. It’s also possible that the intruder is sending out automated probes to thousands of PCs across the Internet and your PC is not under direct attack. In either case, you can send the log information to your ISP and ask them to follow up by tracking down the source of the attempts. Either forward the entire log or cut and paste the relevant sections to a new file.
Watch Out for Problems with Email and the Windows Firewall
Depending on the email program you use and how it gets notification of new email, the Windows Firewall could interfere with the way you retrieve your email. It won’t stop you from getting your email, but it could disable your email program’s notification feature.
The Windows Firewall won’t interfere with the normal notification feature of Outlook Express because the initial request asking for notification of new email comes from Outlook Express, which is inside the firewall. When the server responds to the request, the firewall recognizes that the server is responding to the request from Outlook Express, so it lets the communication pass through.
However, if you use Outlook and connect to a Microsoft Exchange server using a remote procedure call (RPC) to send email notifications (which is usually the case with Exchange), you’ll run into problems. That’s because the RPC initially comes from the server, not from Outlook, so the firewall doesn’t allow the notification to pass to you. In this case, you can still retrieve your email, but you’ll have to check for new email manually; you won’t be able to get automatic notification from the server. So, if you don’t get new mail notifications after you install the Windows Firewall, it’s not that co-workers, friends, and spammers are suddenly ignoring you; you’ll just have to check for new mail manually.
Hacking the Hack
The Windows Firewall Exceptions tab is especially useful for anyone who uses file sharing on a home or corporate network but wants to turn file sharing off when they’re on a public network connection, such as a WiFi hotspot. When you get to a hotspot, before connecting, go to the tab, uncheck the box next to File and Printer Sharing, and click OK. File sharing will be turned off. Then, when you get back to your home or business network, turn it back on again.
See Also
For more information about the Windows Firewall, see Microsoft Knowledge Base Article 875357 (http://support.microsoft.com/kb/875357).
ZoneAlarm: The World’s Best Free Firewall
For the best protection, get this firewall, which is far superior to XP’s Windows Firewall and keeps you safe from Trojan horses and other dangers.
The Windows Firewall that ships with XP has one very serious deficiency: it can’t monitor and block outbound traffic from your PC to the Internet. Many Trojan horses do their damage by installing themselves on your system and then allowing others to take control of your PC, or by using your PC to attack web sites, servers, and other computers. The Windows Firewall won’t offer you protection against these types of Trojans; it won’t be able to tell when a Trojan is making an outbound connection, so the Trojan will be able to do its damage without your knowledge.
Other firewalls, however, will offer that protection. The best of them is ZoneAlarm (http://www.zonealarm.com). There are four versions of the program, a free version and three for-pay versions with differing levels of protection. The free version offers excellent protection against inbound threats as well as against Trojans. It also tells you whenever someone is probing your computer for security holes and gives information about the prober, often including his IP address and the nature of the probe.
ZoneAlarm with Antivirus, which sells for $24.95 for a year’s subscription, adds virus and worm protection to the free firewall features. ZoneAlarm Pro, which sells for $49.95 for a year’s subscription, doesn’t offer worm and virus protection, but does improve on the free version’s protection features, blocks pop ups and cookies, stops personal information from being sent from your computer over the Internet, and does better tracking and reporting about those who might have tried to attack your PC. ZoneAlarm Security Suite, which sells for $69.95 for a year’s subscription, does everything the antivirus, free, and Pro versions do, and also protects against instant messaging dangers, protects against phishing attacks, kills spam, and adds other features as well. At a minimum, try ZoneAlarm because, well, it’s free. If you feel you need more protection, you can go with a for-pay version. I’ve been using the free version for several years and have never felt the need to go to the paid version. Figure 8-14 shows a record of activity that ZoneAlarm Pro has monitored and blocked.

Configuring ZoneAlarm to Block Trojans
The most important feature of ZoneAlarm is its ability to block outgoing traffic from your PC. That way, you can be sure a Trojan hasn’t infected your PC and can’t “call out” to make contact with someone malicious, or be used to attack others from your PC. All versions of ZoneAlarm, the free as well as the for-pay, offer this protection. Since that’s the most important feature, that’s what’s covered in most of this hack.
After you install ZoneAlarm, click Firewall in the left panel and you’ll get to choose the level of protection (from Low to High) you want for the Internet Zone and the Trusted Security Zone (for computers on your network, or that you trust for some other reason). The settings are self-explanatory.
When you start using ZoneAlarm, alerts, such as the one shown in Figure 8-15, will start popping up every time a program attempts to make a connection to the Internet. It will most likely be a program you are familiar with, such as Internet Explorer, Outlook Express, or a similar program. If it’s a program you’re familiar with and you want the program to always be able to access the Internet, click the box that reads “Remember this answer the next time I use this program,” and then click Yes to let the program access the Internet.

If it’s a program you’re unfamiliar with, or if you have no idea why it would be connecting to the Internet, click More Info. You might be asked whether you want to allow your browser to access the Internet. Click Yes, and you’ll be sent to ZoneAlarm’s site, which will offer some basic information about the alert. The general rule, though, is to allow only programs you are familiar with to access the Internet. If you’ve just launched a program that requires Internet access and you get the alert, let the program access the Internet. Or, you might want to let a program you’ve just installed contact the maker’s web site for automatic updates and patches, if you like that sort of thing. But if the alert pops up for no reason at a random time and you’re unfamiliar with the program, you should deny it access. You should also immediately run an antivirus program to see whether it can detect a Trojan.
If you allow the program to access the Internet, and you check the box so that you’re not alerted next time, it will always be able to access the Internet. If you want to always be alerted when the program tries to access the Internet, don’t check the box.
After you designate a program as always being allowed to access the Internet, it will be put onto a list that ZoneAlarm maintains about trusted programs. You can customize any program on that list, take programs off the list, or customize their security settings. To do this, click Program Control in ZoneAlarm’s left panel, and click the Programs tab. You’ll see a screen similar to Figure 8-16.

Use this screen to customize how you’ll allow each program to access the Internet. By inserting a check mark in the appropriate column, you can choose whether to allow the program to access the Internet or Trusted Zone, whether you want it to act as a server in the Internet or Trusted Zone, and similar features. A check mark means the program is allowed to access the Internet; an X means it’s not allowed to access the Internet; and a ? means it should ask before being allowed to access the Internet.
See Also
Use a Proxy Server to Protect Your PC
Many private businesses protect their networks with proxy servers. But you can get the same kind of protection at home—for free—without buying any new hardware.
Proxy servers protect your PC by offering a kind of relay protection. When you use a proxy server, Internet Explorer contacts the proxy instead of the web site. The proxy delivers the page to you if the page is in its cache. If the page is not in its cache, it contacts the site, grabs the page, and then delivers the page to you. In this way, you never directly contact a web site or other Internet location; instead, the proxy server does, so it, rather than you, will be the target of attack or privacy invasion by the site. Proxy servers can be configured for any kind of Internet access, not just web browsing.
Some businesses use proxy servers as part of corporate-wide security precautions, and if you work at such a business, your work PC has been specifically set up to use those servers. But even if you are not at a business with a proxy server you can still use one to protect your PC. You won’t have to set up and run the proxy server yourself; instead, you can use one of the many free ones available on the Internet.
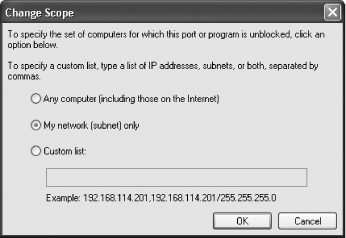
Setting up a proxy server in this way is a two-step process. First, find a free, public proxy server. Then, set up your PC to use it. To find a free, public proxy server, go to the Stay Invisible web site (http://www.stayinvisible.com) and click View Proxies. The site lists hundreds of free, public proxies from around the world and updates the list daily, as shown in Figure 8-17.
Choose a proxy server from the list, and copy down its IP address and port number. If you want to double-check that the server is functioning, go to the Check Your Proxy section on the left side of the web page, type its IP address and port number, and click Check. If the server is functioning, a page will pop up with the server’s IP address and name (often, the name is the same as the IP address). If the server is not functioning, you’ll get a message telling you the connection can’t be made.
Once you’ve confirmed a working proxy server and copied down its IP address and port number, it’s time to configure Internet Explorer to use it. Open Internet Explorer, choose Tools → Internet Options → Connections, and click Settings if you use a dial-up connection and LAN Settings if you access the Internet using an always-on connection, such as over a LAN or via a cable modem or DSL modem. The options will be the same for both ways of access. Figure 8-18 shows the LAN Settings dialog box for configuring a proxy server.

Type in the address of the proxy server and its port number. For local domains, you need to use a proxy server because they will be secure. Check the “Bypass proxy server for local addresses” box if you know your local domain is secure.
If you’re at work and the company uses separate proxy servers for different Internet services, such as FTP and Gopher, click the Advanced button. From there, you’ll be able to fill in the specific information about proxy servers for each Internet service.
Hacking the Hack
If you have a reason for wanting to limit your PC to visiting only certain web sites and banning it from visiting any others—such as for a child’s computer, which you want to have only very limited Internet access—you can hack the proxy server settings to accomplish that.
Go to the LAN Settings dialog box (shown in Figure 8-18), and enable use of a proxy server. Then, click the Advanced button and the Proxy Settings dialog screen appears, as shown in Figure 8-19.

For the HTTP entry, type in a word, such as
nowhere, or type in an Internet address that
doesn’t exist. When you do this,
you’re telling Internet Explorer to use a proxy
server that isn’t there. This effectively blocks
access to the Internet because instead of going to a web site,
Internet Explorer will go to a proxy server. But because the proxy
server doesn’t exist, your browser
won’t be able to visit any site.
Next, check the box next to “Use the same proxy server for all protocols.” This will ensure that you’re blocking Internet access for other services, such as FTP, not just for the Web.
Now you’ve effectively blocked access to the Internet for the PC. At this point you can enable a setting that will let the PC visit only specific web sites. In the Exceptions section, type the locations of the web sites you want to allow to be visited, separated by a semicolon. This Exceptions box tells Internet Explorer to bypass the proxy server for the listed sites, so it will go straight to those sites, bypassing the not-there proxy.
Once you put those settings into effect, whenever your PC tries to access the Web it will look for a proxy server that doesn’t exist, so it won’t be able to get onto the Internet. However, it will let you go to the web sites you’ve put in the Exceptions section.
See Also
Punch an Escape Hole Through Your Firewall
Sometimes, firewalls offer too much protection; they block unsolicited incoming traffic that you want to receive, such as if you’re hosting a web site. Here’s how to open a hole in your firewall to let only specific incoming traffic through.
Most firewalls block all unsolicited inbound traffic and connections, which can be a problem if you’re running a web site, email or FTP server, or other service that requires you to accept unsolicited inbound packets. But you can punch a hole through your firewall to let only that traffic in, while still keeping potentially dangerous intruders out.
First, decide what kind of unsolicited inbound traffic and connections you want to let through, and then find out which ports they use. For example, if you have a web server, you’ll have to allow traffic through that’s bound for port 80. Table 5-1 lists common ports; for a complete list, go to http://www.iana.org/assignments/port-numbers.
How you allow traffic through a firewall varies from firewall to firewall. To do it for XP’s built-in Windows Firewall, from the Control Panel choose Security Center. (If a Security Center icon shows in the system tray, you can instead click that icon.) Then, click the Windows Firewall icon at the bottom of the screen. Click the Exceptions tab. The Windows Firewall Exceptions dialog box appears, as shown in Figure 8-20. To enable a service and allow its incoming traffic through the firewall, put a check next to the service you want to allow through and click OK.
Tip
The Windows Firewall is built into SP2. If you have a version of Windows prior to SP2, it is called the Internet Connection Firewall (ICF). You configure it in the same general manner as you do the Windows Firewall.
For this screen, you won’t have to know the port numbers for the services whose incoming traffic you want to let through; you just need to know which service you want to allow. XP will know to block or unblock the proper port.
You can easily add a new program to the Exceptions list to let it pass through the firewall [Hack #77] .
In addition to programs that you allow through the firewall, you might also want to allow services through. For example, if you’re running a web server, FTP server, or other server, or you have a VPN [Hack #82] that you want to allow others to use, you’ll have to tell the firewall to let those requests through.
From the Control Panel, choose Security Center and click the Windows Firewall icon at the bottom of the screen. Click the Advanced tab, highlight the connection for which you want to allow the service through, and click Settings. Now, select the service you want to allow to pass through, as shown in Figure 8-21, and click OK and then OK again. That service will now be able to bypass the Windows Firewall for the connection you had selected. If you want to allow it for other connections, from the Advanced tab select a different connection and repeat the steps.

There’s a chance the default settings for the services you want to allow don’t work properly. If that’s the case, you can edit them. Depending on the service, you can change the service’s name or IP address, its description, the internal and external port numbers the service uses, and whether it uses the TCP or UDP protocol. For example, if your business uses a VPN with a different port number than the one used by the Windows Firewall, you can change the port number the Windows Firewall uses so that your VPN will work. Some services include hardcoded properties that you can’t change, while others will let you edit them. For example, the Remote Desktop can use only 3389 for external and internal ports and TCP as its protocol, and those can’t be edited. But a few of the services, notably the VPN connections, let you edit the ports and protocol.
To edit the properties for one of the services, select it and choose Edit, and you’ll see the Service Settings screen, as shown in Figure 8-22.

This process lets you select from a number of services that you want
to bypass the Windows Firewall. Table 8-4
describes what each service does. Note that the entry
msmsgs might or might not show up in your system;
Windows Messenger appears if you’ve used Windows
Messenger or Outlook Express (which uses some Messenger components).
Unlike all the other services listed, it is enabled by default, so it
can already bypass the Windows Firewall.
|
Service |
What it does |
|
FTP Server |
Allows others to connect to an FTP server on your PC. |
|
Incoming Connection VPN (L2TP) |
Allows for the use of a Virtual Private Network using the L2TP tunneling technology. |
|
Incoming Connection VPN (PPTP) |
Allows for the use of a Virtual Private Network using the PPTP tunneling technology. |
|
Internet Mail Access Protocol Version 3 (IMAP3) |
Allows others to connect to an IMAP3 email server on your PC to retrieve email. |
|
Internet Mail Access Protocol Version 3 (IMAP4) |
Allows others to connect to an IMAP4 email server on your PC to retrieve email. |
|
Internet Mail Server (SMTP) |
Allows others to use an SMTP server on your PC for sending email. |
|
IP Security (IKE) |
Allows for the use of the Internet Key Exchange (IKE) security technology. |
|
|
Allows for the use of Windows Messenger, plus any software that uses its components, such as Outlook Express. |
|
Post-Office Protocol Version 3 (POP3) |
Allows others to connect to a POP3 email server on your PC to retrieve email. |
|
Remote Desktop |
Allows others to connect to your PC and take control of your desktop using XP Professional’s Remote Desktop feature. (Available in XP Professional only.) |
|
Secure Web Server (HTTPS) |
Allows others to connect to a web server on your PC that uses the HTTPS security protocol. |
|
Telnet Server |
Allows others to use a Telnet server on your PC to use your PC’s resources. |
|
Web Server (HTTP) |
Allows others to connect to a web server on your PC. |
Just because a service isn’t listed in Table 5-1 doesn’t mean you can’t allow its incoming traffic to bypass the Windows Firewall. You can add any service if you know its port information and the name or IP address of the PC on your network where you want the traffic routed. For example, to play some instant messenger games, you’ll need to allow port 1077 to get through. To add a new service, get to the Advanced Settings dialog box shown in Figure 8-21. Then click the Add button and fill out the dialog box shown in Figure 8-23.

Fix the Windows Firewall’s Disabling of File Sharing
When you use the Windows Firewall and try to browse to another computer on your network to share its files, you might get an error message and you won’t be able to connect to those files. That’s because the Windows Firewall closes the ports used for file sharing and server message block (SMB) communications. (SMB is used by the network to allow file and printer access.) You also might not be able to browse the Internet through My Network Places.
To allow file sharing to work across the network and to allow browsing the Internet through My Network Places, open UDP ports 135 through 139, TCP ports 135 through 139, and TCP and UDP port 445 in the Windows Firewall.
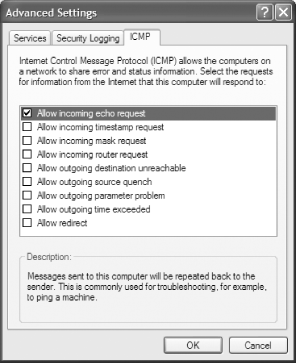
Allow Diagnostic Services to Bypass the Firewall
The Internet Control
Message Protocol (ICMP) enables troubleshooting and diagnostic
services, such as ping Troubleshoot Network Connections with
ping, tracert, and
pathping. By default, though, the Windows Firewall
won’t allow incoming ICMP traffic. You can allow
various ICMP-enabled services to pass through your firewall by
clicking the ICMP tab on the Advanced Settings dialog box shown in
Figure 8-21. From the screen that appears, shown in
Figure 8-24, check the boxes next to the services
you want to allow. To get a description of each service, highlight it
and read about it in the Description area.
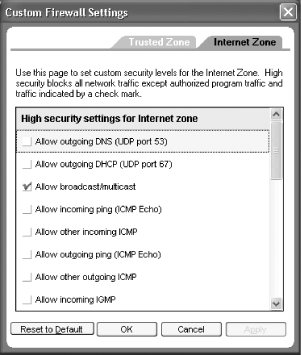
Punch a Hole Through ZoneAlarm
If you use the ZoneAlarm firewall, [Hack #] id(77050)” xml:link="simple” show="replace” actuate="user” CLASS="XRef">you can also allow specific unsolicited incoming traffic through. Click Firewall on the left side of the screen, and then click Custom for each of your security zones. The Custom Firewall Settings dialog box appears, as shown in Figure 8-25. Click the service you want to allow through, click OK, and you’ll be done.
See Also
Close Down Open Ports and Block Protocols
You don’t need a firewall to protect your PC; you can manually close down ports and block certain protocols.
As noted in [Hack 77] and [Hack #78] , firewalls can protect your PC and your network from intruders. But if you don’t want to use a firewall and you still want protection, you can manually close down ports and block protocols.
Some of these ports and protocols are more dangerous than others. For example, leaving open the port commonly used by Telnet (port 23) means someone could use that service to take control of your PC. And the infamous Back Orifice Trojan, which also can give malicious users complete control of your PC, uses a variety of ports, including 31337 and 31338, among others. For a list of which ports are used by Trojans, go to http://www.sans.org/resources/idfaq/oddports.php.
In this hack, you’ll need to know which ports you want to be open on your PC, such as port 80 for web browsing, and you’ll close down all others. For a list of common ports, see Table 5-1. For a complete list of ports, go to http://www.iana.org/assignments/port-numbers.
To close down ports and protocols manually, right-click My Network Places and choose Properties to open the Network Connections folder. Right-click the connection for which you want to close ports and choose Properties. Highlight the Internet Protocol (TCP/IP) listing and choose Properties. On the General tab, click the Advanced button. Click the Options tab, highlight “TCP/IP filtering,” and choose Properties. The TCP/IP Filtering dialog box appears. To block TCP ports, UDP ports, and IP protocols, choose the Permit Only option for each. Doing this will effectively block all TCP ports, UDP ports, and IP protocols.
You don’t want to block all ports, though, so you have to add the ports you want to allow to pass—such as port 80 for web access. You need to keep port 80 open if you want to browse the Web. Click Add to add the ports or protocols you will allow to be used, as shown in Figure 8-26. Keep adding as many ports and protocols as you want to be enabled, and click OK when you’re done. Only the ports and protocols that are listed will be allowed to be used.

Keep in mind that Internet applications and services use hundreds of TCP and UDP ports. If, for example, you enable only web access, you won’t be able to use all other Internet resources, such as FTP, email, file sharing, listening to streaming audio, viewing streaming video, and so on. So, use this hack only if you want your PC to use a very limited number of Internet services and applications.
Set Up a Virtual Private Network
Sometimes you would like to connect to your home machine from work or while traveling. Making your home machine a virtual private network (VPN) server is a secure way to accomplish this.
If you’ve ever taken files home so that you can work on them on your personal computer, you’ve probably had the experience of arriving to work the next day only to realize you’ve forgotten to bring the files back with you. If the files were important enough, you probably had to drive all the way back home to get them, or you’re had to make a lame excuse to your boss as to why you don’t have the TPS report ready yet. Perhaps you’re a road warrior who has found yourself stranded in a hotel room on a Monday morning, just hours before a big meeting, without that copy of the presentation you thought you had copied from your home machine. If either of these sounds like a situation you’ve been in, this is the hack for you.
It is well known that Windows XP has a VPN client built into it, which allows you to make secure connections to your company’s network. Less well known is that Windows XP also has the ability to act as a VPN server, allowing you, or others you designate, to make secure connections into your home network. While you have an established VPN session with your home machine, you can access files from its hard drive or other machines on the network that have file sharing enabled. All you need is a local Internet connection and a VPN client that supports the Point to Point Tunneling Protocol (PPTP), which the client for all versions of Windows does.
Preparing your home machine to accept VPN connections is fairly straightforward. Click Start → Settings → Control Panel → Network and Internet Connections → Network Connections → Create a new connection. This will launch the New Connection Wizard. While advancing through this wizard, the options you want to enable are “Set up an advanced connection,” “Accept Incoming Connections,” and “Allow virtual private connections.” The sixth screen of the wizard allows you to specify the users that can use the VPN; make sure you enable at least one account. If you haven’t created a password for your user, now is the time to do so. You are essentially opening up a part of your machine to the Internet, so make sure you choose a good password. After the wizard is complete, nothing further needs to be done; the VPN is ready to accept incoming connections. You can test this by using a VPN client to connect to the IP address of the VPN server machine.
Most home users use a router that provides Network Address Translation (NAT), which obscures the actual IP address of the machine they want to make a VPN connection to. This means you won’t be able to make a VPN connection to your machine until you configure your router to allow the VPN traffic to pass through to your VPN server [Hack #50] .