Chapter 6. Email
Hacks 59-64
If you’re like a lot of people, email is a big part of your life. For many, it’s replaced the telephone for keeping in touch with friends and family—and, of course, it’s absolutely vital for work as well.
But the odds are you’re not getting the most out of your email. You might be bedeviled by spam, you might be blocked from opening specific files sent to you via email, and you might not know how to back up your mail programs. In this chapter, you’ll find hacks for all that and more, including great Registry hacks for getting the most out of Outlook and Outlook Express, as well as Outlook alternatives. And you’ll find out how to hack Google’s Gmail email service by doing things such as using it as a virtual hard drive.
Slam That Spam
You don’t have to be bedeviled by unwanted mail. Use this hack to kill as much as 90% (or much more, in my case) of your spam.
People who have certain body parts they’d like enlarged, who expect Nigerian strangers to shower several million dollars upon them, who favor spending boatloads of money for semiworthless goods, and who enjoy vile, pornographic come-ons littering their email box love spam.
Everyone else, like you and I, hate the stuff.
While there’s no foolproof way of stopping all the spam that makes its way into your mailbox, I’ve found ways to block at least 90% of what I don’t want headed my way. To get such an effective blocking rate, you’ll need to use downloadable software; the antispam features built into Outlook and Outlook Express simply don’t cut it. (However, if you’re bent on trying to use Outlook and Outlook Express’s antispam features, head to the end of this hack to learn how.)
You can use two primary kinds of software to block spam. One type sits between your email program and the mail servers where you pick up your email. It checks your mail, marks email that it considers spam, and then (depending on the program) lets you handle that spam in a variety of ways, such as automatically deleting it, letting you manually delete it, or marking it in a way that will alert your normal email program that it’s spam—and letting the email program filter or kill the spam. In all cases, you’ll be able to read the messages before they’re deleted, if you want.
The other type of software integrates directly into Outlook or another email program and kills spam from directly within the program. I favor this kind because it’s a simpler, one-step process. But I’ve used both types, and both work well.
For the kind of spam killer that sits between your email program and your mail server, I suggest the free program MailWasher (http://www.pcworld.com/downloads/file_description/0,fid,20000,00.asp). It imports your existing email server account settings so that you don’t have to set them up from scratch, and it lets you read and preview messages before deleting spam. I especially like its bounced mail feature; it will send a false “address not found” message to the sender so that it will appear as though your email address doesn’t exist. While not all spammers bother to clean up their lists of addresses, this could lead to less spam ultimately coming into your mailbox. As with most spam killers, you can add addresses to a list of known spammers, though spammers so frequently spoof their addresses that this might not be of much help. You can also create filters with specified words or groups of words that MailWasher will look for in email, and if it finds them it will consider the message spam.
A more powerful, for-pay version of the program is available for $37 from http://mailwasher.net. Its primary benefit is that it will check multiple email accounts for spam; the free version will check only one. If you need to check only a single account, stay with the free version.
One of the tricks spammers use is to target a site and send a
dictionary attack
to many potential
email accounts on a server. They will send to
“bob,”
“nancy,” etc., as well as to
“asmith,”
“bsmith,”
“csmith,” etc. Most of the emails
will bounce, but the spammer doesn’t care. He
encodes the email in HTML with an embedded
<IMG> tag. The tag has information encoded
within it to uniquely identify the valid email addresses. For
example, say [email protected]
gets an email in HTML format. Inside the email is:
<img src=83.48.123.74/img/jojo_jpg_cjones_mycompany_com.jpg>
The web server at 83.48.123.74 will load the image named jojo.jpg to an email in cjones’ email program. When the user sees the advertisement for herbal Viagra or whatever, she will delete it. However, the damage has already been done. The spammer knows [email protected] exists because he knows the image was downloaded. Soon the user cjones will be getting more than just offers for herbal Viagra.
One way to prevent this type of attack is to turn off displaying HTML or displaying graphics in emails. In Outlook 2003, displaying graphics is turned off by default. Instead of a graphic, you’ll see an X for each graphic. To view the graphic, you have to right-click the X and choose Download Pictures. If you’re receiving email from a spammer, obviously you don’t want to view the graphic.
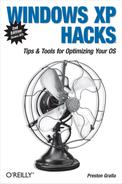
If, for some reason, Outlook 2003 is displaying graphics in your email, you can easily tell it to stop. Choose Tools → Options → Security and in the Download Pictures area, click Change Automatic Download Settings. The screen shown in Figure 6-1 appears.
Check the box next to “Don’t download pictures or other content automatically in HTML e-mail.” If you want to automatically display pictures from people on your Safe Senders and Safe Recipients lists (see details later in this hack), check the appropriate boxes. You should also check the box next to “Warn me before downloading content when editing, forwarding, or replying to email.” You should check this box because when you forward, edit, or reply to an email, Outlook will display and include the graphic, unless you tell it not to when you’re warned. Checking this box tells Outlook to warn you first.
Unfortunately, there’s no direct way to do this in Outlook if you have a version earlier than 2003, but there’s a hack that will do the trick for you. When you’re in your Inbox, turn off Outlook’s Preview Pane by choosing View → Preview Pane. (To restore the pane, choose View → Preview Pane again.) HTML email will grab pictures from web servers only when you’ve opened the mail or viewed it in the Preview Pane, so all you have to do is delete spam without opening it—by using spam killers as outlined earlier in this hack—and you’ll be safe. In Outlook Express, you can do the same thing by choosing View → Layout and unchecking the box next to “Show preview pane.”
If you use Outlook 2002 with at least Service Pack 1 installed, you
can use a Registry hack to turn off the display of HTML. Close
Outlook. Then run the Registry Editor
[Hack #83]
and go to
HKEY_CURRENT_USERSoftwareMicrosoftOffice10.0OutlookOptionsMail.
Create a new DWORD value whose name is
ReadAsPlain. Double-click the new value to open
it. In the Value Data box, type 1, and then click
OK. Open Outlook and notice that any new
unsigned emails are read as plain text, not
HTML.
Tip
In Eudora, this is done by selecting Tools → Options → Display and then unchecking “Automatically download HTML graphics” (this turns off the display of HTML email); by selecting Tools → Options → Display and unchecking “Allow executables in HTML content”; and by selecting Tools → Options → Styled Text and checking “Send plain text only” (this turns off the sending of HTML email, which is just a polite thing to do).
Peer-to-Peer Technology Fights Spam
I’ve tried quite a few Outlook add-in spam killers, and my favorite is SafetyBar (http://www.cloudmark.com). I’ve found that it blocks well over 95% of the spam I receive. It uses peer-to-peer technology to gather the collective intelligence of thousands of other email users to fight spam. When you install it, it creates a Spam folder in Outlook and routes any spam into that folder, where you can review it and then delete it. If you get spam that isn’t automatically routed to the folder, you can mark it as spam. Not only is the mail then sent to the Spam folder, but also, SafetyBar servers are told you consider that piece of mail spam. That information goes into a database, along with similar information from hundreds of thousands of other people who use the program. A variety of algorithms are used to determine what is spam and what isn’t, and that’s what ultimately blocks spam on everyone’s system. It uses collective intelligence, which might be the ultimate spam killer.
You can also block and unblock messages as spam, so if mail is accidentally marked as spam it won’t be blocked in the future. I’ve used the program for more than six months, and I’ve found it increases in effectiveness over time. By now, I estimate that it blocks more than 95% of spam, though that changes on a daily basis.
SafetyBar runs as a small toolbar in Outlook, as shown in Figure 6-2. (It runs as a toolbar in Outlook Express as well.) A nice little touch is the message bar that tells you how much spam the program has blocked, how much time it’s saved you, or how much spam it’s blocked in a day. Depending on my mood, when I see the total amount of spam it’s blocked I’m either depressed that there’s so much spam in the world or pleased at how much spam I’ve been able to avoid.
SafetyBar costs $39.95 for a one-year subscription. Admittedly, that’s a hefty price for a spam killer, considering that others are available for free. But if you get enough spam, you might consider it worth the money.
Tip
One of the more intriguing features of SafetyBar is that it keeps a running count of all the emails you’ve received and what percentage is spam. It shows that more than half of all the mail I receive is spam. As of this writing, I’ve received 149,465 emails while using SafetyBar, and 84,622 of them were spam.
Slam Spam Before It Starts
The best way to fight spam is to make sure it never gets sent to your email box in the first place. So, how do you end up on spam lists? There are many ways, but the most common, according to a comprehensive study done by the Center for Democracy & Technology, is that your email address is harvested by spammers who use programs to automatically scan web pages and gather email addresses from them. Those addresses are then sold to other spammers, so you could end up on dozens of lists.
You might need to have your email address on a public web site for many reasons, so removing your address from sites might not be an option. However, there are ways to hide your address from spammers, even when it’s in plain view.
One way used to be to spell out your email address—for example, post “preston at gralla dot com” instead of [email protected]. Automated harvesting programs won’t be able to grab your address that way.
At least you used to be able to use that trick.
Some spammers have figured it out by now. My new favorite trick is to
use a bit of inline
JavaScript
to generate my email address at page load time. Harvester bots see a
<script> tag, but users see [email protected].
<script type="text/javascript" language="javascript">
<!--
    {     document.write(String.
fromCharCode(60,97,32,104,114,101,102,61,34,109,97,105,108,116,111,58,98,111
,98,64,98,111,98,46,99,111,109,34,62,98,111,98,64,98,111,98,46,99,111,109,60
,47,97,62))
     }
//-->
</script>
<noscript>
<a href = "mailto:%62%6F%62%40%62%6F%62%2E%63%6F%6D">email me</a>
</noscript>
I got the JavaScript generator from http://www.u.arizona.edu/~trw/spam/spam.htm. You feed it your email address, and it generates the JavaScript.
Another
solution is to use HTML characters for your address rather than
plain-text characters. That way, a person who visits the page can see
the email address, since HTML translates the underlying code into a
readable address, but an automated harvester won’t
be able to read it. To use HTML characters, you need to use the ANSI
characters and precede each character with &#.
Separate each HTML character by a ; and leave no
spaces between characters. For example, in HTML, the
[email protected] address is:
preston@ gralla.c om
Keep in mind, though, that if you use HTML characters to spell out your email address, you won’t be able to include automated HTML “MailTo” links; that requires you to actually spell out the text instead of using HTML characters.
Table 6-1 lists the common ANSI codes you’ll need for most email addresses.
|
A |
65 |
Q |
81 |
g |
103 |
w |
119 |
|
B |
66 |
R |
82 |
h |
104 |
x |
120 |
|
C |
67 |
S |
83 |
i |
105 |
y |
121 |
|
D |
68 |
T |
84 |
j |
106 |
z |
122 |
|
E |
69 |
U |
85 |
k |
107 |
@ |
64 |
|
F |
70 |
V |
86 |
l |
108 |
. |
46 |
|
G |
71 |
W |
87 |
m |
109 |
0 |
48 |
|
H |
72 |
X |
88 |
n |
110 |
1 |
49 |
|
I |
73 |
Y |
89 |
o |
111 |
2 |
50 |
|
J |
74 |
Z |
90 |
p |
112 |
3 |
51 |
|
K |
75 |
a |
97 |
q |
113 |
4 |
52 |
|
L |
76 |
b |
98 |
r |
114 |
5 |
53 |
|
M |
77 |
c |
99 |
s |
115 |
6 |
54 |
|
N |
78 |
d |
100 |
t |
116 |
7 |
55 |
|
O |
79 |
e |
101 |
u |
117 |
8 |
56 |
|
P |
80 |
f |
102 |
v |
118 |
9 |
57 |
For a more comprehensive list of ANSI codes and special HTML characters, go to http://www.alanwood.net/demos/ansi.html.
You can do several other things to keep your address out of spammers’ hands. When registering at a site, always read the fine print to see whether you’re also signing up to get unsolicited mail. I also suggest using multiple email addresses, including those from free mail services like Hotmail and Yahoo, and to use those addresses when registering at sites. That way, any spam will be sent to them rather than your normal mail address.
Viewing Mail Header Information in Outlook and Outlook Express
As a general rule, spammers spoof their email addresses so that you won’t be able to find them. However, not all do, and if you examine email header information you might be able to trace spam to its source. Once you find the originating mail server, you can send a message to the ISP’s administrator, asking to block mail from the sender. It might not always work, but it’s worth a try.
The problem for Outlook and Outlook Express users is that those programs don’t show mail header information—information such as the original sender of the message, the original mail server, and relay information in your messages. However, there is a way to view it.
In Outlook, right-click the message whose header you want to view, and choose Options. Header information appears at the bottom of the screen, as shown in Figure 6-3. You can scroll through it and copy and paste from it. You can also view this information if you’re reading a message, by choosing View → Options.

Note that if you use logic when trying to view header information in Outlook, it won’t work. If you choose View → Message Header, for example, you won’t see your header information. Instead, that option toggles the To:, Cc:, and Subject: lines on and off.
In Outlook Express, right-click a message and choose Properties → Details, and you’ll see header information, as shown in Figure 6-4.

Handling Spam in Outlook Express
Both Outlook and Outlook Express include ways to handle spam. Outlook Express doesn’t do a particularly effective job because it requires that you manually determine what spam is and then block future spam based on that. Because spam comes in from so many different email addresses and includes so many different subject lines, it’s difficult to control spam in this way. However, you can give it a try. Here’s how to do it in Outlook Express.
Outlook Express handles spam by letting you add email addresses and domains to a Blocked Senders list. Then, every time a message comes in from the address or domain, the mail is automatically sent to the Deleted Items folder. To add an address or domain to the list, choose Tools → Message Rules → Blocked Senders List. The Blocked Senders tab of the Message Rules dialog box appears. Click Add, and you’ll see the screen pictured in Figure 6-5. Type in the email address or domain you want to block. You can block mail, newsgroup messages, or both. Click OK when you’re done.

Handling Spam in Outlook
Outlook handles spam differently than Outlook Express, and different versions of Outlook handle spam differently.
Outlook 2003 includes a surprisingly good spam killer. It checks incoming messages, and if it decides they’re spam, it routes them to a Junk E-mail folder, where you can then examine and delete them.
To make sure its spam-killing capability is turned on, choose Tools → Options and click the Junk E-mail button in the E-mail section of the screen. The screen shown in Figure 6-6 appears.

You can choose among several options:
- Low
This moves only the most obvious spam to the Junk E-mail folder. This means some spam will get through, but it’s not likely that it will accidentally tag legitimate email as spam.
- High
This is the most aggressive spam fighter. It catches a higher percentage of spam, but also will most likely tag legitimate email as spam.
- Safe Lists Only
This will allow mail to come through only from people or domains that you have specifically said are safe—what Outlook calls Safe Senders. All other mail will be tagged as junk. As a practical matter, this isn’t a particularly good setting because it will tag almost all of your mail as spam.
You can add senders to the Safe Senders list by clicking the Safe Senders tab, clicking the Add button, typing in the email address or domain, and clicking OK. You can also add senders to the list when you receive email. Right-click the message in Outlook and choose Junk E-mail → Add Sender to Safe Senders List.
You can similarly put senders on a Blocked Senders list, which will block all email from them. Click the Blocked Senders tab, click the Add button, type in the email address or domain, and click OK. You can also add senders to the list when you receive email. Right-click the message in Outlook and choose Junk E-mail → Add Sender to Blocked Senders List.
Previous versions of Outlook aren’t nearly as effective in fighting spam. They don’t have a Junk E-mail folder, and don’t automatically send spam to the Deleted Items folder. Instead, these versions will color junk mail gray and color messages with adult content maroon. You can then scan your Inbox for messages with those colors and delete them manually.
In these versions of Outlook, when you receive a message that you consider to be spam or that contains adult content, right-click it and choose Junk E-mail. From the flyaway menu, choose “Add to Junk Senders list” or “Add to Adult Content Senders list.” You can also manually add senders to either list by clicking the Organize button on the Outlook toolbar and then choosing Junk E-mail. The screen shown in Figure 6-7 appears. From here, you can turn on and off the Junk Senders list and the Adult Content Senders list. To add to either list, click the “Click here” link, click Edit Junk Senders or Edit Adult Content Senders, and add addresses to either list.

Tip
You can also use Outlook’s normal filters to handle spam. You can define a rule that will route messages from certain senders, or that contains certain content, to folders that you define, or to the Deleted Items folder. To create rules for doing this, choose Tools → Rules Wizard and follow the instructions. Keep in mind, though, that because spammers use different email addresses constantly, this won’t help you a great deal.
See Also
You can download the Center for Democracy and Technology’s report on how spam is generated and how to avoid it at http://www.cdt.org/speech/spam/030319spamreport.shtml.
SpamPal (http://www.spampal.org) is a free spam fighter that marks email as spam before it gets to your email program. Then you use your email program’s filters to filter out the resulting spam.
An excellent resource for news and information about spam and what you can do to stamp it out can be found at http://spam.abuse.net.
Open Blocked File Attachments in Outlook and Outlook Express
Force Outlook and Outlook Express to let you open a wide variety of file attachments that they normally block.
The world is full of nasty email-borne worms and viruses, and everyone certainly needs to be protected from them. But Microsoft, in the latest versions of Outlook and Outlook Express, takes a Big Nurse, draconian approach to the problem; it refuses to let you open a wide variety of file attachments sent to you via email, including those ending in .exe, .bat, and many other common file extensions. (Eudora doesn’t do this!) The theory is that it’s possible a file with one of those extensions might be dangerous, so you shouldn’t be allowed to open any file with that extension. That’s like banning all cars because some people sometimes get into accidents.
When you try to open a file with one of those blocked extensions, you get the following error message: “Outlook blocked access to the following potentially unsafe attachments.” Then you get a list of the attachments in your email that you can’t open.
Depending on your version of Outlook/Outlook Express, and whether you’ve applied a Service Pack update to either of them, your version might or might not exhibit this behavior. Some older versions don’t act this way; all newer versions do, including SP2.
The simplest way to know whether your version acts this way is to see what happens when you get one of the blocked file attachments. If it’s allowed to go through, there’s no need to use this hack. If it’s blocked, get thee to the keyboard. Outlook and Outlook Express handle the problem differently, so we’ll take a look at each.
Force Outlook to Let You Open Blocked File Attachments
Outlook assigns a level of risk to every file attachment sent to you. Level 1 is considered unsafe, so Outlook blocks your access to Level 1 attachments; you won’t be able to open these files. Level 2 is considered a moderate risk, and you won’t be able to open those files directly. Instead, you have to save the files to disk, and then you’ll be able to open them. I’m not clear on how that increases security, but that’s what Microsoft has done. Oh, and there’s another oddball fact about Level 2: no file types are considered Level 2 risks. The only way for a file to be considered at that risk level is if you use Outlook in concert with a Microsoft Exchange Server and the administrator uses his administration tools to put file extensions into that risk category. The administrator is also the only person who can take file extensions out of the category. So, you can pretty much ignore that category, unless you have some convincing official reason for changing your company’s policy. Any file types not in Levels 1 and 2 are considered “other” and you can open them normally.
To force Outlook to let you open blocked file attachments, use this Registry hack. Before starting, you need to know the list of Level 1 file attachments that Outlook blocks. They’re listed in Table 6-2. Just to make things more confusing, depending on your version of Office and what Service Pack you’ve installed, not all of these extensions can be blocked.
|
Extension |
File type |
|
.ade |
Microsoft Access project extension |
|
.adp |
Microsoft Access project |
|
.app |
Visual FoxPro application |
|
.asx |
Windows Media audio/video |
|
.bas |
Microsoft Visual Basic class module |
|
.bat |
Batch file |
|
.chm |
Compiled HTML Help file |
|
.cmd |
Microsoft Windows NT Command script |
|
.com |
MS-DOS program |
|
.cpl |
Control Panel extension |
|
.crt |
Security certificate |
|
.csh |
Unix shell extension |
|
.exe |
Executable program |
|
.fxp |
Visual FoxPro compiled program |
|
.hlp |
Help file |
|
.hta |
HTML program |
|
.inf |
Setup information |
|
.ins |
Internet Naming Service |
|
.isp |
Internet Communications settings |
|
.js |
Jscript file |
|
.jse |
Jscript Encoded Script file |
|
.ksh |
Unix shell extension |
|
.lnk |
Shortcut |
|
.mda |
Microsoft Access add-in program |
|
.mdb |
Microsoft Access program |
|
.mde |
Microsoft Access MDE database |
|
.mdt |
Microsoft Access workgroup information |
|
.mdw |
Microsoft Access workgroup information |
|
.mdz |
Microsoft Access wizard program |
|
.msc |
Microsoft Common Console document |
|
.msi |
Microsoft Windows Installer package |
|
.msp |
Microsoft Windows Installer patch |
|
.mst |
Microsoft Windows Installer transform; Microsoft Visual Test source file |
|
.ops |
Office XP settings |
|
.pcd |
Photo CD image; Microsoft Visual compiled script |
|
.pif |
Shortcut to MS-DOS program |
|
.prf |
Microsoft Outlook profile settings |
|
.prg |
Visual FoxPro program |
|
.reg |
Registry entries |
|
.scf |
Windows Explorer command |
|
.scr |
Screen saver |
|
.shb |
Shell Scrap object |
|
.shs |
Shell Scrap object |
|
.url |
Internet shortcut |
|
.vb |
VBScript file |
|
.vbe |
VBScript Encoded script file |
|
.vbs |
VBScript file |
|
.wsc |
Windows Script Component |
|
.wsf |
Windows Script file |
|
.wsh |
Windows Script Host Setting file |
Decide which file extension you want to be able to open from within
Outlook, and close Outlook if it’s running. Then run
the Registry Editor
[Hack #83]
and
go to
HKEY_CURRENT_USERSoftwareMicrosoftOffice10.0OutlookSecurity,
which, as its name implies, handles Outlook security. Create a new
String value called
Level1Remove. In the Value Data
field, type the name of the file extension you want to be able to
open, for example, .exe. You can add multiple
file extensions. If you do, separate them with semicolons, but no
spaces, like this: .exe;.bat;.pif. Use Table 6-2 as a guide for which blocked file extensions
you want to be able to open.
When you’re done, exit the Registry and reboot. Now you’ll be able to open the file extensions you specified.
There’s also an Outlook add-in that will let you open blocked email attachments without having to edit the Registry. The Attachment Options add-in, available from http://www.slovaktech.com/attachmentoptions.htm, lets you visually change which attachments you can open, and it also lets you set an additional option—having Outlook ask you whether you want to open certain file extensions on a case-by-case basis, instead of blocking them or automatically opening them. The author asks that you send a $10 donation if you use the add-in.
Force Outlook Express to Let You Open Blocked File Attachments
Depending on your version of Outlook Express, it might prevent you from opening certain email file attachments in the same way Outlook blocks certain files.
Tip
If you have installed Windows XP Service Pack 1 or Service Pack 2, Outlook Express Service Pack 1, or Internet Explorer 6 Service Pack 1, you’ll be blocked from opening certain email file attachments. Also, if you have a newer version of XP, you might be blocked.
With Outlook Express, unlike with Outlook, you won’t be able to determine on an extension-by-extension basis which attachments you can open. Instead, you can tell the program to let you open all blocked extensions or you can tell it to stop you from opening any blocked extensions.
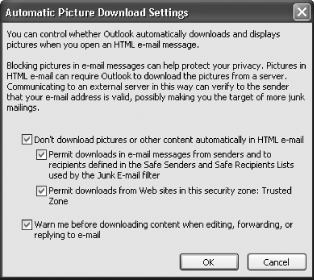
To tell Outlook Express to let you open blocked attachments, choose Tools → Options → Security to open the dialog box shown in Figure 6-8. Clear the box next to “Do not allow attachments to be saved or opened that could potentially be a virus.”
You might have to close Outlook Express and restart it for the settings to take effect.
Back Up and Restore Outlook and Outlook Express Datafiles
If email and contact lists are your lifeblood, you need to back them up regularly, but there’s no easy way to do that using Outlook or Outlook Express. This hack tells you how to do it in each program.
There are two ways to back up and restore Outlook and Outlook Express datafiles: the easy way and the hard way. In the hard way, you manually back up all the datafiles, which can be a long and laborious process because those files are kept in so many different places. Do it once and you might not do it again. In the easy way, you get an add-in that does the backup for you.
Backing Up Outlook Manually
If all you want to do is back up your Outlook messages and contacts, it’s a breeze. Outlook keeps all messages, contacts, and your calendar in a single file that ends in a .pst extension, typically Outlook.pst in the C:Documents and Settings<Your Name>Local SettingsApplication DataMicrosoftOutlook folder. If they’re not there, you can locate them by right-clicking the Outlook Today icon in Outlook, choosing Properties → Advanced, and looking in the Filename box. If you archive your old email messages, there will also be a file named Archive.pst in the same folder as your Outlook.pst file. To back up Outlook, just back up these files to a disk or another computer. To restore them, copy them back to their original locations.
If you don’t use Outlook for your contacts, and instead use the Windows Address Book, your contact information will be kept in a file with the extension .pab. So, you’ll need to back up that file along with your .pst file to have a backup of your contact list.
Warning
If you use Outlook on an Exchange Server, there might not be any .pst files on your system. If you want to back up your messages, contacts, and calendar yourself, you should do a local archive. Your Exchange administrator should be doing it for you, as well. Check with your administrator to see if he’s doing backups, and to find out how to make a local archive.
That’s fine if you want to back up only your email, calendar, and messages. But you might want to back up a whole host of other Outlook information, including your Outlook bar shortcuts; the mail rules you’ve created; your customized toolbar settings; your stationery, signatures, and templates; and other customizations and files. These files might be in the same folder as Outlook.pst, in C:Documents and Settings<Your Name>Application DataMicrosoftOutlook, or in another folder. Various flavors and versions of Outlook are notorious for keeping their files in different locations. Back up these files as you do your Outlook.pst file, to a disk or another computer, and restore them by copying them back into their original folders.
Table 6-3 describes what each of Outlook’s files does. Depending on how you use Outlook, some of these files might not be present on your system.
|
Type of file |
Extension |
|
Personal Folders |
.pst |
|
Personal Address Book |
.pab |
|
Outlook Bar shortcuts |
.fav |
|
Rules Wizard rules (Outlook 2000 and earlier) |
.rwz |
|
Nicknames for AutoResolution |
.nick |
|
Nicknames for AutoComplete (Outlook 2002) |
.nk2 |
|
Customized print settings |
OutlPrnt |
|
Customized toolbar settings |
Outcmd.dat |
|
Customized system folder views |
Views.dat |
|
Macros and VBA programs |
VbaProject.otm |
|
Send/Receive group settings (Outlook 2002) |
.srs |
|
Stationery |
.htm files |
|
Templates |
.oft files |
|
Dictionary |
.dic files |
|
Junk Senders lists |
Junk Senders.txt |
|
Adult Senders list |
Adult Senders.txt |
If you have a laptop and a desktop PC, you’ve already found you apparently can’t synchronize Outlook between them; they each have different data stores of your email messages. To keep them in sync, simply copy the Outlook.pst file from one to the other. For example, when you’re working normally at home or the office, your desktop PC should have the complete, current version of the Outlook.pst file. When you travel with your laptop, copy the file over to it, and your laptop will have the current version of your file. When you return home or to the office, copy the file back to your desktop PC.
Backing Up Outlook Express Manually
Outlook Express has a different data structure than Outlook does, so you’ll need to back up different files. Express is messier than Outlook; it stores your email in multiple files, and you’ll have to back up all of them, rather than just a single file, as you do with Outlook. And you’ll have to back up Registry keys as a way to save your personal settings.
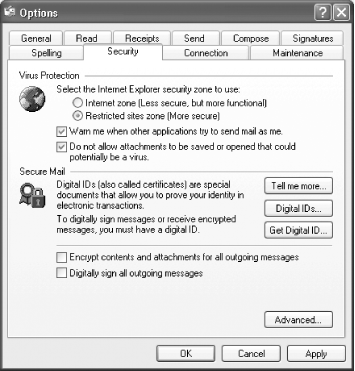
Mail messages in Outlook Express are kept in files with .dbx extensions. To find out their locations, open Outlook Express and chose Tools → Options → Maintenance → Store Folder. You’ll see a dialog box (shown in Figure 6-9) that will tell you the location of the .dbx files. Go to that folder and back up all the .dbx files. Expect to see a lot of them; two dozen or more are not that uncommon, depending on how many mail folders you have. Then, to restore them, just copy them back to their original folders.
The information about your mail
settings, accounts, and preferences is stored on a single Registry
key, HKEY_CURRENT_USERSoftwareMicrosoftInternet Account
Manager. Back up the entire key and its subkeys to a single
.reg file. When you want to restore them,
restore the key as you would using any other
.reg file.
Tip
For information on backing up to .reg keys, restoring using .reg keys, and other ways to back up the Registry, see [Hack 85] and [Hack #86] .
Outlook Express uses the Windows Address Book for contact information, so you need to back up the .dbx file or files. Typically, .dbx files are stored in C:Documents and Settings<Your Name>Application DataMicrosoftAddress Book, but you might have to look elsewhere. Restore the .dbx file by copying it back to its original location.
Mail rules are stored in the Registry, in
the HKEY_CURRENT_USERIdentities key and its
subkeys. As outlined earlier in this hack, back up this key and its
subkeys to a .reg file, and restore back to the
Registry if you need to.
Backing Up Outlook and Outlook Express Using Add-In Software
If you don’t want to go through the trouble of manual backups and restores, you can try out Outlook Express Backup and Genie Outlook Backup from Genie-Soft (http://www.genie-soft.com), which will automate your backups for you. You get a wide variety of backup options, including backing up multiple identities and information, viewing emails from inside the backup and copying text from them, using an automated backup scheduler, encrypting your backups, spanning multiple disks when you back up, and compressing your backups. Both are shareware and free to try, but if you continue to use either of them, you are expected to pay $29.95.
See Also
Microsoft has a free add-in for Outlook, called the Personal Folders Backup tool, that will automatically back up and restore your .pst files. It won’t, however, back up any other Outlook settings. For details, go to http://office.microsoft.com/en-us/assistance/HA010875321033.aspx.
Retrieve Web-Based Email with Your Email Software
There’s no longer a need for Hotmail and Yahoo! mail users to be forced to abandon their desktop email software when checking their email. This hack lets you use your email client to gather web-based email from them.
I have more email accounts than any person has any right to. In addition to my normal POP3-based email accounts, I have web-based accounts on Yahoo! and Hotmail. This means there’s no apparent way to get all my email in one location; I use Outlook for POP3-based email and the Web for Yahoo! and Hotmail. It also means I can never have all my email on my hard disk because Yahoo! and Hotmail store it on the Web. But I like to keep all my outgoing and incoming email in one location. What to do?
I’ve found two free add-ins that let you use your normal email program with Yahoo! mail and Hotmail, whether it’s Outlook, Outlook Express, Eudora, or any other. YahooPOPs! lets you send and receive Yahoo! email, and Hotmail Popper does the same for Hotmail.
Getting Yahoo! Mail with YahooPOPs!
Several years ago, you had the free option of getting your Yahoo! mail using the Yahoo! POP mail server. No longer. Today, if you want to do that directly from Yahoo!, you have to pay a fee.
But with the simple-to-set-up YahooPOPs! (http://yahoopops.sourceforge.net), you can treat Yahoo! like any other mail server and get email from it without having to pay. It’s open source software that has a POP3 interface on one end to talk to your email client, and on the other end it uses an HTTP interface to talk to Yahoo! and get your mail.
Tip
If you use Linux or Mac OS X on another computer, you can use Linux- and Mac-specific versions of YahooPOPs! on those computers and get your Yahoo! mail on them as well.
Getting it to work requires two steps. First, configure the program itself; then, configure your email client to work with it. If you like, you don’t have to configure the program itself; you can leave its defaults, but I recommend making a few changes to the defaults before using it.
After you install the program and run it, it sits in your system tray. To configure it, double-click its icon. While there’s a good deal you can configure, I recommend leaving most defaults in place—with one exception: in Receiving Email under Email Preferences, uncheck “Download emails from the Bulk Mail folder,” as shown in Figure 6-10. If you leave that box checked, you’ll receive all the spam Yahoo! has filtered into your Bulk Mail folder.

As you can see in Figure 6-10, you can configure other preferences here as well, such as whether to download all email or only flagged or unread emails. I stay with the defaults, but you can change them if you wish.
Now it’s time to configure your email program to work with it. How you do that varies from program to program, so check the program’s documentation on the Web for how to do it for individual mail clients. Essentially, though, you create a new mail account in your mail client and call both the incoming mail server and outgoing mail server “localhost.” That configures your client to get the mail from YahooPOPs!. As such, the client doesn’t contact Yahoo! directly. Instead, YahooPOPs! does that; then your client gets the email from YahooPOPs!.
To configure Outlook to work with YahooPOPs!, select Tools → E-mail Accounts. Click “Add a new email account” and then Next, and then select POP3 as the Server Type. Click Next and enter your username and Yahoo! email address under User Information. Under Logon Information, enter your Yahoo! login ID and password. Select “localhost” as your Incoming mail server, and “localhost as the SMTP server” as your outgoing mail server. Then, select More Settings → Advanced and increase the Server Timeout to 10 minutes. Select the Outgoing Server tab and enable “My outgoing server (SMTP) requires authentication.” Then, select “Log on using” and enter your Yahoo! Mail address as the username and your Yahoo! Mail password as the password. Click OK to close the More Settings dialog box. Click Next and then click Finish.
Once you do that, all your outgoing and incoming Yahoo! email will show up in Outlook, just as if the mail were being delivered by any POP3 mail server.
Getting Hotmail Mail with Hotmail Popper
Hotmail Popper (http://www.boolean.ca/hotpop/) works in the same way as YahooPOPs! to let you retrieve and send mail via your Hotmail account. It retrieves mail from Hotmail, and then your email client retrieves it from Hotmail Popper.
There’s one caveat, though. As of this writing, if you’re using the free version of Hotmail you won’t be able to use Hotmail Popper to get your email. You’ll have to have a Hotmail Plus or equivalent MSN account; in other words, you need a for-pay Hotmail account. You used to be able to use Hotmail Popper with the free version of Hotmail, but then Microsoft pulled the plug on it. However, Microsoft is well known for repeatedly changing its mind, so there’s a chance Hotmail Popper will once again work with the free version of Hotmail.
Setup is similar as well. First, configure Hotmail Popper to get your mail; then configure your email client to retrieve it. You shouldn’t need to change the defaults of the program after you install it because by default it won’t retrieve bulk mail from Hotmail. It runs in the Notification area, so if you need to configure it, right-click its icon and choose Properties.
Once it’s running, you have to configure your email client to work with it. Configuration is almost identical to the way you need to configure your mail client for YahooPOPs!, so see the previous section for more information. You create a new POP3 account and set your username and password as you do normally. For your incoming and outgoing mail, use the address 127.0.0.1 as the server. You won’t need to increase the server timeout as you do with YahooPOPs!, though if you experience trouble retrieving mail from the server you can try doing that as a way to solve the problem.
Tip
Gmail, Google’s free email service, lets you retrieve email from it with your normal email software such as Outlook or Outlook Express. You won’t need any add-ins to do it. For details, see [Hack #63] .
Once you’ve configured it, use it as you would any other POP3 mail account.
Gmail Hacks
The best search engine on the planet now has the best web-based email on the planet. Here’s how to get more out of it.
If you’re looking for a free, web-based email service, the best one, hands down, is Gmail. It offers more storage than any of the others (as of this writing, a whopping 1GB’s worth), lets you search through your mail using all of Google’s searching syntax, lets you use your normal email software to receive mail via POP3...the list could go on. Suffice it to say, it’s the one to use.
Because there’s so much to Gmail, you might not know all of its features, or how to get the most out of it. In this hack, you’ll learn how to import contacts from your existing email software into Gmail, how to use your normal email software to receive Gmail, and how to use Gmail as a virtual drive so that you can use the service as if it were an extension of your hard drive.
Import Your Contacts into Gmail
You’ve most likely got dozens or hundreds of contacts in your existing email software. It would be nice to get them into Gmail. It’s not that tough to do; it’s essentially a two-stage process. Gmail can import contacts in the comma-separated values (CSV) format, so first you have to export your contacts into a CSV file and then import them into Gmail.
How you export your contacts varies according to your email software. In Outlook, choose File → Import and Export, and the Import and Export Wizard launches. Choose “Export to a file,” click Next, and from the screen that appears choose Comma Separated Values (Windows). From the next screen, choose your Contacts folder, as shown in Figure 6-11, and click Next.

From the next screen, give the file a name (a .csv extension will be automatically added to it), browse to the folder where you want to save it, and click Next, and then Finish.
Now that you have the file ready, go to your Gmail account and click Contacts on the left side of the screen. Click Import Contacts from the upper-right side of the page that appears. Click the Browse button, then navigate to the folder where you’ve exported your contacts, select it, and click Open. Now you should be at the screen pictured in Figure 6-12, with your information filled in. Click Import Contacts.

After a minute or more, depending on the speed of your Internet connection and how many contacts you’re importing, you’ll get the message shown in Figure 6-13, telling you that your contacts have been imported, and listing the total number of contacts you’ve imported. Click the Close button. Now your contacts will be available. To see them, on the Contact screen click All Contacts.

Use Gmail as a POP3 Account
Unlike other web-based email services, you can use your regular email software to receive mail using a POP3 mail server. (To do this with Yahoo! Mail or Hotmail, you’ll need add-in software [Hack #62] .) You’ll first have to configure Gmail to let you do it, and then you’ll have to tell your email software to retrieve the mail.
In Gmail, click Settings and then click the Forwarding and POP link at the top of the page. The screen shown in Figure 6-14 appears.

If you want your email software to retrieve all the email you’ve ever received on Gmail, choose Enable POP for all mail. Be very careful before making this selection. Remember, Gmail gives you up to 1GB of storage, so if you’ve received a lot of mail, you could end up downloading hundreds of megabytes of mail when you make your first connection to Gmail using your email software. Also keep in mind that even if you have only a little mail in your Inbox, that’s not all the email you have in your Gmail account. Most of your mail is in the Archive folder, and you might have hundreds or thousands of messages there, even if they’re not currently showing in your Inbox.
If you choose Enable POP only for mail that arrives from now on, only those messages you receive after this point will be downloaded to your email software. It’s a much safer choice. If you want some old mail downloaded, you can always go into your Gmail account and forward the mail to yourself. That way, the forwarded mail will be treated as new mail and will be downloaded, while all the rest of your old mail won’t be downloaded.
Next, make your choice about what should happen to your Gmail messages: should they be kept on the Gmail server, and if they are, should they be kept in the Inbox or in the Archived mail? Here are your choices:
Keep Gmail’s copy in the Inbox
This will leave all new mail on the Gmail server, and leave it in your Inbox. That way, even after you download it to your PC, it will stay in the Gmail Inbox on the Web, as if you hadn’t read it.
Archive Gmail’s copy
This will leave all new email on the Gmail server, but instead of putting it into your Inbox, it will move it to your Archived mail. So, whenever you visit Gmail on the Web, if you want to see the mail, go to your Archive.
Trash Gmail’s copy
This will move all the messages to your Trash, where it will be cleaned out by Gmail on a regular basis.
Now it’s time to configure your email program to get
your Gmail mail. You set it up as you do any other new mail account.
For your POP3 server, use pop.gmail.com, and for
your SMTP server, use smtp.gmail.com. When setting
it up, make sure to tell your software to use a secure connection
(SSL) for both SMTP and POP3.
So, for example, here’s how you would set up Outlook
for POP3 Gmail. After you’ve enabled POP3 access in
Gmail, launch Outlook and choose Tools → E-mail Accounts.
Choose “Add a new e-mail account”
and click Next. From the Server Type screen that appears, choose POP3
and click Next. On the screen that appears next, enter your name,
your email address, and your username and password. In the Incoming
Server (POP3) box, type pop.gmail.com and in the
Outgoing mail server box, type smtp.gmail.com.
Check the box next to “Remember
password.” The filled-out screen should look like
Figure 6-15.

Now, click More Settings and then choose the Advanced tab. In both the POP3 and SMTP sections, check the box next to “This server requires an encrypted connection (SSL).” When you do that, the port numbers for the servers will change. For POP3, the port number should change from 110 to 995. If it doesn’t, type 995 in the Incoming Server (POP3) box. For SMTP, type 465 in the Outgoing Server (SMTP) box. Now click the Outgoing Server tab. Check the box next to “My outgoing server (SMTP) requires authentication.” Select “Use same settings as my incoming mail server.” Click OK. You’ll come back to the screen pictured in Figure 6-15. Click Next and then Finish. Now you should be able to send and receive mail using Gmail.
Use Gmail as a Virtual Hard Drive
With all of that extra space on Gmail, wouldn’t it be nice to use some of it for storage rather than mail?
You can, with a free piece of software called GMail Drive shell extension. Download it from http://www.viksoe.dk/code/gmail.htm and install it. (It works only with Internet Explorer, Version 5 and above.)
After you install it, run Windows Explorer. Under My Computer, a new drive will have been created, called the Gmail Drive. Click it, and type in your Gmail password and username. If you don’t want to have to log in every time you click the drive, check the box next to Auto Login.
You can use the Gmail drive as you can any other folder on your hard drive. (You’ll of course have to be connected to the Internet for it to work.) This means you can copy files to it using Windows Explorer in the same way that you do any other files, and you can create subfolders as well.
Warning
The Gmail drive looks like any hard drive on your system, but remember that it’s a virtual drive and you’re connected to it over the Internet. So, you can transfer files to it only at the speed of your Internet connection. On a dial-up connection, this will be exceedingly slow.
But when you view the contents of your Gmail drive, the icons for the files won’t look like the normal ones, as you can see in Figure 6-16. Instead of showing the native icons for each file type (such as pieces of paper for Word files), they’ll show as gear-type icons.
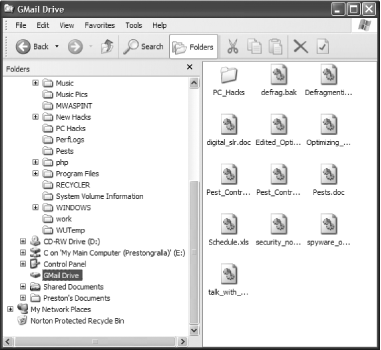
When you copy a file to your Gmail drive, you’re actually creating an email and posting it to your account. The email will appear in your Inbox, with the file as an attachment, as shown in Figure 6-17. If you want to open any of the files from inside Gmail, click the email to view it, and then click the Download button. The file will be downloaded to your PC. Of course, you don’t want to do this because the file is already on your PC.

As you can see from Figure 6-17, using Gmail as a virtual drive can make your Inbox pretty messy. Luckily, you can create a filter that will automatically route the files to your archived mail folder. That way, you’ll never see them in your Inbox, and they’ll be in your archives.
The emails with the files attached to them all show up preceded by
the letters GMAILFS. So, create a filter that will move all files
with that prefix to your archived mail by first clicking Create a
Filter from the top of the Gmail screen. In the Subject box, type
GMAILFS, check the box next to
“Has attachment,” and then click
Next Step. Then check the box next to Skip the Inbox (Archive it) and
then click Create Filter, and all your files will be sent straight to
your Archive, bypassing the Inbox.
You can also have them labeled so that you know at a glance which files you copied from your hard disk. Before clicking Create Filter, check the box next to “Apply the label.” From the drop-down box next to it, select New Label, and from the screen that appears, type in the label name (such as Hard Drive), and click OK. From the drop-down list, choose your new label. Now click Create Filter. The files will be archived, but will also have the label next to them, so you can easily view only your files by clicking the Hard Drive label when you log in to Gmail.
Warning
It’s not a good idea to use Gmail as your hard drive if you’re going to be using POP3 to retrieve your email from Gmail with your email software. If you do that, whenever you retrieve email from Google, you’ll also retrieve all the files you’ve copied to Google when you used it as a virtual hard drive, which can be hundreds of megabytes.
See Also
Many other free add-ins extend the functionality of Gmail—for example, to notify you when you have mail in Gmail, to keep a to-do list, and so on. Find them at http://www.marklyon.org/gmail/gmailapps.htm.
Fire Outlook and Outlook Express
Contrary to popular belief, Microsoft doesn’t make the only two email programs on the planet. Eudora, Thunderbird, and Pegasus are great, free alternatives.
Strange, but true: before Outlook and Outlook Express, there was email software. I know this because I used it all the time. That email software is still around, and some believe it is superior to Outlook and Outlook Express in some ways. While many alternative email programs are out there, two of my favorites, Eudora and Pegasus, have both been around a very long time. And Thunderbird is an open source alternative that’s been developed in concert with the great Firefox browser [Hack #43] . While all of them have some drawbacks, they each have enough unique features that they might make you want to throw away Outlook and Outlook Express.
Check Your Mood with Eudora
Once upon a time, Eudora ruled the roost. In the pre-Outlook and pre-Outlook Express days, you’d find it on the desktops of power users everywhere. Although it’s not nearly as popular today, it has its fans, and with good reason, because it has some unique features you won’t find in any other email software.
Foremost is one of the all-time great features in an email program, a feature that will be welcomed gladly by anyone who has ever blasted out a red-hot email in a fit of anger. As you type, Eudora’s MoodWatch feature analyzes your messages for their degree of aggressiveness and rates them on a scale of one ice cube all the way up to three chili peppers. You see the rating as you write and you get a warning before sending the message if it might be offensive.
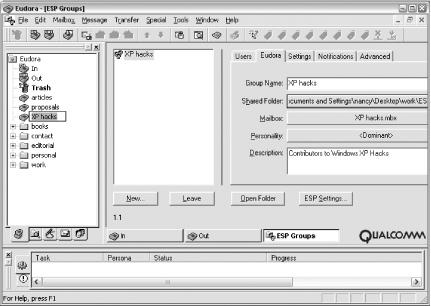
Another goody is the ability to share files on a peer-to-peer basis with other Eudora users, through the Eudora Sharing Protocol (ESP). You define groups of people with whom you want to share files, and they’re the only ones who can access those files. In turn, you can share files with people who give you access to files on their computers. The New ESP Share Group Wizard walks you through setting up a share group. Choose Tools → ESP Groups → New, click “Create a brand new share group,” and then click Next.
You can customize many features of this tool, including the ability to set up a new mailbox just for users in this group so that the messages from users in your new group will be filtered automatically into the appropriate mailbox. The wizard prompts you for this and other options, including share group name, share group description, transfer to new or existing mailbox, share group folder (choose where the files to be shared with the group will live), and even the choice of which Eudora personality—dominant or otherwise—should be associated with the file share group.
You can also set all Eudora preferences for each file share group (right-click the group’s name and choose Options) and set filtering options for messages from the file share group with the ESP Settings button. You can specify each user’s role within the group (can they send updates, only receive updates, or both?). Once you’ve set your preferences, you can share files across machines and collaborate on any sort of document (see Figure 6-18).It’s pretty amazing, and might even convince non-Eudora users to make the switch.
Also included is a way to send voice messages via email, as well as very powerful filtering and searching capabilities. If you’re a statistics hound, you’ll find a usage stats area (Tools → Statistics) that analyzes and displays statistics, such as how much time you’ve spent using the program and the time of day you send and receive the most messages. Email addicts will love it (see Figure 6-19).

An ad-supported version of Eudora is available for free from http://www.eudora.com. If you want to do away with the ads, you can either pay $49.95 or switch to the “light” version, which lacks some of the program’s features.
Move Forward to the Past with Pegasus
If you’re a longtime computer user, Pegasus might remind you of your youth, when there were no common interface standards and a program reflected the personality of individual programmers rather than focus groups and user interface whizzes. In part, that’s because this program was first released in 1990, in the days of Windows 3.0. Its eccentric layout and tiny icons will whisk you back in the Wayback Machine to those days gone by.
That is this program’s strength and its weakness. Good luck trying to figure out this program when you first install it; it’s bristling with often-undecipherable icons. Even the tool tips that appear when you hold your mouse cursor over these icons don’t necessarily help. For example, can anyone explain to me what “Open a list of local people on your system” means?
However, the strength is that these eccentricities carry over into the list of the program’s features, and it’s a very powerful program. The way in which it handles rules for how to automatically process incoming messages is extremely sophisticated. For example, you can use it to create a set of rules that will let you automatically allow people to subscribe to listserv email discussion groups that you run using Pegasus.
Its message-viewing capabilities are also exceptional. You can choose a view that lets you quickly switch between displaying an HTML message either as plain text or as full-blown HTML, and in the “Raw view” you can see the entire message, including all the header information showing you the path the email took to reach you.
Some decidedly odd features also are buried deep in this program. For example, one feature lets you send an email that includes preformatted text telling someone he’s received a phone call. Somehow, I don’t think that one came out of a focus group.
Pegasus is free and available from http://www.pmail.com. If you want manuals and support, you can pay $29.95.
Use Open Source Thunderbird
Thunderbird (shown in Figure 6-20) is a remarkably powerful program, particularly because it’s free. It’s open source software and is being developed by Mozilla.org, which also develops the Firefox and Mozilla browsers.
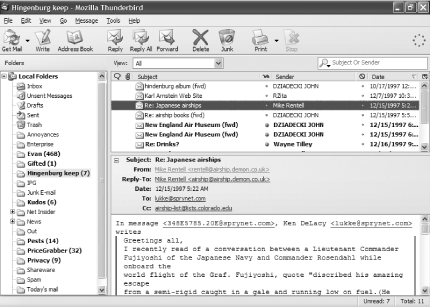
You’ll find just about everything you want in an email program here: a spam killer, the ability to get and read RSS feeds, the ability to read newsgroups, the ability to handle multiple email accounts, excellent search tools, very good filters that make it easy to find the email you want fast—there’s lots more here as well. For example, it also includes built-in encryption for more secure emails. Particularly useful is the ability to group mail in your folders by several criteria, including date, priority, sender, recipient, status, subject, or label.
When you install it, it will import your messages and contacts from other email programs, including Outlook, Outlook Express, Netscape Mail, and Eudora. If you’ve got a lot of mail, this can take some time.
Like Firefox, Thunderbird can use extensions, free add-ins that give it extra features. Some extensions, for example, let you use mouse gestures to open, close, and send email, as well as accomplish other tasks; you hold down the right mouse button and move your mouse in a certain way, and it accomplishes the task. Other add-ins let you read RSS feeds, control your music player, and more.
It’s free; get it at http://www.mozilla.org/products/thunderbird.
See Also
If you decide to stick with Outlook but want a way to improve it, try Nelson Email Organizer (http://www.caelo.com). It offers ways to manage your email overload better, automatically sorts your email by putting it into a variety of easy-to-use folders, does lightning-quick searches on your mail, notifies you when new email arrives, and lets you view your email with many different views. It’s shareware and free to try, but if you continue to use it, you are expected to pay $39.95.