Giving your blog a new look
Adding widgets to your sidebar
Upgrading your free
WordPress.comblog
You don't want your blog to look identical to everyone else's, do you? Although WordPress.com doesn't give you the vast array of design options that you'd have by hosting your own blog, you do have some flexibility.
The great thing about the WordPress hosted service is how easily you can change your theme to one of the alternative designs available. What's not so hot is that you can't create your own custom theme. As noted later in this chapter, you can pay a fee to customize the CSS of the template you've chosen to use, but you need to be familiar with CSS to use this upgrade — and there again, you're limited to customizing only the templates that WordPress provides.
In this chapter, you discover the WordPress.com themes that let you choose a design and format for your blog. You have some fabulous themes to choose among, all created by WordPress users. At this writing, 86 themes are available. You also explore the fun of using sidebar widgets to rearrange how your blogroll, category and monthly archive lists, and page lists are displayed.
This chapter also discusses enhancing your blog with custom CSS (Cascading Style Sheets), choosing a domain name, and increasing the amount of hard drive space on your WordPress.com account through its upgrade feature (for a fee).
It's time to choose a theme for your WordPress.com blog. In this case, the word theme is synonymous with the words design and template. All three words describe the very same things: the visual layout and appearance of your blog.
Follow these steps to find your theme:
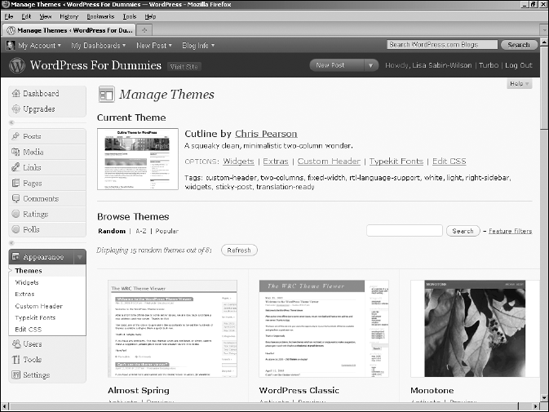
In the Dashboard, click the Themes link on the Appearance menu.
A page full of themes appears (as shown in Figure 5-1), along with a thumbnail image of the theme so that you can get a basic idea of what it looks like.
Scroll through the themes, and when you find a theme you like, click its name or the thumbnail image associated with it.
Tip
You can page through the list of available themes by using the handy buttons at the top-right and bottom-right corners of the Available Themes section. Or you can use the drop-down menu in the top-left corner of the Available Themes section to filter your theme choices by color, columns, width, and option refer to Figure 5-1.
What happens next is pretty nifty! A box pops up, showing you a preview of what your own blog would look like with that particular theme.
Click the Activate link in the top-right corner to activate the theme on your own blog, or click the X in the top-left corner if you decide you'd rather not use that theme.
No, really — it's just that easy. If you get tired of that theme, go to the Design tab and click a different theme name, and you're done.
It really is that easy!
WordPress widgets are very helpful tools built in to the WordPress.com application. They allow you to easily arrange the display of content in your blog sidebar, such as your blogroll(s), recent posts, and monthly and category archive lists. With widgets, arrange and display the content in the sidebar of your blog without having to know a single bit of PHP or HTML.
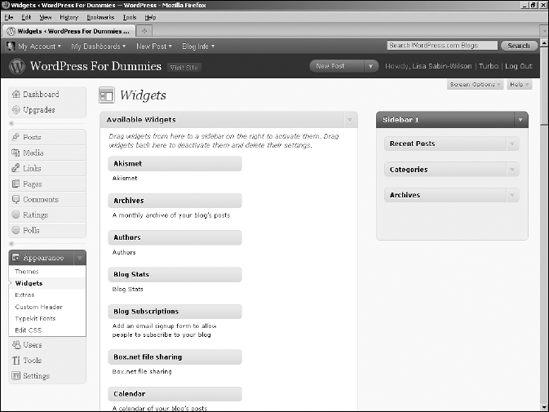
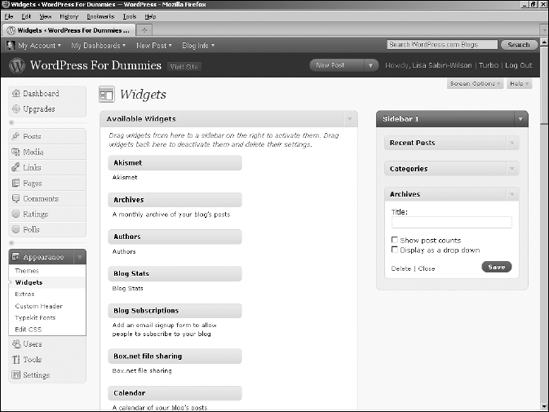
Click the Widgets link on the Appearance menu in the Dashboard. The Widgets page displays the available widgets, as shown in Figure 5-2. This feature is a big draw because it lets you control what features you use and where you place them — all without having to know a lick of code.
On the left side of the Widgets page is a listing of all widgets available for your WordPress.com blog.
On the right side of the Widgets page are the widgets you're using in your sidebar. Figure 5-2 shows that I am using the following widgets in my sidebar:
Recent Posts
Categories
Archives
The Widgets page also includes a drop-down menu in the Current Widgets section (refer to Figure 5-2). If you're using a theme that has only one sidebar, the Widgets page has only one sidebar for you to configure. If you are using a theme with two sidebars (usually called a three-column layout), use the drop-down menu to toggle between Sidebar 1 and Sidebar 2. When you want to configure widgets for Sidebar 1, be sure that Sidebar 1 is selected in the drop-down menu; when you want to configure widgets for the second sidebar, choose Sidebar 2. Click the Show button to load the widgets for that sidebar on your screen.
To add a new widget to your sidebar, follow these steps:
Choose the widget you want to use.
You find all the widgets are listed in the Available Widgets section. For the purpose of these steps, choose the Archives widget.
Click the Widget menu bar.
Use your cursor to drag and drop the widget over to the Sidebar section on the right side of the page. The widget is now located in your sidebar, and the content of the widget now appears on your site in the sidebar.
Click the arrow you see to the right of the widget title.
Click the arrow to see drop-down menu with options for the widget. Each widget has different options that you can configure. The Archives widget, for example, lets you configure the title, the display of the post counts, and the display of the archives (see Figure 5-3).
Select your options and click the Save button.
The options you've set are now saved. Click the Close link to close the widget options menu.
Arrange your widgets in the order in which you want them to appear on your site by clicking a widget and dragging it above or below another widget.
Repeat this step until your widgets are arranged the way you want them.
To remove a widget from your sidebar, click the arrow to the right of the widget title to open the options menu, and then click the Delete link. WordPress removes the widget from the Current Widgets list on the right side of this page and places it back in the Available Widgets list.
After you've selected and configured all your widgets, click the Visit Site button at the top of your WordPress Dashboard (you'll see it to the right of your site name), and your blog's sidebar matches the content (and order of the content) you've arranged in the sidebar on the Widgets page. How cool is that? You can go back to the Widgets page and rearrange the items, as well as add and remove items, to your heart's content.
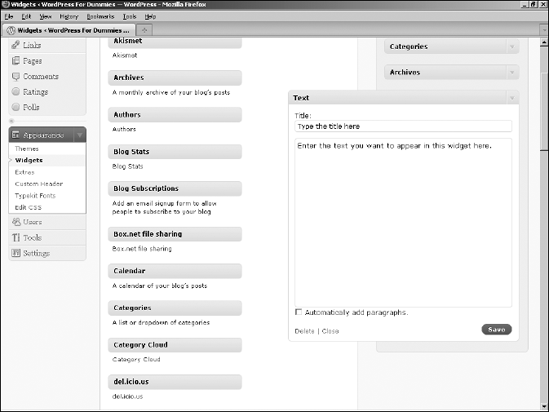
The Text widget in WordPress.com is a little different from the rest of the widgets you encounter on the Widgets page. Add the Text widget just as you would any other, using the steps I outline in the preceding section. After you have it settled in the sidebar, click the arrow to the right of the Widget title. A text box drops down to let you type text or HTML code to insert a hyperlink or include an image file (see Figure 5-4). You can't, however, include any executable code, such as PHP or JavaScript, in a Text widget.
You have no real options to configure, but you can use this simple text box for several things. Here are a couple of examples of what you can use a Text widget for:
Type a short paragraph of text, such as a bio.
Insert the HTML code to display an image in your sidebar. (See Chapter 13 for some information on basic HTML codes you can use.)
The RSS widget lets you display content from another blog in your sidebar. If I wanted to display a list of recent posts from another blog that I have somewhere else, for example, I would use the RSS widget to accomplish this task. Follow these steps to add the RSS widget to your blog:
Add the RSS widget to your sidebar on the Widgets page.
Follow the steps in the "Selecting and activating widgets" section, earlier in this chapter, to add the widget.
Click drop-down arrow to the right of the RSS widget's name.
A box drops down, displaying the different options you can configure for the RSS widget.
In the Enter the RSS URL Here text box, type the RSS URL of the blog you want to add.
You can usually find the RSS Feed URL of a blog listed in the sidebar.
Type the title of the RSS widget.
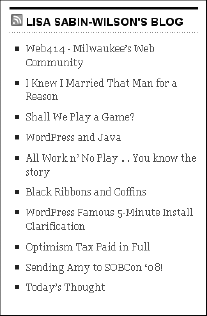
This title is what will appear in your blog above the links from this blog. If I wanted to add the RSS feed from my personal blog, for example, I would type Lisa Sabin-Wilson's blog.
Select the number of items to display
The drop-down menu here gives you a choice of 1-20 — select the number of items from the RSS feed that you would like displayed on your site.
(Optional) Select the Display the Item Content box.
Checking this box tells WordPress that you also want to display the content of the feed (usually, the content of the blog post from the feed URL). If you want to display only the title, leave the box unchecked.
(Optional) Select the Display Item Author, If Available box.
Select this option if you want to display the author's name along with the item's title.
(Optional) Select the Display Item Date box.
Select this option if you want to display the date the item was published, along with the item title.
Click the Save Changes button.
WordPress saves all the options you've just set and reloads the Widgets page with your RSS widget intact.
Figure 5-5 shows my WordPress.com blog displaying the content from my personal blog in the sidebar. I used the RSS widget to make this happen!
Although WordPress.com is a free service, it offers enhancements for a fee. WordPress.com calls these items upgrades, and you can purchase credits for them at the cost of $1 (USD) per credit. (The prices I give here are current as of this book's printing, but they are, of course, subject to change.) Click the Upgrades link in the Upgrades menu to display the Upgrades page, shown in Figure 5-6.
Following is a list of the current upgrades you can purchase to enhance your WordPress.com account, with the prices reflecting the annual cost:
Add A Domain: This upgrade allows you to add your own domain name to your
WordPress.comaccount; see the section "Naming Your Domain," later in this chapter. This service costs $5.00 for the domain registration and $9.97 for the domain mapping.VideoPress: This upgrade equips you with the ability to upload, store, and share your videos from your
WordPress.comaccount. This service covers the storage space that your video files take up on theWordPress.comservers. It costs $59.97 per year.Custom CSS: This upgrade lets you customize the Cascading Style Sheets (CSS) for the theme you're currently using in the
WordPress.comsystem. Recommended for users who understand the use of CSS, this upgrade currently costs $14.97 per year.Space Upgrades: With the free
WordPress.comblog, you have 3GB of hard drive space for use in your upload directory. The various space upgrades add more, letting you upload more files (images, videos, audio files, and so on). Currently, you can add 5GB for $19.97 per year, 15GB for $49.97 per year, or 25GB for $89.97 per year.No Ads: For the cost of $29.97 per year, you can ensure that your
WordPress.comblog is ad-free. Occasionally,WordPress.comdoes serve ads on your blog pages to try and defray the costs of running a popular service. If you'd rather not have those ads appearing on your blog, pay for the No Ads upgrade and you'll be ad-free!Unlimited Private Users: With a free account, you're limited to 35 private users — if you choose to publish your
WordPress.comblog as a private blog — giving access to only those users whom you authorize. This upgrade removes that limit, letting you have unlimited private users for your blog (provided that those users are alreadyWordPress.comaccount holders). The cost is $29.97 per year.

The URL for your WordPress.com blog is http://username.wordpress.com, with username being your username. My username is designs; therefore, my WordPress.com domain is http://designs.wordpress.com.
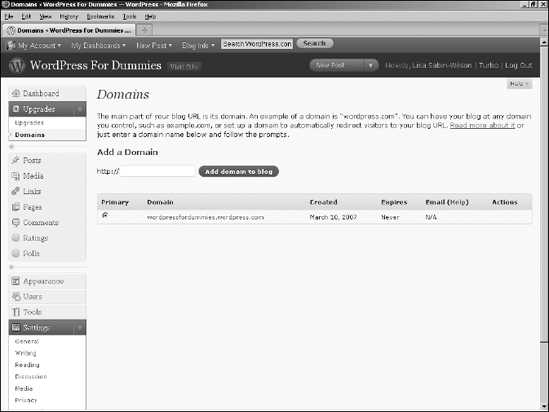
WordPress.com lets you use your own domain name for your WordPress.com blog. Using the Domains feature in WordPress.com is not free, however. At this writing, this feature costs $5.00 for the domain registration and $9.97 for the domain mapping.
When you have your domain registered, go to your WordPress.com Dashboard, click the Domains link in the Upgrades menu, click the Domains tab, and type your domain name in the Add a Domain text box (see Figure 5-7). Then follow the prompts to fully set up your domain name.
When you've configured your domain name correctly, your old WordPress.com URL redirects to your new domain name. If my domain name is LisaSabin-Wilson.com, my WordPress.com blog at http://designs.wordpress.com redirects to http://lisasabin-wilson.com.