Finding and buying a domain name
Finding Web hosting
Brushing up on FTP
Installing WordPress
Before you can start blogging with WordPress.org, you have to set up your base camp. Doing so involves more than simply downloading and installing the WordPress software. You also need to establish your domain (your blog address) and your Web hosting service (the place that houses your blog). Although you initially download your WordPress software onto your hard drive, your Web host is where you install it.
Obtaining a Web server and installing software on it are much more involved projects than simply obtaining an account with the hosted version of WordPress that's available at WordPress.com (covered in Part II). You have to consider many factors in this undertaking, as well as cope with a learning curve, because setting up your blog through a hosting service involves using some technologies that you may not feel comfortable with at first. This chapter takes you through the basics of those technologies, and by the last page of this chapter, you'll have WordPress successfully installed on a Web server with your own domain name.
You've read all the hype. You've heard all the rumors. You've seen the flashy blogs on the Web powered by WordPress. But where do you start?
The first steps toward installing and setting up a WordPress blog are making a decision about a domain name and then purchasing the registration of that name through a domain registrar. A domain name is the unique Web address that you type in a Web browser's address bar to visit a Web site. Some examples of domain names are WordPress.org and Google.com.
Tip
I emphasize the word unique because no two domain names can be the same. If someone else has registered the domain name you want, you can't have it. With that in mind, it sometimes takes a bit of time to find a domain that isn't already in use and is available for you to use.
When registering a domain name, be aware of the extension that you want. The .com, .net, .org, .info, or .biz extension that you see tagged on to the end of any domain name is the top-level domain extension. When you register your domain name, you're asked to choose the extension you want for your domain (as long as it's available, that is).
A word to the wise here: Just because you have registered your domain as a .com doesn't mean that someone else doesn't, or can't, own the very same domain name with a .net. So if you register MyDogHasFleas.com, and it becomes a hugely popular site among readers with dogs that have fleas, someone else can come along and register MyDogHasFleas.net, and run a similar site to yours in the hope of riding the coattails of your Web site's popularity and readership.
You can register your domain name with all available extensions if you want to avert this problem. My business Web site, for example, has the domain name EWebscapes.com; however, I also own EWebscapes.net, EWebscapes.biz, and EWebscapes.info.
Registering a domain costs you anywhere from $3 to $30 per year, depending on what service you use for a registrar and what options (such as privacy options and search-engine submission services) you apply to your domain name during the registration process.
Note
When you pay the domain registration fee today, you need to pay another registration fee when the renewal date comes up again in a year, or two, or five — however many years you chose to register your domain name for. (See the "Domain names: Do you own or rent?" sidebar.) Most registrars give you the option of signing up for a service called Auto Renew to automatically renew your domain name and bill the charges to the credit card you have set up on that account. The registrar sends you a reminder a few months in advance, telling you it's time to renew. If you do not have Auto Renew set up, you need to log in to your registrar account before it expires and manually renew your domain name.
Domain registrars are certified and approved by the Internet Corporation for Assigned Names and Numbers (ICANN). Although hundreds of domain registrars exist today, the ones in the following list are popular because of their longevity in the industry, competitive pricing, and variety of services they offer in addition to domain name registration (such as Web hosting and Web site traffic builders):
No matter where you choose to register your domain name, here are the steps you can take to accomplish this task:
Decide on a domain name.
Doing a little planning and forethought here is necessary. Many people think of a domain name as a brand — a way of identifying their Web sites or blogs. Think of potential names for your site; then you can proceed with your plan.
Verify the domain name's availability.
In your Web browser, enter the URL of the domain registrar of your choice. Look for the section on the registrar's Web site that lets you enter the domain name (typically, a short text field) to see whether it's available. If the domain name isn't available as a
.com, try.netor.info.Purchase the domain name.
Follow the domain registrar's steps to purchase the name using your credit card. After you complete the checkout process, you receive an e-mail confirming your purchase, so be sure to use a valid e-mail address during the registration process.
The next step is obtaining a hosting account, which I cover in the next section.
When you have your domain registered, you need to find a place for it to live — a Web host. Web hosting is the second piece of the puzzle that you need to complete before you begin working with WordPress.org.
A Web host is a business, group, or individual that provides Web server space and bandwidth for file transfer to Web site owners who don't have it. Usually, Web hosting services charge a monthly or annual fee — unless you're fortunate enough to know someone who's willing to give you server space and bandwidth for free. The cost varies from host to host, but you can obtain quality Web hosting services for $3 to $10 per month to start.
Web hosts consider WordPress to be a third-party application. What this means to you is that the host typically won't provide technical support on the use of WordPress (or any other software application), because support isn't included in your hosting package. To find out whether your chosen host supports WordPress, always ask first. As a WordPress user, you can find WordPress support in the official forums at http://wordpress.org/support.
Tip
Several Web hosting providers also have WordPress-related services available for additional fees. These services can include technical support, plugin installation and configuration, and theme design services.
Hosting services generally provide (at least) these services with your account:
Because you intend to run WordPress on your Web server, you need to look for a host that provides the minimum requirements needed to run the software on your hosting account, which are
PHP version 4.3 (or greater)
MySQL version 4.0 (or greater)
Tip
The easiest way to find out whether a host meets the minimum requirement is to check the FAQ (Frequently Asked Questions) section of the host's Web site, if it has one. If not, find the contact information for the hosting company, and fire off an e-mail requesting information on exactly what it supports. Any Web host worth dealing with will answer your e-mail within a reasonable amount of time (12–24 hours is a good barometer).
The popularity of WordPress has given birth to services on the Web that emphasize the use of the software. These services include WordPress designers, WordPress consultants, and — yes — Web hosts that specialize in using WordPress.
Many of these hosts offer a full array of WordPress features, such as an automatic WordPress installation included with your account, a library of WordPress themes, and a staff of support technicians who're very experienced in using WordPress.
Here is a list of some of those providers:
Warning
A few Web hosting providers offer free domain name registration when you sign up for hosting services. Research this topic and read their terms of service, because that free domain name may come with conditions. Many of my clients have gone this route, only to find out a few months later that the Web hosting provider has full control of the domain name, and they aren't allowed to move that domain off the host's servers, either for a set period (usually, a year or two) or for infinity. It's always best to have the control in your hands, not someone else's, so try and stick with an independent domain registrar, such as Network Solutions.
Web hosting services provide two very important things with your account:
Think of your Web host as a garage that you pay to park your car in. The garage gives you the place to store your car (disk space). It even gives you the driveway so that you, and others, can get to and from your car (bandwidth). It won't, however, fix your rockin' stereo system (WordPress or any other third-party software application) that you've installed — unless you're willing to pay a few extra bucks for that service.
Disk space is nothing more complicated than the hard drive on your own computer. Each hard drive has the capacity, or space, for a certain amount of files. An 80GB (gigabyte) hard drive can hold 80GB of data — no more. Your hosting account provides you a limited amount of disk space, and the same concept applies. If your Web host provides you 10GB of disk space, that's the limit on the file size that you're allowed to have. If you want more disk space, you need to upgrade your space limitations. Most Web hosts have a mechanism in place for you to upgrade your allotment.
Starting out with a self-hosted WordPress blog doesn't take much disk space at all. A good starting point for disk space is between 3–5GB of storage space. If you find that you need additional space in the future, contact your hosting provider for an upgrade in space.
Bandwidth refers to the amount of data that is carried from point A to point B within a specific period (usually, only a second or two). I live out in the country — pretty much the middle of nowhere. The water that comes to my house is provided by a private well that lies buried in the backyard somewhere. Between my house and the well are pipes that bring the water to my house. The pipes provide a free flow of water to our home so that everyone can enjoy their long, hot showers while I labor over dishes and laundry, all at the same time. Lucky me!
The very same concept applies to the bandwidth available with your hosting account. Every Web hosting provider offers a variety of bandwidth limits on the accounts it offers. When I want to view your Web site in my browser window, the bandwidth is essentially the pipe that lets your data flow from your "well" to my computer and appear on my monitor. The bandwidth limit is kind of like the pipe connected to my well: It can hold only a certain amount of water before it reaches maximum capacity and won't bring the water from the well any longer. Your bandwidth pipe size is determined by how much bandwidth your Web host allows for your account — the larger the number, the bigger the pipe. A 50MB bandwidth limit makes for a smaller pipe than does a 100MB limit.
Web hosts are pretty generous with the amount of bandwidth they provide in their packages. Like disk space, bandwidth is measured in gigabytes (GB). Bandwidth provision of 10–50GB is generally a respectable amount to run a Web site with a blog.
This section introduces you to the basic elements of File Transfer Protocol (FTP). The ability to use FTP with your hosting account is a given for almost every Web host on the market today. FTP is the method you use to move files from one place to another — for example, from your computer to your Web hosting account. This method is referred to as uploading.
Using FTP to transfer files requires an FTP client. Many FTP clients are available for download. Following are some good (and free) ones:
Earlier in this chapter, in "Finding a Home for Your Blog," you find out how to obtain a Web hosting account. Your Web host gives you a username and password for your account, including an FTP IP address. (Usually, the FTP address is the same as your domain name, but check with your Web host, as addresses may vary.) It is this information — the username, password, and FTP IP address — that you insert into the FTP program to connect it to your hosting account.
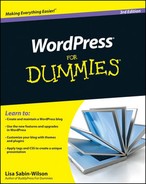
Figure 6-1 shows my FTP client connected to my hosting account. The directory on the left is the listing of files on my computer; the directory on the right shows the listing of files on my hosting account.
FTP clients make it easy to transfer files from your computer to your hosting account by using a drag-and-drop method. You simply click the file on your computer that you want to transfer, drag it over to the side that lists the directory on your hosting account, and drop it. Depending on the FTP client you've chosen to work with, you can refer to its user manuals or support documentation for detailed information on how to use the program.
By the time you're finally ready to install WordPress.org, you should have done the following things:
Purchased the domain name registration for your account
Obtained a hosting service on a Web server for your blog
Established your hosting account username, password, and FTP address
Acquired an FTP client for transferring files to your hosting account
If you've missed any of the items listed, you can go back to the beginning of this chapter to reread the portions you need.
Some Web hosts now offer a one-click installation process for WordPress. If this is the case for you, you can simply follow the instructions provided by your Web host. The instructions in this section are for those of you who are doing a manual install of WordPress on your Web server.
If you have to install WordPress manually, here's where the rubber meets the road — that is, you're putting WordPress's famous five-minute installation to the test. Set your watch, and see whether you can meet that five-minute mark.
Note
The famous five-minute installation includes the time it takes to install the software only. It does not include the time to register a domain name; the time to obtain and set up your Web hosting service; or the time to download, install, configure, and learn how to use the FTP software.
Without further ado, go get the latest version of the WordPress software here: http://wordpress.org/download.
Tip
WordPress gives you two compression formats for the software: zip and tar.gz. I recommend getting the zip file, as it's the most common format for compressed files.
Download the WordPress software to your computer and decompress (or unpack, or unzip) it to a folder on your computer's hard drive. These steps are the first in the installation process for WordPress. Having the program on your own computer isn't enough, however; you also need to upload (transfer) it to your Web server account (the one you obtained in "Finding a Home for Your Blog," earlier in this chapter). Before installing WordPress on your Web server, you need to make sure that you have a MySQL database all set up and ready to accept the WordPress installation. The next section tells you what you need to know about MySQL.
The WordPress software is a personal publishing system that uses a PHP-and-MySQL platform, which provides everything you need to create your own blog and publish your own content dynamically without having to know how to program those pages yourself. In short, all your content (options, posts, comments, and other pertinent data) is stored in a MySQL database in your hosting account.
Every time visitors go to your blog to read your content, they make a request that's sent to your server. The PHP programming language receives that request, obtains the requested information from the MySQL database, and then presents the requested information to your visitors through their Web browsers.
Every Web host is different in how it gives you access to set up and manage your MySQL database(s) for your account. In this section, I use a popular hosting interface called cPanel. If your host provides a different interface, the same basic steps apply; just the setup in the interface that your Web host provides may be different.
To set up the MySQL database for your WordPress blog with cPanel, follow these steps:
Log in to the administration interface with the username and password assigned to you by your Web host.
I'm using the cPanel administration interface, but your host may provide NetAdmin or Plesk, for example.
Locate the MySQL Database Administration section.
In cPanel, click the MySQL Databases icon.
Choose a name for your database, and enter it in the Name text box.
Be sure to make note of the database name, because you will need it during the installation of WordPress later.
Tip
For security reasons, make sure that your password isn't something that sneaky hackers can easily guess. Usually, I give my database a name that I will easily recognize later. This practice is especially helpful if you're running more than one MySQL database in your account. If I name this database something like WordPress or wpblog, I can be reasonably certain — a year from now, when I want to access my database to make some configuration changes — that I know exactly which one I need to deal with.
Click the Create Database button.
You get a message confirming that the database has been created.
Click the Go Back link or the Back button on your browser toolbar.
Choose a username and password for your database, enter them in the Add New User text boxes, and then click the Create User button.
You get a confirmation message that the username was created with the password you specified.
Warning
Make absolutely sure that you note the database name, username, and password that you set up during this process. You will need them in the next section before officially installing WordPress on your Web server. Jot them down on a piece of paper, or copy and paste them into a text-editor window; either way, just make sure that you have them immediately handy.
Click the Go Back link or the Back button on your browser toolbar.
In the Add Users to Database section, choose the user you just set up from the User drop-down menu; then choose the new database from the Database drop-down menu.
The MySQL Account Maintenance, Manage User Privileges page appears in cPanel.
Assign user privileges by selecting the All Privileges check box.
Because you're the administrator (owner) of this database, you need to make sure that you assign all privileges to the new user you just created.
Click the Make Changes button.
A page opens with a confirmation message that you've added your selected user to the selected database.
Click the Go Back link.
You go back to the MySQL Databases page.
To upload the WordPress files to your host, return to the folder on your computer where you unpacked the WordPress software that you downloaded earlier. You'll find all the files you need (shown in Figure 6-2) in a folder called /wordpress.

Using your FTP client, connect to your Web server, and upload all these files to your hosting account, into the root directory.
Tip
If you don't know what your root directory is, contact your hosting provider and ask, "What is my root directory for my account?" Every hosting provider's setup is different. On my Web server, my root directory is the public_html folder; some of my clients have a root directory in a folder called httpdocs. The answer really depends on what type of setup your hosting provider has. When in doubt, ask!
Here are a few things to keep in mind when you're uploading your files:
Upload the contents of the
/wordpressfolder to your Web server — not the folder itself. Most FTP client software lets you select all the files and drag 'n' drop them to your Web server. Other programs have you highlight the files and click a Transfer button.Choose the correct transfer mode. File transfers via FTP have two different forms: ASCII and binary. Most FTP clients are configured to autodetect the transfer mode. Understanding the difference as it pertains to this WordPress installation is important, so that you can troubleshoot any problems you have later:
For the most part, it's a safe bet to make sure that the transfer mode of your FTP client is set to autodetect. But if you experience issues with how those files load on your site, retransfer the files using the appropriate transfer mode.
You can choose a different folder from the root. You aren't required to transfer the files to the root directory of your Web server. You can make the choice to run WordPress on a subdomain, or in a different folder, on your account. If you want your blog address to be
http://yourdomain.com/blog, you would transfer the WordPress files into a folder named/blog.Choose the right file permissions. File permissions tell the Web server how these files can be handled on your server — whether they're files that can be written to. As a general rule, PHP files need to have a permission (
chmod) of 666, whereas file folders need a permission of 755. Almost all FTP clients let you check and change the permissions on the files, if you need to. Typically, you can find the option to change file permissions within the menu options of your FTP client.
The final step in the installation procedure for WordPress is connecting the WordPress software you uploaded to the MySQL database. Follow these steps:
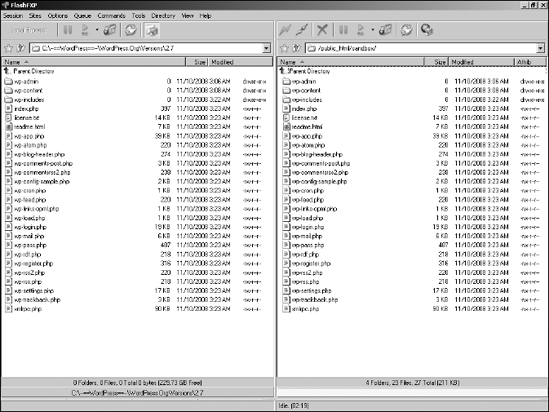
Type this URL in the address window of your browser, replacing
yourdomain.comwith your own domain name:http://yourdomain.com/wp-admin/install.php
If you chose to install WordPress in a different folder from the root directory of your account, make sure you indicate this fact in the URL for the install script. If you transferred the WordPress software files to a folder called
/blog, for example, you would point your browser to the following URL to run the installation:http://yourdomain.com/blog/wp-admin/install.php.Assuming that you did everything correctly (see Table 6-1 for help with common installation problems), you see the message shown in Figure 6-3.
Click the Create a Configuration File button.
The next page that opens is a Welcome to WordPress message, which gives you the information you need to proceed with the installation.
Click the Let's Go button at the bottom of that page.
Dig out the database name, username, and password that you saved earlier, and use that information to fill in the following fields (shown in Figure 6-4):
Database Name: Type the database name you used when you created the MySQL database before this installation. Because hosts differ in configurations, you need to enter either the database name or the database name with your hosting account username appended.
If you named your database wordpress, for example, you would enter that in this text box. Or if your host requires you to append the database name with your hosting account username, you would enter username_wordpress, substituting your hosting username for username. My username is lisasabin, so I entered lisasabin_wordpress.
User Name: Type the username you used when you created the MySQL database before this installation. Depending on what your host requires, you may need to append this username to your hosting account username.
Password: Type the password you used when you set up the MySQL database. You don't need to append the password to your hosting account username here.
Database Host: Ninety-nine percent of the time, you'll leave this field set to localhost. Some hosts, depending on their configurations, have different hosts set for the MySQL database server. If localhost doesn't work, you need to contact your hosting provider to find out the MySQL database host.
When you have all that information filled in, click the Submit button.
You see a message that says, "All right, sparky! You've made it through this part of the installation. WordPress can now communicate with your database. If you're ready, time now to run the install!"
Click the Run the Install button.
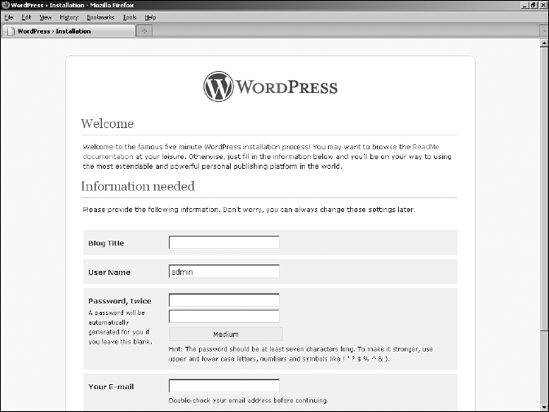
You see another welcome page with a message welcoming you to the famous five-minute WordPress installation process.
Enter or possibly change this information (shown in Figure 6-5):
Blog Title: Enter the title you want to give your blog. The title you enter isn't written in stone; you can change it at a later date, if you like.
User Name: This is the name you will use to log in to WordPress. By default, the username is admin, and you can leave it that way. However, for security reasons, it's recommended practice to change your username to something unique to you.
Password: Type your desired password in the first text box. Then type it again in the second text box to confirm that you've typed it correctly. If the two versions of your password don't match, WordPress alerts you with an error message. If you don't enter a password, one will automatically be generated for you.
Tip
For security reasons (and so other people can't make a lucky guess), passwords should be at least seven characters long and use as many different characters in as many combinations as possible. Use a mixture of uppercase and lowercase letters, numbers, and symbols (like ! " ? $ % ^ &).
Your E-Mail: Enter the e-mail address you want to use to be notified of administrative information about your blog. You can change this address at a later date, too.
Allow My Blog to Appear in Search Engines Like Google and Technorati: By default, this check box is selected, which lets the search engines index the content of your blog and include your blog in search results. To keep your blog out of the search engines, deselect this check box.
Click the Install WordPress button.
The WordPress installation machine works its magic and creates all the tables within the database that contain the default data for your blog. WordPress displays the login information you need to access the WordPress Dashboard. Make note of this username and password before you leave this page. Scribble it down on a piece of paper or copy it into a text editor such as Notepad.
Note
After you click the Install WordPress button, you're sent an e-mail with the login information and login URL. This information is handy if you're called away during this part of the installation process. So go ahead and let the dog out, answer the phone, brew a cup of coffee, or take a 15-minute power nap. If you somehow get distracted away from this page, the e-mail sent to you contains the information you need to successfully log in to your WordPress blog.
Click the Log In button to log in to WordPress.
Tip
If you happen to lose this page before clicking the Log In button, you can always find your way to the login page by entering your domain followed by the call to the login file (for example,
http://yourdomain.com/wp-login.php).You know that you're finished with the installation process when you see the login page, as shown in Figure 6-6. Check out Table 6-1 if you experience any problems during this installation process; it covers some of the common problems users run into.


So do tell — how much time does your watch show for the installation? Was it five minutes? Stop by my blog sometime (http://lisasabinwilson.com), and let me know whether WordPress stood up to its famous five-minute-installation reputation. I'm a curious sort.
The good news is — you're done! Were you expecting a marching band? WordPress isn't that fancy . . . yet. Give them time, though; if anyone can produce it, the folks at WordPress can.
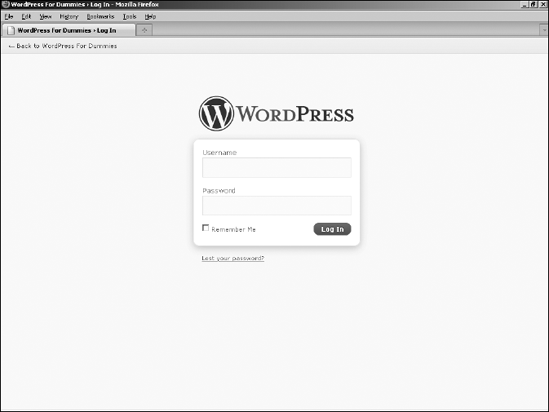
Table 6-1. Common WordPress Installation Problems
Let me be the first to congratulate you on your newly installed WordPress blog! When you're ready, log in and familiarize yourself with the Dashboard, which I describe in Chapter 7.