
The results of good production for picture are readily perceptible to the viewer—lighting, cinematography, composition, transitions, special effects, and so on. Not so with audio. When audio is well produced, it is complementary to the overall dramatic intent of the production and works as a subtle and powerful aspect of the whole. As producer/director George Lucas once commented, “Sound is fifty percent of the motion picture experience.”[1] However, if a sound track is poorly crafted or overly produced and the dialogue, sound effects, or music dominate, it detracts from the film-viewing experience. Nowhere in audio production is “invisibility” more important than with editing.
Editing is indispensable to the production process. Program segments may need to be rearranged, shortened, or cut out altogether. Directors commonly record elements of a program out of sequence; editing makes this possible. It also makes it possible to transpose parts of words; “recompose” music; change the character of a sound effect; improve the quality of dialogue; take out noises such as clicks and pops; eliminate mistakes, long pauses, coughing, “ahs,” “ers,” “ums,” and other awkwardness; record a segment several times and choose the best parts of each take; change the relationship of characters in a drama; create the pace; establish timing; and even redirect an entire storyline. The art of editing requires the ability to see a whole and build toward it while it is still in parts. The best editors have a first-rate ear and innate sensitivity to the aesthetics of sound.
Digital editing allows the assembly of digitally sampled material in or out of sequence, taken from any part of a recording, and placed in any other part of the recording almost instantly. It is therefore also referred to as nonlinear editing. Nonlinear editing is not new. Film and audiotape have always been edited nonlinearly; that is, a sound (or shot) is accessed in one part of a recording and added to another part of the recording, or deleted, in whatever order the editor chooses.
In the digital domain, nonlinear editing is done using hardware and software. These tools are far beyond anything an editor could envision in the days before computers; editing audio tape involved manual splicing with a razor blade. With even a basic nonlinear editor (NLE), it is possible to “see” a sound in its waveform, audition an edit at any stage in the procedure, cut, paste, and copy, adjust levels, add signal processing, and restore any change in the edited material to its original waveform at any time, quickly and seamlessly—all without endangering the master audio. A variety of programs support simple one- and two-track editing environments for mono and stereo audio, respectively, as well as multitrack layouts for more complicated productions. If needed, many editing software programs can display video in sync with the audio.
Digital editing affords the convenience of allowing any recording from almost any source to be transferred and coded or converted in the process. Once editing (and mixing, see Chapter 13) at the computer is completed, the audio may be sent on for mastering or transferred back to the distribution medium if video or online delivery is involved.
Many excellent audio-editing software programs are available. Although they vary in price and sophistication, they all perform functions similar to word processing or a graphics program, such as cut, paste, delete, insert, and so on. They also perform a variety of other functions, depending on the program’s complexity and application—from music recording to synchronizing sound with picture.
Given the number of editing programs available, it would be unwieldy to list and explain their many features here. The following section is a distillation of the basic functions found in many NLEs.
With an NLE, digital audio takes the form of a soundfile, which contains information about the sound such as amplitude and duration. When the soundfile is opened, that information is displayed as a waveform on the monitor.
The waveform displays the profile of a sound’s amplitude over time. By being able to see a representation of a sound, it is easy to spot its dynamics (see Figure 12-1). It is also possible to see greater detail in a waveform by zooming in, a feature that facilitates extremely precise editing. Once the soundfile is retrieved and its waveform displayed, it can be played back, or auditioned, to determine which of its sections is to be defined for editing.

As a sound is played, a cursor scrolls the waveform, enabling the editor to see precisely the part of the sound that is playing at any given moment. When the editor determines the part of the sound to be edited, the segment is highlighted as a defined region. Much like selected text in a word processing program, once a region is defined, the selected edit is performed only in that section of the waveform. The region can be cut from the waveform display or moved and/or copied to another part of the waveform or to another waveform. It can also be inverted or changed in level, envelope, frequency, and so on, up to the limits of the system.
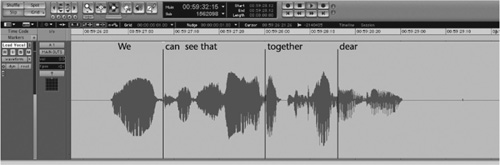
Keeping track of key events in a given region is essential and markers can be placed anywhere in the waveform to facilitate jumping the play cursor to the desired marker points. The marker can be a graphic identifier using a number, a letter, or text (see Figure 12-2).

Anytime in the editing process, the soundfile can be auditioned in a number of ways: from beginning to end, from the defined region, from marker to marker, looping, and at increased or decreased speed in either direction. This latter operation is called scrubbing.
Scrubbing lets you move the play cursor using a mouse through the defined region at any speed and listen to the section being scrubbed. With scrubbing, you can audibly and visibly locate with greater precision the in and out points of a defined region. Many NLEs have jogging and shuttling functions. Jogging facilitates an editor’s ability to navigate or skip through a clip, region, or entire project quickly and with greater ease.
As noted earlier, the basic operations in digital editing are similar to those in word processing, for example, when you delete a word entirely or cut or copy it from one part of a sentence and paste it elsewhere, or when you move entire paragraphs around. Once a region is defined, the Cut command removes it from its original location and copies it to the computer’s random access memory (RAM) for temporary storage. This section of computer memory is usually referred to as the clipboard. Using the Copy command, the defined region is added to the clipboard but is not cut from its original position. The Paste command copies the defined region from the clipboard and inserts it into the waveform immediately after the position of the play cursor. Additional paste functions facilitate how a defined region is placed in any part of the waveform. Undo/Redo allows reversing the previous edit or applying the edit (or change) again.
Snapping appends a defined region to another region, like a magnet with no gap or overlap between them. Slipping moves a defined region freely with spaces preceding or following it, or it can overlap a portion of another region. Spotting places a defined region into a specific location displayed in time code, minutes and seconds, bars and beats, or feet and frames.
There are also commands in digital editing similar to the insert and replace operations in word processing. Insert moves the audio that originally followed the play cursor to a point immediately following the newly inserted segment. Replace overwrites the audio immediately following the play cursor.
Scaling and zooming allow adjustments of the track view; that is, the waveform can be made taller or shorter, expanded to the right or left, widened to show more of its duration, or tightened to better display a more concentrated duration.
Trim or crop shortens or expands a defined region to a desired length. On most NLEs, it provides a quick way to remove noise or silence from the head or tail of an audio clip. There may also be a Delete Silence command that removes unwanted silences between words and sentences or on music tracks. A Limit Silence command determines the length of the silence to be removed.
Time compression and expansion decreases or increases the length of a sound file so that it plays for a shorter or longer period of time. With most editing programs, this is accomplished without changing the sound’s pitch.
Looping allows soundfiles to be repeated exactly at the touch of a button as many times as desired. A looping program may also facilitate creation of synthetic sounds and pitch shifting.
Track grouping moves two or more tracks when they have to retain a direct time relationship; in a music recording, for example, this function is used when one track contains the vocal, another track contains the accompanying guitar, and other tracks contain the supporting rhythm instruments.
Time displays include start display, which gives the start point of the current selection; end display, which gives the end point of the current selection; length display, which gives the duration of the current selection; and current time, which indicates the present point of the play cursor in a track. Data indicators can be displayed in time code, minutes and seconds, bars and beats, or feet and frames.
Still another advantage of digital editing is that the edits you make can be nondestructive. Nondestructive editing changes only the pointers, not the audio data. The original soundfile is not altered regardless of what editing or signal processing you apply. Destructive editing, on the other hand, changes the data by overwriting it. This raises the question: Why employ destructive editing when you can process a soundfile in any way you wish and still preserve the original? There are three answers: The editing program itself may be destructive, that is, changes to the files are temporary until the file is saved; destructive editing may be necessary when memory is limited—it is easier to save a single soundfile than both the original and the duplicate soundfiles; and it may be necessary when the edited soundfile has to be downloaded to another system.
Let’s go through a short editing procedure with a specific example: the guitar strums in Figure 12-3. The peaks in the waveform are where the volume goes up; the valleys are where the volume goes down. Different types of sounds produce different types of waveforms. Vowel sounds in speech and wind sounds, for example, produce waveforms with less pronounced peaks and valleys because they have softer attacks and longer decays (see Figure 12-4).

Figure 12-3. Editing example. Guitar strums must be edited to move the fifth beat to the first by (a) selecting the defined region to edit, (b) cutting it to the clipboard, and (c) pasting it to the first position.

Figure 12-4. Waveforms showing percussive and sustained sounds. Editing percussive sounds (a) is easier than editing sustained sounds (b) because percussives usually have distinct breaks in the audio.
Notice that the accents in the fifth beat, which begin at roughly 02:45, are played more strongly compared with the accents in the previous four beats. The challenge is to move this stronger strum from the fifth beat to the first and still maintain the 4/4 time. Whenever possible, define a region precisely before a volume peak and end it immediately before another volume peak. In this case, that would be from the instant before the fifth beat begins, at about 02:45, to the tail end of the beat sequence at what would be about 04:00.
The editing procedure would be as follows: Scrub the region to be edited until you are sure of the in and out edit points. If necessary, use the zoom magnification tool for a more precise look at the in and out points. These points can be verified using the current position indicator. Click on the selector and drag the cursor from the in point to the out point, thereby defining the region to be edited. Once the region is defined, clicking on the Edit menu Cut command removes the edit and places it on the clipboard.
To replace the edited region at the beginning of the track, position the cursor there and click on the Edit menu Paste command. Another method of making the move is to select the shuffle mode, assuming the edit has to snap to another region, and use the grabber tool to actually move the defined region. If placement of the edit is critical to maintaining the beat, the grid mode may be the one to use.
This example is quite basic and generalized. Techniques specific to editing dialogue, sound effects, and music are discussed later in this chapter.
Sequencing two sounds (or shots) involves creating a transition. Transitions are the connective tissue in any project; they establish pace and provide formal unity and continuity with regard to the relationship of parts to the whole. In audio, four techniques are used to make transitions: segue or cut, crossfade, soft cut, and fade-out/ fade-in.
Segue (pronounced “seg-way”) is a musical term that means “follow on.” In radio, it refers to the playing of two or more recordings with no live announcing in between or live announcing over the segue. In a broader sense, segue is analogous to the term cut used to describe transitions in TV and film. In this context, cutting from one element to another means establishing a picture or sound immediately after the previous picture or sound stops, and doing it at once, not gradually. In discussing the effects of this particular type of transition, we use the broader term cut. Cutting creates transitions that are sharp and well defined, picking up the rhythm of sequences.
The crossfade is another type of transition for smaller changes in time, locale, and action, although you can vary the length of these changes somewhat by increasing or decreasing its duration. The crossfade accomplishes the same thing as the fade-out/fade-in, but aesthetically it is softer, more fluid, and more graceful. It also maintains, rather than breaks, rhythmic continuity and pace.
The crossfade can be produced in a number of ways, depending on the crossfade times and the loudness levels of the sounds when they cross. Usually, it is more aesthetically satisfying to cross the sounds at the moment they are at full and equal loudness. This keeps audience attention “stage-center” with no loss of focus or gap in continuity (see Figure 12-5).
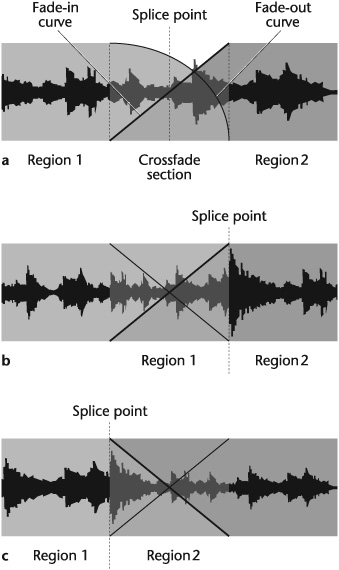
Figure 12-5. Common types of crossfades. (a) Standard, or centered, crossfade on both sides of the splice point. In this example the fade-in curve is linear and smooth, and the fade-out curve is gradual, reducing level steadily. (b) Pre-crossfade creates a crossfade before the splice point, thus maintaining the level of the beginning of region 2 instead of fading across it. Pre-crossfade is useful if there is a strong percussive downbeat or a loud sound at the beginning of region 2. (c) Post-crossfade generates the crossfade after the splice point. It is useful in maintaining the level of region 1 until it ends, to keep, for example, a strong upbeat or an exclamatory sound that occurs at the end of region 1.
A soft cut is a term used with picture when a shot change is brief but not quite as abrupt as a cut nor as deliberate as a dissolve. In audio, a soft cut can be used for transitions that need a quick, yet aesthetically, graceful change; to cover a minor technical apparency without appreciably affecting rhythm, tempo, pace, or dramatic intent; or to provide, as the term suggests, a somewhat gentler way to move from one audio cue to another.
The fade-out/fade-in transition is used to make a clearly defined change from one time, place, and action to another. Aesthetically, it is gentler than the cut; it gives a stronger sense of finality to an ending scene and a sense of new possibilities to the beginning scene. Faster fades suggest shorter lapses of time, smaller changes of location, or fewer events in a series of actions. They still provide a definite break in the presentation, but their quicker rate implies that less has happened. You should not, however, consider these guidelines as prescriptive. There are no formulas for how long transitions should be relative to the scenes they bridge; it is a matter of what feels right.
As with any creative activity, there are about as many approaches as there are players. From the various techniques used in digital editing, the following are a few generally accepted guidelines.
It is physically easier and sonically cleaner to select the in and out edit points at silent spots in the track.
If there is no silent spot, listen and look for the attack of a dynamic such as a hard consonant, a percussive hit, or other transient sound. The best place to edit is just before the dynamic. The quick burst of its onset usually provides enough separation from the preceding sound (see Figure 12-6).
If it is not possible to find a silent or well-defined point in the track, start and end the edit at zero crossings. A zero crossing is the point where the waveform crosses the centerline. It denotes a value of zero amplitude and divides the positive (upper) and negative (lower) parts of the waveform. By using this technique, you avoid or minimize the popping or clicking sound at the transition between two regions.
If the zero-crossing technique still yields too much unwanted sound at the edit point, crossfading smoothes the edit. A crossfade fades out one segment while fading in another and requires sufficient material on either side of the edit point with which to work (see Figure 12-7). Crossfades can vary in length from a few seconds to a few milliseconds. The audibility of a crossfade of a few milliseconds is virtually imperceptible.
In performing a fade-in, when a signal increases in amplitude from silence to the desired level over a period of time, or a fade-out, when a signal gradually decreases to silence, the rates of increase or decrease can vary. The rate of a fade’s curve can be linear—constant over the length of the fade; logarithmic—starting quickly and then slowly tapering off at the end; or S-type—starting quickly, slowing toward the middle, and then speeding up toward the end.
Avoid using time-based effects, such as reverb and delay, during recording. It makes pasting sections from different tracks difficult because they may not match. Dry, or unprocessed, tracks are far easier to edit because they provide a more uniform sound.

An essential part of organizing the editing stage of a project is the edit decision list.
The edit decision list (EDL) is a step-by-step list generated during editing. It includes the in and out edit points of a shot or an audio segment; the nature of the transitions; the duration of the edit; and, if needed, cross-references to other source media (i.e., whether the audio comes from a video track, a digital recorder, and so on).
The format of an EDL may be charted in whatever arrangement is most functional to a production and editing system. Generally, you should include clear, descriptive information that covers what, where and when. Coding is usually in time code, but with music it may be in minutes and seconds. Produce an EDL at the outset of editing to serve as the guide to subsequent editing sessions, during which it becomes a log and is revised and refined until the final edit. As an accurate record of all editing events, the EDL is indispensable both for control and as a timesaver.
The approach to organizing edit tracks obviously depends on the number of individual sound tracks involved. If only a few tracks are to be edited, which may be the case in, say, an interview, the procedure is apparent: Intercut the questions and the answers so the continuity is logical. But when numerous sound tracks are involved, which is likely in drama and music recording, it is necessary to devise a system whereby they are clearly named and organized to facilitate editing and mixing. There is no definitive way of doing this; audio editors use various approaches. The point is: Before any editing begins, name and catalog all the sounds and keep a running log throughout the editing process; otherwise mix-ups—or worse—are inevitable. List each sound and include appropriate information such as its content; time code address; film frame number; scene and take number, any special instructions for editing, signal processing, or mixing; and any problems with the sound such as noise, change in ambience, sudden dropout, a fluff in pronunciation, and so on.
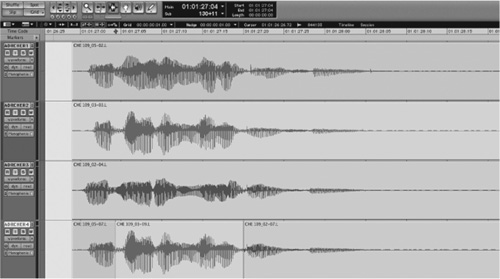
In productions with dialogue, music, and sound effects, first group the sound by category—often referred to as the DME tracks (see Figure 12-8). Then, further group them in each category. For example, the dialogue tracks may be arranged by character and then divided into dialogue from the production recording and dialogue from the automated dialogue replacement (ADR). Sound effects can be categorized as Foley, background, ambience, location, hard (or cut), soft, and design. A design sound effect does not exist in nature; it has to be created. A hard, or cut sound effect, such as a car ignition, door slam, or pistol shot, begins and ends cleanly requiring little adjustment in editing to remain in sync with the picture. A soft sound effect, such as crowd noise, buzzing, and ocean waves does not have a defined beginning and ending and does not explicitly synchronize with the picture.

Once sounds have been grouped, assign them to individual tracks, determining to the extent possible those sounds that do and do not have to overlap. This not only facilitates editing but also affects a sound’s placement in a track.
Managing all your soundfiles is an important aspect of organization in the editing process. Just as file management is a recordkeeping essential to avoid chaos in maintaining production details, so is drive management. With the ability of drives to process and store an ever-increasing magnitude of data, it is imperative to also catalog the information they hold. Devise whatever system works for you, but keep track of which drives contain which files and what soundfiles are where. Be sure to save work in progress often and back up your project frequently to a different drive. It seems like obvious advice, but too frequently the obvious is overlooked.
Editing picture is one-dimensional: One shot is cut, dissolved, or faded out and into another shot. Once the transition has been made, in terms of editing, little happens until the next transition.
Editing sound, on the other hand, is multidimensional. Sounds are layered within each shot, so editing audio becomes more than attending to transitions. In a scene, an actor may be speaking to another actor with traffic outside, a clock ticking, a bath running in another room, footsteps moving back and forth, and music underscoring the action. All these elements have to be edited so that the various sonic layers are properly matched and synchronized and the perspectives are maintained.
Among the considerations basic to editing speech and dialogue are recognizing the sounds that make up words; cutting together similar and dissimilar sounds; handling emphasis and inflection; and matching ambience (or room tone).
Editing speech more often than not requires dealing with the sounds that make up a word rather than with the entire word. These sounds are called phonemes—the smallest unit of speech capable of conveying a distinction in meaning, such as the p and the b in the words “pat” and “bat” or the m and the d in the words “mark” and “dark.”
In editing, some sounds are easier than others to recognize. The easiest are those consonants with striking power, such as d, k, p, and t—sounds with a pronounced attack identified sonically by a click or pop and visually by a spike in the waveform (see Figure 12-9). Consonants are either voiced or unvoiced. A voiced consonant, such as the v in “vary,” issues from vocal tone (resonating the vocal cords) and breath. An unvoiced consonant, such as the p in “put,” is formed only of breath.
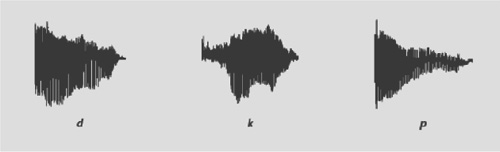
Figure 12-9. Waveforms of the consonants d, k, and p. These waveforms were generated by a female alto voice delivering them with emphasis. Waveforms of the same consonants will look different with other types of voices and deliveries.
The vowels a, e, i, o, and u are the most difficult to identify and separate because they lack any attack. Vowels usually blend with the other sounds in a word. This is particularly the case when they occur in a diphthong, such as ay-ih in “stay.” When vowels begin or are embedded in phrases in connected speech, their sound is more readily apparent. One way to locate vowels, or any sound that is difficult to perceive, is to listen for differences in pitch or to look for a change in the waveform, however slight.
Sometimes, sounds are run together and cannot be separated in the usual way with a cut. If cutting between sounds is still a problem, try the crossfade technique (described previously).
Editing dissimilar sounds in speech is easier than editing similar sounds because they are usually distinct and often flow more naturally. Consider the sentence, “Sound is both challenging and creative.” If we delete both, the edit will be made after is and before challenging. The s will be pasted to the ch and, because they are different sounds, the rhythmic transition between is and challenging is natural and distinct. Such is not the case with speech sounds that are similar or slurred together, such as “and Donna” or “Joe’s soda.” Editing in and out of similar sounds may require crossfading, cutting and replacing parts of key sounds to smooth transitions and retain the natural pattern of speech.
Another common problem for the sound editor is dealing with emphasis and inflection. Suppose the speaker says, “How are you?” with the emphasis on “you” to express concern. For some reason, the “you” is garbled, and without this word it is not possible to use the phrase. If it is unimportant, there’s no problem; but if it must be kept, there are three alternatives: Ask the person to deliver the line again, which may be impractical if not impossible; go through the recording to hear whether the person said “you” elsewhere with the same or almost the same inflection; or construct the word from similar sounds the speaker uttered.
Ambience is background sound. Other terms used synonymously are room tone and presence. Some people draw a distinction between these terms: ambience is any background sound that is part of a recording or has been added in postproduction; and room tone or presence is background sound recorded during actual production to provide the sound editor with the material to assemble sonically consistent backgrounds—not only for maintaining continuity of content but also for matching the background sounds.
One technique used to make the transition from one statement/background to the other is diverting the listeners’ attention. For example, if the ambience during one statement was quiet when the room was filled with people, and the ambience during the second statement was reflectant when the room was almost empty, you could try to locate in the recording a cough, a murmur, someone accidentally hitting the microphone, or some other distraction. Paste the distracter between the two statements (the distracter would also contain some room background) so attention momentarily is called to it instead of to the obvious change in background sound.
Another technique used to match backgrounds is to mix one background with another, or alternately crossfade them, to even them out. This assumes that the ambiences were recorded “in the clear” before or after the event. Always record at least a few minutes of room tone or ambience to have on hand for editing.
Still another approach frequently used to smooth a potentially awkward transition between two ambiences is to have the sound and the picture cut at slightly different places in the shot change. In this situation, the audio slightly precedes or carries into the succeeding visual edit. This is called split editing.
A common technique used to handle background sound is looping. A loop is a section of audio that is repeated, with its start and end having no perceptible edit point. When background sound, such as crowd, wind, or room tone, is continuous—particularly through lengthy scenes—running a continuous track could be unwieldy, take up unnecessary memory, or both. Using the automatic loop function in an NLE solves this problem. But remember: To be effective, a loop must sound continuous, not repetitive. To help eliminate a perceptible edit point, start and end the waveform on the zero crossing and avoid using material that has distinctive sonic events that may call attention to the loop.
In broadcasting, field reporting is so common that the audience has grown used to abrupt changes in levels and background sound within the same program. Nevertheless, change should be motivated and not unnecessarily jarring. With dialogue, however, audiences are more apt to be annoyed by uneven background sound. The best thing to do during the recording is to anticipate the editing.
Ambience is a concern not only in editing speech; it is also an important factor when editing sound effects and music. In all three domains, ambience—background sound—is usually not effective without foreground sound. The two together bring perspective, environment, and size to a scene.
Many of the techniques used in dialogue editing are also used in editing sound effects. If there is an essential difference between the two, dialogue editing mostly involves fixing, whereas sound-effect editing also involves creating. Among the typical challenges a sound effect (SFX) editor faces are building backgrounds, building effects, and matching perspective.
In shooting picture or producing material for radio, segments are often recorded out of order. In the various takes, background sound may change. Even if the location stays the same, background sound may change over time, however slightly, so it may not match a particular shot. Or a scene may be recorded in different areas of the same location. Or a required background sound may not be easily obtained during production and has to be created in the studio. Or it may be less costly to produce a background on a computer than to hire people to perform and record it. In such cases, it is the editor’s role to build the appropriate background sound.
For example, a scene requires the sound of a storm. This particular storm requires several different sonic components—wind, rain, thunder claps, and thunder rumble—and each component has to have a texture: fierce, howling wind; pelting rain; and thunder that tears and booms and then rolls into a long rumble. By processing and layering various prerecorded tracks of wind, rain, and thunder, an editor can build the appropriate storm effect. If the scene has a particular visual rhythm, the editor can cut the sound effects to complement it, adding yet another sonic dimension to the background.
A sound effects editor is often called on to create a specific sound effect by building it. The effect may be needed because it does not exist in the natural world, is unavailable due to poor production planning, to save the expense of paying for sound personnel and studio time to produce it, or because it is simply easier to create on a computer.
The sound of fire, for example, may require the components of crackle to convey the licking sound of its mounting threat, roar to enhance its intensity, and the whoosh of small explosions to add punctuated impacts. Soundfiles for each of these components can be created, manipulated, and processed by the sound editor to create the overall effect.
In dealing with different but related or connected sounds in the same locale, an editor has to be sure that perspectives match. For example, in editing the screech of tires to a car crash, the crash has to sound as though it came out of the screeching tires. It sometimes happens that the screech is heard close up and the crash far away, as if the sounds, though related, occurred in two different locations.
There is also the problem of making sure the sound effect is coming from the shot’s environment. If the ambience of the effect sounds as though it is coming from outside the shot, or, in the parlance of audio, on top of the film, the editor has to mix the effect into the appropriate background sound.
Here are some other guidelines that may prove helpful in editing sound effects:
Digitize sound effects at full level, even the quieter ones. When signal processing is used, it helps to prevent noise buildup and aids in masking noise. Level can always be lowered when called for.
It is easier to edit the SFX tracks after the dialogue and music tracks are in place. That way, the editor has a better sense of determining how to adjust levels so an effect is neither too loud nor too quiet.
A single sound effect may be composed of several different sounds. For example, opening a door may include the rattle of the doorknob, the turn of the knob, the click of the bolt, perhaps a squeak and a scrape of the door opening, the click of the knob release, and the squeak and the scrape plus the thud of the door closing.
Cut the effect as close to the first point of sound as possible.
Sound effects are ordinarily recorded and placed in a track in mono because most are single-source sounds. Ambience, however, is ordinarily not a single-source sound and is therefore handled in stereo or surround.
Place a percussive, or transient, effect—such as a door slam or the crack of a punch—where the action stops. Laying it in where the action starts will result in the effect’s seeming out of sync with the picture.
Most sounds have a natural decay, or tail. A sound may start suddenly with a sharp attack but does not stop that way; even transient sounds have some trail-off. Cutting into the tail will be noticeable unless another sound comes in over it and “washes it out,” or it is crossfaded with another sound.
When editing in a sound effect that occurs off-screen, it is usually distracting to lay it over dialogue. Spot the effect between two lines of dialogue.
Some sounds, such as a horse’s hoofbeats, are difficult to sync with picture. All four hooves cannot be synched. Generally, editors follow the first front leg and then establish the horse’s rhythm.
If, when looping an effect, it is difficult to achieve a seamless loop, try a very short crossfade at the hearable loop point. It should smooth the apparent beginning point of the repetition each time the sound is repeated.
Organize the SFX tracks so they are grouped: the mono effects on, say, tracks 1 through 8, the stereo tracks on 9 through 16, the ambience tracks on 17 through 20, tracks that require special signal processing on 21 through 24, and so on.
A music editor is usually a trained musician. This is particularly helpful in working with the composer. That said, editing music is difficult to discuss in any detail because it involves using one language—the printed word—to explain another language—the notes, chords, rhythms, and other features of abstract, temporal sound. Although there is some similarity between editing speech and dialogue and editing music, such as consideration of space, rhythm, loudness, and inflection (intonation), there are also differences. Music contains so many simultaneous sonic elements that matching sounds is more complex, and slight editing mistakes are more easily detected. In music editing, you have to consider cutting on the right accent to maintain rhythm, tonality, relative loudness, and style. If any of these elements is aurally incompatible, the edit will be obvious.
Generally, edits that heighten intensity cut together well, such as going from quiet to loud, slow to fast, or nonrhythmic to rhythmic. A transition from a seemingly formless or meandering phrase to one that is obviously structured and definite also tends to work.
Perhaps one of the most useful guidelines is to cut before an accent, a downbeat, or a resolution. Think of the final chord in a musical phrase or song. Although it resolves the music, it is the chord before it that creates the anticipation of and the need for resolution; it sets up the last chord. Edit on the anticipatory note—the one requiring some resolution, however brief—so that it leads naturally to the note being joined.
Most Western music has a time signature—2/4 (“two-four”), 3/4, 4/4, 3/8, 6/8, and so forth. The first numeral indicates the number of beats in each measure; the second indicates the value of the note that receives each beat. For example, in 4/4 time, there are four beats to a measure and each quarter-note receives a whole beat; in 3/8 time, there are three beats to the measure and each eighth-note receives a beat. In editing music, you have to preserve the beat, or the edit will be noticeable as a jerk or stutter in the tempo. If you cannot read music or no sheet music exists, pay close attention to the waveform of the music to discern the tempo. Listen to the beat and look for the resulting spike in the waveform.
One way to shorten or lengthen audio material through editing is to use repetitive measures in the music. These measures can be cut out to shorten material, which is obvious. Lengthening the audio using a digital system is relatively straightforward: Repetitive measures can be extended by digital time expansion or by copying, pasting, and sliding them.
Preserving the tempo in music editing is not an isolated consideration. There are other factors such as looping, key signature, comping, and musical style and texture.
Looping is often used in dealing with tempo in music. Unlike dealing with sound effects, where the concern is making sure the loop sounds continuous and not repetitive, with music the concerns are making sure the loop both serves the score and, if necessary, can be adjusted to changes in tempo.
When editing loops, keep in mind the following tips:
Cut at the beginning of the first beat in the measure or bar, preferably immediately before the first cycle of the attack.
Edit immediately before the attack begins. Cutting into the transient could alter the envelope of the voicing and change its character.
The start and end points of the loop should start at zero crossing.
If the edit point is perceptible, perform a very small fade-in at the beginning of a loop and a very small fade-out at the end of the loop, or do a very small crossfade. Be sure to assign a file name to a loop, and note the tempo and the number of measures in the loop’s file name.[2]
Just as most music has a time signature to regulate its tempo, it also has a key signature—E major or B minor, for example—that determines its overall tonality. Some keys are compatible: When you change from one to the other, it sounds natural, or “in tune.” Other keys are not, and pasting them together is jarring, or “out of tune.” Unless it is for effect, or if the picture justifies the change, edited music should sound constant so as not to be noticed.
Comping takes the best part(s) of each recorded track and combines them into a composite final version. In theory, comping music seems straightforward: Edit together all the best takes of every note, phrase, section, lyric, or whatever. In practice, however, that approach often does not work because, overall, the music may lack coherence, sound too mechanical, or result in a part from one take not making sense when played next to a part from another take. There could also be problems in matching pitch—the segments may not be in tune; in the timing—performances may not have quite the same tempo or phrasing; in delivery—one segment may have a more impassioned performance than another; or in recording quality—segments may not have the same sonic fidelity. Maintaining perspective is critical if comping is to be aesthetically successful. It is analogous to a painter who has to work close to a canvas on a detail but must step back to view the entire painting to determine if the detail works (see Figure 12-10).
Each type of music and musical group has a unique style and texture. This distinguishes the style of jazz from hip-hop, the texture of one voice from another although both may have identical registers, or one group from another although both may play the same instruments and music.
Editing from the same piece of music usually does not present a problem in matching style and texture so long as you follow the other guidelines for editing. But if the music is from different sources, matching elements can be a problem. Normally, you would not edit different styles—a piece of classical music to rock music just because they had the same tempo, or a dance band to a military band just because they were playing the same song. Unless by design, the differences in sound would make the edits conspicuous and distracting.
Editing for long periods of time can cause listening fatigue—the reduced ability to perceive or remember the nuances of sound. In computer editing, the problem can be compounded by eyestrain and physical discomfort. If listening fatigue sets in during editing, it will become apparent: such features of sound as tempo, inflection, and tonality are continually mismatched, cuts are slightly off, and it is difficult to keep track of what should be edited to what.
One way to defer listening fatigue is to work in a quiet acoustic environment with no predominance of midrange frequencies because they tend to tire the listener faster. It is also important to remember to bring down playback gain after turning it up, as is often required to hear an edit point better. Finally, take regular breaks to rest the ears, stretch your muscles, and tend to anything else that brings relaxation.
Editing permits the rearranging, shortening, deleting, and recomposing of elements in a production. It allows elements to be recorded out of sequence and as often as necessary.
Digital editing allows the retrieval, assembly, and reassembly of disk-based material quickly and in any order—regardless of the order in which the material was recorded and its location on the disk.
A nonlinear editor (NLE) makes it is possible to audition an edit at any stage in the procedure, adjust levels, add signal processing, and restore any change in the edited material to its original waveform without endangering the master audio.
Audio encoded on a NLE takes the form of a soundfile, which is displayed in a waveform. A waveform displays the profile of a sound’s amplitude over time.
Basic functions in digital editing include scrubbing; cut, copy, paste, delete, insert, and typeover; undo/redo; snapping, slipping, and spotting; scaling and zooming; trim or crop; time compression and expansion; looping; track grouping; time displays; and crossfades.
Nondestructive editing does not alter the original soundfile regardless of what editing or signal processing you apply. Destructive editing permanently alters the original soundfile by overwriting it.
Transitions used in audio editing include the segue or cut, the crossfade, soft cut, and the fade-out/fade-in.
An essential part of editing is the edit decision list, a step-by-step list generated during editing of the in and out edit points of a shot or an audio segment, the nature of the transitions, the duration of the edit, and, if needed, the source reel numbers or time code addresses.
Before editing begins, organize the edit tracks by cataloging all of the sounds and keep a running log throughout the editing process.
As part of the organization, name each file.
Employ drive management: Keep track of which disk drives contain which files and what soundfiles are where.
Editing picture is one-dimensional: one shot is cut, dissolved, or faded out and in to another shot; little happens until the next transition. Editing sound is multidimensional: Sounds are layered within each shot, so editing audio becomes more than attending to transitions.
Among the considerations basic to editing speech are recognizing the sounds that make up words; cutting together similar and dissimilar sounds; handling emphasis and inflection; and matching ambience.
Among the challenges a sound-effect editor deals with are building backgrounds, building effects, and matching perspective.
When editing music, attention must be paid to cutting to resolution, preserving tempo, repetitive measures, looping, key signature, comping, and style and texture.
Comping takes the best part(s) of each recorded track and combines them into a composite final version.
Editing for long periods of time can cause listening fatigue. Take regular breaks.