
There are probably as many approaches to microphone selection and placement as there are producers of audio. This chapter covers basic, time-tested techniques as they apply to miking the speaking voice in various broadcast and production settings and miking for music recording. They are intended only as guidelines; there is no intention of suggesting that they are the best or only approaches.
Before moving on it is necessary to say a word about phase and polarity. In acoustics phase is the time relationship between two or more sound waves at a given point in their cycles (see Chapter 1). In electricity polarity is the relative position of two signal leads—high (+) and low (–)—in the same circuit.
Phase is an important acoustic consideration in microphone placement. If sound sources are not properly placed in relation to mics, sound waves can reach the mics at different times and be out of phase. For example, sound waves from a source slightly off center between two spaced microphones will reach one mic a short time before or after they reach the other mic, causing some cancellation of sound. Perceiving sounds that are considerably out of phase is relatively easy: When you should hear sound, you hear little or none. Perceiving sounds that are only a little out of phase is not so easy.
By changing relative time relationships between given points in the cycles of two waves, a phase shift occurs. To detect unwanted phase shift, listen for the following; unequal levels in frequency response, particularly in the bass and the midrange slightly unstable, wishy-washy sound; or a sound source that is slightly out of position in relation to where it should be in the aural frame.
One way to avoid phase problems with microphones is to follow the three-to-one rule: Place no two microphones closer together than three times the distance between one of them and its sound source. If one mic is 2 inches from a sound source, for example, the nearest other mic should be no closer to the first mic than 6 inches; if one mic is 3 feet from a sound source, the nearest other mic should be no closer than 9 feet to the first, and so on (see Figure 7-1).
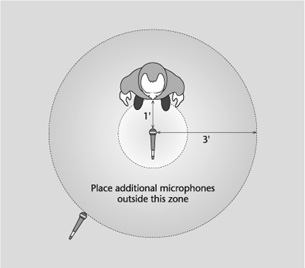
Figure 7-1. Three-to-one rule. Most phasing problems generated by improper microphone placement can be avoided by placing no two mics closer together than three times the distance between one of them and its sound source.
If a sound source emits loud levels, it might be necessary to increase the ratio between microphones to 4:1 or even 5:1. Quiet levels may facilitate mic placement closer than that prescribed by a ratio of 3:1.
Phasing problems can also be caused by reflections from surfaces close to a microphone bouncing back into the mic’s pickup.
Signals in a microphone circuit that are electrically out of polarity reduce sound quality or cancel the sound altogether. A common cause of mics being out of polarity is incorrect wiring of the microphone plugs. Male and female XLR connectors used for most mics have three pins: a ground, a positive pin for high output, and a negative pin for low output (see Chapter 6). (XLR five-pin connectors are used for stereo microphones.) Mic cables house three coded wires. All mics in the same facility must have the same-number pin connected to the same-color wire. If they do not and are used simultaneously, they will be electrically out of polarity.
To check the polarity of two mics, first make sure that both are delegated to the same output channel. Adjust the level for a normal reading as someone speaks into a mic. Turn down the fader and repeat the procedure with another mic. Then open both mics to the normal settings. If the meter reading decreases when the levels of both mics are turned up, there is a polarity problem. The obvious way to correct this condition is to rewire the equipment, assuming the problem is not in the mic itself. If there is no time for that, most multichannel consoles and hard-disk recording systems have a polarity reversal control that reverses polarity by 180 degrees (see Chapter 8).
Before getting into specific applications of miking, it will be helpful to keep in mind six principles:
The closer a microphone is to a sound source, the more detailed, intimate, drier, and, if proximity effect is a factor, bassier the sound. The farther a mic is from a sound source, the more diffused, open, less intimate, and ambient the sound.
Regardless of a directional microphone’s pickup pattern: The higher the frequency, the more directional the sound wave and therefore the mic pickup; the lower the frequency, the more omnidirectional the sound wave and mic pickup.
When employing a number of microphones, more may not always be better. Each additional mic adds a little more noise to the system, even in digital recording, and means another input to keep track of and control, to say nothing of possible phasing problems.
With most moving-coil mics, the farther from the sound source they are placed, the more reduced the high-frequency response.
Generally, large-diaphragm microphones are more suitable in reproducing predominately low-frequency sound sources; small-diaphragm mics are more suitable in reproducing predominately high-frequency sound sources.
Do not confuse perspective with loudness. Loudness aside, in considering mic-to-source distance, it is hearing more or less of the ambience that helps create perspective.
The microphone of choice should be the one that best complements the sound source. That includes the most sonically complex sound source of all: the human voice.
Sometimes in choosing the “right” microphone, circumstances make the decision for you. For example, if some coloration is desirable, a good moving-coil mic may be the best selection; if mellowness is the primary consideration, a ribbon mic may be most suitable; if detail is important, the capacitor mic may be the likely pick. Remember that each type of microphone has particular attributes (see “General Transducer Performance Characteristics” in Chapter 6).
The evaluation of a mic for speech includes at least four criteria: clarity—detail, accuracy, and lack of saturation; presence—open yet stands out; richness—little or no coloration but full, deep, and warm; and versatility—flexibility across different speech applications (important because many of the better microphones are expensive). Other features may also be desirable, such as a built-in pop filter and a shock mount, pad and roll-off controls, variable pickup patterns, and reduced off-axis response.
Another common decision in microphone selection is the directional pattern. Usually, the choice is between an omnidirectional and a unidirectional mic. Again, circumstances sometimes make the decision for you. In a noisy environment, a unidirectional mic discriminates against unwanted sound better than an omnidirectional one; to achieve a more open sound, the omnidirectional mic is the better choice. Using a mini-mic almost always means an omnidirectional pickup. If there is an option of choosing either pickup pattern, each has certain advantages and disadvantages, depending on the demands of a given situation (see Figures 7-2 and 7-3).
Table 7-2. The omnidirectional microphone.
Advantages | Disadvantages |
|---|---|
Does not have to be held directly in front of the mouth to provide adequate pickup | Does not discriminate against unwanted sound Is difficult to use in noisy environments |
Does not reflect slight changes in the mic-to-source distance | Presents greater danger of feedback In reverberant locations |
Gives a sense of the environment | |
Is less susceptible to wind, popping, and handling noises | |
Is not subject to the proximity effect | |
Is natural sounding in rooms with good acoustics |
Table 7-3. The unidirectional microphone.
Advantages | Disadvatages |
|---|---|
Discriminates against unwanted sound | Must be angled correctly to the mouth, or the performer will be off-mic |
Gives little or no sense of the environment (which could also be a disadvantages) | Will be subject to the proximity effect |
Significantly reduces the danger of feedback in reverberant locations | Is susceptible to wind and popping, unless there is a pop filter |
Is more susceptible to handling noises | |
Requires care not to cover the ports, if handheld | |
Is less natural sounding in rooms with good acoustics |
Bidirectional microphones are rarely used because the audio from two people speaking into the same mic is processed through a single channel and cannot be manipulated without difficulty. Moreover, getting the right level and ambience balances could be time-consuming. At times, a bidirectional pattern is used for a single speaker (or singer) to add some ambient pickup through the open rear lobe of the mic instead of employing an omnidirectional mic, which may add more ambience than desired.
Based on the differences detailed in Figures 7-2 and 7-3, the omnidirectional pickup pattern seems to be the more useful of the two. As with the choice of a mic’s transducer type, so it is with deciding on a directional pattern. A microphone’s suitability depends on the sonic requirements, not on favoritism.
Speech is usually close-miked, that is, the distance between the talent and the microphone is about 3 to 6 inches, depending on the force of the delivery and the material performed. Close-miking in-studio produces an intimate sound with little acoustic coloration from ambience. On location, it reduces the chance of unwanted sound from interfering with or distracting attention from the spoken content, particularly with a directional microphone.
As noted earlier in the chapter, the closer a mic is to a sound source, the warmer, more detailed, denser, more oppressive (if too close) the sound, and the closer the listener perceives the speaker to be. The farther a mic is from the sound source, the less warm, less detailed, thinner (if there is little reverberation) the sound, and the more distant the listener perceives the speaker to be.
In most situations involving speech, the performer must be picked up at close range (1) to ensure that the words are heard clearly and are immediately intelligible, and (2) instudio, to avoid any interference from ambience, noise, or other unwanted sounds, and on location, to reduce as much as possible these sonic interferences.
In broadcasting and production, miking speakers usually involves one speaker, such as a disc-jockey, announcer, newscaster, or voice-over performer, two principles as in an interview, or more than two speakers as with a panel program.
A microphone positioned for a seated or standing performer in radio is usually mounted on a flexible swivel stand suspended in front of the performer, or sometimes on a table stand (see Figure 7-4). In television, most often a mini-mic is attached to the performer’s clothing.
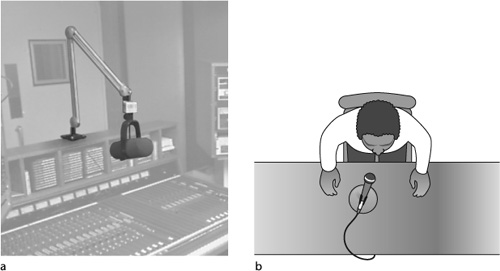
Figure 7-4. Typical microphone positions for a seated or standing performer in radio. (a) Microphone mounted on a flexible swivel stand. (b) Microphone mounted on a desk stand.
With swivel stand and desk stand mics, it is important to keep excessive sound that is reflected from room surfaces, furniture, and equipment from reaching the mic. This can result in comb filtering, creating a hollow sound quality.
To minimize the sound reflections reaching the microphone, a performer should work at a relatively close mic-to-source distance and use a directional microphone. How directional depends on how much front-to-rear sound rejection is needed. Usually, however, cardioid is the pickup pattern of choice. It gives the performer some flexibility in side-to-side movement without going off-mic and produces the intimate sound essential to creating radio’s lip-to-ear rapport with the listener. Keep in mind that with more directional mics, side-to-side movement becomes more restricted.
Because radio studios are acoustically quiet, there is little need for highly directional mics unless more than a few performers are using microphones in close proximity. One problem with using too directional a mic is the usually drier and more closed sound it produces.
It is difficult to suggest an optimal mic-to-source working distance because voice projection and timbre vary from person to person, but here are a few guidelines:
Always stay within the mic’s pickup pattern.
Maintain voice level between 60 and 100 percent of modulation; some radio stations like it between 80 and 100 percent. With digital sound, level cannot exceed 0 dBFS or the audio will distort. Hence maximum level should ride below 0 dBFS to allow for headroom.
Working too close to a mic may create oppressive and unnatural sound that is devoid of ambience.
Working too close to a mic emphasizes tongue movement, lip smacking, and teeth clicks. It could also create proximity effect.
Working too far from a mic diffuses the sound quality, creating spatial distance between the performer and the listener.
Sometimes a mic is positioned to the side of or under a performer’s mouth, with the performer speaking across the mic face (see Figure 7-5). Usually, this is done to reduce the popping and sibilance that often occur when a performer talks directly into a mic.
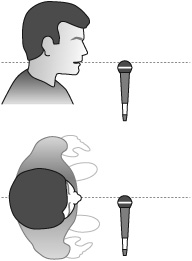
Figure 7-5. Directional microphone positioned so that the performer speaks across the mic face. This placement reduces popping and sibilance, but the directional pattern should be wide-angle cardioid, cardioid, or supercardioid so that frequency response is not adversely affected.
Speaking across a directional microphone can reduce these unwanted sounds. Unless the mouth-to-mic angle is within the microphone’s pickup pattern, however, talking across the mic degrades the response. To eliminate popping and reduce sibilance without overly degrading the response, use a windscreen, use a mic with a built-in pop filter, or point the mic at about a 45-degree angle above, below, or to the side of the performer’s mouth, depending on the mic’s pickup pattern (see Figure 7-6).

In positioning a mic, make sure its head is not parallel to or facing the tabletop. Remember that the angle of a sound’s incidence is equal to its angle of reflectance in midrange and treble frequencies (see Figure 4-5). Therefore, sound waves bouncing from the table will reflect back into the mic’s pickup pattern, creating the comb-filter effect. Any hard surface that is close to a mic, such as a table, console, computer monitor, or window, should be angled so that the sound waves do not reflect directly back into the mic (see Figures 7-7 and 7-8).
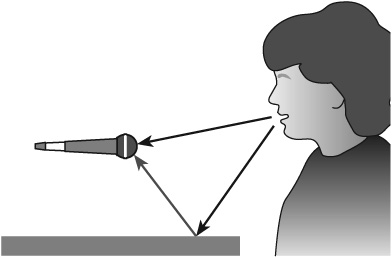
Figure 7-7. Incorrect placement of microphone. Indirect sound waves reflecting back into a mic cause phase cancellations that degrade the response. To avoid this a microphone should not be placed parallel to or more than a few inches from a reflective surface.
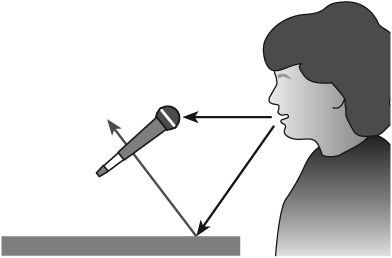
Figure 7-8. Correct placement of microphone. Placing a microphone at an angle to a reflective surface prevents indirect sound from bouncing back into the mic.
When changing the mic’s angle presents a problem, if possible cover the hard surface with a soft material to absorb most of the unwanted reflections. This reduces popping and sibilance. It is also a good idea to mount the mic in a shock absorber if it does not have one built-in. This reduces or eliminates jarring and handling noises.
In television, the advantages of the mini-mic are several:
It is unobtrusive and tends to disappear on-camera.
It is easy to mount.
It is easily adaptable to use with a wireless system, which is how it is mostly employed.
It keeps the mic-to-source distance constant.
It reduces the need for frequent loudness adjustments once the levels have been set.
It requires no special lighting or additional audio operator, as does a boom mic.
It enables participants to be placed comfortably on a set without concern for maintaining levels and mic-to-source distances, or having them handling the mic, as could happen with desk mics.
It facilitates using a wireless microphone system, which eliminates cords and cord connections thereby simplifying setups, avoiding entanglements, and eliminating noise from the mic cord rubbing against a participant or surface.
The mini-mic’s main disadvantage is that it’s a single-purpose microphone. It rarely sounds good used away from the body.
When there is more than one speaker, as in interview and panel programs, in radio it is customary to mike each participant with a separate microphone for better sonic control. Directional mics, usually cardioid or supercardioid, are preferred. If the participants are sitting opposite one another, the cardioid is sufficient because it is least sensitive at 180 degrees off-axis. If the participants are sitting side-by-side, facing the host, the super-cardioid could be a better choice. Its on-axis response allows sufficient side-to-side head movement, and it is less sensitive at the sides than the cardioid. The hypercardioid mic would also work in the latter situation, but there are the potential problems of restricted head movement due to its quite narrow on-axis pickup and of reduced sound quality because of its poorer rejection at 180 degrees. In any case, microphones are commonly fixed to flexible mic mounts to free frontal working space and to make minor positioning adjustments easier (see Figure 7-9).
When multiple microphones are used, they must have the same directional pattern. Mics with different polar patterns, say, a cardioid mic used with a supercardioid mic, will have perceptible sonic differences. With the cardioid and supercardioid mics, for example, the cardioid will produce a more open sound than the supercardioid; or, to put it another way, the supercardioid will sound tighter than the cardioid.
In choosing a microphone for a guest(s), consider that the person may be unfamiliar with mic technique, be nervous, or speak more softly or loudly than usual. Choosing an end-fed, instead of a side-fed, mic makes it easier for the guest to focus the direction toward which to speak. Also, an end-fed mic is usually smaller than a side-fed mic and therefore less intimidating. (See an example of a side-fed mic in Figure 6-38 top left, and an end-fed mic, top right.)
The mini-mic is another option. The speaker cannot be off-mic and tends to forget it is there. The potential problem here is that most mini-mics are omnidirectional and, even in suitable acoustics, the sound may be too open and airy. Directional lavalieres, on the other hand, may create a sound that is too dry.
Sometimes headset mics are used. A headset mic facilitates the feeding and the balancing of all program information to each participant, reduces problems of mic placement, allows host and guests more freedom of head movement, and clears desk space for scripts and note taking. Because it is radio, appearance is of no concern unless the radio program is televised (simulcast), which is done with some programs on a regular basis. Then some attention to appearance does become a factor. Whether televised or not, the participants must be comfortably and sensibly arranged for optimal interaction.
Television panel and talk programs in which the participants are seated invariably use the wireless mini-mic. The positive attributes of the mini-mic have already been articulated. In some situations, however, other microphone mounts are more appropriate.
For a host moving about a set among guests or going into the audience for questions, the handheld mic is the popular choice. In situations where the studio is very large and the audience is seated amphitheater-style, except for overall coverage mics of the audience sound, handheld mics are the only choice for host, guests, and audience participants.
The handheld microphone has these advantages:
It allows the host to control the audience questioning.
It allows the host to control mic-to-source distances.
Like the desk mic, it helps the host generate a closer psychological rapport with the television audience. In interview and variety programs, the host sometimes sits behind a mic mounted on a desk stand. Usually the mic is not live. It is being used as a set piece to create a closer psychological rapport between the host and the television audience, to fill the open table space in front of the host, or both. Otherwise, with a few exceptions, desk mics are seldom used. If you do use a live desk mic, select one that is good-looking so it does not call attention to itself; use one with a built-in shock mount to isolate the mic from desk noises; and make sure the mic-to-source angle is on-axis.
The handheld mic should have a built-in pop filter to minimize sibilance and popping and an internal shock mount to eliminate handling noise. Optimal position is 6 to 12 inches from the mouth, pointing upward at about a 45-degree angle (see Figure 7-10).
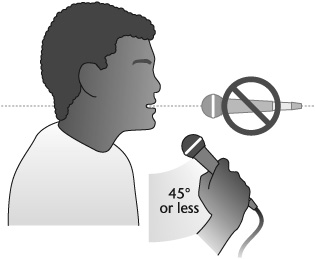
Figure 7-10. Handheld microphone positioning. Ideally, a handheld mic should be positioned 6 to 12 inches from the user’s mouth at an angle of 45 degrees or less. Positioning the mic at an angle of about 90 degrees may result in popping sounds when consonants like p and t are pronounced.
A disadvantage of the handheld mic is that it ties up one of the host’s hands. This is not a problem with the boom mic, and for some situations, it is the mic of choice (see “Boom Mic” later in this chapter).
The omnidirectional, moving-coil, handheld microphone is used most often in stand-up news reports from the field. It picks up enough background sound to provide a sense of environment in normal conditions without overwhelming the reporter’s sound. It is possible to control the balance of background-to-reporter sound by moving the mic closer to or farther from the speaker (see Figure 7-11). The closer the mic-to-source distance, the greater the reduction in background sound.
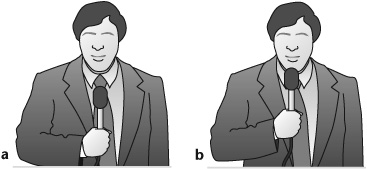
Figure 7-11. Reducing background sound. (a) Holding an omnidirectional microphone at chest level usually creates an optimal mic-to-source distance. (b) If background noise is high, its level can be reduced by decreasing the mic-to-source distance.
What comes into play here is the inverse square law: Outdoors, when mic-to-source distance is doubled, the sound-pressure level drops approximately 6 dB, thus reducing loudness to one-fourth. Conversely, cutting the mic-to-source distance in half increases loudness approximately 6 dB (see Figure 7-12). The precise effect of this law depends on the openness of the area and the directionality of the microphone.
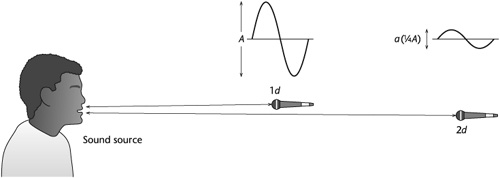
Figure 7-12. Inverse square law. As the distance (d) from a sound source doubles, loudness (A) decreases in proportion to the square of that distance.
Another advantage of the omni mic is that it can be held comfortably below the mouth and in a relatively unobtrusive position on-camera. For interviews, the mic can be situated between reporter and interviewee without necessarily having to move it back and forth for questions and answers (see Figure 7-13).
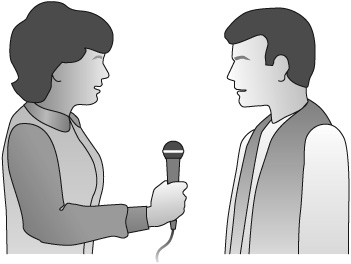
Figure 7-13. Using an omnidirectional microphone for on-location interviews. It can be positioned between the principals, usually with little need for repositioning, at least in quiet surroundings.
In noisy environments, an omnidirectional microphone may not discriminate enough against unwanted sound even at a close mic-to-source distance. In such a situation, a directional mic may be suitable. The sound balance between reporter and background can still be maintained by moving the mic closer to or farther from the reporter’s mouth.
But remember that directional mics must be held at an appropriate angle to be on-axis to the mouth (see Figure 7-14). Moreover, during interviews, the mic must be moved back and forth between interviewer and interviewee if the sound is to be on-mic. In television, the microphone should not obstruct the mouth.

Figure 7-14. Miking when on-location background noise is too loud. Use a directional microphone either (a) several inches from the mouth or (b) close to it, depending on the performer’s voice projection. Because the mic is directional, it must be held at the proper angle if the performer is to be on-mic. With cardioids and supercardioids, the angle does not have to be as severe as it would with a hypercardioid mic because of their wider on-axis response compared with the quite narrow on-axis response of the hypercardioid mic.
To provide a stereo feel to the stand-up report, use a middle-side (M-S) microphone. Recall that the M-S mic combines a cardioid and a bidirectional pickup in a single casing (see Figure 6-26). By speaking into the front of the mic, the reporter’s audio is monaural and on-mic; the bidirectional sides pick up the ambience, providing expanded sonic imaging to the on-scene story. This technique assumes that the environmental sound is not loud enough to overwhelm the reporter’s narrative and that time permits setting up the M-S mic. If, after recording circumstances do not facilitate reproducing the stereo M-S image, the middle, or mono, signal can be separated from the side pickup with no loss in sound and no problem with monaural compatibility.
When guests are coming and going during the course of a show, for example, the boom mic is often used once they are seated. It is less awkward than having a guest put on and take off a mini-mic on-camera or having a guest hold a mic. Usually, no more than a few guests are seated on the set at any one time, which allows one boom to cover the group adequately. In this type of situation, the host generally uses a live desk mic for several reasons: to set the host apart from the guests; to enhance, psychologically, the rapport with the television audience; and to avoid the lighting and logistical problems that result from having two booms on a set in close proximity.
Whenever one boom covers two or more people in conversation, the boom operator has to make sure that none of the program’s content is inaudible or off-mic. A good boom operator must therefore quickly learn the speech rhythms and inflections of the people talking, listen to their conversations, anticipate the nonverbal vocal cues that signal a change in speaker, and, when the change occurs, move the mic from one speaker to another quickly and silently.
Here are a few guidelines to using the boom:
Position the boom above and angled in front of the performer’s mouth. Remember: Sound comes from the mouth, not from the top of the head.
Establish mic-to-source operating distance by having the performer raise an arm at a 45-degree angle toward the tip of the mic and extend a finger; the finger should just touch the mic. Appropriate working distances can be planned from there. For example, if the mic-to-source distance in a close-up is 3 feet, in a medium shot it could be about 6 feet, and in a long shot up to 9 feet.
Directional shotgun microphones compress distance between background and foreground. Aim the mic directly at the performer(s) so as not to increase background sound.
Hypercardioid shotgun mics have considerable rear sensitivity, so avoid pointing the back end toward a source of unwanted noise, such as ventilators, parabolic lights, and so on.
Capacitor shotguns are high-output, high-sensitivity instruments and therefore can be used at somewhat longer mic-to-source distances than moving-coil mics without degrading sound quality. Also, high-frequency response in moving-coil mics falls off with increased mic-to-source distance.
To facilitate learning the shot changes in a multicamera production with drama, provide each boom operator with cue sheets and, if possible, place a TV monitor on the boom (assuming a perambulator boom) or near it. Also provide headphones that feed the program sound to one ear and the director’s cues to the other ear. Boom movers should also have access to cue sheets. Rehearse each shot so that the exact mic-to-source distances are established.
Rehearse all boom operations. Even the slightest movements such as bending down or turning the head while talking can require complicated boom maneuvers. For example, as a head turns while talking, the boom has to be panned and the mic rotated at the same time.
If a performer has a tendency to do “head whips” while interacting with other guests or because dialogue interaction calls for it, place the mic in front, keeping movement to a minimum so the speech sound and ambience are consistent.
Have preparatory discussions with the sound recordist or mixer.
Learn about lighting. A boom operator has to know what side of a set to work from so that the boom does not throw a shadow. Outside it is necessary to be opposite the sun side so that the boom shadow falls away from the performer.
Anticipate the performer’s movements so that the boom leads, rather than follows, the talent.
Position the boom’s base toward the front of the set, not to the side. From the side, it is difficult to judge the microphone’s height in relation to the cameras because cameras are usually placed in an arc around the front of the set.
Indoors or outdoors, it is wise to use a windscreen, especially with a capacitor shotgun because it is particularly susceptible to wind noise. A windscreen permits rapid, abrupt boom movements without distortion from the increased force of air created by such movements.
Due to the size of the perambulator boom, it may be unwieldy in small studios or sets or difficult to maneuver when relatively frequent repositioning is called for, especially if there is no boom mover.
The fishpole boom is used in-studio when larger booms cannot negotiate small spaces, but mostly it is the microphone mount of choice in field production in general and dialogue recording in particular. It is more mobile, easier to manage, takes up less space, and requires fewer crew than wheeled booms. A fishpole is handheld and therefore can be moved around a set with relative ease (see Figure 7-15).
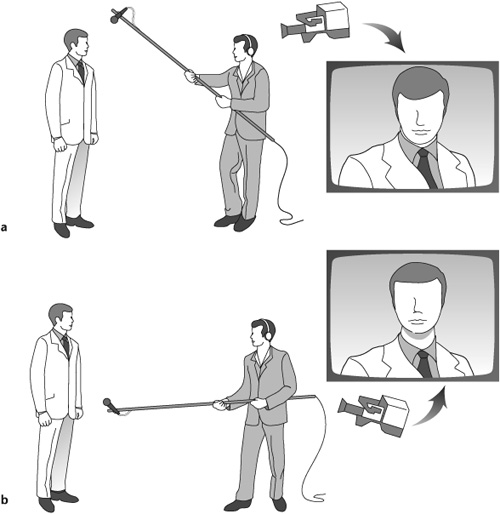
Figure 7-15. Using a fishpole with a directional microphone pointed at the performer’s mouth from (a) above and (b) below. The mic’s position depends on the focal length and the angle of the shot. Better sound is usually obtained by positioning the mic above the performer because sound rises and the bounce from the floor or ground can brighten the pickup.
Fishpole booms come in various lengths, and most have a telescoping tube that can be extended or retracted (see Figure 7-16). Shorter fishpoles can extend from 16 inches to more than 6 feet and weigh as little as 11 ounces; medium-sized fishpoles can extend from 23 inches to 8 feet and weigh about 14 ounces; longer fishpoles can extend from just under 3 feet to more than 16 feet and weigh a little more than a pound.

The fishpole boom does present a few problems. It can get heavy if it has to be carried about the set or held for any length of time, particularly if the mic is weighty. It can be difficult to control precisely, particularly in wider shots when it has to be held high. Furthermore, handling noises can be heard if the fishpole operator is not careful.
It is politic to remember that in field production, the boom operator is the sound department’s eyes and ears on the set.
Operating a fishpole boom is intense and exhausting work. Be well rested and physically conditioned. Build endurance by holding a fishpole for progressively longer periods of time. If one is not available, practice with a bucket or weights at the end of a broom handle.
Wear clothing that is comfortable and relatively loose fitting. Dark clothes help avoid reflections. Because fishpole miking often involves being on your feet for extended periods of time, plus a lot of walking and running, forward and backward, sneakers with thick soles are comfortable and quiet.
Know the script. If one is not available or if last-minute copy changes have been made, learn the body gestures of the performers just before they speak to help anticipate boom movements.
Always use a windscreen, especially with directional capacitor mics, which are particularly sensitive to even minute air movement.
Always use a shock mount. High-quality microphones, particularly capacitors with high sensitivity, are apt to pick up sound conductance through the metal tube. It is a good idea to tape foam rubber around the tube a few inches above the handgrip and below the microphone mount to inhibit sound conductance.
Use high-quality headphones when operating a fishpole boom. Except for the recordist, who may be at some distance, there is no other way to tell what sounds are being picked up or how they are balanced, particularly in relation to the foreground and background sounds.
Be sure there is enough cable and cleared space on the floor if the fishpole mic must move with the performer(s). To avoid the cable problem altogether, and if it is feasible, boom-mount a wireless mic (see Figure 7-17).
Remove all jewelry before recording and wear gloves to help dampen handling noise.
If the fishpole has to be held for any length of time, secure a flag holder around the waist and sit the pole end in its pocket. Some longer fishpoles come with a handle grip on the pole to help support it against the body.
The advantage of the boom-mounted microphone on location, as in the studio, is that by varying its distance to the sound source, you can make it reflect the focal length of shots. This advantage applies especially in the field, where there is more likely to be background sound whose relationship to the principal sound source often helps establish the overall sonic environment. This technique is called perspective miking because it establishes the audio viewpoint. It is the boom mic’s main sonic advantage. Unlike the body-mounted mini-mic whose main sonic disadvantage is that it cannot reflect shot-to-source distances because its perspective is always the same.
There are four basic ways to record musical instruments: close miking, distant miking, accent, or off-, miking, and ambient miking. Depending on the music, size of the ensemble, room acoustics, mixer, and software program one or more of these techniques may be employed in a given session.
Close miking places a microphone relatively close to each sound source or group of sound sources in an ensemble—generally at a distance of about an inch to a foot. Close miking is the technique of choice in studio recording for most popular music genres for a number of reasons: Greater control can be achieved in recording the nuances of each musical element; the sound from each instrument, and leakage from other instruments, is better contained; in popular music the difference in loudness between electric and acoustic instruments can be very difficult to balance with distant miking; and much of pop music is played loudly, and in even relatively live acoustics close miking helps prevent the music from being awash in reverberation. Reverberation, spatial positioning, and blend are added in the postproduction mixdown.
Generally, directional microphones are used in close miking for better sound control of each instrument and to reduce leakage of one instrument into another instrument’s microphone. If acoustics and recording logistics permit, however, there are three good reasons why omnidirectional mics should not be overlooked: (1) the better omni capacitors have an extraordinarily wide, flat response, particularly in the lower frequencies, and little or no off-axis coloration; (2) omnis are not as subject to proximity effect, sibilance, plosives, and breathing sounds as are directional mics; and (3) because of the inverse square law, it is possible to close-mike with an omni and still reduce leakage if the instrument’s sound-pressure level is high enough.
Distant miking places a microphone(s) from about 3 feet to several feet from the sound source. It picks up a fuller range and balance of an instrument, or group of instruments, and captures more of the studio acoustics for a more open and blended sound.
Distant miking is employed when all sounds or voicings, or groups of sounds or voicings, are recorded at the same time and it is important to preserve the ensemble sound, or a sonic sense of it. Orchestral and choral music and certain types of jazz are examples of genres that use distant miking. The technique is also used along with close-miking to enhance a recording by adding natural acoustics.
Accent miking, also known as off-miking, is used to pick up instruments in an ensemble when they solo. It is, in effect, a relatively close-miking technique but used when distant microphones are picking up the ensemble’s overall sound and a solo passage needs to stand out.
Ambience miking, used along with distant miking, attempts to reproduce the aural experience that audiences receive in a live venue by recording in an acoustically suitable studio or concert hall. Microphones are positioned far enough from the ensemble where the later reflections are more prominent than the direct sound (see Figure 7-18). In the mixdown, the ambient pick up is blended with the pick up from the closer mics, making the natural reverb part of the recording, and not adding it artificially in the mix-down, which may be necessary with distant miking and is definitely necessary with close miking.
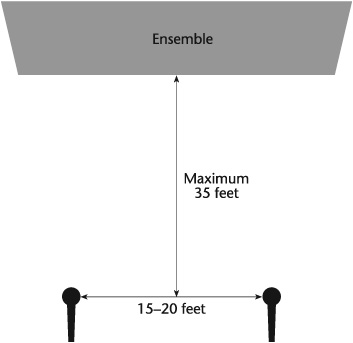
Figure 7-18. Ambience miking. Spaced omnidirectional microphones situated toward the rear of the room. The success of this technique is dependent on a studio or hall with appropriate acoustics. In rooms of some size, to minimize echoes that could result from mixing the direct signal with the signal from the acoustically delayed ambient mics, the distance between the ensemble and the ambient mics should not exceed 35 feet. The distance between the spaced mics should be limited to 15 to 20 feet to minimize comb filtering.
As previously noted, the purpose of distant miking, especially when mixed with sound from close mics, is to add airier, more ambient sound to the overall recording. The microphone arrays used are often stereo arrays. They are mainly coincident, near-coincident, and spaced.
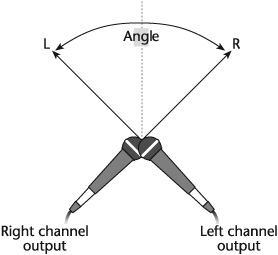
Coincident miking, also called X-Y miking, employs two matched, directional microphones mounted on a vertical axis—with one mic diaphragm directly over the other—and angled apart to aim approximately toward the left and right sides of the sound source. The degree of angle, the mics’ pickup pattern, and the distance from the sound source depend on the width of the stereo image you want to record (see Figure 7-19).
Miking at a distance from the sound source, particularly with classical music, requires high-output, high-sensitivity microphones. Capacitors are the only type of mic that meets this requirement.
Middle-side (M-S) miking is another coincident technique (see Figure 6-26). Recall that a MS microphone is housed in a single casing combining a cardioid mic, the mid, with a side-facing bidirectional mic. The middle mic faces the sound source and, depending on the mic-to-source distance, picks up more direct than indirect sound; the null of the bidirectional mic faces the sound source; therefore, it picks up mostly indirect sound from the left and right of the sound source. By increasing the level of the mid, the stereo image narrows; increasing the level of the side widens the stereo image.
Near-coincident miking angles two directional microphones, spaced horizontally a few inches apart (see Figure 7-20). It is also referred to as X-Y miking. The few inches’ difference between the near-coincident and the coincident arrays adds a sense of warmth, depth, and air to sound compared with the coincident array. The mics are close enough to retain intensity differences between channels at low frequencies yet far enough apart to have sufficient time delay between channels for localization at high frequencies. The stereo spread can be increased or decreased with the angle or space between the mics. The time delay between channels creates a problem, however: The greater the delay, the less the chance of stereo-to-mono compatibility.

Spaced miking employs two matched microphones at least three to several feet apart, perpendicular to the sound source and symmetrical to each other along a centerline (see Figure 7-21). They reproduce a lusher, more spacious sound than any of the nearcoincident arrays—but at a cost. Stereo imaging is more diffused and therefore less detailed. And because so much of the sound reaching the mics derives its directional information from time differences (in addition to intensity differences), stereo-to-mono compatibility is unreliable.
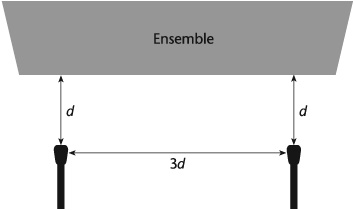
Figure 7-21. Spaced miking technique. This technique positions the mics at a distance (d) of 3 feet or more. It allows the full range and balance of an instrument or ensemble and captures the room sound as well. If the spaced mics are relatively close to the source, to prevent phase anomalies remember the three-to-one rule: The mics should be placed at least three times as far apart as the distance between the sound source and microphone.
If studio acoustics and the music permit, spaced omnidirectional mics are preferred to directional mics because they have less off-axis coloration and flatter overall response, especially in the low frequencies. Capacitors are almost always used. Spacing is determined by the desired width of the stereo image. With omnis, of course, spacing has to be wide enough to reproduce a stereo image. If it is too wide, however, separation may be exaggerated; if spacing is too narrow, the stereo image may lack breadth.
Spaced cardioid mics are arrayed similarly to spaced omnis, but their directionality produces a different sonic outcome. Used with an ensemble, spaced cardioids tend to emphasize the voicings that are most on-axis. They also show the effects of coloration, particularly from any studio ambience. Placement is critical to producing acceptable results with any spaced miking but is even more so with cardioids than with omnis. Spaced cardioids do provide a better chance for mono compatibility, however, because each mic is picking up less common information, reducing the chance of phase cancellations.
There are several variations of the three basic stereo microphone arrays. Figures 7-22 to 7-25 display four of the more commonly employed.
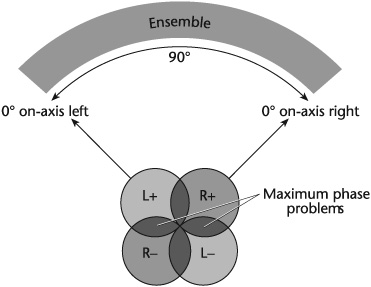
Figure 7-22. Blumlein miking technique. This technique uses two coincident bidirectional mics positioned at a 90-degree angle. It is designed to reproduce accurate representation of the original stereo sound stage, a sense of the ambience surrounding the primary sound source, and the room’s reverberance.

Figure 7-23. ORTF microphone array. The ORTF array (named for the Office de Radiodiffusion-Television Française, the French broadcasting system) mounts two cardioid microphones on a single stand spaced just under 7 inches apart at a 110-degree angle, 55 degrees to the left and the right of center. This technique is designed to produce a clean, clear, often bright sound with a sense of openness while still maintaining mono compatibility.
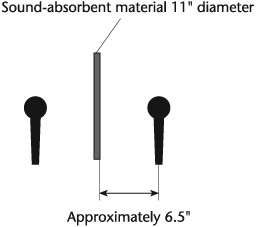
Figure 7-24. Jecklin disk. Also known as the optimal stereo signal (OSS), this technique separates two omnidirectional mics with a sound-absorbing disk or baffle. It is designed to produce a big, spacious sound with good low-frequency response. Localization is adequate but not precise.
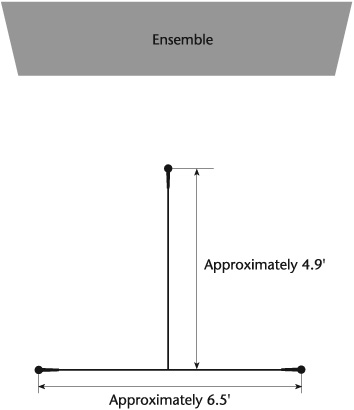
Figure 7-25. Decca Tree. This technique mounts three spaced omni mics at the ends of a T-shaped frame. It is designed to reproduce good stereo imaging with an open, spacious sound. It is favored in recording film scores because it produces a pleasing and stable stereo image that holds up throughout the application of Dolby and other surround-sound matrix systems
As noted earlier in this discussion of miking music, close miking is the technique of choice in studio recording for most popular music genres. Among the commonly recorded voicings in those genres are drums, acoustic guitar, electric bass and electric guitar, piano, and vocal. The following sections are designed to provide an idea of typical approaches to close-miking these selected instruments.
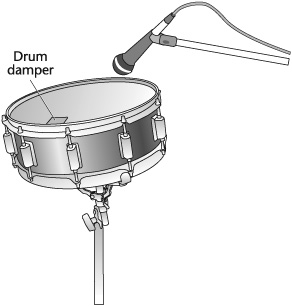
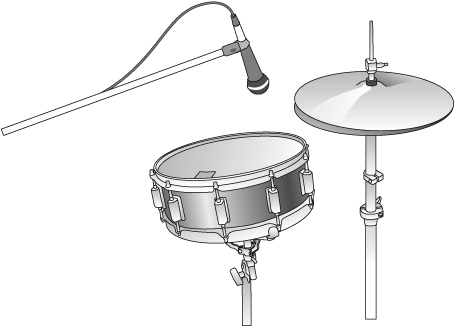
Drums[1]
Perhaps no other instrument provides as many possibilities for microphone combinations, and therefore presents as much of a challenge, as the drums. Several different components make up a drum set—at least a bass drum, a floor (low-pitched) tom-tom, medium- and high-pitched tom-toms, a snare drum, a hi-hat cymbal, and two overhead cymbals.
Although the drum kit consists of several different-sounding instruments, it must be miked so that they sound good individually, yet blend as a unit. That said, drums are miked in many ways. The approach to take depends on the desired sound control and the type of music recorded.
Explaining how to deal with sound control is relatively easy: The more components to regulate, the more mics you use (although this can have its drawbacks—possible phasing, for one). Achieving a particular drum sound for a certain type of music involves many variables and is more difficult to explain.
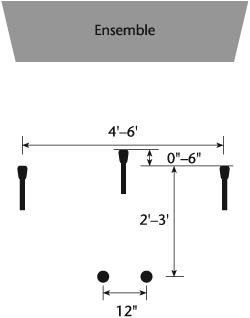
Generally, in rock-and-roll and contemporary pop music, producers like a tight drum sound for added punch and attack. Because this usually requires complete control of the drum sound, they tend to use several microphones for the drums. In jazz, many styles are loose and open, so producers are more likely to use fewer drum mics to achieve an airier sound. Figures 7-26 to 7-28 illustrate three basic approaches to miking the drum kit.
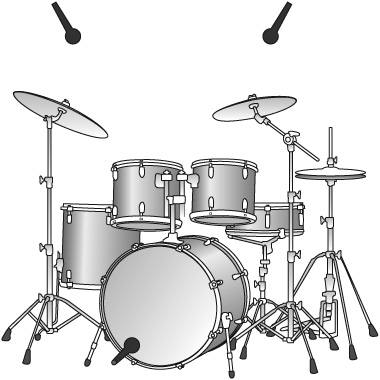
Figure 7-26. Three microphones. Two cardioid capacitor microphones overhead and one directional or nondirectional moving coil in the bass drum. Using two overhead mics helps with the blend and balance and provides a stereo image. The coincident, near-coincident, and spaced arrangements will yield different acoustic results (see “Stereo Arrays” discussed earlier in this chapter). The mic in the bass drum allows separate control of its sound. The directional mic concentrates its impact; the nondirectional mic opens the sound somewhat without picking up much if any of the other drum sounds due to the inverse square law—sound levels increase (or decrease) in inverse proportion to the square of this distance, in this case, from the mic to the drum head. This arrangement produces on open, airy drum sound. Using high-quality microphones is essential, however.
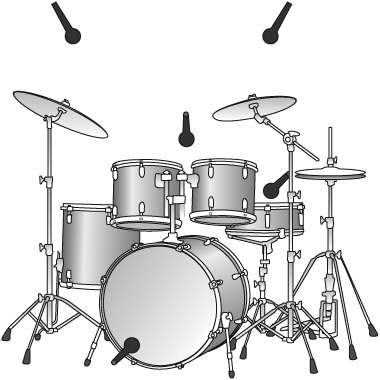
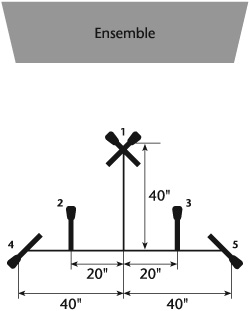
Figure 7-27. Five microphones. Three mics are placed as suggested in Figure 7-26. The fourth is typically placed on the snare drum but sometimes between the snare and hi-hat to obtain a better hi-hat pickup. It can be a moving-coil or capacitor mic depending on the desired sound, and almost always a directional mic (see “Snare Drum” and “Hi-Hat Cymbal” later in this section on “Miking”). The overhead mics, however, may pick up enough of the snare sound so that the sound from the fourth mic can be used only for fill in the mix. The fifth mic is positioned between the medium and high tom-toms for added control of these drums.
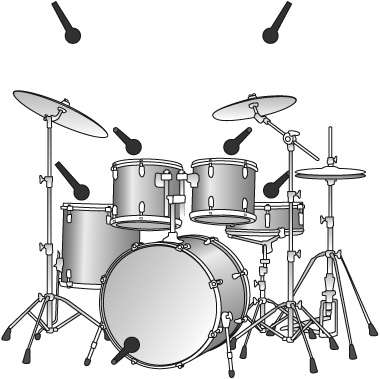
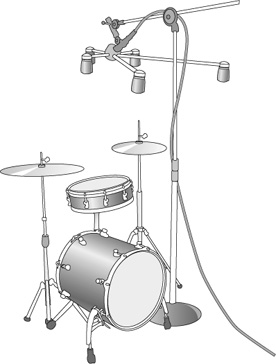
Figure 7-28. Miking each drum. For the drum kit in this illustration, eight microphones are required. The advantages of this technique are that it provides the recordist with optimal control of each drum and cymbal sound in the recording and in the mixdown. The disadvantages are that there may be phasing, leakage, or too dense a sound, or some combination of these factors.
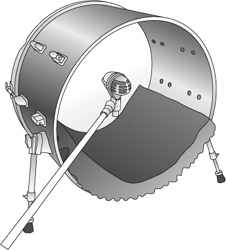
The bass (kick) drum is the foundation of the drum set because it provides the music’s downbeat—the primary rhythm pattern with transient punctuations. In much of popular music, it also works along with the bass guitar providing the bottom sound that supports the other musical elements. Because the bass drum also produces high levels of sound pressure and steep transients, large-diaphragm moving-coil microphones usually work best, although there are a few large-diaphragm capacitor mics that also work well, particularly by adding some midrange coloration.
The common technique for mic placement is to use the hole often cut in the front drumhead or to remove the head entirely and place the mic inside. This gives the sound of the bass drum more punch. Pointing the mic perpendicular to the beater head produces a fuller sound (see Figure 7-29). If the mic is too close to the head, it will pick up more click and attack than fullness and maybe the action of the beater head as well. Pointing it to the side of the drum picks up more of the drum’s overtones, creating a rounder sound with more definition but less attack (see Figure 7-30). Placing the mic outside the open head deepens the drum sound but decreases clarity and attack and could pick up leakage from other instruments.

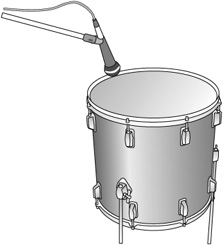
Tom-toms come in a variety of sizes and pitches. Typical drum sets have three toms: the low-pitched, fuller-sounding floor tom; the middle-pitched medium tom; and the higher-pitched, sharper-sounding high tom.
Although toms produce loud transients (all drums do), they are not as strong as those the bass drum produces; you can therefore mike them with moving-coil, capacitor, or the more rugged ribbon mics. Placement, as always, depends on the sound you want. Generally, the mic is placed from 1 to 10 inches above the tom and is aimed at the center, or slightly off-center, of the skin. It is usually mounted just over the edge of the rim to avoid interfering with the drummer’s sticks (see Figures 7-31 and 7-32).
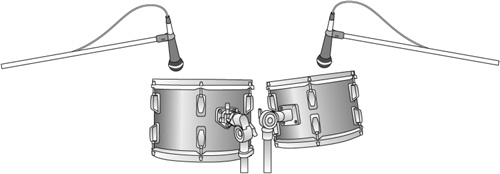
Of all the components in a drum set, the snare usually presents the biggest problem in miking. Most producers prefer a crisp snare drum sound. Miking the snare too closely tends to produce a lifeless sound, whereas miking it too far away tends to pick up annoying overtones, ringing, and leakage from the other drums.
Moving-coil or capacitor mics work well on the snare drum; the moving-coil mic tends to give it a harder edge, and the capacitor mic tends to make it sound richer or crisper. To find the optimal mic position, begin at a point 6 to 10 inches from the drumhead and aim the mic so that its pickup pattern is split between the center and top edge of the drum (see Figure 7-33). This picks up the sounds of the snares and the stick hitting the head.
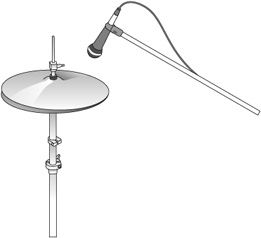
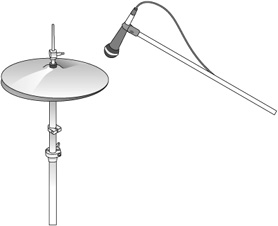
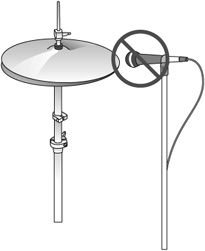
The hi-hat cymbal produces two sounds: a clap and a shimmer. Depending on how important these accents are to the music, the hi-hat can either share the snare drum’s mic or have a mic of its own. If it shares, place the mic between the hi-hat and the snare and adjust the sound balance through mic placement (see Figure 7-34).
If the hi-hat has a separate mic, the two most common positions for it are 4 to 6 inches above the center stem with the mic pointing straight down (see Figure 7-35), and off the edge (see Figure 7-36). Sound is brightest over the edge of the cymbal. Miking too closely off the center produces ringing, and miking off the edge may pick up the rush of air produced each time the two cymbals clap together (see Figure 7-37).
To preserve definition, capacitors work best; for stereo pickup, the coincident (see Figure 7-19), near-coincident (see Figure 7-20), or spaced pair can be used (see Figure 7-21). When using the spaced pair, remember to observe the three-to-one rule to avoid phasing problems.
Because the overhead microphones usually blend the sounds of the entire drum set, they must be at least a few feet above the cymbals. If they are too close to the cymbals, the drum blend will be poor and the mics will pick up annoying overtones that sound like ringing or gonging, depending on the narrowness of the mic’s pickup pattern. If blending the drum sound is left until the mixdown and it is important to isolate the cymbals, roll off the low frequencies reaching the cymbal microphones from the other drums.
Sometimes, regardless of the miking technique, the sound of the overhead cymbals is disproportionately loud and washes over the drum track. There are two ways to reduce the problem: Have the drummer hit the cymbals with less force and, if the cymbals are thick, use thinner cymbals, which are not so loud.
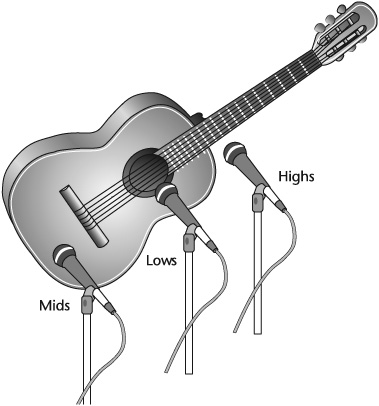
Most of the acoustic guitar’s sound radiates from the front of the instrument, so centering a microphone off the middle of the sound hole should, theoretically, provide a balanced sound. But the mic has to be at least a foot or more from the instrument to pick up the blend of radiated sound. If a mic is too close to the hole, sound is bassy or boomy. Also, because the sound hole resonates at a low frequency, the mic could pick up those vibrations. If it is moved closer to the bridge, detail is lost. If it is moved closer to the neck, presence is reduced; if it is moved too far away, intimacy is affected and, if other instruments are playing, there could be leakage.
One way to achieve a natural, balanced sound is to position the mic 2 to 3 feet from the sound hole. To set a more high- or low-frequency accent, angle the mic either down toward the high strings or up toward the low strings. Figure 7-38 illustrates general tonal effects of microphone positioning.
Sometimes, two microphones are used on an acoustic guitar to add body or dimension to the sound. Common placements include close-to-far, sound hole/neck, and stereo. In the close-to-far technique, the close mic picks up the essential guitar sound, and the far mic is used to pick up ambience (see Figure 7-39). Placing one mic off the sound hole and another off the neck captures a more detailed low- and high-frequency sound blend (see Figure 7-40). Stereo miking adds size to the guitar sound; be careful, however, not to space the mics too far apart or it will create a hole in the middle of the sound (see Figure 7-41). Stereo imaging can also be achieved using middle-side miking, either with an MS mic or two mics, one cardioid and one bidirectional (see Figure 7-42).
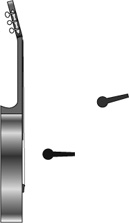
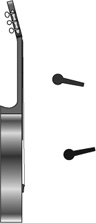
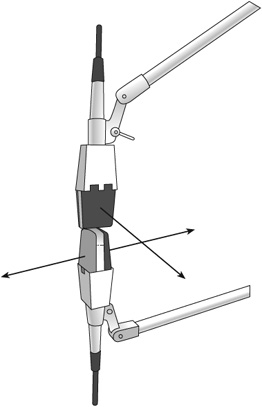
Figure 7-42. Middle-side miking using two multidirectional mics—one set for cardioid pickup and the other set for bidirectional pickup.
Plucking creates quick attacks. Using a dynamic mic, which has slower transient response than a capacitor microphone, can slow the attacks and diminish detail, particularly in the guitar’s bass frequencies. But if a capacitor mic brings out too much crispness, a good moving-coil mic can reduce it.
The piano offers almost unlimited possibilities for sound shaping. More than with many other instruments, the character of the piano sound is dependent on the quality of the piano itself. Smaller grand pianos may have dull, wooden low-end response. Old or abused pianos may ring, thump, or sound dull. Mic technique and signal processing cannot change a piano’s voicing from dull to bright, from thin to rich, or from sharp to smooth, but they can alter a piano’s existing sound. That said, unless the piano is nicely voiced and well tuned, the most savvy recordist with the best equipment has little chance of producing acceptable sound.
Another factor in piano miking is the music. Classical music and jazz generally require a more open sound, so mic placement and pickup should capture the full sonic radiation of the instrument. Popular music, such as rock and country, usually require a tighter sound, so mic placement and pickup are generally closer.
Regardless of the music, aim the open lid toward the middle of the room, not toward the wall. If you aim the open lid toward the wall, in addition to picking up the piano sound, the mic(s) will also pick up the reflections bouncing back from the wall.
There are many miking techniques for the grand piano. Figures 7-43 to 7-45 display a few of the more common approaches.
Figure 7-43. Middle-side-miking a grand piano. An MS microphone about 12 to 18 inches above the middle strings, 8 inches horizontally from the hammers, produces a natural, balanced sound and a relatively spacious low-end to high-end stereo image (assuming appropriate acoustics). Best results are achieved with the piano lid off. Otherwise the lid should be at full stick. At full stick there will be a more concentrated sound with less ambience pickup.
Figure 7-44. Near-coincident microphone array. (a) This illustration employs an X-Y pair of directional mics about 12 to 18 inches above the middle strings using the ORTF technique (see Figure 7-23). It spaces the array just under 7 inches apart at a 110-degree angle, 55 degrees to the left and the right of center. Stereo imaging is wide and, in good acoustics, spacious, with the mids spread somewhat wider across the aural frame than the low and high ends. Best results are achieved with the lid off. (b) When the piano lid remains attached, it should be at full stick. (At short stick the sound can be too closed and muddy.) Because the pickup usually will be more concentrated and less spacious, use a near-coincident or spaced pair of distant mics to pick up more of the blended radiations and ambience to add openness, regardless of whether close-miking is used over the sound board.
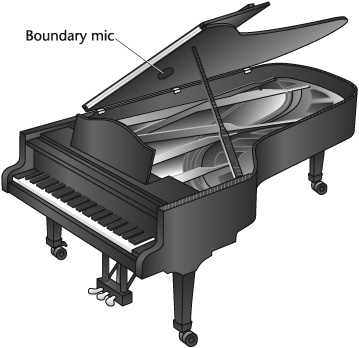
Figure 7-45. Using boundary microphones. A number of techniques are possible using boundary microphones. Two of the more commonly used are (1) mounting one boundary mic on the piano lid to pick up a blended monaural sound (shown here), or (2) mounting two directional boundary mics on the piano lid, one toward the low strings and the other toward the high strings for a balanced, open stereo pickup.
Electric instruments—bass, guitar, and keyboards—generate their sounds through an electric pickup that can be sent to an amplifier or directly to the console. Three techniques are generally used to record an electric instrument: plugging the instrument into an amplifier and placing a mic in front of the amp’s loudspeaker; direct insertion (DI), or plugging the instrument directly into the mic input of the mixer through a direct box; or both miking the amp and using DI.
Electric instruments are usually high impedance, whereas professional-quality audio equipment is low impedance. Not surprisingly, high- and low-impedance equipment are incompatible and produce sonic horrors if connected. The direct box matches impedances, making the output of the instrument compatible with the mixer’s input (see Figure 7-46).

Figure 7-46. Direct box. This unit converts unbalanced signals from guitar amps, stereo keyboards, CD and tape players, and computer sound cards. There are two sections; each includes an XLR connector, 1/4-inch parallel wired in/out jacks, ground lift switch to help eliminate hum and buzz, and a 20 dB pad switch for connection to inputs with overly loud signal levels.
A single amplifier loudspeaker emits directional sound waves whose sonic characteristics change depending on the angle of the microphones and its distance from the amp. A mic on-axis at the center of the speaker tends to produce more bite compared to the mellower sound from a mic positioned off-axis to the center or at the edge of the speaker. An amp cabinet with bass and treble speakers produces a more complex output and usually requires a longer mic-to-source distance to capture a blended sound.
Placement of the cabinet also affects sound. On a carpet, brightness is reduced. On a hard-surfaced floor, depending on the amp, sharpness or brightness is increased. On a riser off the floor, low end is reduced.
When miking an amp loudspeaker, the moving-coil mic is most often used because it can handle loud levels without overloading. With the bass guitar, the directional moving coil is less susceptible to vibration and conductance (especially with a shock mount) caused when the instrument’s long, powerful wavelengths are amplified. Due to its powerful low end, the bass is usually recorded direct to obtain a cleaner sound.
Recording electric bass presents a particular challenge. If there is too much bass, the mix will sound muddy. This could mask the fundamentals of other instruments and result in a thickening and a weighing down of the overall sound. Among the ways to improve clarity are to have the bassist increase treble and reduce bass on the guitar or to equalize in the control room by attenuating around 250 Hz and boosting around 1,500 Hz.
Compression is commonly used in recording the electric bass (see Chapters 11 and 13). It helps reduce noise, smooth variations in attack and loudness, and tighten the sound. Be careful in setting the compressor’s release time. If it is too fast in relation to the decay rate of the bass, the sound will be organlike. A slower release time maintains the natural sound of the instrument; too slow a release time muddies the sound.
When recording an electric guitar, a directional moving coil adds body to the sound. But if it is necessary to reproduce a subtler, warmer, more detailed sound, try a capacitor or one of the more rugged ribbon mics.
As for placement, the main challenge is understanding the dispersion pattern of the amplifier’s loudspeakers (see Figure 7-47). Miking close to the amp and head-on produces a strong central lobe that has considerable high-frequency content within the bandwidth of the instrument itself. Off-axis miking reduces high-frequency content, and backing the mic farther from the amp produces a more blended, balanced sound. Also, the decrease in highs gives the impression of a heavier, bassier sound. Hanging a small mic over the amp emphasizes a guitar’s midrange and reduces leakage. If leakage is not a problem, and even if it is, close miking with an omni works well.
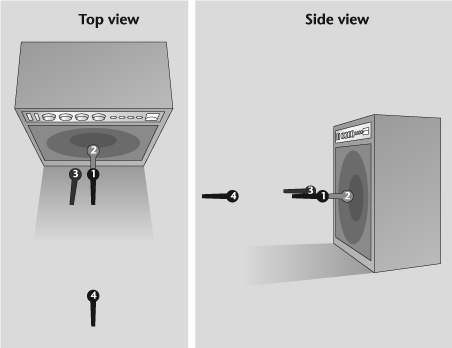
Figure 7-47. Miking an amplifier loudspeaker. (1) Four inches from the amp at the center of the speaker cone produces a natural, balanced sound. (2) One inch from the center of the speaker cone produces a bassy sound but minimizes feedback and leakage. (3) Off-center to the speaker cone produces either a dull or a mellow sound, depending on the acoustics and the microphone, but reduces amplifier noise. (4) Three feet from the center of the speaker cone produces a thinner sound with reduced bass but picks up more ambience and leakage.
An omnidirectional microphone has no proximity effect—its response is uniform. It will therefore pick up various aspects of the loudspeaker dispersion pattern, and the inverse square law takes care of the leakage problem because you are essentially force-feeding the mic from an amp producing a high sound-pressure level at a short mic-to-source distance. Use an omni capacitor or ribbon mic with a fast response.
Producers also record both amp loudspeaker and DI feeds simultaneously. This technique combines the drier, unreverberant but crisp sound of direct insertion with the acoustic coloring of the amplified sound. The amp and DI signals should be recorded on separate tracks. This provides more flexibility in the mixdown when the two sounds are combined or if you decide not to use one of the tracks.
It should be noted that direct recording of guitars does not necessarily guarantee a leakage-free track. If a guitar pickup is near or facing a loud instrument, it will “hear” the vibrations. By turning the musician away from the direct sound waves or by putting a baffle between the instruments, leakage is reduced.
With the electric guitar, special-effect boxes are often used to add to the sonic possibilities. Here too the various signals should be recorded on separate tracks, if possible, to allow flexibility in the mixdown.
Although the speaking voice has a comparatively limited frequency range, the singing voice does not, and it can place a severe test on any microphone. The singing voice is capable of subtle and almost unlimited variations in pitch, timbre, and dynamic range. There are also plosives and sibilance—popping and hissing sounds—to deal with.
In choosing a vocal mic, the most important consideration is the singer’s timbre—how edged, velvety, sharp, mellow, or resonant the voice sounds. The microphone should enhance a voice’s attractive qualities and minimize the unattractive. Usually, assuming no serious problems with tone quality, most producers prefer to use capacitor mics for vocals. They are far more sensitive to subtle changes in sound-pressure waves than dynamic mics; they can better handle the complicated pattern of harmonics and overtones in the human voice; and overall sound quality is the most natural.
Controlling the dynamic range—the quietest to loudest levels a sound source produces—is another tricky problem. Well-disciplined singers can usually control wide fluctuations in the dynamic range themselves. But many cannot—their voices barely move the peak meter during soft passages and put it in the red during loud ones. In miking these vocalists, a producer has three alternatives: ride the level, adjust the singer’s mic position, or use compression. There is a fourth alternative: record the vocal on two tracks.
The preferred methods are to use mic technique to adjust for irregularities in a vocalist’s dynamic range, use compression, or use both. In pop music, vocals are often compressed 10 to 13 dB. But to do so requires that a recordist know how to compensate after compression (see Chapters 11 and 13).
One placement method is to situate the vocalist at an average distance from the mic relative to the loudest and softest passages sung; the distance depends on the song, the power of the singer’s voice, and the acoustics. From this average distance, you can direct the vocalist how closely to move toward the mic during quiet passages and how far for the loud ones. The success of this method depends on the singer’s mic technique—the ability to manage the song and the movements at the same time.
If these approaches don’t work, try recording the vocal on two tracks with one track 10 dB down. If there is overload or a problem with the noise floor, the undistorted or less noisy sections of each recording can be intercut during editing.
The closer to a microphone a performer stands, the greater the chance of picking up unwanted breathing sounds and plosives from p’s, b’s, k’s, and t’s and sibilance from s’s. If the singer’s vocal projection or the type of music permits, increasing the mic-to-source distance significantly reduces these noises. Windscreens also help, but some tend to reduce the higher frequencies, although clearly some high-frequency loss is preferable to sibilance, plosives, or breathiness. If a windscreen is used, the stocking (fabric) windscreen works best (see Figure 6-35d). It is not as dense as most other windscreens and therefore does not inhibit most of the high frequencies from getting through to the mic.
Other ways to reduce popping and sibilance are to have the singer work slightly across mic but within the pickup pattern or to position the mic somewhat above the singer’s mouth (see Figure 7-48). If this increases nasality, position the mic at an angle from slightly below the singer’s mouth. If leakage is no problem, using an omnidirectional mic permits a closer working distance because it is less susceptible to popping, sibilance, and breathing sounds. The sound may be less intimate, however, because an omni mic picks up more indirect sound waves than a directional mic; but the closeness of the singer should overcome the larger amount of indirect sound picked up.
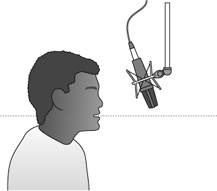
Figure 7-48. Eliminating unwanted vocal sounds. Positioning the microphone slightly above the performer’s mouth is a typical miking technique used to cut down on unwanted popping, sibilance, and breathing sounds.
Although capacitors are almost always the microphone of choice for vocals, they do tend to emphasize sibilance because of the mid- to treble-range response of many models. In such cases, and when other techniques fail to eliminate sibilance, a first-rate moving coil mic, with built-in pop filter, or ribbon mic usually takes care of the problem.
Studios in which high-energy popular music is recorded usually have dry acoustics so the sound does not become awash in reverberation. This can be disconcerting to a singer who is used to hearing a natural acoustic environment as part of the overall vocal sound. To compensate, recordists feed a comfortable amount of reverb through the foldback system so the singer hears the vocal in a more familiar acoustic setting. If there is too much reverb coming through the headphones, however, it can wash out detail and throw off intonation and phrasing. If the reverb is too loud, a singer may tend to lay back in the performance; if it is too soft, a singer may over-project. For these reason, some recordists try to avoid putting any reverb in the foldback so long as it does not inhibit performance.
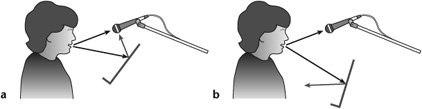
Be aware that when a music stand (or any hard surface) is near the singer’s microphone, sound waves reflect off the stand into the mic. This can cause phase cancellations adversely coloring tone quality. Remembering that a sound’s angle of incidence is equal to its angle of reflectance, position the music stand so that reflections from it do not reach the mic (see Figure 7-49). Or cover the stand with material to absorb the reflections.
Generally, the style of the music sets the guidelines for mic-to-source distance. In popular music, vocalists usually work close to the mic, from a few inches to a few feet, to create a tight, intimate sound. Classical and jazz vocalists work from a couple feet to several feet from the mic to add room ambience, thereby opening the sound and making it airy.
To record as clean a vocal sound as possible, many studios use an isolation booth to prevent leakage from instruments or acoustics from reaching the vocal mic. In the absence of such a booth—or because it may color sound or a vocalist may find it difficult to work in a claustrophobic environment—there are other ways to isolate a microphone (see Figure 7-50).

Figure 7-50. Portable sound filter for recording with reduced room ambience. The filter’s main function is to help obtain a dry vocal (or instrumental) recording. It has six main layers, which both absorb and diffuse the sound waves hitting them, so progressively less of the original source’s acoustic energy passes through each layer. The filter also helps prevent reflected sound from reaching the back and the sides of the mic.
In miking for surround during recording, there are two basic means of handling selection and placement. One is to use direct and ambient miking; the other is to take the direct approach.
With direct/ambient surround-sound miking, either one of two stereo arrays—near-coincident or spaced—will do as a basis for the left-right frontal pickups, then add a center mic for the center channel. Because of the center mic, the angle or space between the stereo mics should be wider than usual. The surround microphones are typically used for ambience and are pointed away from the sound source to the rear or rear-side of the studio or hall.
Figures 7-51 to 7-53 display three examples of surround-sound microphone arrays to provide a sense of the ongoing experimentation with surround miking techniques. None of these examples is intended to suggest that any one approach is preferred to or better than another, nor are they necessarily the most common approaches; there are other workable techniques.
From Jason Corey and Geoff Martin, “Surround Sound Miking Techniques,” Broadcast Engineering, March 2004, p. 42. © 2004 Mondo Code.
Figure 7-51. A basic approach to direct/ambient surround-sound miking. The mics can be either cardioid or wide-angle cardioid, depending on the breadth of the ensemble. The left, center, and right mics face forward. The left and right surround mics may face toward the ceiling (assuming suitable ceiling height and proper acoustics) or may be angled slightly toward the rear.
From Ron Streicher and F. Alton Everest, The New Stereo Soundbook, 3rd ed. (Pasadena, Calif.: Audio Engineering Associates, 2006), p. 13.
Figure 7-52. Decca Tree surround-sound techniques. Mic 1 is a supercardioid X-Y stereo array, mics 2 and 3 are a near-coincident supercardioid stereo pair, and mics 4 and 5 are a spaced subcardioid stereo pair. For a quasi-traditional Decca Tree, use mics 1, 2, and 3 (the traditional Decca Tree uses three omnis—see Figure 7-25); for an ambient Decca Tree, use mics 1, 4, and 5.
From K. K. Profitt, “The Resolution Project,” Mix, October 2005, p. 74. © 2005 Mix magazine.
Figure 7-53. Adjustable surround-sound microphone array for small ensembles. This approach uses five capacitor omnidirectional mics positioned horizontally 30 degrees toward the floor. When recording a jazz trio, for example, the array is positioned 6 feet from the ensemble and 12 feet from the floor. For a string quartet, the array is 18 feet from the ensemble and 13 feet high.
The direct surround-sound miking approach uses microphone arrays especially designed for surround-sound pickup (see Chapter 6). The array may be used to record individual instruments or groups of instruments or to pick up the sound of an entire ensemble. Direct miking tends to center the listener more “inside” the music by placing the voicings side-to-side across the front and from the front speakers to the surrounds (see Figures 7-54 and 7-55). Or the spatial imaging may be in a horseshoe shape, with the listener centered at or somewhat inside its base.
In acoustics, phase is the time relationship between two or more sound waves at a given point in their cycles.
In electricity, polarity is the relative position of two signal leads—the high (+) and the low (-)—in the same circuit.
One way to avoid phase problems with microphones is to follow the three-to-one rule: Place no two microphones closer together than three times the distance between one of them and its sound source.
With most moving-coil mics, the farther from the sound source they are placed, the more reduced the high-frequency response.
Generally, large-diaphragm microphones are more suitable in reproducing predominately low-frequency sound sources; small-diaphragm mics are more suitable in reproducing predominately high-frequency sound sources.
Do not confuse perspective with loudness. Loudness aside, in considering mic-to-source distance, it is hearing more or less of the ambience that helps create perspective.
Evaluation of a microphone for speech includes at least four criteria: clarity, presence, richness, and versatility.
Factors that influence a microphone’s effect on the sound of the speaking (and singing) voice are its sound quality, directional pattern, and mic-to-source distance.
In selecting and positioning a mic, keep excessive sound reflected from room surfaces, furniture, and equipment from reaching the mic, or comb filtering can result. Choose a mic and position it to avoid sibilance, plosives, and breath sounds.
When positioning a microphone in front of a seated or standing performer, it is important to keep excessive sound reflected from surfaces, furniture, and equipment from reaching the mic to preserve sonic intimacy.
To minimize sound reflections reaching the microphone, a performer should work at a relatively close mic-to-source distance and use a directional microphone.
In television, for single speakers, interviews, and panel programs, the mini-mic is usually the microphone of choice because of its many advantages. In radio, conventional directional mics are mainly used sometimes mounted on a desk stand but are more commonly mounted on a swivel stand.
The handheld mic has several advantages, among which are: It allows the host to control the audience questioning; it allows the host to control mic-to-source distances; and it helps the host generate a closer psychological rapport with the viewing audience.
In the field, when controlling mic-to-source distance, it is useful to keep in mind the inverse square law: When mic-to-source distance is doubled, the sound-pressure level drops approximately 6 dB, thus reducing loudness to one-fourth. Conversely, cutting the mic-to-source distance in half increases loudness approximately 6 dB.
When operating the large boom or fishpole boom, there are a number of operational factors to bear in mind, depending on whether the performer(s) is seated or moving about a set.
There are four basic ways to record musical instruments: close miking, distant miking, accent, or off-miking, and ambient miking.
Close miking places a microphone relatively close to each sound source or group of sound sources in an ensemble—generally at a distance of about an inch to a foot.
Distant miking places a microphone(s) from about 3 feet to several feet from the sound source. It picks up a fuller range and balance of an instrument, or group of instruments and captures more of the studio acoustics for a more open and blended sound.
In general, the distant miking stereo arrays are coincident, near-coincident, and spaced.
Accent miking, also known as off-miking, is used to pick up instruments in an ensemble when they solo.
Ambience miking, used along with distant miking, attempts to reproduce the aural experience that audiences receive in a live venue by recording in an acoustically suitable studio or concert hall.
Close miking is the technique of choice in studio recording for most popular music genres. Among the commonly recorded voicings in those genres are drums, acoustic guitar, electric bass and electric guitar, piano, and vocal.
In miking for surround during recording, there are two basic means of handling selection and placement. One is to use direct and ambient miking; the other is to take the direct approach.
With direct/ambient surround-sound miking, either one of two stereo arrays—near-coincident or spaced—will do as a basis for the left-right frontal pickups, then add a center mic for the center channel and the two surround mics for rear-side or rear pickup.
The direct surround-sound miking approach uses microphone arrays especially designed for surround-sound pickup.
[1] As noted earlier, there are almost as many approaches to miking instruments as there are recordists. This section and the following sections on miking instruments are intended to show some of the basic techniques. Decisions about microphone preference and positioning are personal. Therefore, drawings rather than pictures, are used to avoid showing a specific mic placed in a particular way on an instrument, thereby implicitly suggesting a preference or recommendation. As for the myriad other approaches to microphone selection and placement, the Internet and magazines such as Mix, Electronic Musician, EQ, Sound on Sound, and Recording abound with examples.