Chapter 10: Administering Microsoft Forms and Dynamics 365 Customer Voice
Microsoft Forms and Dynamics 365 Customer Voice provide some administrative settings to enable administrators to set policies for creating surveys in their organization. In addition, Customer Voice saves survey data to Dataverse, and there is some setup that a Dataverse administrator has to complete before connecting Customer Voice with Dataverse.
In this chapter, we will review the administration settings for Forms and Customer Voice, walk through process of setting up users in Dataverse for Customer Voice, and review functionalities to help you to move Customer Voice projects from development to test and product environments.
The chapter is organized as follows:
- Administration settings for Microsoft Forms
- Administration settings for Customer Voice
- Managing permissions for Customer Voice
- Managing project deployment for Customer Voice
By the end of the chapter, you will understand what settings are available for you to manage policies for Microsoft Forms and Dynamics 365 Customer Voice.
Administration setting for Microsoft Forms
Microsoft Forms administration settings are available through the Microsoft 365 admin center (admin.microsoft.com). To access the Microsoft Forms settings, navigate to Settings>Org Settings and select Microsoft Forms from the list of the applications to open a settings panel, as shown in Figure 10.1:
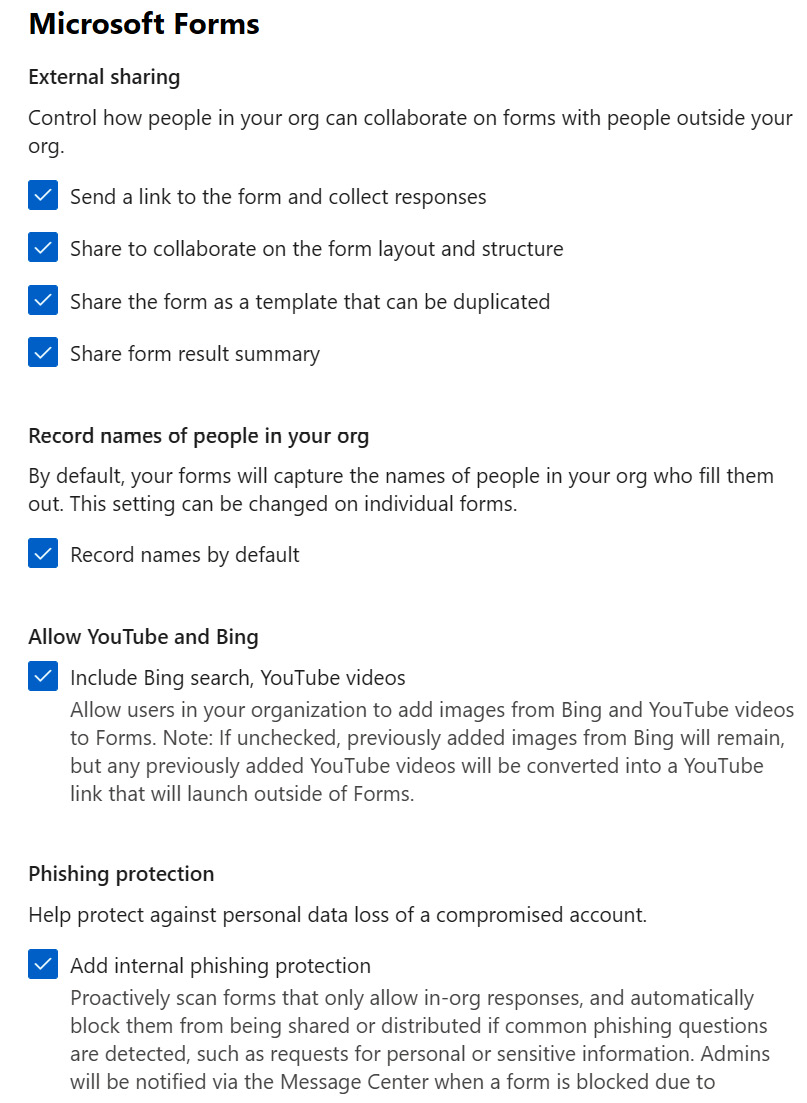
Figure 10.1 – Microsoft Forms settings
We'll describe the settings in the following section.
External sharing
External sharing settings restrict how you can collaborate or send surveys to people outside your organizations.
Send a link to the form and collect responses
Enabling this setting allows users in your organization to send surveys to people outside the organization. When the setting is unchecked, the Anyone can respond option is disabled, as shown in Figure 10.2:

Figure 10.2 – Disabled external sharing option
When the link is shared to people outside the organization, the recipient will be asked to log in to their Microsoft work or school account, and if the user is not part of the same organization, an error message like in Figure 10.3 is shown:

Figure 10.3 – Error message shown to survey recipients outside the organization
In addition to sharing the link for the recipient to respond, Microsoft Forms also supports setting a limit on who you can share the link with to collaborate on the survey.
Share to collaborate on the form layout and structure
To restrict the people with whom survey owners in your organization can collaborate on a survey, you can disable the setting for Share to collaborate on the form layout and structure in the External sharing section. When this setting is disabled, survey owners can no longer select the option to share with people outside the organization, as shown in Figure 10.4:

Figure 10.4 – Disabled external collaboration option
When the link is shared anyway, recipient of the links will be prompted to log in, and users outside the organization will be shown the error message like the one in Figure 10.5:

Figure 10.5 – Error message shown to collaborators outside the organization
Another way survey owners can share a survey design is to share the survey as a template.
Share the form as a template that can be duplicated
Microsoft Forms supports sharing a survey template link to enable the recipient of the link to create a new survey with the same questions and styling. By default, the survey template link is available to users who are internal and external to the organization to make a copy of the survey. By disabling the Share the form as a template that can be duplicated checkbox, the link is only available to users from the same organization. Figure 10.6 shows a comparison of the Share as a template panel where the setting is disabled and enabled:
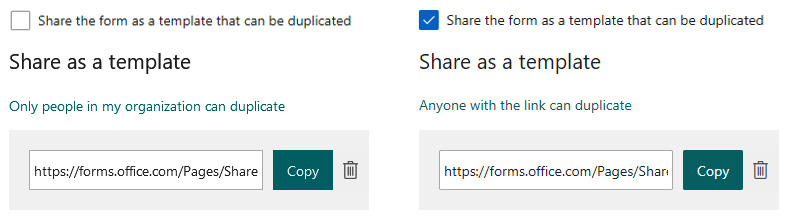
Figure 10.6 – Difference in share as a template based on the admin setting values
When the link is opened by users outside the organization, the user will be shown an error message saying IT policy prevents external user from copying this form.
Share form result summary
As discussed in Chapter 3, Creating a Survey with Microsoft Forms, Microsoft Forms supports sharing the summary report with people who are both internal and external to your organization. Anyone with the summary link can view the report. As an administrator, you can restrict sharing the summary report link to only people within your organization. When the survey owner generates a summary link, a message is displayed stating that only people in the organization can view the summary, as shown in Figure 10.7:
Figure 10.7 – Sharing the summary link when external sharing is disabled
When the link is accessed by users outside the organization, the following message is displayed: IT policy prevents external user from viewing responses summary of this form.
Record names of people in your organization
Microsoft Forms gives survey owners the chance to record the names of the survey responders when selecting Only people in my organization can respond, as shown in Figure 10.8:

Figure 10.8 – Settings to share survey to only people in the organization
The default setting for the Record name option depends on the setting selected by your organization administrator. If the administrator disabled Record names by default, then the survey owner would need to explicitly change the setting for the specific survey to record the name. Otherwise, the survey response would be recorded as Anonymous in the survey report (see Figure 10.9):
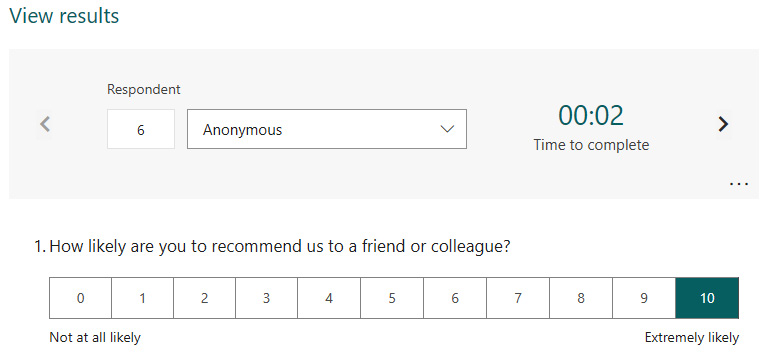
Figure 10.9 – Survey response when the Record name setting is not selected
You can also set the policy that prevents using publicly available images or videos as part of survey questions to minimize the risk of content rights violations.
Allow YouTube and Bing
When creating a survey question, you can insert a YouTube video or an image from Microsoft Bing, as shown in Figure 10.10:

Figure 10.10 – Inserting a video on a survey question
After inserting a YouTube video link, the video is embedded into the survey question, as shown in Figure 10.11:
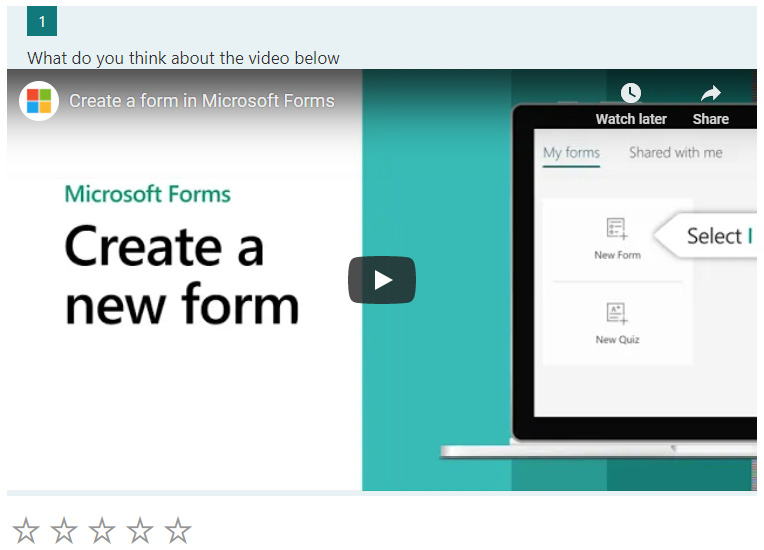
Figure 10.11 – Embedding a YouTube video into a survey question
The use of the images and videos depends on the content rights of the content owner. To minimize the risk of content rights violations, you can disable the Include Bing search, YouTube videos setting. When this setting is disabled, survey owners will get an error message, as shown in Figure 10.12:

Figure 10.12 – Message while inserting a video when an admin disables the setting
The last administrator setting for Microsoft Forms is for phishing protection.
Phishing protection
Microsoft Forms and Dynamics 365 Customer Voice include anti-phishing protection, which means that if your survey is suspected to be a cover for a phishing attack to obtain personal information, your survey would be disabled by default and you would be unable to collect any responses.
Phishing protection is automatically applied to surveys that collect responses from people outside the organization, and you cannot disable it. Phishing protection is enabled, by default, for surveys with the Only people in my organization can respond setting enabled.
If you may need to collect personal information through surveys and would like to prevent your internal survey from being blocked as potential phishing, then an admin can disable the Add internal phishing protection setting. Disabling this setting skips anti-phishing protection checks for internal surveys.
Now that you have learned about the administration settings for Microsoft Forms, let's take a look at the settings for Customer Voice.
Administration settings for Customer Voice
Dynamics 365 Customer Voice is often used for collecting feedback from customers outside your organization, and the settings are simplified to reflect the scenario. You can access the settings for Customer Voice from the same Org Settings page in Microsoft 365 admin center as for Microsoft Forms. The settings for Customer Voice are shown in Figure 10.13:
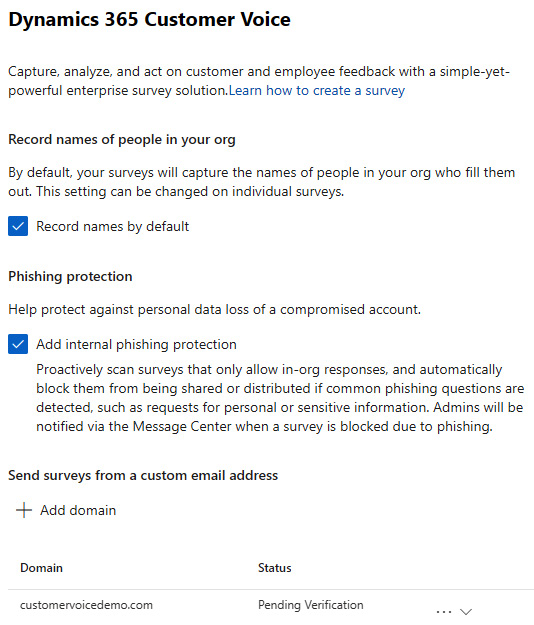
Figure 10.13 – Admin settings for Customer Voice
The first two settings, Record names of people in your org and Phishing protection, are the same as in Microsoft Forms.
The additional setting that is unique for Customer Voice is the setting to customize the email address surveys are sent from.
Send survey from a custom email address
Customer Voice supports sending a personalized survey invitation email to your survey recipients. The email is tracked so you can get a report when the survey recipient opens the email. When sending the survey invitation, Customer Voice by default uses the following email address: [email protected]. You can customize the email sender address with your organization's email address by adding a domain in the administration settings. Complete the following steps:
- Click Add domain from the setting page (See Figure 10.13).
- Specify your organization's email domain address, as shown in Figure 10.14, and click Next:

Figure 10.14 – Specifying the domain
- Get the information that you need to add to your DNS record to verify that you own the domain specified in the previous step:

Figure 10.15 – Domain information for Customer Voice custom email verification
Important note
The DNS verification steps need to be done by your network administrator. Depending on who manages your DNS, the steps may vary. The following steps are an example where the DNS is managed directly from admin.microsoft.com.
- On a new tab, open https://admin.microsoft.com and navigate to Settings>Domains, click on DNS records, and then click Add record (see Figure 10.16):
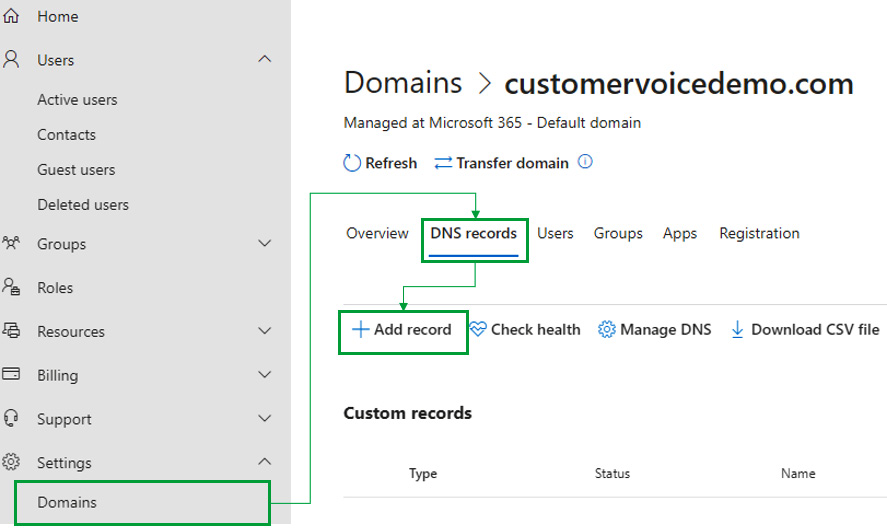
Figure 10.16 – Adding a new record to your domain
- Create a new record for each of the three entries from the preceding step 2. See Figure 10.17 as an example for the three entries:

Figure 10.17 – Example of DNS record entries
Important note
The alias values from step 3 may not display fully. Make sure the alias entry ends with .dynamics.com.
- After adding the entry, your DNS records should look like what is shown in Figure 10.18:
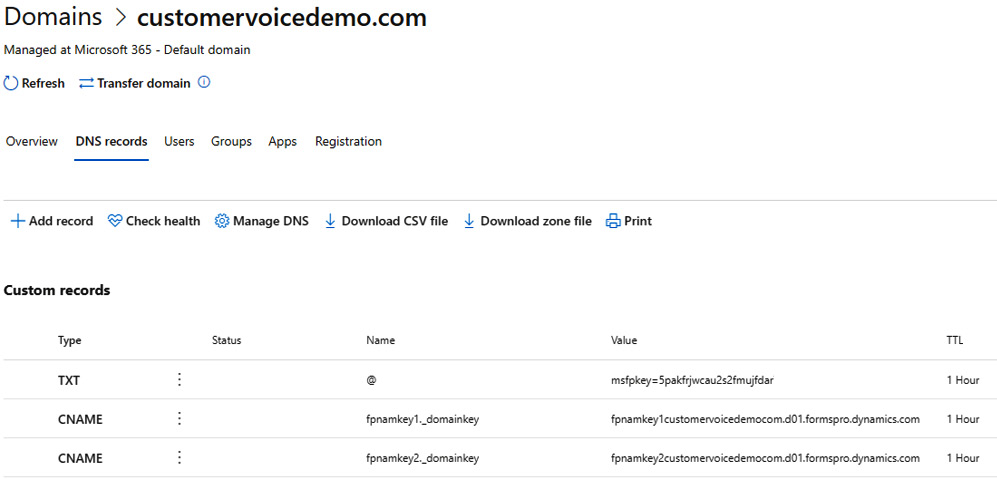
Figure 10.18 – Completed DNS record entries
- Return to the Customer Voice admin setup page (step 2) and click Verify.
- Specify the Email address, Display name, and users who can use the email domain, as shown in Figure 10.19:
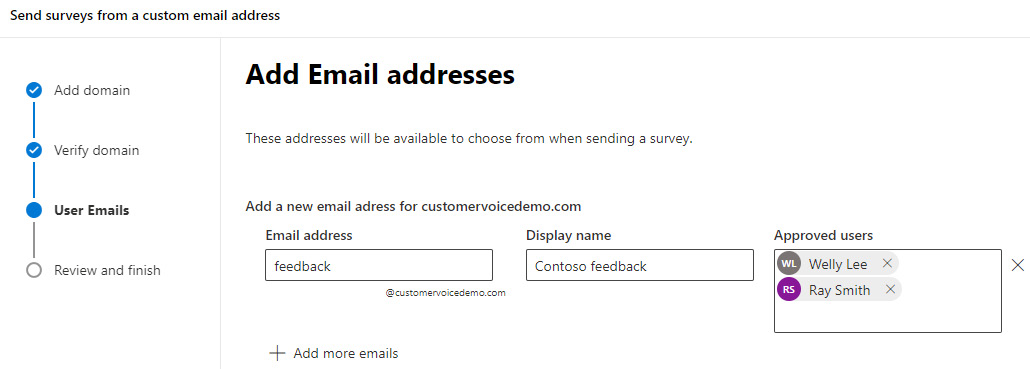
Figure 10.19 – Email address and approved users setup
- Verify the information and complete the setup.
After you have completed the domain setup, the users listed in step 7 can change the sender email address through the Distribution pane, as shown in Figure 10.20:

Figure 10.20 – Email sender setting
In addition to configuring settings, as an admin, you will also need to manage permissions for Customer Voice.
Managing permissions for Customer Voice
Customer Voice stores survey definitions, survey invites, and response data in its own cloud service and the data is then copied to your organization's Dataverse (for more information about Dataverse, go to https://docs.microsoft.com/en-us/powerapps/maker/data-platform/data-platform-intro). If you are using Dynamics 365 or Power Apps, then you can use the Dataverse associated with the application to store the Customer Voice survey data. If you are not using Dynamics 365 or Power Apps, then Customer Voice uses the default Dataverse instance for your organization. In the next section, I will cover how you can manage permissions when using default Dataverse and what additional steps you must follow to manage permissions for Customer Voice in Dynamics 365 or Power Apps.
Using the default Dataverse for Customer Voice
The first time you use Customer Voice, a user account is created in the default Dataverse instance (for more information about default Dataverse, go to https://docs.microsoft.com/en-us/power-platform/admin/environments-overview#the-default-environment). The default Dataverse is a shared database that is used by other applications, such as Power Apps. If there is no default Dataverse instance, Customer Voice will automatically create the default Dataverse and associated tables to store the survey data (see https://docs.microsoft.com/en-us/dynamics365/customer-voice/developer/entity-reference for Customer Voice schemas in Dataverse).
The user created by Customer Voice will be automatically assigned the Project Owner role in the default Dataverse to enable the user to write and read their own data. In Dataverse, a record must have an owner. Survey definition, survey invite, and survey response records are owned by the user who creates the project in Customer Voice.
Customer Voice uses Microsoft 365 Group to share a project with others. When a user shares a project, the user must select a group or create a new group.
You can share a project from the All Project view in Customer Voice or click the Share button when you are in a project.
The following are the steps to share a project in Customer Voice:
- Select an existing group or create a new Microsoft 365 Group. Note that if the administrator disables this setting, then the option to create groups is removed (see Figure 10.21).
- When creating a new group, provide the Group Name and Email address information, and add at least one member to share the survey with.
- Click Share to finish:

Figure 10.21 – Share a Customer Voice project
When you share a project, Customer Voice automatically creates a Team in Dataverse and assigns the Project Owner role to the team. Any subsequent survey records are created using the Dataverse team as the record owner. Any member you add to the group gets access to the record in Dataverse.
User account creation and role assignment are done automatically when you use the default Dataverse option. If you connect to an existing Dataverse instance for Dynamics 365 or Power Apps, then you need to manage permissions manually.
Managing Customer Voice permissions in Dataverse
Any user who needs to create a project and send a survey needs to have permissions in an existing Dataverse instance for Dynamics 365 and Power Apps. By default, Customer Voice is installed automatically as part of the Dynamics 365 customer engagement application (such as Sales, Customer Service, and Marketing). If you are using an existing Dataverse instance for Power Apps, then you need to install Customer Voice from https://aka.ms/CustomerVoiceApp on your existing Dataverse instance. The app installs tables, roles, and the application user account used by Customer Voice to write data to Dataverse.
To enable users to select the Dataverse instance, the user must be assigned the Project Owner role, as shown in Figure 10.22:
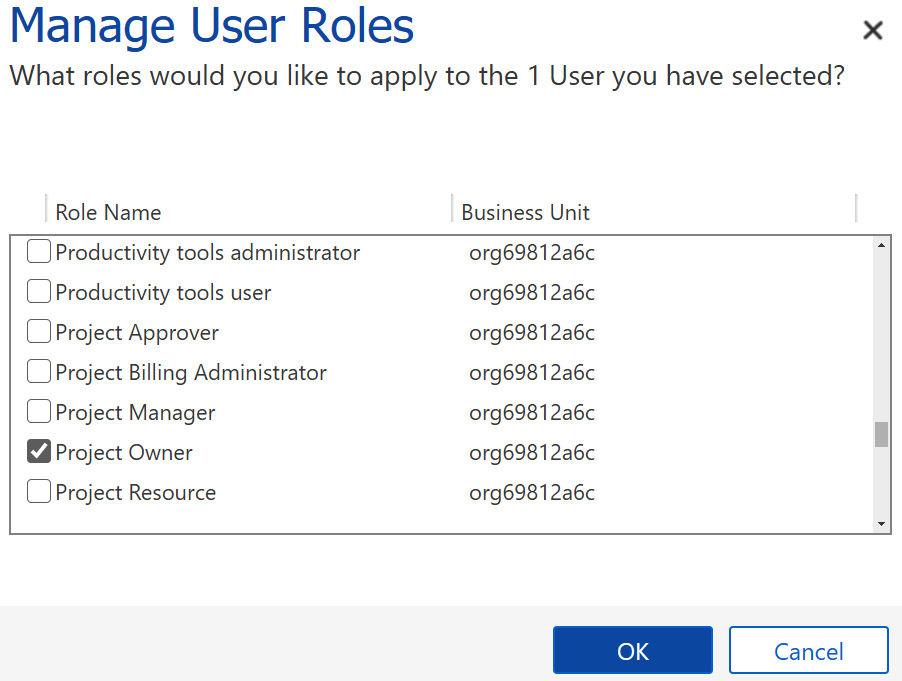
Figure 10.22 – Project owner role for a Customer Voice user
The Project Owner role assigns the necessary privileges to enable users to create survey records in Dataverse. The user will need to have a separate role to access other Dataverse records to send a survey and associate the survey with that record. For example, to send a survey to an existing contact in Dynamics 365, you must have additional permission to access the contact. Without it, the user will not be able to select the contact to send the survey.
Important note
When you are using a Power Automate workflow using a service account, you must share the Customer Voice project to the service account so the workflow can send the survey invites.
The Project Owner role includes privileges for related records, such as the privilege to create a contact. When you send a survey invitation email, by default, Customer Voice creates a contact record. You can turn this option off (see Figure 10.23):
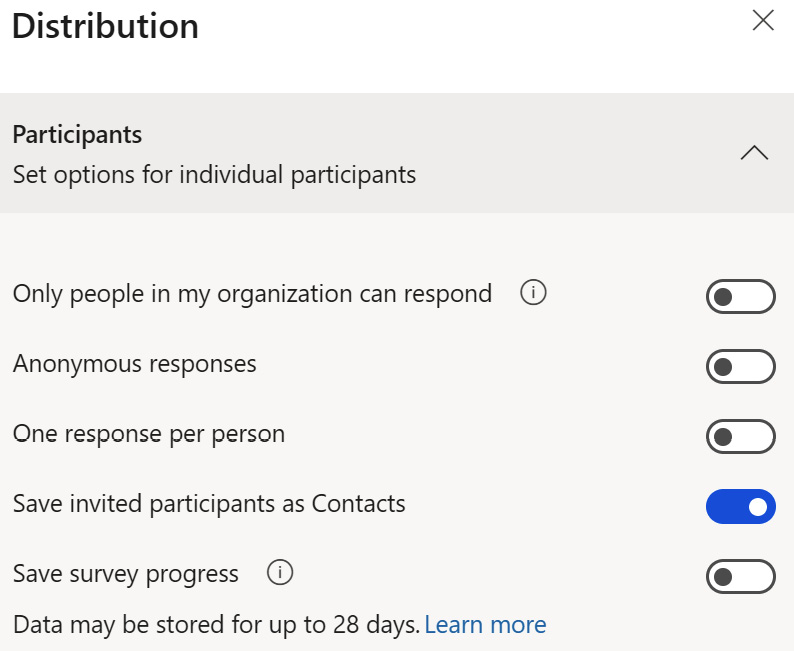
Figure 10.23 – Survey distribution settings
When working on a business solution, organizations often use different environments for development, testing, and production. Each environment has a different owner, and changes to the solution are first made in the development environment before they are moved to the testing environment. After the testing is complete, the changes are deployed to production.
Customer Voice supports multi-environment deployment, which we will discuss next.
Managing project deployment for Customer Voice
You can copy a project between environments within the same organization or across organizations. We will start with copying within the same organization.
Copying a project within the same organization
You can start by creating a Customer Voice project in your development environment. When you are ready to copy the project to a production environment, go to All Projects, select your project, click on the …, and select Copy from the pop-up menu, as shown in Figure 10.24:

Figure 10.24 – Copying a project
Select the environment to copy to, as shown in Figure 10.25:
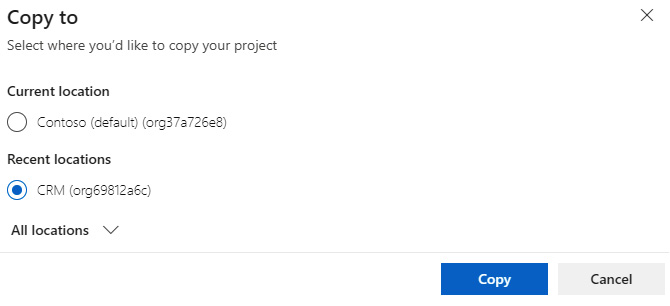
Figure 10.25 – Selecting the destination environment to copy the project to
The copied project will have - copy appended to the project name, and you can use the Rename option to change the name, as shown in Figure 10.26:
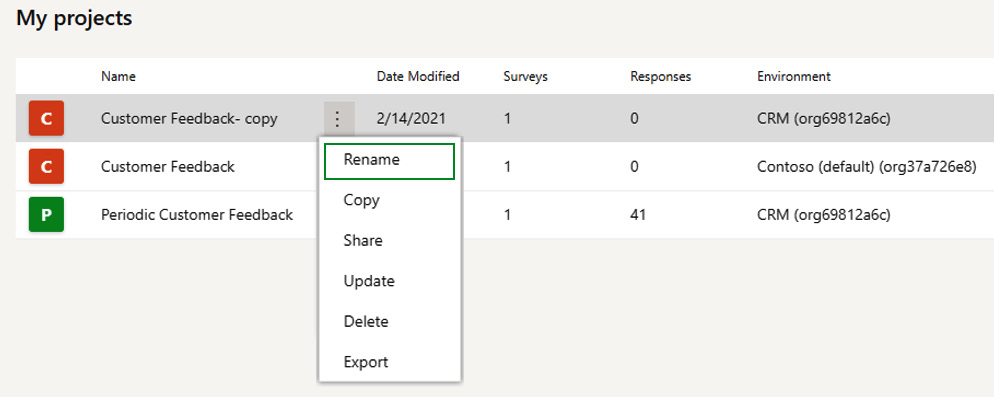
Figure 10.26 – Renaming a project
If you are making changes to the project, you can do this in your development environment. When you are ready to deploy the changes to production, on the related production project, select Update, as shown in Figure 10.27:
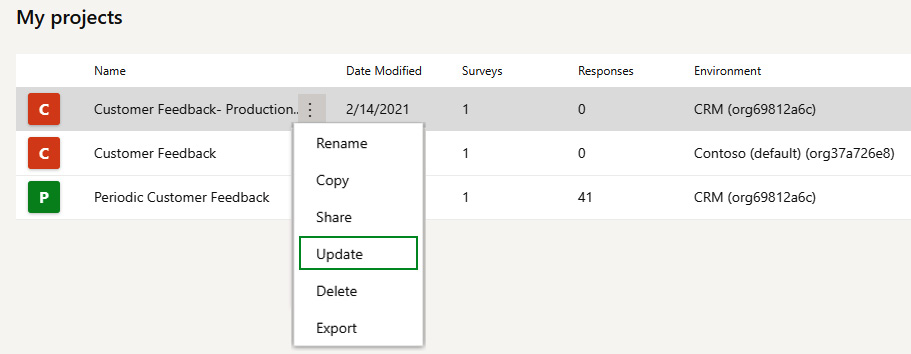
Figure 10.27 – Updating a project
In the dialog window, select the project to copy from (see Figure 10.28):

Figure 10.28 – Update project dialog window
The project will be updated based on the changes in the source project. Changes that are included in the copy include the following:
- Changes in the survey question, including branding, branching logic, personalization, and satisfaction metrics
- Survey translations
- Survey invitation email templates
What is not included in the project update is as follows:
- Permission/sharing
- Survey invitation records
- Survey response records
Sometimes you need to copy a project across different organizations; for example, you may have different organizations for sandbox and production. Another use case is when you are working with an external system integrator that creates a project within their organization and you need to copy it to your organization when it is ready.
Copy a project across organizations
To copy a project across organizations, follow these steps:
- Select the project you would like to copy and, from the … menu, select Export (see Figure 10.29):
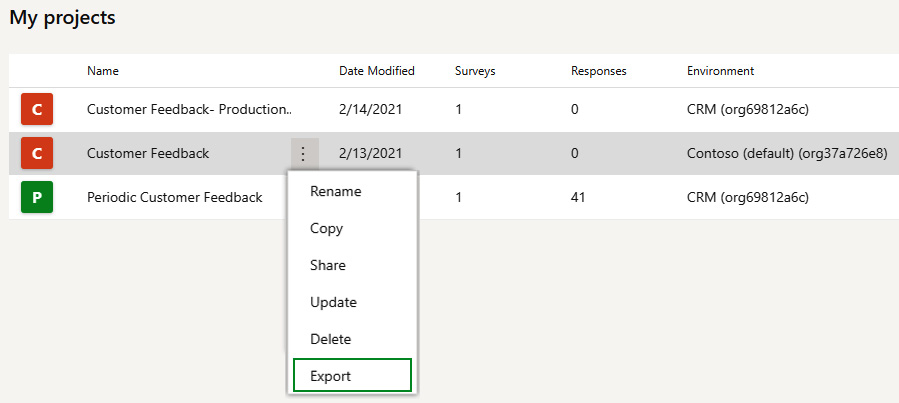
Figure 10.29 – Export project option
- In the dialog box, copy the Link to exported project URL (as shown in Figure 10.30):
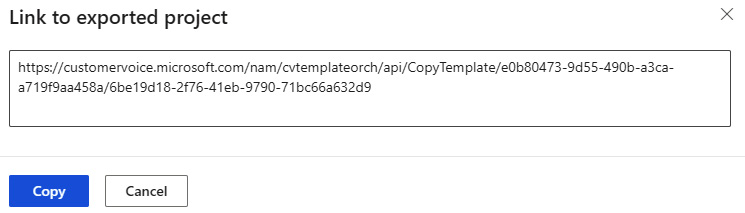
Figure 10.30 – Link to the exported project
- Log in to the destination organization by going to https://customervoice.microsoft.com.
- Paste the URL in your browser.
The project will be created in the destination organization.
Summary
In this chapter, we reviewed the administrative settings for Microsoft Forms and Dynamics 365 Customer Voice to enable you to set the policy for surveys created in your organization. Customer Voice includes built-in integration with Dataverse. You can use the default Dataverse instance or a Dynamics 365-based Dataverse instance. When you connect Customer Voice to Dynamics 365 instances, you need to assign additional roles in the Dynamics 365 to ensure that only authorized users can send surveys to your contacts in Dynamics. Finally, we reviewed how to copy Customer Voice projects from one environment to another for multi-environment deployments.
In the next and last chapter of this book, we will review Customer Voice licensing and how you can manage license allocation.