3
The X Display Manager
The X Display Manager provides a way for users to log on and start initial clients, regardless of which X server they use. This chapter shows how to get xdm going and how to configure it to the needs of your site.
In This Chapter:
The Master Configuration File (xdm-config)
Listing X Servers (the Xservers File)
xdm Host Access Control: the Xaccess File (R5 Only)
Indirect Access and the Chooser
Advantages and Disadvantages of the Chooser
Starting Up Individual X Sessions (the Xsession File)
Restarting xdm Using xdm-pid (R4 and Later)
3
The X Display Manager
The X Display Manager, xdm, runs as a daemon on a host machine. It provides a way for users to log on and start initial clients, regardless of what X server they use.
Not all sites use xdm to control X sessions. Many workstation users still prefer to log on as usual on the console and use the xinit program to start the X server and any preferred clients. xinit, however, is considered obsolete by the X Consortium, with all new functionality being built into xdm. And on a site that includes X terminals, xdm is an essential tool for providing a standard way for users to log on across the network.
xdm also provides a way for administrators to configure environments system-wide. So if you don't already use xdm to control X sessions for users on your site, we encourage you to give it a try.
xdm and Vendor Environments
If you're running a vendor-distributed version of X that's greatly modified from the MIT version, your mileage may vary with this chapter. For example, the OpenWindows 2.x server doesn't work very well with xdm at all. The OpenWindows 3.x distribution, meanwhile, supplies its own version of xdm which is somewhat modified from the version documented here.
SCO Open Desktop has its own version of xdm, called scologin, which must be used for all logins. scologin is enhanced in that it has SCO's session manager scosession built-in as the controlling process for the X session, and it checks for expired passwords. scologin also provides a front end (/etc/scologin) to facilitate some administrative responsibilities.
In addition, many vendor-supplied X environments already have xdm pre-configured when X is installed.
3.1 xdm Concepts
The xdm program is simply an X client that manages the first and last points of connection, control, and coordination of the user session. If you need a conceptual feel for what the X Display Manager is, think of xdm as working for network-connected X servers the way init, getty, and login work for serial-connected ASCII terminals. This is only a loose comparison, but it will serve our purposes in conveying the general function of xdm.
Like init, xdm keeps track of which X servers are available to be connected. When init has determined that an ASCII terminal is available to be managed, it spawns the getty program, which puts up a login prompt. Similarly, when xdm is given management of an X server, it sends a login box to the server display.
When a user types a name and password on a serial ASCII terminal, that information is sent to the login program, which authenticates the password and then starts up whatever program is specified in the user's /etc/passwd, almost always an interactive shell. When the shell begins, user-configurable batch files are executed, $HOME/.profile for the Bourne/Korn shell or $HOME/.cshrc and $HOME/.login for the C shell. The user is then deposited in the selected shell environment, ready to run UNIX commands.
For a user who logs in with an xdm login box, the name and password are also authenticated, using the same mechanism as the login program. However, this is where the functions of login and xdm diverge. As shown in Figure 3-1, instead of running an interactive shell, xdm runs a series of shell scripts. These scripts normally start all your desired X clients, including one or more terminal emulators, each of which will contain an interactive shell. In the default xdm configuration, Xsession is one of the shell scripts that are executed. Xsession then calls another script called $HOME/.xsession (if it exists).

When a user logs out on a character-based terminal, control of the terminal returns to getty, sending another login prompt to the terminal. Consistent with that model, when a user logs out of an X session (i.e., when the “controlling” process of the X session has been terminated), xdm closes all connections and resets the terminal to a “ready for log on” state, displaying a new login box, ready for another user session.
As you can see, xdm is a very ambitious program. It can be configured to control logins on multiple X servers connected to the same machine, creating customized sessions, and offering some basic network security features.
The conclusion is that xdm, when set up properly, enables users to walk up to a display and log in by typing their usernames and passwords, the same as they would on an ASCII terminal. xdm then runs their startup scripts automatically, setting up customized environments and enabling users to begin productive work immediately. When users finish their X sessions, xdm resets each display for the next user. With the X session startup process incorporated into the login process, users need to know relatively little about X11 to start working—given, of course, that xdm and users’ individual environments are configured appropriately.
History of xdm and XDMCP
xdm was introduced with X11R3, to support the X terminals that were just coming to the market. That first version of xdm had several problems, which were solved in X11R4 by the introduction of the XDM Control Protocol (XDMCP).
The most urgent problem that XDMCP addressed was the problem of X terminals that are turned off and on again. Prior to XDMCP, the only way xdm knew to control an X terminal was to look for its entry in the Xservers file (see Section 3.5.2 for more information). Since Xservers is consulted only when xdm is first started, this caused problems when X terminals were turned off temporarily, or when new X terminals were attached. It meant that every time a user turned an X terminal off and on, the system administrator needed to send a SIGHUP to xdm. XDMCP provides a solution to this problem.
XDMCP, introduced in X11R4, is a protocol shared by the xdm client and X servers throughout the network. Using XDMCP, the X server has the responsibility of actively requesting an xdm connection from the host. If an X server uses XDMCP, therefore, it no longer requires an entry in Xservers since the host no longer has the burden of initiating the connection.
Almost all X terminals sold today are XDMCP-compatible. R4 and R5 servers running on local console displays are also XDMCP-compatible, but XDMCP queries are not enabled by default.
3.2 xdm Configuration Files
xdm is configured through a set of editable ASCII files for some of the mechanisms you would expect—a list of servers to be explicitly controlled by xdm, resources to be used by xdm, error messages, whether to use security, etc.—but it also provides ASCII files for setting up an initial default session and setting resources to be loaded by the server itself. The files used for xdm configuration in /usr/lib/X11/xdm are listed here (and shown in Figure 3-2), to be discussed in detail later in the chapter:
xdm-config
Resources specified for xdm. Note that the location of all other files listed below can be redefined with resources specified in xdm-config. (The location of the xdm-config file itself can be reassigned using the -config option to xdm when it is started.)
Xservers
A list of servers to be explicitly managed by xdm. The local display server usually needs to be listed here.
Xsession
The initial startup script used by each individual X session.
Xresources
Resources to be loaded via xrdb by servers managed by xdm.
xdm-pid
A file containing the process ID of xdm. (This file is not designed to be edited by administrators, but is for informational purposes only.) (X11R4 and later only.)
xdm-errors
The error log file for xdm. (This file is not designed to be edited by administrators, but is for informational purposes only.)
A file for configuring access control for XDMCP, specifying different behavior according to the sort of query used. This configuration file is new to X11R5.
GiveConsole
A shell script that changes the ownership of the console to the user. This file is new to X11R5. See Section 4.6.2 for information on how the GiveConsole script is used.
TakeConsole
A shell script that changes the ownership of the console back to root. This file is new to X11R5. See Section 4.6.2 for information on how the TakeConsole script is used.
Xsetup_0
A shell script used for display setup specific to the local console server. This file is new to X11R5.
In users’ home directories, the following files are used by xdm in its default configuration:
$HOME/.xsession
User-specific startup script executed by the systemwide Xsession script.
$HOME/.Xresources
User-specific resources read by the systemwide Xsession script if $HOME/.xsession does not exist. (If $HOME/.xsession does exist, then the .xsession script is responsible for loading user-specific resources from .Xresources or any other resource file.) See Appendix D for information on setting resources.
$HOME/.xsession-errors
Errors specific to a user's X session (R5 only). This file is not designed to be edited.
$HOME/.Xauthority
Machine-readable authorization codes for the user's server. This file is not designed to be edited by hand. See Chapter 4 for information on how the .Xauthority file is used.
Note that the user-configurable .xsession file is available only because it is exec'd by the Xsession shell script. If you don't understand yet why this is important, consider that any administrator can remove that functionality, or can add any other clients or resources to be used by all X user sessions. So xdm configuration is unusual in that you can do just minimal configuration (just set things up so it runs and then leave it alone) or you can go wild setting up a global user environment.
We'll talk about all these files in detail later in the chapter. First, though, we'll give a quick and dirty procedure to get a minimal setup running.
3.3 xdm the Easy Way
For those of you that are interested in just getting xdm working for the first time, you can follow the steps below to set up xdm on a standalone workstation. These steps assume that you are using the MIT-distributed version of xdm, and that the xdm configuration files have not been changed from the defaults distributed by MIT.
- Edit the Xservers file in /usr/lib/X11/xdm as needed. If you want xdm to control the local display server, the Xservers file should contain the line:
:0 local /usr/bin/X11/X
If you don't want xdm to control the local display server, this line should be omitted. In all likelihood, the default Xservers file will work just fine.
- If you're currently running the X server on the local console display, you should exit it. It's also a good idea to have an alternate way to log in to the workstation (such as a remote login across the network, or an ASCII terminal connected to a serial port), since if something goes wrong, your console may become unusable.
- Start xdm as root:
# /usr/bin/X11/xdm
The X server will take over your display and you should see a login box resembling that in Figure 3-3.

Now log in. You should get an xterm window and a twm window manager, as shown in Figure 3-4.

You can configure this environment by creating a shell script in your home directory called .xsession and making it executable. If written as a Bourne shell script, the rules for writing the .xsession file are similar to those for the .xinitrc file used for xinit. Unlike .xinitrc, however, .xsession does not have to be a Bourne shell script, it can be any executable. For information on configuring individual X sessions at the user level, see Chapter 2.
See Section 3.7 for information on how to install xdm to start at boot time.
3.4 Troubleshooting xdm
Problems with logging in via xdm might be traced using xdm error messages. Many errors are placed in the file /usr/lib/X11/xdm/xdm-errors, but if you are using R5 xdm, the first place to look is in the file $HOME/.xsession-errors. $HOME/.xsession-errors contains errors generated only under your user account. In addition, some of the more common situations are listed here:
- If the server doesn't start or if you don't get the login box, there is probably something wrong with your xdm configuration files. Kill xdm from the alternate login we recommended in Step 2, and look in the file /usr/lib/X11/xdm/xdm-errors for hints. Good candidates for mistakes of this magnitude are the Xservers, xdm-config, and Xaccess files. If you'd rather not deal with it, try to restore the files to the MIT defaults (or to the versions originally distributed by your vendor) and try again.
- If you get the “Login incorrect” error, guess what, you typed your login name or password wrong. Try again, xdm uses the same login authentication as the login program does, so if you can log on at the console or at any other terminal window, then you can log on using xdm.
- If you log on and the login box returns instantly, something's wrong with your environment. Either the /usr/lib/X11/xdm/xdm-errors file or $HOME/.xsession-errors (under R5) will contain error messages that can help you track the problem.
- One possibility is that your .xsession file isn't executable. Try pressing F1 (or in R5, CTRL-RETURN) after your password instead of the RETURN key to access the “fail-safe” session. This will bypass your .xsession and give you a single xterm window, sufficient to edit your environment. If your problem is that your .xsession isn't executable, the error message in .xsession-errors (or xdm-errors in R3 and R4) will read something like:
/usr/lib/X11/xdm/Xsession: /home/judy/.xsession: Permission denied
If this is your problem, simply do:
% chmod +x .xsession
This might need to be done if you've just created your .xsession file, or if you've just copied it from another machine using ftp.
- Under R5, another possibility is that there is a problem writing to your $HOME/.xsession-errors file. One reason this might happen is if your home directory isn't properly NFS-mounted from another host. The “failsafe” session won't help in this case; instead, if you're on the console display server, press CTRL-R at the login box to disable both the xdm connection and the X server on that display. The error message in xdm-errors will read:
/usr/lib/X11/xdm/Xsession: /home/tim/.xsession-errors: Permission denied
Either your home directory doesn't exist, or your home directory isn't writable by you, or your .xsession-errors file isn't writable by you ... track down the problem, correct it, and try again.
- One possibility is that your .xsession file isn't executable. Try pressing F1 (or in R5, CTRL-RETURN) after your password instead of the RETURN key to access the “fail-safe” session. This will bypass your .xsession and give you a single xterm window, sufficient to edit your environment. If your problem is that your .xsession isn't executable, the error message in .xsession-errors (or xdm-errors in R3 and R4) will read something like:
- If you log on, windows flicker on your screen, and then the login box reappears, you probably put all your clients in the background in your .xsession script. Press F1 after your password to access the “failsafe” session and edit your .xsession. You need to put the last interactive client in the foreground by omitting the trailing See Section 2.2.3.1 for more information.
(Note that if this is your problem, xdm will not generate an error message since as far as xdm is concerned, everything was executed successfully.)
Now that you have xdm working for your local display, it's trivial for it to control other X servers at your site. If you have X terminals that are XDMCP-compatible, you should be able to just set them up to query your host for an xdm connection. See Section 7.5.1 for more information on setting up X terminals for use with xdm.
Some readers will want to stop reading this chapter right here. However, if you're interested in refining your xdm configuration or you just want to know more about how xdm works, please read on.
3.5 Customizing xdm
Now that we've told you the general idea of xdm and how to get it going, it's time to talk about the gory details.
The following sections describe the xdm configuration files in detail.
3.5.1 The Master Configuration File (xdm-config)
All of the configuration files used by xdm are specified in the xdm-config file (with the notable exception of xdm-config itself), so it's worth your while to become very familiar with its contents. You can consider it to be the starting point of your xdm configuration.
The xdm-config file is really just a resource file for the xdm client. For that reason, the syntax for xdm-config follows standard resource specification syntax. See Appendix D for more information on resource syntax (although you might be able to get through this chapter without it).
The following is the sample xdm-config file as it comes from MIT in Release 5 of X11:
DisplayManager.errorLogFile:        /usr/lib/X11/xdm/xdm-errors
DisplayManager.pidFile:             /usr/lib/X11/xdm/xdm-pid
DisplayManager.keyFile:             /usr/lib/X11/xdm/xdm-keys
DisplayManager.servers:             /usr/lib/X11/xdm/Xservers
DisplayManager.accessFile:          /usr/lib/X11/xdm/Xaccess
DisplayManager._0.authorize:        true
DisplayManager._0.setup:            /usr/lib/X11/xdm/Xsetup_0
DisplayManager._0.startup:          /usr/lib/X11/xdm/GiveConsole
DisplayManager._0.reset:            /usr/lib/X11/xdm/TakeConsole
DisplayManager*resources:           /usr/lib/X11/xdm/Xresources
DisplayManager*session:             /usr/lib/X11/xdm/Xsession
DisplayManager*authComplain:        false
The keyword DisplayManager starting each resource name is the internal “class name” for xdm. xdm uses some resources for configuring xdm itself, and other resources for configuring its behavior once individual X display servers have connected to it. In particular, resource specification in xdm-config follows one of the following forms:
DisplayManager.variable:                  value
        or
DisplayManager.DISPLAY.variable:          value
        or
DisplayManager*variable:                  value
- In the first form, the DisplayManager keyword is separated from the variable name by a single period, meaning that this is a resource that makes sense only when applied to xdm proper. An example of a resource like this is DisplayManager.servers, for specifying which file should be used for listing the X servers to be managed by xdm. You can think of this sort of resource name as applying to xdm's behavior independent of its connection to any particular X server: which servers to connect to, where to copy its process ID, where to put error messages, etc.
- The second form is used to specify a resource that should apply to a single display server only. Here's where the tricky part to resource naming rules for xdm comes into play: since the colon (:) has special meaning in resource specification syntax, the underscore (_) is used where these would normally occur in a display name. For example, the display name bigbird: 0 becomes bigbird_0 if it appears in a resource name. Without an underscore to specify that a particular server is being referred to, the name is taken to represent a group of X servers, called a display class. See Section 3.5.6 for more information on display classes.
The server for which you'd most want to define a specific resource is the local console display (: 0, specified as _0 in resource specifications). An example of one of these is the DisplayManager._0 .authorize resource—you usually want to enable access control on the local server, but you may not want it enabled on X terminals if they don't support that functionality.
- The third form of an xdm resource specification is really just a generalization of the second form. By putting an asterisk between the DisplayManager keyword and the variable name, where a display name would normally be, you can define this value for all servers not specifically defined otherwise. As a common example, you could use the following lines:
DisplayManager*authorize:      false
DisplayManager._0.authorize:   true
and only the local display server will use access control.
In resource lingo, these are called “loose” and “tight” bindings. We discuss resource bindings in detail in Appendix D.
See your xdm manpage for a description of other resources that can be specified in the xdm-config file.
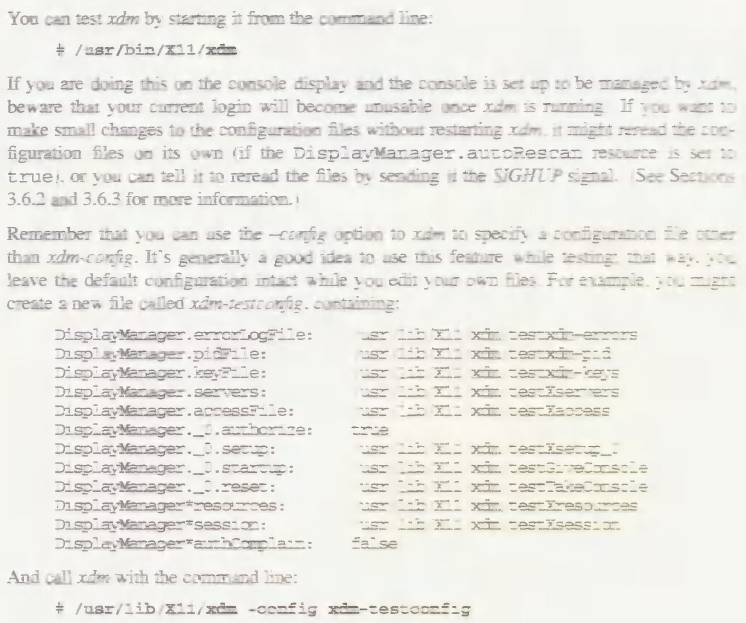
For testing purposes, you can use the -config option to xdm to test new configuration files. For example, to start xdm with a customized configuration file, enter:
# /usr/bin/X11/xdm -config ./my.xdm-config
The DisplayManager.autoRescan resource controls whether xdm automatically rereads the configuration files after they have been changed. If set to true (the default), xdm will reread the xdm-config file the next time a server connects to xdm. If set to false, then if you edit the xdm-config file while xdm is still running, you have to send xdm a SIGHUP signal before it will be reread. See Sections 3.6.2 and 3.6.3 for more information on sending a SIGHUP to xdm.
3.5.2 Listing X Servers (the Xservers File)
The Xservers file was originally designed in X11R3 to list all X servers to be managed by xdm. The XDM Control Protocol, introduced in R4, changes the function of the Xservers file Significantly.
Under X11R3, all X servers managed by xdm required entries in Xservers. The only way xdm would know to connect to a server is if it appeared in the Xservers file at startup. In that way, Xservers acted somewhat like an inittab for xdm.
With X11R4 and XDMCP, the X terminal takes responsibility for querying the host for an xdm connection. For that reason, any X terminal that supports XDMCP should have its entry removed from Xservers on a host running X11R4 or later.
The Xservers file is not yet obsolete, however. It is still used to start the X session on the local console display, which does not normally use XDMCP queries. It is also used to tell xdm how to start up the X server on the local machine.
3.5.2.1 Xservers Syntax
The syntax for each line in the Xservers file varies on whether it's for a server that runs on the local machine, and whether a display class is specified in Xservers for that machine. The only X servers that you need to enter into the Xservers file are those that do not use XDMCP to request a connection. For the most part, the only X server that needs to be specified in Xservers is the console display server. If your console display server is R4- or R5-compatible, it probably supports XDMCP queries but does not have them enabled by default. So you need to enter the local server into the Xservers file if you want it to be managed by xdm:
:0 local /usr/bin/X11/X
The console display name, : 0, is followed by the word local to tell xdm that it's an X server running on the local machine, and then by the command used to start the X server. This command, /usr/bin/X11/X, is executed when xdm is started up. /usr/bin/X11/X is usually a symbolic link to another server program.*
Since X terminals run their server on another machine, they have a slightly different syntax in Xservers. You only need to enter X terminals in Xservers if they don't support XDMCP or if you're running R3 xdm on the host. The following are examples of Xservers entries for X terminals:
ncd1:0 foreign NCD xterminal
visual1:0 VISUAL-X19TURBO foreign Visual xterminal
bigbird:0 XNCD19r foreign Eileen's xterminal
Managing Another Workstation's Display
It's common to use xdm on a given host to manage X terminals, but what if you want it to manage the display server on another workstation? This can be done, it just needs a little coordination between the two hosts. For example, if you want to set up a host rock to manage the display of the workstation scribe, you have to do the following:
- First of all, make sure xdm isn't being run on the workstation scribe, since you probably don't want it running. If for some bizarre reason you do want it running, make sure that the local server isn't listed in the Xservers file on scribe—that is, if xdm is running, make sure the following is commented out in Xservers:
#:0 local /usr/bin/X11/X
- You have to decide which end you want to start the xdm connection on.
- If you want to start the connection on the server side, have the X server started with an active XDMCP query.
% /usr/bin/X11/X -query rock.west.ora.com
If you want to set it up permanently, put this command in /etc/rc.local.
The -query option tells the X server to place a Direct XDMCP query to the specified host. Use the -indirect option in place of -query for an Indirect query to the specified host—for example, to get a chooser box from R5 xdm (see Section 3.5.3.2 for more information on the chooser client). You can also use the -broadcast option for a Broadcast query, in which case the first xdm host who replies to the query gets control of the server. The -broadcast option is not followed by a hostname.
- If you want to start the connection on the host side, put in the Xservers file on the host running xdm (rock in this example):
scribe:0 foreign X server on workstation “scribe”
And have the X server on scribe started “passively”, such as:
% /usr/bin/X11/X
(Again, to set it up permanently, put this command in /etc/rc.local.)
As a policy, it's probably better to have the connection started via an XDMCP query and avoid explicitly listing hosts in Xservers. A disadvantage to listing hosts in Xservers is that you have to make sure that you don't end up having the same server listed in two Xservers files on two different hosts. If you see the following error in the /usr/lib/X11/xdm/xdm-errors file:
error (pid n) : WARNING: keyboard on display ... could not be secured
what might have happened is that another host has the server listed in its Xservers file and is currently running xdm on the same X server.
- If you want to start the connection on the server side, have the X server started with an active XDMCP query.
As with the entry for the local server, each of these entries starts with the display name. In the first of these, the display name, ncd1 : 0, is followed by the word foreign to signify that it's an X server running on another machine.* The other entries are examples of entries for X terminals with display classes specified. If the name of a display is followed by something other than local or foreign, it's taken as a display class. (See Section 3.5.6 for more information on display classes.) In the example, the display classes used are VISUAL-X19TURBO and XNCD19r. The name of the display class is then followed by foreign.
The rest of the line is ignored, and can be used for a comment. In R3, beware that although the rest of the line is ignored, it must consist of at least one word.
Note that like the xdm-config file, the DisplayManager.autoRescan resource controls whether xdm automatically rereads the Xservers file if it has been changed, or requires a SIGHUP signal before it rereads configuration files. By default, any configuration files that have been changed are automatically reread when the next server connects to xdm. See Sections 3.6.2 and 3.6.3 for more information on sending a SIGHUP to xdm.
3.5.3 xdm Host Access Control: the Xaccess File (R5 Only)
In X11R5, the Xaccess file is introduced to allow administrators to control how xdm responds to different types of XDMCP queries. It's important to note that the Xaccess file is not related to server access control, which is controlled by the DisplayManager*authorize resource. See Chapter 4 for information on server access control. All the Xaccess file controls is what servers can get a login window; users still need to supply their user name and password when they actually log in.
As mentioned earlier, there are three types of queries defined for X terminals using XDMCP: Direct, Indirect, and Broadcast. If an X terminal is set up to use “Direct,” it means that it will ask a particular host for a connection. If it is set up to use “Broadcast,” it means that it will send out a general query throughout the network, for any host running xdm to answer—for most X servers, the first host that answers is the one that gets control of the terminal.
“Indirect” queries are for hosts that might forward the connection to another host, but hosts that could actually do this were few and far between before R5 xdm. Ideally, you would want a user to have a choice among multiple hosts to connect to. Some X servers have this functionality built in, using either “Indirect” or “Broadcast” queries. But to control those X terminals that did not have it built in, administrators had to resort to hacking xdm to support it. This has changed with X11R5.
With R5, the Xaccess file starts to put all this in place. Among other things, it provides a way of using the chooser client, which allows the user to choose among multiple other hosts. Indirect, Direct, and Broadcast queries are shown in Figure 3-5.
3.5.3.1 Direct and Broadcast Access
In its simplest form, the Xaccess file can be used to restrict access to particular X servers who request access via Direct and Broadcast queries. You can just list the addresses of X servers that you want to allow connections from, using standard UNIX wildcards (? to match a single character, * to match any number of characters). To omit a particular X server from the list of those allowed, start the name with an exclamation point (!). For example, to restrict access to servers in the ora.com domain, you might do:
*.ora.com
To allow connections from all X servers in the ora.com domain except for a workstation named harry, do:
In its MIT-distributed form, the Xaccess file is configured to allow Direct and Broadcast connections from all X servers:
* #any host can get a login window
3.5.3.2 Indirect Access and the Chooser
Until R5, the distinction between Direct and Indirect queries was poorly defined—there didn't seem to be any difference between connecting via a Direct query or an Indirect query to a particular host. The R5 Xaccess file changes that.
An Indirect query basically allows xdm on the host to determine what to do with the query. If xdm encounters a Broadcast or Direct query, it either pops up a login box or it doesn't (depending on whether the node is allowed access in the Xaccess file, as described above). Responding to an Indirect query, however, the Xaccess file gives the administrator a chance to configure whether to respond directly, whether to pass the query on to another host, or whether to give the user a choice between multiple hosts.
For example, to configure xdm to transfer an Indirect query from any NCD X terminals (named ncd1, ncd2, etc.) directly to the host ruby.ora.com, you might enter in Xaccess:
ncd*.ora.com ruby.ora.com
Alternatively, you can set up xdm to respond to Indirect queries with a chooser box. This gives the user the opportunity to choose between several hosts, as shown in Figure 3-6. The chooser client, implemented via the CHOOSER keyword in the Xaccess file, is a big plus in R5. To allow the NCD X terminals to choose from harry.ora.com, ruby.ora.com, and rock.west.ora.com, enter into Xaccess:
ncd*.ora.com CHOOSER harry.ora.com ruby.ora.com rock.west.ora.com
The chooser box would resemble the box in Figure 3-7.
The chooser client itself resides in /usr/lib/X11/xdm, with everything else. Note that unlike the other files in that directory, it is not a readable ASCII file, but a compiled executable.
Yet another possibility might be to set up the chooser client so it just does a broadcast among all hosts on the network and allows the user to choose among them. To do this, just use the keyword BROADCAST following the CHOOSER keyword.
ncd*.ora.com CHOOSER BROADCAST
To customize the appearance of the chooser client, use the Xresources file. The default Xresources file defines the following resources used by the chooser client:
Chooser*geometry:             700x500+300+200
Chooser*allowShellResize:     false
Chooser*viewport.forceBars:   true
Chooser*label.font:           *-new century schoolbook-bold-i-normal-*-240-*
Chooser*label.label:          XDMCP Host Menu from CLIENTHOST
Chooser*list.font:            -*-*-medium-r-normal-*-*-230-*-*-c-*-iso8859-1
Chooser*Command.font:         *-new century schoolbook-bold-r-normal-*-180-*
3.5.3.3 Using Macros
The Xaccess file allows you to define macros to group together a set of hosts. A macro definition starts with a percent character (%), followed by the macro name, followed by a list of hostnames (with a backslash at the end of the line signifying that the definition continues onto the next line). The macro is then called later on, preceded by the %. An alternative way of allowing X terminals to choose among harry, ruby and rock might be:
%NCDHOSTS       harry.ora.com ruby.ora.com rock.west.ora.com
ncd*.ora.com    CHOOSER %NCDHOSTS
3.5.3.4 Advantages and Disadvantages of the Chooser
The big advantage that the Xaccess file provides is that it can make it much easier to maintain and control X terminals on a network. Without the chooser, the host to query is configured directly on the setup menu of an X terminal using XDMCP. If you want to move the management of some X terminals to another host, it may involve personally visiting each terminal and editing their setup menus manually, step-by-step. However, using the Xaccess file, you can simply set up a single host as the primary xdm server, designed to accept Indirect queries and determine where they should be transferred. Using this scheme, switching xdm management from one host to another is a matter of editing a single file.
In our bicoastal environment, we use the chooser to allow East Coast employees to access their environments from the West Coast without having to do contortions: they simply choose the East Coast xdm host and they are greeted by the same friendly login box they're used to at home.
A problem with the chooser functionality is that due to a bug in R4 xdm, it can be used only to transfer xdm control to another host running R5. For example, if you had in your Xaccess file:
%R5HOSTS   harry.ora.com ruby.ora.com rock.west.ora.com
%R4H0STS   opal.ora.com

*     CHOOSER %R5HOSTS %R4H0STS
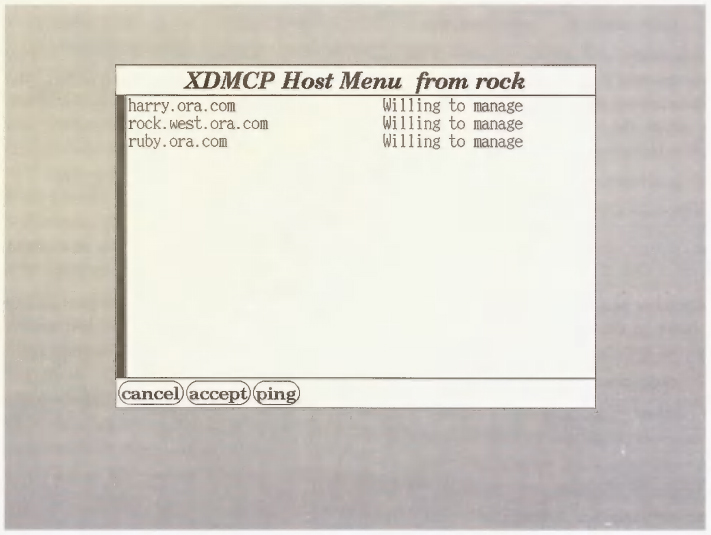
with opal running R4 xdm, the chooser box would look like the one in Figure 3-8.
Note that only the R5 hosts (harry, ruby and rock) are reported as “Willing to manage.” If you select one of the R5 hosts you'll get the xlogin box as expected; but although the R4 host is listed, if you select opal you'll be temporarily “hung” and then you will be returned to the chooser box without a chance to log on.
Note that like the xdm-config file, the DisplayManager.autoRescan resource controls whether xdm automatically rereads the Xaccess file if it has been changed, or requires a SIGHUP signal before it rereads configuration files. By default, any configuration files that have been changed are automatically reread when the next server connects to xdm. A message appears in the xdm-errors file:
info (pid 1564): Rereading access file /usr/lib/X11/xdm/Xaccess
See Sections 3.6.2 and 3.6.3 for more information on sending a SIGHUP to xdm.

3.5.4 The Xresources File
The Xresources file is loaded into each individual X server as it is connected to xdm. The most important function of the Xresources file is to set resources for clients or widgets that are run before the user actually logs in. In particular, the xlogin widget's resources need to be loaded into the server by xdm itself, since it is (by necessity) run before the user logs in. In R5, the chooser and xconsole clients may also be run before the user logs in, so those clients need their resources specified in Xresources as well.
As each X server connects to xdm, the resources in the Xresources file are loaded by the server via the xrdb client. See Section D.1.3 for more information on xrdb.
3.5.4.1 Configuring the Login Box
The login box displayed on an X server controlled by xdm can be configured using the Xresources file. In its default configuration, that file contains the following lines:
xlogin*login.translations: #override
    Ctrl<Key>R:  abort-display()

    <Key>F1:  set-session-argument(failsafe) finish-field()

    Ctrl<Key>Return:  set-session-argument(failsafe) finish-field()

    <Key>Return:  set-session-argument() finish-field()
xlogin*borderWidth:  3
xlogin*greeting:    CLIENTHOST
xlogin*namePrompt:    login:
xlogin*fail:  Login   incorrect
#ifdef COLOR
xlogin*greetColor:    CadetBlue
xlogin*failColor:    red
*Foreground:  black
*Background: #fffff0
#else
xlogin*Foreground:    black
xlogin*Background:    white
#endif
The resources starting with the string xlogin are used by the xlogin widget, xlogin sends the box to the display, prompting the user for a name and password. The xlogin box typically resembles Figure 3-3.
Note that the first resource for xlogin is a translation table, used for defining how special keystrokes might be used within the client (See Section D.1.4 for more information on translation tables.) This translation table is particularly important. What it does is to allow you to log in without running your .xsession file, by pressing F1 after your password instead of RETURN.*
Instead of running your .xsession, pressing F1 tells xdm to run a “failsafe” X session, defined as a single xterm window. (You can actually change this in the Xsession file. See Section 3.5.5 for more information on the Xsession file.) This is important, since otherwise you may have no way of logging in if your .xsession is corrupted.
The other important translation listed here is that you can use CTRL-R to stop xdm from managing your display entirely. This feature, new to R5, is useful for the local console display, where you might want to return to the console to start another windowing system or load a different X server image. Note that this only works if the X server isn't initiating XDMCP queries; otherwise, CTRL-R will abort the current xdm connection, but a new one will instantly replace it.
The remainder of the resources set for xlogin are fairly straightforward, used largely to specify the messages used for prompts and error messages. Note that since this resource file is loaded into the server via xrdb, cpp pre-processor commands (particularly #ifdef, #else, and #endif) can be used. In the R5 default shown above, the pre-processor commands are used to specify how the xlogin box should appear, depending on whether the display has color support. COLOR is one of the variables that are pre-defined in R5 xrdb; see Section D.1.3 for more information on xrdb pre-defined variables.
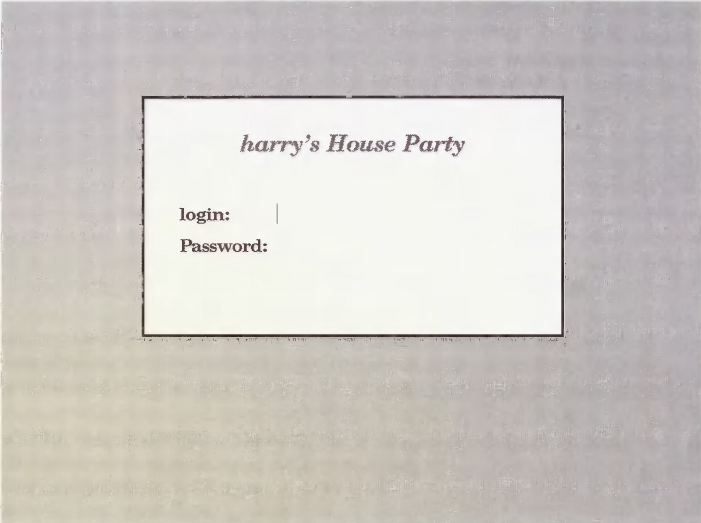
One resource you may want to change is the greeting in the xlogin box. In previous releases of X11, this box said “Welcome to the X Window System” by default; in R5, it simply gives the hostname, as shown in Figure 3-3. If you want to change this greeting, edit the resource definition:
xlogin*greeting: CLIENTHOST
xlogin*greeting: CLIENTHOST's House Party
The resulting login box will look like the one in Figure 3-9.
See the xdm manpage for more information on xlogin resources, including the default translation table.
3.5.4.2 The xconsole Client
As of R5, the DisplayManager._0.setup resource is used to point to a script to be run when the xdm connection to the local display server is initialized. The script, Xsetup_0, simply runs the xconsole client:
#!/bin/sh
xconsole -geometry 480x130-0-0 -daemon -notify -verbose -fn fixed -exitOnFail
This ensures that console messages are sent to a window in between console logins, rather than spewing across the screen and disrupting the display. The resources for xconsole are set in Xresources:
See the manual page for xconsole for more information.
3.5.5 Starting Up Individual X Sessions (the Xsession File)
Now that you have a picture of how xdm starts up and finds out how to respond to individual display servers on the network, it's time to discuss the part where the user actually logs in.
What happens now is completely up to the administrator. All xdm knows about is that it executes the file pointed to by the session resource for that display. In the distribution of R5, that file reads:
#!/bin/sh

exec > $HOME/.xsession-errors 2>&1

case $# in
1)

        case $1 in
        failsafe)
                exec xterm -geometry 80x24-0-0
                ;;
        esac
esac

startup=$HOME/.xsession
resources=$HOME/.Xresources

if [ -f $startup ]; then
        exec $startup
else
        if [ -f $resources ]; then
                xrdb -load $resources
        fi
        twm &
        exec xterm -geometry 80x24+10+10 -ls
fi
See Section 2.2.3 for more information on configuring the .xsession file.
- The first thing that happens is that all subsequent error messages are sent to a file in the user's home directory called .xsession-errors. In R4 and earlier, users’ error messages were mixed in with all other errors in the file pointed to by the DisplayManager.errorFile resource, usually xdm-errors.
- Next, if the script has been called with the failsafe argument, a single xterm window is sent to the display and the script exits. Where does this argument come from? Well, remember in the Xresources file, under the xlogin translation table:
<Key>F1:  set-session-argument(failsafe) finish-field()

Ctrl<Key>Return:  set-session-argument(failsafe) finish-field()
We told you that this key translation set things up so if you typed F1 or CTRL-RETURN after your password instead of RETURN, you would avoid running your .xsession script and would get a lone xterm instead. Now you know how that gets implemented. Administrators can use this as a model to write translations that pass other arguments for Xsession to interpret.
- Next, the script looks for a script in the user's home directory called .xsession. If it exists, it execs it.
- If the .xsession script doesn't exist, the Xsession script creates a workable X session by first looking for a resource file called .Xresources, and if that file exists, loading it with xrdb; regardless, it then starts the twm window manager and a single xterm window.
This is actually a fairly simple script, when you consider that it controls every X server connecting to xdm. It also gives the administrator an unusual amount of power over each X session. At the most innocuous, an administrator could use the Xsession file to add some functionality that all users may need—for example, to add a local font directory into font paths using the xset client. At a slightly more intrusive level, the administrator could use it to set up a message-of-the-day client for users to see when they first log in. But there are really no limits—an administrator could set up a network so that users have no control at all over their own X sessions (by removing the line that executes .xsession), and in fact don't have xterm windows to start new clients (presuming that all they'd want to do is run a mail client and a word processor).
Note that the Xsession script is defined as a loose binding, DisplayManager*session. You could therefore set up a separate X session file for particular X servers. For example, you might want to set up an X session file called Xsession_0:
DisplayManager._0. session: Xsession_0
The only difference in Xsession_0 might be that the xterm called in the failsafe situation would be called with -C, so that console messages will be diverted to this xterm window:
exec xterm -geometry 80x24+10+10 -ls -C
(See Sections 4.6.1 and 4.6.2 for more information on the xterm console window.)
You can also use display classes to group several X terminals together. See Section 3.5.6 for more information on display classes.
3.5.5.1 No Home Directory? (R5)
The redirection of error messages to $HOME/.xsession-errors is a nice addition to R5—it means that if users are having problems, they don't need to weed through the systemwide xdm-errors file, but can start looking for problems locally. This makes life easier for users and administrators alike. However, it does present a problem if for some reason you don't have a home directory on the host.
Since Xsession is executed as a Bourne shell script, the line:
exec > $HOME/.xsession-errors 2>&1
produces a fatal error if it cannot be completed. One reason that may happen is if you don't have a home directory, either because it's a new machine or because there is a problem with your NFS link. The shell tries to create a file in a directory that does not exist and when it can't, the script aborts. The effect is that the user logs in and is immediately bumped out, with no sign of what happened except in xdm-errors:
error (pid 2547): can't lock authorization file /home/lmui/.Xauthority or
backup /usr/lib/X11/xdm/.Xautha02547
error (pid 2547): No home directory /home/lmui for user lmui, using /
/usr/lib/X11/xdm/Xsession: /home/lmui/.xsession-errors: No such file or directory
error (pid 2549): fatal IO error 32 (Broken pipe)
To remedy this situation, you might change the line in Xsession to read:
if [ -d $HOME -a -w $HOME ]
then
     exec > $HOME/.xsession-errors 2>&1
fi
3.5.6 Display Classes
Display classes provide a way to group together several X servers connecting to the same host. The display class is built into the X server, and is presented to xdm when the X server connects via XDMCP. To find out the display class for a given X terminal, you can look it up in the documentation or ask the manufacturer; or, if it won't disturb any users, kill xdm and then restart it at a high “debug” level:
# /usr/lib/X11/xdm -debug 9
Running xdm at this level of debugging is likely to give you far more information than you really want. Among this stream of messages, however, is information about any X server that connects to xdm, including its display class:
Starting display visual5.ora.com:0,VISUAL-X19TURBO
This tells us that the Visual X terminal we're experimenting with is in the display class VISUAL-X19TURBO.*
Display classes come in useful in allowing you to fine-tune your xdm configuration differently according to the display type. Thus far, almost all our examples of display-specific resources have been about the local display server, _0. However, because of hardware pecularities, there are situations when you would want to set resources for individual X servers or for a group of X servers.
For example, the Visual X19TURB0 terminal has 2-bit gray scale support. This is nice, except that it confuses FrameMaker into thinking it has color support. FrameMaker therefore tries to show menus with its color defaults of black text on blue background; the X terminal
3.6 Testing Your xdm Setup
3.6.1 Resetting the Keyboard

3.6.2 Restarting xdm Using xdm-pid (R4 and Later)
In R4 and R5, the xdm process ID is stored in whatever file is pointed to by the DisplayManager.pidFile resource, xdm-pid in the default configuration. If you are running R4 or R5, you can use the xdm-pid file to send a signal to xdm. This file contains the process ID of xdm.
# cat /usr/lib/X11/xdm/xdm-pid
28683
You can send xdm the SIGHUP signal by using the cat output directly:
# kill -HUP ‘cat /usr/lib/X11/xdm/xdm-pid’
The xdm process should now reflect the current configuration files for any new sessions.
If xdm becomes unusable and you are not able to fix it by editing the configuration files, you can kill it for real. (You'll have to use a more severe signal (SIGTERM) to tell it you are serious.)
# kill -TERM ‘cat /usr/lib/X11/xdm/xdm-pid’
Beware that all active sessions managed by xdm will be killed if you use SIGTERM.
3.6.3 Rereading xdm Configuration Files (R3)
To force xdm to reread its configuration files on an R3 system, you need to find the process ID of xdm manually in order to kill it.
First find the process ID of the parent xdm process using the ps command. Then send the SIGHUP signal to the process.
% ps agx | grep  xdm
 2547 ? IW 0:30 -xterm1:0 (xdm)
13511 ? IW 0:56 -xterm2:0 (xdm)
13757 ? IW 0:58 -xterm4:0 (xdm)
15199 ? IW 1:08 -xterm5:0 (xdm)
19175 ? S 1:51 -xterm7:0 (xdm)
19466 ? IW 2:08 -xterm3:0 (xdm)
28683  ? IW 0:09 /usr/bin/X11/xdm
28685 ? S 2:07 -xterm9:0 (xdm)
28743 ? IW 0:00 /bin/sh /usr/lib/X11/xdm-Xsession
17796 p0 S 0:00 grep xdm
The parent xdm stands out, since the xdm processes associated with a particular display change their names to the name of the display. (The arguments to the ps command, as well as its output, will vary according to the flavor of UNIX you are running.) If you send signals to the wrong xdm process, only the display being controlled by that xdm process will be affected.
Controlling scologin
scologin (the version of xdm on Open Desktop, which runs on SCO UNIX machines) has its own ways of starting and restarting the display manager. The scologin daemon has a front end, /etc/scologin, which takes the following options:
start
Starts the scologin process; if scologin is already running, the start command will cause scologin to reread the configuration files Xconfig, Xservers and Xresources.
reread
If scologin is already running, the reread command will cause scologin to reread the configuration files Xconfig, Xservers and Xresources.
stop
Stops scologin. All X sessions currently managed by scologin will be halted.
query
Returns the current status of scologin.
disable
Stops scologin and disables it from restarting when the system reboots.
enable
Starts scologin if not already running, and ensures that it will start automatically at the next reboot.
init
If scologin is enabled, the getty processes on terminals configured for scologin are disabled. This option should be run only by init at boot time.
For example, to have your configuration files reread, enter:
/etc/scologin reread
3.7 Permanent Installation of xdm
When you are happy with your xdm setup, it is time to install it so it will start automatically when the system boots. The way you do this is system dependent, but it is the same procedure as adding any other kind of daemon. In a typical BSD system, you would modify the /etc/rc.local script. Under System V, edit /etc/inittab. (Remember to keep backup copies of any system files you modify!)
Here are a few examples of installing xdm on various platforms:
Installing xdm on SunOS 4.1.1
Add xdm to /etc/rc.local:
if [ -f /usr/bin/X11/xdm ]; then
     /usr/bin/X11/xdm; echo -n “XDM”
fi
Then reboot the system.
Installing xdm on Ultrix 4.2
[ -f /usr/bin/X11/xdm ] && {
      /usr/bin/X11/xdm & echo -n ‘xdm’ > /dev/console
}
Then reboot the system.
Installing xdm on a System V Machine (IRIX 4.0)
(Your system may already be set up for running xdm as shipped. Check before continuing.)
Add xdm to / etc/inittab:
xw:23:respawn:/usr/bin/X11/xdm -nodaemon
Then reboot the system.
Installing xdm on AIX 3.1
Add xdm to /etc/rc.tcpip:
start /usr/bin/X11/xdm “$src_running”
Then reboot the system.
3.8 Related Documentation
For more detailed information on xdm and its resources, see the xdm manual page.
For documentation on XDMCP, look in the X source distribution, in mit/hard-copy/XDMCP/xdmcp.PS.Z.
“The X Administrator: Taming the X Display Manager,” by Miles O'Neal, published in The X Resource, Issue 4, O'Reilly & Associates, Inc., Fall 1992.
*An example of when this would be useful is for a ’386 workstation, on which any number of third-party monitors might be installed, requiring multiple servers to support them all. Among the steps required to install a new monitor may be to link X to a different server program.
*In R3 xdm, the display type transient was used for some foreign displays. “Transient” is no longer a valid display type.
*Alternatively, in R5 you could also enter CTRL-RETURN, for those users who don't have an F1 key.
*In X11R3, XDMCP was not available, so the Xservers file was used to explicitly list the display class used by an X server; see Section 3.5.2.1 for more information.